👂 Take me Hand Acoustic - Cécile Corbel - 单曲 - 网易云音乐
源码Debug工具
(1)cppreference.com (主)
(2)必应 (bing.com)
(3)GPT(主)
(4)Google
学习过程中,如果缺少了cppreference,源码将无法跑通
如果缺少了GPT,效率会大大降低
至于Google,Bing,仅供查漏补缺
目录
🌼前言
🤪P1,俄罗斯方块
解释
(1)wstring 与 L
(2)方块旋转
(3)场地设置
(4)创建场地
(5)屏幕缓冲区
(6)绘制游戏界面并更新显示
(7)碰撞检测
(8)计时 and 输入
(9)游戏逻辑
(10)输出渲染
BUG
源码
效果图
🌼总结
🌼前言
适用人群
初学C++,有一定C语言或C++语法基础的大一大二小白
食用指南
我用的是codeblocks。Visual Studio Code的,如果我能跑通的源码,你跑通不了,可以借助cppreference,google,bing解决问题
B站上油管大神的C++编程实战23款小游戏,黑框 or easyx图形库
对游戏玩法感兴趣的,可以直接到效果处看看,也可先copy源码到自己的编译器跑跑
建议👇
1,先复制博客源码,跑通小游戏
2,看一遍我的解释
3,跟视频敲一遍,遇到不理解的地方,暂停,回看我的注释和解释
4,Youtube的视频最好开中文字幕,二刷,讲的挺好的
作者告诫👇
👇里面有很多有用的东西,比如,针对初学者的8条建议,不管你是学C++还是Java的,强烈建议看看
8-Bits of Advice for New Programmers (The stuff they don't teach you in school!) - YouTube
🤪P1,俄罗斯方块
视频地址
1.俄罗斯方块_哔哩哔哩_bilibili
em......快学完了,才发现油管有中文机翻看.......B站之前无字幕硬啃😂
Code-It-Yourself! Tetris - Programming from Scratch (Quick and Simple C++) - YouTube
源码地址
Javidx9/SimplyCode/OneLoneCoder_Tetris.cpp at master · OneLoneCoder/Javidx9 (github.com)
解释
(1)wstring 与 L
wstring和string都是字符串类型,但它们在存储字符的方式和使用范围上有一些区别。
存储方式:
string用于存储窄字符(如ASCII字符),而wstring用于存储宽字符(如Unicode字符)。string使用单个字节来表示每个字符,而wstring使用多个字节或宽字符来表示每个字符。因此,wstring可以更好地支持各种语言和特殊字符集,包括非拉丁字符、表情符号等。使用范围:由于宽字符的存储需要更多的内存空间,所以在普通的字符串操作中,
string更为常见和常用。而wstring通常在需要处理多国语言、国际化和本地化的场景下使用,比如跨语言文本处理、多语言界面等。L前缀用于将字符串字面量标记为宽字符字符串。这可以让编译器知道该字符串是以宽字符形式存储的
//长度为7的字符串数组, 存储7个方块的形状
wstring tetromino[7]; //tetromino四面体, 即俄罗斯方块; wstring多字符表示单字符
tetromono[7].append(L"...."); //将字符"...."追加到末尾(2)方块旋转
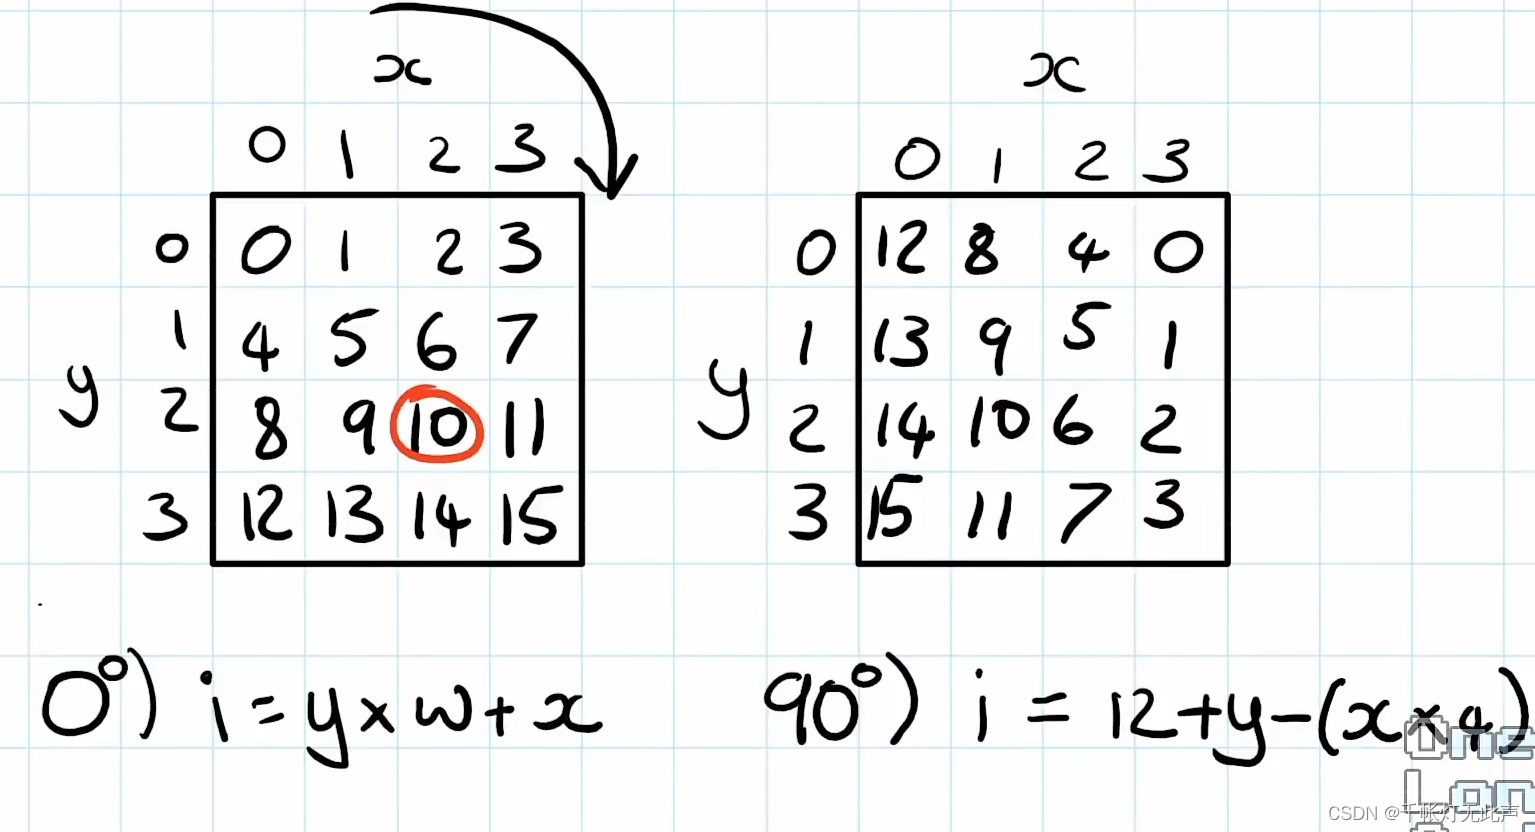
方块顺时针旋转90°
旋转前索引是10,x,y为横纵坐标,10 = y * w + x = 2 * 4 + 2(w表示4*4矩阵的边长,为什么用4*4矩阵呢,因为刚好能容下7种方块旋转后的位置)
向右旋转90°后,原来的索引 i = y * w + x,现在的索引 i 和 x,y有什么关系呢👇
当x = 0, y = 0,i = 12;当y自增1, i自增1;当x自增1,i 减少 4.
可以得出关系式 i = 12 + y - 4*x
同理,画图可得:
0°) i = 4*y + x
90°) i = 12 + y - 4*x
180°)i = 15 - 4*y + x
270°)i = 3 - y + 4*x
然后就得到了Rotate()函数
(3)场地设置
int nFieldWidth = 12;
int nFieldHeight = 18;
unsigned char *pField = nullptr;
- nFieldWidth 表示场地的宽度,它的值为 12。这意味着在水平方向上,场地被分割成了 12 个单元格或列。
- nFieldHeight 表示场地的高度,它的值为 18。这意味着在垂直方向上,场地被分割成了 18 个单元格或行。
- pField 是一个指向无符号字符的指针,初始化为 nullptr。这个指针通常用于动态分配内存,并表示场地的状态或布局。通过使用指针,可以在程序运行时为场地分配所需的内存空间。
(4)创建场地
pField = new unsigned char[nFieldWidth*nFieldHeight]; //Create playfor(int x = 0; x < nFieldWidth; ++x) //Board Boundaryfor(int y = 0; y < nFieldHeight; ++y)pField[y*nFieldWidth + x] = (x == 0 || x == nFieldWidth - 1 || y == nFieldHeight - 1) ? 9 : 0;new,动态分配内存,通过pField可以动态访问大小为 nFieldWidth*nFieldHeight 的内存空间
nFieldWidth,nFieldHeight为游戏区域大小
pField[y*nFieldWidth + x] = (x == 0 || x == nFieldWidth - 1 || y == nFieldHeight - 1) ? 9 : 0;👆设立边界,如果(y * 宽度 + x)表示索引 i ,pField[i] = ...表示,如果是边界,赋值9,内部,则赋值0
x == 0,左边界。 x == nFieldWidth - 1,右边界。 y == nFieldHeight - 1,下边界
因为方块从上方出现,所以不需要上边界
(5)屏幕缓冲区
wchar_t *screen = new wchar_t[nScreenWidth*nScreenHeight];for(int i = 0; i < nScreenWidth*nScreenHeight; ++i) screen[i] = L' ';HANDLE hConsole = CreateConsoleScreenBuffer(GENERIC_READ | GENERIC_WRITE, 0, NULL, CONSOLE_TEXTMODE_BUFFER, NULL);SetConsoleActiveScreenBuffer(hConcole);DWORD dwBytesWritten = 0;
wchar_t是一种用于表示宽字符的数据类型,通常在Windows中用于支持Unicode字符集首先,使用
new操作符为屏幕缓冲区分配内存,大小为nScreenWidth * nScreenHeight个宽字符 (wchar_t)然后,通过循环,将数组
screen中的每个元素都设置为宽字符空格(L' '),表示屏幕缓冲区初始化为空白接下来,调用
CreateConsoleScreenBuffer函数创建一个新的控制台屏幕缓冲区,并将其句柄保存在hConsole变量中。该函数参数中的GENERIC_READ | GENERIC_WRITE表示该缓冲区可供读取和写入4,
SetConsoleActiveScreenBuffer函数将当前活动的控制台屏幕缓冲区设置为刚刚创建的缓冲区。这将使得我们可以在控制台上显示缓冲区中的内容5,声明了一个名为
dwBytesWritten的DWORD变量用于记录写入到控制台屏幕缓冲区的字节数目的
创建一个带有空格字符初始化的屏幕缓冲区,并将其设置为活动的屏幕缓冲区,以便后续可以将字符输出到控制台屏幕上
(6)绘制游戏界面并更新显示
while(!bGameOver){// Draw Fieldfor(int x = 0; x < nFieldWidth; x++)for(int y = 0; y < nFieldHeight; y++)screen[(y + 2) * nScreenWidth + (x + 2)] = L" ABCDEFG=#"[pField[y*nFieldWidth + x]];// Display FrameWriteConsoleOutputCharacterW(hConsole, screen, nScreenWidth * nScreenHeight, { 0,0 }, &dwBytesWritten);}nFieldWidth游戏界面宽度,nFieldHeight游戏界面高度;注意与屏幕宽度和高度区分
nScreenWidth屏幕宽度,nScreenHeight屏幕高度
[(y + 2) * nScreenWidth + (x + 2)]:表示在屏幕上的位置,其中(y + 2)和(x + 2)是为了偏移屏幕上的空白区域,使得方块能够正常显示。L" ABCDEFG=#":是一个字符串,每个字符代表不同的方块或者空白区域。字符与方块的对应关系如下:
' ':表示空白区域'A':表示第一种方块'B':表示第二种方块'C':表示第三种方块'D':表示第四种方块'E':表示第五种方块'F':表示第六种方块'G':表示第七种方块'#':表示边界
屏幕会根据
pField数组中的数字,映射到屏幕上的对应位置,从而实现游戏场景的显示比如pField中为0,表示空格,1表示第1种方块,8表示=,9表示#也就是边界....
WriteConsoleOutputCharacterW(hConsole, screen, nScreenWidth * nScreenHeight, { 0,0 }, &dwBytesWritten);
WriteConsoleOutputCharacterW是一个 Windows API 函数,用于将字符写入控制台的输出缓冲区。参数解释如下:
hConsole:控制台输出句柄,表示要写入的目标控制台窗口。screen:指向包含要写入的字符数据的字符数组的指针。在这段代码中,它是指向screen数组的指针。nScreenWidth * nScreenHeight:要写入的字符数目,即屏幕宽度乘以屏幕高度。表示输出缓冲区的大小。{ 0,0 }:一个用于指定写入操作开始位置的坐标的 COORD 结构体。在这里,{ 0,0 }表示从输出缓冲区左上角开始写入。&dwBytesWritten:一个指向DWORD类型变量的指针,用于接收实际写入的字符数量。综上所述,这段代码的作用是将
screen数组中的字符数据写入到控制台的输出缓冲区中,并显示在控制台窗口上。
第6步为止,会出现这么个框👇
(7)碰撞检测
俄罗斯的碰撞检测较为简单,每次都移动一格,不会出现这种情况👇
辅助理解:如何做一个俄罗斯方块4:形状碰撞检测(上) | 微信开放社区 (qq.com)
👆文章中的碰撞检测,和油管有个相似的点👇
以及
往方格里填充数字,叫“数据抽象化”
所有消除游戏都会涉及
除了俄罗斯方块这种非典型的消除游戏外还;有换位消除,比如消消乐;以及将消消乐与RPG等结合起来的站双帕拾迷,2048等
那么如何模拟碰撞检测呢?👇
比如当前方块由4填充,下方方块由2填充,当前方块任一位置下,是2,就会发生碰撞
int nCurrentPiece = 0;
int nCurrentRotation = 0;
int nCurrentX = nFieldWidth / 2;
int nCurrentY = 0;
nCurrentPiece:表示当前正在下落的方块的类型(编号)nCurrentRotation:表示当前方块的旋转状态nCurrentX:表示当前方块的水平位置(X 坐标)nCurrentY:表示当前方块的垂直位置(Y 坐标)
检查方块位置👇
nTetromino:表示方块的类型(编号)nRotation:表示方块的旋转状态nPosX:表示要放置方块的水平位置(X 坐标)nPosY:表示要放置方块的垂直位置(Y 坐标)
// 检查方块是否适合放置在指定位置
bool DoesPieceFit(int nTetromino, int nRotation, int nPosX, int nPosY)
{for (int px = 0; px < 4; px++) // 循环遍历方块的水平位置for (int py = 0; py < 4; py++) // 循环遍历方块的垂直位置{// 获取方块内部位置的索引int pi = Rotate(px, py, nRotation);// 获取方块在游戏区域中的索引int fi = (nPosY + py) * nFieldWidth + (nPosX + px);// Check that test is in bounds. Note out of bounds does// not necessarily mean a fail, as the long vertical piece// can have cells that lie outside the boundary, so we'll// just ignore themif (nPosX + px >= 0 && nPosX + px < nFieldWidth) // 检查方块是否在横向范围内if (nPosY + py >= 0 && nPosY + py < nFieldHeight) // 检查方块是否在纵向范围内if (tetromino[nTetromino][pi] == L'X' && pField[fi] != 0) // 检查方块和游戏区域是否有重叠return false; // 第一个碰撞就返回失败}return true; // 方块适合放置在指定位置
}
关于第3行 if 的进一步解释👇
if (tetromino[nTetromino][pi] == L'X' && pField[fi] != 0)结合下面这行代码,pField是游戏区域的一维数组,边界存储为9,内部存储为0
👆即碰到障碍物,不能继续往该方向移动
pField[y*nFieldWidth + x] = (x == 0 || x == nFieldWidth - 1 || y == nFieldHeight - 1) ? 9 : 0;绘制当前方块👇
// 绘制当前方块
for (int px = 0; px < 4; px++) // 循环遍历方块的水平位置for (int py = 0; py < 4; py++) // 循环遍历方块的垂直位置if (tetromino[nCurrentPiece][Rotate(px, py, nCurrentRotation)] == L'X') // 检查方块是否存在于当前位置screen[(nCurrentY + py + 2)*nScreenWidth + (nCurrentX + px + 2)] = nCurrentPiece + 65; // 将方块绘制到屏幕上(加上适当的偏移量)
👆再详细解释下screen这一行,这里作个区分👇
screen是一维指针数组,类型是宽字符数组,表示的是整个控制台屏幕区域,80*30
而pField是游戏区域,12*18
+ 2 对应偏移量,最后 +65 转化为对应大写字母,毕竟A~G分别代表7种不同方块
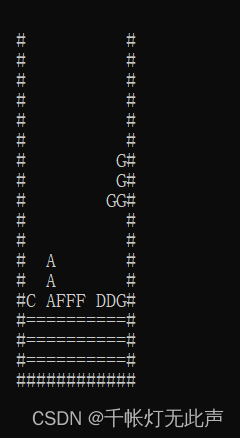
pField = new unsigned char[nFieldWidth*nFieldHeight]; //Create playwchar_t *screen = new wchar_t[nScreenWidth*nScreenHeight];第7步为止,效果👇
(8)计时 and 输入
// GAME TIMING ===================== 计时
this_thread::sleep_for(50ms);
this_thread::sleep_for(50ms)是一个C++中的线程操作,用于使当前线程暂停执行一段时间
this_thread是C++标准库中的一个命名空间,提供了与线程相关的函数和类sleep_for是this_thread命名空间中的一个函数,用于使当前线程暂停执行指定的时间段
bool bKey[4];// INPUT ===========================
for (int k = 0; k < 4; k++)    // right left down  Z    // R   L   D Z bKey[k] = (0x8000 & GetAsyncKeyState((unsigned char)("\x27\x25\x28Z"[k]))) != 0;
for (int k = 0; k < 4; k++): 这是一个循环语句,用于遍历四个按键
bKey[k] = (0x8000 & GetAsyncKeyState((unsigned char)("\x27\x25\x28Z"[k]))) != 0;将获取的按键状态存储到数组bKey中的操作
0x8000是一个十六进制数,用于掩码操作,目的是检查按键状态中的最高位是否被置位GetAsyncKeyState()是一个 Windows API 函数,用于检查指定虚拟键码对应的按键状态。它返回一个包含按键状态信息的值(unsigned char)("\x27\x25\x28Z"[k])是一个字符数组,包含了四个字符,分别代表了右、左、下和Z键的虚拟键码(0x8000 & GetAsyncKeyState((unsigned char)("\x27\x25\x28Z"[k]))) != 0判断了指定键码对应的按键是否处于按下状态。如果按键被按下,则结果为真,否则为假。- 最后,将检测到的按键状态存储在数组
bKey的对应位置上总之,这段代码通过循环遍历四个按键,将每个按键的状态存储在
bKey数组中,以便后续在游戏逻辑中根据按键状态做出相应的响应
再详细解释下,为什么这行代码,可以判断按键是否被按下👇
bKey[k] = (0x8000 & GetAsyncKeyState((unsigned char)("\x27\x25\x28Z"[k]))) != 0;👆0x8000,二进制表示为 1000000000000000
而 GetAsyncKeyState() 函数,可以获取指定虚拟键码对应的按键状态
该函数会返回一个值,最高位表示案件状态,1表示按下,0表示未按下
再通过按位与 & ,已知0x8000最高位是1,如果按键按下了,那么 & 的结果就为1
将 1 存储到 bKey[] 中
补充:按位与,&,两个数对应位,都为1,才是1
(9)游戏逻辑
//GAME LOGIC ======================
// left
if (bKey[1])
{if (DoesPieceFit(nCurrentPiece, nCurrentRotation, nCurrentX - 1, nCurrentY)){nCurrentX = nCurrentX - 1;}
}
👆按下左键的处理
(1)
DoesPieceFit()判断当前方块在向左移动一格后是否会与其他方块碰撞(2)nCurrentX - 1 表示新的 x 坐标
// right
if (bKey[0])
{if (DoesPieceFit(nCurrentPiece, nCurrentRotation, nCurrentX + 1, nCurrentY)){nCurrentX = nCurrentX + 1;}
}
同理,按下右键,,以及后面的下键
Perfect!Very nice!
当然!
作为一个C++程序员,你可以尝试优化,尽可能地减少嵌套👇
DoesPieceFit(),边界,返回0
bKey[],按键按下
// right
nCurrentX += (bKey[0] && DoesPieceFit(nCurrentPiece, nCurrentRotation, nCurrentX + 1, nCurrentY)) ? 1 : 0;
// left
nCurrentX -= (bKey[1] && DoesPieceFit(nCurrentPiece, nCurrentRotation, nCurrentX - 1, nCurrentY)) ? 1 : 0;
// down
nCurrentY += (bKey[2] && DoesPieceFit(nCurrentPiece, nCurrentRotation, nCurrentX, nCurrentY + 1)) ? 1 : 0;
接下来是按下 z 键,旋转👇
// Z
nCurrentRotation += (bKey[3] && DoesPieceFit(nCurrentPiece, nCurrentRotation + 1, nCurrentX, nCurrentY)) ? 1 : 0;
nCurrentRotation 旋转状态,0°,90°,180°,270°,周而复始
但是,如果仅仅是上面的代码,当你按住 Z 键时,方块会连续旋转,体验非常差
所以👇
bool bRotatedHold = false;// Z
if (bKey[3]) //按下Z键
{nCurrentRotation += (!bRotatedHold && DoesPieceFit(nCurrentPiece, nCurrentRotation + 1, nCurrentX, nCurrentY)) ? 1 : 0;bRotatedHold = true;
}
else //无法连续旋转bRotatedHold = false;
计时方块下落
int nSpeed = 20;int nSpeedCounter = 0;bool bForceDown  = false;
以及
// GAME TIMING ===================== 计时this_thread::sleep_for(50ms);nSpeedCounter++;bForceDown = (nSpeedCounter == nSpeed);
以及
if (bForceDown)
{if (DoesPieceFit(nCurrentPiece, nCurrentRotation, nCurrentX, nCurrentY + 1))nCurrentY++; // It can, so do it!else {// Lock the current piece in the fieldfor (int px = 0; px < 4; px++)for (int py = 0; py < 4; py++)if (tetromino[nCurrentPiece][Rotate(px, py, nCurrentRotation)] == L'X')pField[(nCurrentY + py) * nFieldWidth + (nCurrentX + px)] = nCurrentPiece + 1// check have we have got any lines// choose next piecenCurrentX = nFieldWidth / 2;nCurrentY = 0;nCurrentRotation = 0;nCurrentPiece = rand() % 7; // 0~6 随机方块// if piece does not fitbGameOver = !DoesPieceFit(nCurrentPiece, nCurrentRotation, nCurrentX, nCurrentY);}}
先介绍个概念,大多数游戏,每秒钟会渲染 60 帧(60 FPS)或 30 帧
nSpeed是控制方块下落速度的变量,初始化为20nSpeedCounter是一个计数器,用于记录方块下落的帧数,初始化为0bForceDown是一个布尔变量,用于标记是否强制方块向下移动,初始化为false
this_thread::sleep_for(50ms);是将当前线程暂停执行,等待50毫秒,以控制游戏帧率nSpeedCounter++;将计数器nSpeedCounter的值加1,表示经过了一个帧bForceDown = (nSpeedCounter == nSpeed);判断计数器是否等于设定数量,如果相等,则将bForceDown设置为true,表示需要强制方块向下移动
如果
bForceDown为true,即需要强制方块向下移动:
- 判断当前方块是否可以向下移动,通过
DoesPieceFit函数来判断
- 如果可以移动,则将当前方块的y坐标加1,表示向下移动一格
- 如果不可以移动,则执行以下操作:
- 将当前方块的形状锁定在游戏场景数组中的对应位置
- 检查是否有完整的行被填满,可以执行消除行的操作
- 选择下一个方块的初始位置和形状
- 如果新的方块无法放置在指定位置,则将游戏状态标记为结束(bGameOver为true)
到了这一步,我们已经实现旋转和碰撞检测了,但是,相同一行填满后,不会消去,而且没有分数记录。下面我们来实现消去👇
// check have we have got any lines
for (int py = 0; py < 4; py++)if (nCurrentY + py < nFieldHeight - 1) //遍历方块每一行, 并保证不出界{bool bLine = true;// 遍历每一列for (int px = 1; px < nFieldWidth - 1; px++) // 排除左右边界的列bLine &= (pField[(nCurrentY + py) * nFieldWidth + px]) != 0;if (bLine){// Remove Line, set to =for (int px = 1; px < nFieldWidth - 1; px++) //排除左右边界pField[(nCurrentY + py) * nFieldWidth + px] = 8; // 二维索引}}
(1)pField[],内部空白处是0,!= 0表示被占用了(A~G或者=)
(2)&=是 C++ 中的按位与赋值运算符。它将左操作数和右操作数进行按位与运算,并将结果赋值给左操作数
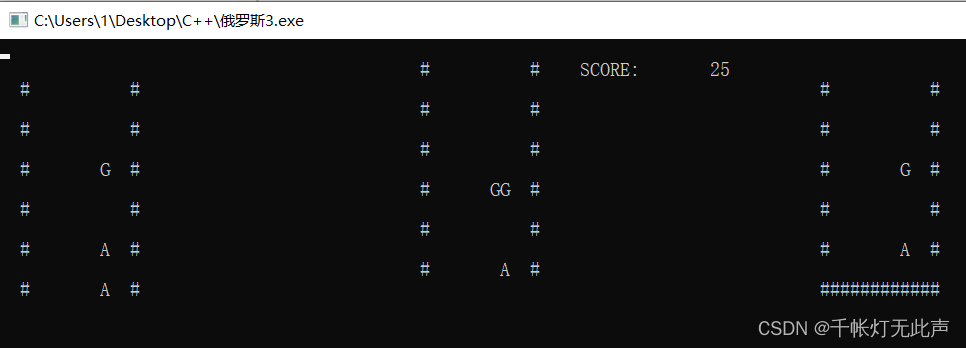
上面代码添加后,效果👇
数字 8 表示 =,👇消去的空行全变成了 =
下面加以优化
vector<int> vLines;// Draw current piece 后添加
if (!vLines.empty())
{// Display Frame (cheekily to draw lines)WriteConsoleOutputCharacterW(hConsole, screen, nScreenWidth * nScreenHeight, { 0,0 }, &dwBytesWritten);this_thread::sleep_for(400ms); // Delay a bitfor (auto &v : vLines)for (int px = 1; px < nFieldWidth - 1; px++){for (int py = v; py > 0; py--)pField[py * nFieldWidth + px] = pField[(py - 1) * nFieldWidth + px];pField[px] = 0;}vLines.clear();
}
解释下auto👇
for (auto &v : vLines)// 等价于for (auto it = vLines.begin(); it != vLines.end(); ++it) {auto& v = *it;// ...
}
vLines[]是在遍历当前方块下落的位置时被插入的。当一个方块无法继续下落时,会检查当前方块所占据的行是否已经填满,如果有一行或多行被填满,那么将这些行的索引(nCurrentY + py)添加到vLines[]向量中。插入的操作发生在以下这段代码中👇最后是 vLines.push_back(nCurrentY + py);
如果某一行或多行填满了,就将 y 索引插入到vLines
// check have we have got any lines
for (int py = 0; py < 4; py++)if (nCurrentY + py < nFieldHeight - 1) //遍历方块每一行, 并保证不出界{bool bLine = true;for (int px = 1; px < nFieldWidth - 1; px++) // 排除左右边界的列bLine &= (pField[(nCurrentY + py) * nFieldWidth + px]) != 0;if (bLine){// Remove Line, set to =for (int px = 1; px < nFieldWidth - 1; px++) //排除左右边界pField[(nCurrentY + py) * nFieldWidth + px] = 8; // 二维索引vLines.push_back(nCurrentY + py);}}
上述代码添加后,可以正常消去了
(10)输出渲染
记录分数 + 难度逐渐增加
int nPieceCount = 0; // 难度设置
int nScore = 0; //分数nPieceCount++;
if (nPieceCount % 10 == 0)if (nSpeed >= 10) nSpeed--; //nSpeed越小, 下落速度越快// 分数
nScore += 25;
if (!vLines.empty()) nScore += (1 << vLines.size()) * 100; //2的vLines.size()次方// Draw Score
swprintf_s(&screen[2 * nScreenWidth + nFieldWidth + 6], 16, L"SCORE: %8d", nScore);// 游戏结束 查看分数
CloseHandle(hConsole)
cout<< "Game Over!! Score:"<< nScore << endl;
system("pause");
swprintf_s()是一个格式化字符串的函数,用于将格式化后的内容写入一个 wide character 字符串中
int swprintf_s(wchar_t* buffer, size_t sizeInWords, const wchar_t* format, ...)
该函数接受多个参数
buffer:指向目标字符串的指针。格式化后的内容将被写入到这个字符串中
sizeInWords:目标字符串的大小(以字节为单位)或允许写入的最大字符数。在进行写入操作时,要确保目标字符串具有足够的空间来容纳格式化后的内容
format:格式化字符串,用于指定输出的格式
...:可变数量的参数,用于根据format中的格式指定要插入的值
CloseHandle() 函数是用于关闭一个句柄(handle)的函数
That's the end! Cheers!
BUG
经过4次cppreference的检索后,BUG解决完毕,跑通了。但是....👇
出现这么个玩意,git clone源码100%相同,但输出不一样。
窗口大小的问题。
鼠标移动到窗口上方白色横条处,右键 - 属性 - 布局👇改成这个
对应代码中的80*30
即可正确输出
源码
copy我的代码到codeblocks即可运行,Github的源码最新更新都是1年多前的了,版本不一样,当然如果你用的是vs code,需要自己安装各种插件(另外,注意调整窗口大小)
#include <iostream>
#include <thread>
#include <vector>
using namespace std;#include<wchar.h> //snwprintf()
#include <stdio.h>
#include <windows.h>// 定义 ms 后缀操作符
std::chrono::milliseconds operator""ms(unsigned long long milliseconds)
{return std::chrono::milliseconds(milliseconds); //防止while循环开头的sleep_for()报错
}wstring tetromino[7]; //长度为7的字符串数组, 保存7种方块
int nFieldWidth = 12;
int nFieldHeight = 18;
unsigned char *pField = nullptr; //动态分配内存int nScreenWidth = 80; //Console Screen Size X (columns)
int nScreenHeight = 30; //Console Screen Size Y (rows)int Rotate(int px, int py, int r) // px横坐标, py纵坐标, r旋转次数
{int pi = 0;switch (r % 4){case 0: // 0 degrees			// 0  1  2  3pi = py * 4 + px;			// 4  5  6  7break;						// 8  9 10 11//12 13 14 15case 1: // 90 degrees			//12  8  4  0pi = 12 + py - (px * 4);	//13  9  5  1break;						//14 10  6  2//15 11  7  3case 2: // 180 degrees			//15 14 13 12pi = 15 - (py * 4) - px;	//11 10  9  8break;						// 7  6  5  4// 3  2  1  0case 3: // 270 degrees			// 3  7 11 15pi = 3 - py + (px * 4);		// 2  6 10 14break;						// 1  5  9 13}								// 0  4  8 12return pi; // 返回索引
}bool DoesPieceFit(int nTetromino, int nRotation, int nPosX, int nPosY)
{for (int px = 0; px < 4; px++)for (int py = 0; py < 4; py++){// Get index into pieceint pi = Rotate(px, py, nRotation);//Get index into fieldint fi = (nPosY + py) * nFieldWidth + (nPosX + px);// Check that test is in bounds. Note out of bounds does// not necessarily mean a fail, as the long vertical piece// can have cells that lie outside the boundary, so we'll// just ignore themif (nPosX + px >= 0 && nPosX + px < nFieldWidth)if (nPosY + py >= 0 && nPosY + py < nFieldHeight)if (tetromino[nTetromino][pi] == L'X' && pField[fi] != 0)return false; // fail on first hit}return true;
}int main()
{//创建7种方块tetromino[0].append(L"..X."); //结尾追加字符tetromino[0].append(L"..X.");tetromino[0].append(L"..X.");tetromino[0].append(L"..X.");tetromino[1].append(L"..X."); //结尾追加字符tetromino[1].append(L".XX.");tetromino[1].append(L".X..");tetromino[1].append(L"....");tetromino[2].append(L".X.."); //结尾追加字符tetromino[2].append(L".XX.");tetromino[2].append(L"..X.");tetromino[2].append(L"....");tetromino[3].append(L"...."); //结尾追加字符tetromino[3].append(L".XX.");tetromino[3].append(L".XX.");tetromino[3].append(L"....");tetromino[4].append(L"..X."); //结尾追加字符tetromino[4].append(L".XX.");tetromino[4].append(L"..X.");tetromino[4].append(L"....");tetromino[5].append(L"...."); //结尾追加字符tetromino[5].append(L".XX.");tetromino[5].append(L"..X.");tetromino[5].append(L"..X.");tetromino[6].append(L"..X."); //结尾追加字符tetromino[6].append(L"..X.");tetromino[6].append(L".XX.");tetromino[6].append(L"....");pField = new unsigned char[nFieldWidth*nFieldHeight]; //Create playfor(int x = 0; x < nFieldWidth; ++x) //Board Boundaryfor(int y = 0; y < nFieldHeight; ++y)pField[y*nFieldWidth + x] = (x == 0 || x == nFieldWidth - 1 || y == nFieldHeight - 1) ? 9 : 0;wchar_t *screen = new wchar_t[nScreenWidth*nScreenHeight];for(int i = 0; i < nScreenWidth*nScreenHeight; ++i) screen[i] = L' ';HANDLE hConsole = CreateConsoleScreenBuffer(GENERIC_READ | GENERIC_WRITE, 0, NULL, CONSOLE_TEXTMODE_BUFFER, NULL);SetConsoleActiveScreenBuffer(hConsole);DWORD dwBytesWritten = 0;// Game Logic Stuffbool bGameOver = false;int nCurrentPiece = 0; //方块编号int nCurrentRotation = 0; //旋转状态int nCurrentX = nFieldWidth / 2; //方块x坐标int nCurrentY = 0; //方块y坐标bool bKey[4];bool bRotatedHold = false;int nSpeed = 20;int nSpeedCounter = 0;bool bForceDown  = false;int nPieceCount = 0; // 难度设置int nScore = 0; //分数vector<int> vLines;while(!bGameOver){// GAME TIMING ===================== 计时this_thread::sleep_for(50ms);nSpeedCounter++;bForceDown = (nSpeedCounter == nSpeed);// INPUT ===========================for (int k = 0; k < 4; k++)    // right left down  Z    // R   L   D ZbKey[k] = (0x8000 & GetAsyncKeyState((unsigned char)("\x27\x25\x28Z"[k]))) != 0;//GAME LOGIC ======================// rightnCurrentX += (bKey[0] && DoesPieceFit(nCurrentPiece, nCurrentRotation, nCurrentX + 1, nCurrentY)) ? 1 : 0;// leftnCurrentX -= (bKey[1] && DoesPieceFit(nCurrentPiece, nCurrentRotation, nCurrentX - 1, nCurrentY)) ? 1 : 0;// downnCurrentY += (bKey[2] && DoesPieceFit(nCurrentPiece, nCurrentRotation, nCurrentX, nCurrentY + 1)) ? 1 : 0;// Zif (bKey[3]) //按下Z键{nCurrentRotation += (!bRotatedHold && DoesPieceFit(nCurrentPiece, nCurrentRotation + 1, nCurrentX, nCurrentY)) ? 1 : 0;bRotatedHold = true;}else //松开后, 再按才旋转bRotatedHold = false;if (bForceDown){if (DoesPieceFit(nCurrentPiece, nCurrentRotation, nCurrentX, nCurrentY + 1))nCurrentY++; // It can, so do it!else{// Lock the current piece in the fieldfor (int px = 0; px < 4; px++)for (int py = 0; py < 4; py++)if (tetromino[nCurrentPiece][Rotate(px, py, nCurrentRotation)] == L'X')pField[(nCurrentY + py) * nFieldWidth + (nCurrentX + px)] = nCurrentPiece + 1;nPieceCount++;if (nPieceCount % 10 == 0)if (nSpeed >= 10) nSpeed--; //nSpeed越小, 下落速度越快// check have we have got any linesfor (int py = 0; py < 4; py++)if (nCurrentY + py < nFieldHeight - 1) //遍历方块每一行, 并保证不出界{bool bLine = true;for (int px = 1; px < nFieldWidth - 1; px++) // 排除左右边界的列bLine &= (pField[(nCurrentY + py) * nFieldWidth + px]) != 0;if (bLine){// Remove Line, set to =for (int px = 1; px < nFieldWidth - 1; px++) //排除左右边界pField[(nCurrentY + py) * nFieldWidth + px] = 8; // 二维索引vLines.push_back(nCurrentY + py);}}nScore += 25;if (!vLines.empty()) nScore += (1 << vLines.size()) * 100; //2的vLines.size()次方// choose next piecenCurrentX = nFieldWidth / 2;nCurrentY = 0;nCurrentRotation = 0;nCurrentPiece = rand() % 7; // 0~6 随机方块// if piece does not fitbGameOver = !DoesPieceFit(nCurrentPiece, nCurrentRotation, nCurrentX, nCurrentY);}nSpeedCounter = 0; //持续下落}// RENDER OUTPUT =================== 渲染输出// Draw Fieldfor(int x = 0; x < nFieldWidth; x++)for(int y = 0; y < nFieldHeight; y++)screen[(y + 2) * nScreenWidth + (x + 2)] = L" ABCDEFG=#"[pField[y*nFieldWidth + x]];// Draw Current Piecefor (int px = 0; px < 4; px++)for (int py = 0; py < 4; py++)if (tetromino[nCurrentPiece][Rotate(px, py, nCurrentRotation)] == L'X')screen[(nCurrentY + py + 2)*nScreenWidth + (nCurrentX + px + 2)] = nCurrentPiece + 65;// Draw Scoresnwprintf(&screen[2 * nScreenWidth + nFieldWidth + 6], 16, L"SCORE: %8d", nScore);if (!vLines.empty()){// Display Frame (cheekily to draw lines)WriteConsoleOutputCharacterW(hConsole, screen, nScreenWidth * nScreenHeight, { 0,0 }, &dwBytesWritten);this_thread::sleep_for(400ms); // Delay a bitfor (auto &v : vLines)for (int px = 1; px < nFieldWidth - 1; px++) //排除左右边界{for (int py = v; py > 0; py--)pField[py * nFieldWidth + px] = pField[(py - 1) * nFieldWidth + px];pField[px] = 0;}vLines.clear();}// Display FrameWriteConsoleOutputCharacterW(hConsole, screen, nScreenWidth * nScreenHeight, { 0,0 }, &dwBytesWritten);}// 游戏结束 查看分数CloseHandle(hConsole);cout<< "Game Over!! Score:"<< nScore << endl;system("pause");return 0;
}
效果图
操作按键:← ↓ → Z(Z旋转)
--
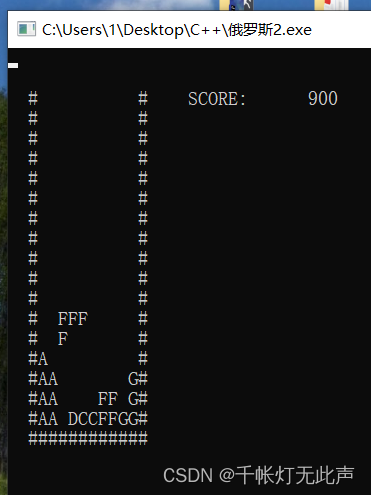
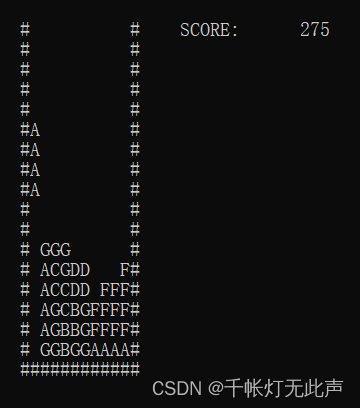
玩了10分钟大概.....每个方块奖励25分,每消去1行奖励200分,每消去2行奖励400分,每消去3行奖励800分....(鼓励冒险)👇
比如说,你可以这样👇
一次3行,800分,一次4行,1600分
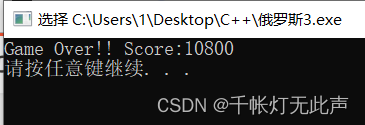
10800分😎感兴趣的可以自己玩玩再研究源码和视频
🌼总结
Rotate(int px, int py, int r): 根据给定的方块坐标(px, py)和旋转次数r,返回旋转后方块的索引位置
DoesPieceFit(int nTetromino, int nRotation, int nPosX, int nPosY): 判断给定的方块是否适合放置在指定的位置(nPosX, nPosY)上。通过遍历方块的每个格子,并将其与场地进行匹配,判断方块是否和场地中的其他方块冲突
main(): 游戏的主函数。包括创建方块、初始化场地和屏幕,控制游戏逻辑的循环,处理用户输入,更新方块的位置和状态,判断方块能否放置,渲染输出到屏幕,计分和游戏结束
除了函数,还有一些使用的标准库函数和数据结构,例如iostream、thread、vector、wchar.h、stdio.h、windows.h等,用于处理字符输出、线程睡眠、动态内存分配


