目录
一. 底层原理
二. 红黑树节点的定义
三. 仿函数封装
四. 基本函数的封装
五. 迭代器的封装
5.1 迭代器的基本定义
5.2 *与->操作
5.3 迭代器的++操作
5.3.1 右子树不为空
5.3.2 右子树为空
5.4 迭代器的--操作
5.4.1 当前节点的父节点为空
5.4.2 左子树不为空
5.4.3 左子树为空
5.5 ==与!=操作
六. Map整体封装
七. Set整体封装
八. 红黑树整体封装
一. 底层原理
我们需要知道的是Map和Set底层是由红黑树封装的。而我们红黑树的底层又是kv结构。那我们可以把红黑树的V变成Map和Set传参的地方,Map传的是Key,Set传的是pair<Key,value>。

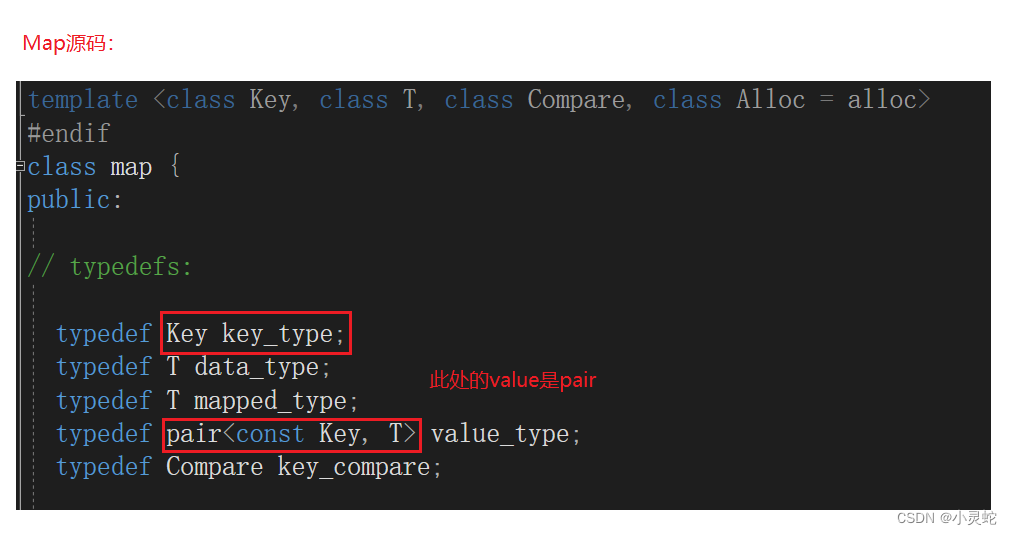
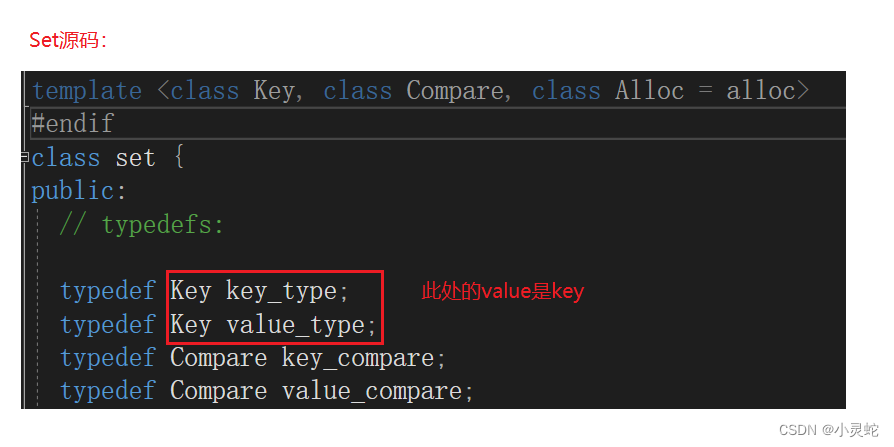
因此我们可以为了识别到底是Map还是Set定义一个模板参数T。
template<class K,class T>
class RBTree{};此处参数K依旧是Key,只不过参数T可以是Set的Key,也可以是Map的pair<Key,Value>。
如果是Map,那么传参就是:
template<class K,class T>
class Map
{
private:RBTree<K, pair<K,T>> _map;
};
而如果是Set,那么传参就是:
template<class K>
class Set
{
private:RBTree<K,K> _set;
};
我们可以看见,无论是Map还是Set,好像T参数已经包含了K参数,那为什么还要第一个参数K参数呢?

因为我们除了去insert(const Value& v)以外,还有find(const Key& k)操作,而find函数就需要第一个参数K,而如果不要第一个参数Set是不能满足的,所以第一个参数是必需的。
二. 红黑树节点的定义
这里节点的定义我们与前面普通的红黑树(具体的定义可看:http://t.csdnimg.cn/hlYqJ)不一样的是,我们需要去考虑到底是Map还是Set,也就是传的参数不一样。所以可以用一个模板参数来定义:
enum Colour
{RED,BLACK
};
template<class T>
struct RBTreeNode
{RBTreeNode<T>* _left;RBTreeNode<T>* _right;RBTreeNode<T>* _parent;Colour _col;T _data;RBTreeNode(const T& data):_left(nullptr),_right(nullptr),_parent(nullptr),_col(RED),_data(data){}
};
此处T,Map就传pair<Key,Value>,而Set就传Key。

三. 仿函数封装
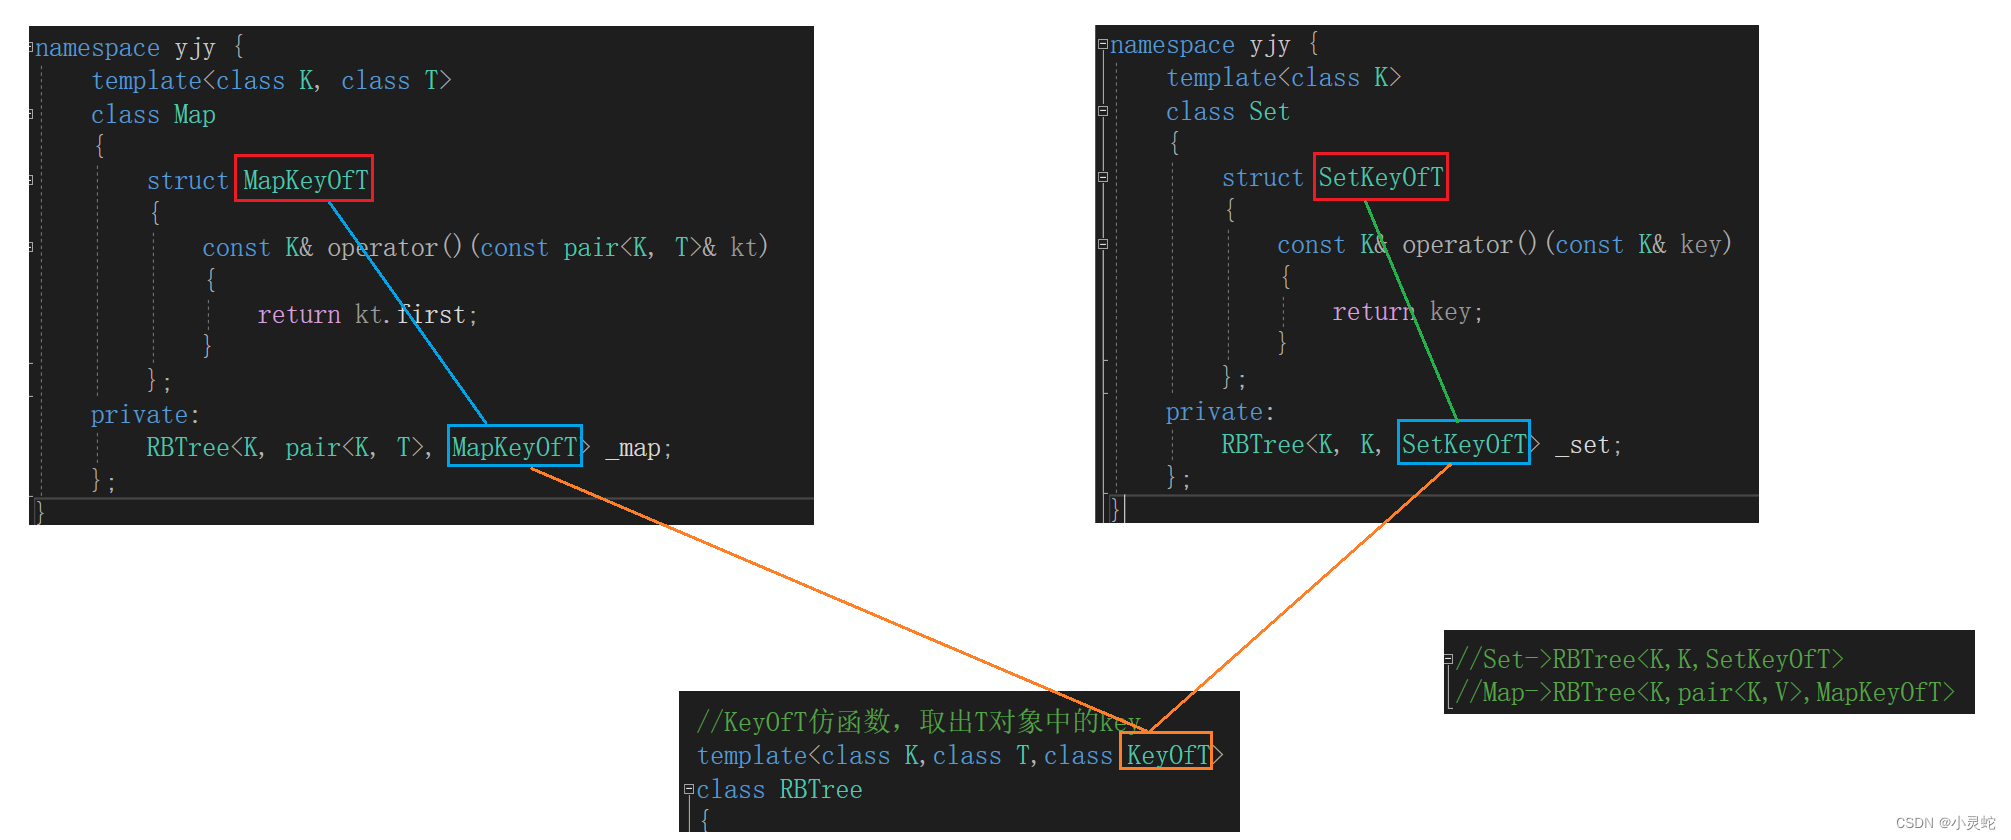
我们可以看见对于Map的pair我们是不能做比较,也做不了比较的,但是我们可以知道的是Key是能做比较的,因此我们需要将pair中的Key取出来作比较,这里就能用到我们的仿函数。
仿函数(functor)是一种在C++中使用的概念,它允许一个类的对象表现得像函数一样。仿函数通过在其类定义中重载函数调用运算符operator()来实现这种行为。
- 对于Map我们需要取出pair键值对中的第一个元素Key。
namespace yjy {template<class K,class T>class Map{struct MapKeyOfT{const K& operator()(const pair<K,T>& kt){return kt.first;}};private:RBTree<K, pair<K,T>, MapKeyOfT> _map;};
}- 对于Set我们直接返回自带的Key就行。
namespace yjy {template<class K>class Set{struct SetKeyOfT{const K& operator()(const K& key){return key;}};private:RBTree<K,K, SetKeyOfT> _set;};
}
整体的仿函数传参即:
那么有了我们的仿函数之后,我们就可以运用在下面这样的比较之中:
bool Find(const T& data)
{KeyOfT _rot;Node* cur = _root;while (cur){if (_rot(cur->_data) < _rot(data)){cur = cur->_right;}else if (_rot(cur->_data) > _rot(data)){cur = cur->_left;}else{return true;}}return false;
}
四. 基本函数的封装
我们有了仿函数之后,就可以对一些基本操作函数进行编写(此处只是在红黑树的基础上加上了仿函数,如果对操作还有不懂的,可以去看:http://t.csdnimg.cn/577bU)。
bool Find(const T& data)
{KeyOfT _rot;Node* cur = _root;while (cur){if (_rot(cur->_data) < _rot(data)){cur = cur->_right;}else if (_rot(cur->_data) > _rot(data)){cur = cur->_left;}else{return true;}}return false;
}
bool Insert(const T& data)
{if (_root == nullptr){_root = new Node(data);_root->_col = BLACK;return true;}KeyOfT _rot;Node* parent = nullptr;Node* cur = _root;while (cur){if (_rot(cur->_data) > _rot(data)){parent = cur;cur = cur->_left;}else if (_rot(cur->_data) < _rot(data)){parent = cur;cur = cur->_right;}else{return true;}}cur = new Node(data);Node* newnode = cur;if (_rot(parent->_data) < _rot(data)){parent->_right = cur;}else{parent->_left = cur;}cur->_parent = parent;while (parent && parent->_col == RED){Node* grandparent = parent->_parent;Node* uncle = nullptr;//parent和uncle是grandparent的左还是右不影响结果//cur是parent的左还是右不影响结果if (parent == grandparent->_left){uncle = grandparent->_right;//uncle存在且为红if (uncle && uncle->_col == RED){parent->_col = BLACK;uncle->_col = BLACK;grandparent->_col = RED;if (grandparent == _root){grandparent->_col = BLACK;}else{cur = grandparent;parent = cur->_parent;}}else{//		g//	p		u//cif (cur == parent->_left){RotaleR(grandparent);parent->_col = BLACK;grandparent->_col = RED;}//		g//	p		u//		celse{RotaleL(parent);RotaleR(grandparent);cur->_col = BLACK;grandparent->_col = RED;}break;}}else{uncle = grandparent->_left;if (uncle && uncle->_col == RED){parent->_col = BLACK;uncle->_col = BLACK;grandparent->_col = RED;if (grandparent == _root){grandparent->_col = BLACK;}else{cur = grandparent;parent = cur->_parent;}}else{//		g//	u		p//				cif (cur == parent->_right){RotaleL(grandparent);parent->_col = BLACK;grandparent->_col = RED;}//		g//	u		p//		celse{RotaleR(parent);RotaleL(grandparent);cur->_col = BLACK;grandparent->_col = RED;}break;}}}return true;
}
void RotaleL(Node* parent)
{Node* subR = parent->_right;Node* subRL = subR->_left;parent->_right = subRL;subR->_left = parent;if (subRL){subRL->_parent = parent;}Node* ppnode = parent->_parent;parent->_parent = subR;if (parent == _root){_root = subR;subR->_parent = nullptr;}else{if (parent == ppnode->_left){ppnode->_left = subR;}else if (parent == ppnode->_right){ppnode->_right = subR;}subR->_parent = ppnode;}
}
void RotaleR(Node* parent)
{Node* subL = parent->_left;Node* subLR = subL->_right;parent->_left = subLR;subL->_right = parent;if (subLR){subLR->_parent = parent;}Node* ppnode = parent->_parent;parent->_parent = subL;if (parent == _root){_root = subL;subL->_parent = nullptr;}else{if (ppnode->_left == parent){ppnode->_left = subL;}else if (ppnode->_right == parent){ppnode->_right = subL;}subL->_parent = ppnode;}
}
五. 迭代器的封装
我们写出了仿函数之后,一切都水到渠成了,就可以继续对迭代器进行封装了。

5.1 迭代器的基本定义
template<class T,class Ptr,class Ref>//此处Ptr是T*,Ref是T&
struct RBTreeIterator
{typedef RBTreeNode<T> Node;typedef RBTreeIterator<T,Ptr,Ref> Self;Node* _node;RBTreeIterator(Node* node):_node(node){}
}
5.2 *与->操作
对于*操作,就是返回数据的引用,而->操作,就是返回数据的地址,即指针。
Ref operator*()
{return _node->_data;
}
Ptr operator->()
{return &_node->_data;
}
5.3 迭代器的++操作
此处我们需要分为右子树不为空和右子树为空两种情况。为什么呢?
我们可以根据二叉树的中序遍历来看,根节点遍历完了,就该遍历右子树,如果右子树为空,则直接跳到上一层,如果不为空,则进入右子树。那么我们下面来细讲一下这两种情况。
Self& operator++()
{if (_node->_right)//右边不为空{//右子树的最左边节点Node* subright = _node->_right;while (subright->_left){subright = subright->_left;}_node = subright;}else{//祖先里面孩子是父亲左的那个Node* cur = _node;Node* subparent = _node->_parent;while (subparent&&subparent->_right == cur){cur = subparent;subparent = subparent->_parent;}_node = subparent;}return *this;
}
5.3.1 右子树不为空
我们可以根据中序来解释,进入右子树之后,我们应该进入右子树的最左节点。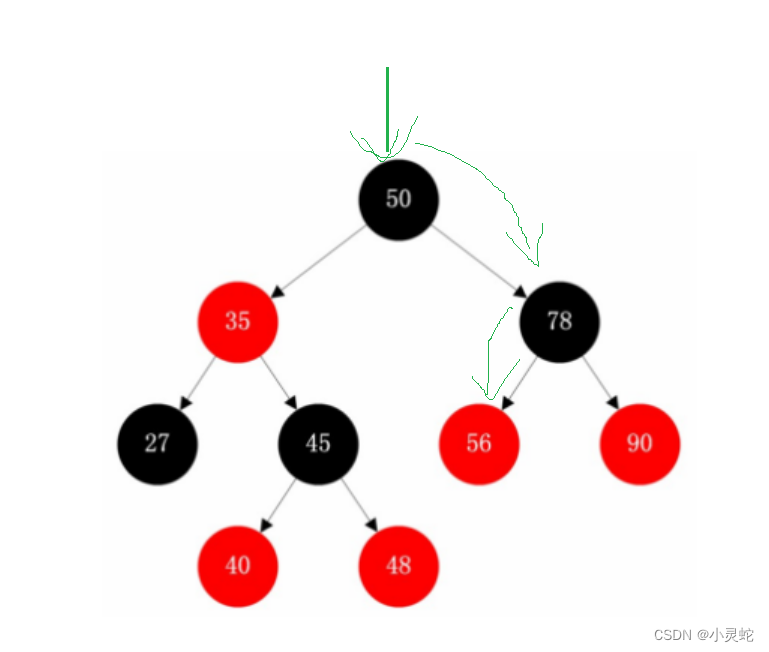
如图,当前节点是50,右子树不为空,则走到右子树的最左节点56。
5.3.2 右子树为空
当右子树为空的情况出现时,我们可以知道后面一步需要遍历到当前节点的父节点,那么我们再进一步思考一下,当前节点是父节点的右节点时,又说明父节点的右子树遍历完了,又需要向上迭代。所以我们要迭代到什么时候才行呢?
应该是迭代到当前节点是父节点的左节点时,此时后面一步就是到父节点。

如图:当前节点是48,右节点为空,则向上走,一直走到35的时候,此时35是50的左节点。
5.4 迭代器的--操作
--操作与++操作不同,不只是迭代的方向不同,情况也有所不同。
我们这里要先判断当前节点的父节点是否为空节点。为什么呢?咱们下面再说。除了这种情况外,还有左子树不为空和左子树为空两种情况。
Self& operator--()
{if (_node->_parent==nullptr){Node* maxright = _node;while (maxright->_right){maxright = maxright->_right;}_node = maxright;}else if (_node->_left)//左边不为空{//左子树的最右边节点Node* subright = _node->_left;while (subright->_right){subright = subright->_right;}_node = subright;}else{//祖先里面孩子是父亲右的那个Node* cur = _node;Node* subparent = _node->_parent;while (subparent && subparent->_left == cur){cur = subparent;subparent = subparent->_parent;}_node = subparent;}return *this;
}
5.4.1 当前节点的父节点为空
当前节点的父节点为空,证明当前节点是此时的根节点。我们再进行--的话,就要走到最右边节点。因为在STL库定义中,是如下图一样的结构:
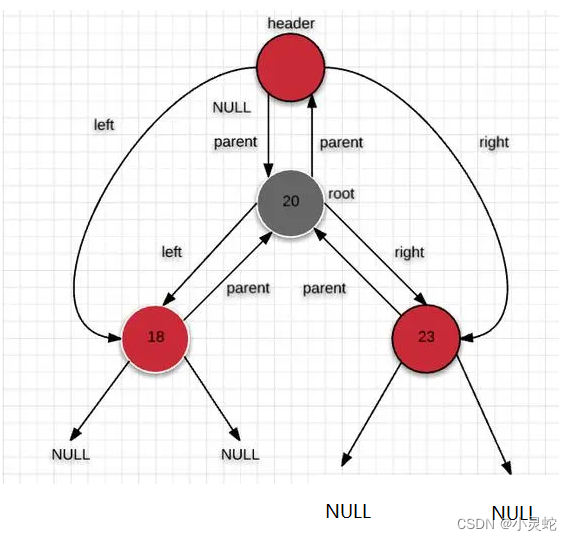
我们这里就没有定义header头结点,但是我们还是可以看到,根节点之后应该到最右节点。
5.4.2 左子树不为空
此时根据++操作右子树不为空时的情况可以得到此时应该走到左子树的最右节点。
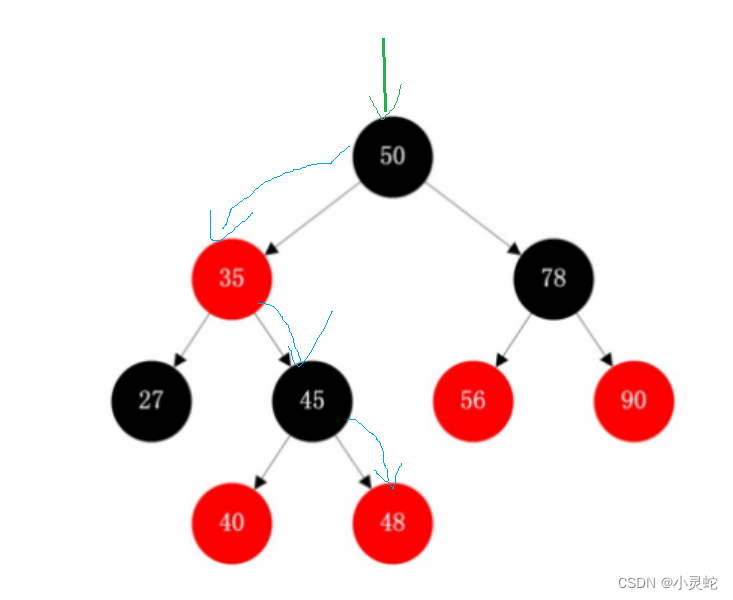
如图:当前节点是50,此后应该迭代到左子树的最右节点,即48。
5.4.3 左子树为空
此时也应该向上迭代,到什么时候结束呢?
应该到当前节点是父节点的右节点为止,因为如果当前节点是父节点的左节点时,又说明左子树走完了,又要向上迭代。所以我们要一直迭代到当前节点是父节点的右节点时。
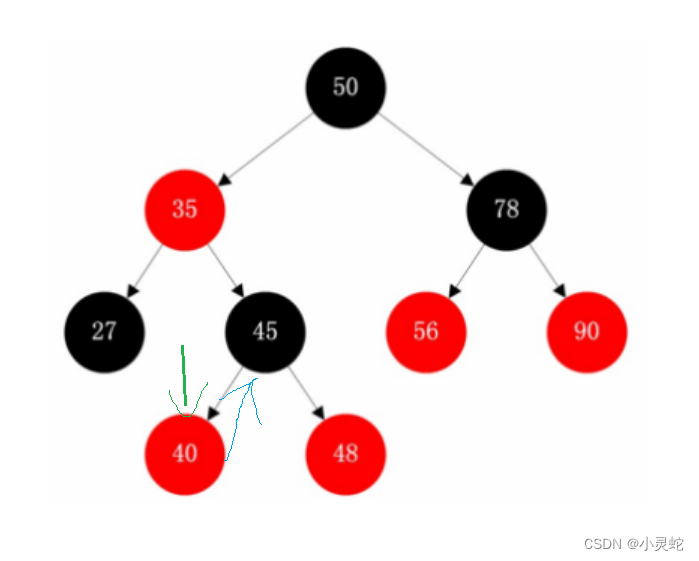
如图:当前节点是40,应该迭代到当前节点是父节点的右节点时,所以要迭代到45。
5.5 ==与!=操作
对于==与!=操作就是判断数据是否相等。
bool operator!=(const Self& s)
{return _node != s._node;
}
bool operator==(const Self& s)
{return _node == s._node;
}
六. Map整体封装
对于Map来说,需要多一个operator[]操作。
由于我们知道,Map里面的Key是不能随意改变的,所以加上const修饰。
namespace yjy {template<class K,class T>class Map{struct MapKeyOfT{const K& operator()(const pair<K,T>& kt){return kt.first;}};public:typedef typename RBTree<K, pair<const K,T>, MapKeyOfT>::iterator iterator;typedef typename RBTree<K, pair<const K,T>, MapKeyOfT>::const_iterator const_iterator;iterator begin(){return _map.begin();}iterator end(){return _map.end();}const_iterator begin() const{return _map.begin();}const_iterator end() const{return _map.end();}pair<iterator,bool> Insert(const pair<K,T>& kt){return _map.Insert(kt);}iterator Find(const K& k){return _map.Find(k);}T& operator[](const K& key){pair<iterator, bool> ret = Insert(make_pair(key, T()));return ret.first->second;}private:RBTree<K, pair<const K,T>, MapKeyOfT> _map;};
}
七. Set整体封装
此处的Key也要加上const修饰,因为是不可改变的。
namespace yjy {template<class K>class Set{struct SetKeyOfT{const K& operator()(const K& key){return key;}};public:typedef typename RBTree<K,const K, SetKeyOfT>::iterator iterator;typedef typename RBTree<K, const K, SetKeyOfT>::const_iterator const_iterator;iterator begin(){return _set.begin();}iterator end(){return _set.end();}const_iterator begin() const{return _set.begin();}const_iterator end() const{return _set.end();}pair<iterator, bool> Insert(const K& key){return _set.Insert(key);}iterator Find(const K& k){return _set.Find(k);}private:RBTree<K,const K, SetKeyOfT> _set;};
}
八. 红黑树整体封装
#include<iostream>
#include<vector>
using namespace std;
enum Colour
{RED,BLACK
};
template<class T>
struct RBTreeNode
{RBTreeNode<T>* _left;RBTreeNode<T>* _right;RBTreeNode<T>* _parent;Colour _col;T _data;RBTreeNode(const T& data):_left(nullptr),_right(nullptr),_parent(nullptr),_col(RED),_data(data){}
};
template<class T,class Ptr,class Ref>
struct RBTreeIterator
{typedef RBTreeNode<T> Node;typedef RBTreeIterator<T,Ptr,Ref> Self;Node* _node;RBTreeIterator(Node* node):_node(node){}Ref operator*(){return _node->_data;}Ptr operator->(){return &_node->_data;}Self& operator++(){if (_node->_right)//右边不为空{//右子树的最左边节点Node* subright = _node->_right;while (subright->_left){subright = subright->_left;}_node = subright;}else{//祖先里面孩子是父亲左的那个Node* cur = _node;Node* subparent = _node->_parent;while (subparent&&subparent->_right == cur){cur = subparent;subparent = subparent->_parent;}_node = subparent;}return *this;}Self& operator--(){if (_node->_parent==nullptr){Node* maxright = _node;while (maxright->_right){maxright = maxright->_right;}_node = maxright;}else if (_node->_left)//左边不为空{//左子树的最右边节点Node* subright = _node->_left;while (subright->_right){subright = subright->_right;}_node = subright;}else{//祖先里面孩子是父亲右的那个Node* cur = _node;Node* subparent = _node->_parent;while (subparent && subparent->_left == cur){cur = subparent;subparent = subparent->_parent;}_node = subparent;}return *this;}bool operator!=(const Self& s){return _node != s._node;}bool operator==(const Self& s){return _node == s._node;}
};//Set->RBTree<K,K,SetKeyOfT>
//Map->RBTree<K,pair<K,V>,MapKeyOfT>//KeyOfT仿函数,取出T对象中的key
template<class K,class T,class KeyOfT>
class RBTree
{typedef RBTreeNode<T> Node;
public:typedef RBTreeIterator<T,T*,T&> iterator;typedef RBTreeIterator<T,const T*,const T&> const_iterator;iterator begin(){Node* subleft = _root;while (subleft&&subleft->_left){subleft = subleft->_left;}return iterator(subleft);}const_iterator begin() const{Node* subleft = _root;while (subleft && subleft->_left){subleft = subleft->_left;}return const_iterator(subleft);}iterator end(){return iterator(nullptr);}const_iterator end() const{return const_iterator(nullptr);}iterator Find(const T& data){KeyOfT _rot;Node* cur = _root;while (cur){if (_rot(cur->_data) < _rot(data)){cur = cur->_right;}else if (_rot(cur->_data) > _rot(data)){cur = cur->_left;}else{return iterator(cur);}}return end();}pair<iterator,bool> Insert(const T& data){if (_root == nullptr){_root = new Node(data);_root->_col = BLACK;return make_pair(iterator(_root), true);}KeyOfT _rot;Node* parent = nullptr;Node* cur = _root;while (cur){if (_rot(cur->_data) > _rot(data)){parent = cur;cur = cur->_left;}else if (_rot(cur->_data) < _rot(data)){parent = cur;cur = cur->_right;}else{return make_pair(iterator(cur),true);}}cur = new Node(data);Node* newnode = cur;if (_rot(parent->_data) < _rot(data)){parent->_right = cur;}else{parent->_left = cur;}cur->_parent = parent;while (parent && parent->_col == RED){Node* grandparent = parent->_parent;Node* uncle = nullptr;//parent和uncle是grandparent的左还是右不影响结果//cur是parent的左还是右不影响结果if (parent == grandparent->_left){uncle = grandparent->_right;//uncle存在且为红if (uncle && uncle->_col == RED){parent->_col = BLACK;uncle->_col = BLACK;grandparent->_col = RED;if (grandparent == _root){grandparent->_col = BLACK;}else{cur = grandparent;parent = cur->_parent;}}else{//		g//	p		u//cif (cur == parent->_left){RotaleR(grandparent);parent->_col = BLACK;grandparent->_col = RED;}//		g//	p		u//		celse{RotaleL(parent);RotaleR(grandparent);cur->_col = BLACK;grandparent->_col = RED;}break;}}else{uncle = grandparent->_left;if (uncle && uncle->_col == RED){parent->_col = BLACK;uncle->_col = BLACK;grandparent->_col = RED;if (grandparent == _root){grandparent->_col = BLACK;}else{cur = grandparent;parent = cur->_parent;}}else{//		g//	u		p//				cif (cur == parent->_right){RotaleL(grandparent);parent->_col = BLACK;grandparent->_col = RED;}//		g//	u		p//		celse{RotaleR(parent);RotaleL(grandparent);cur->_col = BLACK;grandparent->_col = RED;}break;}}}return make_pair(iterator(newnode),true);}void RotaleL(Node* parent){Node* subR = parent->_right;Node* subRL = subR->_left;parent->_right = subRL;subR->_left = parent;if (subRL){subRL->_parent = parent;}Node* ppnode = parent->_parent;parent->_parent = subR;if (parent == _root){_root = subR;subR->_parent = nullptr;}else{if (parent == ppnode->_left){ppnode->_left = subR;}else if (parent == ppnode->_right){ppnode->_right = subR;}subR->_parent = ppnode;}}void RotaleR(Node* parent){Node* subL = parent->_left;Node* subLR = subL->_right;parent->_left = subLR;subL->_right = parent;if (subLR){subLR->_parent = parent;}Node* ppnode = parent->_parent;parent->_parent = subL;if (parent == _root){_root = subL;subL->_parent = nullptr;}else{if (ppnode->_left == parent){ppnode->_left = subL;}else if (ppnode->_right == parent){ppnode->_right = subL;}subL->_parent = ppnode;}}
private:Node* _root=nullptr;
};
总结
好了,到这里今天的知识就讲完了,大家有错误一点要在评论指出,我怕我一人搁这瞎bb,没人告诉我错误就寄了。
祝大家越来越好,不用关注我(疯狂暗示)

![[Java EE] 多线程(一) :线程的创建与常用方法(上)](https://img-blog.csdnimg.cn/direct/e9151685ff964264b3acd06fa82e7f74.png)


