环境配置:
| RHCE | 客户机 | 192.168.100.146 |
| node1 | lvs | 192.168.100.145 |
| node2 | RS | 192.168.100.147 |
| node3 | RS | 192.168.100.148 |
配置ipvsadm httpd:
[root@node1 ~]# yum install ipvsadm.x86_64
[root@node2 ~]# yum install http -y
[root@node2 ~]# systemctl start httpd
[root@node3 ~]# yum install http -y
[root@node3 ~]# systemctl start httpd
配置LVS虚拟IP(VIP)
[root@node1 ~]# ifconfig ens33:200 192.168.100.200 netmask 255.255.255.0 up
将内容写入/var/www/html 测试httpd
[root@node3 ~]# echo "web test page,ip is `hostname -I`" > /var/www/html/index.html
[root@node3 ~]# systemctl start httpd
[root@node3 ~]# curl 192.168.100.148
web test page,ip is 192.168.100.148[root@node2 ~]# echo "web test page,ip is `hostname -I`" > /var/www/html/index.html
[root@node2 ~]# systemctl start httpd
[root@node2 ~]# curl 192.168.100.147
web test page,ip is 192.168.100.147
手工在RS端绑定VIP
[root@node3 ~]# ifconfig lo:200 192.168.100.200 netmask 255.255.255.255 up
[root@node2 ~]# ifconfig lo:200 192.168.100.200 netmask 255.255.255.255 up
添加RS访问VIP路由
[root@node2 ~]# route add -host 192.168.100.200 dev lo
[root@node3 ~]# route add -host 192.168.100.200 dev lo
手工在RS端一直ARP响应
调整内核参数
[root@node3 all]# echo "1" > /proc/sys/net/ipv4/conf/lo/arp_ignore
[root@node3 all]# echo "2" > /proc/sys/net/ipv4/conf/lo/arp_announce
[root@node3 conf]# echo "1" > /proc/sys/net/ipv4/conf/all/arp_ignore
[root@node3 conf]# echo "2" > /proc/sys/net/ipv4/conf/all/arp_announce
[root@node3 ~]# echo "1" > /proc/sys/net/ipv4/conf/all/arp_ignore
[root@node3 ~]# echo "2" > /proc/sys/net/ipv4/conf/all/arp_announce
[root@node3 ~]# echo "1" > /proc/sys/net/ipv4/conf/lo/arp_ignore
[root@node3 ~]# echo "2" > /proc/sys/net/ipv4/conf/lo/arp_announce
arp_ignore- INTEGER
手工执行配置添加LVS服务并增加两台RS
[root@node1 ~]# ipvsadm -A -t 192.168.100.200:80 -s rr
[root@node1 ~]# ipvsadm -a -t 192.168.100.200:80 -r 192.168.100.147:80 -g
[root@node1 ~]# ipvsadm -a -t 192.168.100.200:80 -r 192.168.100.148:80 -g
ipvs查看配置状态
[root@node1 ~]# ipvsadm -Ln
IP Virtual Server version 1.2.1 (size=4096)
Prot LocalAddress:Port Scheduler Flags
-> RemoteAddress:Port Forward Weight ActiveConn InActConn
TCP 192.168.100.200:80 rr
-> 172.168.100.147:80 Route 1 0 0
-> 172.168.100.148:80 Route 1 0 0
客户机检测配置
[root@RHCE ~]# for ((i=1;i<=6;i++)); do curl 192.168.100.200; done
web test page,ip is 192.168.100.147
web test page,ip is 192.168.100.148
web test page,ip is 192.168.100.147
web test page,ip is 192.168.100.148
web test page,ip is 192.168.100.147
web test page,ip is 192.168.100.148
使用nginx配置负载均衡
| RHCE | 192.168.100.146 | 负载均衡服务器 |
| node2 | 192.168.100.148 | nginx服务器 |
| node3 | 192.168.100.149 | nginx服务器 |
安装nginx可以使用如下仓库:
[nginx]
name=nginx repo
baseurl=http://nginx.org/packages/centos/7/$basearch/
gpgcheck=0
enabled=1
关闭防火墙 以及SELinux宽容模式
systemctl stop firewalld setenforce 0启动服务并向主机 node2 node3 写入内容
systenctl start nginx 启动nginx服务echo "web test page ip is `hostname -I`" > /usr/share/nginx/html/index.html #写入内容systenctl start nginx 再次启动nginx服务在RHCE负载均衡服务器上配置
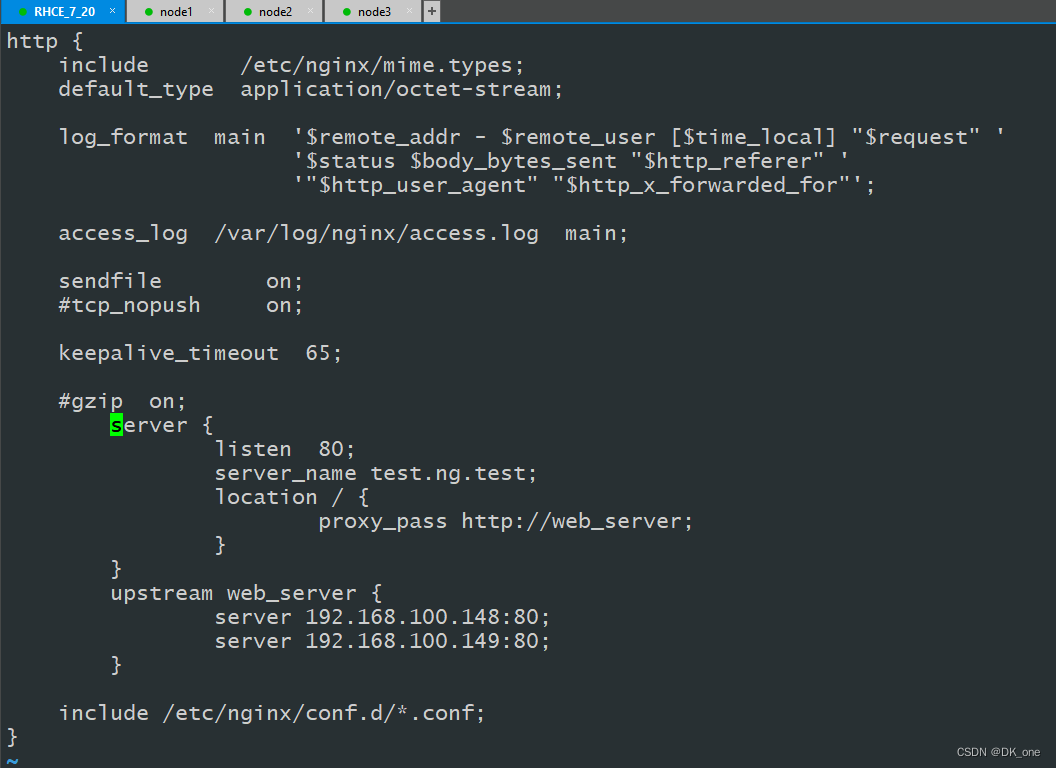
vim /etc/nginx/nginx.conf #在 http模块中写入如下内容server {listen 80;server_name test.ng.test; 定义域名 也可以用iplocation / {proxy_pass http://web_server;}}upstream web_server {server 192.168.100.148:80; nginx服务器地址 server 192.168.100.149:80;}
测试结果:


