目录:
- 双向LSTM
- torch.nn.embedding()实现词嵌入层
- nn.LSTM
- nn.LSTMCell
- LSTM 情感分类例子
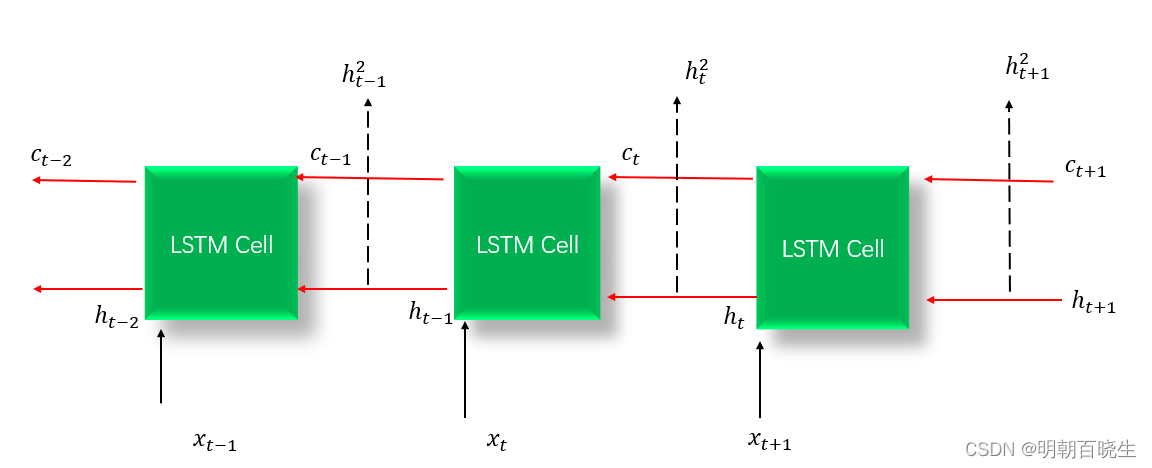
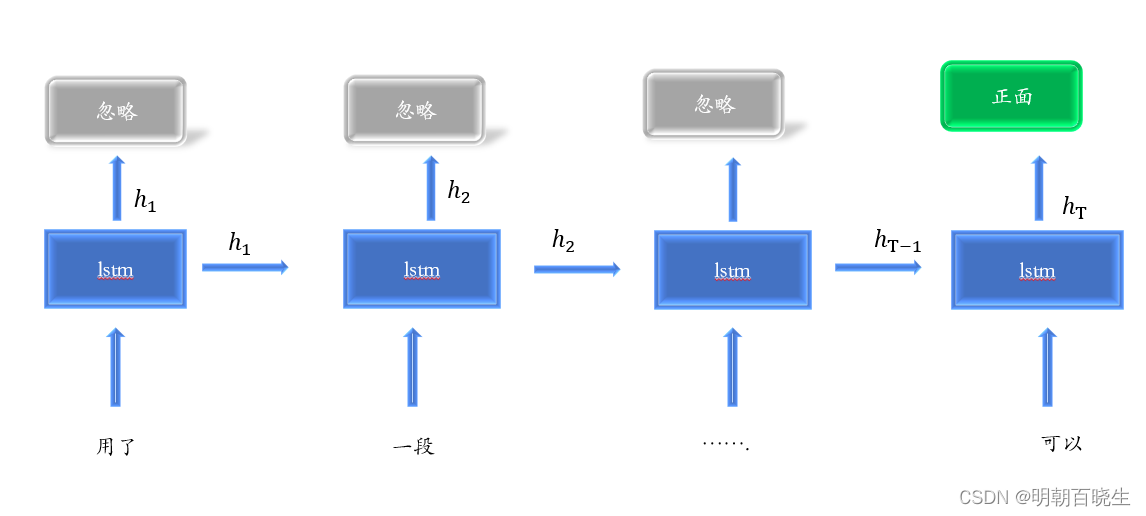
一 双向LSTM
1 原理
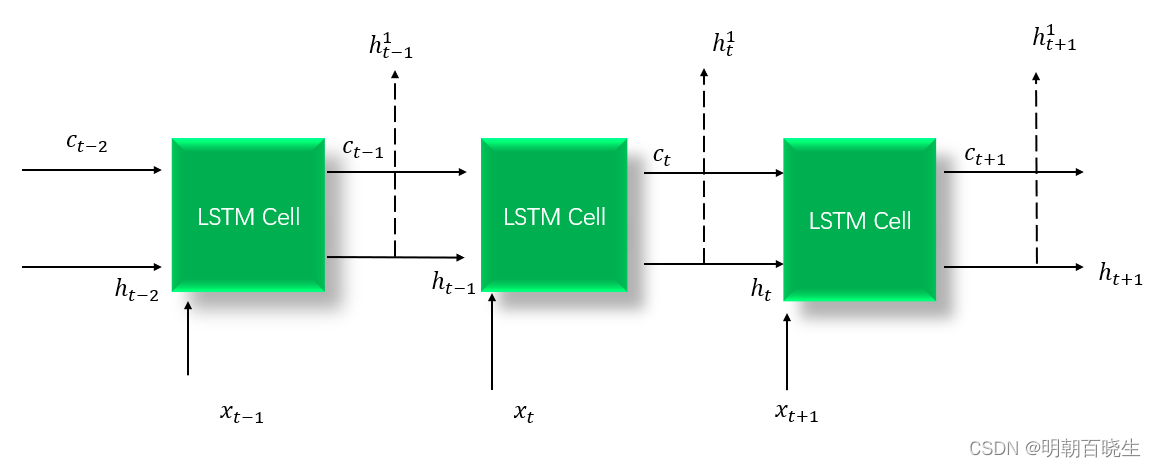
正向输出的结果是
反向输出的结果是
nn.LSTM模块他在最后会将正向和反向的结果进行拼接concat.得到
# -*- coding: utf-8 -*-
"""
Created on Fri Aug  4 11:27:19 2023@author: chengxf2
"""
import torch
import torch.nn  as nnclass MyLSTM(nn.Module):def __init__(self, input_size, hidden_size, nOut):super(MyLSTM, self).__init__()self.rnn = nn.LSTM(input_size, hidden_size, bidirectional=True)self.linear = nn.Linear(hidden_size * 2, nOut)def forward(self, input):#这里面的hidden 是concat 以后的结果hidden, _ = self.rnn(input)print("\n hidden ",hidden.shape) #[seq_len, batch_size, hidden_size*2]T, b, h = hidden.size()print(T,b,h)h_rec = hidden.view(T * b, h)output = self.linear(h_rec)  # [T * b, nOut]output = output.view(T, b, -1)print("\n out ",output.shape)return outputseq_len = 5
batch_size =1
input_size = 2
hidden_size = 10
N = 2
model = MyLSTM(input_size,hidden_size, N)
X = torch.randn((seq_len, batch_size, input_size))output = model(X)
二 torch.nn.embedding()实现词嵌入层
意义
输入: 词的编号索引,输出: 对应符号的嵌入向量。
参数:
| 参数 | 意思 |
| Num_embeddings | 词典的大小尺寸,比如总共出现100个词,那就输入100 |
| embeddding _ dim | 词对应向量的维度 |
| padding_idx | 输入长度为100,但是每次的句子长度并不一样,后面就需要用统一的数字填充,而这里就是指定这个数字,这样,网络在遇到填充id时,就不会计算其与其它符号的相关性。(初始化为0) |
| max_norm | 最大范数,如果嵌入向量的范数超过了这个界限,就要进行再归一化 |
| norm_type | 指定利用什么范数计算,并用于对比max_norm,默认为2范数 |
| scale_grad_by_freq | 根据单词在mini-batch中出现的频率,对梯度进行放缩。默认为False. |
| sparse | 若为True,则与权重矩阵相关的梯度转变为稀疏张量。 |
# -*- coding: utf-8 -*-
"""
Created on Fri Aug  4 15:08:09 2023@author: chengxf2
"""import torch
import torch.nn as nnword_to_idx = {'my':0,'name':1,'is':2,"jack":3}num_embeddings = len(word_to_idx.keys())
embedding_dim = 10
#<class 'torch.nn.modules.sparse.Embedding'>
embeds = nn.Embedding(num_embeddings, embedding_dim)text = 'is name'
text_idx = torch.LongTensor([word_to_idx[i] for i in text.split()])
#词嵌入得到词向量 [2,10]
hello_embed = embeds(text_idx)
print(hello_embed.shape, hello_embed.type)
三 nn.LSTM
1.1 模型参数
| nn.LSTM 参数 | 作用 |
| Input_size | 输入层的维度 |
| Hidden _ size | 隐藏层的维数 |
| Num_layers | 堆叠的层数,默认值是1层,如果设置为2。第一层的隐藏值h,作为第二层的输入层的输入 |
| bias | 隐层状态是否带bias,默认为true。 |
| batch_first | 默认False [T, batch_size, input_size] |
| dropout | 默认值0 |
| bidirectional | 是否是双向 RNN,默认为:false |
1.2 forward 定义
x shape: [seq,batch_size, input_size]
h,c shape: [num_layer, batch_size, hidden_size]
out shape: [seq, batch_size, hidden_size]
# -*- coding: utf-8 -*-
"""
Created on Thu Aug  3 16:29:49 2023@author: chengxf2
"""import torch
import torch.nn as nn
import torch.nn.functional as F
import torch.optim as optimlstm = nn.LSTM(input_size=50, hidden_size=20, num_layers=1)
print(lstm)x = torch.randn(10,5,50)out, (h,c)= lstm(x)print("\n out shape ",out.shape)print("\n hidden shape ",h.shape)print("\n c shape ",c.shape)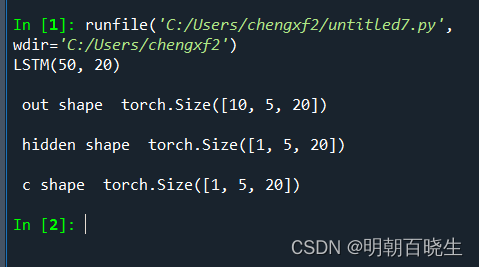
四 nn.LSTMCell
2.1 参数基本一样,主要区别是forward 过程不一样
| nn.LSTM 参数 | 作用 |
| Input_size | 输入层的维度 |
| Hidden _ size | 隐藏层的维数 |
| Num_layers | 堆叠的层数,默认值是1层,如果设置为2。第一层的隐藏值h,作为第二层的输入层的输入 |
2.2 forward
的shape: [batch_size, input_size]
的shape: [batch_size, input_size]
# -*- coding: utf-8 -*-
"""
Created on Thu Aug  3 16:39:42 2023@author: chengxf2
"""
import  torch
import  torch.nn as nn
import  torch.nn.functional as Fprint('lstmCell')batch_size =2
input_size = 20
hidden_size =10
seq_num = 5
cell = nn.LSTMCell(input_size, hidden_size)
X = torch.randn((seq_num,batch_size,input_size))
H0 = torch.zeros(batch_size,hidden_size)
C0=  torch.zeros(batch_size, hidden_size)for xt in X:ht,ct = cell(xt,[H0,C0])print("\n ht.shape",ht.shape)
print("\n ct.shape",ht.shape)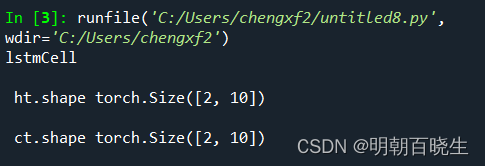
五 LSTM 情感分类
5.1 环境安装
torch text 有兼容性要求
pip install  torchtext==0.11.0  --user
pip install  SpaCy
安装完可以打印看一下,版本是否兼容
# -*- coding: utf-8 -*-
"""
Created on Mon Aug  7 15:49:15 2023@author: chengxf2
"""import torch
import torchtextprint(torch.__version__)
print(torchtext.__version__)-----------------------------
runfile('D:/AI/LSTM/untitled0.py', wdir='D:/AI/LSTM')
1.10.0+cpu
0.11.0
1.2 加载数据集
文件名: loadcorpus.py
import torch
from torchtext.legacy import data
from torchtext.legacy import datasetsdef load_data():'''Step 1: Create a dataset objectlegacy code:Field class is used for data processing, including tokenizer and numberzation. To check out the dataset, users need to first set up the TEXT/LABEL fields.'''TEXT = data.Field(tokenize=data.get_tokenizer('basic_english'),init_token='', eos_token='', lower=True)LABEL = data.LabelField(dtype = torch.long)# 按照(TEXT, LABEL) 分割成 训练集:25000,测试集:25000legacy_train, legacy_test = datasets.IMDB.splits(TEXT, LABEL)  # datasets here refers to torchtext.legacy.datasetsprint('len of train data:', len(legacy_train))        # 25000print('len of test data:', len(legacy_test))          # 25000# torchtext.data.Example : 用来表示一个样本,数据+标签#print(legacy_test.examples[15].text)                 #文本:句子的单词列表:字符串#print(legacy_train.examples[15].label)                # 标签: 字符串return TEXT, LABEL,legacy_train, legacy_testdef  create_vocabulary(TEXT,LABEL, legacy_train):'''Step 2 Build the data processing pipelinelegacy code:The default tokenizer implemented in the Field class is the built-in python split() function.Users choose the tokenizer by calling data.get_tokenizer(), and add it to the Field constructor.For the sequence model:it's common to append <BOS> (begin-of-sentence)and <EOS> (end-of-sentence) tokens, and the special tokens need to be defined in the Field class.Things you can do with a vocabuary object1: Total length of the vocabulary2: String2Index (stoi) and Index2String (itos)3:  A purpose-specific vocabulary which contains word appearing more than N times'''TEXT.build_vocab(legacy_train,max_size=9997)LABEL.build_vocab(legacy_train)legacy_vocab = TEXT.vocab#10003vocab_size = len(legacy_vocab)print("\n  length of the TEXT vocab is", vocab_size)print("\n length of the LABEL vocab is", len(LABEL.vocab))#print('pretrained_embedding:', pretrained_embedding.shape)    # torch.Size([10002, 100])legacy_stoi = legacy_vocab.stoi#print("The index of 'example' is", legacy_stoi['example'])legacy_itos = legacy_vocab.itos#print("The token at index 466 is: ", legacy_itos[466])# Set up the mim_freq value in the Vocab class#TEXT.build_vocab(legacy_train, min_freq=10)#legacy_vocab2 = TEXT.vocab#print("The length of the legacy vocab is: ", len(legacy_vocab2))return vocab_sizedef  create_iterator(batchs ,train_data, test_data):'''Step 3: Generate batch iteratorlegacy code:To train a model efficiently,it's recommended to build an iterator to generate data batch.'''device = torch.device("cuda" if torch.cuda.is_available() else "cpu")legacy_train_iterator, legacy_test_iterator = data.Iterator.splits((train_data, test_data), batch_size=batchs, device = device)return legacy_train_iterator, legacy_test_iterator def  iterator_data(legacy_train_iterator):'''Step 4: Iterate batch to train a modelbatch.text.shape:  [seq_len, batch_size]'''for i, batch in enumerate(legacy_train_iterator):continue#print("\n shape: ",batch.text.shape,"\t i:",i,"\t text: ",batch.text[:,0][0:3])def load_corpus():print("\n ==> Step 1: Create a dataset object ")TEXT, LABEL,train_data, test_data = load_data()print("\n ==> Step 2: Build the data processing pipeline")vocab_size= create_vocabulary(TEXT, LABEL, train_data)print("\n ==> Step 3: Generate batch iterator")legacy_train_iterator, legacy_test_iterator  =create_iterator(30, train_data, test_data)#print("\n ==> Step 4: iterator_data ")#iterator_data(legacy_train_iterator)return vocab_size,legacy_train_iterator, legacy_test_iterator
1.3 创建模型
文件名: lstmModule
# -*- coding: utf-8 -*-
"""
Created on Mon Aug  7 11:58:41 2023@author: chengxf2
"""import torch
import torch.nn as nnclass LSTM(nn.Module):def __init__(self, vocab_size,embedding_dim, hidden_dim,bidirectional):super(LSTM, self).__init__()self.category_num = 1 #最后分类的种类,二分类为1self.bidirectional = 2#双向#[0-10001]=>[100]#vovcab_size: 单词数量  embedding_dim: 词向量维度self.embedding =nn.Embedding(vocab_size, embedding_dim)#[100]=>[256]#双向LSTM,FC层使用hidden_dim*2self.lstm = nn.LSTM(embedding_dim, hidden_dim, num_layers=2,bidirectional=bidirectional, dropout= 0.5)#[256*2]=>1self.fc = nn.Linear(hidden_dim*2 , self.category_num)self.dropout = nn.Dropout(0.5)if True == bidirectional:self.bidirectional = 2def forward(self, X):'''X: [seq_len, batch] 开始输入的是词的索引构成的向量'''#转换为向量形式[seq_len, batch]=>[seq_len, batch, input_size]embedding = self.embedding(X)embedding = self.dropout(embedding)#output.shape: [seq, batch_size,hidd_dim*2] 实际上就是隐藏层#hidden.shape: [num_layer*self.bidirectional,  batch_size, hid_dim]#cell.shape:   [num_layer*self.bidirectional,  batch_size, hid_dim]output, (hidden, cell) = self.lstm(embedding)#print("\n output",output.shape, "\t hidden ",hidden.shape, "\t cell ",cell.shape)#双向,要把最后两个输出拼接  hidden.shape :torch.Size([4, 30, 100])if 2 == self.bidirectional:output = torch.cat([hidden[-2], hidden[-1]], dim=1)#output.shape [batch_size, hid_dim*2]output = self.dropout(output)#[seq_num, category_num]out = self.fc(output)return out
1.4 main.py 训练部分
# -*- coding: utf-8 -*-
"""
Created on Tue Aug  8 10:06:05 2023@author: chengxf2
"""import torch
from torch import nn
from torch.nn import functional as F
import lstmModule
from   lstmModule import LSTM as lstm
import loadcorpus
from loadcorpus import load_corpus
from torch import optim
import numpy as np'''
def predict():#模型预测for batch in test_iterator:# batch_size个预测preds = rnn(batch.text).squeeze(1)preds = predice_test(preds)# print(preds)i = 0for text in batch.text:# 遍历一句话里的每个单词for word in text:print(TEXT.vocab.itos[word], end=' ')print('')# 输出3句话if i == 3:breaki = i + 1i = 0for pred in preds:idx = int(pred.item())print(idx, LABEL.vocab.itos[idx])# 输出3个结果(标签)if i == 3:breaki = i + 1break'''
def evaluate(rnn, iterator, criteon):'''数据集分为3部分:train, validate, test训练的时候:每轮结束要用validate 数据集来验证一下,防止过拟合'''avg_acc = []rnn.eval()         # 表示进入测试模式with torch.no_grad():for batch in iterator:pred = rnn(batch.text).squeeze(1)      # [b, 1] => [b]acc = binary_acc(pred, batch.label).item()avg_acc.append(acc)avg_acc = np.array(avg_acc).mean()print('test acc:', avg_acc)def binary_acc(preds, y):'''定义一个函数用于计算准确率'''preds = torch.round(torch.sigmoid(preds))correct = torch.eq(preds, y).float()acc = correct.sum() / len(y)return accdef train(model, iterator, optimizer, criteon):#训练函数avg_acc = []model.train()   # 表示进入训练模式for i, batch in enumerate(iterator):# [seq, b] => [b, 1] => [b]# batch.text 就是上面forward函数的参数text,压缩维度是为了和batch.label维度一致pred = model(batch.text)#pred.shape: [seq,1]=>[seq]pred = pred.squeeze(1)target = batch.label.float()loss = criteon(pred, target)# 计算每个batch的准确率acc = binary_acc(pred, batch.label).item()avg_acc.append(acc)optimizer.zero_grad()  # 清零梯度准备计算loss.backward()        # 反向传播optimizer.step()       # 更新训练参数if i % 2 == 0:print("\n i:%d"%i,"\t acc : %4.2f"%acc)avg_acc = np.array(avg_acc).mean()print('avg acc:', avg_acc)def main():print("---main---")maxIter = 5input_size = 128hidden_size = 256vocab_size,train_iterator, test_iterator = load_corpus()net = lstm(vocab_size, input_size, hidden_size,True)device = torch.device("cuda" if torch.cuda.is_available() else "cpu")optimizer = optim.Adam(net.parameters(), lr=1e-4)# BCEWithLogitsLoss是针对二分类的CrossEntropycriteon = nn.BCEWithLogitsLoss()criteon.to(device)net.to(device)print("\n ---train--")for epoch in range(maxIter):# 训练模型train(net, train_iterator, optimizer, criteon)# 评估模型evaluate(net, test_iterator, criteon)if __name__ == "__main__":main()
参考:
深度学习与Pytorch入门实战(十六)情感分类实战(基于IMDB数据集)_Douzi1024的博客-CSDN博客
https://github.com/pytorch/text/blob/master/examples/legacy_tutorial/migration_tutorial.ipynb
LSTM情感分类(上) - 知乎
Google Colab 快速上手 - 知乎
深度学习与Pytorch入门实战(十六)情感分类实战(基于IMDB数据集)_Douzi1024的博客-CSDN博客
https://github.com/pytorch/text/blob/master/examples/legacy_tutorial/migration_tutorial.ipynb
https://github.com/renjunxiang/Text-Classification/blob/master/TextClassification/data/data_single.csv