更好的阅读体验 \huge{\color{red}{更好的阅读体验}} 更好的阅读体验
Java IO 模型
本篇示例代码仓库:learn-netty
基础概念
在 I/O 操作中有这么两组概念,其中同步/异步 要和线程中的同步线程/异步线程要区分开,这里指的是同步IO / 异步IO
阻塞/非阻塞:
- 没有数据传过来时,读会阻塞直到有数据;缓冲区满时,写操作也会阻塞
- 非阻塞遇到这些情况,都是直接返回
同步/异步:
- 数据就绪后需要自己去读是同步
- 数据就绪后系统直接读好再回调给程序是异步
常见的 IO 模型:
- 同步阻塞 IO
- 同步非阻塞 IO
- IO 多路复用
- 信号IO
- 异步 IO
Java BIO
BIO 是 blocking I/O 的简称,它是同步阻塞型 IO,其相关的类和接口在 java.io 下,简单来讲:
- BIO模型下的服务端为每一个请求都分配一个线程进行处理
- I/O 操作都是基于流 Stream 的操作
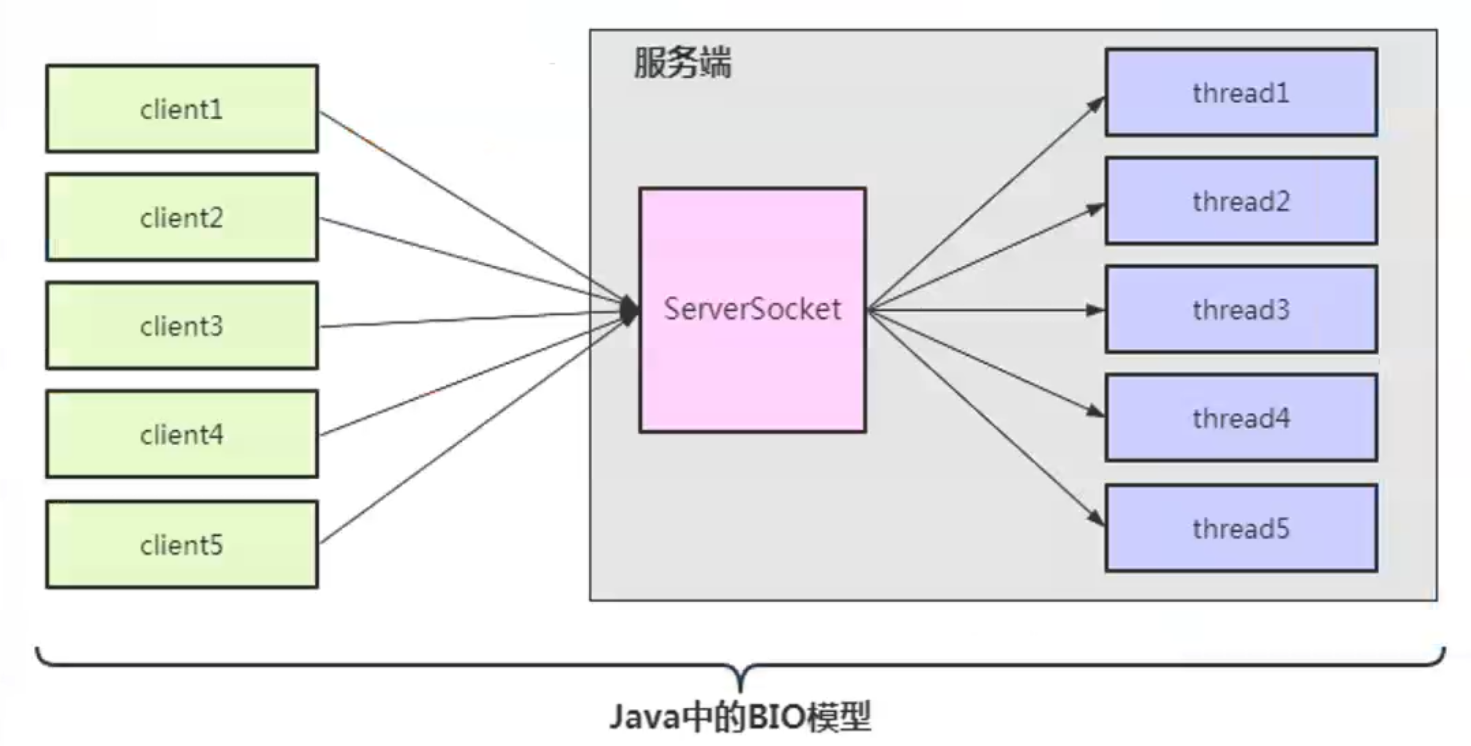
编写一个简单的 BioServer:
public class BioServer {public static void main (String[] args) throws IOException {// BIO 模型的服务端要为每一个客户端建立一个对应的连接ServerSocket serverSocket = new ServerSocket(1145);while (true) {// 持续接受客户端的连接Socket accept = serverSocket.accept();// 为每一个客户端连接新开一个线程,执行对应的业务new Thread(new ClientService(accept)).start();}}static class ClientService implements Runnable {private Socket socket;public ClientService (Socket socket) {this.socket = socket;}@Overridepublic void run() {System.out.println("执行对应的业务操作:" + socket);}}
}
对应来一个简单的 Client:
public class Client {public static void main(String[] args) throws IOException {Socket socket = new Socket("127.0.0.1", 1145);System.out.println("建立连接:" + socket);}
}
这种 IO 模型的弊端十分明显:
- 线程开销:客户端的并发数与后端的线程数成1:1的比例,线程的创建、销毁是非常消耗系统资源的,随着并发量增大,服务端性能将显著下降,甚至会发生线程堆栈溢出等错误
- 线程阻塞:当连接创建后,如果该线程没有操作时,会进行阻塞操作,这样极大的浪费了服务器资源
Java NIO
NIO,称之为 New IO 或是 non-block IO(非阻塞IO),这两种说法都可以,其实称之为非阻塞 IO 更恰当一些
NIO的三大核心组件:
- Buffer(缓冲区)
- Channel(通道)
- Selector(选择器/多路复用器)
Buffer
在应用层面,数据从网络传递给 Buffer,我们操作 Buffer 中的数据,之后再通过 NIO 的 api 将处理后的 Buffer 中的数据写回到网络中:
- Buffer是一个对象,包含一些要写入或者读出的数据
- 原有的 IO 数据读写都是在 Stream 中,而 NIO 则是用 Buffer 预处理
- 读数据从缓冲区读,写数据也写入到缓冲区
- 缓冲区的本质是一个数组,底层支持多种实现(通常是字节数组实现),还提供了对数据结构化访问以及维护读写位置等操作
查看一下 java.nio 包下的 Buffer.java 源码中的几个私有属性:
// Invariants: mark <= position <= limit <= capacityprivate int mark = -1;private int position = 0;private int limit;private int capacity;
mark <= position <= limit <= capacity 这个大小关系是在写模式下的:
- mark 就是一个标志位,capacity 是总容量
- position 是写入起始位置,limit 限制了可操作的最大地址
当 Buffer 需要读数据时会进行读写模式切换:
public Buffer flip() {limit = position;position = 0;mark = -1;return this;}
- 这里将 limit 值更新为 position 的位置,即可读的区间不会超过已写入的区间
- 然后将 position 置 0,即读区间的起始位置
Channel
Channel是一个通道,管道,网络数据通过 Channel 读取和写入
Channel 和流 Stream 的不同之处:
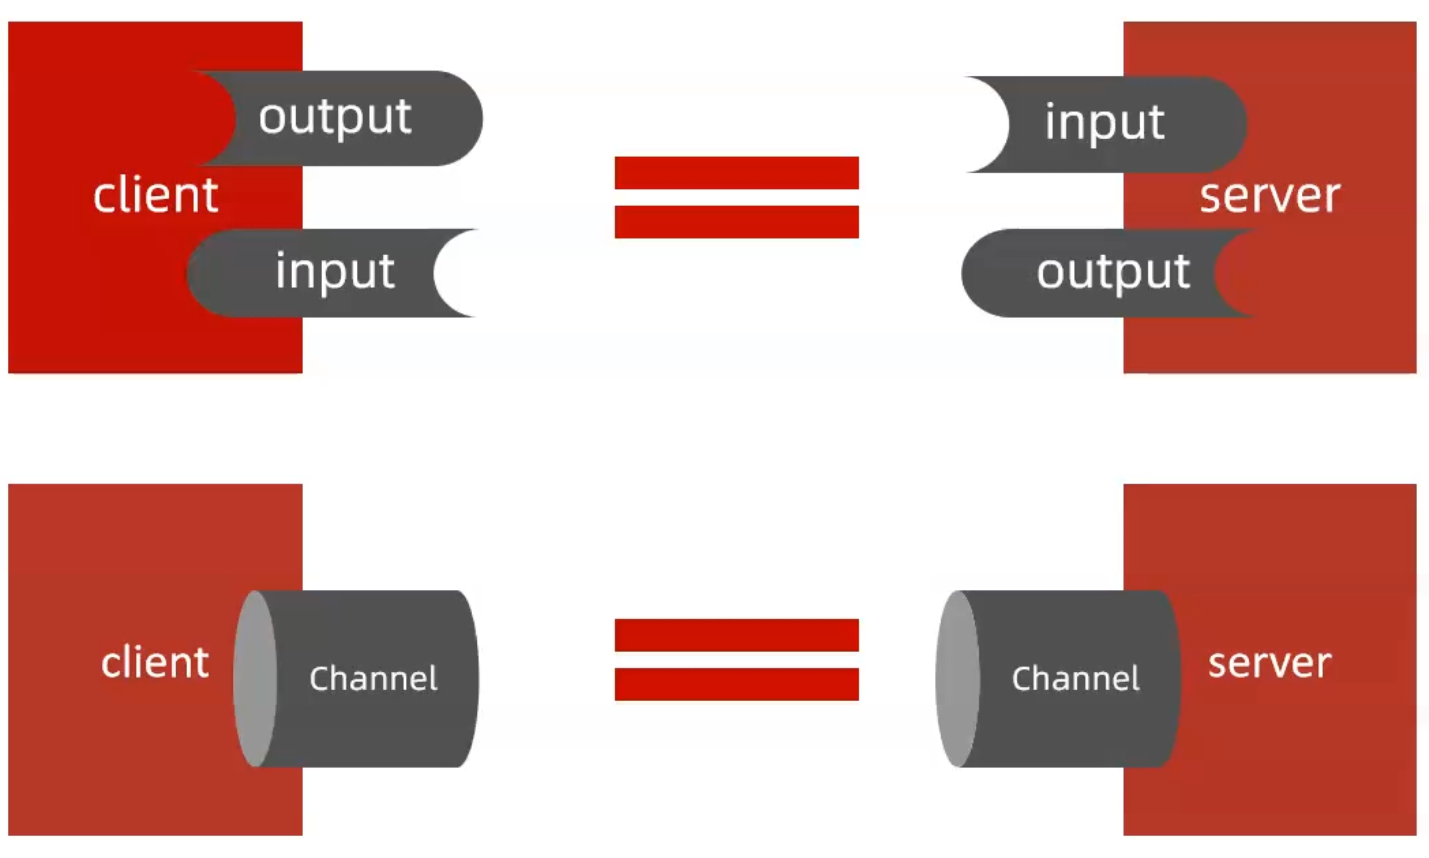
- Channel 是双向的
- 流只在一个方向上移动(InputStream/OutputStream)
- 而 Channel 可以用于读写同时进行,即 Channel 是全双工模式
Java 提供两个网络读写相关的 Channel:
- ServerSocketChannel:用于服务端和客户端建立连接,服务端必备,客户端不需要
- SocketChannel:用于客户端和服务端双向通信,服务端建立连接后需要创建该对象和客户端进行通信
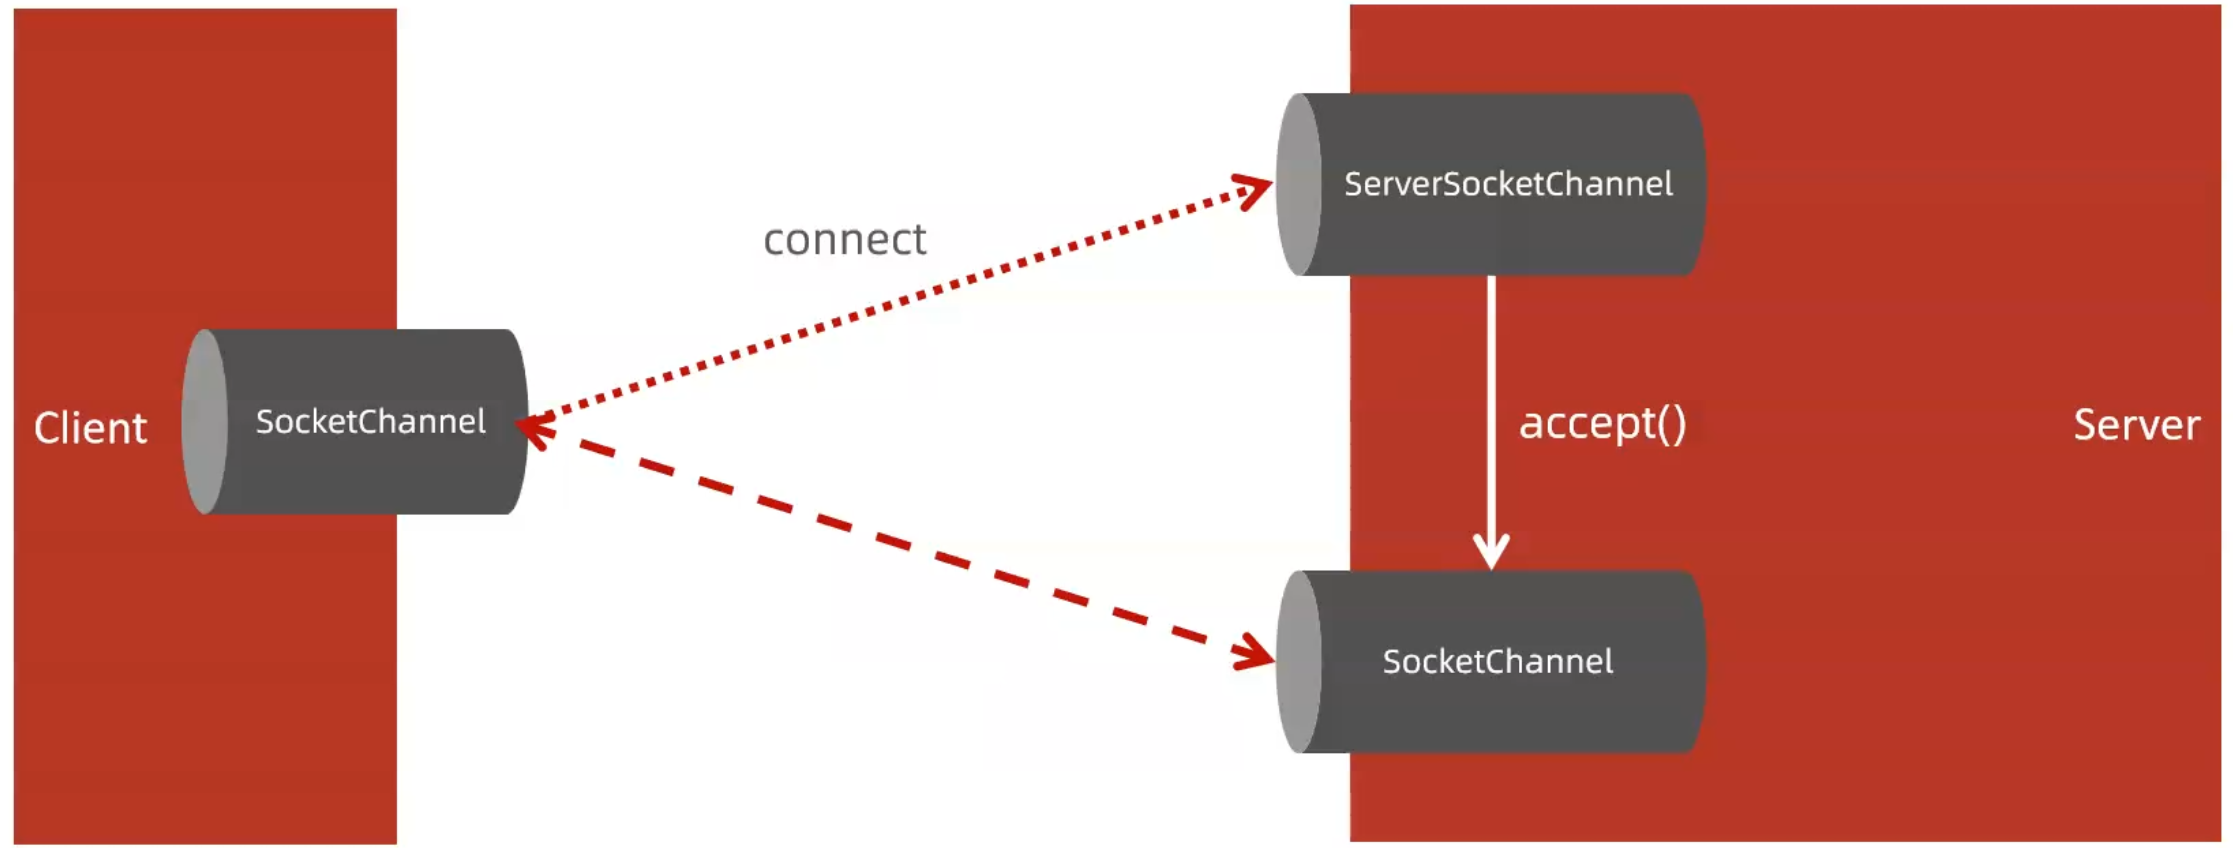
这里 SocketChannel 在不同端上所支持的事件是不一样的:
| 端类型 | Channel 类型 | OP_ACCEPT | OP_CONNECT | OP_WRITE | OP_READ |
|---|---|---|---|---|---|
| Client 端 | SocketChannel | 支持 | 支持 | 支持 | |
| Server 端 | ServerSocketChannel | 支持 | |||
| Server 端 | SocketChannel | 支持 | 支持 |
Selector
Selector(选择器/多路复用器):
- Selector 会不断轮询注册在其上的 Channel
- 如果某个Channel 上面发生读或者写事件,即该Channel处于就绪状态,它就会被 Selector 轮询出来
- 被轮询出的 Channel 通过 selectedKeys 即可获取就绪的该 Channel 的集合,进行后续的I/O操作
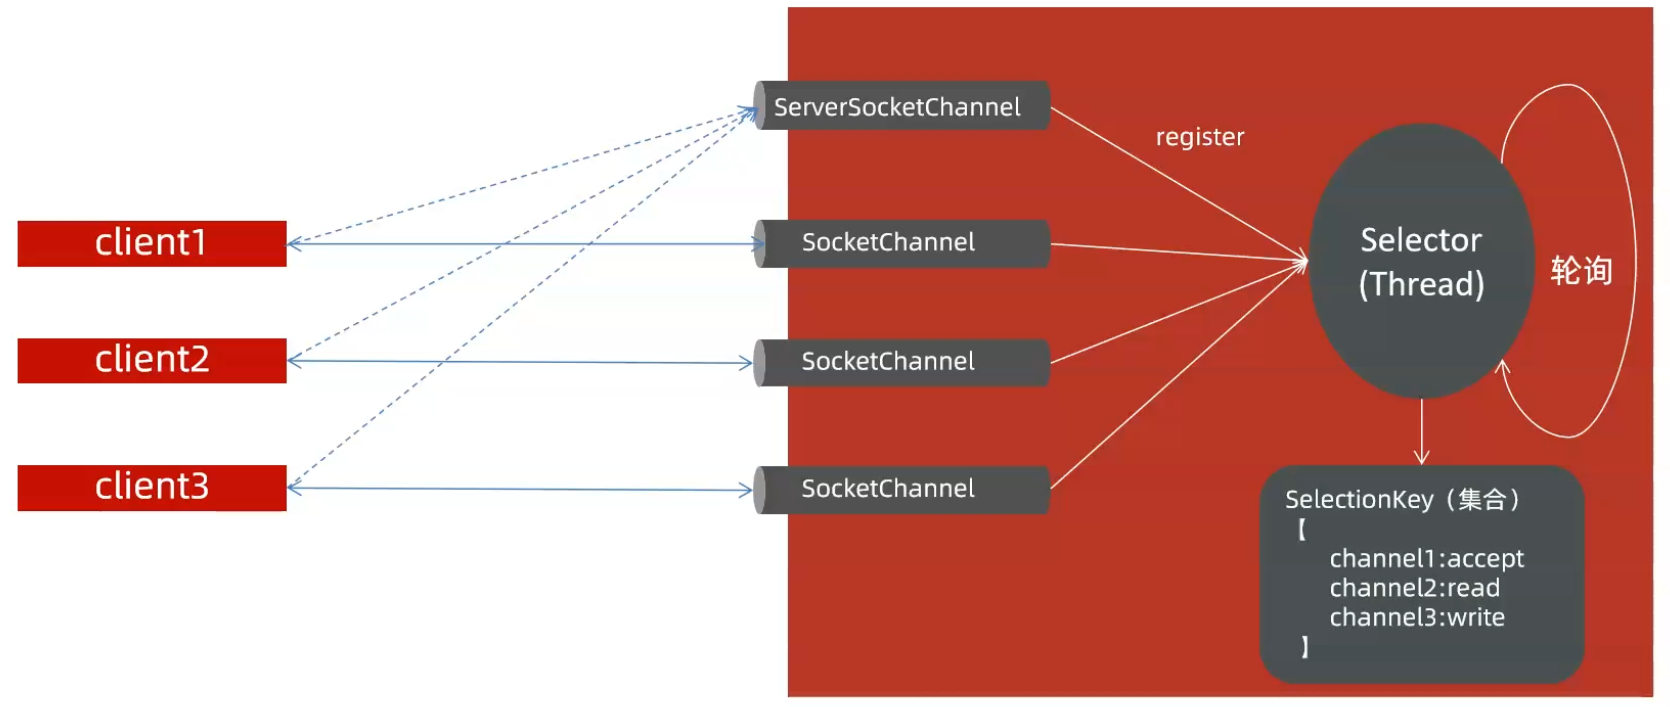
基于 NIO 来实现一个服务端:
public class NioServer {public static void main(String[] args) {try {//1、打开ServerSocketChannel,用于监听客户端的连接,它是所有客户端连接的父管道(代表客户端连接的管道都是通过它创建的)ServerSocketChannel serverSocketChannel = ServerSocketChannel.open();//2、绑定监听端口,设置连接为非阻塞模式serverSocketChannel.socket().bind(new InetSocketAddress(1145));serverSocketChannel.configureBlocking(false);//3、创建多路复用器SelectorSelector selector = Selector.open();//4、将ServlerSocketChannel注册到selector上,监听客户端连接事件ACCEPTserverSocketChannel.register(selector, SelectionKey.OP_ACCEPT);//5、创建 Reactor线程,让多路复用器在 Reactor 线程中执行多路复用程序new Thread(new SingleReactor(selector)).start();} catch (IOException e) {e.printStackTrace();}}
}class SingleReactor implements  Runnable{private final Selector selector;public SingleReactor(Selector selector) {this.selector = selector;}public void run() {//6、selector轮询准备就绪的事件while (true) {try {selector.select(1000);Set<SelectionKey> selectionKeys = selector.selectedKeys();Iterator<SelectionKey> iterator = selectionKeys.iterator();while (iterator.hasNext()) {SelectionKey selectionKey = iterator.next();iterator.remove();try {processKey(selectionKey);} catch (IOException e) {e.printStackTrace();if (selectionKey !=null ) {selectionKey.cancel();SelectableChannel channel = selectionKey.channel();if (channel !=null) {channel.close();}}}}} catch (IOException e) {e.printStackTrace();}}}private void processKey(SelectionKey key) throws IOException {if (key.isValid()) {//7、根据准备就绪的事件类型分别处理if (key.isAcceptable()) {//客户端请求连接事件就绪//7.1、接收一个新的客户端连接,创建对应的SocketChannel,ServerSocketChannel serverSocketChannel = (ServerSocketChannel) key.channel();SocketChannel socketChannel = serverSocketChannel.accept();//7.2、设置socketChannel的非阻塞模式,并将其注册到Selector上,监听读事件socketChannel.configureBlocking(false);socketChannel.register(this.selector,SelectionKey.OP_READ);}if (key.isReadable()) {//读事件准备继续//7.1、读客户端发送过来的数据SocketChannel socketChannel = (SocketChannel) key.channel();ByteBuffer readBufer = ByteBuffer.allocate(1024);int readBytes = socketChannel.read(readBufer);//前面设置过socketChannel是非阻塞的,故要通过返回值判断读取到的字节数if (readBytes > 0) {readBufer.flip();//读写模式切换byte[] bytes = new byte[readBufer.remaining()];readBufer.get(bytes);String msg = new String(bytes,"utf-8");//进行业务处理String response = doService(msg);//给客户端响应数据System.out.println("服务端开始向客户端响应数据");byte[] responseBytes = response.getBytes();ByteBuffer writeBuffer = ByteBuffer.allocate(responseBytes.length);writeBuffer.put(responseBytes);writeBuffer.flip();socketChannel.write(writeBuffer);}else if (readBytes < 0) {//值为-1表示链路通道已经关闭key.cancel();socketChannel.close();}else {//没读取到数据,忽略}}}}private String doService(String msg) {System.out.println("成功接收来自客户端发送过来的数据:"+msg);return "hello client,i am server!";}}
对应的客户端实现:
public class NioClient {public static void main(String[] args) {try {//1、窗口客户端SocketChannel,绑定客户端本地地址(不选默认随机分配一个可用地址)SocketChannel socketChannel = SocketChannel.open();//2、设置非阻塞模式,socketChannel.configureBlocking(false);//3、创建SelectorSelector selector = Selector.open();//3、创建Reactor线程new Thread(new SingleReactorClient(socketChannel,selector)).start();} catch (IOException e) {e.printStackTrace();}}
}class SingleReactorClient implements  Runnable{private final SocketChannel socketChannel;private final Selector selector;public SingleReactorClient(SocketChannel socketChannel, Selector selector) {this.socketChannel = socketChannel;this.selector = selector;}public void run() {try {//连接服务端doConnect(socketChannel,selector);} catch (IOException e) {e.printStackTrace();System.exit(1);}//5、多路复用器执行多路复用程序while (true) {try {selector.select(1000);Set<SelectionKey> selectionKeys = selector.selectedKeys();Iterator<SelectionKey> iterator = selectionKeys.iterator();while (iterator.hasNext()) {SelectionKey selectionKey = iterator.next();processKey(selectionKey);iterator.remove();}} catch (IOException e) {e.printStackTrace();}}}private void doConnect(SocketChannel sc, Selector selector) throws IOException {System.out.println("客户端成功启动,开始连接服务端");//3、连接服务端boolean connect = sc.connect(new InetSocketAddress("127.0.0.1", 1145));//4、将socketChannel注册到selector并判断是否连接成功,连接成功监听读事件,没有继续监听连接事件System.out.println("connect="+connect);if (connect) {sc.register(selector, SelectionKey.OP_READ);System.out.println("客户端成功连上服务端,准备发送数据");//开始进行业务处理,向服务端发送数据doService(sc);}else {sc.register(selector,SelectionKey.OP_CONNECT);}}private void processKey(SelectionKey key) throws IOException {if (key.isValid()) {//6、根据准备就绪的事件类型分别处理if (key.isConnectable()) {//服务端可连接事件准备就绪SocketChannel sc = (SocketChannel) key.channel();if (sc.finishConnect()) {//6.1、向selector注册可读事件(接收来自服务端的数据)sc.register(selector,SelectionKey.OP_READ);//6.2、处理业务 向服务端发送数据doService(sc);}else {//连接失败,退出System.exit(1);}}if (key.isReadable()) {//读事件准备继续//6.1、读服务端返回的数据SocketChannel sc = (SocketChannel) key.channel();ByteBuffer readBufer = ByteBuffer.allocate(1024);int readBytes = sc.read(readBufer);//前面设置过socketChannel是非阻塞的,故要通过返回值判断读取到的字节数if (readBytes > 0) {readBufer.flip();//读写模式切换byte[] bytes = new byte[readBufer.remaining()];readBufer.get(bytes);String msg = new String(bytes,"utf-8");//接收到服务端返回的数据后进行相关操作doService(msg);}else if (readBytes < 0) {//值为-1表示链路通道已经关闭key.cancel();sc.close();}else {//没读取到数据,忽略}}}}private static void doService(SocketChannel socketChannel) throws IOException {System.out.println("客户端开始向服务端发送数据:");//向服务端发送数据byte[] bytes = "hello nioServer,i am nioClient !".getBytes();ByteBuffer writeBuffer = ByteBuffer.allocate(bytes.length);writeBuffer.put(bytes);writeBuffer.flip();socketChannel.write(writeBuffer);}private String doService(String msg) {System.out.println("成功接收来自服务端响应的数据:"+msg);return "";}
}
AIO
在NIO中,Selector 多路复用器在做轮询时,如果没有事件发生,也会进行阻塞,如何优化?
这里提出 AIO,它是 Asynchronous l/O 的简称(异步非阻塞 IO),是异步IO,该异步 IO 是需要依赖于操作系统底层的异步 IO 实现
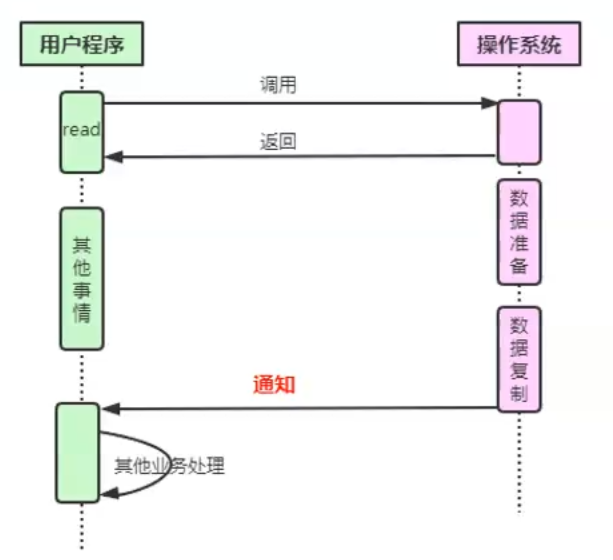
- 用户线程通过系统调用,告知 kernel 内核启动某个 IO 操作,用户线程返回
- kernel 内核在整个 IO 操作(包括数据准备、数据复制)完成后,通知用户程序,用户执行后续的业务操作
目前该技术在 Windows 下实现成熟,但很少作为百万级以上或者说高并发应用的服务器操作系统来使用
Liux系统下,异步 IO 模型在 2.6 版本才引入,目前并不完善。所以 Liux 下,实现高并发网络编程时都是以 NIO 多路复用模型模式为主
Reactor 线程模型
基础概念
Reactor 线程模型不是 Java专属,也不是 Netty 专属,它其实是一种并发编程模型,是一种思想,具有指导意义。
Reactor 模型中定义了三种角色:
- Reactor:负责监听和分配事件,将 I/O 事件分派给对应的 Handle,新的事件包含连接建立就绪、读就绪写就绪等
- Acceptor:处理客户端新连接,并分派请求到处理器链中
- Handler:将自身与事件绑定,执行非阻塞读/写任务,完成 Channel 的读入,完成处理业务逻辑后,负责将结果写出 Channel
单 Reactor
我们之前在 Java NIO 中实现的代码其实就是一个类似的 Reactor 单线程模型:
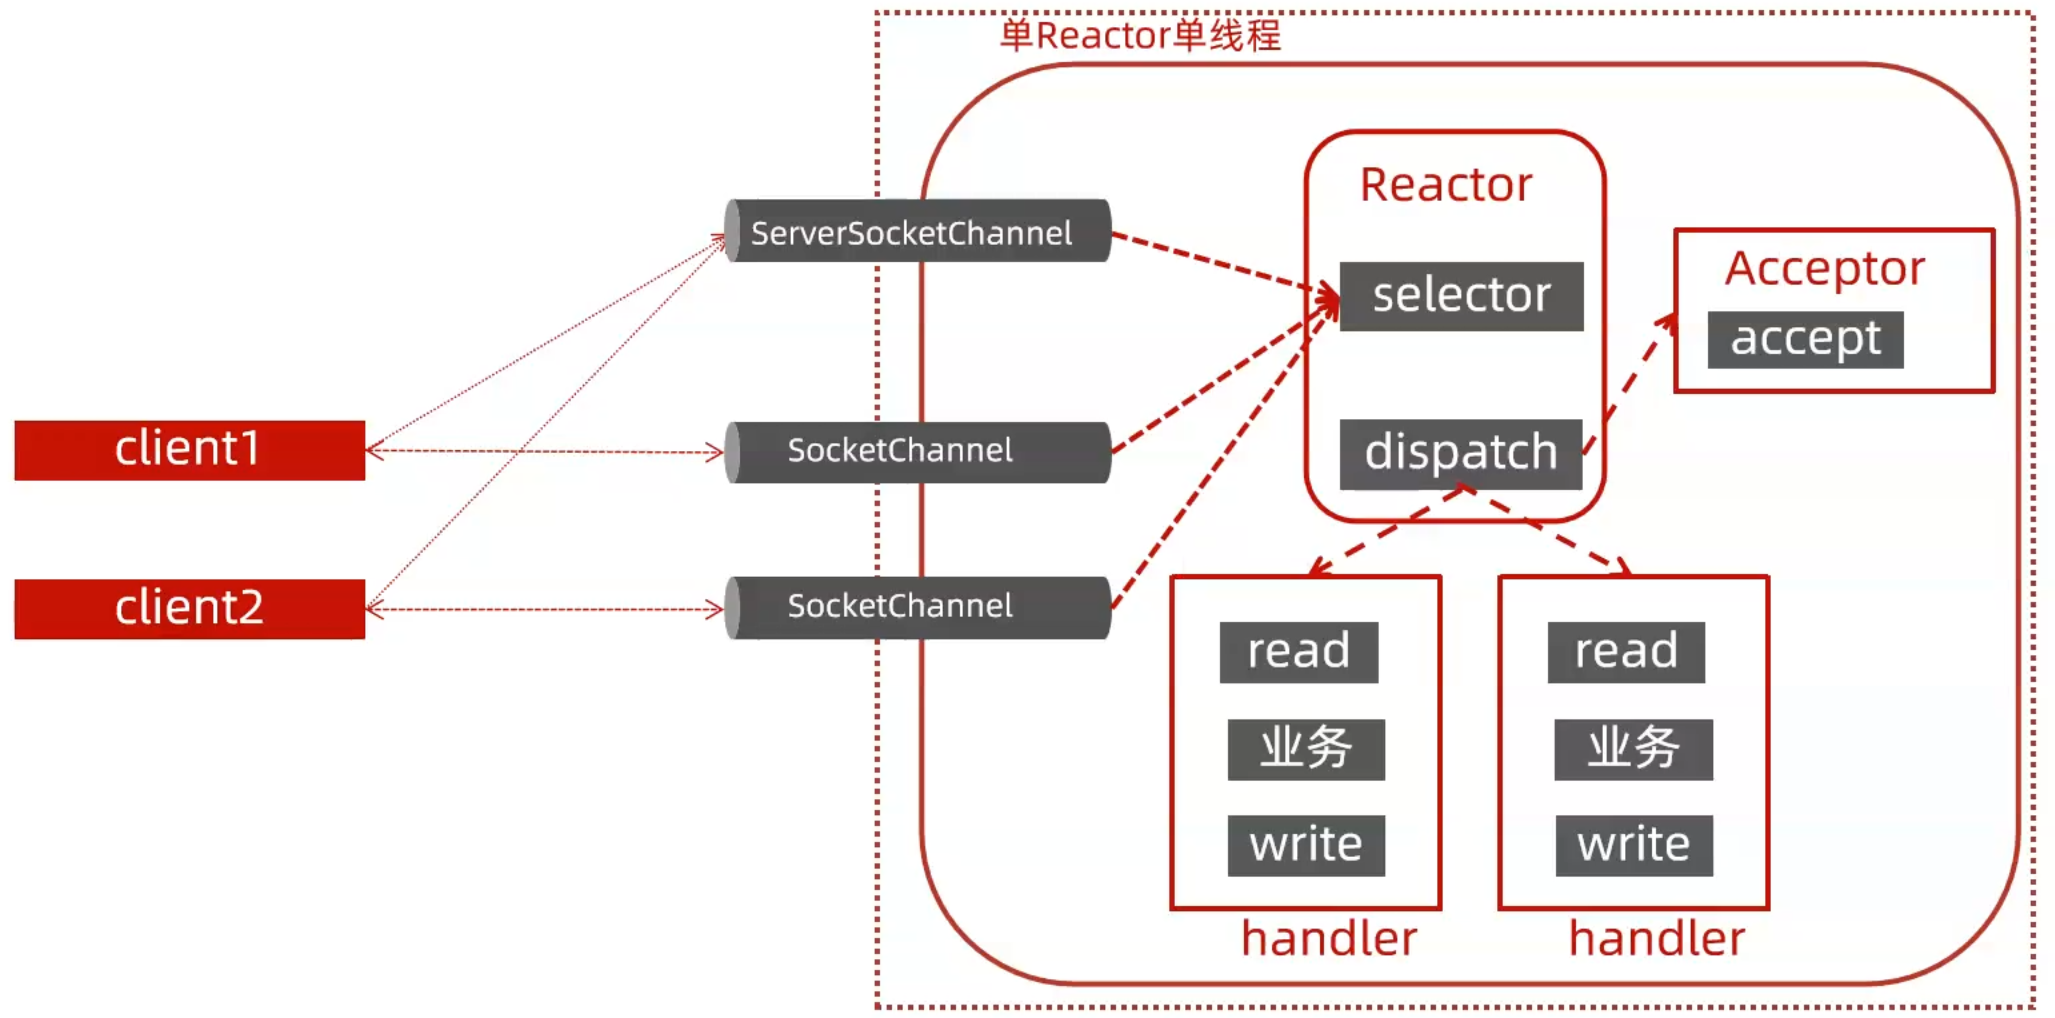
在 Reactor 单线程模型中:
- 一个单独的线程运行一个事件循环,负责监听事件的发生(如网络请求)并将对应的处理工作委托给相应的处理器
- 一旦事件被 Reactor检测到,就通知到程序中相应的事件处理器(Handler)来相应地处理这些事件
这样的模型好处是编码简单,实现容易,但是所有的业务都需要依赖单线程执行,很容易达到性能瓶颈,因此可以将业务抽离出来放到线程池中执行,这就是单 Reactor 多线程模型:
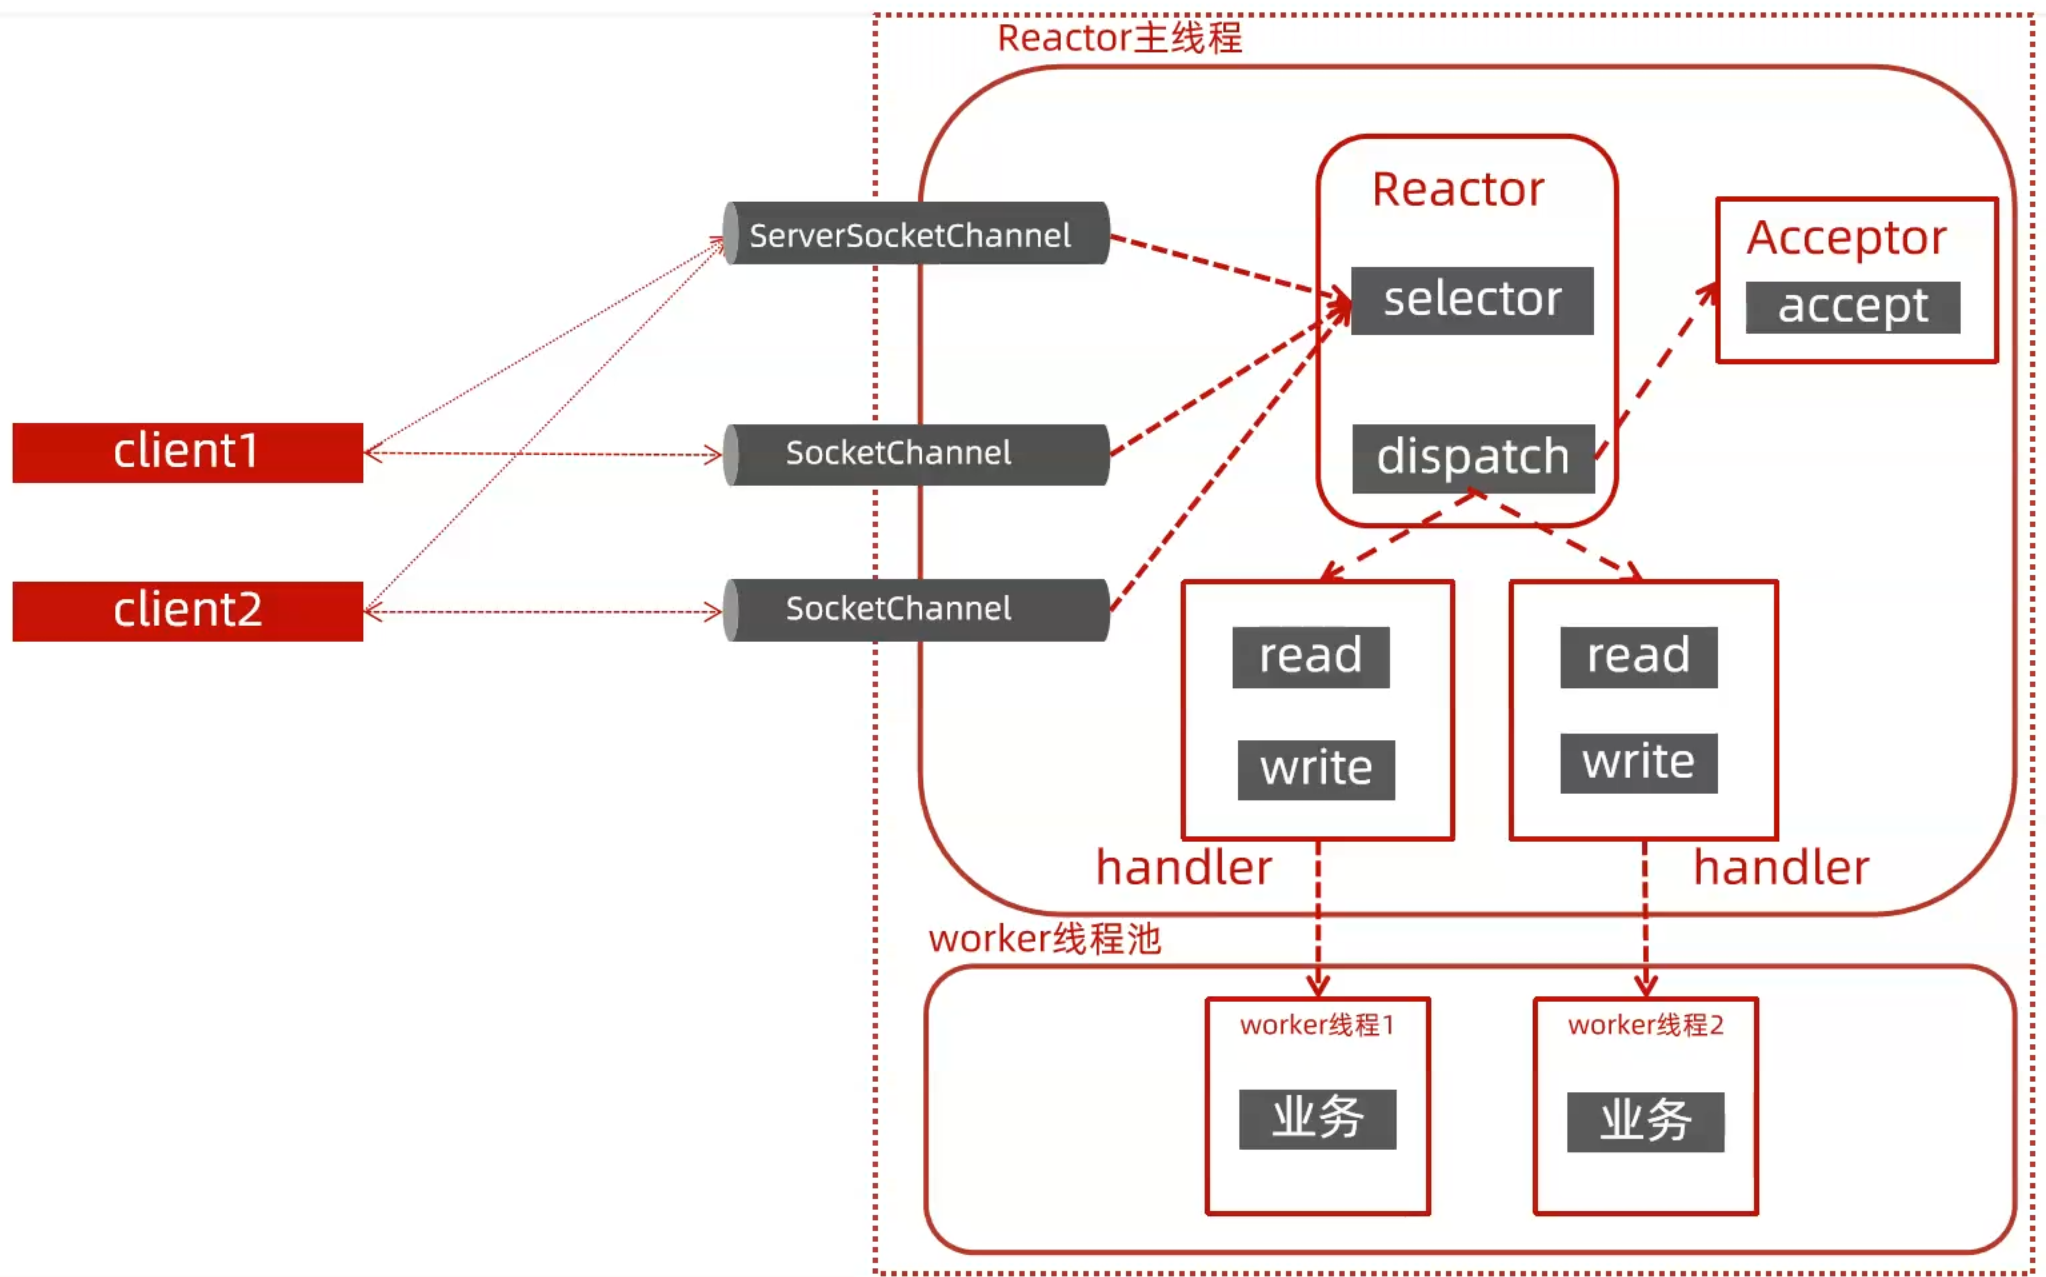
主从 Reactor
对于单 Reactor 多线程模型中,虽然我们已经将业务进行了分离,但是仍然存在缺陷:
- 假如有多个 Handler 在执行 read 操作,则当前的线程仍然被阻塞
- 对于其他 Client 发起的连接请求将会阻塞,这就存在丢失连接的风险
对于服务器来说,接收客户端的连接是比较重要的,因此将这部分操作单独用线程去操作:
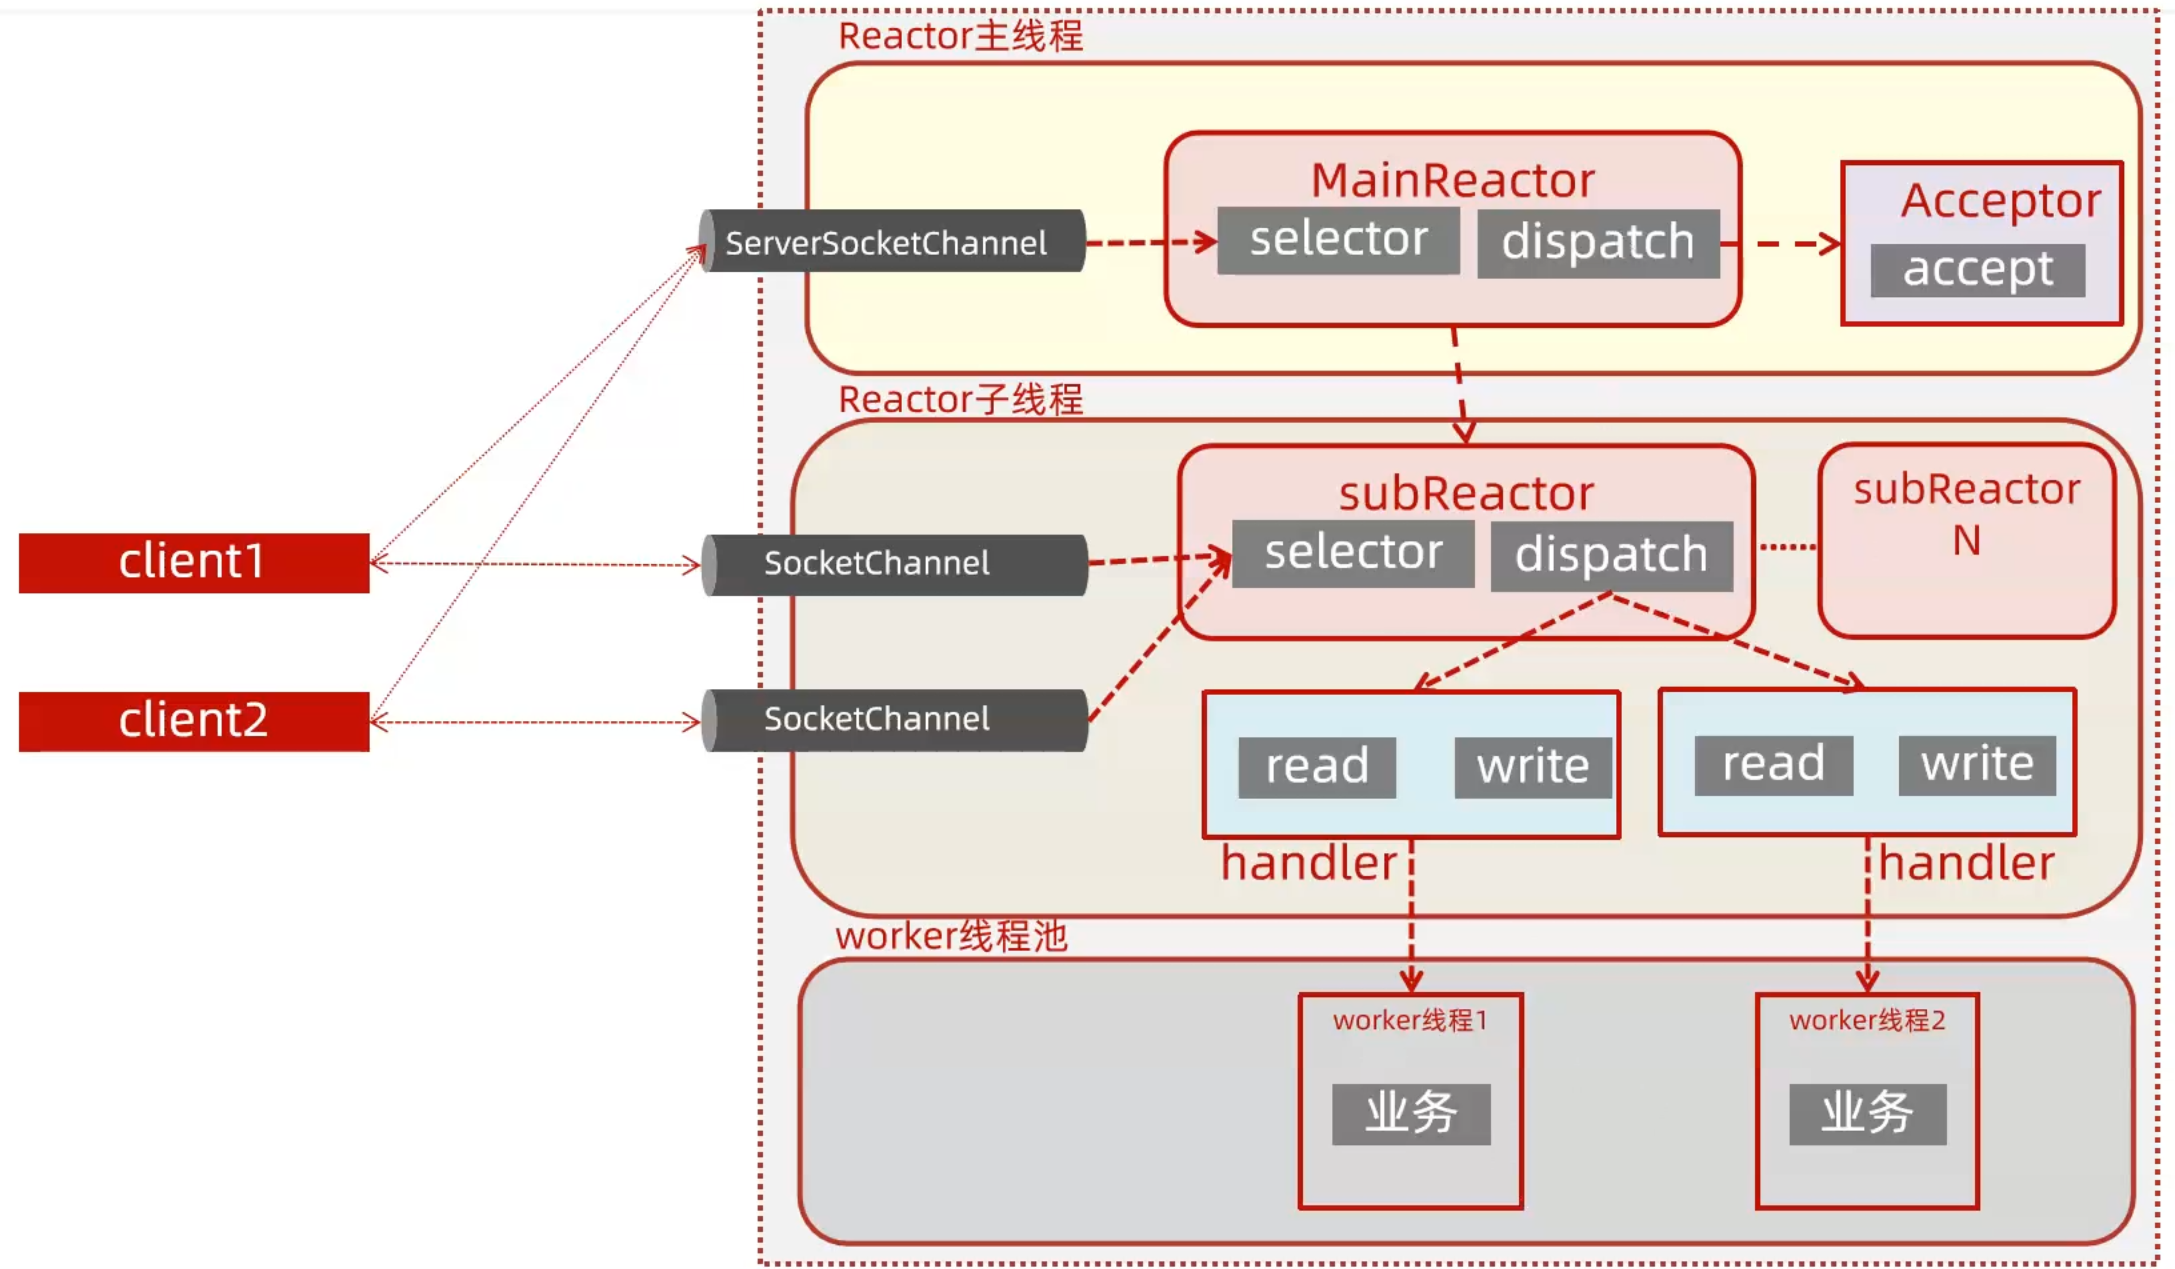 这里的 subReactor 可以有多个,但都只负责对连接建立事件的监听,已建立连接的 SocketChannel 将会注册到 MainReactor 中。
Netty 概述
Netty 是由 JBOSS 提供的一个 java 开源框架,现为 Github上的独立项目,项目地址。
Netty 提供非阻塞的、事件驱动的网络应用程序框架和工具,用以快速开发高性能、高可靠性的网络服务器和客户端程序:
- 本质:网络应用程序框架
- 实现:异步、事件驱动
- 特性:高性能、可维护、快速开发
- 用途:开发服务器和客户端
Netty 架构设计
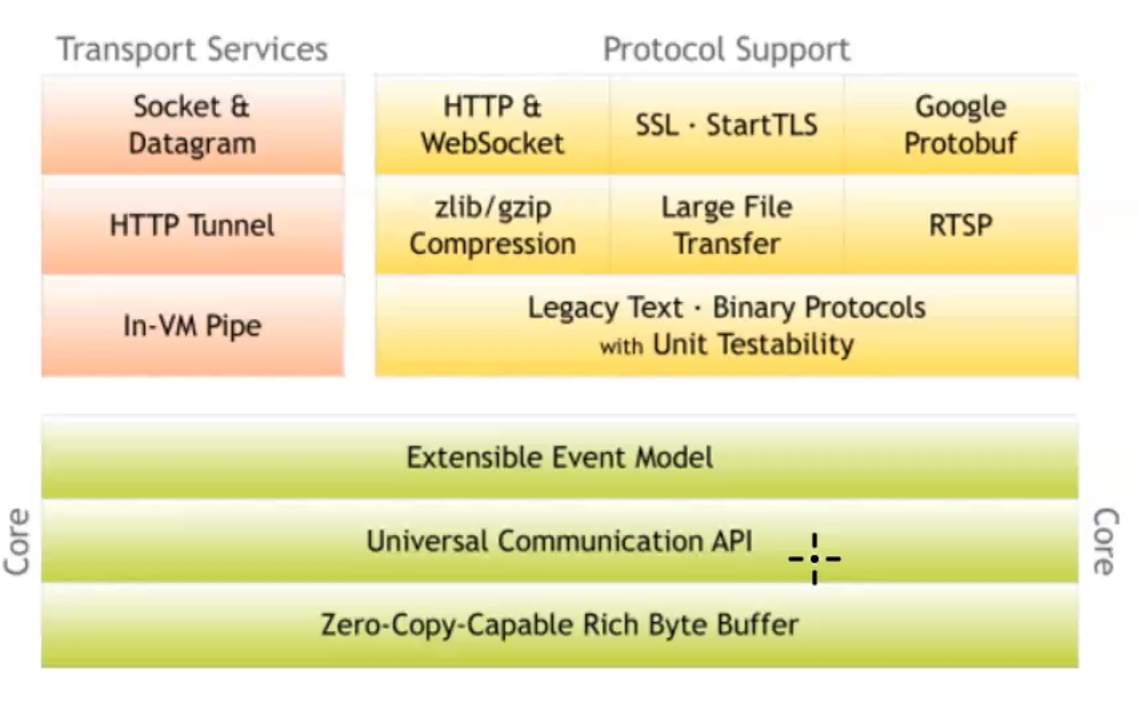
核心:
- 可扩展的事件模型
- 统一的通信api,简化了通信编码
- 零拷贝机制与丰富的字节缓冲区
传输服务:
- 支持 socket 以及 datagram(数据报)
- http传输服务
- In-VM Pipe(管道协议,是jvm的一种进程)
协议支持:
- http 以及 websocket
- SSL安全套接字协议支持
- Google Protobuf(序列化框架)
- 支持 zlib、gzip 压缩,支持大文件的传输
- RTSP(实时流传输协议,是TCP/IP协议体系中的一个应用层协议)
- 支持二进制协议并且提供了完整的单元测试
Netty 核心优势
API隔离:
- JDK 中 NIO 的一些 API 功能薄弱且复杂
- Netty 隔离了 JDK 中 NIO 的实现变化及实现细节
- 譬如:ByteBuffer -> ByteBuf 主要负责从底层的 IO 中读取数据到 ByteBuf
- 然后传递给应用程序,应用程序处理完之后封装为 ByteBuf,写回给 IO
简化开发:
- 使用 JDK 原生 API 需要对多线程要很熟悉
- 因为 NIO 涉及到 Reactor 设计模式,得对里面的原理要相当的熟悉
高可用机制:
- JDK 原生方式要实现高可用,需要自己实现断路重连、半包读写、粘包处理、失败缓存处理等相关操作
- 而 Netty 则做的更多,它解决了传输的一些问题譬如粘包半包现象,它支持常用的应用层协议,完善的断路重连等异常处理
缺陷处理
- JDK 的 NIO 存在 bug,如经典的 epoll bug,会导致 CPU100%
- 而 Netty 封装的更完善
Netty 线程模型
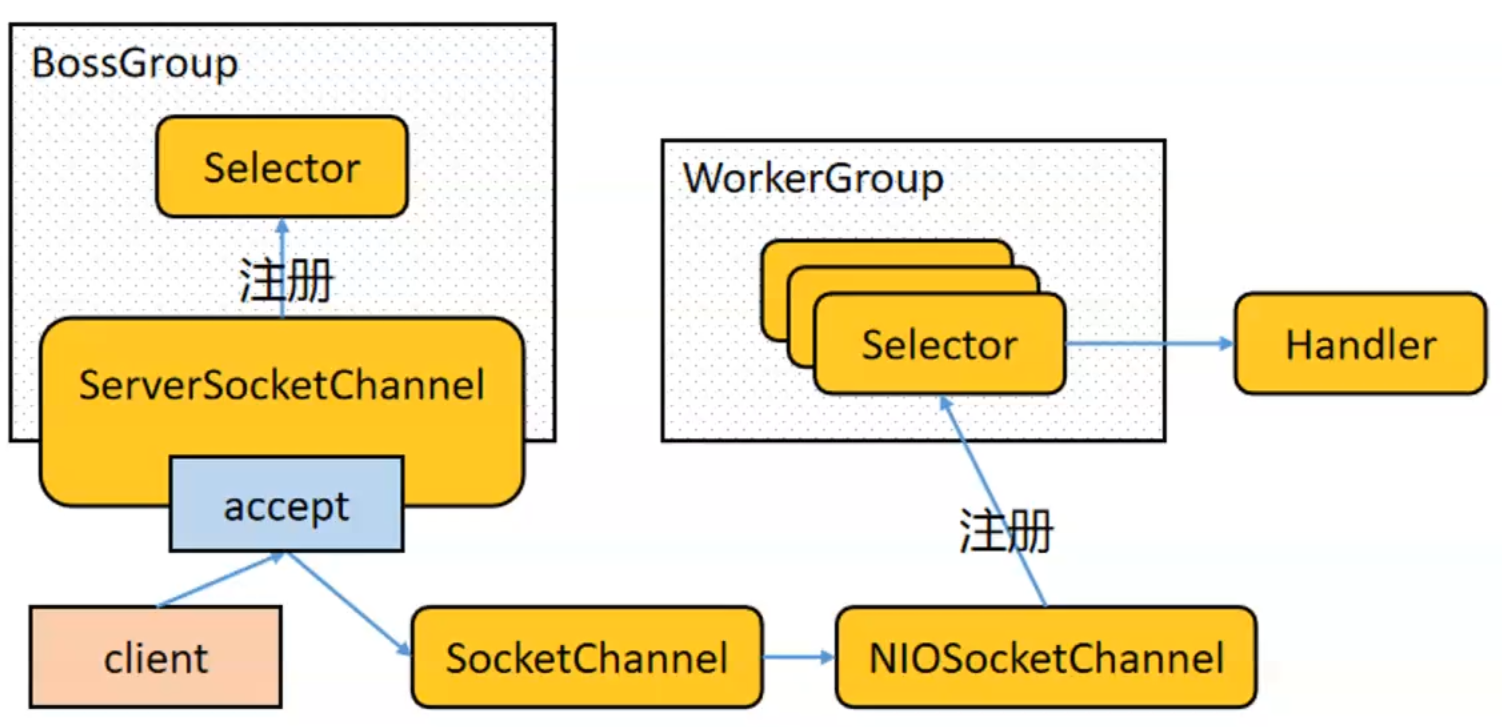
Netty 线程模型是基于 Reactor 模型实现的,对 Reactor 的三种模式都有非常好的支持,并做了一定的改进,也非常的灵活,一般情况,在服务端会采用主从架构模型。
对于主从 Reactor 架构:
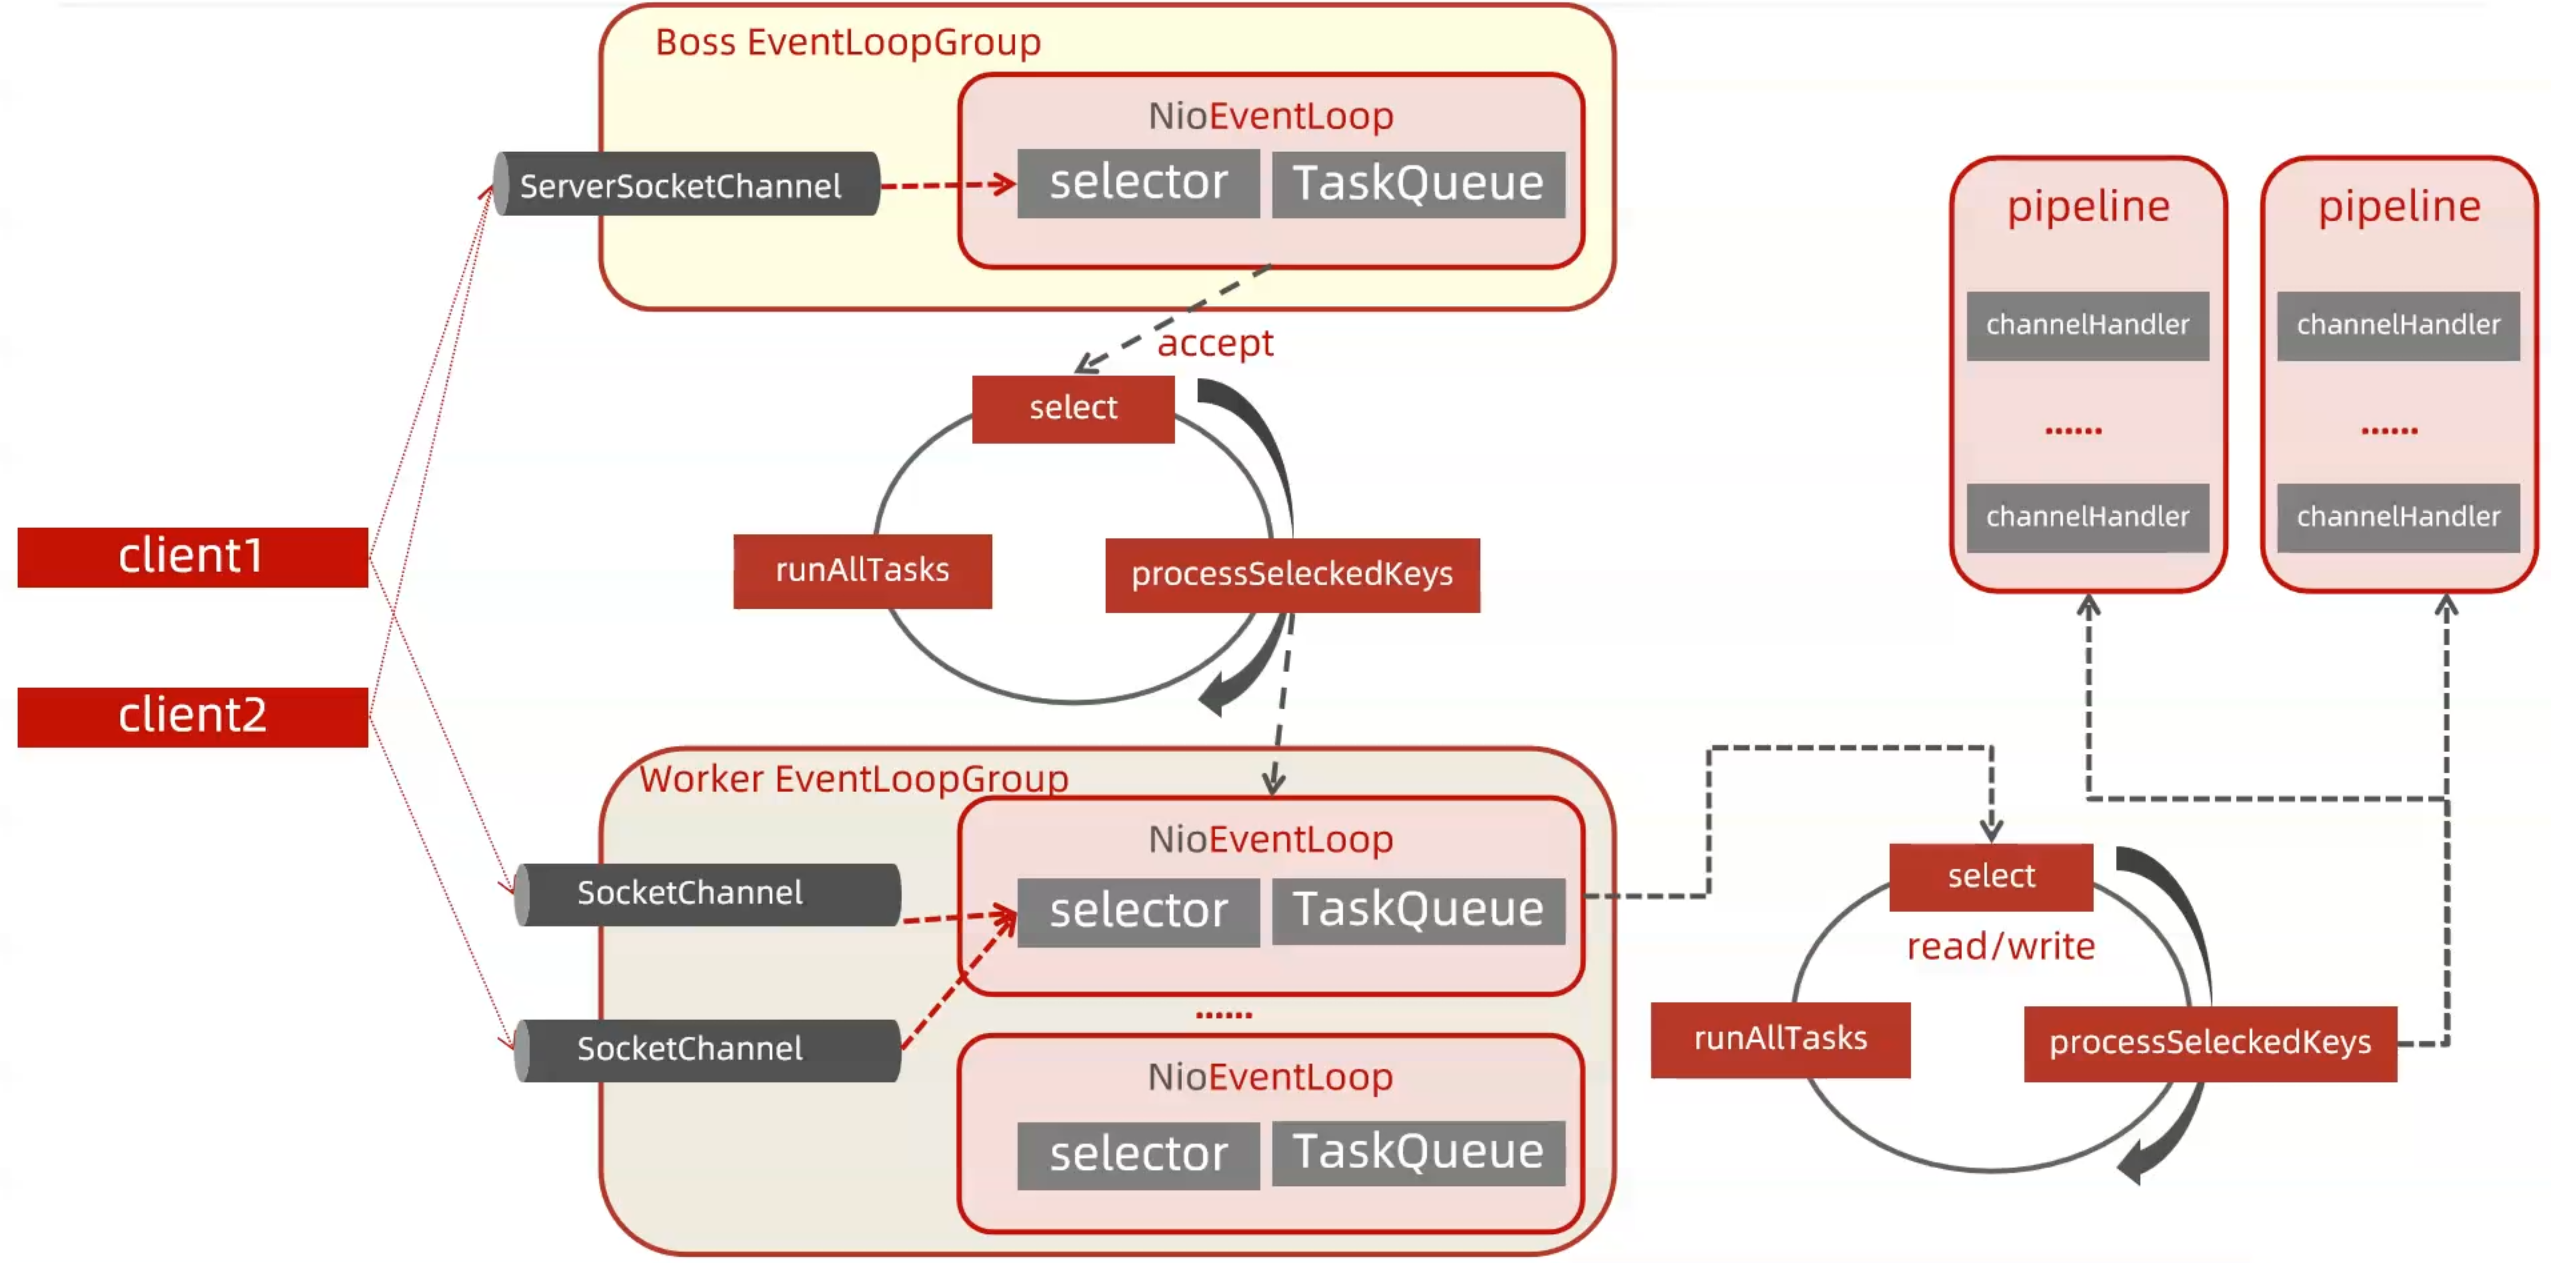
Netty 抽象出两组线程池:
- BossGroup 和 WorkerGroup,每个线程池中都有 EventLoop 线程(可以是OIO,NIO,AIO)
- BossGroup 中的线程专门负责和客户端建立连接
- WorkerGroup 中的线程专门负责处理连接上的读写
- EventLoopGroup 相当于一个事件循环组,这个组中含有多个事件循环
EventLoop 表示一个不断循环的执行事件处理的线程,每个 EventLoop 都包含一个 Selector,用于监听注册在其上的 Socket 网络连接(Channel)
每个 Boss EventLoop 中循环执行以下三个步骤:
- select:轮训注册在其上的 ServerSocketChannel 的 accept 事件(OP_ACCEPT事件)
- processSelectedKeys:处理 accept 事件,与客户端建立连接,生成一个 SocketChannel,并将其注册到某个WorkerEventLoop上的 Selector 上
- runAllTasks:再去以此循环处理任务队列中的其他任务
每个 WorkerEventLoop 中循环执行以下三个步骤:
- select:轮训注册在其上的 SocketChannel 的 read/write 事件(OP READ/OP_WRITE事件)
- processSelectedKeys:在对应的 SocketChannel上处理 read/write 事件
- runAllTasks:再去以此循环处理任务队列中的其他任务
在以上两个 processSelectedKeys 步骤中,会使用 Pipeline(管道),Pipeline中引用了 Channel,即通过 Pipeline 可以获取到对
应的Channel,Pipeline 中维护了很多的处理器(拦截处理器、过滤处理器、自定义处理器等)
Pipeline 和 Handler
ChannelPipeline 处理流程
ChannelPipeline 提供了 ChannelHandler 链的容器:

以服务端程序为例:
- 客户端发送过来的数据要接收,读取处理,我们称数据是入站的
- 入站的数据交由各个 Handler 处理,即执行具体的业务逻辑
- 如果服务器想向客户端写回数据,也需要经过一系列 Handler 处理,我们称数据是出站的
Handler 的头节点和尾节点都是初始化好的,用户无需自己实现,只需要实现中间的 Handler 即可
当一个事件如接收到数据或者异常发生时,这个事件会按照 ChannelPipeline 中的 ChannelHandler 的顺序被处理,每个ChannelHandler 可以传递给下一个,直到有一个处理器处理它或者 Pipeline 中没有更多的处理器了,这个处理过程是责任链设计模式的体现。
ChannelHandler 体系结构
在 ChannelPipeline 的处理流程中,对于入站和出站的数据,对应的 ChannelHandler 的类型不同:
- ChannellnboundHandler:入站事件处理器
- ChannelOutBoundHandler:出站事件处理器
- ChannelHandlerAdapter:提供了一些方法的默认实现,可减少用户对于ChannelHandler的编写
- ChannelDuplexHandler:混合型,既能处理入站事件又能处理出站事件
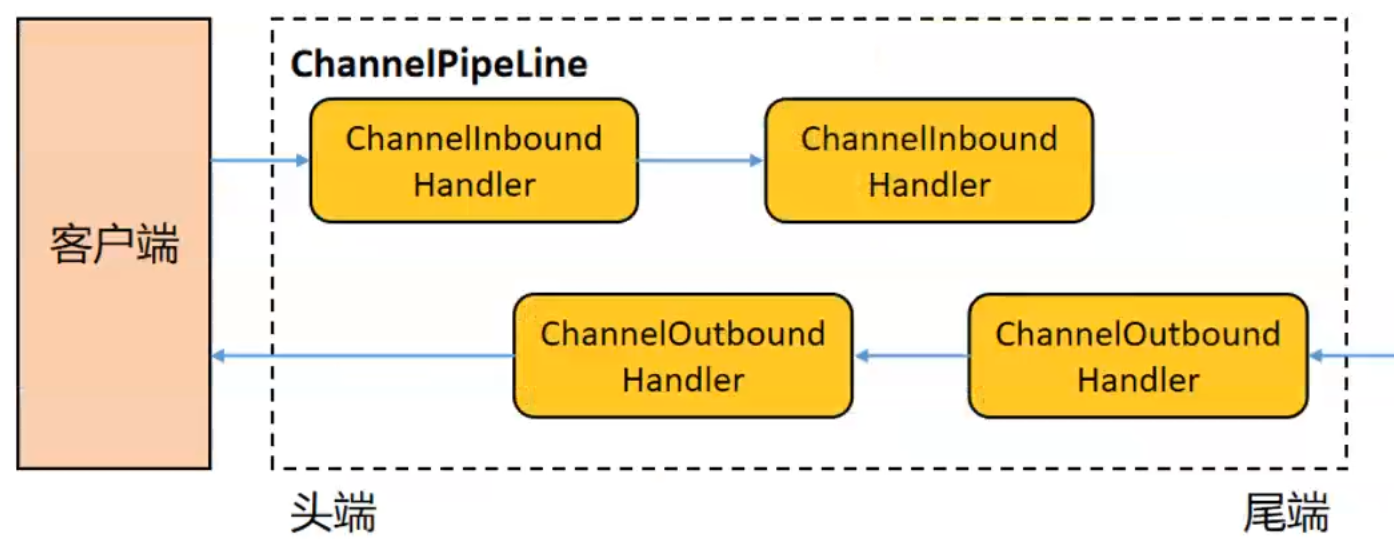
inbound 入站事件处理顺序(方向)是由链表的头到链表尾,outbound 事件的处理顺序是由链表尾到链表头:
- inbound 入站事件由 Netty 内部触发,最终由 Netty 外部的代码消费
- outbound 事件由 Netty 外部的代码触发,最终由 Netty 内部消费
Quick Start
引入依赖
<dependency><groupId>io.netty</groupId><artifactId>netty-all</artifactId><version>4.1.42.Final</version>
</dependency>
这里为了后续便于演示,添加 sl4j:
<dependency><groupId>org.slf4j</groupId><artifactId>slf4j-simple</artifactId><version>1.7.25</version>
</dependency>
<dependency><groupId>org.slf4j</groupId><artifactId>slf4j-api</artifactId><version>1.7.25</version>
</dependency>
编写 Server
配置 Server
public class NettyServer {private static final Logger log = LoggerFactory.getLogger(NettyServer.class);public static void main(String[] args) {NettyServer NettyServer = new NettyServer();NettyServer.start(8888);}public void start(int port) {//创建 bossGroup workerGroup 分别管理连接建立事件和具体的业务处理事件EventLoopGroup boss = new NioEventLoopGroup();EventLoopGroup worker = new NioEventLoopGroup();try {//创建启动引导类ServerBootstrap serverBootstrap = new ServerBootstrap();//配置参数serverBootstrap.group(boss,worker).channel(NioServerSocketChannel.class)       //指定服务端通道,用于接收并创建新连接.handler(new LoggingHandler(LogLevel.DEBUG)) // 给 boss group 配置 handler.childHandler(new ChannelInitializer<SocketChannel>() {//每个客户端 channel 初始化时都会执行该方法来配置该 channel 的相关 handler@Overrideprotected void initChannel(SocketChannel ch) throws Exception {//获取与该 channel 绑定的 pipelineChannelPipeline pipeline = ch.pipeline();//向 pipeline 中添加 handler,如果没有注册到这里则不会生效pipeline.addLast(new ServerOutboundHandler1());pipeline.addLast(new ServerInboundHandler1());pipeline.addLast(new ServerInboundHandler2());}}); //给 worker group 配置 handler//服务端绑定端口启动ChannelFuture future = serverBootstrap.bind(port).sync();//服务端监听端口关闭future.channel().closeFuture().sync();} catch (Exception e) {log.error("netty server error ,{}",e.getMessage());} finally {//优雅关闭 boss workerboss.shutdownGracefully();worker.shutdownGracefully();}}
}
这样我们就配置好了服务端,我们需要做的就是完成 worker 的 Pipeline 中各个 Handler 的处理逻辑即可
编写 Handler
对于入站处理数据,需要一个 Inbound 类型的 Handler:
public class ServerInboundHandler1 extends ChannelInboundHandlerAdapter {private static final Logger log = LoggerFactory.getLogger(ServerInboundHandler1.class);/*** 通道准备就绪时** @param ctx* @throws Exception*/@Overridepublic void channelActive(ChannelHandlerContext ctx) throws Exception {log.info("ServerInboundHandler1 channelActive-----");//将事件向下传递ctx.fireChannelActive();}/*** 通道有数据可读时** @param ctx* @param msg* @throws Exception*/@Overridepublic void channelRead(ChannelHandlerContext ctx, Object msg) throws Exception {log.info("ServerInboundHandler1 channelRead----,remoteAddress={}", ctx.channel().remoteAddress());//处理接收的数据ByteBuf buf = (ByteBuf) msg;log.info("ServerInboundHandler1:received client data = {}", buf.toString(StandardCharsets.UTF_8));//将事件消息向下传递,如果不传递则 msg 不会到达下一个 handlerctx.fireChannelRead(msg);}/*** 数据读取完毕时** @param ctx* @throws Exception*/@Overridepublic void channelReadComplete(ChannelHandlerContext ctx) throws Exception {log.info("channelReadComplete----");//数据读取结束后向客户端写回数据byte[] data = "hello client , i am server".getBytes(StandardCharsets.UTF_8);ByteBuf buffer = Unpooled.buffer(data.length);buffer.writeBytes(data);//以bytebuf为中心,看是写到bytebuf中还是从bytebuf中读ByteBuf buf = Unpooled.copiedBuffer("hello client , i am server", StandardCharsets.UTF_8);ctx.writeAndFlush(buf);//通过ctx写,事件会从当前handler向pipeline头部移动//ctx.channel().writeAndFlush(buf);//通过Channel写,事件会从通道尾部向头部移动}/*** 发生异常时** @param ctx* @param cause* @throws Exception*/@Overridepublic void exceptionCaught(ChannelHandlerContext ctx, Throwable cause) throws Exception {log.info("ServerInboundHandler1 exceptionCaught----,cause={}", cause.getMessage());}
}
这里要注意,如果该 Handler 需要向下传递数据,即要让他之后的 Handler 也拿到 msg,需要在 channelRead 内 ChannelHandlerContext 的 fireChannelRead 方法
再来一个 ServerInboundHandler2 进行 msg 传递测试:
public class ServerInboundHandler2 extends ChannelInboundHandlerAdapter {private static final Logger log = LoggerFactory.getLogger(ServerInboundHandler2.class);@Overridepublic void channelActive(ChannelHandlerContext ctx) throws Exception {log.info("ServerInboundHandler2 channelActive-----");}@Overridepublic void channelRead(ChannelHandlerContext ctx, Object msg) throws Exception {log.info("ServerInboundHandler2 channelRead----,remoteAddress={}", ctx.channel().remoteAddress());//处理接收的数据ByteBuf buf = (ByteBuf) msg;log.info("ServerInboundHandler2:received client data = {}", buf.toString(StandardCharsets.UTF_8));}@Overridepublic void channelReadComplete(ChannelHandlerContext ctx) throws Exception {log.info("ServerInboundHandler2 channelReadComplete----");}@Overridepublic void exceptionCaught(ChannelHandlerContext ctx, Throwable cause) throws Exception {}
}
在数据处理完后,会由 tail 节点写回,我们也可以编写 Outbound 类型的 Handler 来添加对出站数据的处理:
public class ServerInboundHandler1 extends ChannelInboundHandlerAdapter {private static final Logger log = LoggerFactory.getLogger(ServerInboundHandler1.class);/*** 通道准备就绪时** @param ctx* @throws Exception*/@Overridepublic void channelActive(ChannelHandlerContext ctx) throws Exception {log.info("ServerInboundHandler1 channelActive-----");//将事件向下传递//ctx.fireChannelActive();super.channelActive(ctx);}/*** 通道有数据可读时** @param ctx* @param msg* @throws Exception*/@Overridepublic void channelRead(ChannelHandlerContext ctx, Object msg) throws Exception {log.info("ServerInboundHandler1 channelRead----,remoteAddress={}", ctx.channel().remoteAddress());//处理接收的数据ByteBuf buf = (ByteBuf) msg;log.info("ServerInboundHandler1:received client data = {}", buf.toString(StandardCharsets.UTF_8));//将事件消息向下传递,如果不传递则 msg 不会到达下一个 handlerctx.fireChannelRead(msg);
//        super.channelRead(ctx, msg);}/*** 数据读取完毕时** @param ctx* @throws Exception*/@Overridepublic void channelReadComplete(ChannelHandlerContext ctx) throws Exception {log.info("channelReadComplete----");//数据读取结束后向客户端写回数据byte[] data = "hello client , i am server".getBytes(StandardCharsets.UTF_8);ByteBuf buffer = Unpooled.buffer(data.length);buffer.writeBytes(data);//以bytebuf为中心,看是写到bytebuf中还是从bytebuf中读ByteBuf buf = Unpooled.copiedBuffer("hello client , i am server", StandardCharsets.UTF_8);ctx.writeAndFlush(buf);//通过ctx写,事件会从当前handler向pipeline头部移动//ctx.channel().writeAndFlush(buf);//通过Channel写,事件会从通道尾部向头部移动}/*** 发生异常时** @param ctx* @param cause* @throws Exception*/@Overridepublic void exceptionCaught(ChannelHandlerContext ctx, Throwable cause) throws Exception {log.info("ServerInboundHandler1 exceptionCaught----,cause={}", cause.getMessage());}
}
这里注意,在写回数据时;
- 如果调用的是
ctx.channel().writeAndFlush():则会从 tail 节点从后往前寻找 Outbound 类型的 Handler 节点处理 - 如果调用的是
ctx.writeAndFlush():则会从当前的 Handler 流向 head
编写 Client
配置 Client
public class NettyClient {private static final Logger log = LoggerFactory.getLogger(NettyClient.class);public static void main(String[] args) {NettyClient client = new NettyClient();client.start("127.0.0.1", 8888);}public void start(String host, int port) {EventLoopGroup group = new NioEventLoopGroup();try {Bootstrap bootstrap = new Bootstrap();bootstrap.group(group).channel(NioSocketChannel.class).handler(new ChannelInitializer<SocketChannel>() {@Overrideprotected void initChannel(SocketChannel ch) throws Exception {ChannelPipeline pipeline = ch.pipeline();//添加客户端 channel 对应的 handlerpipeline.addLast(new ClientInboundHandler1());pipeline.addLast(new ClientSimpleInboundHandler2());}});//连接远程启动ChannelFuture future = bootstrap.connect(host, port).sync();//监听通道关闭future.channel().closeFuture().sync();} catch (Exception e) {log.error("netty client error ,msg={}", e.getMessage());} finally {//优雅关闭group.shutdownGracefully();}}
}
和服务端一样,只不过客户端不需要 worker,只需要完成当前 Pipeline 中各个 Handler 的处理逻辑即可
编写 Handler
public class ClientInboundHandler1 extends ChannelInboundHandlerAdapter {private static final Logger log = LoggerFactory.getLogger(ClientInboundHandler1.class);/*** 通道准备就绪** @param ctx* @throws Exception*/@Overridepublic void channelActive(ChannelHandlerContext ctx) throws Exception {log.info("ClientInboundHandler1 channelActive begin send data");//通道准备就绪后开始向服务端发送数据ByteBuf buf = Unpooled.copiedBuffer("hello server,i am client".getBytes(StandardCharsets.UTF_8));ctx.writeAndFlush(buf);}/*** 通道有数据可读(服务端返回了数据)** @param ctx* @param msg* @throws Exception*/@Overridepublic void channelRead(ChannelHandlerContext ctx, Object msg) throws Exception {log.info("ClientInboundHandler1 channelRead");ByteBuf buf = (ByteBuf) msg;log.info("ClientInboundHandler1: received server data ={}", buf.toString(StandardCharsets.UTF_8));// 接着传递消息给下一个 ChannelInboundHandlerctx.fireChannelRead(msg);}/*** 数据读取完毕** @param ctx* @throws Exception*/@Overridepublic void channelReadComplete(ChannelHandlerContext ctx) throws Exception {super.channelReadComplete(ctx);}/*** 产生了异常** @param ctx* @param cause* @throws Exception*/@Overridepublic void exceptionCaught(ChannelHandlerContext ctx, Throwable cause) throws Exception {super.exceptionCaught(ctx, cause);}
}
同样的,Client 的 ChannelInboundHandler 在 channelRead 也需要 fireChannelRead 才能将 msg 向后传递
这里继续编写一个 Handler 用于测试 msg 传递:
public class ClientSimpleInboundHandler2 extends SimpleChannelInboundHandler<ByteBuf> {private static final Logger log = LoggerFactory.getLogger(ClientSimpleInboundHandler2.class);@Overrideprotected void channelRead0(ChannelHandlerContext ctx, ByteBuf msg) throws Exception {log.info("ClientSimpleInboundHandler2 channelRead");log.info("ClientSimpleInboundHandler2: received server data ={}", msg.toString(StandardCharsets.UTF_8));}}
Netty 核心组件剖析
这里我们仍然基于上述的 Netty 线程模型来看:

Bootstrap
Bootstrap 是引导的意思,它的作用是配置整个 Netty 程序,将各个组件都串起来,最后绑定端口、启动 Netty 服务
Netty 中提供了两种类型的引导类:
- 用于客户端的 Bootstrap
- 用于服务端的 ServerBootstrap
ServerBootstrap 将绑定到一个端口,因为服务器必须要监听连接,而 Bootstrap 则是由想要连接到远程节点的客户端应用程序所使用的
引导一个客户端只需要一个 EventLoopGroup,但是一个 ServerBootstrap 则需要两个
Channel
Netty 中的 Channel 是与网络套接字相关的,可以理解为是 socket 连接
在客户端与服务端连接的时候就会建立一个Channel,它负责基本的 IO 操作,比如:bind()、connecti()、read()、write()等
主要作用:
- 通过 Channel 可获得当前网络连接的通道状态
- 通过Channel 可获得网络连接的配置参数(缓冲区大小等)
- Channel 提供异步的网络I/O操作,比如连接的建立、数据的读写、端口的绑定等
不同协议、不同的 I/O 类型的连接都有不同的 Channel 类型与之对应
EventLoopGroup & EventLoop
Netty 是基于事件驱动的,比如:连接注册,连接激活;数据读取;异常事件等等,有了事件,就需要一个组件去监控事件的产生和事件的协调处理——这个组件就是 EventLoop(事件循环/EventExecutor)
在 Netty 中,每个 Channel 都会被分配到一个 EventLoop,一个 EventLoop 可以服务于多个 Channel,每个 EventLoop 会占用一个Thread,同时这个 Thread 会处理 EventLoop 上面发生的所有 IO 操作和事件
EventLoopGroup 是用来生成 EventLoop 的,包含了一组 EventLoop,可以初步理解成 Netty 线程池
在我们之前的示例代码中,EventLoopGroup 是接口,我们采用的实现是 NioEventLoopGroup:
// 主线程,不处理任何业务逻辑,只是接收客户的连接请求
EventLoopGroup boss = new NioEventLoopGroup();
// 工作线程,处理注册其上 Channel的 I/O 事件及其他 Task
EventLoopGroup worker = new NioEventLoopGroup();
这里查看 NioEventLoopGroup 源码,继承自 MultithreadEventLoopGroup:
private static final int DEFAULT_EVENT_LOOP_THREADS = Math.max(1, SystemPropertyUtil.getInt("io.netty.eventLoopThreads", NettyRuntime.availableProcessors() * 2));
其中 DEFAULT_EVENT_LOOP_THREADS 表示默认的核心线程数:
-
核心线程数默认为 max(1, CPU 核心数 * 2)
-
核心线程数在创建时可通过构造函数指定
对于 bossgroup,我们其实也只用到了其中的一个线程,因为服务端一般只会绑定一个端口启动
ChannelHandler 复用
每个客户端 Channel 创建后初始化时均会向与该 Channel 绑定的 Pipeline 中添加 Handler,此种模式下,每个 Channel 享有的是各自独立的 Handler,例如之前 NettyServer 中的配置初始化:
.childHandler(new ChannelInitializer<SocketChannel>() {//每个客户端 channel 初始化时都会执行该方法来配置该 channel 的相关 handler@Overrideprotected void initChannel(SocketChannel ch) throws Exception {//获取与该 channel 绑定的 pipelineChannelPipeline pipeline = ch.pipeline();//向 pipeline 中添加 handler,如果没有注册到这里则不会生效pipeline.addLast(new ServerOutboundHandler1());pipeline.addLast(new ServerInboundHandler1());pipeline.addLast(new ServerInboundHandler2());}
原先上述方式会给每次新注册进来的 Channel 初始化新的 Handler,如果我们稍作修改:
public class NettyServer {private static final Logger log = LoggerFactory.getLogger(NettyServer.class);public static void main(String[] args) {NettyServer NettyServer = new NettyServer();NettyServer.start(8888);}public void start(int port) {//创建 bossGroup workerGroup 分别管理连接建立事件和具体的业务处理事件EventLoopGroup boss = new NioEventLoopGroup();EventLoopGroup worker = new NioEventLoopGroup();// 只创建一次 serverInboundHandler2 对象ServerInboundHandler2 serverInboundHandler2 = new ServerInboundHandler2();try {//创建启动引导类ServerBootstrap serverBootstrap = new ServerBootstrap();//配置参数serverBootstrap.group(boss,worker).channel(NioServerSocketChannel.class)       //指定服务端通道,用于接收并创建新连接.handler(new LoggingHandler(LogLevel.DEBUG)) // 给 boss group 配置 handler.childHandler(new ChannelInitializer<SocketChannel>() {//每个客户端 channel 初始化时都会执行该方法来配置该 channel 的相关 handler@Overrideprotected void initChannel(SocketChannel ch) throws Exception {//获取与该 channel 绑定的 pipelineChannelPipeline pipeline = ch.pipeline();//向 pipeline 中添加 handler,如果没有注册到这里则不会生效pipeline.addLast(new ServerOutboundHandler1());pipeline.addLast(new ServerInboundHandler1());// 在这里对 serverInboundHandler2 进行复用pipeline.addLast(serverInboundHandler2);}}); //给 worker group 配置 handlerChannelFuture future = serverBootstrap.bind(port).sync();future.channel().closeFuture().sync();} catch (Exception e) {log.error("netty server error ,{}",e.getMessage());} finally {//优雅关闭 boss workerboss.shutdownGracefully();worker.shutdownGracefully();}}
}
如果我们此时直接运行两个 NettyClient 实例并且绑定到这个 NettyServer,则第二个运行的实例将会报错:
[nioEventLoopGroup-2-1] INFO handler.client.ClientInboundHandler1 - ClientInboundHandler1 channelActive begin send data
[nioEventLoopGroup-2-1] WARN io.netty.channel.DefaultChannelPipeline - An exceptionCaught() event was fired, and it reached at the tail of the pipeline. It usually means the last handler in the pipeline did not handle the exception.
java.io.IOException: 你的主机中的软件中止了一个已建立的连接。at java.base/sun.nio.ch.SocketDispatcher.read0(Native Method)at java.base/sun.nio.ch.SocketDispatcher.read(SocketDispatcher.java:46)at java.base/sun.nio.ch.IOUtil.readIntoNativeBuffer(IOUtil.java:330)at java.base/sun.nio.ch.IOUtil.read(IOUtil.java:284)at java.base/sun.nio.ch.IOUtil.read(IOUtil.java:259)at java.base/sun.nio.ch.SocketChannelImpl.read(SocketChannelImpl.java:417)at io.netty.buffer.PooledByteBuf.setBytes(PooledByteBuf.java:247)at io.netty.buffer.AbstractByteBuf.writeBytes(AbstractByteBuf.java:1147)at io.netty.channel.socket.nio.NioSocketChannel.doReadBytes(NioSocketChannel.java:347)at io.netty.channel.nio.AbstractNioByteChannel$NioByteUnsafe.read(AbstractNioByteChannel.java:148)at io.netty.channel.nio.NioEventLoop.processSelectedKey(NioEventLoop.java:700)at io.netty.channel.nio.NioEventLoop.processSelectedKeysOptimized(NioEventLoop.java:635)at io.netty.channel.nio.NioEventLoop.processSelectedKeys(NioEventLoop.java:552)at io.netty.channel.nio.NioEventLoop.run(NioEventLoop.java:514)at io.netty.util.concurrent.SingleThreadEventExecutor$6.run(SingleThreadEventExecutor.java:1044)at io.netty.util.internal.ThreadExecutorMap$2.run(ThreadExecutorMap.java:74)at io.netty.util.concurrent.FastThreadLocalRunnable.run(FastThreadLocalRunnable.java:30)at java.base/java.lang.Thread.run(Thread.java:840)Process finished with exit code 0
如果想要实现 ChannelHandler 复用,则只需要在对应需要复用的 Handler 上添加 @Shareble 注解即可:

对 ServerInboundHandler2 添加注解即可:
@ChannelHandler.Sharable
public class ServerInboundHandler2 extends ChannelInboundHandlerAdapter {private static final Logger log = LoggerFactory.getLogger(ServerInboundHandler2.class);@Overridepublic void channelActive(ChannelHandlerContext ctx) throws Exception {log.info("ServerInboundHandler2 channelActive-----");}@Overridepublic void channelRead(ChannelHandlerContext ctx, Object msg) throws Exception {log.info("ServerInboundHandler2 channelRead----,remoteAddress={}", ctx.channel().remoteAddress());//处理接收的数据ByteBuf buf = (ByteBuf) msg;log.info("ServerInboundHandler2:received client data = {}", buf.toString(StandardCharsets.UTF_8));}@Overridepublic void channelReadComplete(ChannelHandlerContext ctx) throws Exception {log.info("ServerInboundHandler2 channelReadComplete----");}@Overridepublic void exceptionCaught(ChannelHandlerContext ctx, Throwable cause) throws Exception {}
}
SimpleChannelInboundHandler
对于编写 Netty 数据入站处理器,可以选择继承 ChannellnboundHandlerAdapter,也可以选择继 SimpleChannellnboundHandlers<I> 区别是什么?
对于继承了 ChannellnboundHandlerAdapter 的 channelRead 方法:
@Overridepublic void channelRead(ChannelHandlerContext ctx, Object msg) throws Exception {log.info("ServerInboundHandler1 channelRead----,remoteAddress={}", ctx.channel().remoteAddress());//处理接收的数据ByteBuf buf = (ByteBuf) msg;log.info("ServerInboundHandler1:received client data = {}", buf.toString(StandardCharsets.UTF_8));//将事件消息向下传递,如果不传递则 msg 不会到达下一个 handlerctx.fireChannelRead(msg);}
其中 msg 是 Object 类型的,因此在当前 Handler 处理时需要判断上一个 Handler 处理的 msg 是什么类型的,在之前的示例中,我们默认了处理的 msg 都是 ByteBuf 类型,每次处理都要做强制转换。
对于 SimpleChannellnboundHandlers<I>,本质上也是继承自 ChannellnboundHandlerAdapter,但仅仅对其中的 channelRead 方法进行了重写:
public void channelRead(ChannelHandlerContext ctx, Object msg) throws Exception {boolean release = true;try {// 判断是否是接收if (this.acceptInboundMessage(msg)) {// 调用 channelRead0 方法this.channelRead0(ctx, msg);} else {release = false;ctx.fireChannelRead(msg);}} finally {if (this.autoRelease && release) {// 对原始资源释放ReferenceCountUtil.release(msg);}}}
继承 SimpleChannellnboundHandler 需要重写channelRead0方法,且可以通过泛型指定 msg 类型:
protected abstract void channelRead0(ChannelHandlerContext var1, I var2) throws Exception;
是一个抽象方法,参数将 var2 作为泛型指定,因此在使用 SimpleChannellnboundHandlers<I> 指定的类型后,只需要重写 channelRead0 方法可以帮我们把 msg 来转换。
注意:
- SimpleChannellnboundHandler 在接收到数据后会自动 release 掉数据占用的 Bytebuffer 资源
- 服务端异步处理数据,服务端想把客户端发送来的数据再写回等等场景下最好不要继承 SimpleChannellnboundHandler
- 客户端推荐使用 SimpleChannellnboundHandler,服务端看场景
ByteBuf
基础定义
Java NIO 提供了 ByteBuffer 作为它的字节容器,但是这个类使用起来过于复杂,而且也有些繁琐。
Netty 使用 ByteBuf 来替代 ByteBuffer,它是一个强大的实现,既解决了 JDK API 的局限性,又为网络应用程序的开发者提供了更好的 API。
从结构上来说:
- ByteBuf由一串字节数组构成,数组中每个字节用来存放信息
- ByteBuf提供了两个索引,一个用于读取数据(readerlndex),一个用于写入数据(writerlndex)
- 这两个索引通过在字节数组中移动,来定位需要读或者写信息的位置
- 而 JDK 的 ByteBuffer 只有一个索引,因此需要使用flip方法进行读写切换
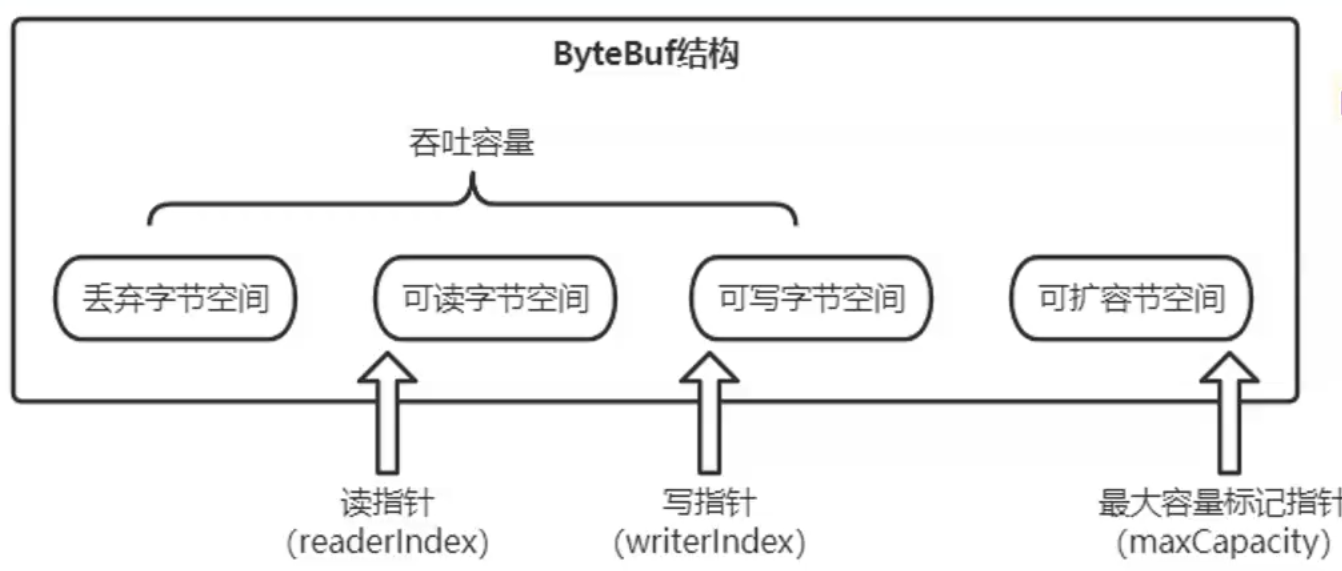
- readerlndex:
- 指示读取的起始位置
- 每读取一个字节,readerlndex 自增累加 1
- 如果 readerlndex与 writerlndex 相等,ByteBuf 不可读
- writerlndex:
- 指示写入的起始位置
- 每写入一个字节,writelndex自增累加l
- 如果增加到 writerlndex 与 capacity() 容量相等,表示 ByteBuf 已经不可写
- maxCapacity:
- 指示 ByteBuf 可以扩容的最大容量
- 如果向 ByteBuf 写入数据时,容量不足,该值表示可以进行扩容的最大容量
如果 writerlndex 与 capacity() 容量相等时继续向 ByteBuf 中写数据,Netty 会自动扩容 ByteBuf,直到扩容到底层的内存大小为 maxCapacity
三种模式
- 堆缓冲区(HeapByteBuf):
- 内存分配在JVM堆,分配和回收速度比较快,可以被JVM自动回收
- 缺点是:如果进行 socket 的 IO 读写,需要额外做一次内存复制,将堆内存对应的缓冲区复制到内核 Channe l中,性能会有一定程度的下降
- 由于在堆上被 JVM管理,在不被使用时可以快速释放,可以通过ByteBuf.array() 来获取 byte[] 数据
- 直接缓冲区(DirectByteBuf):
- 内存分配的是堆外内存(系统内存),相比堆内存,它的分配和回收速度会慢一些
- 但是将它写入或从 Socket Channel 中读取时,由于减少了一次内存拷贝,速度比堆内存块
- 复合缓冲区(CompositeByte Buf):
- 将两个不同的缓冲区从逻辑上合并,让使用更加方便
Netty 默认使用的是DirectByteBuf,如果需要使用HeapByteBuf模式,则需要进行系统参数的设置:
// 设置 HeapByteBuf 模式,但 ByteBuf 的分配器 ByteBufAllocator 要设置为非池化,否则不能切换到堆缓冲器模式
System.setProperty("io.netty.noUnsafe","true");
BufAllocator
Netty 提供了两种 ByteBufAllocator 的实现,分别是:
- PooledByteBufAllocator:
- 实现了 ByteBuf 的对象的池化,提高性能减少并最大限度地减少内存碎片
- 池化思想:通过预先申请一块专用内存地址作为内存池进行管理,从而不需要每次都进行分配和释放
- UnpooledByteBufAllocator:
- 没有实现对象的池化,每次会生成新的对象实例
Netty 默认使用了PooledByteBufAllocator,但可以通过引导类设置非池化模式
参考源码 DefaultChannelConfig 中的 allocator属性:
//引导类中设置非池化模式
bootstrap.childOption(ChannelOption.ALLOCATOR,UnpooledByteBufAllocator.DEFAULT)
//或者通过系统参数设置
System.setProperty("io.netty.allocator.type","pooled");
System.setProperty("io.netty.allocator.type","unpooled");
对于 Pooled 类型的 ByteBuf :
- 不管是 PooledDirectByteBuf 还是 PooledHeapByteBufa 都只能由 Netty 内部自己使用(构造是私有和受保护的)
- 开发者可以使用 Unpooled 类型的 ByteBuf
Netty 提供 Unpooled 工具类创建的 ByteBuf 都是 unpooled 类型,默认采用的 Allocator 是 direct 类型;当然用户可以自己选择创建 UnpooledDirectByteBuf 和 UnpooledHeapByteBuf
ByteBuf 释放机制
ByteBuf 不同模式下的释放:
- ByteBuf 如果采用的是堆缓冲区模式的话,可以由GC回收
- 但是如果采用的是直接缓冲区,就不受GC的管理,就得手动释放,否则会发生内存泄露
Netty 自身引入了引用计数,提供了 ReferenceCounted 接口,当对象的引用计数 > 0 时要保证对象不被释放,当为 0 时需要被释放,这里分为手动释放和自动释放:
- 手动释放:
- 就是在使用完成后,调用ReferenceCountUtil.release(byte Buf) 进行释放
- 这种方式的弊端就是一旦忘记释放就可能会造成内存泄露
- 自动释放:
- 有三种方式,分别是入站的TailHandler(TailContext)、继承SimpleChannellnboundHandler 和 HeadHandler(HeadContext)的出站释放
- TailContext:Inbound 流水线的末端,如果前面的nandler都把消息向后传递最终由TailContext释放该消息,需
要注意的是,如果没有进行向下传递,是不会进行释放操作的 - SimpleChannellnboundHandler:自定义的 InboundHandler 继承自 SimpleChannellnboundHandler,在 SimpleChannellnboundHandler 中自动释放
- HeadContext:outbound:流水线的末端,出站消息一般是由应用所申请,到达最后一站时,经过一轮复杂的调用,在 flush 完成后终将被 release 掉
总结:
- 对于入站消息:
- 对原消息不做处理,依次调用 ctx.fireChannelRead(msg) 把原消息往下传,如果能到TailContext,那不用做什么释放,它会自动释放
- 将原消息转化为新的消息并调用 ctx.fireChannelRead(newMsg) 往下传,那需要将原消息 release 掉
- 如果已经不再调用 ctx.fireChannelRead(msg) 传递任何消息,需要把原消息 release 掉
- 对于出站消息:
- 无需用户关心
- 消息最终都会走到 HeadContext,flush 之后会自动释放
Future & Promise
Netty 的异步编程模型
对于 JDK5 的 Future 来说,在调用 Future 后想要得到任务执行的返回值必须要通过 future. get() 方法监听 future 对象中 result 字段,因此这种方式会导致线程阻塞。
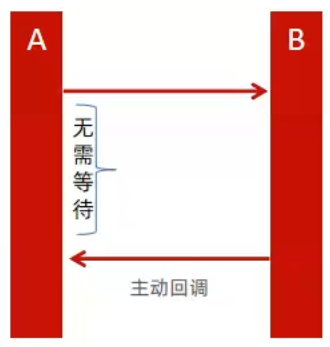
对于 Netty 来说,其的异步模型为 Future/Promise 异步模型:
- future和promise,目的是将值(future)与其计算方式(promise)分离,从而允许更灵活地进行计算,特别是通过并行化。
- Future表示目标计算的返回值,Promise表示计算的方式,这个模型将返回结果和计算逻辑分离,目的是为了让计算逻辑不影响返回结果,从而抽象出一套异步编程模型。而计算逻辑与结果关联的纽带就是callback。
- Netty中有非常多的异步调用,譬如:client/server的启动,连接,数据的读写等操作都是支持异步的。
对于JDK8来说,新增加了一个类:CompletableFuture,它提供了非常强大的 Future 的扩展功能,最重要的是实现了回调的功能
Netty Future
Netty 中使用了一个 ChannelFuture 来实现异步操作,其中 ChannelFuture 继承自 io.netty.util.concurrent.Future 接口:
public interface Future<V> extends java.util.concurrent.Future<V> {// 只有IO操作完成时才返回trueboolean isSuccess();// 只有当cancel(boolean)成功取消时才返回trueboolean isCancellable();// IO操作发生异常时,返回导致IO操作以此的原因,如果没有异常,返回nullThrowable cause();// 向Future添加事件,future完成时,会执行这些事件,如果add时future已经完成,会立即执行监听事件Future<V> addListener(GenericFutureListener<? extends Future<? super V>> listener);Future<V> addListeners(GenericFutureListener<? extends Future<? super V>>... listeners);// 移除监听事件,future完成时,不会触发Future<V> removeListener(GenericFutureListener<? extends Future<? super V>> listener);Future<V> removeListeners(GenericFutureListener<? extends Future<? super V>>... listeners);// 等待future doneFuture<V> sync() throws InterruptedException;// 等待future done,不可打断Future<V> syncUninterruptibly();// 等待future完成Future<V> await() throws InterruptedException;// 等待future 完成,不可打断Future<V> awaitUninterruptibly();boolean await(long timeout, TimeUnit unit) throws InterruptedException;boolean await(long timeoutMillis) throws InterruptedException;boolean awaitUninterruptibly(long timeout, TimeUnit unit);boolean awaitUninterruptibly(long timeoutMillis);// 立刻获得结果,如果没有完成,返回nullV getNow();// 如果成功取消,future会失败,导致CancellationException@Overrideboolean cancel(boolean mayInterruptIfRunning);
Netty 自己实现的 Future 继承了 JDK 的 Future,新增了 sync() 和await() 用于阻塞等待,还加了 Listeners,只要任务结束去回调 Listener 就可以了,那么我们就不一定要主动调用 isDone() 来获取状态,或通过 get() 阻塞方法来获取值。
Netty的 Future 与 Java 的 Future 虽然类名相同,但功能上略有不同,Netty 中引入了 Promise 机制。
Netty Promise
Netty 的Future,只是增加了监听器。整个异步的状态,是不能进行设置和修改的,于是 Netty 的 Promise 接口扩展了 Netty 的 Future接口,可以设置异步执行的结果。在IO操作过程,如果顺利完成、或者发生异常,都可以设置Promise的结果,并且通知Promise的Listener 们,示例如下:
package netty;import io.netty.channel.EventLoopGroup;
import io.netty.channel.nio.NioEventLoopGroup;
import io.netty.util.concurrent.DefaultPromise;
import io.netty.util.concurrent.Future;
import io.netty.util.concurrent.Promise;
import org.junit.Test;
import org.slf4j.Logger;
import org.slf4j.LoggerFactory;import java.time.LocalDateTime;
import java.util.concurrent.ExecutionException;
import java.util.concurrent.TimeUnit;public class NettyFutureTest {private static final Logger log = LoggerFactory.getLogger(NettyFutureTest.class);@Testpublic void testFuture() throws InterruptedException, ExecutionException {EventLoopGroup group = new NioEventLoopGroup();Future<String> future = group.submit( () ->{log.info("---异步线程执行任务开始----,time={}", LocalDateTime.now().toString());try {TimeUnit.SECONDS.sleep(3);} catch (InterruptedException e) {e.printStackTrace();}log.info("---异步线程执行任务结束----,time={}", LocalDateTime.now().toString());return "hello netty future";});/*String result = future.get();log.info("----主线程阻塞等待异步线程执行结果:{}",result);*///设置监听future.addListener( future1 -> {log.info("---收到异步线程执行任务结果通知----执行结果是;{},time={}",future1.get(), LocalDateTime.now().toString());});log.info("---主线程----");TimeUnit.SECONDS.sleep(10);}@Testpublic void testPromise() throws InterruptedException {EventLoopGroup group = new NioEventLoopGroup();Promise promise = new DefaultPromise(group.next());//promise绑定到eventloop上group.submit(()->{log.info("---异步线程执行任务开始----,time={}", LocalDateTime.now().toString());try {int i = 1/0;TimeUnit.SECONDS.sleep(3);promise.setSuccess("hello netty promise");TimeUnit.SECONDS.sleep(3);log.info("---异步线程执行任务结束----,time={}", LocalDateTime.now().toString());return;} catch (Exception e) {promise.setFailure(e);}});//设置监听回调promise.addListener(future -> {log.info("----异步任务执行结果:{}",future.isSuccess());});promise.addListener(future2 -> {log.info("----异步任务执行结果:{}",future2.isSuccess());});log.info("---主线程----");TimeUnit.SECONDS.sleep(10);}}
在 Java 的 Future 中,业务逻辑为一个 Callable 或 Runnable 实现类,该类的 call() 或 run() 执行完毕意味着业务逻辑的完结,在 Promise 机制中,可以在业务逻辑中人工设置业务逻辑的成功与失败,这样更加方便的监控自己的业务逻辑。
Netty 编码器
TCP 粘包拆包
Socket 缓冲区与滑动窗口
Netty 底层是基于 TCP 协议来处理网络数据传输,而对于 TCP 协议而言,它传输数据是基于字节流传输的。
应用层在传输数据时:
- 实际上会先将数据写入到 TCP 套接字的缓冲区,当缓冲区被写满后,数据才会被写出去。
- 每个TCP Socket 在内核中都有一个发送缓冲区(SO_SNDBUF )和一个接收缓冲区(SO_RCVBUF)
- TCP 的全双工的工作模式以及 TCP 的滑动窗口便是依赖于这两个独立的 buffer 以及此 buffer 的填充状态
SO_SNDBUF:
- 进程发送的数据的时候假设调用了一个 send 方法,将数据拷贝进入 Socket 的内核发送缓冲区之中,然后 send 便会在上层返回。
- 换句话说,send 返回之时,数据不一定会发送到对端去(和write写文件有点类似),send 仅仅是把应用层 buffer 的数据拷贝进Socket 的内核发送 buffer 中。
SO_RCVBUF:
- 把接收到的数据缓存入内核,应用进程一直没有调用 read 进行读取的话,此数据会一直缓存在相应 Socket 的接收缓冲区内。不管进程是否读取 Socket,对端发来的数据都会经由内核接收并且缓存到 Socket 的内核接收缓冲区之中。
- read 所做的工作,就是把内核缓冲区中的数据拷贝到应用层用户的 buffer 里面,仅此而已。
接收缓冲区保存收到的数据一直到应用进程读走为止。对于 TCP,如果应用进程一直没有读取,buffer 满了之后发生的动作是:通知对端 TCP 协议中的窗口关闭。这个便是滑动窗口的实现。保证 TCP 套接口接收缓冲区不会溢出,从而保证了 TCP 是可靠传输。因为对方不允许发出超过所通告窗口大小的数据。 这就是 TCP 的流量控制,如果对方无视窗口大小而发出了超过窗口大小的数据,则接收方 TCP 将丢弃它。
滑动窗口:
- TCP连接在三次握手的时候,会将自己的窗口大小(window size)发送给对方,其实就是 SO_RCVBUF 指定的值。之后在发送数据的时,发送方必须要先确认接收方的窗口没有被填充满,如果没有填满,则可以发送。
- 每次发送数据后,发送方将自己维护的对方的 window size 减小,表示对方的 SO_RCVBUF 可用空间变小。
- 当接收方处理开始处理 SO_RCVBUF 中的数据时,会将数据从 Socket 在内核中的接受缓冲区读出,此时接收方的 SO_RCVBUF 可用空间变大,即 window size 变大,接受方会以 ack 消息的方式将自己最新的 window size 返回给发送方,此时发送方将自己的维护的接受的方的 window size 设置为ack消息返回的 window size。
- 此外,发送方可以连续的给接受方发送消息,只要保证对方的 SO_RCVBUF 空间可以缓存数据即可,即 window size>0。当接收方的 SO_RCVBUF 被填充满时,此时 window size=0,发送方不能再继续发送数据,要等待接收方 ack 消息,以获得最新可用的 window size。
MSS/MTU分片
MTU (Maxitum Transmission Unit,最大传输单元)是链路层对一次可以发送的最大数据的限制。MSS(Maxitum Segment Size,最大分段大小)是 TCP 报文中 data 部分的最大长度,是传输层对一次可以发送的最大数据的限制。
数据在传输过程中,每经过一层,都会加上一些额外的信息:
- 应用层:只关心发送的数据 data,将数据写入 Socket 在内核中的缓冲区 SO_SNDBUF 即返回,操作系统会将 SO_SNDBUF 中的数据取出来进行发送;
- 传输层:会在 data 前面加上 TCP Header(20字节);
- 网络层:会在 TCP 报文的基础上再添加一个 IP Header,也就是将自己的网络地址加入到报文中。IPv4 中 IP Header 长度是 20 字节,IPV6 中 IP Header 长度是 40 字节;
- 链路层:加上 Datalink Header 和 CRC。会将 SMAC(Source Machine,数据发送方的MAC地址),DMAC(Destination Machine,数据接受方的MAC地址 )和 Type 域加入。SMAC+DMAC+Type+CRC 总长度为 18 字节;
- 物理层:进行传输
MTU 是以太网传输数据方面的限制,每个以太网帧最大不能超过 1518bytes。刨去以太网帧的帧头(DMAC+SMAC+Type域) 14Bytes 和帧尾 (CRC校验 ) 4 Bytes,那么剩下承载上层协议的地方也就是 data 域最大就只能有 1500 Bytes 这个值 我们就把它称之为 MTU。
因此,对于过大的数据传输,TCP 必须对其进行拆包。
Nagle 算法
TCP/IP 协议中,无论发送多少数据,总是要在数据(data)前面加上协议头(TCP Header+IP Header),同时,对方接收到数据,也需要发送 ACK 表示确认。
为了尽可能的利用网络带宽,TCP 总是希望尽可能的发送足够大的数据。(一个连接会设置 MSS 参数,因此,TCP/IP 希望每次都能够以 MSS 尺寸的数据块来发送数据)。Nagle 算法就是为了尽可能发送大块数据,避免网络中充斥着许多小数据块。
Nagle 算法的基本定义是任意时刻,最多只能有一个未被确认的小段。 所谓 “小段”,指的是小于 MSS 尺寸的数据块;所谓“未被确认”,是指一个数据块发送出去后,没有收到对方发送的 ACK 确认该数据已收到。
Nagle 算法的规则:
- 如果 SO_SNDBUF 中的数据长度达到 MSS,则允许发送;
- 如果该 SO_SNDBUF 中含有 FIN,表示请求关闭连接,则先将 SO_SNDBUF 中的剩余数据发送,再关闭;
- 设置了
TCP_NODELAY=true选项,则允许发送。TCP_NODELAY 是取消 TCP 的确认延迟机制,相当于禁用了 Negale 算法。正常情况下,当 Server 端收到数据之后,它并不会马上向 client 端发送 ACK,而是会将 ACK 的发送延迟一段时间(一般是 40ms),它希望在 t 时间内 server 端会向 client 端发送应答数据,这样 ACK 就能够和应答数据一起发送,就像是应答数据捎带着 ACK 过去。当然,TCP 确认延迟 40ms 并不是一直不变的, TCP 连接的延迟确认时间一般初始化为最小值 40ms,随后根据连接的重传超时时间(RTO)、上次收到数据包与本次接收数据包的时间间隔等参数进行不断调整。另外可以通过设置 TCP_QUICKACK 选项来取消确认延迟; - 未设置 TCP_CORK 选项时,若所有发出去的小数据包(包长度小于MSS)均被确认,则允许发送;
- 上述条件都未满足,但发生了超时(一般为200ms),则立即发送。
因此,综合分析来看,TCP 层肯定是会出现当次接收到的数据是不完整数据的情况。
总结
出现粘包可能的原因有:
- 发送方每次写入数据 < 套接字缓冲区大小;
- 接收方读取套接字缓冲区数据不够及时。
出现半包的可能原因有:
- 发送方每次写入数据 > 套接字缓冲区大小;
- 发送的数据大于协议 MTU,所以必须要拆包。
解决问题肯定不是在4层来做而是在应用层,通过定义通信协议来解决粘包和拆包的问题。发送方 和 接收方约定某个规则:
- 当发生粘包的时候通过某种约定来拆包;
- 如果在拆包,通过某种约定来将数据组成一个完整的包处理。
由此可知:发生这种现象的根本原因是因为,TCP协议是面向连接的、可靠的、基于字节流的传输层通信协议,是一种流式协议,消息无边界。
解决方案
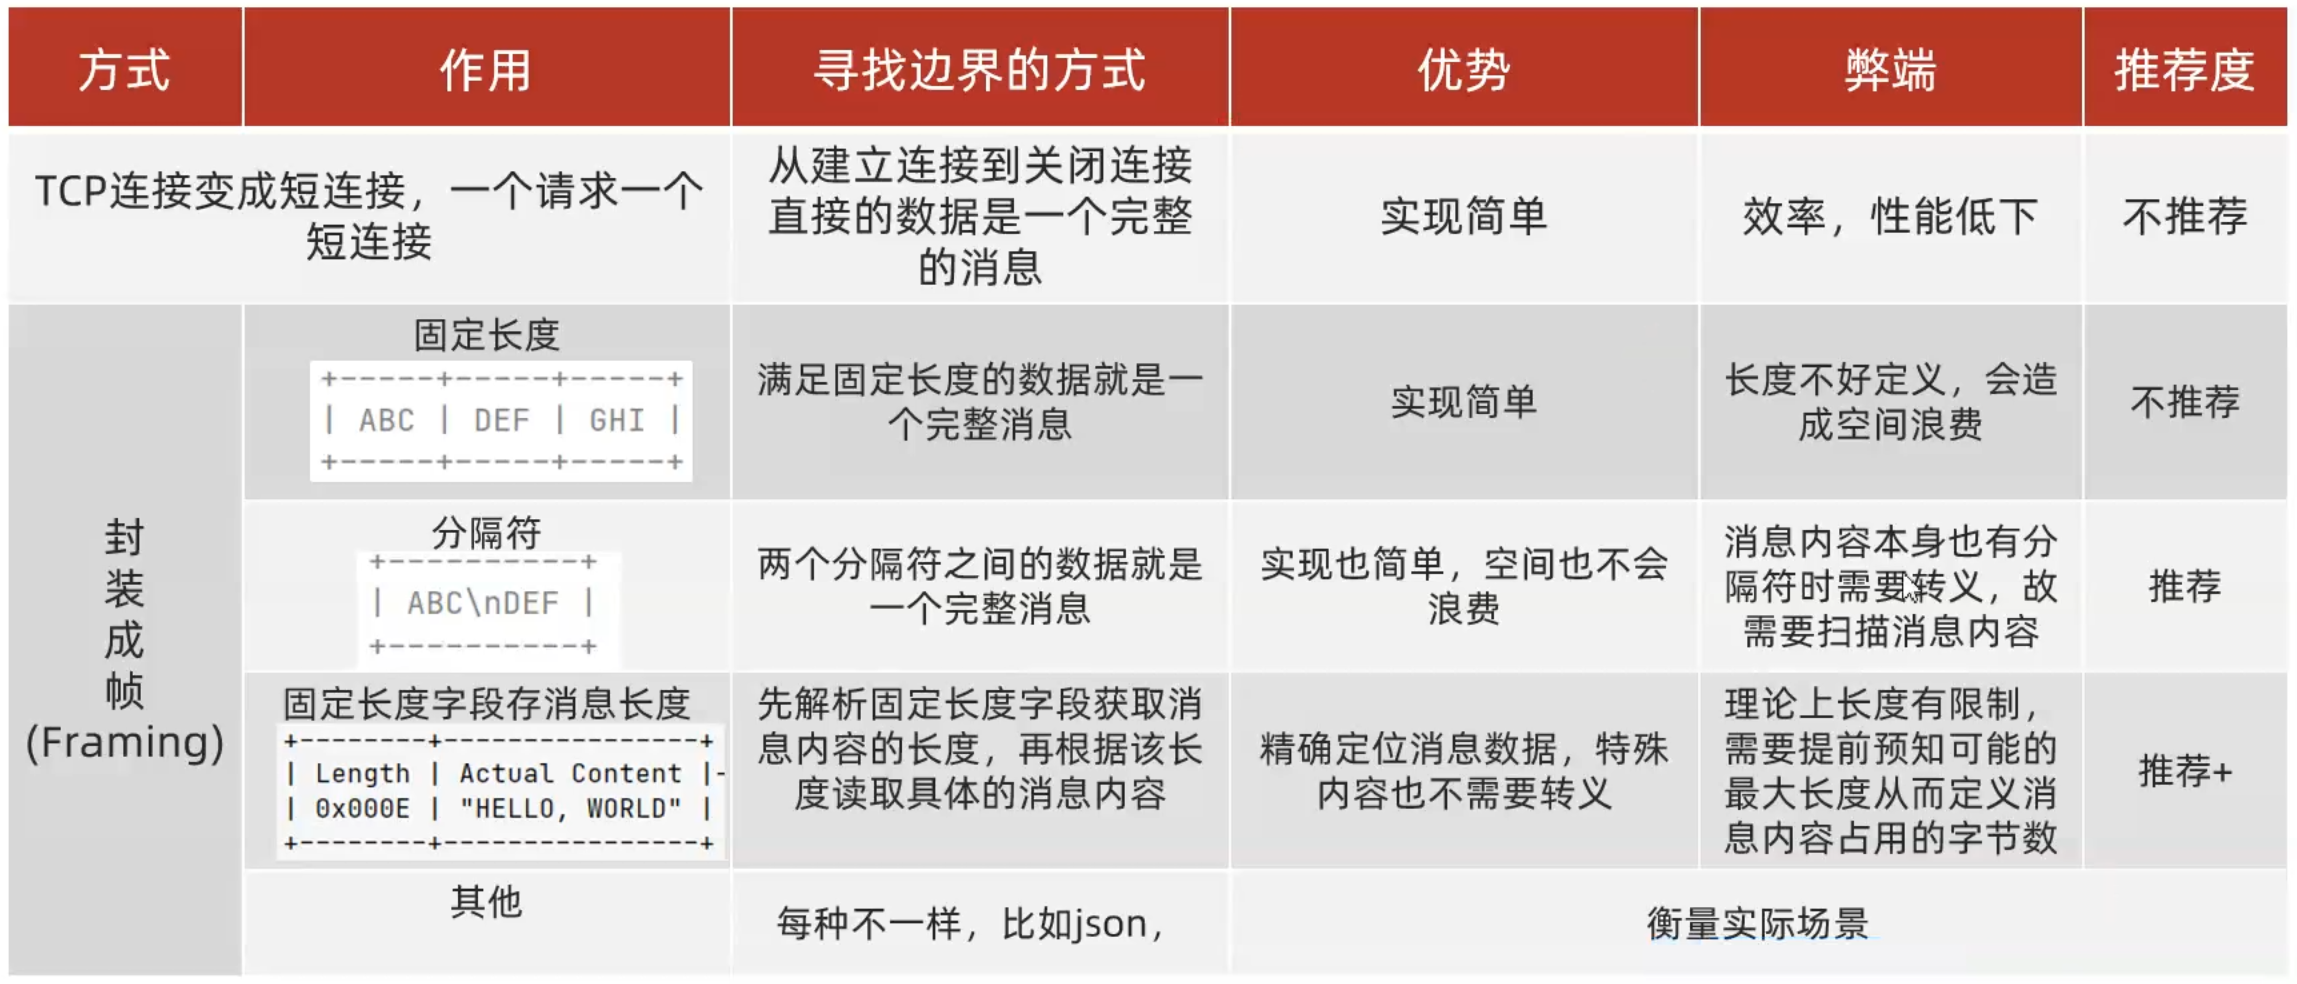
经过上述分析,解决TCP粘包,半包问题的根本在于找出消息的边界:
-
短链接:
- 每个请求都是一次连接的过程
- 防止多个报文合并发送,一个连接只发送一条报文
-
定长协议
- 报文的长度是固定值
- 如果不补齐空格,那么就会读到下一个报文的字节来填充上一个报文直到补齐为止,这样粘包了
-
特殊字符分割协议:
- 包的尾部添加指定的特殊字符,比如:\n,\r等等。
- 需要注意的是:约定的特殊字符要保证唯一性,不能出现在报文的正文中,否则就将正文一分为二了。
-
变长协议:
- 将消息分为消息头和消息体,消息头中标识当前完整的消息体长度。
- 发送方在发送数据之前先获取数据的二进制字节大小,然后在消息体前面添加消息大小;
- 接收方在解析消息时先获取消息大小,之后必须读到该大小的字节数才认为是完整的消息。
Netty 消息编码器
Netty 提供了针对封装成帧这种形式下不同方式的拆包器。
所谓的拆包其实就是数据的解码,所谓解码就是将网络中的一些原始数据解码成上层应用的数据,那对应在发送数据的时候要按照同样的方式进行数据的编码操作然后发送到网络中。

以下针对 Netty 的编码器示例完整代码:learn-netty-demo
FixedLengthFrameDecoder
public class ServerChannelInitializer extends ChannelInitializer<SocketChannel> {@Overrideprotected void initChannel(SocketChannel socketChannel) throws Exception {ChannelPipeline pipeline = socketChannel.pipeline();pipeline.addLast(new FixedLengthFrameDecoder(10));pipeline.addLast("decoder", new StringDecoder());pipeline.addLast("encoder", new StringEncoder());// 自己的逻辑Handlerpipeline.addLast("handler", new PeServerHandler());}
}
public class ClientChannelInitializer extends ChannelInitializer<SocketChannel> {@Overrideprotected void initChannel(SocketChannel socketChannel) throws Exception {ChannelPipeline pipeline = socketChannel.pipeline();pipeline.addLast(new FixedLengthFrameDecoder(10));pipeline.addLast("decoder", new StringDecoder());pipeline.addLast("encoder", new StringEncoder());// 客户端的逻辑pipeline.addLast("handler", new PeClientHandler());}
}
LineBasedFrameDecoder
public class ServerChannelInitializer extends ChannelInitializer<SocketChannel> {@Overrideprotected void initChannel(SocketChannel socketChannel) throws Exception {ChannelPipeline pipeline = socketChannel.pipeline();pipeline.addLast(new LineBasedFrameDecoder(2048));pipeline.addLast("decoder", new StringDecoder());pipeline.addLast("encoder", new StringEncoder());// 自己的逻辑Handlerpipeline.addLast("handler", new PeServerHandler());}
}
public class ClientChannelInitializer extends  ChannelInitializer<SocketChannel> {@Overrideprotected void initChannel(SocketChannel socketChannel) throws Exception {ChannelPipeline pipeline = socketChannel.pipeline();pipeline.addLast(new LineBasedFrameDecoder(2048));pipeline.addLast("decoder", new StringDecoder());pipeline.addLast("encoder", new StringEncoder());// 客户端的逻辑pipeline.addLast("handler", new PeClientHandler());}
}
LengthFieldBasedFrameDecoder
public class ServerChannelInitializer extends ChannelInitializer<SocketChannel> {@Overrideprotected void initChannel(SocketChannel socketChannel) throws Exception {ChannelPipeline pipeline = socketChannel.pipeline();pipeline.addLast(new LengthFieldBasedFrameDecoder(1024, // 帧的最大长度,即每个数据包最大限度0, // 长度字段偏移量4, // 长度字段所占的字节数0, // 消息头的长度,可以为负数4) // 需要忽略的字节数,从消息头开始,这里是指整个包);
//        pipeline.addLast("decoder", new StringDecoder());//pipeline.addLast("encoder", new StringEncoder());// 自己的逻辑Handlerpipeline.addLast("handler", new PeServerHandler());}
}
public class ClientChannelInitializer extends ChannelInitializer<SocketChannel> {@Overrideprotected void initChannel(SocketChannel socketChannel) throws Exception {ChannelPipeline pipeline = socketChannel.pipeline();pipeline.addLast(new LineBasedFrameDecoder(10));
//        pipeline.addLast("decoder", new StringDecoder());
//        pipeline.addLast("encoder", new StringEncoder());// 客户端的逻辑pipeline.addLast("handler", new PeClientHandler());}
}
自定义编码器
public class ServerChannelInitializer extends ChannelInitializer<SocketChannel> {@Overrideprotected void initChannel(SocketChannel socketChannel) throws Exception {ChannelPipeline pipeline = socketChannel.pipeline();pipeline.addLast(new MyProtocolEncoder());/**** MsgReq 对象 :* byte type 字段占一个字节* int length 字段 占4个字节* 剩下的是消息体* 那么 这里的 参数设置:** int maxFrameLength:可以设置你认为的小题最大上限* int lengthFieldOffset:长度字段从哪个位置开始读:第0个字节是type,长度是从1开始的* int lengthFieldLength:长度字段所占的字节数,int类型占4个字节* int lengthAdjustment:是否需要调整消息头的长度,即读取消息头是否需要偏移一下,我们这里不需要* int initialBytesToStrip:消息体是否需要忽略一些字节数,比如忽略消息头的长度,我们这里消息头也算在对象里面了所以不忽略* boolean failFast:如果读取长度不够是否快速失败**/pipeline.addLast(new MyProtocolDecoder(1024, // 帧的最大长度,即每个数据包最大限度1, // 长度字段偏移量4, // 长度字段所占的字节数0, // 消息头的长度,可以为负数0, // 需要忽略的字节数,从消息头开始,这里是指整个包true));// 自己的逻辑Handlerpipeline.addLast("handler", new PeServerHandler());}
}
public class ClientChannelInitializer extends ChannelInitializer<SocketChannel> {@Overrideprotected void initChannel(SocketChannel socketChannel) throws Exception {ChannelPipeline pipeline = socketChannel.pipeline();pipeline.addLast(new MyProtocolEncoder());/**** MsgReq 对象 :* byte type 字段占一个字节* int length 字段 占4个字节* 剩下的是消息体* 那么 这里的 参数设置:** int maxFrameLength:可以设置你认为的小题最大上限* int lengthFieldOffset:长度字段从哪个位置开始读:第0个字节是type,长度是从1开始的* int lengthFieldLength:长度字段所占的字节数,int类型占4个字节* int lengthAdjustment:是否需要调整消息头的长度,即读取消息头是否需要偏移一下,我们这里不需要* int initialBytesToStrip:消息体是否需要忽略一些字节数,比如忽略消息头的长度,我们这里消息头也算在对象里面了所以不忽略* boolean failFast:如果读取长度不够是否快速失败**/pipeline.addLast(new MyProtocolDecoder(1024,1,4,0,0,true));// 客户端的逻辑pipeline.addLast("handler", new PeClientHandler());}
}
二次编解码
我们把解决半包粘包问题的常用三种解码器叫一次解码器。
其作用是将原始数据流(可能会出现粘包和半包的数据流)转换为用户数据(ByteBuf中存储),但仍然是字节数据。
因此我们需要二次解码器将字节数组转换为java对象,或者将一种格式转化为另一种格式,方便上层应用程序使用。
一次解码器继承自:ByteToMessageDecoder
二次解码器继承自:MessageToMessageDecoder
但他们的本质都是继承: ChannellnboundHandlerAdapter
用户数据(ByteBuf)Java Object之间的转换,或者将将一种格式转化为另一种格式(譬如将应用数据转化成某种
协议数据)。
- Java序列化:不推荐使用,占用空间大,也只有java语言能用
- Marshaling:比java序列化稍好
- XML:可读性好,但是占用空间大
- JSON:可读性也好,空间较小
- MessagePack:占用空间比SON小,可读性不如SON,但也还行
- Protobuf:性能高,体积小,但是可读性差
- hessian:跨语言、高效的二进制序列化协议,整体性能和protobuf:差不多。
- 其他
Http 编解码
protected void initChannel(SocketChannel ch) throws Exception {//获取与该channel绑定的pipelineChannelPipeline pipeline = ch.pipeline();//测试 http servicepipeline.addLast(new HttpResponseEncoder());pipeline.addLast(new HttpRequestDecoder());//文件上传需要设置大点儿 单位是字节pipeline.addLast(new HttpObjectAggregator(1024*1024*8));pipeline.addLast(new MyHttpServerHandler());
}
public class MyHttpServerHandler extends SimpleChannelInboundHandler<FullHttpRequest> {private static final Logger log = LoggerFactory.getLogger(MyHttpServerHandler.class);private static final HttpDataFactory HTTP_DATA_FACTORY = new DefaultHttpDataFactory(DefaultHttpDataFactory.MAXSIZE);static {DiskFileUpload.baseDirectory = "/opt/netty/fileupload";}@Overrideprotected void channelRead0(ChannelHandlerContext ctx, FullHttpRequest fullHttpRequest) throws Exception {//HttpRequest request = fullHttpRequest;//String uri = fullHttpRequest.uri(); //获取methodHttpMethod method = fullHttpRequest.method();//根据method解析参数,封装数据,if (HttpMethod.GET.equals(method)) {parseGet(fullHttpRequest);}else if (HttpMethod.POST.equals(method)) {parsePost(fullHttpRequest);}else {log.error("{} method is not supported ,please change http method for get or post!");}//service//response clientStringBuilder sb = new StringBuilder();sb.append("<html>");sb.append("<head>");sb.append("</head>");sb.append("<body>");sb.append("<h3>success</h3>");sb.append("</body>");sb.append("</html>");writeResponse(ctx,fullHttpRequest,HttpResponseStatus.OK,sb.toString());}private void writeResponse(ChannelHandlerContext ctx, FullHttpRequest fullHttpRequest, HttpResponseStatus status, String msg) {FullHttpResponse response = new DefaultFullHttpResponse(HttpVersion.HTTP_1_1,status);response.content().writeBytes(msg.getBytes(StandardCharsets.UTF_8));response.headers().set(HttpHeaderNames.CONTENT_TYPE,"text/html;charset=utf-8");HttpUtil.setContentLength(response,response.content().readableBytes());boolean keepAlive = HttpUtil.isKeepAlive(fullHttpRequest);if (keepAlive) {response.headers().set(HttpHeaderNames.CONNECTION,"keep-alive");ctx.writeAndFlush(response);}else {ctx.writeAndFlush(response).addListener(ChannelFutureListener.CLOSE);}}private void parsePost(FullHttpRequest fullHttpRequest) {//获取content-typeString contentType = getContentType(fullHttpRequest);switch (contentType) {case "application/json":parseJson(fullHttpRequest.content());break;case "application/x-www-form-urlencoded":parseForm(fullHttpRequest);break;case "multipart/form-data":parseMultipart(fullHttpRequest);break;default:}}private void parseMultipart(FullHttpRequest fullHttpRequest) {HttpPostRequestDecoder postRequestDecoder = new HttpPostRequestDecoder(HTTP_DATA_FACTORY,fullHttpRequest);//判断是否是multipartif (postRequestDecoder.isMultipart()) {//获取 body中的数据List<InterfaceHttpData> bodyHttpDatas = postRequestDecoder.getBodyHttpDatas();bodyHttpDatas.forEach(dataItem ->{//获取数据项的类型InterfaceHttpData.HttpDataType dataType = dataItem.getHttpDataType();//判断是普通表达项还是文件上传项if (dataType.equals(InterfaceHttpData.HttpDataType.Attribute)) {//普通表单项 直接获取数据Attribute attribute = (Attribute) dataItem;try {log.info("表单项名称:{},表单项值:{}",attribute.getName(),attribute.getValue());} catch (IOException e) {log.error("获取表单项数据错误,msg={}",e.getMessage());}}else if (dataType.equals(InterfaceHttpData.HttpDataType.FileUpload)) {//文件上传项 处理待上传的数据FileUpload fileUpload = (FileUpload) dataItem;//获取原始文件名称String filename = fileUpload.getFilename();//获取表单name属性String name = fileUpload.getName();log.info("文件名称:{},表单项名称:{}",filename,name);//将文件数据保存到磁盘if (fileUpload.isCompleted()) {try {String path = DiskFileUpload.baseDirectory + File.separator + filename;//File file = fileUpload.getFile();fileUpload.renameTo(new File(path));} catch (IOException e) {log.error("文件转存失败,msg={}",e.getMessage());}}}else {}});}}private void parseForm(FullHttpRequest fullHttpRequest) {//post请求时uri中也可能携带参数parseKVstr(fullHttpRequest.uri(),true);//解析请求体中的表单数据parseFormData(fullHttpRequest.content());}private void parseFormData(ByteBuf body) {String bodystr = body.toString(StandardCharsets.UTF_8);parseKVstr(bodystr,false);}private void parseJson(ByteBuf jsonbody) {String jsonstr = jsonbody.toString(StandardCharsets.UTF_8);//使用json工具反序列化JSONObject jsonObject = JSONObject.parseObject(jsonstr);//打印 json数据jsonObject.entrySet().stream().forEach(entry ->{log.info("json key={},json value={}",entry.getKey(),entry.getValue());});}private String getContentType(FullHttpRequest request) {HttpHeaders headers = request.headers();String contentType = headers.get(HttpHeaderNames.CONTENT_TYPE);// text/plain;charset=UTF-8//List<String> acceptEncoding = headers.getAll(HttpHeaderNames.ACCEPT_ENCODING);//accept-encoding:gzip, deflate, brreturn contentType.split(";")[0];}private void parseGet(FullHttpRequest request) {//通过uri解析请求参数parseKVstr(request.uri(),true);}private void parseKVstr(String str,boolean hasPath) {//通过QueryStringDecoder解析kv字符串QueryStringDecoder qsd = new QueryStringDecoder(str, StandardCharsets.UTF_8,hasPath);get请求的uri是: path?k=vMap<String, List<String>> parameters = qsd.parameters();//封装参数,执行业务 此处打印即可if (parameters!=null && parameters.size() > 0) {parameters.entrySet().stream().forEach(entry->{log.info("参数名:{},参数值:{}",entry.getKey(),entry.getValue());});}}@Overridepublic void channelReadComplete(ChannelHandlerContext ctx) throws Exception {//ctx.flush();}@Overridepublic void exceptionCaught(ChannelHandlerContext ctx, Throwable cause) throws Exception {log.error("MyHttpServerHandler Exception,{}",cause.getMessage());}
}
<!DOCTYPE html>
<html lang="en">
<head><meta charset="UTF-8"><title>测试 netty http server</title>
</head>
<body><form action="http://localhost:8888/test" method="post" enctype="multipart/form-data"><label for="username">用户名:</label><input id="username" type="text" name="username"><br/><label for="password">密码:</label><input id="password" type="password" name="password"><br/><label for="email">邮箱:</label><input id="email" type="email" name="email"><br/><label for="address">地址:</label><input id="address" type="text" name="address"><br/><label for="pic">选择文件:</label><input id="pic" type="file" name="pic"><br/><input type="submit" value="提交"></form>
</body>
</html>
websocke 编解码
.childHandler(new ChannelInitializer<SocketChannel>() {//每个客户端channel初始化时都会执行该方法来配置该channel的相关handler@Overrideprotected void initChannel(SocketChannel ch) throws Exception {//获取与该channel绑定的pipelineChannelPipeline pipeline = ch.pipeline();//基于netty开发websocket 服务端pipeline.addLast(new HttpServerCodec());//HttpServerCodec = HttpRequestDecoder + HttpResponseEncoderpipeline.addLast(new HttpObjectAggregator(1024*1024*8));//pipeline.addLast(new ChunkedWriteHandler());//添加业务处理器pipeline.addLast(new MyWebSocketServerHandler());}
});
public class MyWebSocketServerHandler extends SimpleChannelInboundHandler<Object> {private static final Logger log = LoggerFactory.getLogger(MyWebSocketServerHandler.class);private WebSocketServerHandshaker serverHandshaker;@Overrideprotected void channelRead0(ChannelHandlerContext ctx, Object msg) throws Exception {//判断是http握手请求还是websocket请求if (msg instanceof FullHttpRequest) {boolean handShaker = handleHttpRequest(ctx, (FullHttpRequest) msg);if (handShaker) {//握手成功后 服务端主动推送消息,每隔5s推送一次new Thread(()->{while (true) {try {ctx.channel().writeAndFlush(new TextWebSocketFrame("你好,这是服务器主动推送回来的数据,当前时间为:"+new Date().toString()));TimeUnit.SECONDS.sleep(5);} catch (InterruptedException e) {log.error("push msg exception ,{}",e.getMessage());}}}).start();}}else if (msg instanceof WebSocketFrame) {handleWebSocketFrame(ctx,(WebSocketFrame)msg);}}/*** 接收到的消息是已经解码的WebSocketFrame消息* @param ctx* @param frame*/private void handleWebSocketFrame(ChannelHandlerContext ctx, WebSocketFrame frame) {// 判断链路消息类型if (frame instanceof CloseWebSocketFrame) { // 关闭链路指令serverHandshaker.close(ctx.channel(),((CloseWebSocketFrame) frame).retain());return;}if (frame instanceof PingWebSocketFrame) { // 维持链路的ping 指令ctx.channel().writeAndFlush(new PongWebSocketFrame(frame.content().retain()));return;}if (frame instanceof TextWebSocketFrame) { // 普通文本消息TextWebSocketFrame textFrame = (TextWebSocketFrame) frame;String message = textFrame.text();log.info("receive text msg is {}",message);//构造返回ctx.channel().writeAndFlush(new TextWebSocketFrame("你好,欢迎使用netty websocket 服务,当前时间为:"+new Date().toString()));return;}if (frame instanceof BinaryWebSocketFrame) { //二进制消息log.info("frame is binarywebsocketframe");}}private boolean handleHttpRequest(ChannelHandlerContext ctx, FullHttpRequest fullHttpRequest) {//先判断是否解码成功,if (!fullHttpRequest.decoderResult().isSuccess()) {sendHttpResponse(ctx,fullHttpRequest,new DefaultFullHttpResponse(HttpVersion.HTTP_1_1, HttpResponseStatus.BAD_REQUEST));return false;}// 然后判断是否要建立websocket连接//构造握手工厂 创建握手处理类,并且构造握手响应给客户端WebSocketServerHandshakerFactory serverHandshakerFactory = new WebSocketServerHandshakerFactory("ws://localhost:8888/mywebsocket",null,false);if (!fullHttpRequest.headers().contains(HttpHeaderNames.UPGRADE,"websocket",true)) {WebSocketServerHandshakerFactory.sendUnsupportedVersionResponse(ctx.channel());return false;}serverHandshaker = serverHandshakerFactory.newHandshaker(fullHttpRequest);serverHandshaker.handshake(ctx.channel(),fullHttpRequest);return true;}private void sendHttpResponse(ChannelHandlerContext ctx, FullHttpRequest request, FullHttpResponse response) {if (!response.status().equals(HttpResponseStatus.OK)) {ByteBuf byteBuf = Unpooled.wrappedBuffer("error".getBytes(StandardCharsets.UTF_8));response.content().writeBytes(byteBuf);byteBuf.release();HttpUtil.setContentLength(response,response.content().readableBytes());}ChannelFuture future = ctx.channel().writeAndFlush(response);if (!HttpUtil.isKeepAlive(request) || !response.status().equals(HttpResponseStatus.OK) ) {future.addListener(ChannelFutureListener.CLOSE);}}@Overridepublic void channelReadComplete(ChannelHandlerContext ctx) throws Exception {ctx.flush();}@Overridepublic void exceptionCaught(ChannelHandlerContext ctx, Throwable cause) throws Exception {log.error("server error,msg is {}",cause.getMessage());ctx.close();}
}
<!DOCTYPE html>
<html lang="en">
<head><meta charset="UTF-8"><title>test netty websocket </title>
</head>
<body>
<br>
<script type="text/javascript">var socket;if(!window.WebSocket){window.WebSocket=window.MozWebSocket;}if(window.WebSocket){socket=new WebSocket("ws://localhost:8888/mywebSocket");socket.onmessage=function(event){var ta=document.getElementById('responseText');ta.value="";ta.value=event.data;};socket.onopen=function(event){var ta=document.getElementById('responseText');ta.value='打开WebSocket服务器正常,浏览器支持WebSocket!';};socket.onclose=function(event){var ta=document.getElementById('responseText');ta.value='';ta.value="WebSocket 关闭!";};}else{alert("抱歉,您的浏览器不支持WebSocket协议!");}function send(message){if(!window.WebSocket){return;}if(socket!=null){socket.send(message);}else{alert("WebSocket连接没有建立成功,请刷新页面!");}/* if(socket.readyState==WebSocket.open){socket.send(message);}else{alert("WebSocket连接没有建立成功!");} */}
</script>
<form onsubmit="return false;"><input type="text" name="message" value="Netty WebSocket实战"/><br><br><input type="button" value="发送WebSocket请求消息" onclick="send(this.form.message.value)"/><hr color="blue"/><h3>服务端返回的应答消息</h3><textarea id="responseText" style="width:500px;height:300px;"></textarea>
</form>
</body>
</html>
keepavlie 与 idle 监测

TCP Keepalvie
主要由如下三个参数:
- net.ipv4.tcp_keepalive_time 7200
- net.ipv4.tcp_keepalive_intvl 75
- net.ipv4.tcp_keepalive_probes =9
当启用(默认关闭)keepalive时:
- TCP在连接没有数据通过的7200秒后发送keepalive探测消息
- 当探测没有确认时,按75秒的重试频率重发
- 一直发9个探测包都没有确认,就认定连接失效
所以总耗时一般为:2小时11分钟(7200秒+75秒*9次
应用层 Keepalive
应用心跳
除了在tcp网络层开启 keepalive 之外,我们普遍还需要在应用层启动 keepalive,一般称之为:应用心跳(心跳机制)
原因如下:
- 协议分层,各层关注点不同,网络传输层关注网络是否可达,应用层关注是否能正常提供服务
- tcp的 keepalive 默认关闭,并且经过路由等中转设备后 keepalive 包有可能被丢弃
- tcp层的 keepalive 时间太长,默认 > 2小时,虽然可改,但是属于系统参数一旦改动影响该机器上的所有应用
另外需要注意:http虽然属于应用层协议,因此会经常听到HTTP的头信息:Connection:Keep-Alive,HTTP/1.1默认使 Connection:keep-alive 进行长连接。
在一次TCP连接中可以完成多个HTTP请求,但是对每个请求仍然要单独发header,Keep-Alive不会永久保持连接,它有一个保持时间,可以在不同的服务器软件(如Apache)中设定这个时间。
这种长连接是一种“伪链接”,而且只能由客户端发送请求,服务端响应。HTTP协议的长连接和短连接,实质上是TCP协议的长连接和短连接。
idle 监测
ldle监测,只是负责诊断,诊断后,做出不同的行为,决定Idle监测的最终用途,一般用来配合keepalive,减少 keepalive 消息:
- 定时 keepalive 消息,keepalive消息与服务器正常消息交换完全不关联,定时就发送;
- 空闲监测 + 判定为 ldle 时才发 keepalive,有其他数据传输的时候,不发送keepalive,无数据传输超过一定时间,判定为 ldle,再发keepalive
这样的机制优点在于:
- 能够快速释放损坏的、恶意的、很久不用的连接,让系统时刻保持最好的状态
- 实际应用中:两种方式结合起来使用,按需 keepalive,保证不会空闲,如果空闲,关闭连接
keepavlie + idle 案例
首先,将NettyClient和NettyServer拷贝一份得到NettyClientV2和NettyServerV2,其次初始化服务端和客户端的pipeline
//Server端
protected void initChannel(SocketChannel ch) throws Exception {//获取与该channel绑定的pipelineChannelPipeline pipeline = ch.pipeline();pipeline.addLast(new LoggingHandler(LogLevel.INFO));pipeline.addLast(new LengthFieldPrepender(2));pipeline.addLast(new StringEncoder());pipeline.addLast(new LengthFieldBasedFrameDecoder(1024,0,2,0,2));pipeline.addLast(new StringDecoder());
}
//Client端
protected void initChannel(SocketChannel ch) throws Exception {ChannelPipeline pipeline = ch.pipeline();pipeline.addLast(new LoggingHandler(LogLevel.INFO));pipeline.addLast(new LengthFieldPrepender(2));pipeline.addLast(new StringEncoder());pipeline.addLast(new LengthFieldBasedFrameDecoder(1024,0,2,0,2));pipeline.addLast(new StringDecoder());
}
服务端编写用于idle监测的handler
@Slf4j
public class ServerReadIdleCheckHandler extends IdleStateHandler {public ServerReadIdleCheckHandler() {super(10, 0, 0, TimeUnit.SECONDS);}@Overrideprotected void channelIdle(ChannelHandlerContext ctx, IdleStateEvent evt) throws Exception {log.info("server channel idle----");if (evt == IdleStateEvent.FIRST_READER_IDLE_STATE_EVENT) {ctx.close();log.info("server read idle , close channel.....");return;}super.channelIdle(ctx, evt);}
}
服务端添加 ServerIdleCheckHandler到 pipeline 中
protected void initChannel(SocketChannel ch) throws Exception {//获取与该channel绑定的pipelineChannelPipeline pipeline = ch.pipeline();pipeline.addLast(new LoggingHandler(LogLevel.INFO));pipeline.addLast(new ServerReadIdleCheckHandler());//添加ServerReadIdleCheckHandlerpipeline.addLast(new LengthFieldPrepender(2));pipeline.addLast(new StringEncoder());pipeline.addLast(new LengthFieldBasedFrameDecoder(1024,0,2,0,2));pipeline.addLast(new StringDecoder());
}
客户端完成,5s的 write 监测,超过5s不发送数据,就发送一个 keepalive 消息,避免被服务端断掉连接,故,编写客户端的 idlehandler
@Slf4j
public class ClientWriteCheckIdleHandler extends IdleStateHandler {public ClientWriteCheckIdleHandler() {super(0, 5, 0, TimeUnit.SECONDS);}//也可在channelIdle方法中直接处理
}
@Slf4j
@ChannelHandler.Sharable
public class KeepaliveHandler extends ChannelDuplexHandler {@Overridepublic void userEventTriggered(ChannelHandlerContext ctx, Object evt) throws Exception {if (evt == IdleStateEvent.FIRST_WRITER_IDLE_STATE_EVENT) {log.info("client write idle,so send keepalive msg to server");ctx.writeAndFlush("this is keepalive msg");}super.userEventTriggered(ctx, evt);}
}
客户端向 pipeline 中添加 handler
protected void initChannel(SocketChannel ch) throws Exception {ChannelPipeline pipeline = ch.pipeline();pipeline.addLast(new LoggingHandler(LogLevel.INFO));pipeline.addLast(new ClientWriteCheckIdleHandler());//write idle监测pipeline.addLast(new LengthFieldPrepender(2));pipeline.addLast(new StringEncoder());pipeline.addLast(new KeepaliveHandler());//发送keepalvie消息pipeline.addLast(new LengthFieldBasedFrameDecoder(1024,0,2,0,2));pipeline.addLast(new StringDecoder());
}
Netty 性能优化
System 参数调优
设置 linux 系统参数,例如:/proc/sys/net/ipv4/tcp_keepalive_time
Linux 参数:
- 进行tcp连接时,系统为每个tcp连接都会创建一个 socket 句柄,其实就是一个文件句柄(linux一切皆为文)
- 但是系统对于每个进程能够打开的文件句柄数量做了限制,超出则报错:Too many open file
- 设置方式:有很多种,ulimit -n [xxx]
- 注意:该命令修改的数值,只对当前登录用户目前使用的环境有效,系统重启或用户退出后失效
- 建议的做法是可以作为启动脚本的一部分,在启动程序前执行
netty支持的系统参数设置,例如:serverbootstrap.option(ChannelOption.S0 BACKLOG,1024),且设置形式有两种:
- 针对SocketChannel:通过 .childOption 设置
- 针对ServerSocketChannel:通过 .option 设置
ScoketChannel:有 7 个参数可以设置,常用的两个:
- SO_KEEPALIVE, tcp 层 keepalvie,默认关闭,一般选择关闭 tcp keepalive 而使用应用 keepalive
- TCP_NODELAY:设置是否启用 nagle 算法,由于该算法是 tcp 在发送数据时将小的、碎片化的数据拼接成一个大的报文一起发送,以此来提高效率,默认是 false(启用),如果启用可能会导致有些数据有延时,如果业务不能忍受,小报文也需要立即发送则可以禁用该算法。
ServerSocketChannel:有 3 个参数可以设置,常用的一个如下:
- SO_BACKLOG:最大等待连接数量,netty在linux下该值的获取是通过:io.netty.util.NetUtil完成的
- 先尝试获取:/proc/sys/net/core/somaxconn
- 然后尝试:sysctl
- 最终没有获取到使用默认值:PlatformDependent.isWindows()? 200 : 128;
线程模型优化
根据实际需求将业务进行分类:
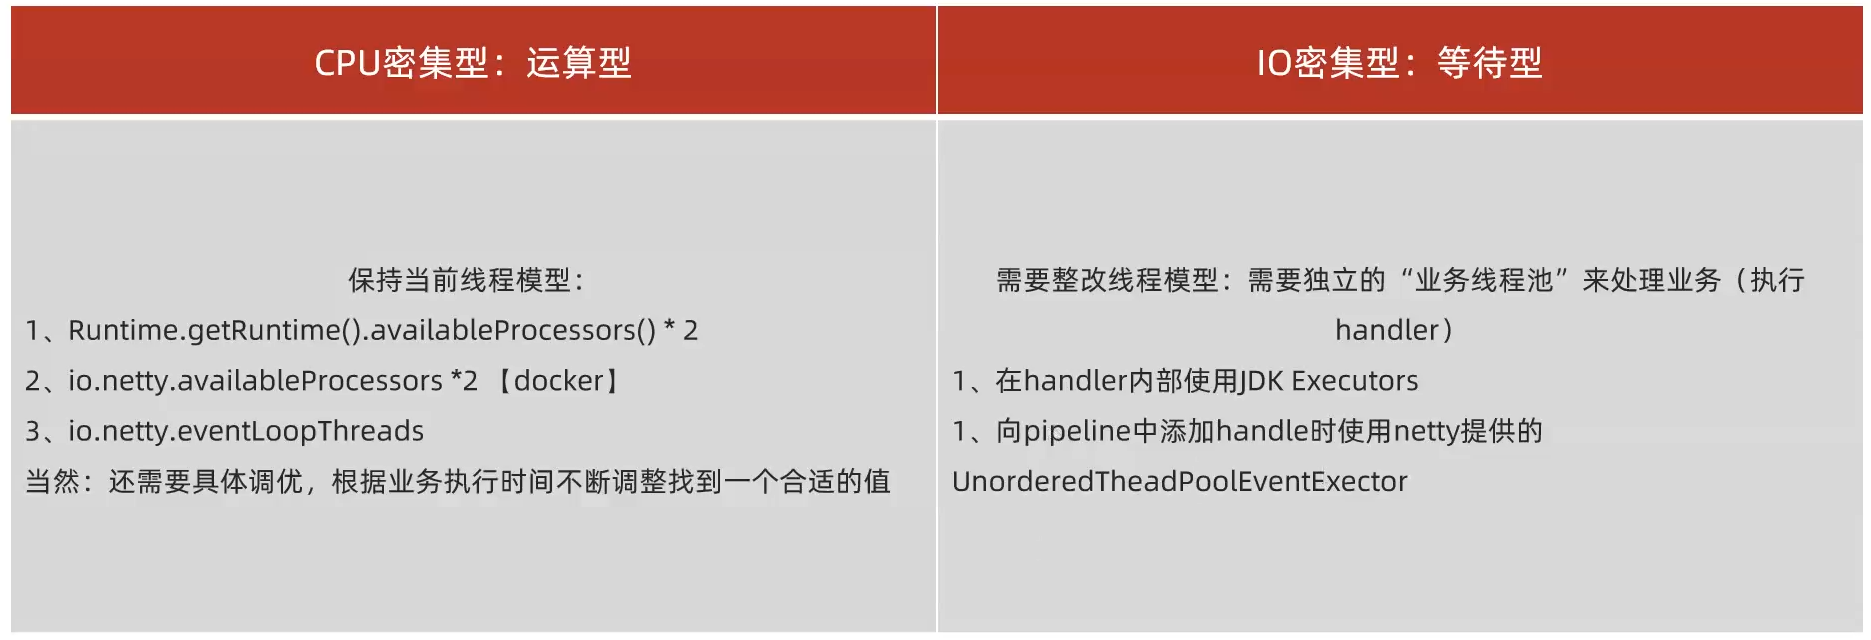
Netty 零拷贝
操作系统中的零拷贝
系统内核处理 IO 操作分为两个阶段:
- 等待数据:系统内核在等待网卡接收到数据后,把数据写到内核中
- 拷贝数据:系统内核在获取到数据后,将数据拷贝到用户进程的空间中
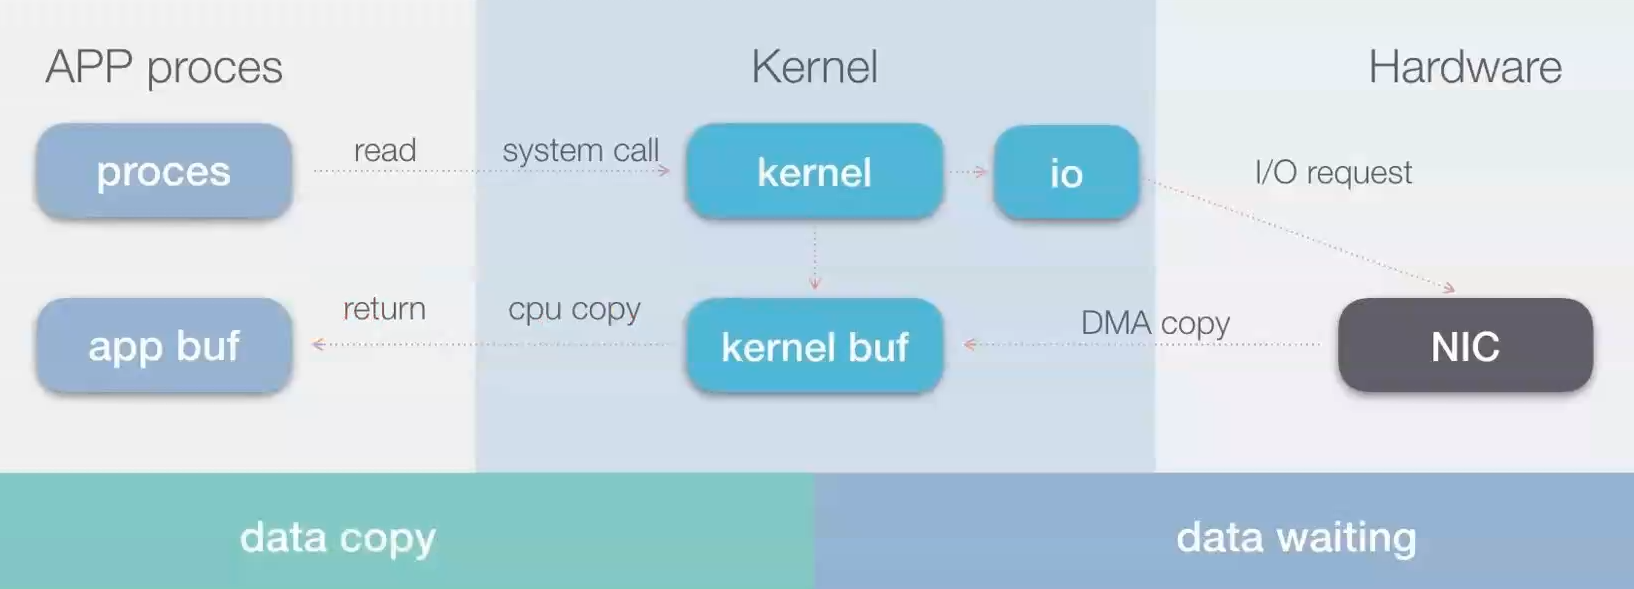
在 OS 层面上的 Zero-copy 通常指避免在用户态(User-space)与内核态(Kernel-space)之间来回拷贝数据
例如,Linux 提供的 mmap 系统调用:
- 它可以将一段用户空间内存映射到内核空间,当映射成功后,用户对这段内存区域的修改可以直接反映到内核空间
- 同样地, 内核空间对这段区域的修改也直接反映用户空间
正因为有这样的映射关系, 我们就不需要在 用户态(User-space)与 内核态(Kernel-space)之间拷贝数据,提高了数据传输的效率
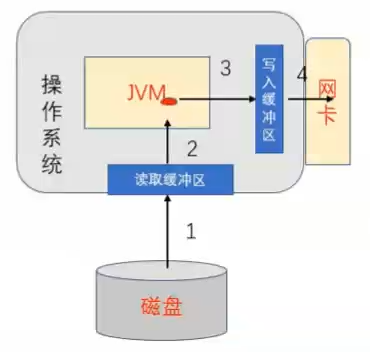
通过java的 FileChannel.transferTo 方法(底层基于NIO),可以避免多余的拷贝(当然这需要底层操作系统的支持)
Netty 中的零拷贝
Netty 中的 Zero-copy 与上面我们所提到到 OS 层面上的 Zero-copy 不太一样。
Netty 的 Zero-coyp 完全是在用户态(Java层面)的,它的 Zero-copy 的更多的是偏向于优化数据操作这样的概念,Netty 的 Zero-copy 主要体现在如下几个方面:
- Direct Buffer:
- 直接堆外内存区域分配空间而不是在堆内存中分配
- 如果使用传统的堆内存分配,当我们需要将数据通过 socket 发送的时候,需要将数据从堆内存拷贝到堆外直接内存,然后再由直接内存拷贝到网卡接口层
- 通过Netty提供的 DirectBuffers 直接将数据分配到堆外内存,避免多余的数据拷贝
- Composite Buffers:
- 传统的ByteBuffer,如果需要将两个ByteBuffert中的数据组合到一起,我们需要首先创建一个 size = size1+ size2 大小的新的数组然后将两个数组中的数据拷贝到新的数组中
- 但是使用 Netty 提供的组合 ByteBuf 就可以避免这样的操作,因为 Composite ByteBuf 并没有真正将多个Buffer组合起来,而是保存了它们的引用,从而避免了数据的拷贝,实现了零拷贝
- 同时也支持 slice 操作,因此可以将 ByteBuf 分解为多个共享同一个存储区域的 ByteBuf 避免了内存的拷贝
- 通过 wrap 操作:
- 我们可以将 byte[] 数组、ByteBuf、ByteBuffer 等包装成一个 Netty ByteBuf 对象,进而避免了拷贝操作
- 通过 FileRegion:
- 利用 FileRegion 包装的 FileChannel.tranferTo(Java nio) 实现文件传输
- 可以直接将文件缓冲区的数据发送到目标 Channel,避免了传统通过循环 write 方式导致的内存拷贝问题
