这一模块的思路和前面的语言控制模块很相似,差别只是调用TCP 去控制
废话少说,放码过来
增添/修改代码
receive_interface.c
#include <pthread.h>
#include <mqueue.h>
#include <string.h>
#include <errno.h>
#include <stdlib.h>
#include <stdio.h>#include "receive_interface.h"
#include "control.h"
#include "mq_queue.h"
#include "global.h"
#include "face.h"
#include "myoled.h"/*
接收模块:
对接收到消息做出相应处理
包括 oled 人脸识别 语言播报 GPIO  引脚状态配置*/static int oled_fd = -1;typedef struct
{int msg_len;unsigned char*buffer;ctrl_info_t *ctrl_info;
}recv_msg_t;static int  receive_init(void)
{ // 设备类链表添加oled_fd = myoled_init(); // 初始化oledface_init(); // 初始化人脸识别return 0;
}static void receive_final(void)
{face_final();if(-1 != oled_fd){close(oled_fd); // 关闭oled 打开的文件oled_fd = -1; //复位}}
//  处理设备 --  比如打开灯 和风扇等
static void*handler_device(void *arg)
{pthread_detach(pthread_self()); // 和主线程(他的父线程)分离recv_msg_t *recv_msg = NULL;if(NULL != arg){recv_msg = (recv_msg_t *)arg;printf("recv_len = %d\n",recv_msg->msg_len);printf("%s|%s|%d, handler: 0x%x,0x%x,0x%x,0x%x,0x%x,0x%x\n",__FILE__,__func__,__LINE__,recv_msg->buffer[0],recv_msg->buffer[1],recv_msg->buffer[2],recv_msg->buffer[3],recv_msg->buffer[4],recv_msg->buffer[5]);}// need to do something pthread_exit(0);
}static void* receive_get(void *arg) // 接收消息队列里面的 数据
{printf("enter receive_get\n");//  通过参数 初始化我们 定义的recv_msg_t 结构体recv_msg_t *recv_msg = NULL;unsigned char*buffer = NULL;struct mq_attr attr;pthread_t tid = -1;ssize_t read_len = -1;if(NULL != arg){recv_msg = (recv_msg_t *)malloc(sizeof(recv_msg_t));recv_msg->ctrl_info = (ctrl_info_t *)arg;// 这里实际上就获取到了mqd 和 phead(我们需要操作的struct control 链表 的头节点)recv_msg->msg_len = 0;recv_msg->buffer = NULL;}elsepthread_exit(0);if(mq_getattr(recv_msg->ctrl_info->mqd,&attr) == -1){ // 获取消息队列失败 -- 异常pthread_exit(0);}// 能获取到消息队列recv_msg->buffer = (unsigned char *)malloc(attr.mq_msgsize); // 分配内存buffer = (unsigned char *)malloc(attr.mq_msgsize); // mq_msgsize -- 每条消息的大小memset(recv_msg->buffer,0,attr.mq_msgsize); // 初始化memset(buffer,0,attr.mq_msgsize); // 初始化pthread_detach(pthread_self()); // 和主线程(他的父线程)分离while (1){read_len = mq_receive(recv_msg->ctrl_info->mqd,buffer,attr.mq_msgsize,NULL) ;printf("%s|%s|%d, recv: 0x%x,0x%x,0x%x,0x%x,0x%x,0x%x\n",__FILE__,__func__,__LINE__,buffer[0],buffer[1],buffer[2],buffer[3],buffer[4],buffer[5]);printf("%s|%s|%d: read_len = %ld\n",__FILE__,__func__,__LINE__,read_len);if(-1 == read_len){// 接收失败if(errno == EAGAIN){printf("queue is empty\n");}else{break;}}// 以下是接收到正常数据的情况 else if(buffer[0] == 0xAA && buffer[1] == 0x55 &&buffer[4]==0x55 && buffer[5]==0xAA){recv_msg->msg_len = read_len;memcpy(recv_msg->buffer,buffer,read_len);//  创建线程去 处理我们的接收到的信号pthread_create(&tid,NULL,handler_device,(void*)recv_msg);}}if(NULL != recv_msg)free(recv_msg);if(NULL !=  buffer)free(buffer);pthread_exit(0);}struct  control receive_control ={.control_name = "receive",.init = receive_init,.final = receive_final,.get = receive_get,.set = NULL, //不需要实现 设置.next = NULL
};struct control *add_receive_to_ctrl_list(struct control *phead)
{//头插法实现 添加链表节点return add_interface_to_ctrl_list(phead,&receive_control);};
receive_interface.h
#ifndef ___RECEIVE_INTERFACE_H___
#define ___RECEIVE_INTERFACE_H___#include "control.h"
struct control *add_receive_to_ctrl_list(struct control *phead);#endif
修改的main.c
#include <stdio.h>
#include <pthread.h>
#include <stdlib.h>
#include <wiringPi.h>#include "control.h"
#include "mq_queue.h"
#include "voice_interface.h"
#include "socket_interface.h"
#include "smoke_interface.h"
#include "receive_interface.h"
#include "global.h"// msg_queue_createint main() {pthread_t thread_id;struct control *control_phead = NULL;struct control *pointer = NULL;ctrl_info_t *ctrl_info = NULL;ctrl_info = (ctrl_info_t *)malloc(sizeof(ctrl_info_t));ctrl_info->ctrl_phead = NULL;ctrl_info->mqd = -1;int node_num = 0; // 统计节点数if(-1 == wiringPiSetup())// 初始化 wiringPi 库{perror("wiringPi Init");return -1;}// 创建消息队列ctrl_info->mqd = msg_queue_create();if(-1 == ctrl_info->mqd)// 创建消息队列失败{printf("%s|%s|%d, mqd= %d\n",__FILE__,__func__,__LINE__,ctrl_info->mqd);return -1;}//  头插法插入 , so 头一直在变化ctrl_info->ctrl_phead = add_voice_to_ctrl_list(ctrl_info->ctrl_phead);ctrl_info->ctrl_phead = add_tcpsocket_to_ctrl_list(ctrl_info->ctrl_phead);ctrl_info->ctrl_phead = add_smoke_to_ctrl_list(ctrl_info->ctrl_phead);ctrl_info->ctrl_phead = add_receive_to_ctrl_list(ctrl_info->ctrl_phead);pointer = ctrl_info->ctrl_phead;while(NULL!=pointer) // 对所有控制结构体初始化,并且统计节点数{if(NULL != pointer->init){printf("%s|%s|%d   control_name = %s\n",__FILE__,__func__,__LINE__,pointer->control_name);pointer->init();}pointer = pointer->next;node_num++; // 统计节点数}// 根据节点的总数 --> 创建对应数目的线程pthread_t *tid = (pthread_t *)malloc(sizeof(int) *node_num);pointer = ctrl_info->ctrl_phead;for(int i=0;i<node_num;++i)//遍历所有节点{if(NULL != pointer->get){printf("%s|%s|%d   control_name = %s\n",__FILE__,__func__,__LINE__,pointer->control_name);pthread_create(&tid[i],NULL,(void *)pointer->get,(void *)ctrl_info); // 传入这个结构体参数,方便同时调用多组线程里面的API}pointer = pointer->next;}for(int i=0;i<node_num;++i){pthread_join(tid[i],NULL);}for(int i=0;i<node_num;++i){if(NULL != pointer->final)pointer->final(); // 接打开的使用接口关闭pointer = pointer->next;}msq_queue_final(ctrl_info->mqd);if(NULL != ctrl_info)free(ctrl_info); // 这个是malloc 堆区申请的内存 -->  需要手动的释放if(NULL != tid)free(tid);return 0;
}
编译执行:
编译:
make
发送到arm-64平台
scp ./obj/smarthome orangepi@192.168.1.11:/home/orangepi
// 需要用到阿里云人脸识别接口,需要调用 py文件,一起传过去
scp src/face.py orangepi@192.168.1.11:/home/orangepi
执行:
sudo -E ./smarthome
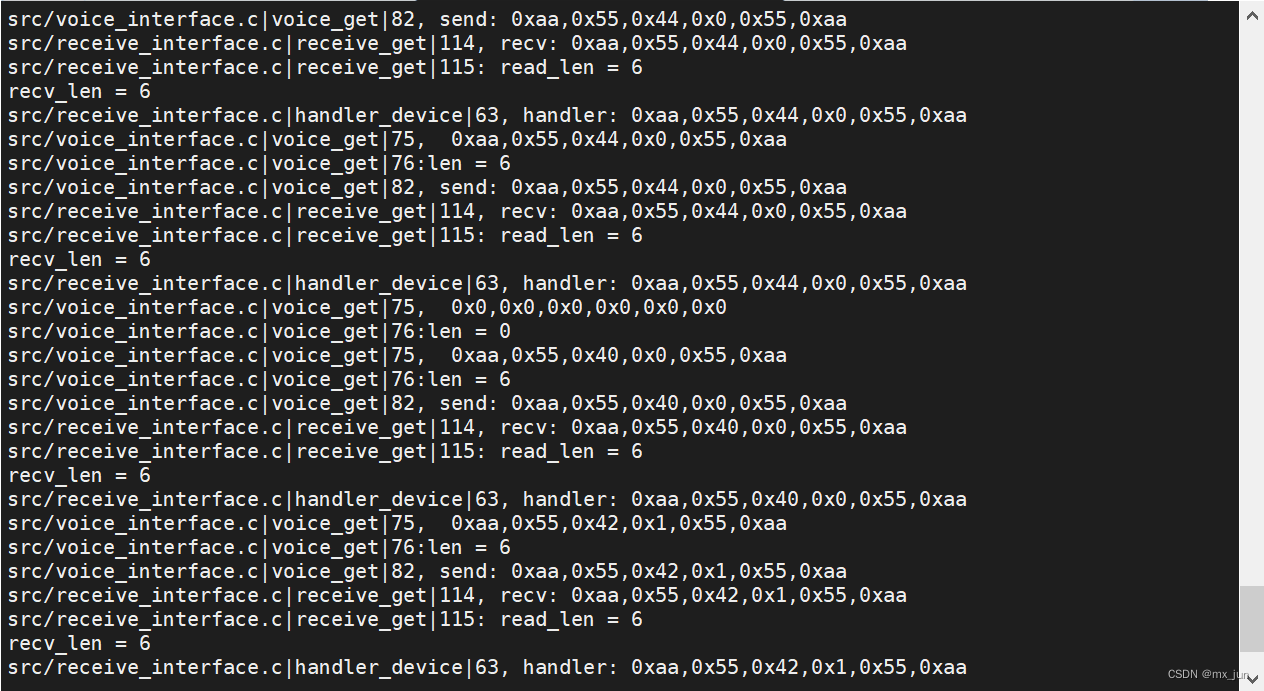
可以看到我们的 hanler 函数已经接收到对的数据了,剩下的就是对这些数据的处理了,我们将在下一篇实现,让代码和关联设备们起来,进一步完善我们的功能。

![【实验3.1]使用Scrapy采集豆瓣读书评分在9分以上的图书数据。 要求采集每本图书的数据,包括图书名、评分、作者、出版社和出版年份。](https://img-blog.csdnimg.cn/direct/b2b170ca58cd468faa1acbb4155242be.png)