文章目录
- 前言
- 事件UIEvent
- 一、事件传递
- 遍历顺序
- 二、手势识别
- 三、响应机制
- UIResponder(响应者)
- 响应者链
- 四、相关应用
- 扩大button点击范围
- 穿透事件
- 总结
前言
提到响应者链与事件传递,如果看过其他人的博客,经常能看到这经典的三张图
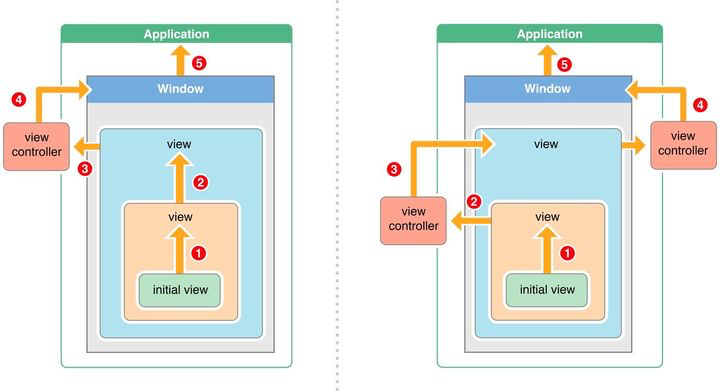
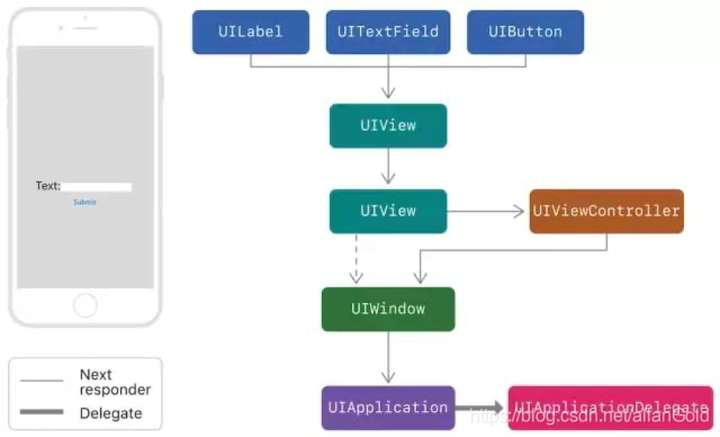
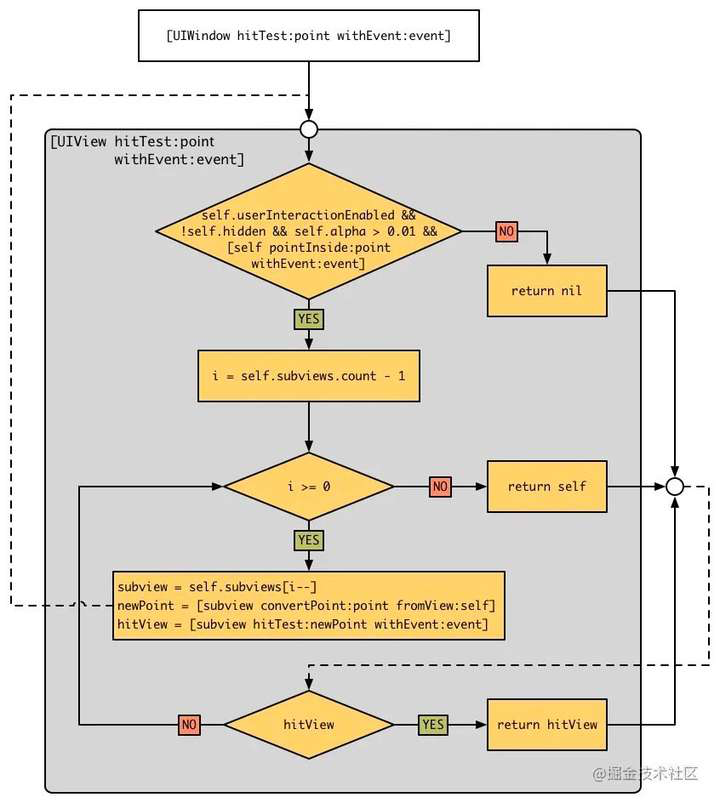
本文会对事件的传递与响应机制进行详细的讲解
事件UIEvent
在开讲之前,我们先来理解一下UIEvent
事件指的是 UIEvent : NSObject,它的API文档很简单:
typedef NS_ENUM(NSInteger, UIEventType) {UIEventTypeTouches,UIEventTypeMotion,UIEventTypeRemoteControl,UIEventTypePresses API_AVAILABLE(ios(9.0)),UIEventTypeScroll      API_AVAILABLE(ios(13.4), tvos(13.4)) API_UNAVAILABLE(watchos) = 10,UIEventTypeHover       API_AVAILABLE(ios(13.4), tvos(13.4)) API_UNAVAILABLE(watchos) = 11,UIEventTypeTransform   API_AVAILABLE(ios(13.4), tvos(13.4)) API_UNAVAILABLE(watchos) = 14,
};typedef NS_ENUM(NSInteger, UIEventSubtype) {// available in iPhone OS 3.0UIEventSubtypeNone                              = 0,// for UIEventTypeMotion, available in iPhone OS 3.0UIEventSubtypeMotionShake                       = 1,// for UIEventTypeRemoteControl, available in iOS 4.0UIEventSubtypeRemoteControlPlay                 = 100,UIEventSubtypeRemoteControlPause                = 101,UIEventSubtypeRemoteControlStop                 = 102,UIEventSubtypeRemoteControlTogglePlayPause      = 103,UIEventSubtypeRemoteControlNextTrack            = 104,UIEventSubtypeRemoteControlPreviousTrack        = 105,UIEventSubtypeRemoteControlBeginSeekingBackward = 106,UIEventSubtypeRemoteControlEndSeekingBackward   = 107,UIEventSubtypeRemoteControlBeginSeekingForward  = 108,UIEventSubtypeRemoteControlEndSeekingForward    = 109,
};/// Set of buttons pressed for the current event
/// Raw format of: 1 << (buttonNumber - 1)
/// UIEventButtonMaskPrimary = 1 << 0
typedef NS_OPTIONS(NSInteger, UIEventButtonMask) {UIEventButtonMaskPrimary    = 1 << 0,UIEventButtonMaskSecondary  = 1 << 1
} NS_SWIFT_NAME(UIEvent.ButtonMask) API_AVAILABLE(ios(13.4)) API_UNAVAILABLE(tvos, watchos);/// Convenience initializer for a button mask where `buttonNumber` is a one-based index of the button on the input device
/// .button(1) == .primary
/// .button(2) == .secondary
UIKIT_EXTERN UIEventButtonMask UIEventButtonMaskForButtonNumber(NSInteger buttonNumber) NS_SWIFT_NAME(UIEventButtonMask.button(_:)) API_AVAILABLE(ios(13.4)) API_UNAVAILABLE(tvos, watchos);UIKIT_EXTERN API_AVAILABLE(ios(2.0)) @interface UIEvent : NSObject@property(nonatomic,readonly) UIEventType     type API_AVAILABLE(ios(3.0));
@property(nonatomic,readonly) UIEventSubtype  subtype API_AVAILABLE(ios(3.0));@property(nonatomic,readonly) NSTimeInterval  timestamp;@property (nonatomic, readonly) UIKeyModifierFlags modifierFlags API_AVAILABLE(ios(13.4), tvos(13.4)) API_UNAVAILABLE(watchos);
@property (nonatomic, readonly) UIEventButtonMask buttonMask API_AVAILABLE(ios(13.4)) API_UNAVAILABLE(tvos, watchos);@property(nonatomic, readonly, nullable) NSSet <UITouch *> *allTouches;
- (nullable NSSet <UITouch *> *)touchesForWindow:(UIWindow *)window;
- (nullable NSSet <UITouch *> *)touchesForView:(UIView *)view;
- (nullable NSSet <UITouch *> *)touchesForGestureRecognizer:(UIGestureRecognizer *)gesture API_AVAILABLE(ios(3.2));// An array of auxiliary UITouch’s for the touch events that did not get delivered for a given main touch. This also includes an auxiliary version of the main touch itself.
- (nullable NSArray <UITouch *> *)coalescedTouchesForTouch:(UITouch *)touch API_AVAILABLE(ios(9.0));// An array of auxiliary UITouch’s for touch events that are predicted to occur for a given main touch. These predictions may not exactly match the real behavior of the touch as it moves, so they should be interpreted as an estimate.
- (nullable NSArray <UITouch *> *)predictedTouchesForTouch:(UITouch *)touch API_AVAILABLE(ios(9.0));@endNS_ASSUME_NONNULL_END#else
#import <UIKitCore/UIEvent.h>
#endif
我们以 UIEventType 作为突破口
typedef NS_ENUM(NSInteger, UIEventType) {UIEventTypeTouches,UIEventTypeMotion,UIEventTypeRemoteControl,UIEventTypePresses API_AVAILABLE(ios(9.0)),UIEventTypeScroll      API_AVAILABLE(ios(13.4), tvos(13.4)) API_UNAVAILABLE(watchos) = 10,UIEventTypeHover       API_AVAILABLE(ios(13.4), tvos(13.4)) API_UNAVAILABLE(watchos) = 11,UIEventTypeTransform   API_AVAILABLE(ios(13.4), tvos(13.4)) API_UNAVAILABLE(watchos) = 14,
};
目前iOS主流使用的事件有三种
touch events(触摸事件)motion events(运动事件)remote-control events(远程控制事件)
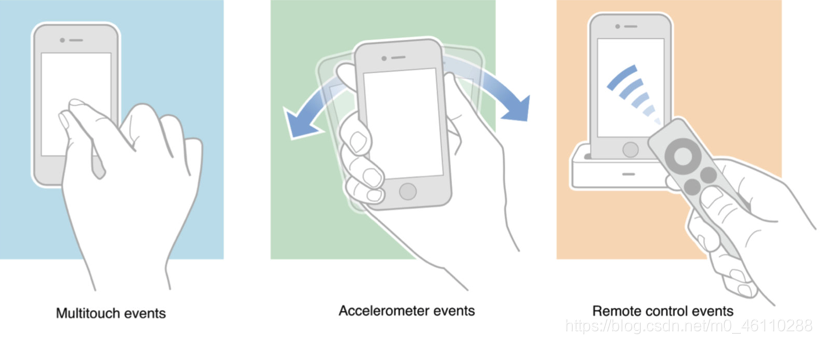
我们这里着重讲一下触摸事件
触摸事件就是我们的手指或者苹果的
Pencil(触笔)在屏幕中所引发的互动,比如轻点、长按、滑动等操作,是我们最常接触到的事件类型。触摸事件对象可以包含一个或多个触摸,并且每个触摸由
UITouch 对象表示。当触摸事件发生时,系统会将其沿着线路传递,找到适当的响应者并调用适当的方法,例如
touchedBegan:withEvent:。响应者对象会根据触摸来确定适当的方法。 触摸事件分为以下几类:
手势事件
- 长按手势(UILongPressGestureRecognizer)
- 拖动手势(UIPanGestureRecognizer)
- 捏合手势(UIPinchGestureRecognizer)
- 响应屏幕边缘手势(UIScreenEdgePanGestureRecognizer)
- 轻扫手势(UISwipeGestureRecognizer)
- 旋转手势(UIRotationGestureRecognizer)
- 点击手势(UITapGestureRecognizer)
- 自定义手势
- 点击 button 相关
触摸事件对应的对象为 UITouch,UITouch实际上就对应着我们的手指,有几根手指就有几个UITouch对象
一、事件传递
事件传递机制(Event Handling)
iOS的事件传递系统将触摸和其他事件(如动作、手势)发送到视图层次结构中的适当对象。在事件传递过程中,系统通常从根视图开始查找,并递归向下查找以找到最适合处理该事件的视图。
传递流程
- 事件的产生:
用户通过手势或是触摸等其他操作与设备交互,生成事件,系统将事件传递给应用的UIApplication实例,以开始事件分发 - UIApplication事件分发:
UIApplication负责顶层管理所有用户输入事件。
它将事件传递给当前活动的UIWindow对象,以进一步查找适合的响应者。 - UIWindow事件分发:
当前活动的UIWindow对象接收事件并通过hitTest:withEvent:方法开始寻找适当的视图。
UIWindow遍历整个视图层次结构,以找到最合适的视图来响应事件。 - 命中测试(Hit-Testing):
hitTest:withEvent:是寻找第一响应者的核心方法。它通过以下步骤工作:
- 检查当前视图的
userInteractionEnabled、hidden和alpha属性以确保视图可交互。当视图隐藏属性hidden=NO、交互userInteractionEnabled=YES、透明度alpha>0.01三者同时满足才拥有响应能力。 - 调用
pointInside:withEvent:,确定触摸点是否在当前视图的边界范围内。 - 从后往前遍历子视图,递归调用子视图的
hitTest:withEvent:方法。 - 如果找到合适的子视图,它将返回该子视图作为第一响应者;否则返回当前视图自身。
我们可以写一个其简单实现实例
- (UIView *)hitTest:(CGPoint)point withEvent:(UIEvent *)event {// 视图不能交互、隐藏或不可见时,直接返回nilif (self.userInteractionEnabled == NO || self.hidden == YES || self.alpha < 0.01) {return nil;}// 判断触摸点是否在当前视图范围内if (![self pointInside:point withEvent:event]) {return nil;}// 从后往前遍历子视图(子视图叠加次序),递归调用for (UIView *subview in [self.subviews reverseObjectEnumerator]) {// 转换坐标到子视图的坐标系CGPoint convertedPoint = [subview convertPoint:point fromView:self];// 递归查找子视图UIView *hitView = [subview hitTest:convertedPoint withEvent:event];if (hitView != nil) {return hitView;}}// 没有合适的子视图时,当前视图自己成为第一响应者return self;
}
- 第一响应者确定:
如果确定了当前触摸点在当前视图上,同时当前视图没有任何子视图,那么当前视图就成为第一响应者并开始处理触摸事件
touchesBegan:withEvent:、touchesMoved:withEvent:、touchesEnded:withEvent:、touchesCancelled:withEvent:方法由第一响应者接收并处理,这些都是触摸事件
讲到这里,其实我们的事件传递就已经结束了,事件传递的目的就是为了让我们找到第一响应者
总结一下第一响应者
- 能够响应触摸事件
- 触摸点在自己身上
- 没有任何子视图,或是所有子视图都不在触摸点上
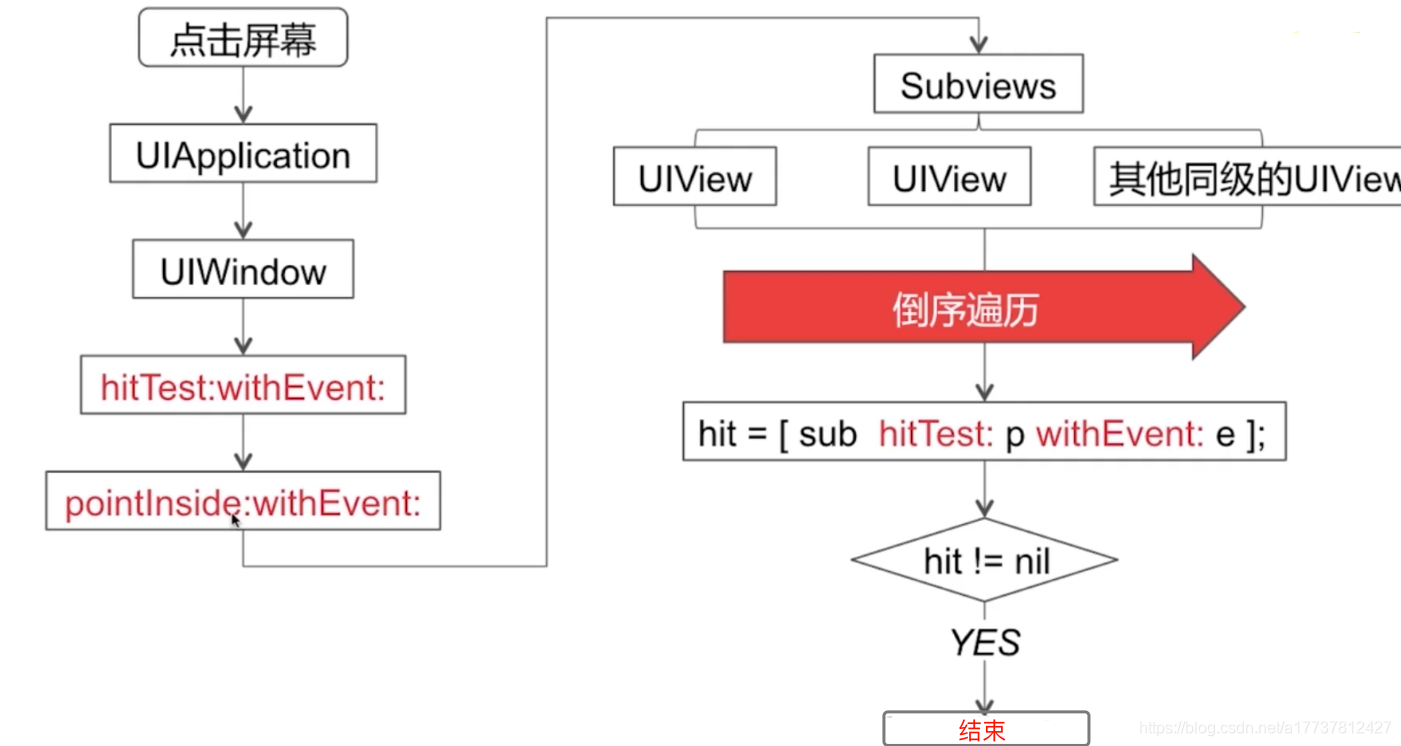
遍历顺序
我们在上图中看到了在subViews中查找响应者的过程是倒序遍历,这是什么意思呢
也就是我们遍历当前视图的子视图时,首先hitTest:withEvent:方法会被子视图数组中的最后一个元素调用
如何理解这句话呢?简单理解就是会从最后一个添加到当前视图的子视图进行遍历,也就是视图上最上层的子视图是第一个被遍历的,然后再继续去遍历其他子视图,我们来看一个demo:
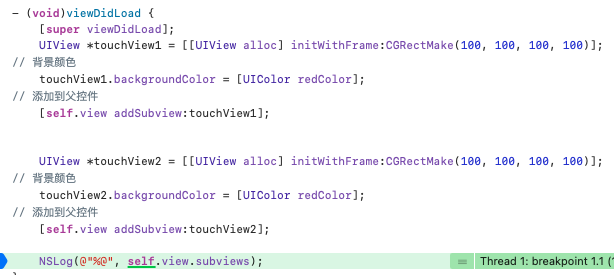
可以看到touchView1先被添加到view中,随后再添加touchView2,我们来看一下subViews数组
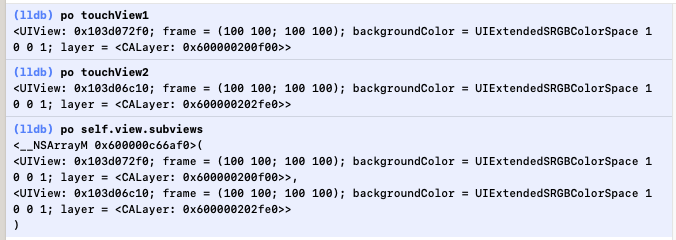
可以看到touchView2在数组的尾部,这也就说明了倒序遍历就是从后面添加的视图向前遍历
二、手势识别
找到了合适的View,也就是第一响应者,如果是触摸事件,我们就要去识别是何种手势
使用不同的手势会调用不同次数的事件,这里我们不细讲,只要知道有这么一个过程即可
三、响应机制
在了解响应者链前,我们需要知道什么是响应者
UIResponder(响应者)
在 iOS 中,只有继承于 UIResponder 的对象、或者它本身才能成为响应者。很多常见的对象都可以相应事件,比如 UIApplication 、UIViewController、所有的 UIView(包括 UIWindow)。
我们来看一张继承图
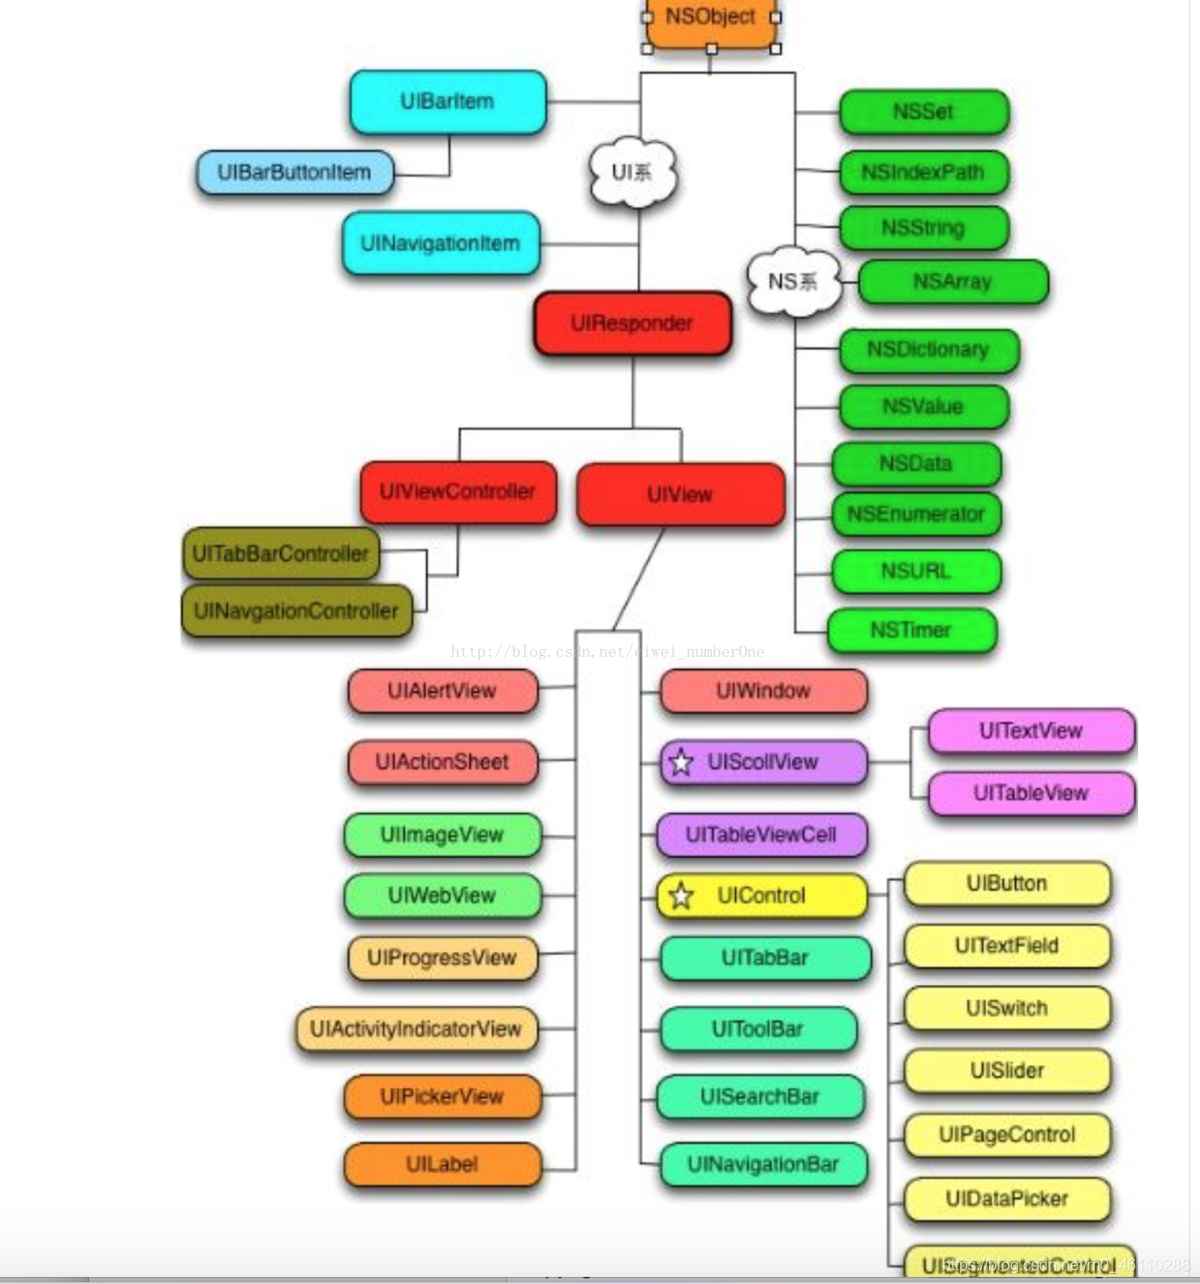
可以看到UIResponder提供了我们平时最常用的touchesBegan/touchesMoved/touchesEnded方法。此外还有如下几个属性比较重要:
isFirstResponder:判断该View是否为第一响应者。canBecomeFirstResponder:判断该View是否可以成为第一响应者。becomeFirstResponder:使该View成为第一响应者。resignFirstResponder:取消View的第一响应者。
如果我们将一个view_A先加在view_B上,然后又加到view_C上,那么view_A.nextResponder指的是view_B。
响应者链
找到第一响应者之后并且识别出手势后,我们就要确定由谁来响应这个事件了,如何理解这句话呢?
第一响应者不一定能响应事件,因为他可能并没有实现触摸事件
我们来以一个Demo来理解

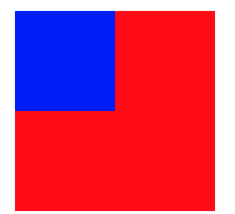
红色的是V1,蓝色的是V2,V2是第一响应者
我们为我们的V1添加点击事件
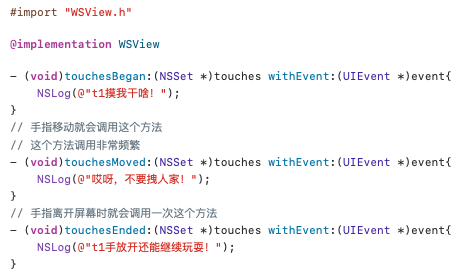
我们点击蓝色区域

可以看到响应触摸事件的我们的V1,也就是红色区域,这也说明了第一响应者不一定能响应事件
这里需要注意的一点是如果我们要给视图添加触摸事件,一定要新建一个子类View,不能再UIViewC中重写touches实例方法,因为这样事件的响应者就是UIViewC而非你期望中的View,我们也以一个Demo来示范
在VC中重写方法
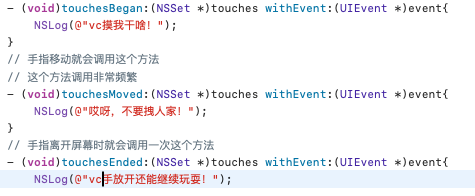
在VC中重写方法
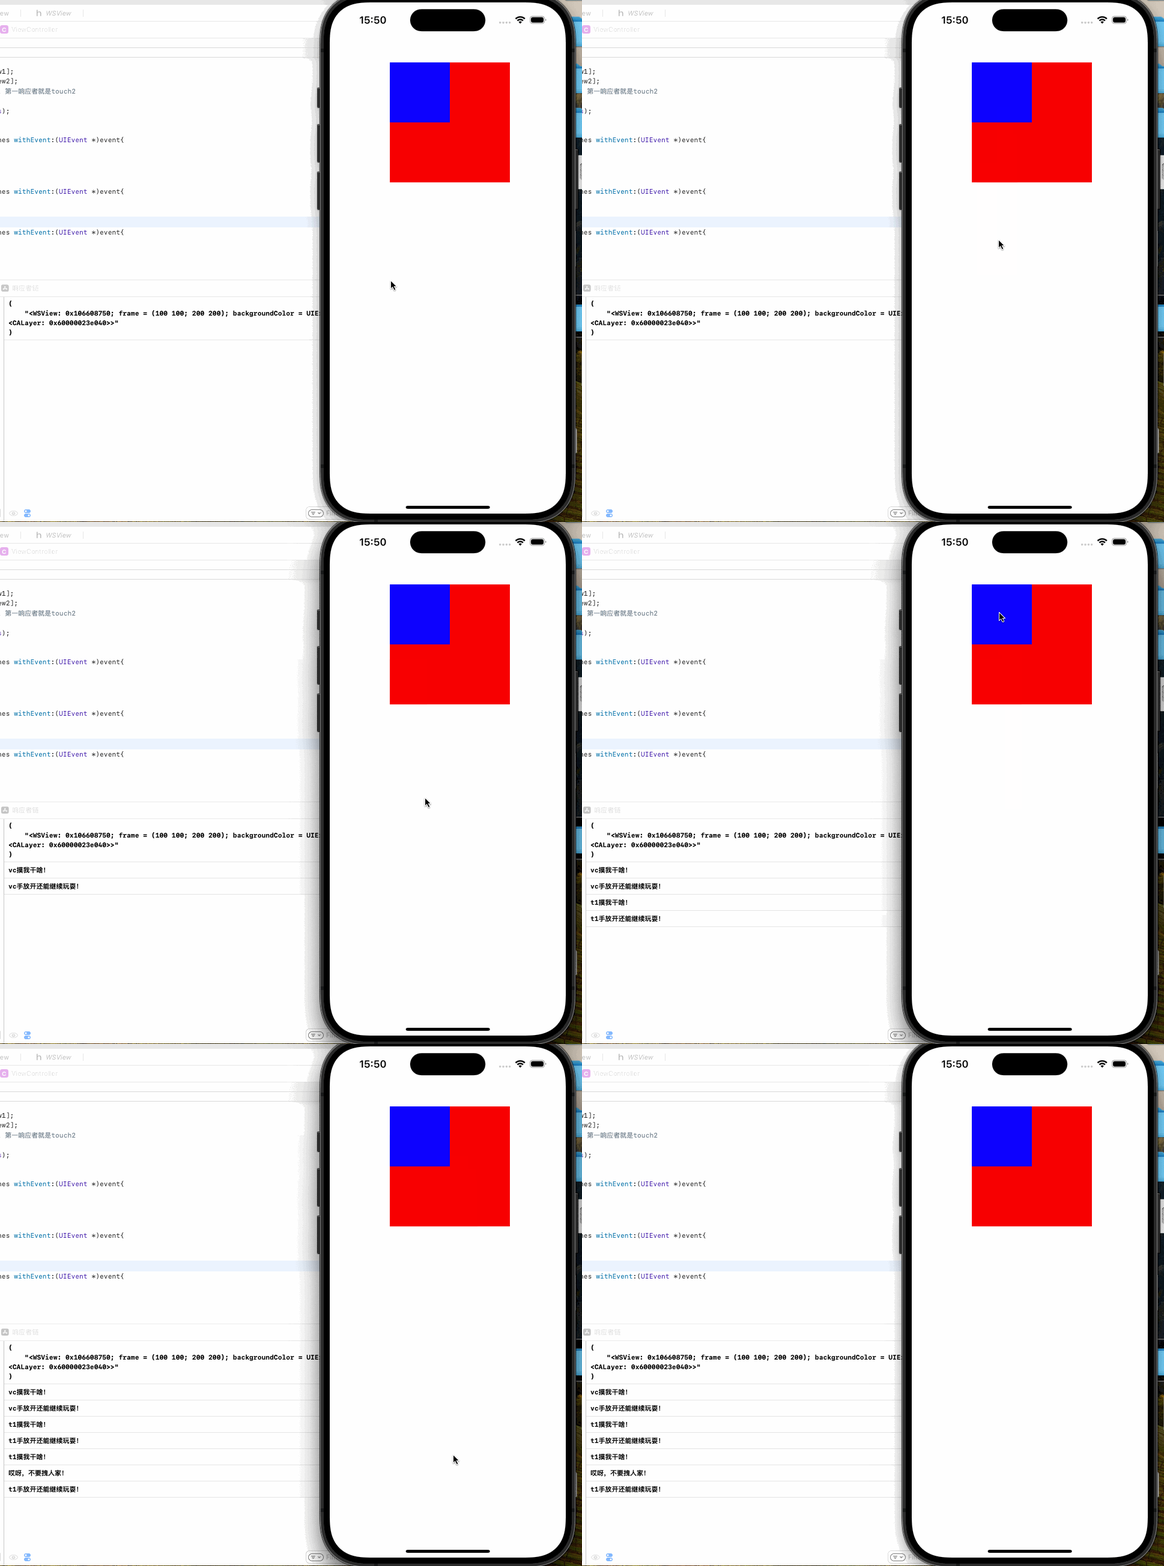
可以看到当我点击空白区域时候响应的是VC,点击蓝色或是红色区域时响应的是V1,这是因为事件的传递是沿响应者链传递的,由此引出我们对响应者链的讨论
响应者链示意图:
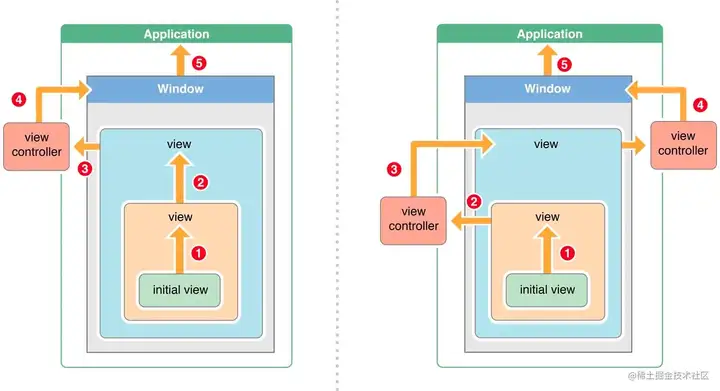
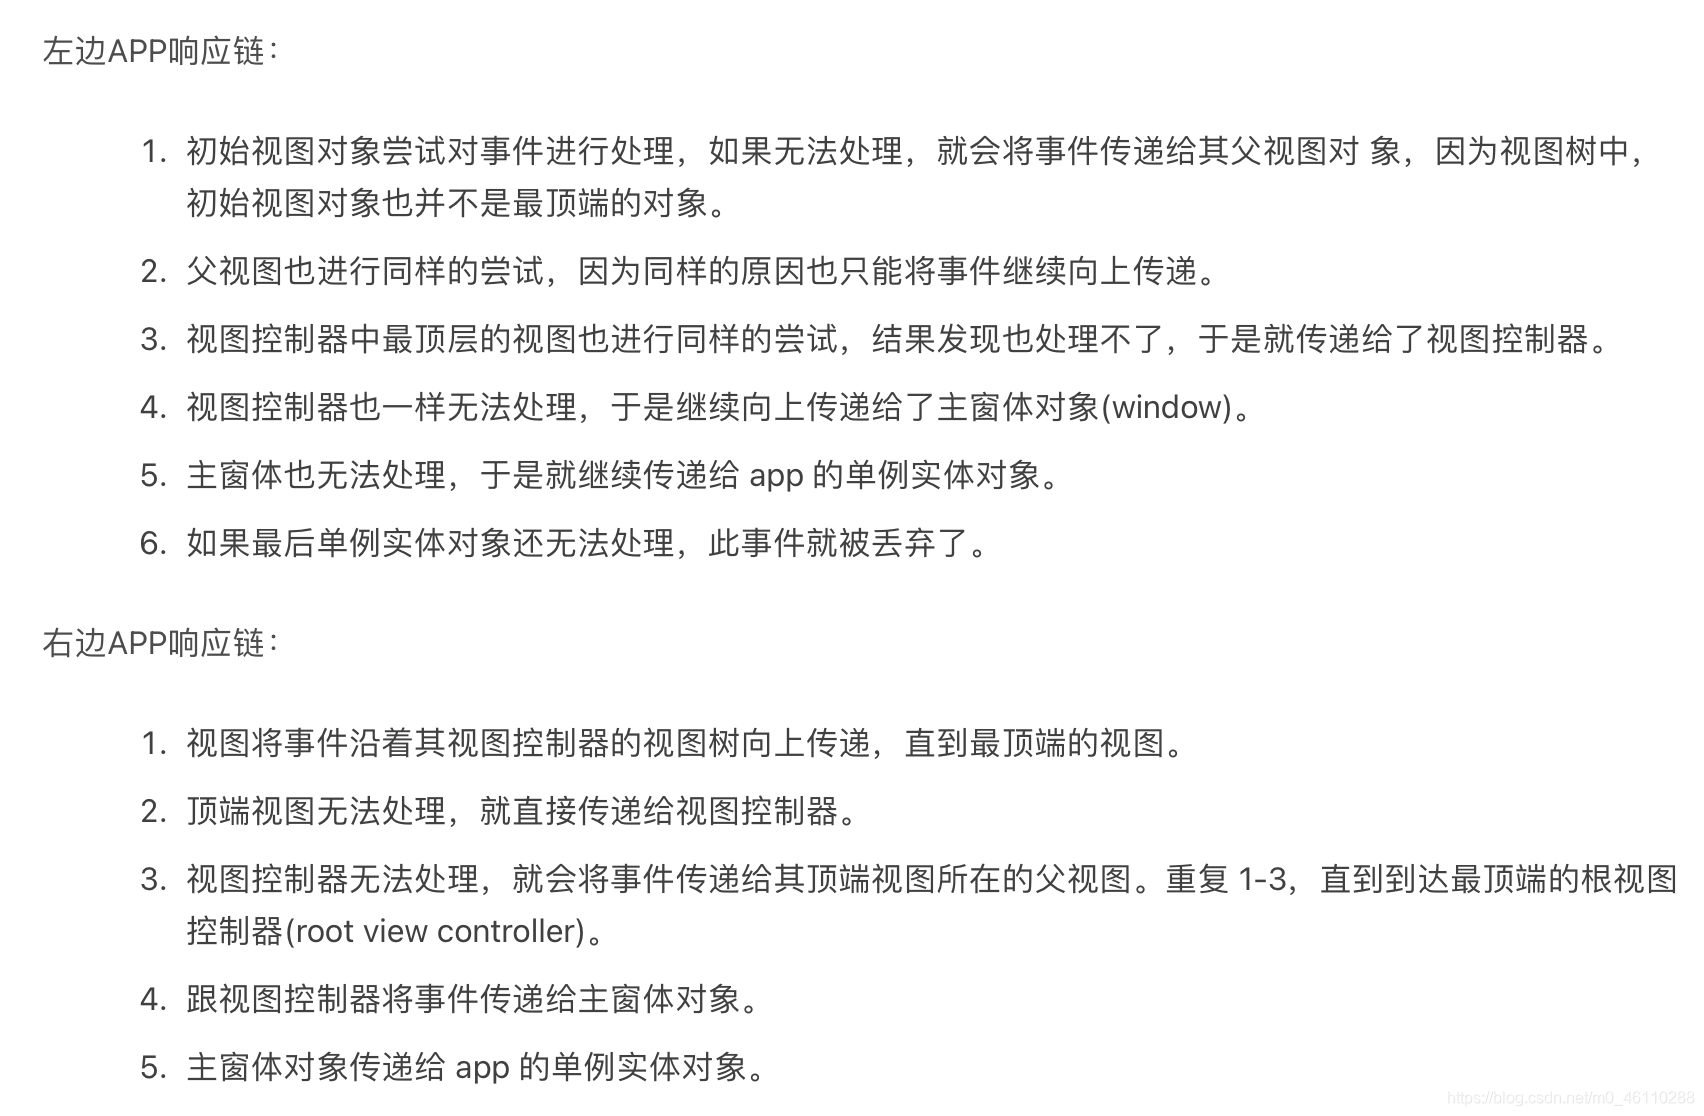
- Response Chain,响应链,一般我们称之为响应者链。
- 在我们的 app 中,所有的视图都是按照一定的结构组织起来的,即树状层次结构,每个 view 都有自己的 superView,包括 controller 的 topmost view(即 controller 的 self.view)。
- 当一个 view 被 add 到 superView 上的时候,它的 nextResponder 属性就会被指向它的 superView。
- 当 controller 被初始化的时候,self.view(topmost view) 的 nextResponder 会被指向所在的 controller,而 controller 的 nextResponder 会被指向 self.view的superView。
- 这样,整个 app 就通过 nextResponder 串成了一条链,这就是我们所说的响应者链。
- 所以响应者链是一条虚拟的链,并没有一个对象来专门存储这样的一条链,而是通过 UIResponder 的属性串联起来的。
@property(nonatomic, readonly, nullable) UIResponder *nextResponder;
总结一下响应者链的响应流程
判断当前视图能否响应,再去判断当前视图的nextResponder,如果是VC的View,那么nextResponder就是VC
如果不是控制器的 View,上一个响应者就是SuperView
响应的大致的过程 第一响应者 –> super view –> ……–> view controller –> window –>Application
四、相关应用
扩大button点击范围
解决:给button加分类然后重写pointInside
实现步骤:
- 自定义按钮:创建一个自定义按钮子类,继承自 UIButton。
- 重写 point(inside:with:):在自定义按钮类中重写此方法。该方法接受一个点,并判断该点是否在视图的范围内。你可以扩展点击区域,以便更宽泛的区域内点击时视图仍然会接收点击事件。
- 设定点击区域扩展的大小:可以设定需要扩大点击范围的值,在四个方向上(上、下、左、右)同时增大或仅针对特定方向。
// CustomButton.h
#import <UIKit/UIKit.h>@interface CustomButton : UIButton@property (nonatomic) UIEdgeInsets hitTestEdgeInsets;@end// CustomButton.m
#import "CustomButton.h"@implementation CustomButton- (BOOL)pointInside:(CGPoint)point withEvent:(UIEvent *)event {// 计算新的扩大后的点击区域CGRect largerFrame = CGRectMake(self.bounds.origin.x - self.hitTestEdgeInsets.left,self.bounds.origin.y - self.hitTestEdgeInsets.top,self.bounds.size.width + self.hitTestEdgeInsets.left + self.hitTestEdgeInsets.right,self.bounds.size.height + self.hitTestEdgeInsets.top + self.hitTestEdgeInsets.bottom);// 判断点是否在新的点击区域内return CGRectContainsPoint(largerFrame, point);
}@end
在你的视图控制器中,将自定义按钮的 hitTestEdgeInsets 属性设置为所需的值,以扩大点击区域:
// Example usage in a view controller
CustomButton *button = [[CustomButton alloc] initWithFrame:CGRectMake(100, 100, 100, 40)];
button.backgroundColor = [UIColor systemBlueColor];
[button setTitle:@"Click Me" forState:UIControlStateNormal];// 将点击区域向四个方向各扩展10个点
button.hitTestEdgeInsets = UIEdgeInsetsMake(-10, -10, -10, -10);[self.view addSubview:button];
穿透事件
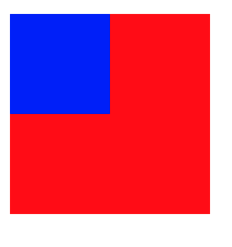
例如我们想点击蓝色区域时响应事件的是红色区域,但是第一响应者是蓝色区域,那么就需要我们重写(UIView *)hitTest:(CGPoint)point withEvent:(UIEvent *)event方法,让其无法成为响应者,这样就会让红色成为响应者
- (UIView *)hitTest:(CGPoint)point withEvent:(UIEvent *)event {self.userInteractionEnabled = NO;return [super hitTest:point withEvent:event];}
总结
- 当触摸事件发生后,系统会自动生成一个
UIEvent对象,记录事件产生的时间和类型 - 然后系统会将UIEvent事件加入到一个由
UIApplication管理的事件队列中 - 然后
UIApplication将事件分发给UIWindow,主窗口会在视图层次结构中找到一个最合适的视图来处理触摸事件 - 不断递归调用
hitTest方法来找到第一响应者 - 如果第一响应者无法响应事件,那么按照响应者链往上传递,也就是传递给自己的父视图
- 一直传递直到
UIApplication,如果都无法响应则事件被丢弃
参考博客事件传递与响应 详解(精通iOS系列)
