✨1. 实现功能
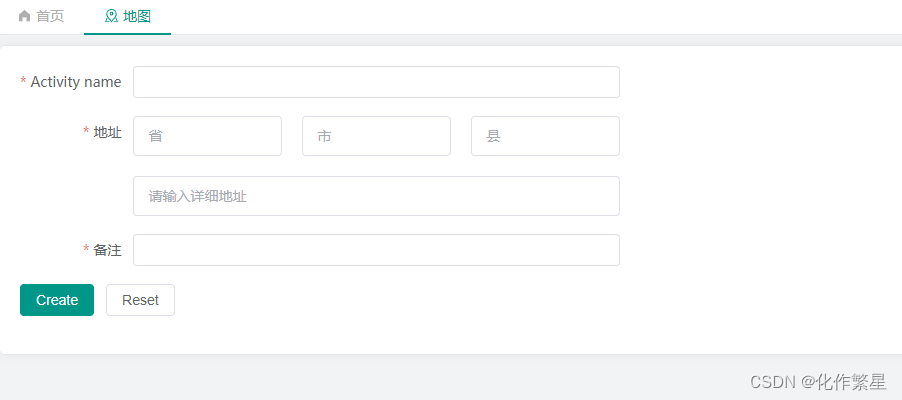
- 🌟表单内显示省市县以及详细地址
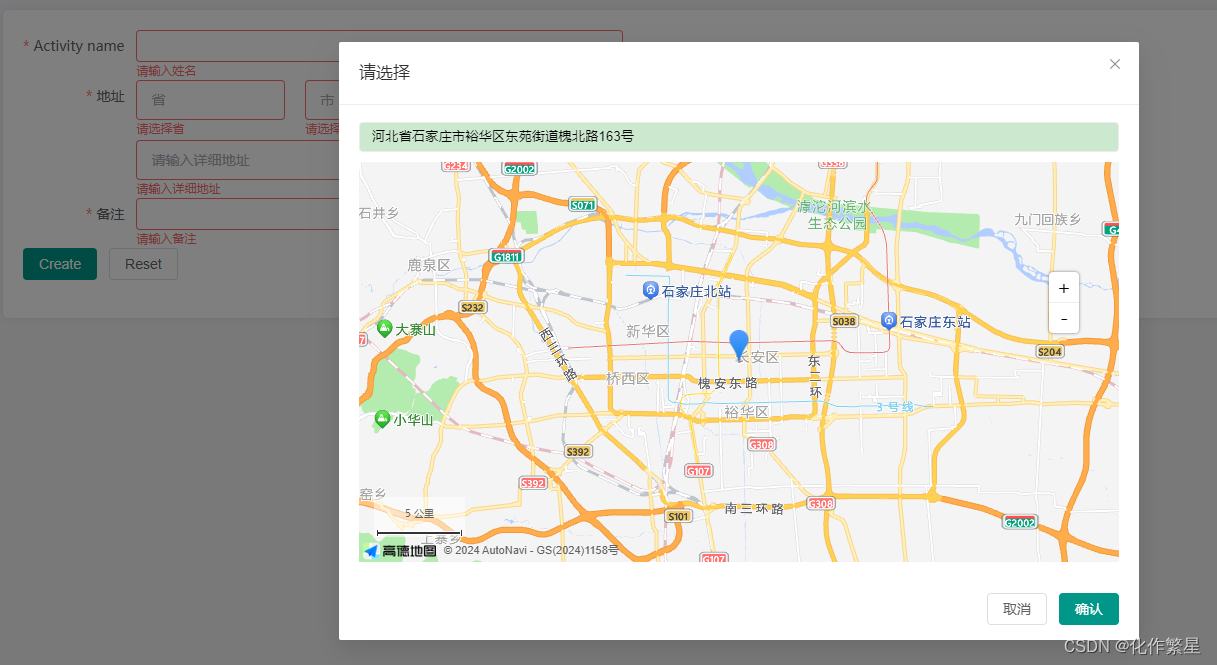
- 点击省市县输入框时,打开对应地图弹窗,进行位置选择
- 选择位置回显入对应输入框
- 表单内的省市县以及地址输入框同外嵌表单走相同的校验方式
- 触发校验后点击
reset实现清除校验与清空数据
- 🌟地图内展示地址搜索框以及地图坐标图
- 搜索框展示当前经纬度地址
- 搜索框可输入自定义地址,下拉菜单展示范围兴趣点和道路信息,点击可进行搜索
- 🌟 单独封装每个组件,使
form-item和dialog以及amap三个组件可单独使用
✨2. 示例图
-
💖示例图1:💖
-
💖💖示例图2:💖
-
💖💖💖示例图3:💖

-
💖💖💖💖示例图4:💖

-
💖💖💖💖💖示例图5:💖

✨3. 组件代码
🌹1. 组件目录结构

2. 🍗 🍖地图组件AmapContainer.vue
<template><div v-loading="loading"><input type="text" class="address" v-model="iMap.address" id="inputAddress" /><div id="container"></div></div>
</template><script setup lang="ts" name="AmapContainer">
import { ref, reactive, computed, watch, onMounted, onUnmounted } from "vue";
import AMapLoader from "@amap/amap-jsapi-loader";
import { AMAP_MAP_KEY, AMAP_SECRET_KEY } from "@/config";
import { getBrowserLang } from "@/utils";
import { useGlobalStore } from "@/stores/modules/global";
import { IMap } from "../interface/index";const globalStore = useGlobalStore();
const language = computed(() => {if (globalStore.language == "zh") return "zh_cn";if (globalStore.language == "en") return "en";return getBrowserLang() == "zh" ? "zh_cn" : "en";
});const loading = ref(true);interface ExtendsWindow extends Window {_AMapSecurityConfig?: {securityJsCode: string;};
}
let _window: ExtendsWindow = window;// 定义map实例
let map: any = null;const iMap = reactive<IMap>({province: "",city: "",district: "",address: "",lnglat: [114.525918, 38.032612],canSubmit: true
});watch(() => iMap.address,() => {iMap.canSubmit = !iMap.address;}
);onMounted(() => {initMap();
});onUnmounted(() => {map?.destroy();
});// 初始化地图
const initMap = async () => {_window._AMapSecurityConfig = {securityJsCode: AMAP_SECRET_KEY // ❓高德秘钥👇👇下方会有👇👇};AMapLoader.load({key: AMAP_MAP_KEY, // ❓申请好的Web端开发者Key,首次调用 load 时必填👇👇下方会有👇👇version: "2.0", // ❓指定要加载的 JSAPI 的版本,缺省时默认为 1.4.15plugins: ["AMap.ToolBar", "AMap.Scale", "AMap.Marker", "AMap.Geocoder", "AMap.AutoComplete"] //需要使用的的插件列表}).then(AMap => {map = new AMap.Map("container", {// 设置地图容器idviewMode: "2D", // 是否为3D地图模式zoom: 11, // 初始化地图级别center: iMap.lnglat // 初始化地图中心点位置});//创建工具条插件实例const toolbar = new AMap.ToolBar({position: {top: "110px",right: "40px"}});map.addControl(toolbar);//创建比例尺插件实例const Scale = new AMap.Scale();map.addControl(Scale);//创建标记插件实例const Marker = new AMap.Marker({position: iMap.lnglat});map.addControl(Marker);//创建地理编码插件实例const Geocoder: any = new AMap.Geocoder({radius: 1000, //以已知坐标为中心点,radius为半径,返回范围内兴趣点和道路信息extensions: "base", //返回地址描述以及附近兴趣点和道路信息,默认“base | all”lang: language.value});//返回地理编码结果Geocoder.getAddress(iMap.lnglat, (status, result) => {if (status === "complete" && result.info === "OK") {iMap.province = result.regeocode.addressComponent.province;iMap.city = result.regeocode.addressComponent.city;iMap.district = result.regeocode.addressComponent.district;iMap.address = result.regeocode.formattedAddress;AutoComplete.setCity(iMap.address);loading.value = false;}});// 根据输入关键字提示匹配信息const AutoComplete = new AMap.AutoComplete({input: "inputAddress",city: iMap.address,datatype: "all",lang: language.value});AutoComplete.on("select", result => {iMap.lnglat = [result.poi.location.lng, result.poi.location.lat];setPointOrAddress();});//点击地图事件map.on("click", e => {iMap.lnglat = [e.lnglat.lng, e.lnglat.lat];setPointOrAddress();});// 设置地图点坐标与位置交互const setPointOrAddress = () => {Marker.setPosition(iMap.lnglat);map.setCenter(iMap.lnglat);map.setZoom(12);Geocoder.getAddress(iMap.lnglat, (status, result) => {if (status === "complete" && result.info === "OK") {iMap.province = result.regeocode.addressComponent.province;iMap.city = result.regeocode.addressComponent.city;iMap.district = result.regeocode.addressComponent.district;iMap.address = result.regeocode.formattedAddress;}});};}).catch(e => {console.log(e);});
};defineExpose({iMap
});
</script><style scoped lang="scss">
@import "../index.scss";
</style><style lang="scss">
.amap-sug-result {z-index: 10000;
}
</style>
🍀3. 弹窗组件AmapDialog.vue 🍀
<template><el-dialog :model-value="visible" title="请选择" width="800" :before-close="handleClose"><AmapContainer ref="amapContainer" /><template #footer><div class="dialog-footer"><el-button @click="handleClose">取消</el-button><el-button type="primary" :disabled="amapContainer?.iMap?.canSubmit" @click="handleConfirm">确认</el-button></div></template></el-dialog>
</template><script setup lang="ts" name="AmapExplore">
/*🔻// 使用方式// ❤️amapFlag: 控制弹窗显隐// ❤️iMap必须ref定义, 接收选择地址数据// 示例:// 💥<AmapExplore v-model:visible="amapFlag" v-model:amap="iMap" />💥
*/ 🔺
import { ref, withDefaults } from "vue";
import { IAddress } from "../interface/index";
import AmapContainer from "./AmapContainer.vue";withDefaults(defineProps<{visible: boolean;amap: Partial<IAddress>;}>(),{visible: false}
);const amapContainer = ref();// 定义emits
const emits = defineEmits<{"update:amap": [value: IAddress];"update:visible": [value: boolean];
}>();const handleConfirm = () => {// delete amapContainer.value?.iMap?.canSubmit;emits("update:amap", amapContainer.value?.iMap);handleClose();
};const handleClose = () => {emits("update:visible", false);
};
</script><style scoped lang="scss"></style>
🌼4. 表单组件AmapExplore/index.vue 🌼
<template><el-row :gutter="gutter" :style="gutterStyle"><el-col :span="8"><el-form-item prop="province"><el-inputv-model="iMapForm.province"ref="provinceRef"placeholder="省"size="large"style="width: 100%"@click="handleAmapChange"></el-input></el-form-item></el-col><el-col :span="8"><el-form-item prop="city"><el-inputv-model="iMapForm.city"ref="cityRef"placeholder="市"size="large"style="width: 100%"@click="handleAmapChange"></el-input></el-form-item></el-col><el-col :span="8"><el-form-item prop="district"><el-inputv-model="iMapForm.district"ref="districtRef"placeholder="县"size="large"style="width: 100%"@click="handleAmapChange"></el-input></el-form-item></el-col></el-row><el-col :span="24"><el-form-item prop="address"><el-input v-model="iMapForm.address" placeholder="请输入详细地址" size="large" style="width: 100%"></el-input></el-form-item></el-col><AmapDialog v-model:visible="amapFlag" v-model:amap="iMapForm" />
</template><script setup lang="ts" name="AmapExplore">
import { ref, reactive, watch, inject, watchEffect } from "vue";
import type { FormRules } from "element-plus";
import { IAddress } from "./interface/index";
import AmapDialog from "./components/AmapDialog.vue";// 栅格间隔与样式
const gutter = 20;
const gutterStyle = {width: `calc(100% + ${gutter}px)`,"margin-bottom": `${gutter}px`
};// 接收传入的formData和formRules
const { ruleForm, rules } = inject<{ ruleForm: Object; rules: any }>("aMap", { ruleForm: reactive({}), rules: reactive({}) });const iMapForm = ref<IAddress>({province: "",city: "",district: "",address: "",lnglat: []
});// 若地址有值,则赋予formData
watch(() => iMapForm,n => {// 为防止重复赋值if (n.value.province || n.value.city || n.value.district || n.value.address) {Object.assign(ruleForm, { ...iMapForm.value });}},{deep: true}
);// 另处理经纬度lnglat
watch([() => iMapForm.value.province, () => iMapForm.value.city, () => iMapForm.value.district], n => {if (n.some(item => !item)) {iMapForm.value.lnglat = [];}
});watch(() => iMapForm.value.lnglat,n => {if (!n.length) {Object.assign(ruleForm, iMapForm.value);}}
);// 将formData赋值给iMapForm-主要作用为清空重置
watchEffect(() => {Object.assign(iMapForm.value, { ...ruleForm });
});// form校验;
const iMapRules = reactive<FormRules<IAddress>>({province: [{ required: true, message: "请选择省", trigger: ["blur", "change"] }],city: [{ required: true, message: "请选择市", trigger: ["blur", "change"] }],district: [{ required: true, message: "请选择区、县", trigger: ["blur", "change"] }],address: [{ required: true, message: "请输入详细地址", trigger: ["blur", "change"] }]
});// 合并校验数据;
watch(rules, () => Object.assign(rules, { ...iMapRules }), {immediate: true,deep: true
});// 地图弹窗
const amapFlag = ref<boolean>(false);
const provinceRef = ref();
const cityRef = ref();
const districtRef = ref();
const handleAmapChange = () => {amapFlag.value = true;provinceRef.value.blur();cityRef.value.blur();districtRef.value.blur();
};
</script><style scoped lang="scss"></style>
5. 🌿scss文件 🌿
// AmapContainer
.address {box-sizing: border-box;width: 100%;height: 30px;padding: 0 12px;margin-bottom: 10px;line-height: 30px;border: 1px solid #ececec;border-radius: 4px;
}
#container {width: 100%;height: 400px;padding: 0;margin: 0;
}
🌴6. 类型定义interface/index.ts 🌴
export interface IAddress {province: string;city: string;district: string;address: string;lnglat: number[];
}
export interface IMap extends IAddress {canSubmit: boolean;
}
❕ ❕7. 地图组件内使用的高德AMAP_MAP_KEY和秘钥AMAP_SECRET_KEY可以自行设置
// 高德地图 key
export const AMAP_MAP_KEY: string = "****";
// 高德地图 安全密钥
export const AMAP_SECRET_KEY: string = "*****";
✨4. 父组件使用😎
- ☝️ 使用组件
<!-- 1. 使用组件 -->
<AmapExplore />
- ✌️使用
provide向后代传入表单数据(formData)和校验规则(formRules)
// 2. 传入formData和formRules
provide("aMap", { ruleForm, rules });
- 👋完整代码示例:
<template><div class="card amap-example"><el-form ref="ruleFormRef" :model="ruleForm" :rules label-width="auto" style="max-width: 600px"><el-form-item label="Activity name" prop="name"><el-input v-model="ruleForm.name" /></el-form-item><el-form-item label="地址" required><!-- 1. 使用组件 --><AmapExplore /></el-form-item><el-form-item label="备注" prop="remark"><el-input v-model="ruleForm.remark" /></el-form-item><el-form-item><el-button type="primary" @click="submitForm(ruleFormRef)"> Create </el-button><el-button @click="resetForm(ruleFormRef)">Reset</el-button></el-form-item></el-form></div>
</template><script setup lang="ts" name="amapExample">
import { reactive, ref, provide } from "vue";
import type { FormInstance, FormRules } from "element-plus";
import AmapExplore from "@/components/AmapExplore/index.vue";interface RuleForm {name: string;remark: string;
}
const ruleFormRef = ref<FormInstance>();
let ruleForm = reactive<RuleForm>({name: "",remark: ""
});let rules = reactive<FormRules<RuleForm>>({name: [{ required: true, message: "请输入姓名", trigger: "blur" }],remark: [{ required: true, message: "请输入备注", trigger: "blur" }]
});// 2. 传入formData和formRules
provide("aMap", { ruleForm, rules });const submitForm = async (formEl: FormInstance | undefined) => {console.log(ruleForm, "s");if (!formEl) return;await formEl.validate((valid, fields) => {if (valid) {console.log("submit!");} else {console.log("error submit!", fields);}});
};const resetForm = (formEl: FormInstance | undefined) => {if (!formEl) return;formEl.resetFields();
};
</script>
❗️ 5. 封装实例缺点💦
- 当选择地址之后,再次打开地图弹窗,更改地图标记点,地址会实时变更,
- 不论点击取消还是确认按钮,都会改变表单内部值
- 💢初始不会出现此问题💢
- 💪后续会改进😁😁😁😁

