目录
一、前言
二、spring 条件注解概述
2.1 条件注解@Conditional介绍
2.2 @Conditional扩展注解
2.2.1 @Conditional扩展注解汇总
三、spring 条件注解案例演示
3.1 @ConditionalOnBean
3.2 @ConditionalOnMissingBean
3.2.1 使用在类上
3.2.2 使用场景补充
3.3 @ConditionalOnClass
3.4 @ConditionalOnExpression
3.5 @ConditionalOnProperty
四、条件注解源码剖析
4.1 @ConditionalOnMissingClass 源码剖析
4.1.1 debug过程分析
4.1.2 源码分析过程小结
五、条件注解的应用场景
5.1 条件注解使用案例
六、写在文末
一、前言
spring框架之所以得到普遍应用,一方面是框架优良的封装性,能够帮助开发人员节省很多底层开发工作,从而提升效率,另一方面框架自身提供了很多扩展点,开发者通过这些扩展点可以对自身业务进行很好的拓展,比如自定义starter,从而与spring框架无缝集成。
随着springboot逐渐成为微服务开发的标配,得到很多开发者的喜爱,springboot相比spring来说,增加了很多对开发友好的功能、配置等,尤其是全注解开发是springboot框架的一大特色,由于注解相当的多,接下来以spring框架中一个容易被大家忽略的扩展点,即条件注解为例进行说明。
二、spring 条件注解概述
2.1 条件注解@Conditional介绍
spring中核心条件注解是@Conditional,它用于判断Bean是否满足特定的条件,如果满足(或不满足)条件,则将标注了该注解的bean注册到IOC容器,否则不注册。因此, @Conditional这个注解的核心就是用来控制 Bean 的创建的。
SpringBoot自动配置功能里面就大量的使用了条件注解,还有很多与springboot集成的第三方组件也有使用。
@Conditional注解和Condition接口搭配一起使用,通过对应Condition接口来告知是否满足匹配条件,注解源码如下:
@Target({ElementType.TYPE, ElementType.METHOD})
@Retention(RetentionPolicy.RUNTIME)
@Documented
public @interface Conditional {/*** 所有用于匹配的Condition接口(实现该接口的类),只有这些类都返回true才认为是满足条件*/Class<? extends Condition>[] value();
}
@Conditional注解可以添加在@Configuration、@Component、@Service等修饰的类上,用于控制对应的Bean是否需要创建,如果添加在@Bean修饰的方法上,则用于控制方法对应的Bean是否需要创建
2.2 @Conditional扩展注解
事实上,在实际开发或看到的框架级源码中,直接使用@Conditional并不多,更多的是使用像@ConditionalOnBean,@ConditionalOnMissingBean,或@ConditionalOnClass等这样的注解,我们也称之为扩展注解,以@ConditionalOnBean为例,不妨看一下该注解源码,可以看到,该注解添加了对@Conditional的引用,侧面说明了属于@Conditional注解的扩展这一说法。
@Target({ElementType.TYPE, ElementType.METHOD})
@Retention(RetentionPolicy.RUNTIME)
@Documented
@Conditional({OnBeanCondition.class})
public @interface ConditionalOnBean {Class<?>[] value() default {};String[] type() default {};Class<? extends Annotation>[] annotation() default {};String[] name() default {};SearchStrategy search() default SearchStrategy.ALL;Class<?>[] parameterizedContainer() default {};
}
2.2.1 @Conditional扩展注解汇总
下面列举的是@Conditional常用的扩展注解
| 注解名称 | 使用参考 | 生效位置 | 备注 |
|---|---|---|---|
| @ConditionalOnBean | @ConditionalOnBean(value=AA.class) | bean | IOC容器中存在括号中的实例时生效 |
| @ConditionalOnMissingBean | @ConditionalOnMissingBean(name = "bean名称") | bean | IOC容器中不存在括号中的实例时生效 |
| @ConditionalOnClass | @ConditionalOnClass(AA.class) | class | 类加载器中存在对应的类生效 |
| @ConditionalOnMissingClass | @ConditionalOnMissingClass(AA.class) | class | 类加载器中不存在对应的类生效 |
| @ConditionalOnExpression | @ConditionalOnExpression(“’表达式值’”) | class 或 bean | 判断SpEL 表达式成立生效 |
| @ConditionalOnProperty | @ConditionalOnProperty(prefix = “spring.redis”, name = “port”, havingValue = “3306”, matchIfMissing = true) | class 或 bean | 应用环境属性满足条件生效 |
| @ConditionalOnResource | @ConditionalOnResource(resources= “common.properties”) | class 或 bean | 应用环境存在指定的资源文件生效 |
三、spring 条件注解案例演示
上面总结了@Conditional条件注解以及相关的扩展注解,为了加深对这些注解的理解,接下来针对各个注解的使用通过代码进行演示,以形成更深刻的印象。
3.1 @ConditionalOnBean
@ConditionalOnBean对应的Condition处理类是OnBeanCondition,即在IOC容器中存在指定的Bean时当前的bean则被创建,源码如下,该注解可用在方法或类上。
@Target({ElementType.TYPE, ElementType.METHOD})
@Retention(RetentionPolicy.RUNTIME)
@Documented
@Conditional({OnBeanCondition.class})
public @interface ConditionalOnBean {Class<?>[] value() default {};String[] type() default {};Class<? extends Annotation>[] annotation() default {};String[] name() default {};SearchStrategy search() default SearchStrategy.ALL;Class<?>[] parameterizedContainer() default {};
}
创建如下配置类,在当前类中,在depart这个bean的方法上通过ConditionalOnBean注解来控制,即如果IOC容器中存在了role的bean实例,则depart这个bean才会被创建出来;
@ComponentScan("com.congge")
@Configuration
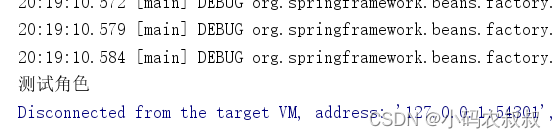
public class ScanConfig {@Beanpublic Role role(){return new Role("0002","测试角色");}/*** 也可以写为:@ConditionalOnBean(name = "role") , name的值确保是正确的* @return*/@Bean@ConditionalOnBean(Role.class)public Depart depart(){return new Depart("0001","架构部");}}按照上述代码,role这个bean实例会被创建,所以depart的bean也会被创建出来,使用下面的代码进行测试;
public static void main(String[] args) {AnnotationConfigApplicationContext applicationContext = new AnnotationConfigApplicationContext(ScanConfig.class);//角色存在Role role = (Role)applicationContext.getBean("role");System.out.println(role.getRoleName());//部门是否存在Depart depart = (Depart)applicationContext.getBean("depart");System.out.println(depart.getDeptName());}运行上面的代码,可以看到如下效果,说明depart的bean实例也创建了;

如果去掉role的bean实例创建,改造后代码如下
@ComponentScan("com.congge")
@Configuration
public class ScanConfig {@Bean@ConditionalOnBean(Role.class)public Depart depart(){return new Depart("0001","架构部");}}
改造测试代码
public static void main(String[] args) {AnnotationConfigApplicationContext applicationContext = new AnnotationConfigApplicationContext(ScanConfig.class);//角色存在//Role role = (Role)applicationContext.getBean("role");//System.out.println("role :" + role);//System.out.println(role.getRoleName());//部门是否存在Depart depart = (Depart)applicationContext.getBean("depart");System.out.println("depart :" + depart);//System.out.println(depart.getDeptName());}再次运行时直接报错了,即depart这个bean不存在,反向说明@ConditionalOnBean生效了

3.2 @ConditionalOnMissingBean
@ConditionalOnMissingBean对应的Condition实现类是OnBeanCondition,即IOC容器中不存在指定的Bean则创建当前的bean(或类中的bean),对应源码如下:
@Target({ElementType.TYPE, ElementType.METHOD})
@Retention(RetentionPolicy.RUNTIME)
@Documented
@Conditional({OnBeanCondition.class})
public @interface ConditionalOnMissingBean {Class<?>[] value() default {};String[] type() default {};Class<?>[] ignored() default {};String[] ignoredType() default {};Class<? extends Annotation>[] annotation() default {};String[] name() default {};SearchStrategy search() default SearchStrategy.ALL;Class<?>[] parameterizedContainer() default {};
}
紧接上述案例,在创建user的bean的方法上面使用ConditionalOnMissingBean注解,代码如下:
@ComponentScan("com.congge")
@Configuration
public class ScanConfig {@Beanpublic Role role(){return new Role("0002","测试角色");}@Bean@ConditionalOnMissingBean(name = "depart")public User user(){return new User("0003","jerry");}}
按照代码猜想,user方法使用当前注解,表示当IOC容器中不存在depart这个bean的时候,user这个bean会被创建出来,使用下面的测试代码
public static void main(String[] args) {AnnotationConfigApplicationContext applicationContext = new AnnotationConfigApplicationContext(ScanConfig.class);//角色存在Role role = (Role)applicationContext.getBean("role");System.out.println(role.getRoleName());//用户是否存在User user = (User)applicationContext.getBean("user");System.out.println(user.getUserName());}运行这段代码,看到如下效果,说明注解生效了

3.2.1 使用在类上
以上演示的是两个注解使用在方法上的效果,从源码上可以发现,也支持在类上面使用,如果作用在类上面时表示整个类中的bean生效;
我们在类上添加这个注解,如果IOC容器中并没有userBean这个实例的情况下,可以创建role和depart的bean实例
@ComponentScan("com.congge")
@Configuration
@ConditionalOnMissingBean(name = "userBean")
public class ScanConfig {@Beanpublic Role role(){return new Role("0002","测试角色");}/*** 也可以写为:@ConditionalOnBean(name = "role")* @return*/@Beanpublic Depart depart(){return new Depart("0001","架构部");}}
运行如下的测试代码
public static void main(String[] args) {AnnotationConfigApplicationContext applicationContext = new AnnotationConfigApplicationContext(ScanConfig.class);//用户是否存在//User user = (User)applicationContext.getBean("userBean");//System.out.println(user.getUserName());//角色存在Role role = (Role)applicationContext.getBean("role");System.out.println(role.getRoleName());//角色存在Depart depart = (Depart)applicationContext.getBean("depart");System.out.println(depart.getDeptName());}通过控制台输出日志也印证了上面的猜想,可以正确获取role或depart对应的bean

3.2.2 使用场景补充
对于该注解的使用场景,做如下补充:
- 项目中,只允许某个bean注入一次的时候使用,即保证在ioc中这个bean的实例只有一个1;
- 一般来说,对于自定义配置类,可以加@ConditionalOnMissingBean注解,以避免多个配置同时注入的风险;
加了这个注解后,当你注册两个相同类型的bean时,
会抛出异常,它会保证同一个类型的bean只有一个
如下,同时创建两个User的bean实例,user1和user2;
@Bean@ConditionalOnMissingBeanpublic User user1(){return new User("user1","james");}@Bean@ConditionalOnMissingBeanpublic User user2(){return new User("user2","zhaoyun");}通过运行下面的测试代码发现,在这种情况下,最终只创建了user1这个bean
public static void main(String[] args) {AnnotationConfigApplicationContext applicationContext = new AnnotationConfigApplicationContext(ScanConfig.class);User user1 = (User)applicationContext.getBean("user1");System.out.println(user1.getUserName());User user2 = (User)applicationContext.getBean("user2");System.out.println(user2.getUserName());}运行效果如下:

3.3 @ConditionalOnClass
@ConditionalOnClass对应的Condition处理类是OnClassCondition,即如果当前类路径下面有指定的类时则生效。对应的源码如下:
@Target({ElementType.TYPE, ElementType.METHOD})
@Retention(RetentionPolicy.RUNTIME)
@Documented
@Conditional({OnClassCondition.class})
public @interface ConditionalOnClass {Class<?>[] value() default {};String[] name() default {};
}
在当前工程中存在User这样一个类的情况下,通过这个注解,可以预想role这个bean可以被创建出来
@ComponentScan("com.congge")
@Configuration
//@ConditionalOnMissingBean(name = "userBean")
public class ScanConfig {/*** 也可以写成: com.congge.entity.User* @return*/@Bean@ConditionalOnClass(User.class)public Role role(){return new Role("0002","测试角色");}}
运行测试代码,可以看到role对应的bean被创建出来了;
假如将User类删除或注释掉,使用下面代码,再次测试
/*** 也可以写成: com.congge.entity.User* @return*/@Bean//@ConditionalOnClass(User.class)@ConditionalOnClass(name ="com.congge.entity.User")public Role role(){return new Role("0002","测试角色");}运行可以看到下面的效果

@ConditionalOnMissingClass 可以类比进行本地验证
3.4 @ConditionalOnExpression
@ConditionalOnExpression对应的Condition处理类是OnExpressionCondition,即只有当SpEL表达式满足条件的时候则生效,对应的源码如下
@Retention(RetentionPolicy.RUNTIME)
@Target({ElementType.TYPE, ElementType.METHOD})
@Documented
@Conditional({OnExpressionCondition.class})
public @interface ConditionalOnExpression {String value() default "true";
}
在本地配置文件 application.properties中增加如下配置:
server.port=8087#条件表达式需用到的配置
hxstrive.type=server
hxstrive.user.enable=true
hxstrive.order.size=10
在配置类上添加@ConditionalOnExpression注解,代码如下,当作用在类上面的时候,表示当表达式中的条件得到满足时,类中的bean将会被创建;
@Configuration
@ConditionalOnExpression("'${hxstrive.type}'.equals('server') && (${hxstrive.user.enable})")
public class ScanConfig {@Beanpublic Role role(){return new Role("0002","测试角色");}
}
关于SPEL表达式的写法,网上有非常详细的资料可供参考,这里就不再过多展示了
再在启动类中获取一下role的bean,如果能够获取到,说明表达式生效了
@SpringBootApplication
@EnableAutoConfiguration(exclude={DataSourceAutoConfiguration.class})
public class AnnoApp {public static void main(String[] args) {ConfigurableApplicationContext context = SpringApplication.run(AnnoApp.class, args);Role role = (Role) context.getBean("role");System.out.println(role.getRoleName());}
}
运行上述启动类,通过控制台可以发现,role这个bean的实例创建出来了

3.5 @ConditionalOnProperty
@ConditionalOnProperty对应的Condition实现类OnPropertyCondition,只有当对应的配置属性和给定条件的值相等的时候则生效,源码如下,
@Retention(RetentionPolicy.RUNTIME)
@Target({ElementType.TYPE, ElementType.METHOD})
@Documented
@Conditional({OnPropertyCondition.class})
public @interface ConditionalOnProperty {String[] value() default {};String prefix() default "";String[] name() default {};String havingValue() default "";boolean matchIfMissing() default false;
}
该注解通过其三个属性prefix,name以及havingValue来实现的,其中prefix表示配置文件里节点前缀,name用来从application.properties中读取某个属性值,havingValue表示目标值,具体来说:
- 如果该值为空,则返回false;
- 如果值不为空,则将该值与havingValue指定的值进行比较,如果一样则返回true,否则返回false;
- 返回值为false,则该configuration不生效;为true则生效;
在如下代码中,userBean的创建依赖于类上的注解@ConditionalOnProperty以及其中的属性值是否满足要求
@Configuration
@ConditionalOnProperty(prefix="spring.user",name = "username", havingValue = "jerry")
public class BeanConfig {@Bean("userBean")public User userBean(){return new User("0003","mike");}
}
在application.properties配置文件中存在如下配置
spring.user.username=jerry基于上面的配置条件下,运行下面的启动类,可以看到可以获取到userBean的实例
public static void main(String[] args) {ConfigurableApplicationContext context = SpringApplication.run(AnnoApp.class, args);User user = (User) context.getBean("userBean");System.out.println(user.getUserName());}
四、条件注解源码剖析
以@ConditionalOnMissingClass为例,分析下该注解的源码执行过程,有如下代码,在ScanConfig这个类上使用了该注解,表示如果注解中的User类存在的情况下,role这个bean将会被创建;
@Configuration
@ComponentScan("com.congge")
@ConditionalOnMissingClass(value = "com.congge.entity.User")
public class ScanConfig {@Beanpublic Role role(){return new Role("0002","测试角色");}}
在当前的工程中,我们先将User类删除或注释掉,使用如下的代码进行测试,效果是role的bean被创建出来了,这也正好与@ConditionalOnMissingClass这个注解要实现的功能内涵相符;

4.1 @ConditionalOnMissingClass 源码剖析
springboot从启动到如何进行扫描,注解解析,bean解析以及后置处理器等等流程这里不继续展开,这是一个相对复杂的过程,我们直接从该注解源码入手来看,搞清楚其底层实现原理。
@ConditionalOnMissingClass 源码如下,该注解可以作用在类上,也可以作用在某个方法即bean的创建上;
@Target({ElementType.TYPE, ElementType.METHOD})
@Retention(RetentionPolicy.RUNTIME)
@Documented
@Conditional({OnClassCondition.class})
public @interface ConditionalOnMissingClass {String[] value() default {};
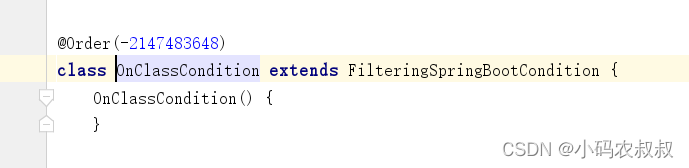
}实现条件选择的重要入口OnClassCondition.class,从这里点击进去,可以看到,该类继承了FilteringSpringBootCondition这个类,一般如果有继承关系,还需要从父类寻找线索;
从FilteringSpringBootCondition继续深入,看到了SpringBootCondition这个类,

继续深入到SpringBootCondition这个类中,才找到了最终的答案,即要完成条件的判断,最终需要调用matches这个方法,这个方法的接口定义就是在Condition接口中定义的;
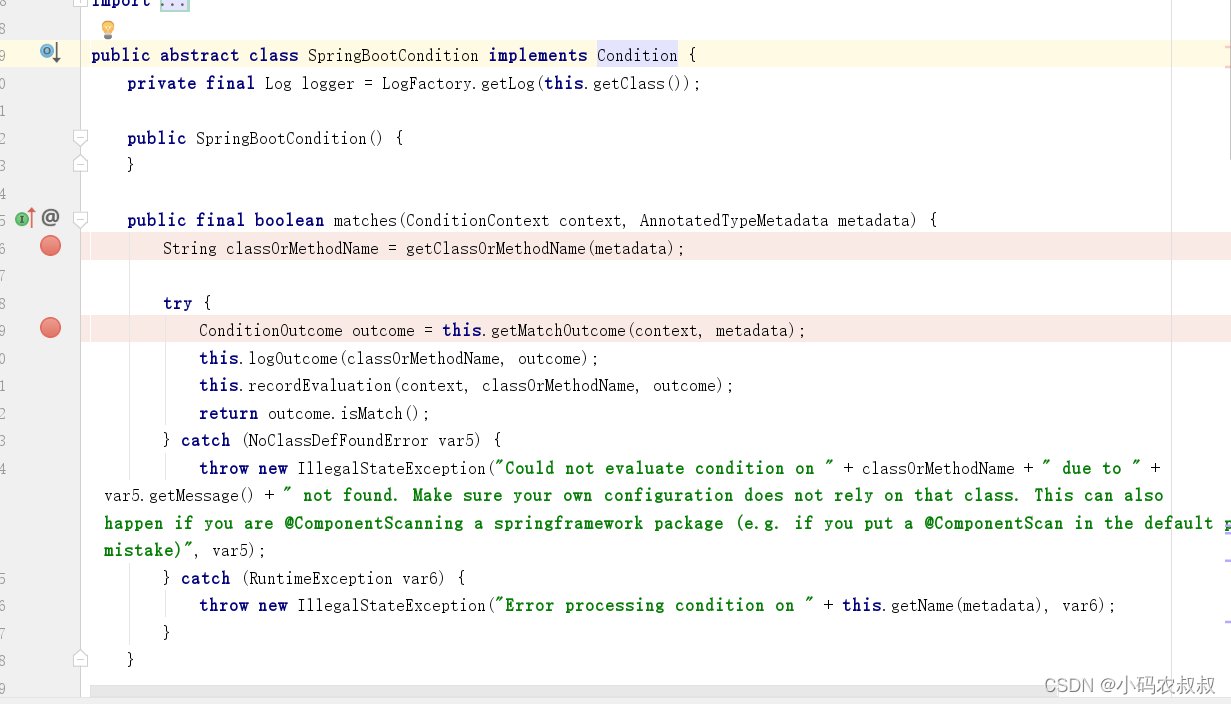
接下去只需要把matches这个方法的来龙去脉搞清楚即可,关于这个方法,我们通过代码注释加以理解
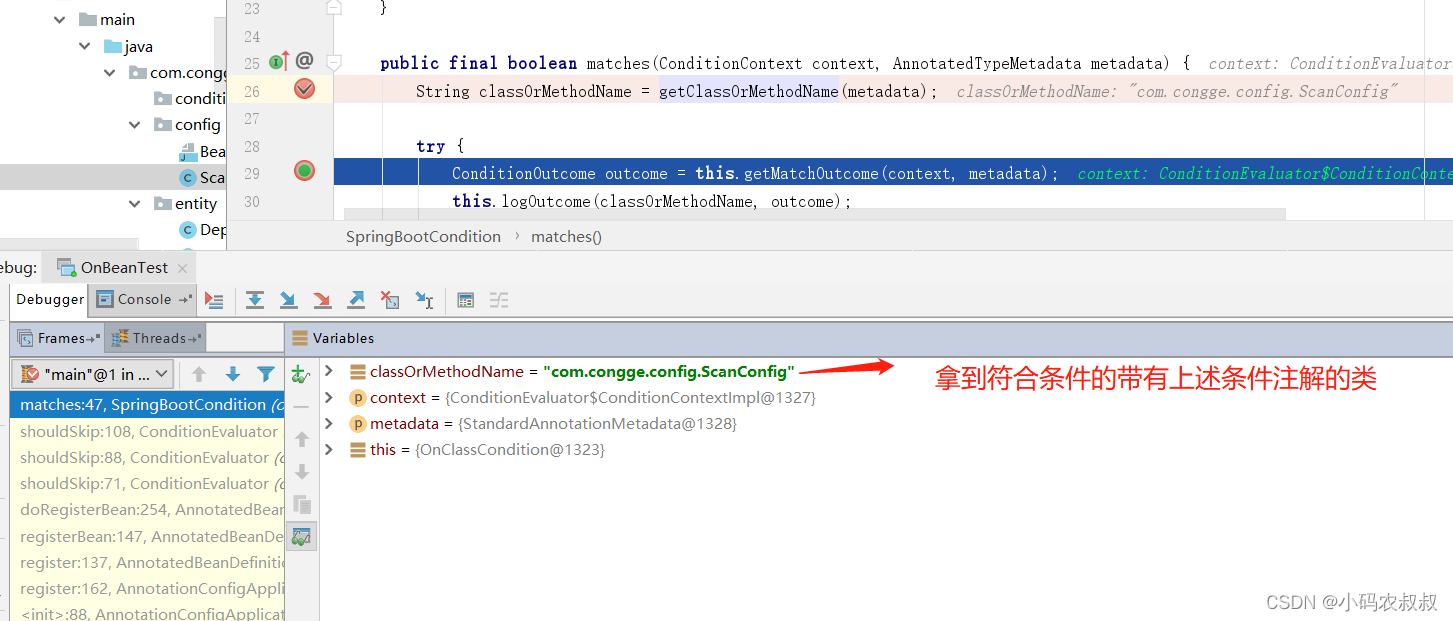
//针对所有条件注解进行判断
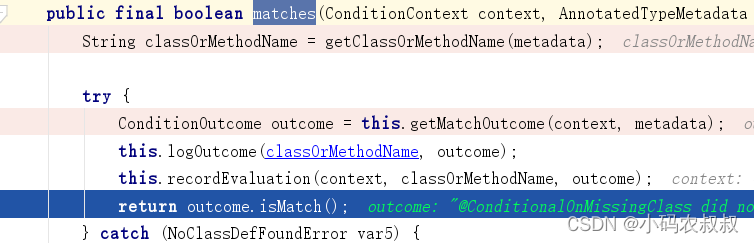
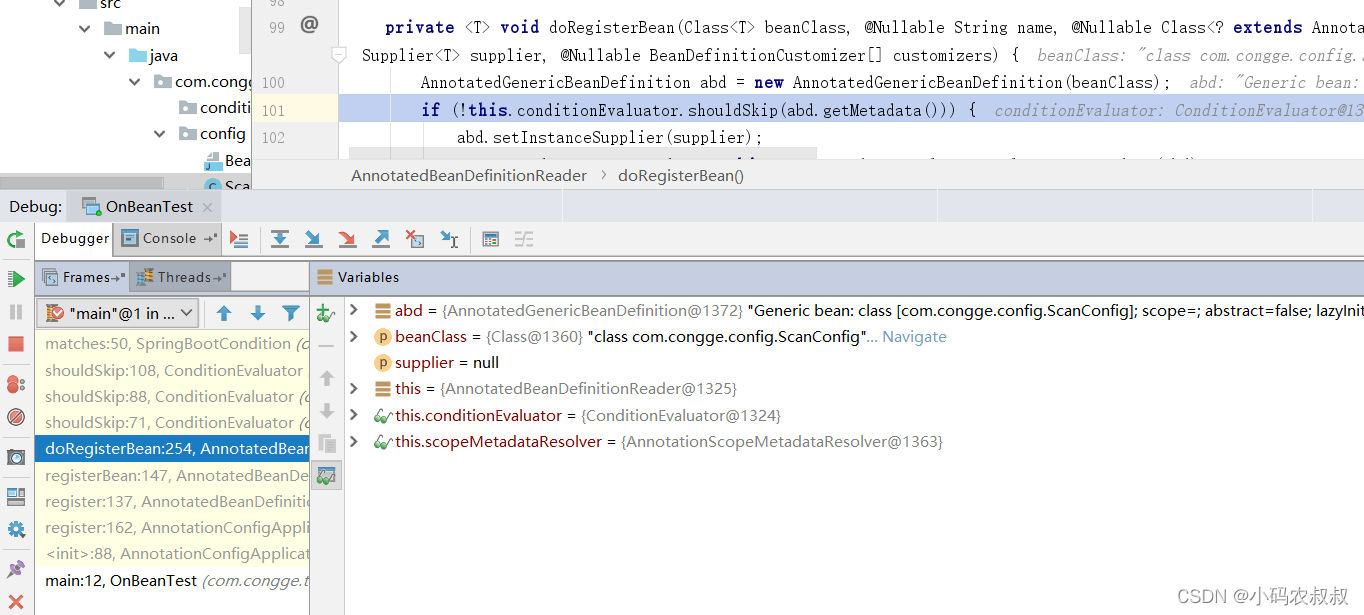
public final boolean matches(ConditionContext context, AnnotatedTypeMetadata metadata) {//条件注解是写在哪个类或方法上呢?通过这个方法进行获取String classOrMethodName = getClassOrMethodName(metadata);try {//拿到条件注解的判断结果ConditionOutcome outcome = this.getMatchOutcome(context, metadata);//记录当前条件判断的结果到日志中this.logOutcome(classOrMethodName, outcome);//将判断的结果记录到ConditionEvaluationReport中去this.recordEvaluation(context, classOrMethodName, outcome);//获取判断的结果return outcome.isMatch();} catch (NoClassDefFoundError var5) {throw new IllegalStateException("Could not evaluate condition on " + classOrMethodName + " due to " + var5.getMessage() + " not found. Make sure your own configuration does not rely on that class. This can also happen if you are @ComponentScanning a springframework package (e.g. if you put a @ComponentScan in the default package by mistake)", var5);} catch (RuntimeException var6) {throw new IllegalStateException("Error processing condition on " + this.getName(metadata), var6);}}4.1.1 debug过程分析
从上面的matches方法入手,通过debug来到下面的流程
找到具体的条件注解对应的实现
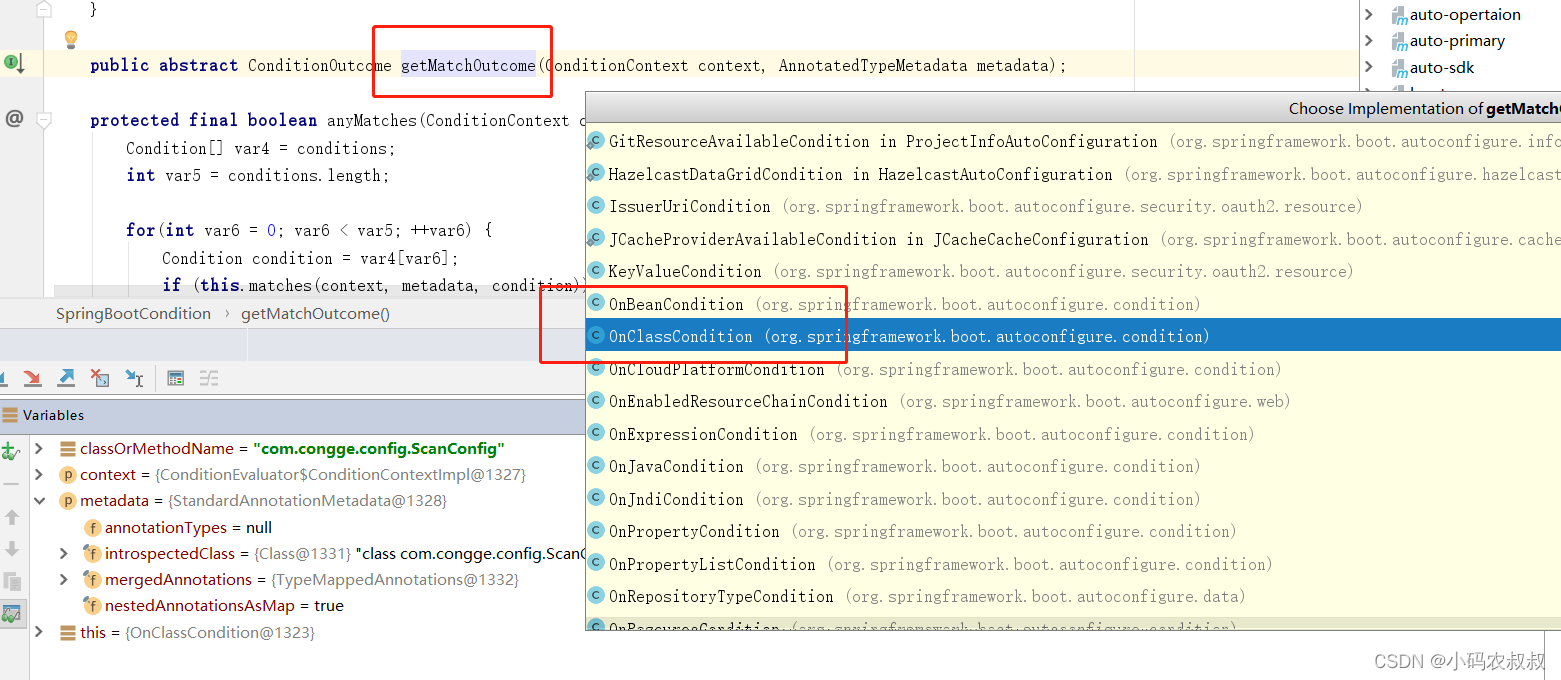
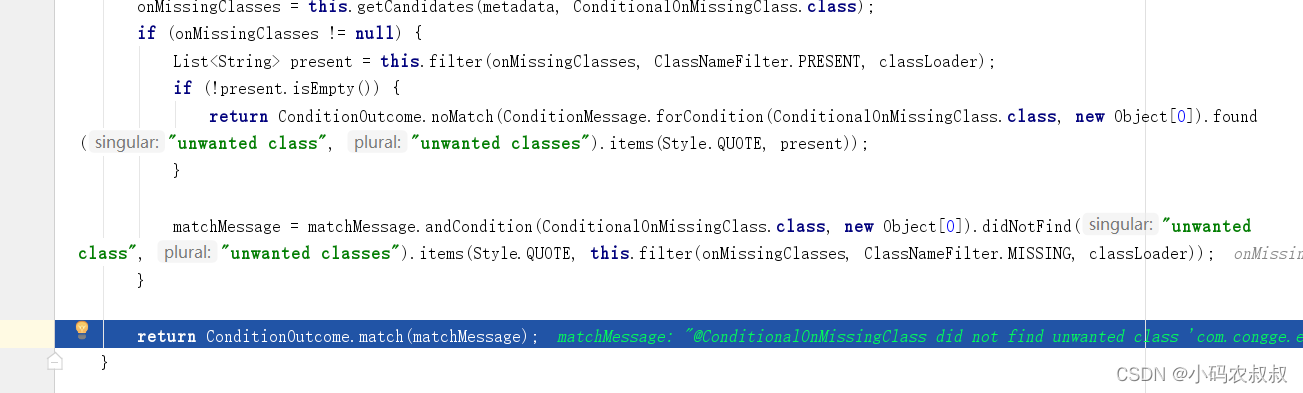
进入到OnClassCondition类中找到getMatchOutcome方法,源码如下,可结合注释进行理解
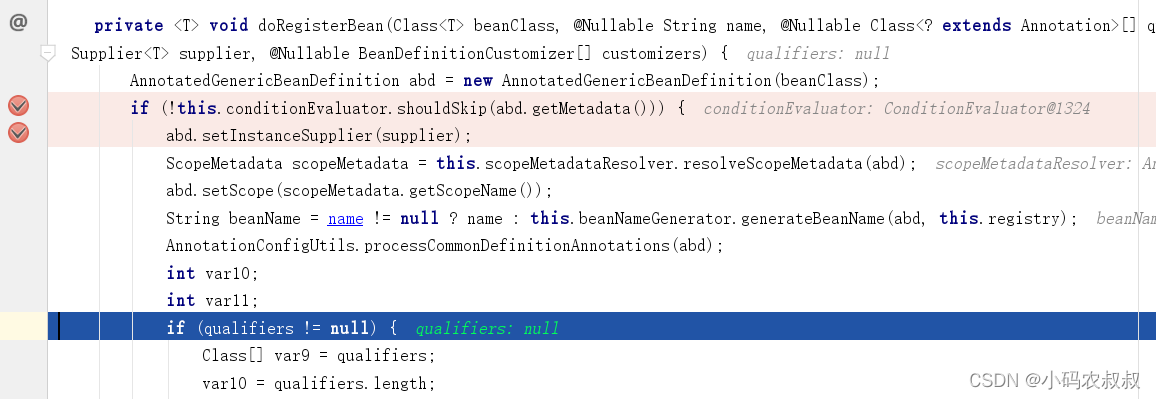
public ConditionOutcome getMatchOutcome(ConditionContext context, AnnotatedTypeMetadata metadata) {ClassLoader classLoader = context.getClassLoader();ConditionMessage matchMessage = ConditionMessage.empty();//拿到ConditionalOnClass 注解中的value值,也就是需要判断这个类是否存在List<String> onClasses = this.getCandidates(metadata, ConditionalOnClass.class);List onMissingClasses;if (onClasses != null) {//过滤onClasses中不存在的类onMissingClasses = this.filter(onClasses, ClassNameFilter.MISSING, classLoader);//如果上一步过滤出来了不存在的类,说明不匹配if (!onMissingClasses.isEmpty()) {return ConditionOutcome.noMatch(ConditionMessage.forCondition(ConditionalOnClass.class, new Object[0]).didNotFind("required class", "required classes").items(Style.QUOTE, onMissingClasses));}//否则就是匹配到了matchMessage = matchMessage.andCondition(ConditionalOnClass.class, new Object[0]).found("required class", "required classes").items(Style.QUOTE, this.filter(onClasses, ClassNameFilter.PRESENT, classLoader));}//拿到ConditionalOnMissingClass 注解中的value值,也就是需要判断这个类是否存在onMissingClasses = this.getCandidates(metadata, ConditionalOnMissingClass.class);if (onMissingClasses != null) {//进一步检查这个ConditionalOnMissingClass中的class类是否存在List<String> present = this.filter(onMissingClasses, ClassNameFilter.PRESENT, classLoader);//如果过滤出来有不符合条件的,说明不匹配if (!present.isEmpty()) {return ConditionOutcome.noMatch(ConditionMessage.forCondition(ConditionalOnMissingClass.class, new Object[0]).found("unwanted class", "unwanted classes").items(Style.QUOTE, present));}matchMessage = matchMessage.andCondition(ConditionalOnMissingClass.class, new Object[0]).didNotFind("unwanted class", "unwanted classes").items(Style.QUOTE, this.filter(onMissingClasses, ClassNameFilter.MISSING, classLoader));}return ConditionOutcome.match(matchMessage);}通过断点调试,会进入到解析ConditionalOnMissingClass注解的方法,然后解析到了User这个类

继续跟进,最终会调用到 ConditionOutcome.match 这个方法,由于上述的判断通过了,这里直接返回了使用ConditionOutcome封装的对象,其中match为true;

返回到调用的地方,当上述的判断通过之后,SpringBootCondition中的matches方法返回true
到这里,相信对spring注册bean过程稍有了解的同学不难猜到,接下来将会执行对ScanConfig类的解析,并对该类中需要创建bean的方法进行创建的过程,这也不难理解,在端点的调用链路上即可窥探一二
从上面的端点执行链路不难看出,在执行doRegisterBean的过程中,调用了一个shouldSkip的方法,就是在这个方法中完成了对上述ConditionalOnMissingClass注解的解析过程,如果matches方法返回true之后,我们继续前进一步,接下去就是一个注册bean的过程;
解析并注册bean,即对ScanConfig类解析和创建BeanDefinition等一些列步骤;

4.1.2 源码分析过程小结
上述以@ConditionalOnMissingClass注解为例分析了源码执行的过程,其他的几个注解可以类似的进行研究,总结来说,条件注解的解析发生在bean注册之前,作为是否创建bean的判断条件,只要记住这一点就可以了。
五、条件注解的应用场景
在springboot框架中,关于条件注解有非常多的应用,有心的同学可以在很多与springboot框架集成的外部组件的源码中看到,比如ConditionalOnMissingClass注解用于日志整合中,作为兜底类,比如日志配置中,如果某个项目中没有特殊的配置,那么就用兜底的配置,否则就用兜底的配置。这就是没有指定的实现,就会有默认的配置实现。
5.1 条件注解使用案例
下面以@ConditionalOnProperty这个注解为例配合一个定时任务调度场景说明,我们的需求是:
通过一个外部配置文件来控制定时任务是否执行;
能够实现上述需求的方式有很多,这里选择使用@ConditionalOnProperty条件表达式注解来实现,具体来说,在执行定时任务的类上面(或方法)添加该注解,通过注解中引入配置参数的值来控制即可。代码如下:
@Component
@EnableScheduling
public class UserTask {//每5秒钟执行一次@Scheduled(cron="0/5 * * * * ?")@ConditionalOnProperty(prefix="user.task",name = "enable", havingValue = "true")public void cron(){System.out.println("执行定时任务");}}
第一次,在配置参数为false的情况下,启动程序,等待5秒之后并没有执行

将参数开启为true,再次启动程序,等待5秒之后,,定时任务就执行了

六、写在文末
spring条件注解是spring框架注解体系中非常重要的组成成员,也是spring为开发者提供的扩展点之一,合理使用条件注解,可以给应用开发带来意想不到的效果,希望对看到本文的你提供一个思路,本文到此技术,感谢观看。