前文我们总览了free5gc的总体软件架构。整一个free5gc系统又由几个NF(Network Function)组成,所以本文继续深入研究单个NF的软件架构。
要研究NF的软件架构,最直接的方式是找一个简单的NF来回观摩。free5gc/ausf算是比较简单的一个,然而我发现了一个更简单的NF,叫做andy89923nf-example。这个NF虽然不在free5gc的代码仓库里面,但却是由主要开发者提供的(我猜是阳明交大给他们的学生上课练习用)。所以我们不妨从这个最简单的NF入手。
$ git clone https://github.com/andy89923/nf-example
$ tree nf-example
.
├── cmd
│   └── main.go
├── config
│   └── nfcfg.yaml
├── internal
│   ├── context
│   │   └── context.go
│   ├── logger
│   │   └── logger.go
│   └── sbi
│       ├── processor
│       │   ├── processor.go
│       │   ├── processor_mock.go
│       │   ├── spy_family.go
│       │   └── spy_family_test.go
│       ├── api_default.go
│       ├── api_spyfamily.go
│       ├── api_spyfamily_test.go
│       ├── router.go
│       ├── server.go
│       └── server_mock.go
├── pkg
│   ├── app
│   │   └── app.go
│   ├── factory
│   │   ├── config.go
│   │   └── factory.go
│   └── service
│       └── init.go
├── Makefile
├── go.mod
├── go.sum
└── README.md
整一个项目的文件目录中cmd、internal、pkg是最重要的,包含了整个NF的代码文件。其中
-
internal中的代码文件实现了这个NF的主要功能 -
pkg里的代码文件主要就干两件事,- 读取配置解析文件
congid.yaml,以及 - 把internal中的各种功能打包成一个服务供其他NF使用。简单来说,
service/init.go就是整个NF的本体。
- 读取配置解析文件
-
cmd/中唯一的文件main.go是整个NF的主文件,也是编译器的入口文件,主要做的事情是把这个NF打包成一个命令行工具点击查看代码
ubuntu@VM-0-6-ubuntu:~$ cd nf-example/
ubuntu@VM-0-6-ubuntu:~/nf-example$ make
Start building nf....ubuntu@VM-0-6-ubuntu:~/nf-example$ ls bin/
nfubuntu@VM-0-6-ubuntu:~/nf-example$ bin/nf -c config/nfcfg.yaml
2024-09-18T20:30:45.245834852+08:00 [INFO][ANYA][Main] Anya version:  free5GC version: v1.0-1-gb6896c0build time:      2024-09-18T12:30:16Zcommit hash:     commit time:     2024-09-01T05:52:32Zgo version:      go1.21.8 linux/amd64
2024-09-18T20:30:45.246738739+08:00 [INFO][ANYA][CFG] Read config from [config/nfcfg.yaml]
2024-09-18T20:30:45.247300020+08:00 [INFO][ANYA][Main] Log enable is set to [true]
2024-09-18T20:30:45.247346267+08:00 [INFO][ANYA][Main] Log level is set to [info]
2024-09-18T20:30:45.247397054+08:00 [INFO][ANYA][Main] Report Caller is set to [false]
[GIN-debug] [WARNING] Running in "debug" mode. Switch to "release" mode in production.
- using env:	export GIN_MODE=release
- using code:	gin.SetMode(gin.ReleaseMode)2024-09-18T20:30:45.247727497+08:00 [INFO][ANYA][SBI] Starting server...
2024-09-18T20:30:45.247761643+08:00 [INFO][ANYA][SBI] Start SBI server (listen on 127.0.0.163:8000)
每一个NF的代码组织都是类似这样的大同小异,其中cmd和pkg的代码高度重复,区别于每一个NF的还是其internal中的主要功能实现。这一个NF的功能很简单,就只是监听本地的8000端口,提供一个/spyfamily/character/{Name}接口,返回对应id在动画《SPY×FAMILY》中的人物全名
点击查看代码
ubuntu@VM-0-6-ubuntu:~$ curl -X GET http://127.0.0.163:8000/default/
"Hello free5GC!"ubuntu@VM-0-6-ubuntu:~$ curl -X GET http://127.0.0.163:8000/spyfamily/
"Hello SPYxFAMILY!"ubuntu@VM-0-6-ubuntu:~$ curl -X GET http://127.0.0.163:8000/spyfamily/character/Loid
"Character: Loid Forger"
cmd
cmd/main.go的功能就是把这个NF打包成一个cmd。下面是一段简化版的main.go的代码。main() 函数里创建了一个cli类型,绑定了一个action函数,也就是我们在命令行里运行编译后的命令行工具时会执行的函数。action主要做的事情就是初始化日志文件,读取配置文件,和最重要的初始化NF及运行NF。
// `cmd/main.go`简化版代码
package mainimport (// other imports ..."github.com/andy89923/nf-example/pkg/factory""github.com/andy89923/nf-example/pkg/service""github.com/urfave/cli"
)var NF *service.NfAppfunc main() {app := cli.NewApp()app.Name = "anya"app.Usage = "SPYxFamily"app.Action = actionapp.Flags = []cli.Flag{cli.StringFlag{Name:  "config, c",Usage: "Load configuration from `FILE`",},cli.StringSliceFlag{Name:  "log, l",Usage: "Output NF log to `FILE`",},}if err := app.Run(os.Args); err != nil {logger.MainLog.Errorf("ANYA Run Error: %v\n", err)}
}// 1. init log file
// 2. read config file
// 3. set up Ctrl-c
// 4. init the NF app
// 5. run the NF app and launch the server by `nf.Start()`
func action(cliCtx *cli.Context) error {tlsKeyLogPath, err := initLogFile(cliCtx.StringSlice("log"))cfg, err := factory.ReadConfig(cliCtx.String("config"))factory.NfConfig = cfg// Ctrl-c to quit the serverctx, cancel := context.WithCancel(context.Background())sigCh := make(chan os.Signal, 1)signal.Notify(sigCh, os.Interrupt, syscall.SIGTERM)go func() {<-sigCh  // Wait for interrupt signal to gracefully shutdowncancel() // Notify each goroutine and wait them stopped}()nf, err := service.NewApp(ctx, cfg, tlsKeyLogPath)nf.Start()return nil
}func initLogFile(logNfPath []string) (string, error) {//...
}
pkg
pkg包里的代码都是可以暴露给其他模块调用的功能。在这一个NF中,主要的功能有两个,一个是定义配置和读取配置件,另一个是把internal中不对外暴露的各种功能包装成一个NfApp服务应用。这是所有NF的pkg包(除了upf)都会有的功能,但有些NF会暴露更多功能,比如chf就还提供了一些计费相关的工具。
配置
pkg/factory主要负责处理NF所需的配置,其中config.go定义了需要怎样的配置。
点击查看代码
// config.go 中的部分代码
type Config struct {Info          *Info          `yaml:"info" valid:"required"`Configuration *Configuration `yaml:"configuration" valid:"required"`Logger        *Logger        `yaml:"logger" valid:"required"`sync.RWMutex
}type Info struct {Version     string `yaml:"version" valid:"required,in(1.0.0)"`Description string `yaml:"description,omitempty" valid:"type(string)"`
}type Configuration struct {NfName string `yaml:"nfName,omitempty"`Sbi    *Sbi   `yaml:"sbi"`
}type Logger struct {Enable       bool   `yaml:"enable" valid:"type(bool)"`Level        string `yaml:"level" valid:"required,in(trace|debug|info|warn|error|fatal|panic)"`ReportCaller bool   `yaml:"reportCaller" valid:"type(bool)"`
}
而factory.go则是读取yaml文件并解析成相应的go类型。factory.go里的代码在所有NF中都高度相似:都是55行左右,只有InitConfigFactory和ReadConfig两个函数。他们唯一的不同就是使用的logger不同,所以在import部分导入了各自NF的logger。如此高的重复度,我猜测在以后应该会被重构优化掉。
点击查看代码
// factory.go 的全部代码
// https://github.com/andy89923/nf-example/blob/v1.0/pkg/factory/factory.go
package factoryimport ("fmt""os""github.com/andy89923/nf-example/internal/logger""github.com/asaskevich/govalidator""gopkg.in/yaml.v2"
)var NfConfig *Config// TODO: Support configuration update from REST api
func InitConfigFactory(f string, cfg *Config) error {if f == "" {// Use default config pathf = NfDefaultConfigPath}if content, err := os.ReadFile(f); err != nil {return fmt.Errorf("[Factory] %+v", err)} else {logger.CfgLog.Infof("Read config from [%s]", f)if yamlErr := yaml.Unmarshal(content, cfg); yamlErr != nil {return fmt.Errorf("[Factory] %+v", yamlErr)}}return nil
}func ReadConfig(cfgPath string) (*Config, error) {cfg := &Config{}if err := InitConfigFactory(cfgPath, cfg); err != nil {return nil, fmt.Errorf("ReadConfig [%s] Error: %+v", cfgPath, err)}if _, err := cfg.Validate(); err != nil {validErrs := err.(govalidator.Errors).Errors()for _, validErr := range validErrs {logger.CfgLog.Errorf("%+v", validErr)}logger.CfgLog.Errorf("[-- PLEASE REFER TO SAMPLE CONFIG FILE COMMENTS --]")return nil, fmt.Errorf("Config validate Error")}return cfg, nil
}
服务应用
app/app.go定义了一个NF的app,而service/init.go实现了这个app,两者共同把这个NF打包成一个服务应用。
app/app.go就只有短短十几行代码,定义了一个App接口:
package appimport (nf_context "github.com/andy89923/nf-example/internal/context""github.com/andy89923/nf-example/pkg/factory"
)type App interface {SetLogEnable(enable bool)SetLogLevel(level string)SetReportCaller(reportCaller bool)Start()Terminate()// 各个NF唯二的不同Context() *nf_context.NFContextConfig() *factory.Config
}
free5gc中所有NF的app.go都是这样的接口,唯一(二)的不同是Context()函数和Config()函数的返回值类型不同。鉴于如此高的重复度,合理怀疑在后面的版本会被优化掉。比如把各个NF的NFContext和NFConfig抽象出来,以后所有NF都只实现一个NFApp接口,而不是每一个NF都定义一个接口。但目前v3.4.3就是这么操作的,我们就跟着他来。
service/init.go中的代码则是实现了上面定义的App接口。init.go定义了一个NfApp类型,并且实现了诸如Start()等函数。
// `service/init.go`简化版代码
package service
import ("context"// other imports ...nf_context "github.com/andy89923/nf-example/internal/context""github.com/andy89923/nf-example/internal/sbi""github.com/andy89923/nf-example/internal/sbi/processor""github.com/andy89923/nf-example/pkg/factory"
)// NF的本体
type NfApp struct {cfg   *factory.ConfignfCtx *nf_context.NFContextctx    context.Contextcancel context.CancelFuncwg     sync.WaitGroupsbiServer *sbi.Server         processor *processor.Processor
}func (a *NfApp) Start() {a.sbiServer.Run(&a.wg)go a.listenShutdown(a.ctx)a.Wait()
}func (a *NfApp) listenShutdown(ctx context.Context) {<-ctx.Done()a.terminateProcedure()
}func (a *NfApp) terminateProcedure() {a.sbiServer.Shutdown()
}仔细阅读service/init.go的代码,就会发现NfApp的很多函数都是调用的NfApp.sbiServer的函数,而sbiServer又会调用processor.Processor的函数来真正处理外部请求,再看processor.Processor,又会发现它调用了NfApp.nfCtx里的数据。这其中稍显复杂,现在是时候深入internal包看看
internal
internal包内部由三个包,其中logger包是关于打日志的功能,与核心功能关系不大,暂且忽略。关键在于context和sbi这两个包,其中context里面定义的是整个NF在全生命周期里都会存储和使用的数据,而sbi则是接收来自外部其他NF的请求,使用自家context中的数据处理请求,然后返回处理结果。从程序 = 数据结构 + 算法的角度来看,可以认为context是数据结构,而sbi则是算法。
context
上文讲过:
这一个NF的功能很简单,就只是监听本地的8000端口,提供一个
/spyfamily/character/{Name}接口,返回对应id在动画《SPY×FAMILY》中的人物全名
关于《SPY×FAMILY》中人物的数据,就存在了NFContext里面,连带着这个NF的名字、id、URI协议、绑定的IP帝之和端口等基本信息。
// context.go 简化版代码
type NFContext struct {NfId        stringName        stringUriScheme   models.UriSchemeBindingIPv4 stringSBIPort     intSpyFamilyData map[string]string
}
var nfContext = NFContext{}// 初始化NFContext
func InitNfContext() {// other initialisationnfContext.SpyFamilyData = map[string]string{"Loid":   "Forger",  // Loid 其实应该是 Lloyd"Anya":   "Forger","Yor":    "Forger",// ......}
}
sbi
sbi包实现了一个server来使用context的数据提供对外服务,这个server也就是pkg/init.go里的NfApp.sbiServer。
// `server.go`简化版代码
package sbiimport ("net/http"// other imports ..."github.com/andy89923/nf-example/internal/sbi/processor""github.com/andy89923/nf-example/pkg/app""github.com/gin-gonic/gin"
)
type nfApp interface {app.AppProcessor() *processor.Processor
}type Server struct {nfApp  // 必须实现nfApp接口的所有方法,否则编译报错httpServer *http.Serverrouter     *gin.Engine
}func NewServer(nf nfApp, tlsKeyLogPath string) *Server {s := &Server{nfApp: nf,}s.router = newRouter(s)server, err := bindRouter(nf, s.router, tlsKeyLogPath)s.httpServer = serverreturn s
}
// other functions ...
我们可以看到这个sbiServer其实也是一个包装器,里面是一个go标准库里的http.Server类型,而从NewServer()函数可知,这个http.Server还与一个gin.Engine绑定在一起了。那这个gin.Engine又是做什么的?gin是一个go语言的高性能web框架,gin.Engine与一个httpserver绑定后,把这个server接收到的所有请求经过预处理后分发给相应的处理函数去处理,比如说,来自/default路径的请求由一个函数处理,来自/spyfamily的请求由另一个函数处理。这些处理逻辑写在了router.go文件里:
// `router.go`简化版代码
package sbiimport (// other imports ..."github.com/gin-gonic/gin""github.com/free5gc/util/httpwrapper"
)type Route struct {Name    stringMethod  stringPattern string  // 定义一个路径的patternAPIFunc gin.HandlerFunc  // 处理来自该路径的请求的函数
}func applyRoutes(group *gin.RouterGroup, routes []Route) {for _, route := range routes {switch route.Method {case "GET":group.GET(route.Pattern, route.APIFunc)// "POST", "DELETE", ......}
}func newRouter(s *Server) *gin.Engine {router := logger_util.NewGinWithLogrus(logger.GinLog)defaultGroup := router.Group("/default")  applyRoutes(defaultGroup, s.getDefaultRoute())  // 处理所有来自/default的请求spyFamilyGroup := router.Group("/spyfamily")applyRoutes(spyFamilyGroup, s.getSpyFamilyRoute())  // 处理所有来自/spyfamily的请求return router
}func bindRouter(nf app.App, router *gin.Engine, tlsKeyLogPath string) (*http.Server, error) {sbiConfig := nf.Config().Configuration.SbibindAddr := fmt.Sprintf("%s:%d", sbiConfig.BindingIPv4, sbiConfig.Port)return httpwrapper.NewHttp2Server(bindAddr, tlsKeyLogPath, router)
}
从router.go可知,所有处理所有来自/default的请求,被分发到下一级的server.getDefaultRoute()去处理;类似的,所有来自/spyfamily的请求,被分发到下一级的server.getSpyFamilyRoute()去处理。这getDefaultRoute()和getSpyFamilyRoute()方法,分别定义在了api_default.go和api_spyfamily.go文件里面。
// https://github.com/andy89923/nf-example/blob/v1.0/internal/sbi/api_default.go
package sbi
import ("net/http""github.com/gin-gonic/gin"
)
func (s *Server) getDefaultRoute() []Route {return []Route{{Name:    "Hello free5GC!",Method:  http.MethodGet,Pattern: "/",APIFunc: func(c *gin.Context) {c.JSON(http.StatusOK, "Hello free5GC!")},},}
}
// https://github.com/andy89923/nf-example/blob/v1.0/internal/sbi/api_spyfamily.go
package sbi
import ("net/http""github.com/andy89923/nf-example/internal/logger""github.com/gin-gonic/gin"
)
func (s *Server) getSpyFamilyRoute() []Route {return []Route{{Name:    "Hello SPYxFAMILY!",Method:  http.MethodGet,Pattern: "/",APIFunc: func(c *gin.Context) {c.JSON(http.StatusOK, "Hello SPYxFAMILY!")},},{Name:    "SPYxFAMILY Character",Method:  http.MethodGet,Pattern: "/character/:Name",APIFunc: s.HTTPSerchSpyFamilyCharacter,},}
}func (s *Server) HTTPSerchSpyFamilyCharacter(c *gin.Context) {logger.SBILog.Infof("In HTTPSerchCharacter")targetName := c.Param("Name")if targetName == "" {c.String(http.StatusBadRequest, "No name provided")return}s.Processor().FindSpyFamilyCharacterName(c, targetName)
}
在往深入看,可以看到api_router的职责只是接收外部的请求,然后解析和提取请求中的信息,把这些信息交给Processor去处理。例如上面api_family.go中查询角色全名的代码是通过调用Processor的函数来完成的:s.Processor().FindSpyFamilyCharacterName(ginContext, targetName)。
下面是processor的简化版代码,其中processor.go负责定义一个全局的Processor类型,而它的方法都在相应的文件中实现。
// sbi/processor/processor.gp
package processor
import "github.com/andy89923/nf-example/pkg/app"type ProcessorNf interface {app.AppProcessor() *Processor
}
type Processor struct {ProcessorNf
}
func NewProcessor(nf ProcessorNf) (*Processor, error) {p := &Processor{ProcessorNf: nf,  // 可以调用NFContext的数据了}return p, nil
}
// sbi/processor/spy_fammily.gp
package processor
// imports ...
func (p *Processor) FindSpyFamilyCharacterName(c *gin.Context, targetName string) {if lastName, ok := p.Context().SpyFamilyData[targetName]; ok {  // 通过NfApp掉用NFContext的数据c.String(http.StatusOK, fmt.Sprintf("Character: %s %s", targetName, lastName))return}c.String(http.StatusNotFound, fmt.Sprintf("[%s] not found in SPYxFAMILY", targetName))
}
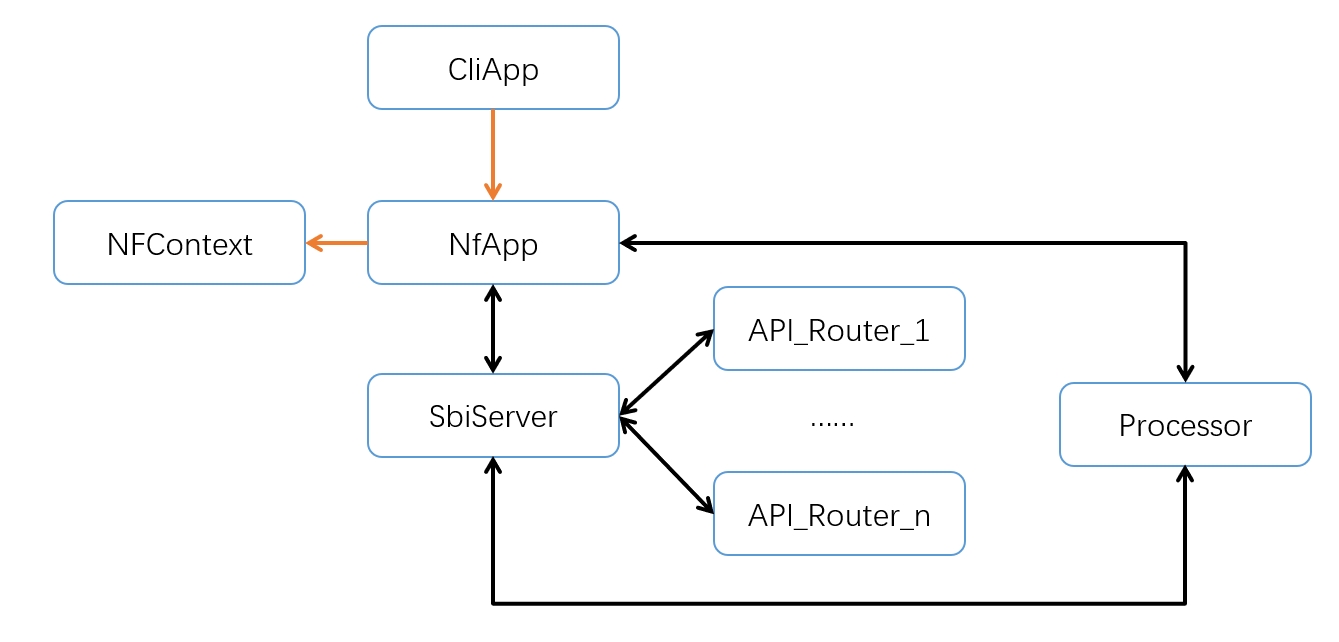
到此为止,我们就看完了这一个example-nf的所有代码文件,还可以画出一个简单的结构图:

图中的方框代表在代码中定义的主要类型,而箭头代表引用或调用关系,从CliApp开始一步步调用NFContext中的数据和Processor中的的方法。有趣的一点是NfApp 与SbiServer之间,与Processor之间的箭头是双向的,也就是它们可以相互调用。这是一个稍显复杂但尤其的设计细节,主要是做到了功能的分离和解耦:
NfApp负责整体应用程序的生命周期和配置,SbiServer专注于处理 HTTP 请求和路由,Processor聚焦对特定的功能的实现。这种分离使得每个组件的职责更加清晰。- 如果将来需要添加新的功能或组件,这种设计使得可以相对容易地集成到现有结构中,而不会破坏现有的代码。
- 另一个额外的好处是使得单元测试成为真正的单元测试,而不是对一个大系统的集成测试。如果
NfApp、SbiServer、和Processor他们的所有功能和职责混在一起,假设这个类型就叫WholeApp,那么单元测试也许会复杂到无从下手,这整一个WholeApp就是一个相对独立的系统,对这个类型的测试代码本身就很复杂,看起来一点都不“单元”。
虽然这种设计模式增加了一些复杂性,但它提供了更好的长期可维护性和灵活性。free5gc的开发团队显然在做设计时认为这写额外的复杂性所带来的好处是值得的。
至此,我们就通过研究一个example-nf了解了free5gc系统中每一个NF子系统的总体结构。然而这一个简单的example-nf还是遗漏了一些重要的点,比如说每个NF是如何与其他NF交互的?对这一个问题的解答就需要我们深入研究一个真正的NF了。

![[神经网络与深度学习笔记]LDA降维](https://cnblog-1319619106.cos.ap-shanghai.myqcloud.com/image-20240921145128545.png)


