STM32MP157 TF-A 移植
在了解了 STM32MP 系列芯片的启动流程后,我们将开始进行东山 Pi 柒号的 TF-A 移植。
准备工作
首先,我们需要下载 STM32MP1 系列的 STM32MPU_Developer_Package,该包中包含编译器 SDK 和官方源码:
-
STM32MP1 OpenSTLinux 开发套件
https://www.st.com.cn/zh/embedded-software/stm32mp1dev.html -
OpenSTLinux 开发套件安装和使用说明
https://wiki.stmicroelectronics.cn/stm32mpu/wiki/STM32MPU_Developer_Package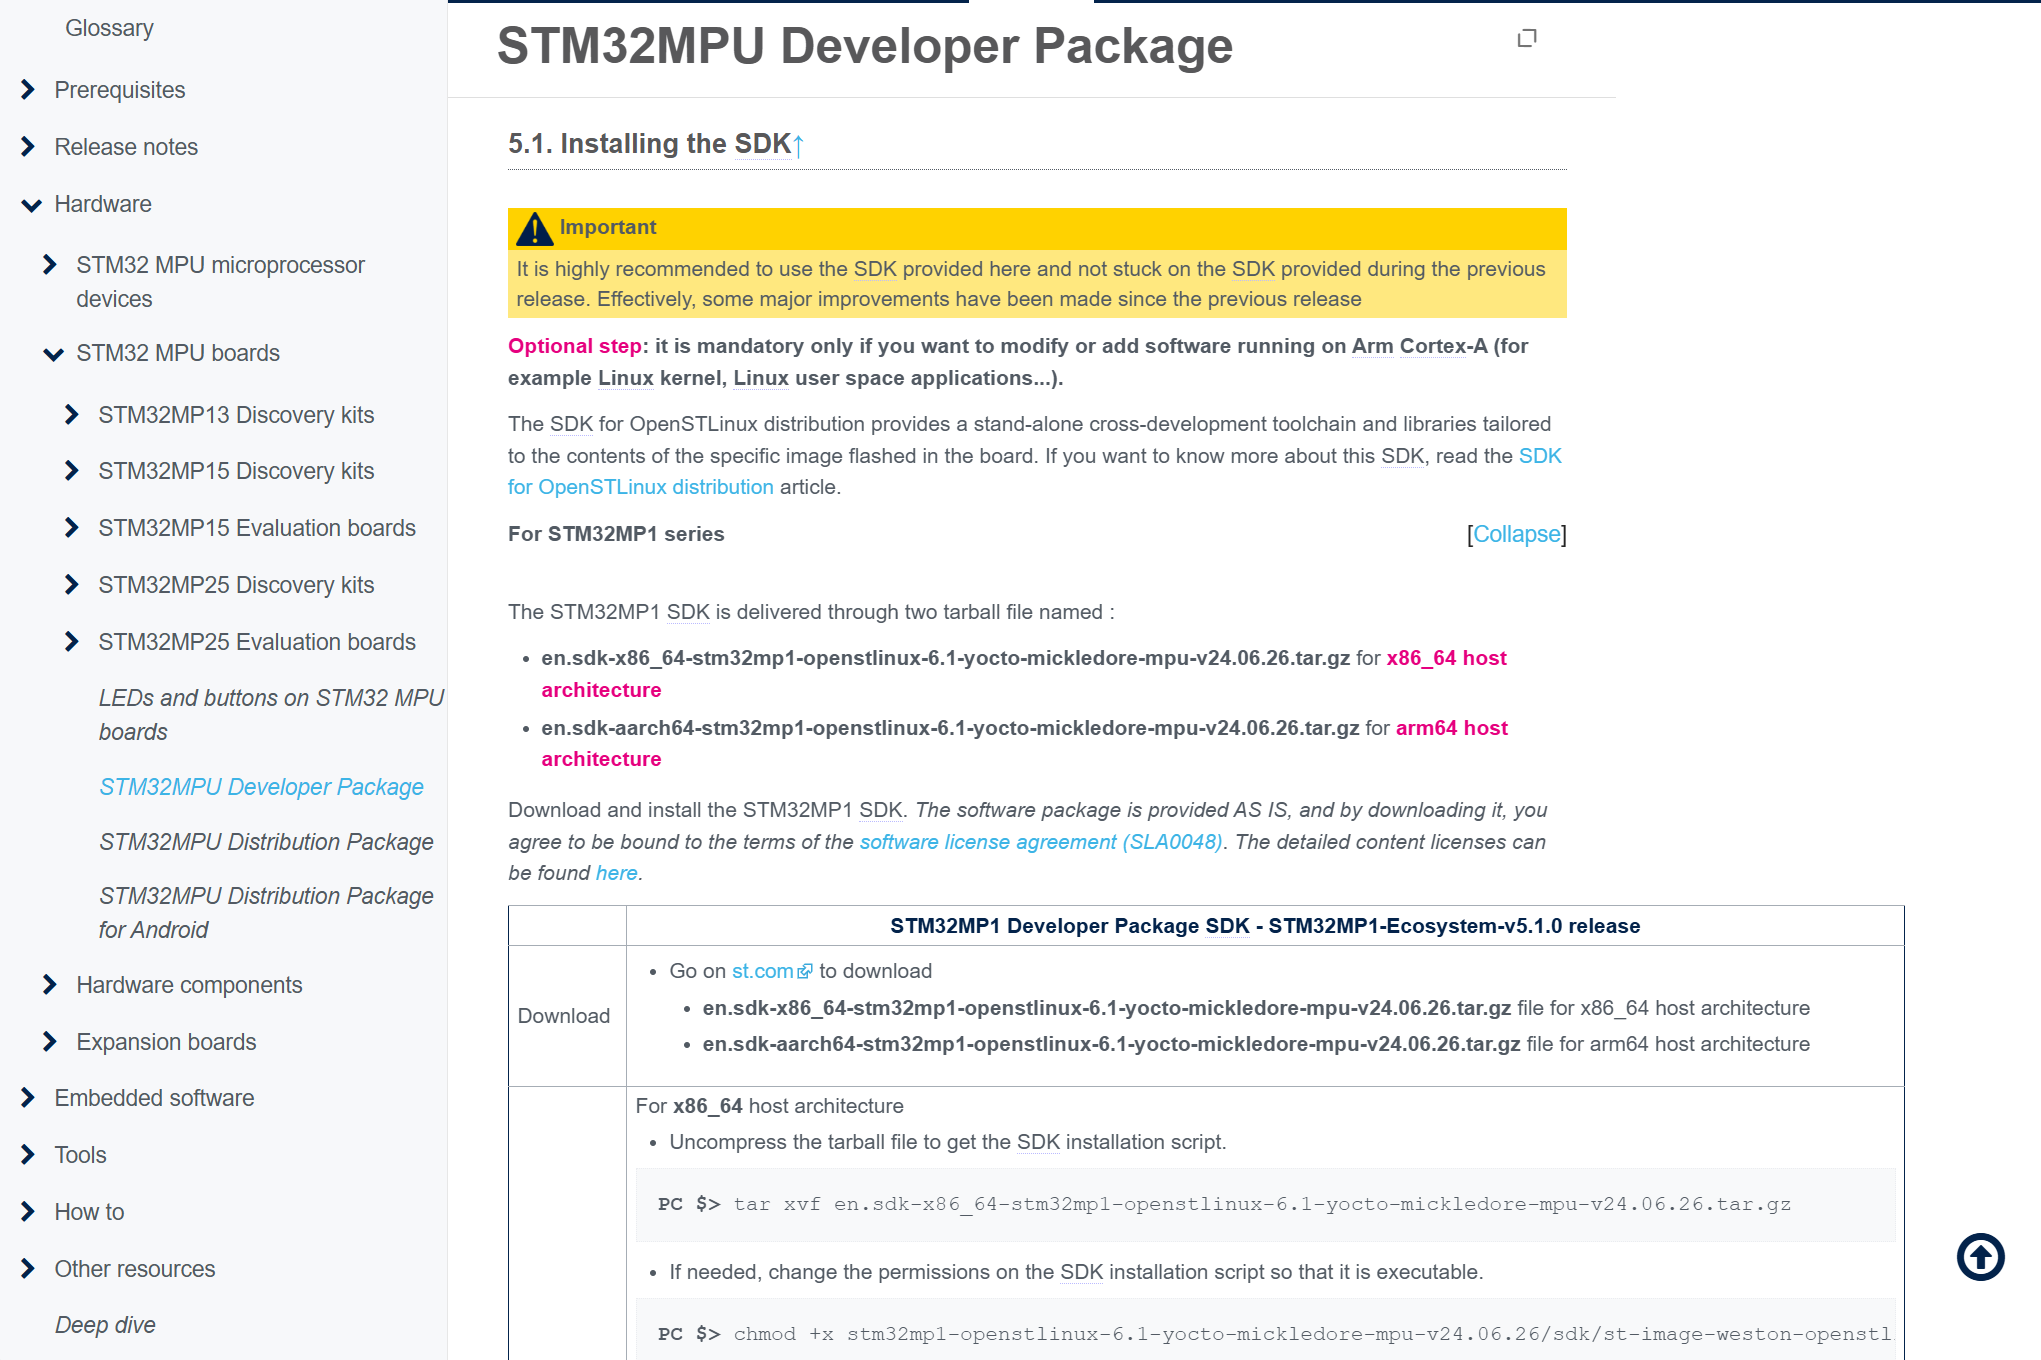
完成 SDK 和源码的安装与下载后,我们就可以开始系统移植了。
开始TF-A 移植
解压 SOURCE 源码包,进入tf-a目录:
cd tf-a-stm32mp-v2.8.15-stm32mp-r2-r0
解压 tf-a 源码,并使用st patch文件
tar -xvf tf-a-stm32mp-v2.8.15-stm32mp-r2-r0.tar.xz
cd tf-a-stm32mp-v2.8.15-stm32mp-r2
for p in `ls -1 ../*.patch`; do patch -p1 < $p; done
复制官方开发版stm32mp157d-dk1的设备树作为源,我们在这基础上进行修改。因为板子芯片是stm32mp157dac所以需要使用d结尾的开发板配置。这是芯片后缀不同代表内部外设有差异,需要设备树中选择正确的芯片级stm32mp15x*.dtsi文件:
cp fdts/stm32mp157d-dk1.dts fdts/stm32mp157d-ask.dts
cp fdts/stm32mp157d-dk1-fw-config.dts fdts/stm32mp157d-ask-fw-config.dts
cp fdts/stm32mp15xx-dkx.dtsi fdts/stm32mp15xx-ask.dtsi
修改stm32mp157d-ask.dts,使用我们复制的dtsi:
// #include "stm32mp15xx-dkx.dtsi"
#include "stm32mp15xx-ask.dtsi"
现在我们主要来修改stm32mp15xx-ask.dtsi文件:
DDR 配置修改
在stm32mp15xx-ask.dtsi中的DDR设备树为"stm32mp15-ddr3-1x4Gb-1066-binG.dtsi",这与我们的板子配置不一样,东山派内存为2x2Gb的组合。在东山派Github上的DDR配置在新版本内核中使用会有些问题,这里我们使用这份DDR配置stm32mp15-ddr3-ask-2x2Gb-1066-binG.dtsi:
#define DDR_MEM_COMPATIBLE ddr3l-ask-1066-888-bin-g-2x2gb-533mhz
#define DDR_MEM_NAME "DDR3L 32bits 2x2Gb 533MHz"
#define DDR_MEM_SPEED 533000
#define DDR_MEM_SIZE 0x20000000#define DDR_MSTR 0x00040401
#define DDR_MRCTRL0 0x00000010
#define DDR_MRCTRL1 0x00000000
#define DDR_DERATEEN 0x00000000
#define DDR_DERATEINT 0x00800000
#define DDR_PWRCTL 0x00000000
#define DDR_PWRTMG 0x00400010
#define DDR_HWLPCTL 0x00000000
#define DDR_RFSHCTL0 0x00210000
#define DDR_RFSHCTL3 0x00000000
#define DDR_RFSHTMG 0x0040008B
#define DDR_CRCPARCTL0 0x00000000
#define DDR_DRAMTMG0 0x121B1214
#define DDR_DRAMTMG1 0x000A041C
#define DDR_DRAMTMG2 0x0608090F
#define DDR_DRAMTMG3 0x0050400C
#define DDR_DRAMTMG4 0x08040608
#define DDR_DRAMTMG5 0x06060403
#define DDR_DRAMTMG6 0x02020002
#define DDR_DRAMTMG7 0x00000202
#define DDR_DRAMTMG8 0x00001005
#define DDR_DRAMTMG14 0x000000A0
#define DDR_ZQCTL0 0xC2000040
#define DDR_DFITMG0 0x02060105
#define DDR_DFITMG1 0x00000202
#define DDR_DFILPCFG0 0x07000000
#define DDR_DFIUPD0 0xC0400003
#define DDR_DFIUPD1 0x00000000
#define DDR_DFIUPD2 0x00000000
#define DDR_DFIPHYMSTR 0x00000000
#define DDR_ODTCFG 0x06000600
#define DDR_ODTMAP 0x00000001
#define DDR_SCHED 0x00000C01
#define DDR_SCHED1 0x00000000
#define DDR_PERFHPR1 0x01000001
#define DDR_PERFLPR1 0x08000200
#define DDR_PERFWR1 0x08000400
#define DDR_DBG0 0x00000000
#define DDR_DBG1 0x00000000
#define DDR_DBGCMD 0x00000000
#define DDR_POISONCFG 0x00000000
#define DDR_PCCFG 0x00000010
#define DDR_PCFGR_0 0x00010000
#define DDR_PCFGW_0 0x00000000
#define DDR_PCFGQOS0_0 0x02100C03
#define DDR_PCFGQOS1_0 0x00800100
#define DDR_PCFGWQOS0_0 0x01100C03
#define DDR_PCFGWQOS1_0 0x01000200
#define DDR_PCFGR_1 0x00010000
#define DDR_PCFGW_1 0x00000000
#define DDR_PCFGQOS0_1 0x02100C03
#define DDR_PCFGQOS1_1 0x00800040
#define DDR_PCFGWQOS0_1 0x01100C03
#define DDR_PCFGWQOS1_1 0x01000200
#define DDR_ADDRMAP1 0x00080808
#define DDR_ADDRMAP2 0x00000000
#define DDR_ADDRMAP3 0x00000000
#define DDR_ADDRMAP4 0x00001F1F
#define DDR_ADDRMAP5 0x07070707
#define DDR_ADDRMAP6 0x0F0F0707
#define DDR_ADDRMAP9 0x00000000
#define DDR_ADDRMAP10 0x00000000
#define DDR_ADDRMAP11 0x00000000
#define DDR_PGCR 0x01442E02
#define DDR_PTR0 0x0022AA5B
#define DDR_PTR1 0x04841104
#define DDR_PTR2 0x042DA068
#define DDR_ACIOCR 0x10400812
#define DDR_DXCCR 0x00000C40
#define DDR_DSGCR 0xF200011F
#define DDR_DCR 0x0000000B
#define DDR_DTPR0 0x38D488D0
#define DDR_DTPR1 0x098B00D8
#define DDR_DTPR2 0x10023600
#define DDR_MR0 0x00000840
#define DDR_MR1 0x00000000
#define DDR_MR2 0x00000248
#define DDR_MR3 0x00000000
#define DDR_ODTCR 0x00010000
#define DDR_ZQ0CR1 0x00000038
#define DDR_DX0GCR 0x0000CE81
#define DDR_DX1GCR 0x0000CE81
#define DDR_DX2GCR 0x0000CE81
#define DDR_DX3GCR 0x0000CE81#include "stm32mp15-ddr.dtsi"修改stm32mp15xx-ask.dtsi使用新的DDR设备树:
// #include "stm32mp15-ddr3-1x4Gb-1066-binG.dtsi"
#include "stm32mp15-ddr3-ask-2x2Gb-1066-binG.dtsi"
电源调节器修改
硬件说明中核心板采用分立电源,未使用PMIC电源管理:
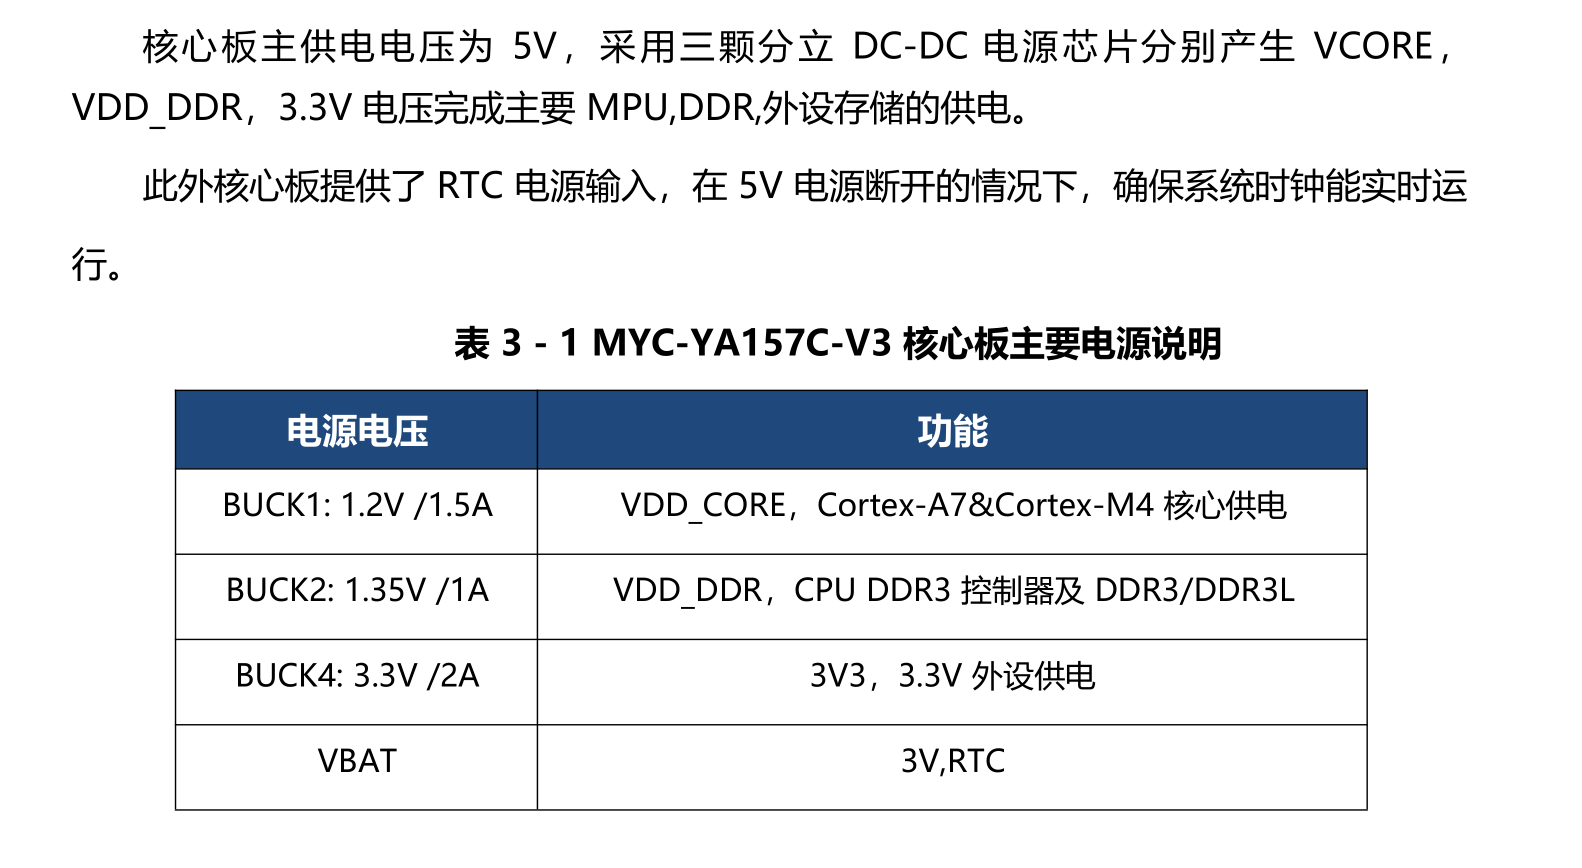
我们需要修改stm32mp15xx-ask.dtsi中相关的配置:
// 删除 &i2c4 全部配置
&i2c4 {
...
};// 添加固定电压调节器
vdd: vdd
vddcore: vddcore
vdd_usb: vdd_usb
v3v3: v3v3
时钟源修改
核心板使用有源晶振,需要删除digbypass:
// 删除以下节点
&clk_hse {st,digbypass;
};
添加EMMC
&sdmmc2 {
..
};
修改调试串口GPIO
uart4_pins_a: uart4-0 {pinmux = <STM32_PINMUX('A', 11, AF6)>; /* UART4_RX */pinmux = <STM32_PINMUX('A', 12, AF6)>; /* UART4_TX */
完整的dts文件如下:
// SPDX-License-Identifier: (GPL-2.0+ OR BSD-3-Clause)
/** Copyright (c) 2019-2023, STMicroelectronics - All Rights Reserved* Author: Alexandre Torgue <alexandre.torgue@st.com> for STMicroelectronics.*/#include <dt-bindings/clock/stm32mp1-clksrc.h>
// #include "stm32mp15-ddr3-1x4Gb-1066-binG.dtsi"
#include "stm32mp15-ddr3-ask-2x2Gb-1066-binG.dtsi"/ {memory@c0000000 {device_type = "memory";reg = <0xc0000000 0x20000000>;};vin: vin {compatible = "regulator-fixed";regulator-name = "vin";regulator-min-microvolt = <5000000>;regulator-max-microvolt = <5000000>;regulator-always-on;};vdd: vdd {compatible = "regulator-fixed";regulator-name = "vdd";regulator-min-microvolt = <3300000>;regulator-max-microvolt = <3300000>;regulator-always-on;};vddcore: vddcore {compatible = "regulator-fixed";regulator-name = "vddcore";regulator-min-microvolt = <1250000>;regulator-max-microvolt = <1250000>;regulator-always-on;};vdd_usb: vdd_usb {compatible = "regulator-fixed";regulator-name = "vdd_usb";regulator-min-microvolt = <3300000>;regulator-max-microvolt = <3300000>;regulator-always-on;};v3v3: v3v3 {compatible = "regulator-fixed";regulator-name = "v3v3";regulator-min-microvolt = <3300000>;regulator-max-microvolt = <3300000>;regulator-always-on;};
};&bsec {board_id: board_id@ec {reg = <0xec 0x4>;st,non-secure-otp;};
};&cpu0 {cpu-supply = <&vddcore>;
};&cpu1 {cpu-supply = <&vddcore>;
};&hash1 {status = "okay";
};&iwdg1 {timeout-sec = <32>;status = "okay";
};&pwr_regulators {vdd-supply = <&vdd>;vdd_3v3_usbfs-supply = <&vdd_usb>;
};&rcc {compatible = "st,stm32mp1-rcc-secure", "st,stm32mp1-rcc", "syscon";st,clksrc = <CLK_MPU_PLL1PCLK_AXI_PLL2PCLK_MCU_PLL3PCLK_MCO1_DISABLEDCLK_MCO2_DISABLEDCLK_CKPER_HSECLK_FMC_ACLKCLK_QSPI_ACLKCLK_ETH_PLL4PCLK_SDMMC12_PLL4PCLK_DSI_DSIPLLCLK_STGEN_HSECLK_USBPHY_HSECLK_SPI2S1_PLL3QCLK_SPI2S23_PLL3QCLK_SPI45_HSICLK_SPI6_HSICLK_I2C46_HSICLK_SDMMC3_PLL4PCLK_USBO_USBPHYCLK_ADC_CKPERCLK_CEC_LSECLK_I2C12_HSICLK_I2C35_HSICLK_UART1_HSICLK_UART24_HSICLK_UART35_HSICLK_UART6_HSICLK_UART78_HSICLK_SPDIF_PLL4PCLK_FDCAN_PLL4RCLK_SAI1_PLL3QCLK_SAI2_PLL3QCLK_SAI3_PLL3QCLK_SAI4_PLL3QCLK_RNG1_CSICLK_RNG2_LSICLK_LPTIM1_PCLK1CLK_LPTIM23_PCLK3CLK_LPTIM45_LSE>;st,clkdiv = <DIV(DIV_MPU, 1)DIV(DIV_AXI, 0)DIV(DIV_MCU, 0)DIV(DIV_APB1, 1)DIV(DIV_APB2, 1)DIV(DIV_APB3, 1)DIV(DIV_APB4, 1)DIV(DIV_APB5, 2)DIV(DIV_MCO1, 0)DIV(DIV_MCO2, 0)>;st,pll_vco {pll2_vco_1066Mhz: pll2-vco-1066Mhz {src = <CLK_PLL12_HSE>;divmn = <2 65>;frac = <0x1400>;};pll3_vco_417Mhz: pll3-vco-417Mhz {src = <CLK_PLL3_HSE>;divmn = <1 33>;frac = <0x1a04>;};pll4_vco_594Mhz: pll4-vco-594Mhz {src = <CLK_PLL4_HSE>;divmn = <3 98>;};};/* VCO = 1066.0 MHz => P = 266 (AXI), Q = 533 (GPU), R = 533 (DDR) */pll2: st,pll@1 {compatible = "st,stm32mp1-pll";reg = <1>;st,pll = <&pll2_cfg1>;pll2_cfg1: pll2_cfg1 {st,pll_vco = <&pll2_vco_1066Mhz>;st,pll_div_pqr = <1 0 0>;};};/* VCO = 417.8 MHz => P = 209, Q = 24, R = 11 */pll3: st,pll@2 {compatible = "st,stm32mp1-pll";reg = <2>;st,pll = <&pll3_cfg1>;pll3_cfg1: pll3_cfg1 {st,pll_vco = <&pll3_vco_417Mhz>;st,pll_div_pqr = <1 16 36>;};};/* VCO = 594.0 MHz => P = 99, Q = 74, R = 74 */pll4: st,pll@3 {compatible = "st,stm32mp1-pll";reg = <3>;st,pll = <&pll4_cfg1>;pll4_cfg1: pll4_cfg1 {st,pll_vco = <&pll4_vco_594Mhz>;st,pll_div_pqr = <5 7 7>;};};
};&rng1 {status = "okay";
};&rtc {status = "okay";
};&sdmmc1 {pinctrl-names = "default";pinctrl-0 = <&sdmmc1_b4_pins_a>;disable-wp;st,neg-edge;bus-width = <4>;vmmc-supply = <&v3v3>;status = "okay";
};&sdmmc2 {pinctrl-names = "default";pinctrl-0 = <&sdmmc2_b4_pins_a &sdmmc2_d47_pins_a>;non-removable;no-sd;no-sdio;st,dirpol;st,negedge;bus-width = <8>;vmmc-supply = <&v3v3>;vqmmc-supply = <&v3v3>;status = "okay";
};&uart4 {pinctrl-names = "default";pinctrl-0 = <&uart4_pins_a>;status = "okay";
};&uart7 {pinctrl-names = "default";pinctrl-0 = <&uart7_pins_c>;status = "disabled";
};&usart3 {pinctrl-names = "default";pinctrl-0 = <&usart3_pins_c>;uart-has-rtscts;status = "disabled";
};&usbotg_hs {phys = <&usbphyc_port1 0>;phy-names = "usb2-phy";usb-role-switch;status = "okay";
};&usbphyc {status = "okay";
};&usbphyc_port0 {phy-supply = <&vdd_usb>;
};&usbphyc_port1 {phy-supply = <&vdd_usb>;
};&pinctrl {sdmmc2_b4_pins_a: sdmmc2-b4-0 {pins1 {pinmux = <STM32_PINMUX('B', 14, AF9)>, /* SDMMC2_D0 */<STM32_PINMUX('B', 15, AF9)>, /* SDMMC2_D1 */<STM32_PINMUX('B', 3, AF9)>, /* SDMMC2_D2 */<STM32_PINMUX('B', 4, AF9)>, /* SDMMC2_D3 */<STM32_PINMUX('G', 6, AF10)>; /* SDMMC2_CMD */slew-rate = <1>;drive-push-pull;bias-pull-up;};pins2 {pinmux = <STM32_PINMUX('E', 3, AF9)>; /* SDMMC2_CK */slew-rate = <2>;drive-push-pull;bias-pull-up;};};sdmmc2_d47_pins_a: sdmmc2-d47-0 {pins {pinmux = <STM32_PINMUX('A', 8, AF9)>, /* SDMMC2_D4 */<STM32_PINMUX('A', 9, AF10)>, /* SDMMC2_D5 */<STM32_PINMUX('E', 5, AF9)>, /* SDMMC2_D6 */<STM32_PINMUX('D', 3, AF9)>; /* SDMMC2_D7 */slew-rate = <1>;drive-push-pull;bias-pull-up;};};uart4_pins_a: uart4-0 {pins1 {pinmux = <STM32_PINMUX('A', 11, AF6)>; /* UART4_RX */bias-disable;};pins2 {pinmux = <STM32_PINMUX('A', 12, AF6)>; /* UART4_TX */bias-disable;drive-push-pull;slew-rate = <0>;};};
};
源码修改
因为在设备树中我们添加了几个regulator-fixed,需要修改tf-a-stm32mp-v2.8.15-stm32mp-r2/plat/st/stm32mp1/stm32mp1_def.h中的PLAT_NB_FIXED_REGUS:
// #define PLAT_NB_FIXED_REGUS		U(2)
#define PLAT_NB_FIXED_REGUS		U(10)
开始编译
# 需要使用你的SDK路径
source ~/MP157/weston/v5.1/sdk/environment-setup-cortexa7t2hf-neon-vfpv4-ostl-linux-gnueabi# 设置 FIP 路径
export FIP_DEPLOYDIR_ROOT=$PWD/../../FIP_artifacts# 编译 usb 启动的 tf-a,在USB烧录时使用
make -f $PWD/../Makefile.sdk TF_A_DEVICETREE=stm32mp157d-ask TF_A_CONFIG=usb all# 编译 sd 卡启动程序
make -f $PWD/../Makefile.sdk TF_A_DEVICETREE=stm32mp157d-ask TF_A_CONFIG=optee-sdcard all# 编译 emmc 启动程序
make -f $PWD/../Makefile.sdk TF_A_DEVICETREE=stm32mp157d-ask TF_A_CONFIG=optee-emmc all
编译结束的以下错误可以暂时忽略,因为它需要用到OP-TEE和U-boot文件:
[ERROR] some files are not present, please provide it or change the paremeters
编译成功后会生成以下文件,其中带stm32后缀和metadata.bin文件需要烧录到开发板中:
tf-a-stm32mp-v2.8.15-stm32mp-r2$ ls ../deploy/
debug     metadata.bin                           tf-a-stm32mp157d-ask-optee-sdcard.stm32
fwconfig  tf-a-stm32mp157d-ask-optee-emmc.stm32  tf-a-stm32mp157d-ask-usb.stm32
开始烧录
解压打开STM32MP1 OpenSTLinux入门套件包,将编译新生成的*.stm32和metadata.bin文件复制到images\stm32mp1\arm-trusted-firmware中,复制images\stm32mp1\flashlayout_st-image-weston\optee\FlashLayout_sdcard_stm32mp157d-dk1-optee.tsv为一份新的配置。如果使用emmc则可以使用FlashLayout_emmc开头的文件,修改如下:
#Opt	Id	Name	Type	IP	Offset	Binary
-	0x01	fsbl-boot	Binary	none	0x0	arm-trusted-firmware/tf-a-stm32mp157d-ask-usb.stm32
这里的烧录只使用了- usb.stm32表示将TF-A烧录到内存中运行,因为烧录SD和EMMC需要修改uboot,这里暂时跳过。
使用命令行STM32_Programmer_CLI.exe进行烧录运行:
STM32_Programmer_CLI.exe -c port=usb1 -w .\flashlayout_st-image-weston\optee\FlashLayout_sdcard_stm32mp157d-ask-optee.tsv
烧录结束后可看到以下串口打印,这里TF-A已运行成功,并启动USB DFU等待下载文件:
NOTICE:  CPU: STM32MP157DAC Rev.Z
NOTICE:  Model: STMicroelectronics STM32MP157D-DK1 Discovery Board
INFO:    Reset reason (0x14):
INFO:      Pad Reset from NRST
INFO:    FCONF: Reading TB_FW firmware configuration file from: 0x2ffe2000
INFO:    FCONF: Reading firmware configuration information for: stm32mp_io
INFO:    FCONF: Reading firmware configuration information for: stm32mp_fuse
INFO:    Using USB
INFO:      Instance 2
INFO:    Boot used partition fsbl1
NOTICE:  BL2: v2.8-stm32mp1-r2.0(debug):fb87407-dirty(fb87407f)
NOTICE:  BL2: Built : 16:22:40, Oct 24 2024
INFO:    BL2: Doing platform setup
INFO:    RAM: DDR3L 32bits 2x2Gb 533MHz
INFO:    Memory size = 0x20000000 (512 MB)
INFO:    DFU USB START...
可以在tf-a-stm32mp-v2.8.15-stm32mp-r2/include/common/debug.h文件中修改打印级别,查看更多信息:
#undef LOG_LEVEL
#define LOG_LEVEL LOG_LEVEL_VERBOSE
运行效果:
NOTICE:  CPU: STM32MP157DAC Rev.Z
NOTICE:  Model: STMicroelectronics STM32MP157D-DK1 Discovery Board
VERBOSE: BSEC: OTP 0 is locked and will not be refreshed
VERBOSE: fixed reg init!
VERBOSE: register fixed reg vin!
VERBOSE: register vin
VERBOSE: vin: parse dt
VERBOSE: vin: min_mv=5000
VERBOSE: vin: max_mv=5000
VERBOSE: vin: list volt
VERBOSE: vin: set regulator-always-on
VERBOSE: register fixed reg vdd!
VERBOSE: register vdd
VERBOSE: vdd: parse dt
VERBOSE: vdd: min_mv=3300
VERBOSE: vdd: max_mv=3300
VERBOSE: vdd: list volt
VERBOSE: vdd: set regulator-always-on
VERBOSE: register fixed reg vddcore!
VERBOSE: register vddcore
VERBOSE: vddcore: parse dt
VERBOSE: vddcore: min_mv=1250
VERBOSE: vddcore: max_mv=1250
VERBOSE: vddcore: list volt
VERBOSE: vddcore: set regulator-always-on
VERBOSE: register fixed reg vdd_usb!
VERBOSE: register vdd_usb
VERBOSE: vdd_usb: parse dt
VERBOSE: vdd_usb: min_mv=3300
VERBOSE: vdd_usb: max_mv=3300
VERBOSE: vdd_usb: list volt
VERBOSE: vdd_usb: set regulator-always-on
VERBOSE: register fixed reg v3v3!
VERBOSE: register v3v3
VERBOSE: v3v3: parse dt
VERBOSE: v3v3: min_mv=3300
VERBOSE: v3v3: max_mv=3300
VERBOSE: v3v3: list volt
VERBOSE: v3v3: set regulator-always-on
VERBOSE: vdd: supplied by 18
VERBOSE: Enable clock 51
VERBOSE: IWDG1 found, non-secure
VERBOSE: Enable clock 68
VERBOSE: Disable clock 68
VERBOSE: 2 IWDG instances found
VERBOSE: Enable clock 68
VERBOSE: Disable clock 68
VERBOSE: BSEC: OTP 0 is locked and will not be refreshed
VERBOSE: TrustZone : Configuring region 0 (TZC Interface Base=0x5c006000 sec_attr=0x3, ns_devs=0x0)
INFO:    Reset reason (0x14):
INFO:      Pad Reset from NRST
VERBOSE: BSEC: OTP 0 is locked and will not be refreshed
INFO:    FCONF: Reading TB_FW firmware configuration file from: 0x2ffe2000
INFO:    FCONF: Reading firmware configuration information for: stm32mp_io
VERBOSE: FCONF: stm32mp-io_policies.fw_cfg_uuid cell found with value = 5807e16a-8459-47be-8ed5-648e8dddab0e
VERBOSE: FCONF: stm32mp-io_policies.bl32_uuid cell found with value = 05d0e189-53dc-1347-8d2b-500a4b7a3e38
VERBOSE: FCONF: stm32mp-io_policies.bl32_extra1_uuid cell found with value = 0b70c29b-2a5a-7840-9f65-0a5682738288
VERBOSE: FCONF: stm32mp-io_policies.bl32_extra2_uuid cell found with value = 8ea87bb1-cfa2-3f4d-85fd-e7bba50220d9
VERBOSE: FCONF: stm32mp-io_policies.bl33_uuid cell found with value = d6d0eea7-fcea-d54b-9782-9934f234b6e4
VERBOSE: FCONF: stm32mp-io_policies.hw_cfg_uuid cell found with value = 08b8f1d9-c9cf-9349-a962-6fbc6b7265cc
VERBOSE: FCONF: stm32mp-io_policies.tos_fw_cfg_uuid cell found with value = 26257c1a-dbc6-7f47-8d96-c4c4b0248021
INFO:    FCONF: Reading firmware configuration information for: stm32mp_fuse
INFO:    Using USB
INFO:      Instance 2
INFO:    Boot used partition fsbl1
NOTICE:  BL2: v2.8-stm32mp1-r2.0(debug):fb87407-dirty(fb87407f)
NOTICE:  BL2: Built : 16:22:40, Oct 24 2024
INFO:    BL2: Doing platform setup
VERBOSE: STM32MP DDR probe
INFO:    RAM: DDR3L 32bits 2x2Gb 533MHz
VERBOSE: stm32mp_ddr_dt_get_param: st,ctl-reg[0x19] = 0
VERBOSE: stm32mp_ddr_dt_get_param: st,ctl-timing[0xc] = 0
VERBOSE: stm32mp_ddr_dt_get_param: st,ctl-map[0x9] = 0
VERBOSE: stm32mp_ddr_dt_get_param: st,ctl-perf[0x11] = 0
VERBOSE: stm32mp_ddr_dt_get_param: st,phy-reg[0xb] = 0
VERBOSE: stm32mp_ddr_dt_get_param: st,phy-timing[0xa] = 0
VERBOSE: name = DDR3L 32bits 2x2Gb 533MHz
VERBOSE: speed = 533000 kHz
VERBOSE: size  = 0x20000000
VERBOSE: disable DDR PHY retention
VERBOSE: DDR: mem_speed (533000 kHz), RCC 533000 kHz
VERBOSE: [0x5a0031b0] dfimisc = 0x0
VERBOSE: init static
VERBOSE: init timing
VERBOSE: init map
VERBOSE: [0x5a0030d0] init0 = 0x4002004e
VERBOSE: init perf
VERBOSE: init static
VERBOSE: init timing
VERBOSE:   > [0x5a00400c] pgsr = 0x7 &
VERBOSE:
[0x5a00400c] pgsr = 0x7
VERBOSE: [0x5a004004] pir = 0x1007f -> 0x1007f
VERBOSE:   > [0x5a00400c] pgsr = 0xf &
VERBOSE:
[0x5a00400c] pgsr = 0xf
VERBOSE: [0x5a003320] swctl = 0x0
VERBOSE: [0x5a0031b0] dfimisc = 0x1
VERBOSE: [0x5a003320] swctl = 0x1
VERBOSE: [0x5a003324] swstat = 0x1 VERBOSE: [0x5a003324] swstat = 0x1
VERBOSE: [0x5a003004] stat = 0x1
VERBOSE: [0x5a003004] stat = 0x1
VERBOSE: DDR DQS training.
VERBOSE: [0x5a003304] dbg1 = 0x2
VERBOSE: [0x5a003308] dbgcam = 0x37000000 VERBOSE: [0x5a003308] dbgcam = 0x37000000 VERBOSE: [0x5a003320] swctl = 0x0
VERBOSE: [0x5a003060] rfshctl3 = 0x1
VERBOSE: [0x5a003060] rfshctl3 = 0x1 VERBOSE: [0x5a003060] rfshctl3 = 0x1
VERBOSE: [0x5a003320] swctl = 0x1
VERBOSE: [0x5a003324] swstat = 0x1 VERBOSE: [0x5a003324] swstat = 0x1
VERBOSE: [0x5a003304] dbg1 = 0x0
VERBOSE: [0x5a004004] pir = 0x81 -> 0x81
VERBOSE:   > [0x5a00400c] pgsr = 0x1f &
VERBOSE:
[0x5a00400c] pgsr = 0x1f
VERBOSE:   > [0x5a00400c] pgsr = 0x1f &
VERBOSE:
[0x5a00400c] pgsr = 0x1f
VERBOSE: [0x5a003304] dbg1 = 0x2
VERBOSE: [0x5a003308] dbgcam = 0x37000000 VERBOSE: [0x5a003308] dbgcam = 0x37000000 VERBOSE: [0x5a003320] swctl = 0x0
VERBOSE: [0x5a003060] rfshctl3 = 0x0
VERBOSE: [0x5a003060] rfshctl3 = 0x0 VERBOSE: [0x5a003060] rfshctl3 = 0x0
VERBOSE: [0x5a003320] swctl = 0x1
VERBOSE: [0x5a003324] swstat = 0x1 VERBOSE: [0x5a003324] swstat = 0x1
VERBOSE: [0x5a003304] dbg1 = 0x0
VERBOSE: [0x5a003490] pctrl_0 = 0x1
VERBOSE: [0x5a003540] pctrl_1 = 0x1
VERBOSE: stm32mp1_ddr_setup : ram size(c0000000, 20000000)
INFO:    Memory size = 0x20000000 (512 MB)
VERBOSE: [0x5a003490] pctrl_0 = 0x0
VERBOSE: [0x5a003540] pctrl_1 = 0x0
VERBOSE: [0x5a0033fc] pstat = 0x0 VERBOSE: [0x5a003304] dbg1 = 0x2
VERBOSE: [0x5a003308] dbgcam = 0x37000000 VERBOSE: [0x5a003308] dbgcam = 0x37000000 VERBOSE: [0x5a003320] swctl = 0x0
VERBOSE: [0x5a003320] swctl = 0x1
VERBOSE: [0x5a003324] swstat = 0x1 VERBOSE: [0x5a003324] swstat = 0x1
VERBOSE: [0x5a003304] dbg1 = 0x0
VERBOSE: [0x5a003490] pctrl_0 = 0x1
VERBOSE: [0x5a003540] pctrl_1 = 0x1
VERBOSE: Enable clock 99
VERBOSE: Disable clock 99
INFO:    DFU USB START...
VERBOSE: read packet length 8 to 0x2fffc540
VERBOSE: read packet length 8 to 0x2fffc540
VERBOSE: read packet length 8 to 0x2fffc540
VERBOSE: read packet length 8 to 0x2fffc540
VERBOSE: read packet length 8 to 0x2fffc540
VERBOSE: read packet length 8 to 0x2fffc540
VERBOSE: read packet length 8 to 0x2fffc540
VERBOSE: read packet length 8 to 0x2fffc540
VERBOSE: read packet length 8 to 0x2fffc540
VERBOSE: read packet length 8 to 0x2fffc540
VERBOSE: read packet length 8 to 0x2fffc540
到这里TF-A移植就完成了。
相关链接:
STM32MP1 OpenSTLinux入门套件下载和使用说明
https://www.st.com.cn/zh/embedded-software/stm32mp1starter.html
https://wiki.stmicroelectronics.cn/stm32mpu/wiki/STM32MP15_Discovery_kits_-_Starter_Package
STM32MP1 OpenSTLinux开发套件下载和使用说明
https://www.st.com.cn/zh/embedded-software/stm32mp1dev.html
https://wiki.stmicroelectronics.cn/stm32mpu/wiki/STM32MPU_Developer_Package