使用项目:https://github.com/intel/linux-sgx.git
前言:目前国内和国外互联网上关于使用模拟模式来完成sgx的博客我是真的一点没有找到,因此自己写一份博客来完成记录
环境:
-
Ubuntu22.04
-
不支持sgx,没有硬件存在
-
(mac也可以按照本教程来完成工作)
前置工作:
-
下载上面提到的项目
-
(不需要driver驱动,在模拟环境下,不需要驱动!!!困扰了我很久)
下载项目:
git clone https://github.com/~/sgx/linux-sgx/linux-sgx.git && cd linux-sgx
# 我使用了2.14这个版本,防止项目太庞大,因为我只是想模拟一下
git tag
git check sgx_2.14 # 貌似是这个名字
git status #提示切换分支成功
下面我是使用docker来完成的这个工作,不想使用docker的也可以,看最后有提到,原理相同
# 首先修改 .dockerignore,当前路径~/linux-sgx
# 首先预编译一下sdk
make preparation
预编译会下载其他的git项目,以及其他的内容,等待结束没有报错出现OK字样
cd docker/build
# 进入docker目录修改DockerFile以及.sh文件
vim Dockerfile
1.修改Dockerfile
修改Dockerfile里面的内容如下,首先我们需要明确,我们使用Docker运行的项目是SampleEnclave这个demo,在SIM模式下运行,因此只需要对于这模块进行修改
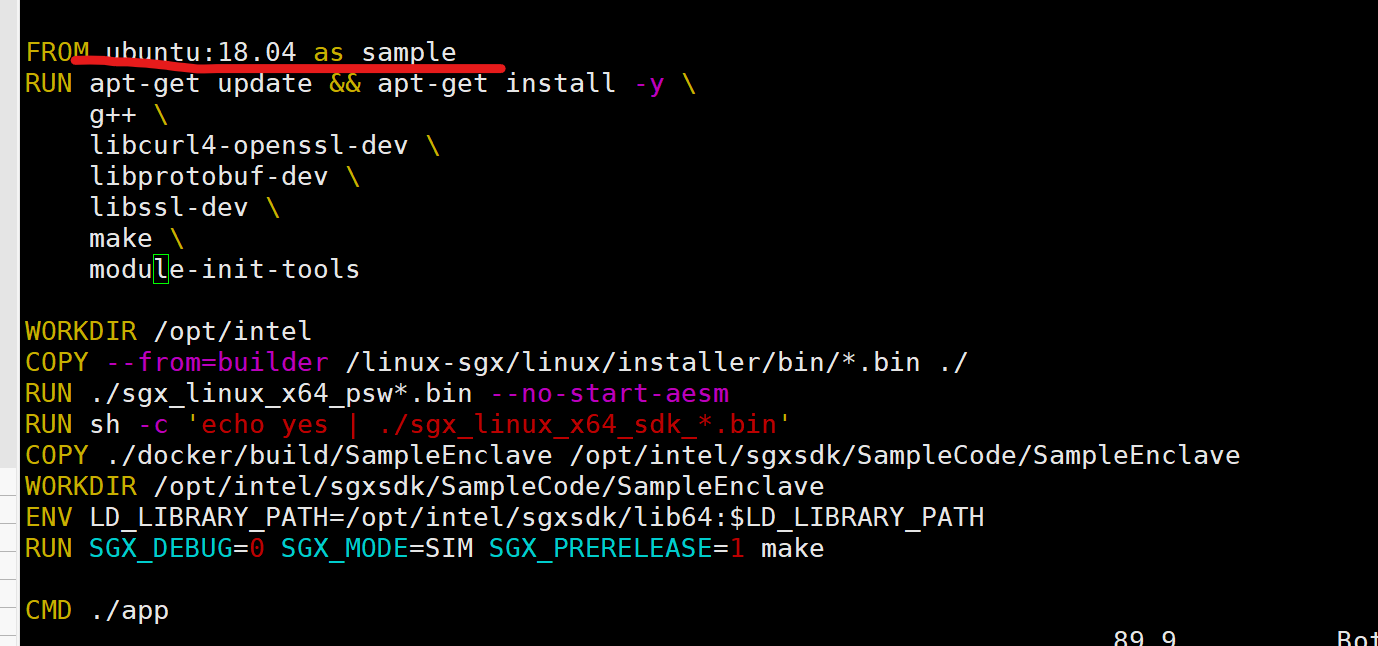
我们需要改动的点是:
# 修改SGX_MODE模式是SIM
RUN SGX_DEBUG=0 SGX_MODE=SIM SGX_PRERELEASE=1 make
同时在上面ENV地方添加路径依赖,保证能够让代码找到_sim.a 结尾的模拟库,同时我删除了其中切换USER的步骤,因为害怕路径依赖失效
# 这部分内容我全部删除了
RUN adduser -q --disabled-password --gecos "" --no-create-home sgxuser
USER sgxuser
2.修改build_and_run_sample.docker.sh
docker run --env http_proxy --env https_proxy --device=/dev/sgx_enclave -v aesmd-socket:/var/run/aesmd -it sgx_sample
# 修改为,去掉了--device=/dev/sgx_enclave
docker run --env http_proxy --env https_proxy  -v aesmd-socket:/var/run/aesmd -it sgx_sample
3.修改compose(可能不需要,因为不需要编排,但是我还是修改了)
删除掉下面的device,因为我们不支持sgx,所以没有对应设备
services:
aesm:
image: sgx_aesm
devices:
- /dev/sgx/enclave
- /dev/sgx/provision
volumes:
- aesmd-socket:/var/run/aesmd
stdin_open: true
tty: true
environment:
- http_proxy
- https_proxy
sample:
image: sgx_sample
depends_on:
- aesm
devices:
- /dev/sgx/enclave
volumes:
- aesmd-socket:/var/run/aesmd
stdin_open: true
tty: true
environment:
- http_proxy
- https_proxy
4.启动docker
sudo ./build_and_run_sample_docker.sh
会进行下面内容:
-
传输 ../..目录的内容到docker daemon
-
然后在docker容器内进行编译sdk
-
然后编译psw(我们用不到)
-
之后就会在模拟模式下启动内容
我的运行截图如下:
~/sgx/linux-sgx/docker/build # sudo ./build_and_run_sample_docker.sh
DEPRECATED: The legacy builder is deprecated and will be removed in a future release.
Install the buildx component to build images with BuildKit:
https://docs.docker.com/go/buildx/
Sending build context to Docker daemon 390.2MB
Step 1/29 : FROM ubuntu:18.04 as builder
---> f9a80a55f492
Step 2/29 : RUN apt-get update && apt-get install -y autoconf automake build-essential cmake curl debhelper git libcurl4-openssl-dev libprotobuf-dev libssl-dev libtool lsb-release ocaml ocamlbuild protobuf-compiler python wget
---> Using cache
---> f58d93be68c4
Step 3/29 : WORKDIR /linux-sgx
---> Using cache
---> 5da8c3a56b09
Step 4/29 : COPY . .
---> Using cache
---> 2726e0a0aac2
Step 5/29 : RUN make sdk_install_pkg_no_mitigation
---> Using cache
---> e660719d11b3
Step 6/29 : WORKDIR /opt/intel
---> Using cache
---> 6a432f3bc318
Step 7/29 : RUN sh -c 'echo yes | /linux-sgx/linux/installer/bin/sgx_linux_x64_sdk_*.bin'
---> Using cache
---> 6652fef818cf
Step 8/29 : WORKDIR /linux-sgx
---> Using cache
---> 32a650eed1ea
Step 9/29 : RUN make psw_install_pkg
---> Using cache
---> 8624ac81f5fd
Step 10/29 : FROM ubuntu:18.04 as aesm
---> f9a80a55f492
Step 11/29 : RUN apt-get update && apt-get install -y libcurl4 libprotobuf10 libssl1.1 make module-init-tools
---> Using cache
---> 219c9431e7bf
Step 12/29 : WORKDIR /installer
---> Using cache
---> 9b55037469e5
Step 13/29 : COPY --from=builder /linux-sgx/linux/installer/bin/*.bin ./
---> Using cache
---> 092ac12e9dcc
Step 14/29 : RUN ./sgx_linux_x64_psw*.bin --no-start-aesm
---> Using cache
---> 81448571338c
Step 15/29 : USER aesmd
---> Using cache
---> f7396ecac317
Step 16/29 : WORKDIR /opt/intel/sgxpsw/aesm/
---> Using cache
---> 8c7f6a7cacfa
Step 17/29 : ENV LD_LIBRARY_PATH=.
---> Using cache
---> 140e551470e5
Step 18/29 : CMD ./aesm_service --no-daemon
---> Using cache
---> f3093b1897a3
Step 19/29 : FROM ubuntu:18.04 as sample
---> f9a80a55f492
Step 20/29 : RUN apt-get update && apt-get install -y g++ libcurl4-openssl-dev libprotobuf-dev libssl-dev make module-init-tools
---> Using cache
---> 37bbee366b11
Step 21/29 : WORKDIR /opt/intel
---> Using cache
---> 4f750e55159b
Step 22/29 : COPY --from=builder /linux-sgx/linux/installer/bin/*.bin ./
---> Using cache
---> cddd91fbc2e9
Step 23/29 : RUN ./sgx_linux_x64_psw*.bin --no-start-aesm
---> Using cache
---> 432a393799f3
Step 24/29 : RUN sh -c 'echo yes | ./sgx_linux_x64_sdk_*.bin'
---> Using cache
---> 83132d57f2c8
Step 25/29 : COPY ./docker/build/SampleEnclave /opt/intel/sgxsdk/SampleCode/SampleEnclave
---> Using cache
---> e1248384e6e1
Step 26/29 : WORKDIR /opt/intel/sgxsdk/SampleCode/SampleEnclave
---> Using cache
---> aa84e8a74f5f
Step 27/29 : ENV LD_LIBRARY_PATH=/opt/intel/sgxsdk/lib64:$LD_LIBRARY_PATH
---> Using cache
---> 61eb09ad6fa8
Step 28/29 : RUN SGX_DEBUG=0 SGX_MODE=SIM SGX_PRERELEASE=1 make
---> Using cache
---> fefd0a4f9ae0
Step 29/29 : CMD ./app
---> Using cache
---> 2cf5a95e5a8a
Successfully built 2cf5a95e5a8a
Successfully tagged sgx_sample:latest
Checksum(0x0x7ffde2b86000, 100) = 0xfffd4143
Info: executing thread synchronization, please wait...
target is replaced!Info: SampleEnclave successfully returned.
Enter a character before exit ...
至此,sim运行sgx就可以了,不过是docker模式,下面提一下非docker使用sim
最后提示一下,如果想把文件内容传递到docker地下,docker传递给docker daemon上下文环境是 /linux-sgx,这个底下有 .dockerignore,记得删掉一些东西,排除一下
5.非docker使用sim运行sgx
同样下载项目,按照这个流程来进行在本机下安装sdk:https://flxdu.cn/Notes/2022/Intel-R-SGX%E7%8E%AF%E5%A2%83%E5%9C%A8Ubuntu-18-04%E7%9A%84%E5%AE%89%E8%A3%85.html
有任何其他问题,联系邮箱:2742598536@qq.com,我明白你这会大海中捞针寻找方法的痛苦