教程的链接:https://www.bilibili.com/video/BV1nU4y1X7iQ
教程内的老师没用GAS的插件,而是自己写了一个。这一篇文章只是开头,还有很多的内容没有往里面写。
新增了一个object类,新增了一个使用这个类的组件。然后把这个组件用在了我们的SCharacter上面,重构了我们的攻击功能。
新增类:SAction
SAction.h
// Fill out your copyright notice in the Description page of Project Settings.#pragma once#include "CoreMinimal.h"
#include "UObject/NoExportTypes.h"
#include "SAction.generated.h"//此处的UCLASS宏内需要填入Blueprintable,否则我们不能在创建蓝图的时候从所有类中找到我们的SAction类
UCLASS(Blueprintable)
class ACTIONROGUELIKE_API USAction : public UObject
{GENERATED_BODY()public://行为名字来开始或停止UPROPERTY(EditDefaultsOnly,Category="Action")FName ActionName;//宏内的BlueprintNativeEvent意味着蓝图可重写UFUNCTION(BlueprintNativeEvent,Category="Action")void StartAction(AActor* Instigator);UFUNCTION(BlueprintNativeEvent, Category = "Action")void StopAction(AActor* Instigator);class UWorld* GetWorld() const override;
};
SAction.cpp
// Fill out your copyright notice in the Description page of Project Settings.#include "SAction.h"
#include "Logging/LogMacros.h"void USAction::StartAction_Implementation(AActor* Instigator)
{UE_LOG(LogTemp, Log, TEXT("Running: % s"), *GetNameSafe(this));
}void USAction::StopAction_Implementation(AActor* Instigator)
{UE_LOG(LogTemp, Log, TEXT("Stopped: % s"), *GetNameSafe(this));
}//重写的GetWorld()方法,防止子类调用GetWorld()方法出现错误
class UWorld* USAction::GetWorld() const
{UActorComponent* Comp = Cast<UActorComponent>(GetOuter());if (Comp){return Comp->GetWorld();}return nullptr;
}
SActionComponent.h
// Fill out your copyright notice in the Description page of Project Settings.#pragma once#include "CoreMinimal.h"
#include "Components/ActorComponent.h"
#include "SActionComponent.generated.h"class USAction;UCLASS( ClassGroup=(Custom), meta=(BlueprintSpawnableComponent) )
class ACTIONROGUELIKE_API USActionComponent : public UActorComponent
{GENERATED_BODY()protected://行为列表UPROPERTY()TArray<USAction*> Actions;//蓝图内填写的行为列表UPROPERTY(EditAnywhere, Category = "Actions")TArray<TSubclassOf<USAction>> DefaultActions;public://增加行为函数UFUNCTION(BlueprintCallable,Category="Actions")void AddAction(TSubclassOf<USAction>ActionClass);//通过名字来获取Action类,然后执行ActionUFUNCTION(BlueprintCallable, Category = "Actions")bool StartActionByName(AActor* Instigator, FName ActionName);//通过名字来获取Action类,然后停止ActionUFUNCTION(BlueprintCallable, Category = "Actions")bool StopActionByName(AActor* Instigator, FName ActionName);public:	// Sets default values for this component's propertiesUSActionComponent();protected:// Called when the game startsvirtual void BeginPlay() override;public:	// Called every framevirtual void TickComponent(float DeltaTime, ELevelTick TickType, FActorComponentTickFunction* ThisTickFunction) override;};
SActionComponent.cpp
// Fill out your copyright notice in the Description page of Project Settings.#include "SActionComponent.h"
#include "SAction.h"void USActionComponent::AddAction(TSubclassOf<USAction>ActionClass)
{if (!ensure(ActionClass)){return;}USAction* NewAction =  NewObject<USAction>(this,ActionClass);if (NewAction){Actions.Add(NewAction);}
}bool USActionComponent::StartActionByName(AActor* Instigator, FName ActionName)
{for (USAction *Action : Actions){if (Action&&Action->ActionName==ActionName){//调用开始事件Action->StartAction(Instigator);return true;}}return false;
}bool USActionComponent::StopActionByName(AActor* Instigator, FName ActionName)
{for (USAction* Action : Actions){if (Action && Action->ActionName == ActionName){//调用停止事件Action->StopAction(Instigator);return true;}}return false;
}// Sets default values for this component's properties
USActionComponent::USActionComponent()
{PrimaryComponentTick.bCanEverTick = true;
}// Called when the game starts
void USActionComponent::BeginPlay()
{Super::BeginPlay();//将我们在蓝图内填入的Action类丢到我们的类列表内for (TSubclassOf<USAction> ActionClass : DefaultActions){AddAction(ActionClass);}}// Called every frame
void USActionComponent::TickComponent(float DeltaTime, ELevelTick TickType, FActorComponentTickFunction* ThisTickFunction)
{Super::TickComponent(DeltaTime, TickType, ThisTickFunction);}
写完这两个类后,我们可以先进行一个尝试。我们会分别用蓝图和C++来演示如何使用Action这个类,以及如何运行这些Action类的子类。
首先是冲刺的功能,当我们摁住Shift的时候人物移速会加快,而我们放开Shift的时候人物移速会回到平常的样子。我们在蓝图内实现这个功能。以SAction为父类创建一个蓝图子类,在子类里面进行函数的重写。


蓝图内的默认增长值和事件名字如图所示。
同时我们给SCharacter增加一个事件按键绑定,这一步和教程不一样(因为UE5.1.1版本的缘故)我们需要按照先前的方法进行绑定,然后在绑定函数那里写上
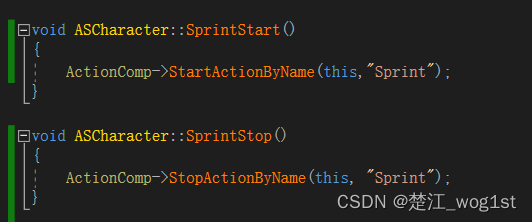
然后进入蓝图编辑器的PlayerCharacter内的ActionComp内,在默认事件内把我们的蓝图给填上去。
在这些工作完成之后我们就实现了Shift进行加速的功能。之后便是把我们进行攻击的功能的函数给迁移到我们的Action内,用我们的ActionComp去实现它而不是在我们的SCharacter类里面实现它。
为此我们需要写一个SAction的子类,SAction_ProjectileAttack。
SAction_ProjectileAttack.h
// Fill out your copyright notice in the Description page of Project Settings.#pragma once#include "CoreMinimal.h"
#include "SAction.h"
#include "SAction_ProjectileAttack.generated.h"/*** */
UCLASS()
class ACTIONROGUELIKE_API USAction_ProjectileAttack : public USAction
{GENERATED_BODY()protected://魔法子弹类UPROPERTY(EditAnywhere, Category="Attack")class TSubclassOf<AActor> ProjectileClass;//手部插槽名字UPROPERTY(VisibleAnywhere, Category="Effects")FName HandSocketName;//timer的delay时间长UPROPERTY(EditDefaultsOnly, Category="Attack")float AttackAnimDelay;//动画UPROPERTY(EditAnywhere, Category="Attack")class UAnimMontage* AttackAnim;//手部生成效果UPROPERTY(EditAnywhere, Category="Attack")UParticleSystem* CastingEffect;//timer结束时触发的函数UFUNCTION()void AttackDelay_Elapsed(ACharacter* InstigatorCharacter);public://开始事件函数重写virtual void StartAction_Implementation(AActor* Instigator) override;USAction_ProjectileAttack();
};
各位会发现,我们把部分SCharacter类里面的部分UPROPERTY给拿了过来,在Action内去进行使用。
SAction_ProjectileAttack.cpp
// Fill out your copyright notice in the Description page of Project Settings.#include "SAction_ProjectileAttack.h"
#include "GameFramework/Character.h"
#include "Kismet/GameplayStatics.h"
#include "SCharacter.h"void USAction_ProjectileAttack::StartAction_Implementation(AActor* Instigator)
{Super::StartAction_Implementation(Instigator);ACharacter* Character = Cast<ACharacter>(Instigator);if (Character){Character->PlayAnimMontage(AttackAnim);UGameplayStatics::SpawnEmitterAttached(CastingEffect, Character->GetMesh(), HandSocketName, FVector::ZeroVector, FRotator::ZeroRotator, EAttachLocation::SnapToTarget);FTimerHandle TimerHandel_AttackDelay;FTimerDelegate Delegate;Delegate.BindUFunction(this, "AttackDelay_Elapsed", Character);GetWorld()->GetTimerManager().SetTimer(TimerHandel_AttackDelay, Delegate, AttackAnimDelay, false);}}void USAction_ProjectileAttack::AttackDelay_Elapsed(ACharacter* InstigatorCharacter)
{if (ensureAlways(ProjectileClass)){FVector HandLocation = InstigatorCharacter->GetMesh()->GetSocketLocation(HandSocketName);//生成参数设置FActorSpawnParameters SpawnParams;SpawnParams.SpawnCollisionHandlingOverride = ESpawnActorCollisionHandlingMethod::AlwaysSpawn;SpawnParams.Instigator = InstigatorCharacter;//检测的球体半径设置FCollisionShape Shape;Shape.SetSphere(20.0f);//增加忽视碰撞的对象FCollisionQueryParams Params;Params.AddIgnoredActor(InstigatorCharacter);//增加检测的通道FCollisionObjectQueryParams ObjParams;ObjParams.AddObjectTypesToQuery(ECC_WorldDynamic);ObjParams.AddObjectTypesToQuery(ECC_WorldStatic);ObjParams.AddObjectTypesToQuery(ECC_Pawn);ASCharacter* PlayerCharacter = Cast<ASCharacter>(InstigatorCharacter);FVector TraceStart = PlayerCharacter->GetPawnViewLocation();FVector TraceEnd = TraceStart + (InstigatorCharacter->GetControlRotation().Vector() * 5000);FHitResult Hit;if (GetWorld()->SweepSingleByObjectType(Hit,TraceStart,TraceEnd,FQuat::Identity,ObjParams,Shape,Params)){TraceEnd = Hit.ImpactPoint;}//老师的求旋转方法FRotator ProjRotation = FRotationMatrix::MakeFromX(TraceEnd - HandLocation).Rotator();//我的求旋转方法//FRotator ProjRotation = (TraceEnd - HandLocation).Rotation();FTransform SpawnTM = FTransform(ProjRotation, HandLocation);GetWorld()->SpawnActor<AActor>(ProjectileClass, SpawnTM, SpawnParams);}StopAction(InstigatorCharacter);
}USAction_ProjectileAttack::USAction_ProjectileAttack()
{AttackAnimDelay = 0.2f;HandSocketName = "Muzzle_01";
}
在我看视频的时候,发现这一部分我的思路和老师的思路大体相同但还是有些细节上是不太一样的(汗)我用的是LineTracting,而老师用的是ObjType,很难说哪个好哪个不好,我觉得更像是一个需求的两个不同实现罢了。包括后面的求Rotation的方法,我是直接进行一个减法,在我的概念内,Rotation实际上是一个方向,也就是一个向量,而向量的长短对我来说是无所谓的东西。而老师用的方法我去网上查看了下,然后看了下源码,大概理解是这样:FRotationMatrix中存放物体相对于世界坐标系的旋转角度信息,具体的我在源码内做个解析
TMatrix<T> TRotationMatrix<T>::MakeFromX(TVector<T> const& XAxis)
{//获得一个参数的副本TVector<T> const NewX = XAxis.GetSafeNormal();// try to use up if possible//UE_KINDA_SMALL_NUMBER的大小为1.e-4f就是0.0001f,如果Z方向上的向量小于0.9999那么UpVector赋前值,如果大于,那么赋后值TVector<T> const UpVector = (FMath::Abs(NewX.Z) < (1.f - UE_KINDA_SMALL_NUMBER)) ? TVector<T>(0, 0, 1.f) : TVector<T>(1.f, 0, 0);//UpVector ^ NewX 我对于^符号的理解是进行异或运算,但是我没想明白向量做异或运算实际上是怎么做的const TVector<T> NewY = (UpVector ^ NewX).GetSafeNormal();const TVector<T> NewZ = NewX ^ NewY;//返回一个矩阵return TMatrix<T>(NewX, NewY, NewZ, TVector<T>::ZeroVector);
}
然后调用Rotator()函数,将矩阵变成我们的Rotation进行赋值。
除此之外的内容我的方法与教程给出的方法大同小异,我的方法内会缺一个在进行发射动画的时候手部会生成一个附着的特效,这个是之前的作业,我在之前的文档里面写过没看懂作业要求,这里做个补充说明。
创建完子类之后,我们在蓝图编辑器内去新建我们的MagicProjectile的蓝图类,我这里只用我们的普通魔法子弹做示范:
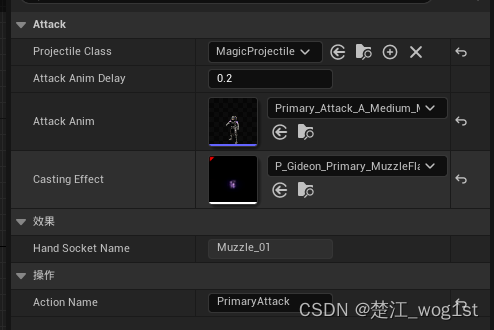
我们填入这些参数之后,在我们的SCharacter类内部进行修改,我们可以将我们攻击相关的绝大多数函数都给删掉了,只保留下一个和我们按键绑定的那一个函数,然后在函数内部写上

然后我们就可以重现我们的攻击功能了!同时如果以后我们想要往里面增加更多的魔法子弹相关技能的话,都可以通过这个MagicProjectile去创建,不用像我们以前那样一个函数写很多遍了(其实也可以只写一遍,在我们已经写好的函数内增加一个魔法子弹类,然后按生成参数的方法去生成我们的魔法子弹,但是所有代码都加到SCharacter类内,会让我们的代码显得太过于冗长,对我们的后期维护不友好)。而且对于SCharacter来说,这些功能都是封装起来的,它只不过是调用而已,我们后期维护也更加方便了!
