1、下载gitlab
首先在 /etc/yum.repos.d/目录下配置gitlab下载镜像源。
# 进入目录 /etc/yum.repos.d/
cd /etc/yum.repos.d/# 创建文件 gitlab-ce.repo
vim gitlab-ce.repo# 添加以下内容
[gitlab-ce]
name=gitlab-ce
baseurl=https://mirror.tuna.tsinghua.edu.cn/gitlab-ce/yum/el7/
gpgcheck=0
enabled=1# 清空缓存 && 更新缓存
yum clean all && yum makecache# 配置成功后下载gitlab
yum install -y  gitlab-ce-16.9.9-ce.0.el7.x86_64# 下载最新版
yum install -y gitlab-ce
2、安装配置
2.1、修改配置文件
#修改配置文件
vim /etc/gitlab/gitlab.rb# 修改访问路径:
external_url 'http://xxx.xxx.xxx.xxx:9010'
2.2、启动
# 要使用命令重载一下配置文件
gitlab-ctl reconfigure # 重新启动
gitlab-ctl restart# 查看各个组件状态
gitlab-ctl status
# 输出以下信息启动成功
run: alertmanager: (pid 24037) 413s; run: log: (pid 23539) 470s
run: gitaly: (pid 23986) 417s; run: log: (pid 22354) 613s
run: gitlab-exporter: (pid 23981) 417s; run: log: (pid 23371) 489s
run: gitlab-kas: (pid 22620) 598s; run: log: (pid 22635) 597s
run: gitlab-workhorse: (pid 23958) 419s; run: log: (pid 23183) 509s
run: logrotate: (pid 22194) 628s; run: log: (pid 22233) 625s
run: nginx: (pid 23965) 419s; run: log: (pid 23260) 501s
run: node-exporter: (pid 23973) 418s; run: log: (pid 23307) 497s
run: postgres-exporter: (pid 24061) 413s; run: log: (pid 23578) 465s
run: postgresql: (pid 22415) 604s; run: log: (pid 22433) 603s
run: prometheus: (pid 24003) 416s; run: log: (pid 23483) 477s
run: puma: (pid 23065) 522s; run: log: (pid 23083) 519s
run: redis: (pid 22264) 622s; run: log: (pid 22282) 618s
run: redis-exporter: (pid 23995) 417s; run: log: (pid 23429) 483s
run: sidekiq: (pid 23099) 516s; run: log: (pid 23140) 513s
2.3、访问
启动成功后,开放9010端口

浏览器访问地址,发现启动成功

2.4、注册账号
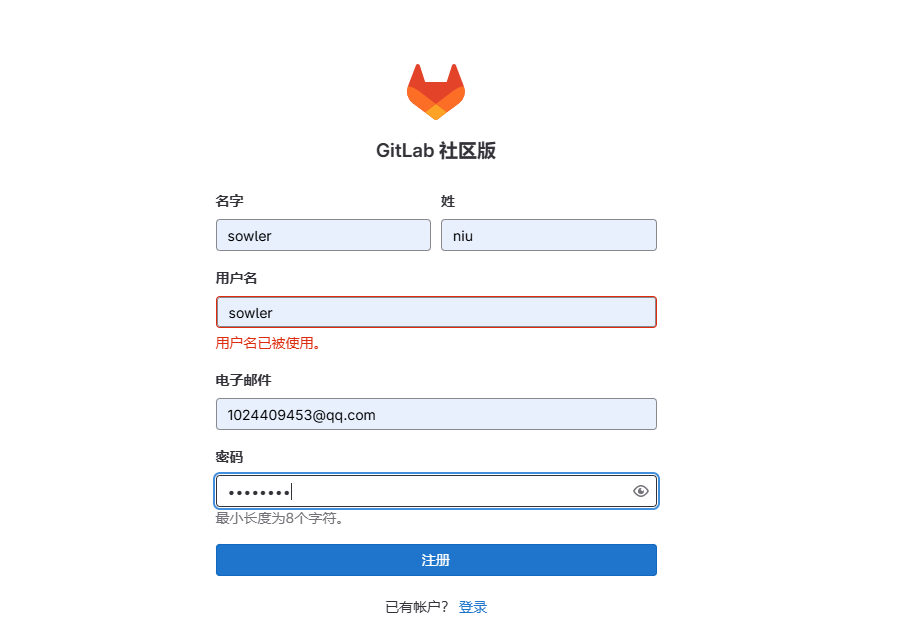
点击立即注册,注册账号,输入账号密码
账号:sowler
密码:aqwe1235
2.5、登录
注册成功后,开始登录,输入账号和密码后报错:
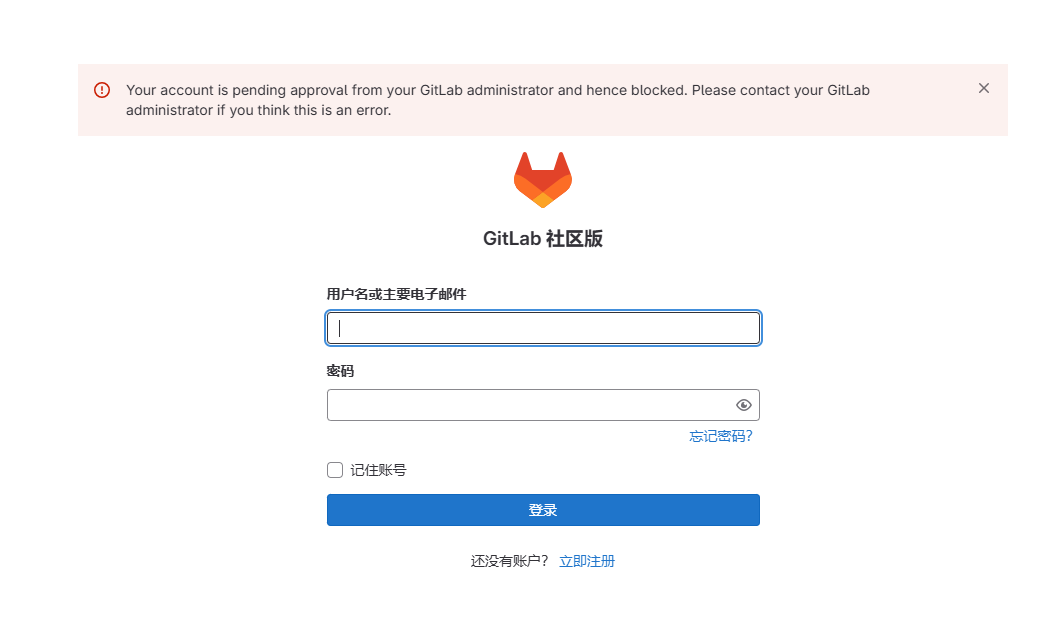
通过上面的这段报错内容可以看到错误原因
Your account is pending approval from your GitLab administrator and hence blocked. Please contact your GitLabadministrator if you think this is an error#翻译后
您的帐户正在等待您的GitLab管理员的批准,因此被封锁。如果您认为这是一个错误,请联系您的gitlab管理员
需要管理员批准,通过查找发现gitlab会内置一个管理员账号。默认账号为:root ,执行以下命令查看root的账号密码
[root@linux-servertwo opt]#  cat /etc/gitlab/initial_root_password
# WARNING: This value is valid only in the following conditions
#          1. If provided manually (either via `GITLAB_ROOT_PASSWORD` environment variable or via `gitlab_rails['initial_root_password']` setting in `gitlab.rb`, it was provided before database was seeded for the first time (usually, the first reconfigure run).
#          2. Password hasn't been changed manually, either via UI or via command line.
#
#          If the password shown here doesn't work, you must reset the admin password following https://docs.gitlab.com/ee/security/reset_user_password.html#reset-your-root-password.Password: KNARZgiUjFtm/IOELqQWiR4P2ds7+xK715CxNQpOyU4=# NOTE: This file will be automatically deleted in the first reconfigure run after 24 hours.
由此可以看出用户名就是root,密码就是上面的Password,通过以上账号再次进行登录。
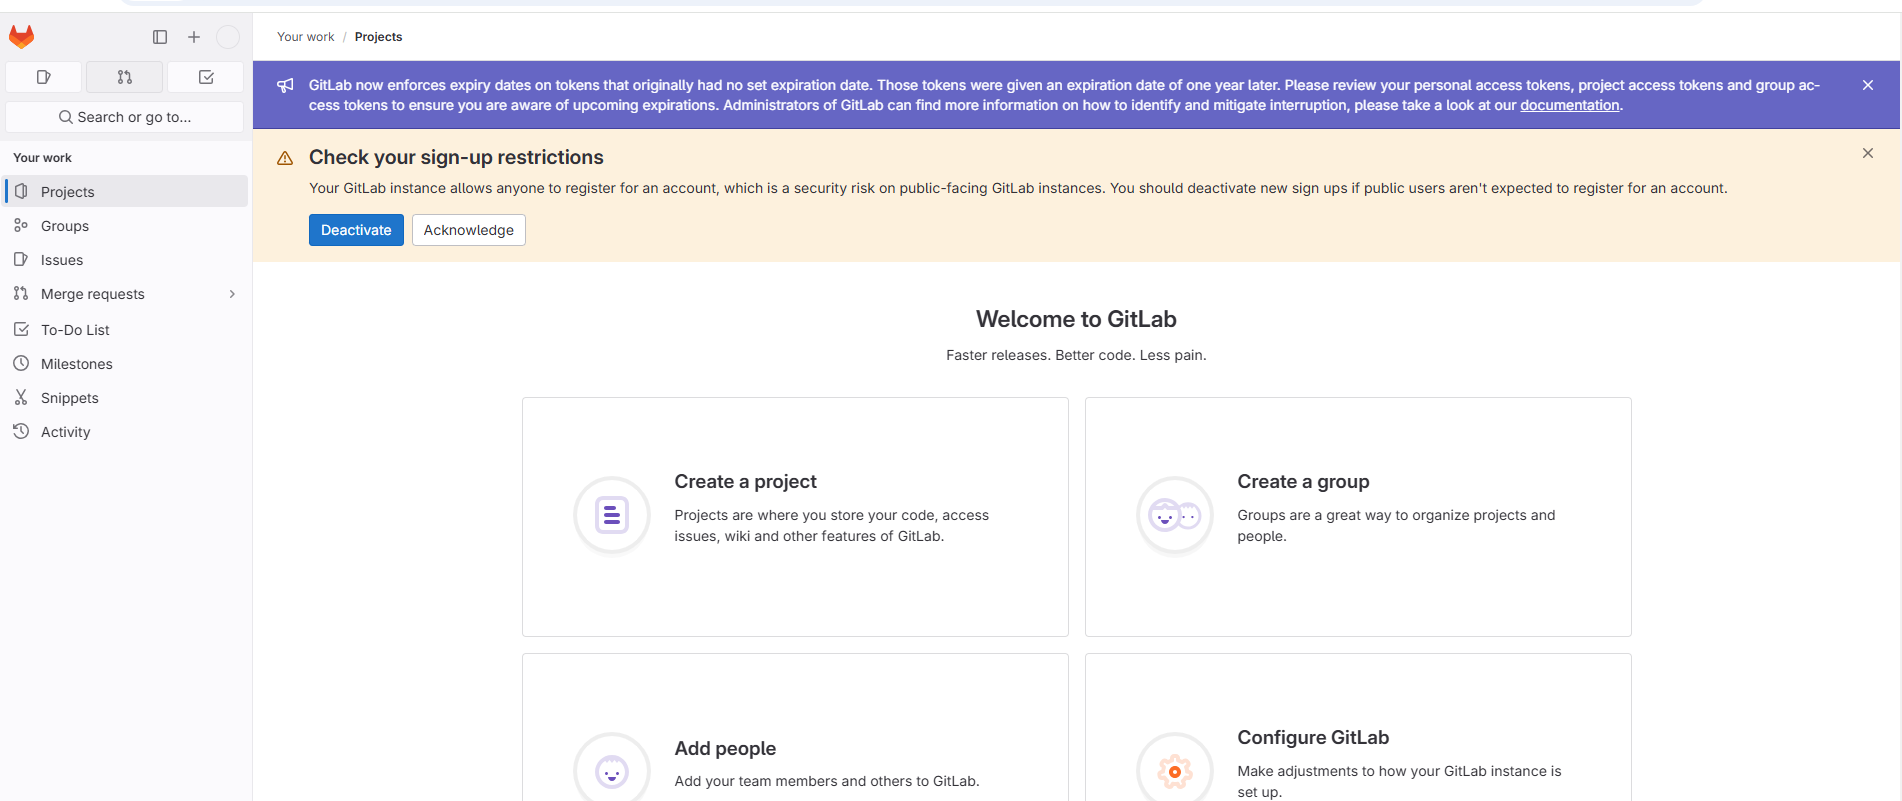
发现登录成功。根据页面提示,可以点击 Deactivate 禁用注册功能。
2.6、设置中文
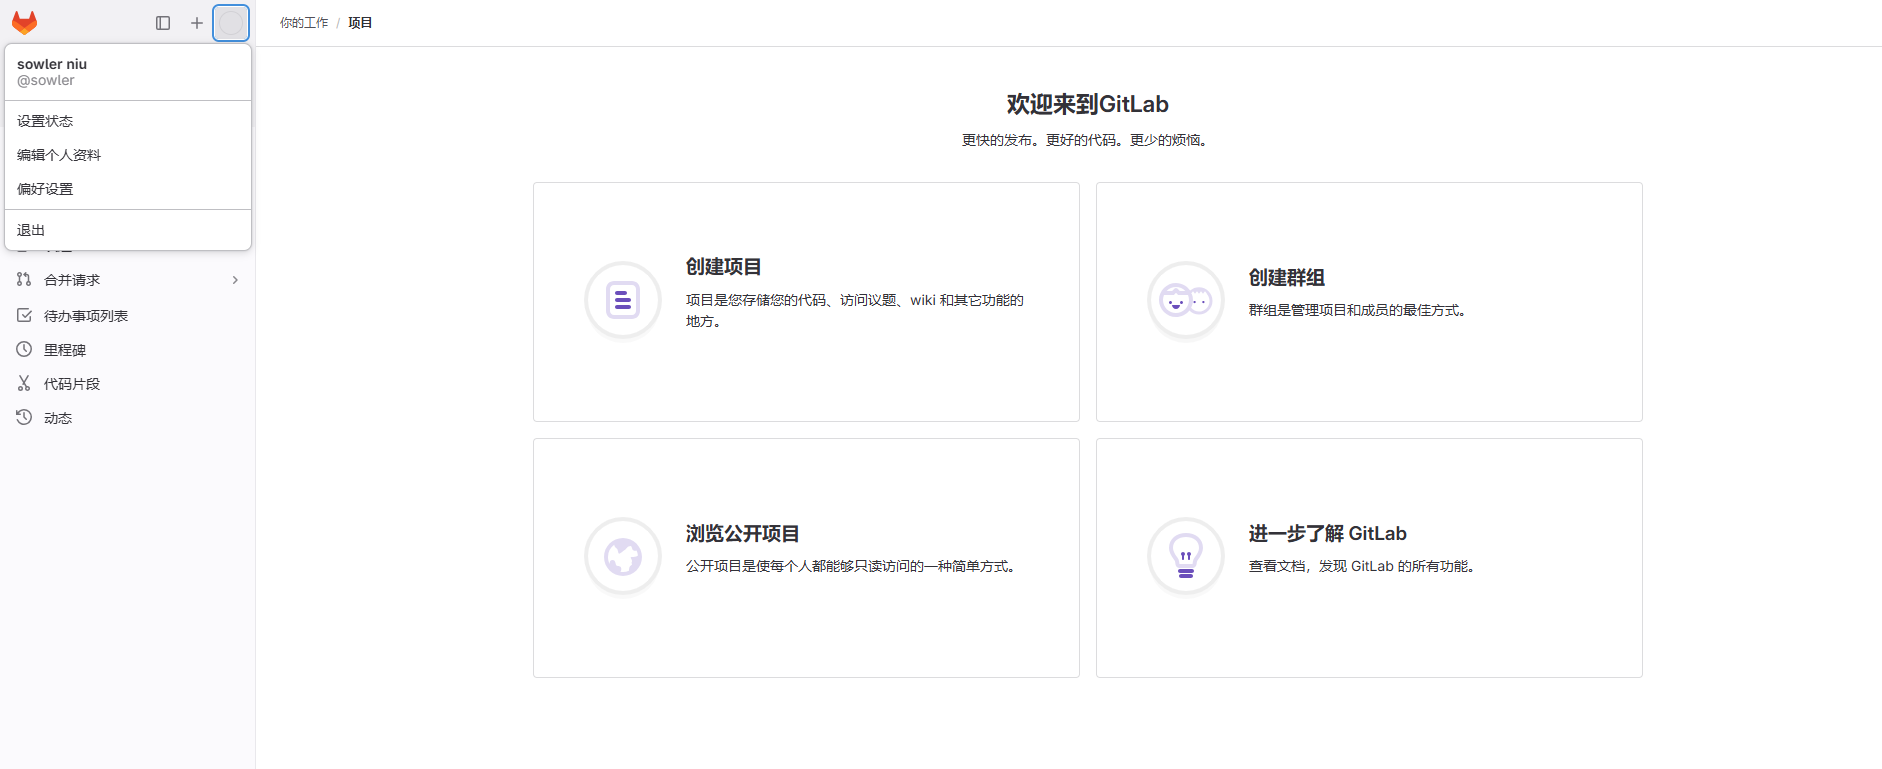
点击登录用户头像,选择下图所示的菜单。

进入以下页面,选择中文简体语言。
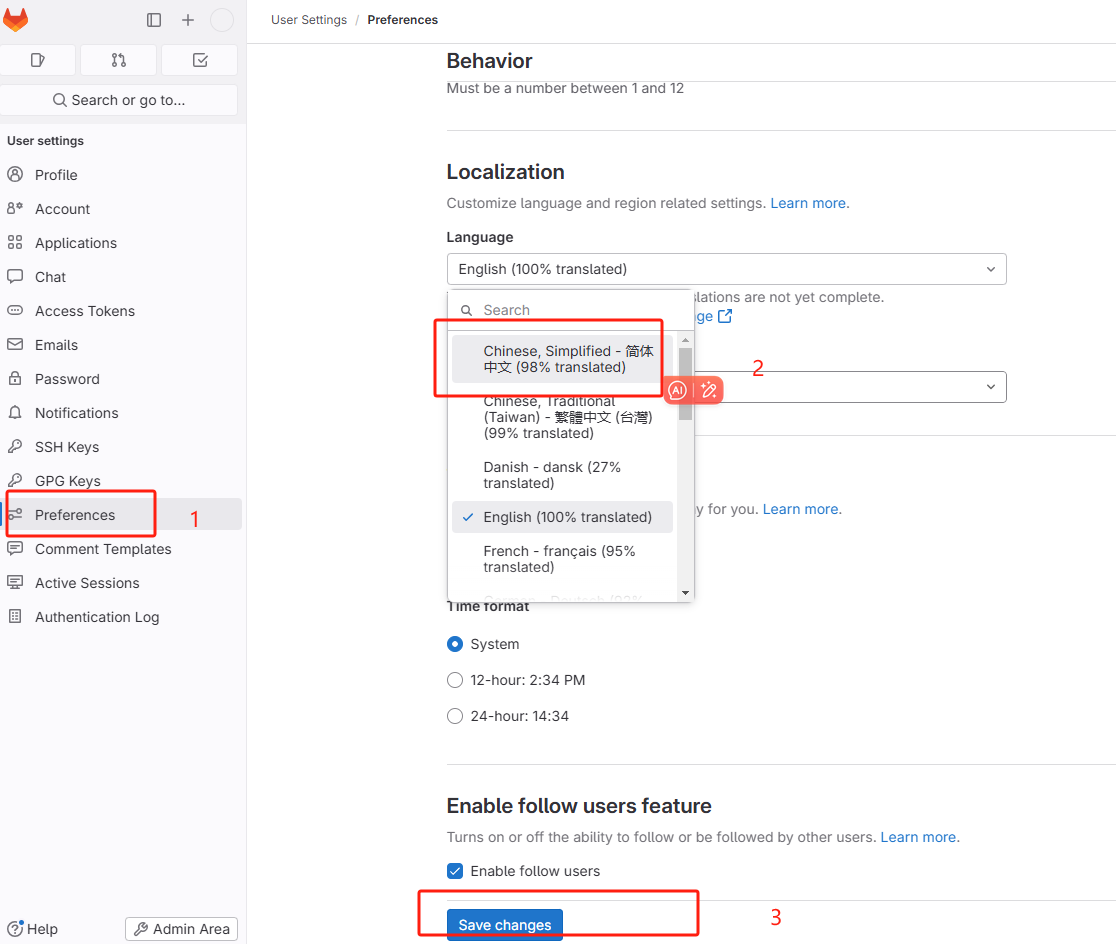
保存成功后,刷新页面,发现文字已经更新

2.7、更新管理员密码
设置好中文后,接下来就改尽快更新管理员密码了因为根据上面查看密码提示信息发现以上生成的管理员密码文件会在24小时后第一次重新配置时自动删除。
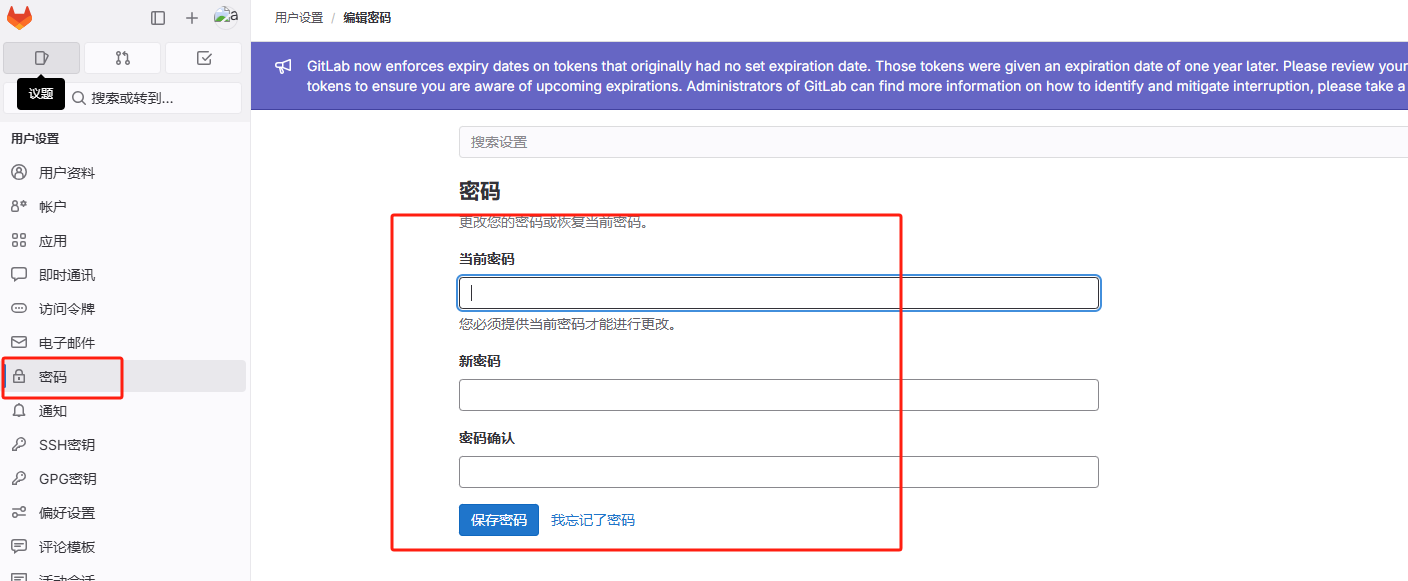
当前密码就是/etc/gitlab/initial_root_password 文件的初始化密码,然后输入新密码进行更新。新密码:aqwe1235
2.8、关闭注册功能
点击管理中心

找到设置
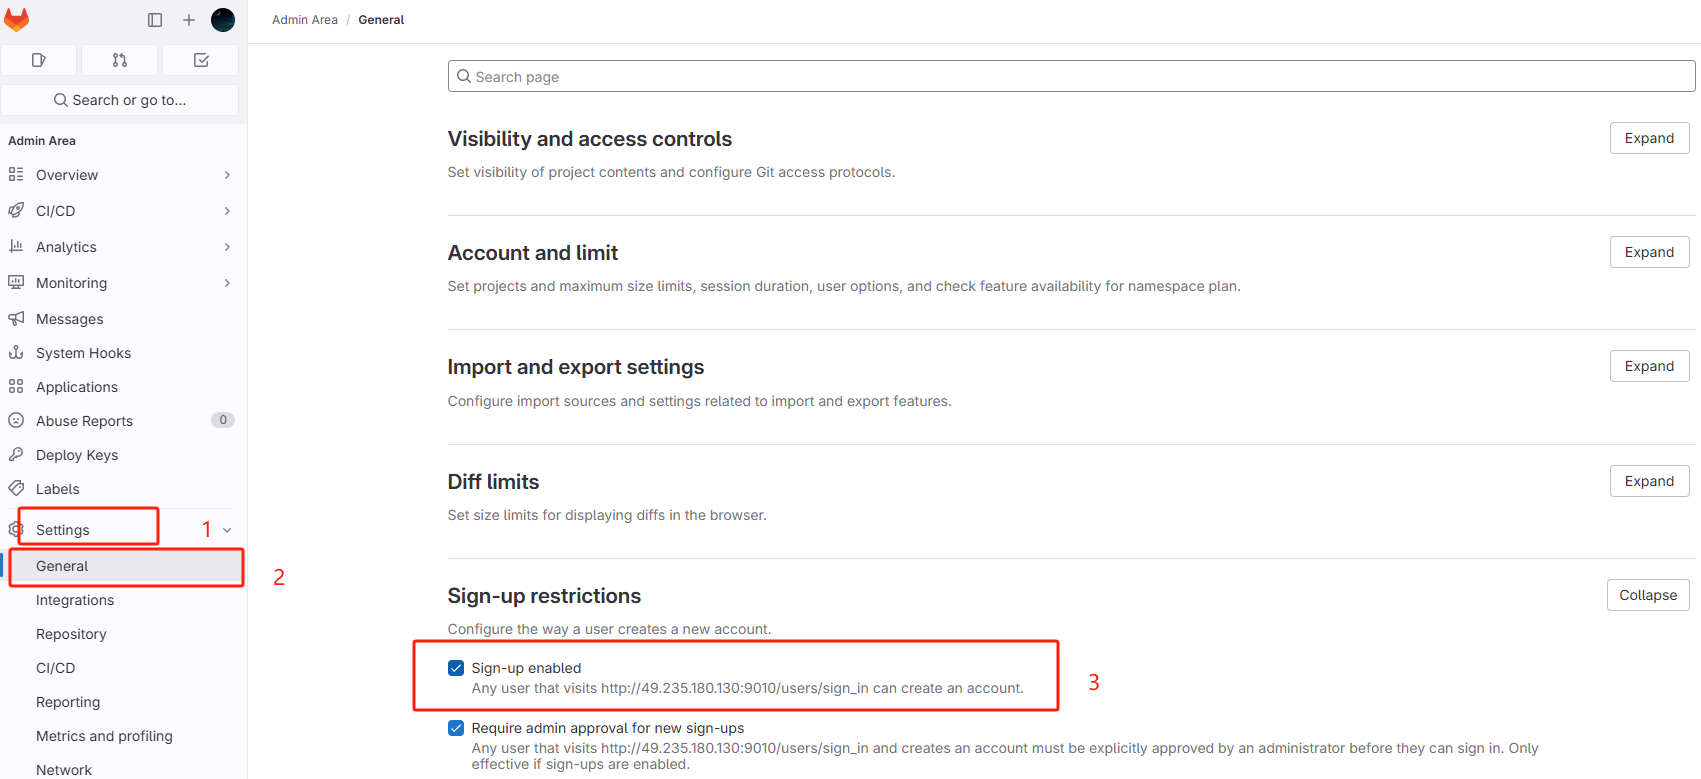
取消以下勾选
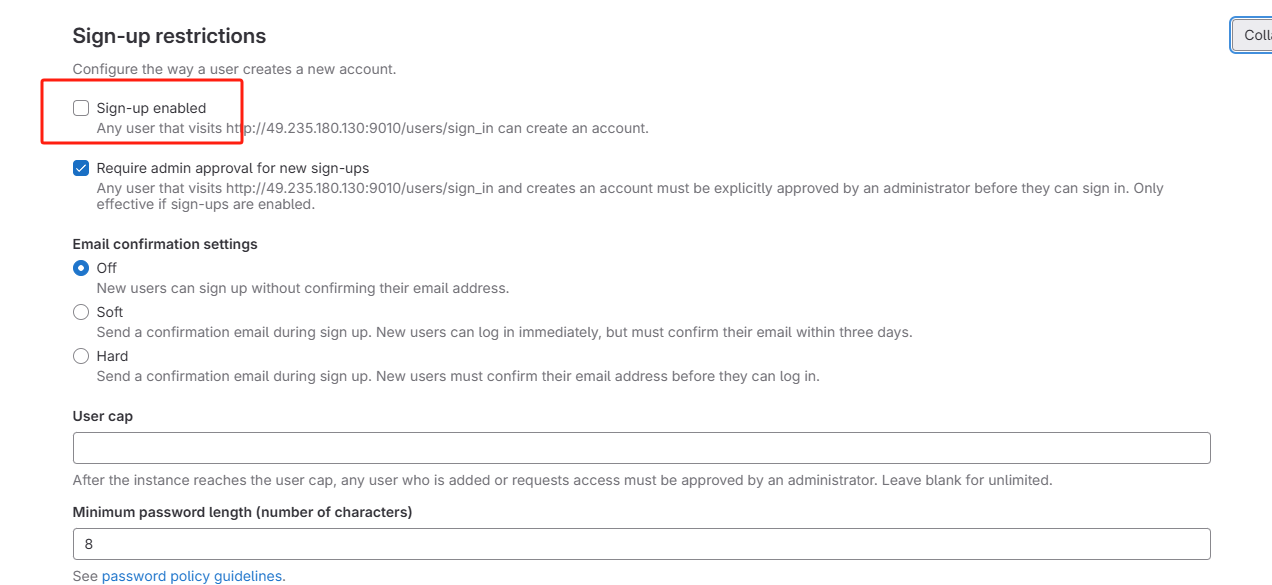
点击下方保存按钮

访问登录页面,发现注册功能已经取消。

2.9、激活账号
接下来激活刚刚创建的账号信息
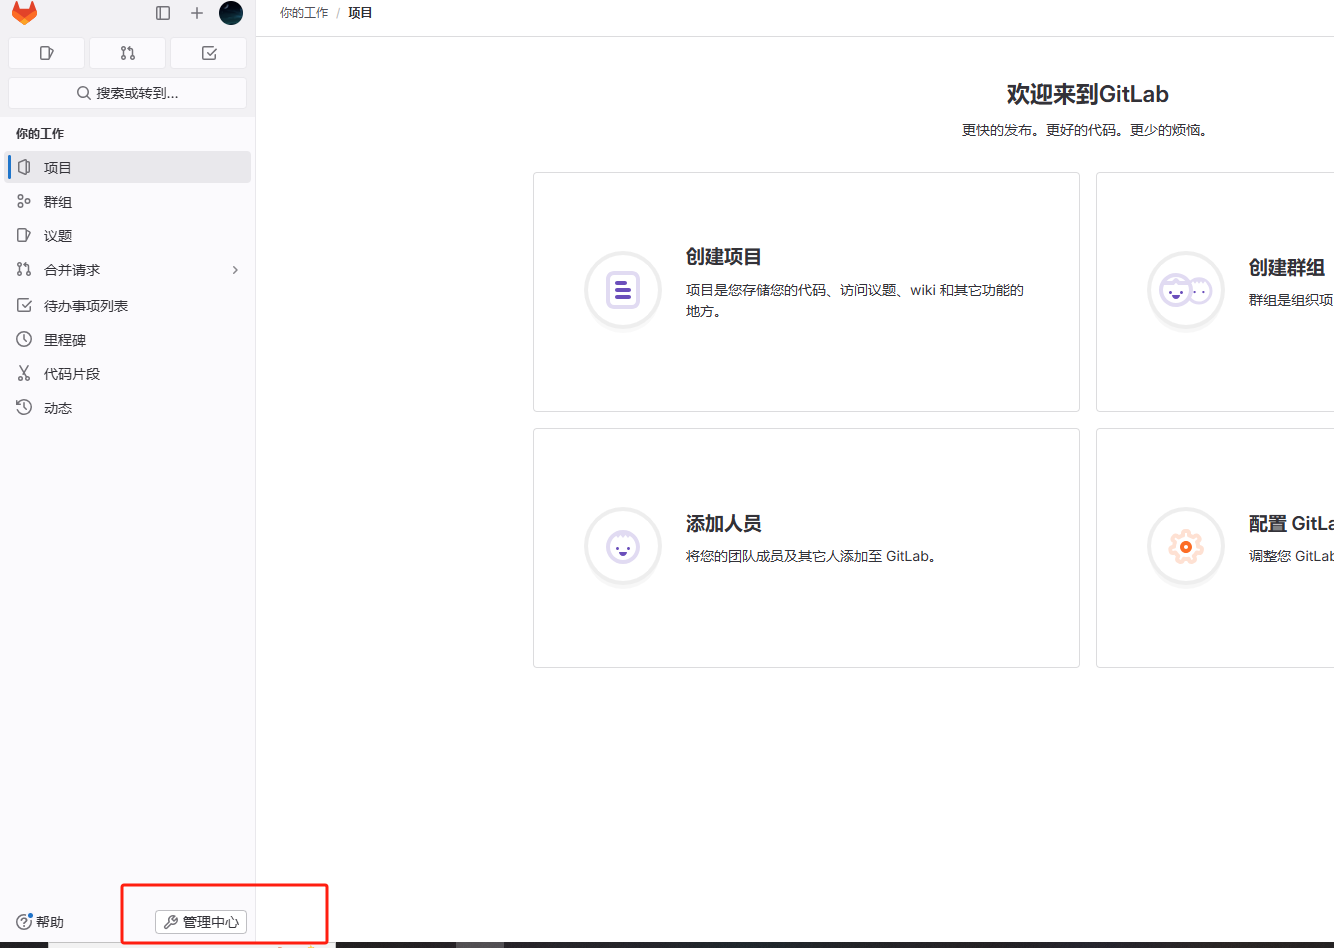
点击管理中心,进入以下页面

点击等待批准菜单,显示未激活的账号列表,点击批准按钮进行激活

激活成功后,在激活列表展示已经激活的用户账号信息
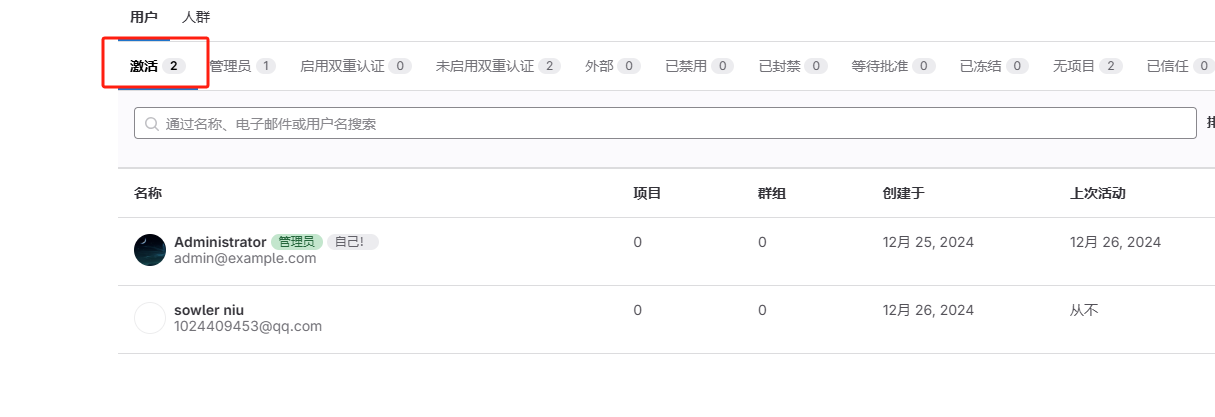
激活后,使用sowler账号登录,发现登录成功。
2.10、管理员账号注册用户
首先使用root账号登录gitlab,进入管理中心

点击用户->新建用户
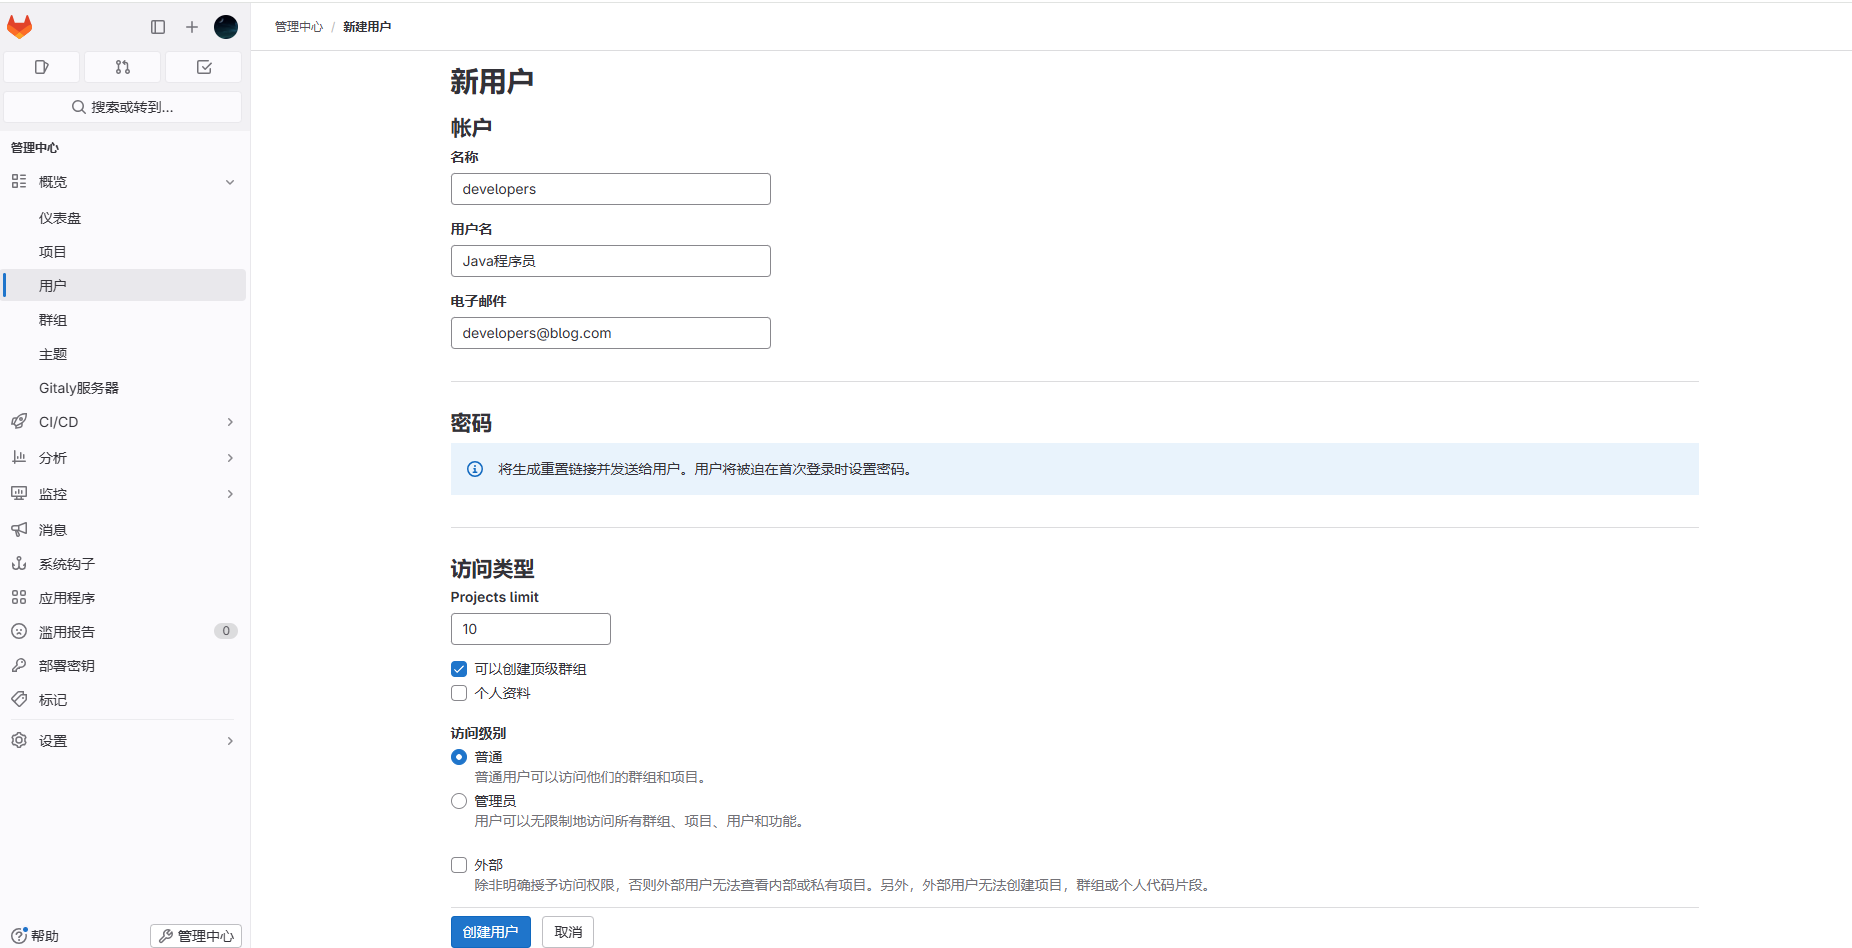
创建成功后,激活列表会显示用户信息

点击编辑,初始密码用户密码
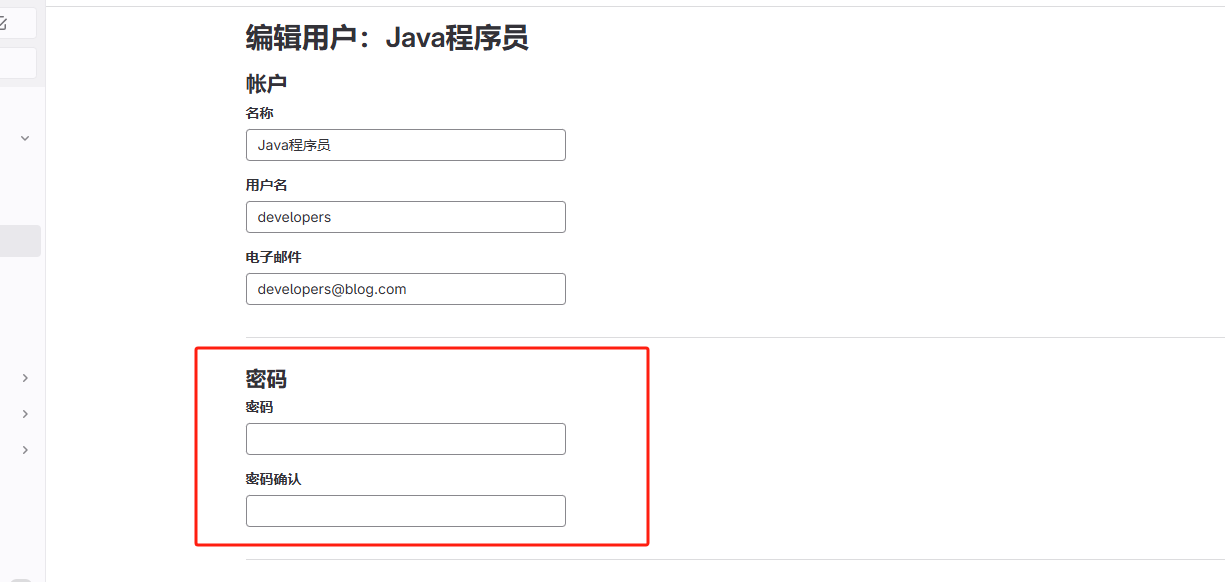
当第一次登录时,由用户进行修改密码

切换用户账号进行登录,进行修改密码

2.11、邮件通知发送
修改gitlab配置/etc/gitlab/gitlab.rb 启动邮件通知
vim /etc/gitlab/gitlab.rb# 启用SMTP
gitlab_rails['smtp_enable'] = true
# SMTP服务器配置
gitlab_rails['smtp_address'] = "smtp.example.com"  # 替换为你的SMTP服务器地址
gitlab_rails['smtp_port'] = 465                  # SMTP端口,一般是587(TLS)或465(SSL)
gitlab_rails['smtp_user_name'] = "your-email@example.com"  # SMTP用户名
gitlab_rails['smtp_password'] = "your-password"    # SMTP密码
gitlab_rails['smtp_domain'] = "example.com"        # 邮件域名
gitlab_rails['smtp_authentication'] = "login"      # 认证方式
#gitlab_rails['smtp_enable_starttls_auto'] = true   # 启用TLS
gitlab_rails['smtp_tls'] = true  # 配置成功后,查询加载配置
gitlab-ctl reconfigure
gitlab-ctl restart# 测试邮件配置
# 进入GitLab Rails控制台
[root@linux-servertwo gitlab]#  gitlab-rails console -e production
--------------------------------------------------------------------------------Ruby:         ruby 3.1.4p223 (2023-03-30 revision 957bb7cb81) [x86_64-linux]GitLab:       16.9.9 (ed54f379d9b) FOSSGitLab Shell: 14.33.0PostgreSQL:   14.11
------------------------------------------------------------[ booted in 56.85s ]
Loading production environment (Rails 7.0.8)
irb(main):001:0> # 发送测试邮件
Notify.test_email('test@example.com', 'Message Subject', 'Message Body').deliver_now
Notify.test_email('1024409453@qq.com', 'GitLab注册通知', '您注册的Gitlab账号已成功,欢迎登录查看。这是一封测试邮件').deliver_now
如果遇到问题,可以查看日志文件:
# 查看所有GitLab日志
gitlab-ctl tail# 只查看邮件相关日志
gitlab-ctl tail gitlab-rails# 第一次没有配置成功,连接超时了
irb(main):002:0> Notify.test_email('1024409453@qq.com', 'GitLab注册通知', '您注册的Gitlab账号已成功,欢迎登录查看。这是一封测试邮件').deliver_now
Delivered mail 676e255dc9029_76b52d00328@linux-servertwo.mail (30024.4ms)
/opt/gitlab/embedded/lib/ruby/gems/3.1.0/gems/net-smtp-0.3.3/lib/net/smtp.rb:645:in `rescue in tcp_socket': Timeout to open TCP connection to smtp.163.com:456 (exceeds 30 seconds) (Net::OpenTimeout)
/opt/gitlab/embedded/lib/ruby/3.1.0/socket.rb:61:in `connect_internal': Connection timed out - user specified timeout (Errno::ETIMEDOUT)
irb(main):003:0> # 再次发送
irb(main):001:0> Notify.test_email('1024409453@qq.com', 'GitLab注册通知', '您注册的Gitlab账号已成功,欢迎登录查看。这是一封测试邮件').deliver_now
Delivered mail 676e312ae2e23_3bad2d00104f9@linux-servertwo.mail (616.7ms)
/opt/gitlab/embedded/lib/ruby/gems/3.1.0/gems/net-smtp-0.3.3/lib/net/smtp.rb:1076:in `check_response': 553 Mail from must equal authorized user (Net::SMTPFatalError)# 设置发件人
# 发件人邮箱设置 - 使用163邮箱
gitlab_rails['gitlab_email_from'] = 'gitlab_test@163.com'      # 必须和smtp_user_name一致
gitlab_rails['gitlab_email_display_name'] = 'GitLab DevOps'
gitlab_rails['gitlab_email_reply_to'] = 'gitlab_test@163.com'  # 保持一致
gitlab_rails['gitlab_email_subject_suffix'] = '[GitLab-DevOps]'  # 以上配置成功后,再次发送,发送成功
irb(main):001:0> Notify.test_email('1024409453@qq.com', 'GitLab注册通知', '您注册的Gitlab账号已成功,欢迎登录查看。这是一封测试邮件').deliver_now
Delivered mail 676e335528c0b_4a412d00629c9@linux-servertwo.mail (852.2ms)
=> #<Mail::Message:375740, Multipart: false, Headers: <Date: Fri, 27 Dec 2024 12:55:49 +0800>, <From: GitLab DevOps <sowlerblogs@163.com>>, <Reply-To: GitLab DevOps <gitlabe@test.com>>, <To: 1024409453@qq.com>, <Message-ID: <676e335528c0b_4a412d00629c9@linux-servertwo.mail>>, <Subject: GitLab注册通知>, <Mime-Version: 1.0>, <Content-Type: text/html; charset=UTF-8>, <Content-Transfer-Encoding: 7bit>, <Auto-Submitted: auto-generated>, <X-Auto-Response-Suppress: All>>
邮件列表已经显示

查看邮件

企业邮箱示例
gitlab_rails['gitlab_email_from'] = 'gitlab@yourdomain.com'gitlab_rails['gitlab_email_display_name'] = 'GitLab DevOps'gitlab_rails['gitlab_email_reply_to'] = 'support@yourdomain.com'gitlab_rails['gitlab_email_subject_suffix'] = '[GitLab-DevOps]'
2.12、备份与恢复
把提交的代码和操作的数据进行备份是很主要的,不然后面数据遗失了损失很大,由其对于公司来说。所以强烈建议定期备份数据文件或者编写脚本自动备份数据。数据备份不仅保证了数据安全可控,在gitlab迁移到另一台服务器时,使用最佳方法就是通过备份和还原。
2.12.1、备份
手动备份
Gitlab提供了一个简单的命令行来备份整个Gitlab,并且能灵活的满足需求。使用如下命令,备份数据到/var/opt/gitlab/backups目录下
[root@linux-servertwo gitlab]# gitlab-rake gitlab:backup:create
2024-12-27 05:40:07 UTC -- Dumping database ...
Dumping PostgreSQL database gitlabhq_production ... [DONE]
2024-12-27 05:40:13 UTC -- Dumping database ... done
2024-12-27 05:40:13 UTC -- Dumping repositories ...
2024-12-27 05:40:13 UTC -- Backup 1735278007_2024_12_27_16.9.9 is done.
2024-12-27 05:40:13 UTC -- Deleting backup and restore PID file ... done
进入/var/opt/gitlab/backups目录查看备份文件
[root@linux-servertwo backups]# ls -l
total 720
-rw------- 1 git git 737280 Dec 27 13:40 1735278007_2024_12_27_16.9.9_gitlab_backup.tar
更改Gitlab备份目录
# 更改/etc/gitlab/gitlab.rb文件
vim /etc/gitlab/gitlab.rb# Backup settings 数据存放的路径、权限、时间配置
gitlab_rails['manage_backup_path'] = true              # 开启备份功能
gitlab_rails['backup_path'] = "/data/gitlab/backups"    # 自定义备份路径
gitlab_rails['backup_archive_permissions'] = 0644        # 备份文件权限
gitlab_rails['backup_keep_time'] = 604800               # 备份保留时间(单位:秒),这里是7天# 重新加载配置
gitlab-ctl reconfigure# 重启服务
gitlab-ctl restart
自定义备份目录需要创建备份目录并赋予目录git权限
# 创建备份目录
mkdir -p /data/gitlab/backups
# 设置目录所有者
chown -R git:git /data/gitlab/backups
# 设置目录权限
chmod 755 /data/gitlab/backups# 开始备份
[root@linux-servertwo gitlab]# gitlab-rake gitlab:backup:create
2024-12-27 06:05:08 UTC -- Dumping database ...
Dumping PostgreSQL database gitlabhq_production ... [DONE]
2024-12-27 06:05:36 UTC -- Dumping database ... done
2024-12-27 06:05:36 UTC -- Dumping repositories ...
2024-12-27 06:05:36 UTC -- Warning: Your gitlab.rb and gitlab-secrets.json files contain sensitive data
and are not included in this backup. You will need these files to restore a backup.
Please back them up manually.
2024-12-27 06:05:36 UTC -- Backup 1735279508_2024_12_27_16.9.9 is done.
2024-12-27 06:05:36 UTC -- Deleting backup and restore PID file ... done# 查看自定义的备份目录
[root@linux-servertwo gitlab]# ls -l /data/gitlab/backups
total 720
-rw-r--r-- 1 git git 737280 Dec 27 14:05 1735279508_2024_12_27_16.9.9_gitlab_backup.tar
# 发现备份成功
问题
在备份的时候出现红字警告
2024-12-27 06:05:36 UTC -- Warning: Your gitlab.rb and gitlab-secrets.json files contain sensitive data
and are not included in this backup. You will need these files to restore a backup.
Please back them up manually.
# 翻译
警告:您的gitlab。Rb和gitlab的秘密。Json文件包含敏感数据并且不包含在此备份中。您将需要这些文件来恢复备份。请手动备份。
根据提示,需要自己来备份gitlab.rb 和 gitlab-secrets.json两个文件
[root@linux-servertwo gitlab]# cp /etc/gitlab/gitlab.rb /etc/gitlab/gitlab.rb.bak
[root@linux-servertwo gitlab]# cp /etc/gitlab/gitlab-secrets.json /etc/gitlab/gitlab-secrets.json.bak

自动备份
使用Linux的crontab 命令来实现自动备份
# 输入命令crontab -e
crontab -e
# 输入相应的任务 -添加定时任务(每天凌晨2点备份)
0 2 * * * /opt/gitlab/bin/gitlab-rake gitlab:backup:create CRON=1#注意:环境变量CRON=1的作用是如果没有任何错误发生时, 抑制备份脚本的所有进度输出
#查看周期性计划任务
crontab -l
2.12.2、恢复
首先进入 /var/opt/gitlab/backups 目录
cd /var/opt/gitlab/backups
把已经备份的文件上传进去,然后执行以下命令恢复数据
# 停止相关服务
sudo gitlab-ctl stop unicorn
sudo gitlab-ctl stop puma
sudo gitlab-ctl stop sidekiq# 恢复备份-填写备份文件的时间戳信息
gitlab-rake gitlab:backup:restore BACKUP=1735279508_2024_12_27_16.9.9# 启动服务
gitlab-ctl reconfiguregitlab-ctl restart gitlab-ctl status |grep run
2.13、登录欢迎页
进入 管理中心->设置->外观

3、内存优化
使用云服务部署gitlab 的服务器是2C4G的云服务器,部署后内存占用太大,服务器出现卡顿现象,所以需要更改gitlab启动配置来缩小内存占用。通过Linux的free -h 命令查看内存占用信息,发现内存已经占用满了。

更改配置文件,关闭不需要的内置服务,首先找到并修改gitlab.rb主配置文件
vim /etc/gitlab/gitlab.rb
减少Puma工作进程和线程数
# Puma 设置
# Puma settings - reduce workers and threads
# puma['enable'] = true
# puma['ha'] = false
puma['worker_timeout'] = 60
# 减少 Puma worker 进程数,默认值为 2
puma['worker_processes'] = 2
# 减少每个 worker 的最小和最大线程数
# 默认值分别为 4 和 4,降低这些值可以减少内存使用
puma['min_threads'] = 1
puma['max_threads'] = 2
降低后台守护进程并发数【Sidekiq并发数】
# Sidekiq settings - reduce concurrency
# 减少后台任务处理的并发数
sidekiq['max_concurrency'] = 5
# 设置最小并发数为 0,允许在空闲时释放更多内存
sidekiq['min_concurrency'] = 0
减少PostgreSQL的内存缓冲区和工作内存
# 并发连接数
postgresql['max_connections'] = 200
# 减少共享缓冲区大小,默认推荐值是系统内存的 25% ,对于小型部署,128MB 通常足够
postgresql['shared_buffers'] = "128MB"
# 减少每个数据库连接的工作内存, 降低此值可以减少总体内存使用,但可能影响复杂查询性能
postgresql['work_mem'] = "8MB"
# 设置维护操作的工作内存, 这个值影响 VACUUM, CREATE INDEX 等操作
postgresql['maintenance_work_mem'] = "16MB"
# 减少查询计划器预估可用的系统缓存大小
# 这不是实际分配的内存,而是告诉优化器系统有多少可用缓存
postgresql['effective_cache_size'] = "256MB"
# 限制后台工作进程数
postgresql['max_worker_processes'] = 2
# 禁用并行查询,可以节省内存
postgresql['max_parallel_workers_per_gather'] = 0
限制Redis最大内存使用
# 限制 Redis 最大内存使用
redis['maxmemory'] = "256MB"
# 内存达到限制时的淘汰策略
# allkeys-lru: 当内存不足时,删除最近最少使用的 key
redis['maxmemory_policy'] = "allkeys-lru"
限制Ruby垃圾收集器的内存分配
# GitLab application settings
# 环境变量配置
#gitlab_rails['env'] = {# 限制 glibc 内存分配器的 arena 数量# 可以减少内存碎片#'MALLOC_ARENA_MAX' => "2",# 限制 Bundler 并行安装 gem 的作业数#'BUNDLE_JOBS' => "1"
#}gitlab_rails['env'] = {'MALLOC_ARENA_MAX' => "2",'BUNDLE_JOBS' => "1"
}
减少GitLab后台任务的运行频率
# 后台任务计划任务优化
# Reduce number of background jobs
# 减少清理卡住的 CI 任务的频率(每 4 小时而不是每小时)
gitlab_rails['stuck_ci_jobs_worker_cron'] = "0 */4 * * *"
# 减少清理构建产物的频率(每 30 分钟而不是每 7 分钟)
gitlab_rails['expire_build_artifacts_worker_cron'] = "*/30 * * * *"
# 减少仓库检查的频率(每 2 小时而不是每小时)
gitlab_rails['repository_check_worker_cron'] = "0 */2 * * *"
# 减少管理员邮件发送的频率(每周而不是每天)
gitlab_rails['admin_email_worker_cron'] = "0 0 * * 0"
重载配置
gitlab-ctl reconfigure
重启服务
gitlab-ctl restart
检查服务状态
gitlab-ctl status
这些设置会降低GitLab的性能,但可以显著减少内存使用。可以根据具体使用情况和服务器资源,可能需要进一步调整这些值。再次查看内存占用大小

可以发现内存已经成功下降到系统可控范围内。
问题
通过执行以上命令,内存占用有一定的下降,但是当用户登录进去后,内存占用率有显著上升,但用户退出后内存占用不会下降
###############################################
# Ruby GC (垃圾回收)优化
###############################################
gitlab_rails['env'] = {# 已有配置'MALLOC_ARENA_MAX' => "2",'BUNDLE_JOBS' => "1",# Ruby GC 调优# 更激进的垃圾回收'RUBY_GC_HEAP_INIT_SLOTS' => "50000",'RUBY_GC_HEAP_FREE_SLOTS' => "4096",'RUBY_GC_HEAP_GROWTH_MAX_SLOTS' => "300000",'RUBY_GC_HEAP_GROWTH_FACTOR' => "1.1",# 强制在大对象分配后进行GC'RUBY_GC_MALLOC_LIMIT' => "4000100",'RUBY_GC_OLDMALLOC_LIMIT' => "4000100",# 减少Ruby进程的最大内存使用'RUBY_HEAP_MIN_SLOTS' => "150000",'RUBY_HEAP_FREE_MIN' => "4096",'RUBY_HEAP_SLOTS_INCREMENT' => "100000"
}# 重新加载配置
gitlab-ctl reconfigure# 完全重启所有服务
gitlab-ctl stop# 启动gitlab
gitlab-ctl start# 检查服务状态
gitlab-ctl status
通过 free -h 再次查看内存占用情况

通过以上配置,内存占用基本稳定在2.2~2.3G左右,已经达到预期效果可以正常使用了。
4、服务器配置建议
根据实际用户规模和项目数量调整硬件配置。
- CPU:至少配置 4 核 CPU(中型团队建议 8 核以上)。
- 内存:最低要求 4GB,推荐至少 8GB 或更多(对于大型部署建议 16GB+)。
- 存储空间:推荐使用 SSD 提升 IO 性能,确保有足够空间存储代码仓库、备份和日志。
| 小型团队 (1-10用户) | 2核 | 4GB | 50GB SSD | 100Mbps |
| 中小团队 (10-50用户) | 4核 | 8GB | 100GB SSD | 500Mbps |
| 中型团队 (50-100用户) | 8核 | 16GB | 500GB SSD | 1Gbps |
| 大型团队 (100+用户) | 16核 | 32GB | 1TB SSD (NVMe) | 10Gbps |# 说明:# 所有配置建议使用SSD存储以提升性能# 内存建议预留25%用于系统运行# 存储空间需要考虑代码仓库增长和备份需求# 网络带宽需要根据实际访问量和并发数调整
服务器硬件资源不足会导致 GitLab 运行缓慢或服务中断。官网说明:

5、安装目录
GitLab主安装目录,组件依赖程序:/opt/gitlab/GitLab配置文件目录:/etc/gitlab/ GitLab各个组件存储路径,数据目录:/var/opt/gitlab/ GitLab组件日志目录:/var/log/gitlab/ GitLab仓库默认存储路径:/var/opt/gitlab/git-data/repositories版本文件备份路径:/var/opt/gitlab/backups/nginx安装路径:/var/opt/gitlab/nginx/redis安装路径:/var/opt/gitlab/redis
详细信息
/opt/gitlab/                # GitLab主安装目录
├── bin/                   # 可执行文件目录
│   ├── gitlab-ctl        # GitLab控制脚本
│   └── gitlab-rake       # GitLab rake命令
│
├── embedded/              # GitLab依赖的软件包
│   ├── bin/              # 内置命令
│   ├── service/          # 服务配置
│   └── lib/              # 依赖库
│/etc/gitlab/               # 配置文件目录
├── gitlab.rb             # 主配置文件
├── gitlab-secrets.json   # 密钥配置
└── ssl/                  # SSL证书目录/var/opt/gitlab/          # 数据目录
├── backups/             # 默认备份目录
├── git-data/            # Git仓库数据
├── postgresql/          # PostgreSQL数据
├── redis/              # Redis数据
├── gitlab-rails/       # Rails应用数据
└── nginx/              # Nginx配置和日志/var/log/gitlab/         # 日志目录
├── nginx/              # Nginx日志
├── postgresql/         # 数据库日志
├── redis/             # Redis日志
├── gitlab-rails/      # Rails应用日志
└── sidekiq/           # 后台任务日志
6、常用命令
#  检查 GitLab 当前配置
grep -E '^[a-Z]' /etc/gitlab/gitlab.rb # 会显示所有未被注释的配置行,帮助查看当前生效的 GitLab 配置# 重新加载配置文件
gitlab-ctl reconfigure# 重启
gitlab-ctl restart# 查看服务状态
gitlab-ctl status# 启动gitlab
gitlab-ctl start# 停止
gitlab-ctl stop# 查看所有的logs; 按 Ctrl-C 退出
gitlab-ctl tail# 拉取/var/log/gitlab下子目录的日志
gitlab-ctl tail gitlab-rails# 拉取某个指定的日志文件
gitlab-ctl tail nginx/gitlab_error.log# 帮助
gitlab-ctl help#GitLab 诊断命令 建议使用时机:安装GitLab后、升级GitLab前后、遇到系统问题时、定期系统检查
gitlab-rake gitlab:check SANITIZE=true --trace	# 查看运行状态
systemctl status gitlab-runsvdir.service # 禁止Gitlab开机自启动
systemctl disable gitlab-runsvdir.service # 启用Gitlab开机自启动
systemctl enable gitlab-runsvdir.service
公众号文章链接: https://mp.weixin.qq.com/s/TswRK9QymfE2OvjNqhZ5Zw

![E94 Tarjan边双缩点+树形DP P8867 [NOIP2022] 建造军营](https://img2024.cnblogs.com/blog/1973969/202501/1973969-20250106124100531-2065970898.png)


