作者:尹正杰
版权声明:原创作品,谢绝转载!否则将追究法律责任。
目录
- 一.ansible模块概述
- 1.ansible模块数量井喷式增长
- 2.模块分类
- 二.Ansible常用模块
- 1.command模块
- 1.1 command模块概述
- 1.2 command模块示例
- 2.shell模块
- 2.1 shell模块概述
- 2.2 shell模块示例
- 3.script模块
- 3.1 script模块概述
- 3.2 script模块示例
- 4.copy模块
- 4.1 copy模块概述
- 4.2 copy模块示例
- 5.fetch模块
- 5.1 fetch模块概述
- 5.2 fetch模块示例
- 6.get_url模块
- 6.1 get_url模块概述
- 6.2 get_url模块示例
- 7.file模块
- 7.1 file模块概述
- 7.2 file模块示例
- 8.stat模块
- 8.1 stat模块概述
- 8.2 stat模块示例
- 9.archive模块
- 9.1 archive模块概述
- 9.2 ansible-core版本安装第三方模块
- 9.3 archive模块示例
- 10.unarchive模块
- 10.1 unarchive模块概述
- 10.2 unarchive模块示例
- 11.hostname模块
- 11.1 hostname模块概述
- 11.2 hostname模块示例
- 12.cron模块
- 12.1 cron模块概述
- 12.2 cron模块示例
- 13.yum
- 13.1 yum模块概述
- 13.2 yum模块示例
- 14.yum_repository模块
- 14.1 yum_repository模块概述
- 14.2 yum_repository模块示例
- 15.apt模块
- 15.1 apt模块概述
- 15.2 apt模块示例
- 16.apt_repository模块
- 16.1 apt_repository模块概述
- 16.2 apt_repository模块示例
- 17.apt_key模块
- 17.1 apt_key模块概述
- 17.2 apt_key模块示例
- 18.service模块
- 18.1 service模块
- 18.2 service模块示例
- 19.user模块
- 19.1 user模块概述
- 19.2 user模块示例
- 20. group模块
- 20.1 group模块
- 20.2 group模块示例
- 21.lineinfile模块
- 21.1 lineinfile模块概述
- 21.2 lineinfile模块示例
- 22.replace模块
- 22.1 replace模块概述
- 22.2 replace模块示例
- 23.selinux模块
- 23.1 selinux模块概述
- 23.2 selinux模块示例
- 24.reboot模块
- 24.1 reboot模块概述
- 24.2 reboot模块示例
- 25.mount模块
- 25.1 mount模块概述
- 25.2 mount模块示例
- 26.setup模块
- 26.1 setup模块概述
- 26.2 setup模块示例
- 27.debug模块
- 27.1 debug模块概述
- 27.2 debug模块示例
- 28.sysctl模块
- 28.1 sysctl模块概述
- 28.2 sysctl模块示例
- 29.pam_limits模块
- 29.1 pam_limits模块概述
- 29.2 pam_limits模块示例
- 30.其他模块
- 1.command模块
- 三.可能会遇到的报错
- 1.dest '/tmp/jasonyin2020' must be an existing dir
- 2.[WARNING]: module selinux not found in
一.ansible模块概述
1.ansible模块数量井喷式增长
| 时间 | 版本 | 模块数量 |
|---|---|---|
| 2016年12月 | ansible 1.9.2 | 540 |
| 2018年01月 | ansible 2.3.8 | 1378 |
| 2018年05月 | ansible 2.5.3 | 1562 |
| 2018年07月 | ansible 2.6.3 | 1852 |
| 2020年03月 | ansible 2.9.5 | 3387 |
| 2021年12月 | ansible 2.11.8 | 6141 |
| 2022年06月 | ansible 2.12.6 | 6763 |
| 2022年12月 | ansible 2.13.3 | 7214 |
如上表所示,随着ansible版本的升级,对应的模块数量也再井喷式增长。虽然有大量模块,但是使用频率较高的模块仅有一部分,我们也没有必要学习上千个模块,而是要掌握方法。
2.模块分类
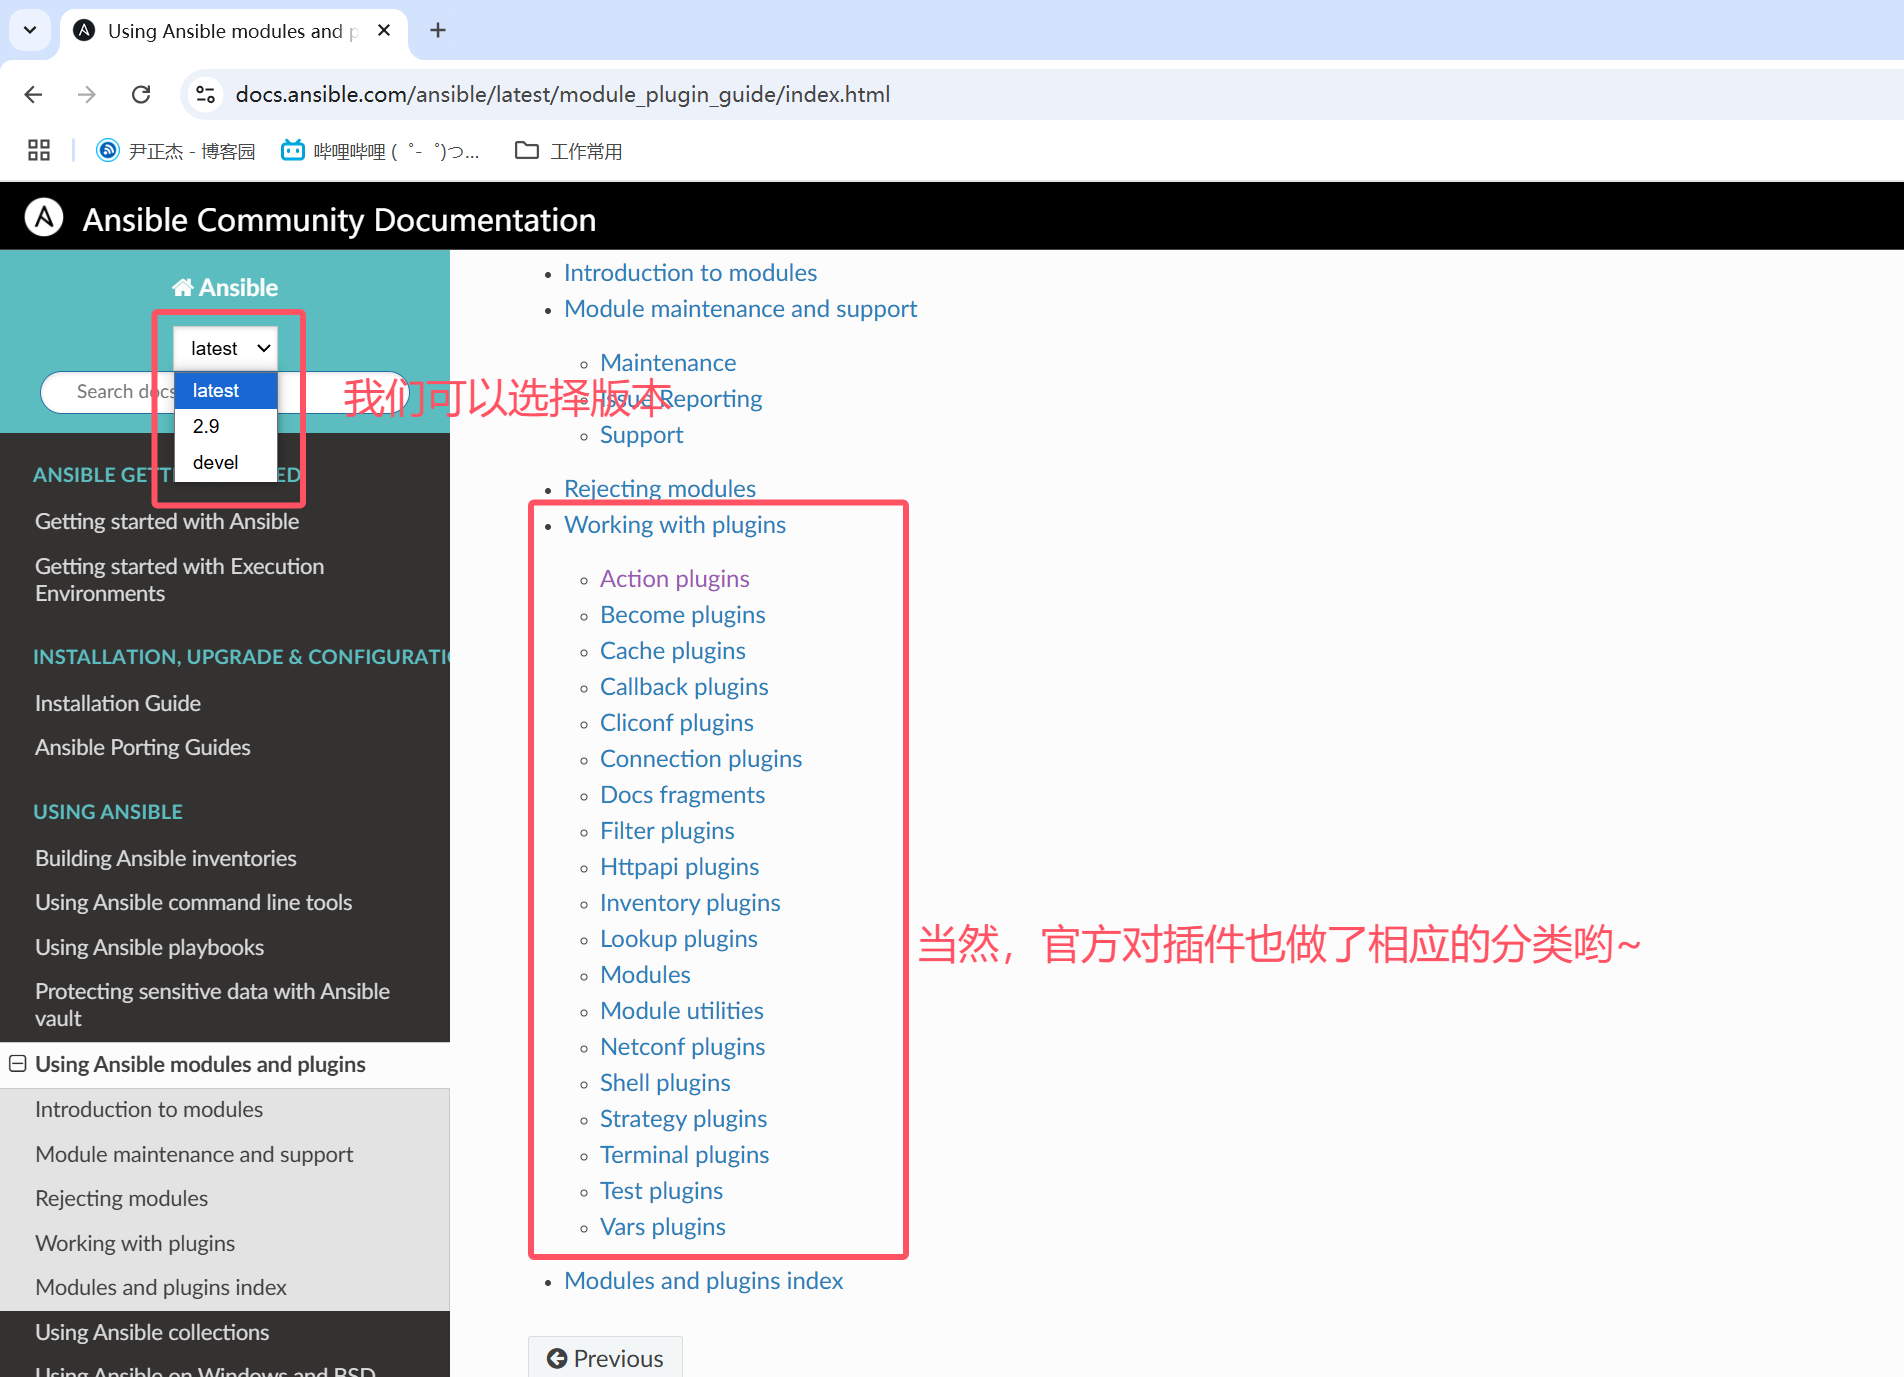
如上图所示,官方对ansible的插件做了类型划分,我们需要的时候去看对应模块的文档即可。模块插件官方文档:https://docs.ansible.com/ansible/latest/module_plugin_guide/index.html
二.Ansible常用模块
1.command模块
1.1 command模块概述
command模块为ansible默认模块,可以省略-m选项,该模块用来在远程主机上执行shell命令。但是有些操作不支持,比如管道,重定向,通配符等,如果非要实现这些功能,可以使用shell模块实现。此模块不具备幂等性,查看帮助文档如下:
[root@worker232 ~]# ansible-doc -s command
- name: Execute commands on targetscommand:...
[root@worker232 ~]#
1.2 command模块示例
	1.环境准备
[root@worker232 ~]# cat /etc/ansible/hosts
[k8s]
10.0.0.23[1:3][k8s:vars]
ansible_ssh_password=yinzhengjie
ansible_ssh_user=root
[root@worker232 ~]# 2.查看远程主机的主机名
[root@worker232 ~]# ansible 10.0.0.231 -m command -a 'hostname'
10.0.0.231 | CHANGED | rc=0 >>
master231
[root@worker232 ~]# 3.creates相当于if语句,用于判断文件或目录是否存在,若不存在才会执行后面的命令
[root@worker232 ~]# ansible 10.0.0.231 -m command -a 'creates=/root/yinzhengjie mkdir yinzhengjie'
10.0.0.231 | CHANGED | rc=0 >>[root@worker232 ~]#
[root@worker232 ~]# ansible 10.0.0.231 -m command -a 'creates=/root/yinzhengjie mkdir yinzhengjie'
10.0.0.231 | SUCCESS | rc=0 >>
skipped, since /root/yinzhengjie existsDid not run command since '/root/yinzhengjie' exists
[root@worker232 ~]# 4.chdir相当于Linux的cd命令,切换到指定的工作目录,后续的命令会在该目录下执行哟
[root@worker232 ~]# ansible 10.0.0.231 -m command -a 'chdir=/root/yinzhengjie creates=/root/yinzhengjie/jasonyin2020 touch jasonyin2020'
10.0.0.231 | CHANGED | rc=0 >>[root@worker232 ~]#
[root@worker232 ~]# ansible 10.0.0.231 -m command -a 'chdir=/root/yinzhengjie creates=/root/yinzhengjie/jasonyin2020 touch jasonyin2020'
10.0.0.231 | SUCCESS | rc=0 >>
skipped, since /root/yinzhengjie/jasonyin2020 existsDid not run command since '/root/yinzhengjie/jasonyin2020' exists
[root@worker232 ~]# 5.不支持重定向
[root@worker232 ~]# ansible 10.0.0.231 -m command -a 'echo https://www.cnblogs.com/yinzhengjie > blog.txt'
10.0.0.231 | CHANGED | rc=0 >>
https://www.cnblogs.com/yinzhengjie > blog.txt
[root@worker232 ~]# 6.不支持管道符号
[root@worker232 ~]# ansible 10.0.0.231 -m command -a 'echo 10+20|bc'
10.0.0.231 | CHANGED | rc=0 >>
10+20|bc
[root@worker232 ~]# 7.不支持同时执行多条命令
[root@worker232 ~]# ansible 10.0.0.231 -m command -a 'date;id'
10.0.0.231 | FAILED | rc=2 >>
[Errno 2] No such file or directory: b'date;id'
[root@worker232 ~]#
2.shell模块
2.1 shell模块概述
shell模块用法和command模块类似,都是用来执行shell命令,但功能相比command模块更加强大,对于command模块中不支持的功能,此处均可使用。在调用shell模块执行命令时,复杂的命令也有可能会执行失败,类似于包含多重管道,正则表达式这些,在这种情况下,我们需要携程shell脚本,用copy模块直接推送到远程执行。此模块也不具有幂等性,查看帮助文档如下:
[root@worker232 ~]# ansible-doc -s shell
- name: Execute shell commands on targetsshell:...
[root@worker232 ~]#
2.2 shell模块示例
	1.支持管道
[root@worker232 ~]# ansible all -m shell -a 'echo 10+20|bc'
10.0.0.232 | CHANGED | rc=0 >>
30
10.0.0.231 | CHANGED | rc=0 >>
30
10.0.0.233 | CHANGED | rc=0 >>
30
[root@worker232 ~]# 2.支持重定向
[root@worker232 ~]# ansible 10.0.0.231 -m shell -a 'echo https://www.cnblogs.com/yinzhengjie > blog.txt'
10.0.0.231 | CHANGED | rc=0 >>[root@worker232 ~]# 3.支持多条命令
[root@worker232 ~]# ansible 10.0.0.231 -m shell -a 'date;id;hostname;'4.不支持幂等性【所谓的幂等性指的是多次执行结果是一样的】
[root@worker232 ~]# ansible 10.0.0.231 -m shell -a 'mkdir xixi'
10.0.0.231 | CHANGED | rc=0 >>[root@worker232 ~]#
[root@worker232 ~]# ansible 10.0.0.231 -m shell -a 'mkdir xixi'
10.0.0.231 | FAILED | rc=1 >>
mkdir: cannot create directory ‘xixi’: File existsnon-zero return code
[root@worker232 ~]# 5.还原ansible原理【在ansible执行过程中,去对应的/tmp目录下查看数据】5.1 运行命令
[root@worker232 ~]# ansible 10.0.0.231 -m shell -a 'sleep 60; echo successfully'
10.0.0.231 | CHANGED | rc=0 >>
successfully
[root@worker232 ~]# 5.2 远端主机查看
[root@master231 ~]# cat /tmp/ansible-tmp-1736267242.7051392-44872-55740912527729/AnsiballZ_command.py
...ANSIBALLZ_PARAMS = '{"ANSIBLE_MODULE_ARGS": {"_raw_params": "sleep 60; echo successfully", "...5.3 可以保留远端主机的Python脚本,默认是删除,可以调整为保留
[root@worker232 ~]# vim /etc/ansible/ansible.cfg
...
keep_remote_files=True
3.script模块
3.1 script模块概述
script模块可以在远程主机上运行ansible机器上的脚步,而且脚本文件可以没有执行权限,这里的脚步并不仅仅只是shell脚本,只要远程主机上能执行的,都可以,包括但不限于Python,Shell,PHP等。script此模块也不具有幂等性,查看帮助文档如下:
[root@worker232 ~]# ansible-doc -s script
- name: Runs a local script on a remote node after transferring itscript:...
[root@worker232 ~]#
3.2 script模块示例
	1.准备测试脚本
[root@worker232 ~]# ll get_ip_mac.sh
-rw-r--r-- 1 root root 171 Jan  8 22:41 get_ip_mac.sh
[root@worker232 ~]#
[root@worker232 ~]# cat get_ip_mac.sh
#!/bin/bashdate >> /tmp/ip_mac.log
ifconfig  eth0 | grep netmask | awk '{print $2}' >> /tmp/ip_mac.log
ifconfig  eth0 | grep inet6 | awk '{print $2}' >> /tmp/ip_mac.log
[root@worker232 ~]#
[root@worker232 ~]# cat sleep.py
#!/usr/bin/python3.10import timeprint("尹正杰博客: https://www.cnblogs.com/yinzhengjie")time.sleep(5)
[root@worker232 ~]# 2.使用ansible调用shell脚本
[root@worker232 ~]# ansible k8s -m script -a "get_ip_mac.sh" 3.使用ansible调用Python脚本
[root@worker232 ~]# ansible k8s -m script -a "sleep.py"
4.copy模块
4.1 copy模块概述
copy模块将ansible主机上的文件复制到远程主机。此模块具有幂等性,查看帮助文档如下:
[root@worker232 ~]# ansible-doc -s copy
- name: Copy files to remote locationscopy:...
[root@worker232 ~]#
4.2 copy模块示例
温馨提示:copy模块在拷贝文件时会对比checksum的值,如果目标和本地的文件一致就不做任何操作,不一致就会进行拷贝!1.第一次会拷贝文件
[root@worker232 ~]# ansible 10.0.0.231 -m copy -a 'src=/etc/hosts dest=/tmp/hosts.bak'2.由于第一次已经拷贝成功了,因此第二次执行时并不会拷贝文件
[root@worker232 ~]# ansible 10.0.0.231 -m copy -a 'src=/etc/hosts dest=/tmp/hosts.bak'3.从内容中生成文件
[root@worker232 ~]# ansible 10.0.0.231 -m copy -a 'content=#!/usr/bin/python3.10\n\nprint("杰哥讲运维") dest=/tmp/yinzhengjie.py'
5.fetch模块
5.1 fetch模块概述
fetch模块从远程主机提取文件至ansible的主控端,和copy相反,不支持目录。
5.2 fetch模块示例
[root@worker232 ~]# ansible k8s -m fetch -a "src=/etc/os-release dest=/tmp/backup"
6.get_url模块
6.1 get_url模块概述
get_url模块可以将网络上的资源下载到指定主机,支持http,https,ftp协议。
6.2 get_url模块示例
	1.将网络的连接文件下载到本地
[root@worker232 ~]# ansible 10.0.0.231 -m get_url -a 'url=https://pic.cnblogs.com/avatar/795254/20241212095316.png dest=/tmp/yinzhengjie.png'2.下载文件时指定md5校验(如果md5校验失败则无法完成下载)
[root@worker232 ~]# ansible 10.0.0.231 -m get_url -a 'url=https://pic.cnblogs.com/avatar/795254/20241212095316.png dest=/tmp/yinzhengjie.png checksum="md5:314b1638eb0e18e67985ddd12c36dd2f"'
7.file模块
7.1 file模块概述
file模块主要提供文件管理功能,比如创建,设置文件权限和属性,设置链接,删除文件或目录等。
7.2 file模块示例
	1.递归创建目录
[root@worker232 ~]# ansible 10.0.0.231 -m file -a 'path=/tmp/yinzhengjie/ansible state=directory owner=yinzhengjie group=root recurse=yes'2.创建文件【要确保目录是存在的,否则会报错!】
[root@worker232 ~]# ansible 10.0.0.231 -m file -a 'path=/tmp/yinzhengjie/ansible/blog.txt state=touch owner=yinzhengjie group=root mode=600'3.获取文件信息
[root@worker232 ~]# ansible 10.0.0.231 -m file -a 'path=/tmp/yinzhengjie/ansible/blog.txt state=file'4.创建连接文件
[root@worker232 ~]# ansible 10.0.0.231 -m file -a 'src=/tmp/yinzhengjie/ansible/blog.txt dest=/tmp/blog state=link owner=yinzhengjie'5.删除文件文件或目录
[root@worker232 ~]# ansible 10.0.0.231 -m file -a "path=/tmp/blog state=absent"
8.stat模块
8.1 stat模块概述
stat模块用来获取目标文件的状态,对于Window主机而言,要是用win_stat模块。
8.2 stat模块示例
[root@worker232 ~]# ansible 10.0.0.231 -m stat -a "path=/etc/os-release"
9.archive模块
9.1 archive模块概述
archive模块在远程主机上执行压缩打包命令,此模块的源和目标都在远程主机上。
9.2 ansible-core版本安装第三方模块
	1.ansible-core版本并不包含archive模块,因此需要单独安装
[root@worker232 ~]# ansible-doc -s archive
[WARNING]: module archive not found in:
/root/.ansible/plugins/modules:/usr/share/ansible/plugins/modules:/usr/lib/python3/dist-packages/ansible/modules
[root@worker232 ~]# 2.ansible-core版本安装第三方模块
[root@worker232 ~]# apt -y install python3-pip
[root@worker232 ~]# pip install -vvv "resolvelib >= 0.5.3,< 0.6.0"
[root@worker232 ~]# ansible-galaxy collection install community.general --no-cache  # 可以多尝试几次直到安装成功
Starting galaxy collection install process
Process install dependency map
Starting collection install process
Downloading https://galaxy.ansible.com/api/v3/plugin/ansible/content/published/collections/artifacts/community-general-10.2.0.tar.gz to /tmp/ansible-local-1069451r_0wmui/tmpu03benxk/community-general-10.2.0-7hvcj0ea
Installing 'community.general:10.2.0' to '/root/.ansible/collections/ansible_collections/community/general'
community.general:10.2.0 was installed successfully
[root@worker232 ~]#
9.3 archive模块示例
	1.打包zip文件格式
[root@worker232 ~]# ansible 10.0.0.231 -m archive -a 'path=/etc/docker/daemon.json dest=/root/yinzhengjie.zip format=zip mode=600'2.打包bz2文件格式
[root@worker232 ~]# ansible 10.0.0.231 -m archive -a 'path=/etc/os-release dest=/root/yinzhengjie.bz2 format=bz2 mode=600'
10.unarchive模块
10.1 unarchive模块概述
unarchive模块主要用来解压缩或者解包,将ansible主机或其他主机上的压缩包复制到指定主机,再解压到某个目录。在使用此模块时,要保证远程主机能解压对应的压缩包。
10.2 unarchive模块示例
	1.准备压缩文件
[root@worker232 ~]# ls
get_ip_mac.sh  sleep.py
[root@worker232 ~]#
[root@worker232 ~]# tar zcf yinzhengjie.tar.gz get_ip_mac.sh sleep.py
[root@worker232 ~]#
[root@worker232 ~]# ls
get_ip_mac.sh  sleep.py  yinzhengjie.tar.gz
[root@worker232 ~]# 2.将ansible主机的软件包解压到远端主机【远程主机的解压目录必须存在】
[root@worker232 ~]# ansible 10.0.0.231 -m unarchive -a "src=/root/yinzhengjie.tar.gz dest=/tmp owner=yinzhengjie"3.将网站的压缩包解压到远程主机【远程服务器必须得有unzip命令】
[root@worker232 ~]# ansible 10.0.0.231 -m unarchive -a "src=https://nginx.org/download/nginx-1.27.3.zip dest=/tmp remote_src=yes mode=660"
11.hostname模块
11.1 hostname模块概述
hostname模块主要用于修改远程主机的主机名,修改后永久生效。
11.2 hostname模块示例
[root@worker232 ~]# ansible 10.0.0.231 -m hostname -a "name=yinzhengjie-k8s"12.cron模块
12.1 cron模块概述
cron模块用于管理远程主机上的crontab定时任务。
12.2 cron模块示例
	1.创建一个每分钟的定时任务
[root@worker232 ~]# ansible 10.0.0.231 -m cron -a 'job="/usr/bin/wall 杰哥讲运维" name=yinzhengjie-cron'2.创建自定义时间周期的任务
[root@worker232 ~]# ansible 10.0.0.231 -m cron -a 'job="/usr/bin/wall 杰哥讲运维" name=yinzhengjie-cron-custom minute=*/20 hour=5 day=1,3,5,7,9 month=10,11,12 weekday=1-5'3.修改周期性任务
[root@worker232 ~]# ansible 10.0.0.231 -m cron -a 'job="/usr/bin/wall 杰哥讲运维" name=yinzhengjie-cron-custom minute=*/20 hour=5'4.禁用周期性任务
[root@worker232 ~]# ansible 10.0.0.231 -m cron -a 'job="/usr/bin/wall 杰哥讲运维" name=yinzhengjie-cron-custom disabled=yes'5.删除定时任务
[root@worker232 ~]# ansible 10.0.0.231 -m cron -a 'job="/usr/bin/wall 杰哥讲运维" name=yinzhengjie-cron-custom state=absent'6.设置环境变量
[root@worker232 ~]# ansible 10.0.0.231 -m cron -a 'job="/usr/bin/wall 杰哥讲运维" name=APP_HOME job=/yinzhengjie/softwares env=yes'7.删除变量
[root@worker232 ~]# ansible 10.0.0.231 -m cron -a 'job="/usr/bin/wall 杰哥讲运维" name=APP_HOME job=/yinzhengjie/softwares env=yes state=absent'8.为指定用户创建定时任务
[root@worker232 ~]# ansible 10.0.0.231 -m cron -a 'job="/usr/bin/wall 杰哥讲运维" name=yinzhengjie-cron-custom  user=yinzhengjie' 9.为指定用户删除定时任务
[root@worker232 ~]# ansible 10.0.0.231 -m cron -a 'job="/usr/bin/wall 杰哥讲运维" name=yinzhengjie-cron-custom  user=yinzhengjie state=absent' 温馨提示:"/usr/bin/wall"程序可以定义往终端发送广播信息。
13.yum
13.1 yum模块概述
yum和apt模块用于在远程主机上管理软件包,适用于redhat系列。
13.2 yum模块示例
	1.yum列出指定软件包,相当于"yum list --showduplicates nginx"
[root@worker232 ~]# ansible 10.0.0.141 -m yum -a 'list=nginx'2.列出所有的repo,相当于"yum repolist"
[root@worker232 ~]# ansible 10.0.0.141 -m yum -a 'list=repo'3.写在nginx服务
[root@worker232 ~]# ansible 10.0.0.141 -m yum -a 'name=nginx state=removed'4.从指定源安装sos服务
[root@worker232 ~]# ansible 10.0.0.141 -m yum -a 'name=sos enablerepo=baseos'5.从rpm包中安装,不校验ssl证书包
[root@worker232 ~]# ansible 10.0.0.141 -m yum -a 'name=https://mirrors.aliyun.com/zabbix/zabbix/7.2/stable/rocky/9/x86_64/zabbix-agent-7.2.2-release1.el9.x86_64.rpm state=present validate_certs=no disable_gpg_check=yes'
14.yum_repository模块
14.1 yum_repository模块概述
yum_repository模块用来对远程主机上的yum仓库配置进行管理。
14.2 yum_repository模块示例
	1.添加yum源
[root@worker232 ~]# ansible 10.0.0.231 -m yum_repository -a 'name=nginx description=nginx-stable-repo baseurl="http://nginx.org/packages/centos/$releasever/$basearch/" gpgcheck=1 enabled=1 gpgkey=https://nginx.org/keys/nginx_signing.key'2.删除yum源
[root@worker232 ~]# ansible 10.0.0.231 -m yum_repository -a 'name=nginx state=absent'
15.apt模块
15.1 apt模块概述
apt模块用于在远程主机上管理软件包,适用于debian系列。
15.2 apt模块示例
	1.更新索引,相当于"apt update"
[root@worker232 ~]# ansible 10.0.0.231 -m apt -a 'update_cache=yes'2.清空缓存
[root@worker232 ~]# ansible 10.0.0.231 -m apt -a 'autoclean=yes'3.安装nginx指定版本
[root@worker232 ~]# ansible 10.0.0.231 -m apt -a 'name=nginx=1.18.0-6ubuntu14.5 state=present'4.卸载nginx
[root@worker232 ~]# ansible 10.0.0.231 -m apt -a 'name=nginx* state=absent'5.将所有的包升级到最新【危险操作,慎用,可能会导致某些服务无法启动】
[root@worker232 ~]# ansible 10.0.0.231 -m apt -a 'name=* state=latest'
16.apt_repository模块
16.1 apt_repository模块概述
apt_repository模块实现apt仓库的配置管理,仅用于debian系列的环境中。
16.2 apt_repository模块示例
	1.添加atp源1.1 添加Ubuntu的docker-ce源
[root@worker232 ~]# ansible 10.0.0.231 -m apt_repository -a 'repo="deb [arch=amd64 signed-by=/etc/apt/keyrings/docker.gpg] https://mirrors.aliyun.com/docker-ce/linux/ubuntu   jammy stable" filename="docker-ce" update_cache=no'1.2 远程主机查看apt源信息
[root@master231 ~]# ll /etc/apt/sources.list.d/docker-ce.list
-rw-r--r-- 1 root root 119 Jan 11 18:26 /etc/apt/sources.list.d/docker-ce.list
[root@master231 ~]#
[root@master231 ~]# cat /etc/apt/sources.list.d/docker-ce.list
deb [arch=amd64 signed-by=/etc/apt/keyrings/docker.gpg] https://mirrors.aliyun.com/docker-ce/linux/ubuntu jammy stable
[root@master231 ~]# 2.删除apt源2.1 删除ubuntu的apt源
[root@worker232 ~]# ansible 10.0.0.231 -m apt_repository -a 'repo="deb [arch=amd64 signed-by=/etc/apt/keyrings/docker.gpg] https://mirrors.aliyun.com/docker-ce/linux/ubuntu   jammy stable" filename="docker-ce" state=absent'2.2 远程主机查看apt源信息
[root@master231 ~]# ll /etc/apt/sources.list.d/docker-ce.list
ls: cannot access '/etc/apt/sources.list.d/docker-ce.list': No such file or directory
[root@master231 ~]#
17.apt_key模块
17.1 apt_key模块概述
apt_key模块实现apt仓库的配置管理,仅用于debian系列的环境中。
17.2 apt_key模块示例
	1.添加key
[root@worker232 ~]# ansible 10.0.0.231 -m apt_key -a 'url=https://nginx.org/keys/nginx_signing.key state=present'2.远程主机上查看验证
[root@master231 ~]# apt-key list
Warning: apt-key is deprecated. Manage keyring files in trusted.gpg.d instead (see apt-key(8)).
/etc/apt/trusted.gpg
--------------------
pub   rsa2048 2021-05-04 [SC]35BA A0B3 3E9E B396 F59C  A838 C0BA 5CE6 DC63 15A3
uid           [ unknown] Artifact Registry Repository Signer <artifact-registry-repository-signer@google.com>pub   rsa2048 2022-05-21 [SC]A362 B822 F6DE DC65 2817  EA46 B53D C80D 13ED EF05
uid           [ unknown] Rapture Automatic Signing Key (cloud-rapture-signing-key-2022-03-07-08_01_01.pub)
sub   rsa2048 2022-05-21 [E]pub   rsa2048 2011-08-19 [SC] [expires: 2027-05-24]573B FD6B 3D8F BC64 1079  A6AB ABF5 BD82 7BD9 BF62
uid           [ unknown] nginx signing key <signing-key@nginx.com>pub   rsa4096 2024-05-29 [SC]8540 A6F1 8833 A80E 9C16  53A4 2FD2 1310 B49F 6B46
uid           [ unknown] nginx signing key <signing-key-2@nginx.com>pub   rsa4096 2024-05-29 [SC]9E9B E90E ACBC DE69 FE9B  204C BCDC D8A3 8D88 A2B3
uid           [ unknown] nginx signing key <signing-key-3@nginx.com>/etc/apt/trusted.gpg.d/ubuntu-keyring-2012-cdimage.gpg
------------------------------------------------------
pub   rsa4096 2012-05-11 [SC]8439 38DF 228D 22F7 B374  2BC0 D94A A3F0 EFE2 1092
uid           [ unknown] Ubuntu CD Image Automatic Signing Key (2012) <cdimage@ubuntu.com>/etc/apt/trusted.gpg.d/ubuntu-keyring-2018-archive.gpg
------------------------------------------------------
pub   rsa4096 2018-09-17 [SC]F6EC B376 2474 EDA9 D21B  7022 8719 20D1 991B C93C
uid           [ unknown] Ubuntu Archive Automatic Signing Key (2018) <ftpmaster@ubuntu.com>[root@master231 ~]# 3.移除key
[root@worker232 ~]# ansible 10.0.0.231 -m apt_key -a 'url=https://nginx.org/keys/nginx_signing.key state=present'
18.service模块
18.1 service模块
service模块主要用于对远程服务进行管理
18.2 service模块示例
	1.停止服务
[root@worker232 ~]# ansible 10.0.0.231 -m service -a 'name=nginx state=stopped'2.重载服务
[root@worker232 ~]# ansible 10.0.0.231 -m service -a 'name=nginx state=reloaded'3.重启服务
[root@worker232 ~]# ansible 10.0.0.231 -m service -a 'name=nginx state=restarted'4.启动服务
[root@worker232 ~]# ansible 10.0.0.231 -m service -a 'name=nginx state=started'5.禁用开机自启动服务
[root@worker232 ~]# ansible 10.0.0.231 -m service -a 'name=nginx enabled=no'6.配置服务开机自启动
[root@worker232 ~]# ansible 10.0.0.231 -m service -a 'name=nginx enabled=yes'
19.user模块
19.1 user模块概述
user模块用于对远程主机用户进行管理。
19.2 user模块示例
	1.创建用户
[root@worker232 ~]# ansible 10.0.0.231 -m user -a 'name=jasonyin2020 comment="ansible user" uid=2025 home=/yinzhengjie/'远端验证:
[root@master231 ~]# getent passwd jasonyin2020
jasonyin2020:x:2025:1002:ansible user:/yinzhengjie/:/bin/bash
[root@master231 ~]# 2.创建系统用户,不指定家目录,指定shell,组,密码
[root@worker232 ~]# openssl passwd -6 yinzhengjie
$6$ulVbLUfZK7RJarPa$Nr3D03V4qBocLd3rmmWr/Pt04QOUun9ZDSLcgrIIyKP48aViPOZJ8I32HbG5Oz6IODgBsLVnZCcwisPlcnoVn.
[root@worker232 ~]#
[root@worker232 ~]# ansible 10.0.0.231 -m user -a 'name=jiege comment="ansible user" system=yes create_home=no shell=/sbin/nologin group=root password="$6$ulVbLUfZK7RJarPa$Nr3D03V4qBocLd3rmmWr/Pt04QOUun9ZDSLcgrIIyKP48aViPOZJ8I32HbG5Oz6IODgBsLVnZCcwisPlcnoVn."'3.创建用户并在用户的家目录件(~/.ssh)中生成密钥文
[root@worker232 ~]# ansible 10.0.0.231 -m user -a 'name=hanpaopao generate_ssh_key=yes ssh_key_bits=2048'4.删除用户
[root@worker232 ~]# ansible 10.0.0.231 -m user -a 'name=jiege state=absent'
20. group模块
20.1 group模块
group模块用于在远端创建组,该模块也是幂等性的。
20.2 group模块示例
	1.创建普通组(gid大于1000)
[root@worker232 ~]# ansible 10.0.0.231 -m group -a 'name=jiege gid=2025'2.创建系统组(gid小于1000)
[root@worker232 ~]# ansible 10.0.0.231 -m group -a 'name=devops gid=999 system=yes'3.删除组
[root@worker232 ~]# ansible 10.0.0.231 -m group -a 'name=devops state=absent'
21.lineinfile模块
21.1 lineinfile模块概述
lineinfile模块主要用于修改远程主机上的文件。ansible提供了两个常用的文件修改模块,其中lineinfile主要针对单行进行替换修改。如果使用ansible调用sed进行文件修改时,经常会遇到转义的情况,而且在特殊符号进行替换时,有可能会失败。使用regexp配合正则来锚定要修改的内容时,如果有多行被匹配,则只有最后一行会被替换,如果删除,则匹配到的行都会被删除。
21.2 lineinfile模块示例
	1.替换案例1.1 远程主机准备数据
[root@master231 ~]# cat /tmp/test.txt
aaa
bbb
xixi-123
haha-456
hehe-789
jiege讲运维2024
jiege讲运维2025
[root@master231 ~]# 1.2 替换一行的内容
[root@worker232 ~]# ansible 10.0.0.231 -m lineinfile -a 'path=/tmp/test.txt regexp="^jiege" line="杰哥"'1.3 查看远程主机数据
[root@master231 ~]# cat /tmp/test.txt
aaa
bbb
xixi-123
haha-456
hehe-789
jiege讲运维2024
杰哥
[root@master231 ~]# 2.新增案例2.1 行位新增一行内容【注意,对于两次新增行的内容还不能一样】
[root@worker232 ~]# ansible 10.0.0.231 -m lineinfile -a 'path=/tmp/test.txt line="ccc-123"'2.2 查看远程主机数据
[root@master231 ~]# cat /tmp/test.txt
aaa
bbb
xixi-123
haha-456
hehe-789
jiege讲运维2024
杰哥
ccc-123
[root@master231 ~]# 3.在锚定行的上一行添加数据3.1 在锚定行的上方插入数据
[root@worker232 ~]# ansible 10.0.0.231 -m lineinfile -a 'path=/tmp/test.txt insertbefore="^hehe" line="AAAAA"'3.2 查看远程主机数据
[root@master231 ~]# cat /tmp/test.txt
aaa
bbb
xixi-123
haha-456
AAAAA
hehe-789
jiege讲运维2024
杰哥
ccc-123
[root@master231 ~]# 4.在锚定行的下一行添加数据4.1 在锚定行的下方插入数据
[root@worker232 ~]# ansible 10.0.0.231 -m lineinfile -a 'path=/tmp/test.txt insertafter="^hehe" line="BBBBB"'4.2 查看远程主机数据
[root@master231 ~]# cat /tmp/test.txt
aaa
bbb
xixi-123
haha-456
AAAAA
hehe-789
BBBBB
jiege讲运维2024
杰哥
ccc-123
[root@master231 ~]# 5.删除文件中的行5.1 删除行会匹配所有的行,删除时可以进行备份
[root@worker232 ~]# ansible 10.0.0.231 -m lineinfile -a 'path=/tmp/test.txt regexp="123$" backup=yes state=absent'
10.0.0.231 | CHANGED => {"ansible_facts": {"discovered_interpreter_python": "/usr/bin/python3"},"backup": "/tmp/test.txt.5809.2025-01-11@10:37:24~","changed": true,"found": 2,"msg": "2 line(s) removed"
}
[root@worker232 ~]# 5.2 查看远程主机数据
[root@master231 ~]# cat /tmp/test.txt
aaa
bbb
haha-456
AAAAA
hehe-789
BBBBB
jiege讲运维2024
杰哥
[root@master231 ~]# 5.3 查看备份的文件内容【备份文件参考删除时"backup"的输出内容】
[root@master231 ~]# cat /tmp/test.txt.5809.2025-01-11@10:37:24~
aaa
bbb
xixi-123
haha-456
AAAAA
hehe-789
BBBBB
jiege讲运维2024
杰哥
ccc-123
[root@master231 ~]# 6.新增行时文件不存在自动创建新文件6.1 文件不存在,则创建新文件
[root@worker232 ~]# ansible 10.0.0.231 -m lineinfile -a 'path=/tmp/demo.log line="杰哥讲运维" create=yes mode=600'6.2 查看远程主机数据
[root@master231 ~]# ll /tmp/demo.log
-rw------- 1 root root 16 Jan 11 10:40 /tmp/demo.log
[root@master231 ~]#
[root@master231 ~]# cat  /tmp/demo.log
杰哥讲运维
[root@master231 ~]# 7.正则匹配后向引用7.1 查看修改前远程主机数据
[root@master231 ~]# cat /tmp/test.txt
aaa
bbb
haha-456
AAAAA
hehe-789
BBBBB
jiege讲运维2024
杰哥
[root@master231 ~]# 7.2 正则匹配后向引用
[root@worker232 ~]# ansible 10.0.0.231 -m lineinfile -a "path=/tmp/test.txt regexp='^haha(.*)$' backrefs=yes line='哈哈\1'"7.3 再次查看远程主机数据
[root@master231 ~]# cat /tmp/test.txt
aaa
bbb
哈哈-456
AAAAA
hehe-789
BBBBB
jiege讲运维2024
杰哥
[root@master231 ~]#
22.replace模块
22.1 replace模块概述
replace模块与lineinfile模块功能类似,也是基于正则匹配的模式来修改文件。但是与lineinfile模块不同的是replace模块用于多行匹配和修改。
22.2 replace模块示例
	1.替换制定行的内容1.1 准备测试数据
[root@master231 ~]# cat /tmp/demo.log
2025
杰哥讲运维
2026
jasonyin2020
https://www.cnblogs.com/yinzhengjie
https://space.bilibili.com/600805398/channel/series
[root@master231 ~]# 1.2 替换所有以4个数字开头的行
[root@worker232 ~]# ansible 10.0.0.231 -m replace -a "path=/tmp/demo.log regexp='^(\d{4})$'  replace='\1@@@@@\1' backup=yes"1.3 再次查看数据
[root@master231 ~]# cat /tmp/demo.log
2025@@@@@2025
杰哥讲运维
2026@@@@@2026
jasonyin2020
https://www.cnblogs.com/yinzhengjie
https://space.bilibili.com/600805398/channel/series
[root@master231 ~]# 2.匹配指定行之间的数据2.1 准备测试数据
[root@master231 ~]# cat /tmp/haha.log
xixi
2025
haha
2026
hehe
2027
[root@master231 ~]# 2.2 处理2025到hehe之间行的行前面加一个"#"号
[root@worker232 ~]# ansible 10.0.0.231 -m replace -a "path=/tmp/haha.log before='hehe' after='2025' regexp='^(.+)$' replace='# \1'"2.3 再次查看数据
[root@master231 ~]# cat /tmp/haha.log
xixi
2025
# haha
# 2026
hehe
2027
[root@master231 ~]#
23.selinux模块
23.1 selinux模块概述
selinux模块用做对远程主机的selinux机制进行管理。一般用于CentOS系列的操作系统,对于Ubuntu系统可跳过。
23.2 selinux模块示例
	1.安装支持selinux的模块
[root@worker232 ~]# ansible-galaxy collection install ansible.posix --no-cache2.启用selinux
[root@worker232 ~]# ansible 10.0.0.231 -m selinux -a 'state=enforcing policy=targeted'3.禁用selinux
[root@worker232 ~]# ansible 10.0.0.231 -m selinux -a 'state=disabled policy=targeted'
24.reboot模块
24.1 reboot模块概述
reboot模块主要用于对远程主机进行重启操作。
24.2 reboot模块示例
	1.重启远程主机,重启前等待90s,并发送重启消息。【等待时间小于60无效,会立刻重启哟~】
[root@worker232 ~]# ansible 10.0.0.231 -m reboot -a 'pre_reboot_delay=90 msg="Yinzhengjie Server restarts after 90 seconds"'
10.0.0.231 | CHANGED => {"changed": true,"elapsed": 114,"rebooted": true
}
[root@worker232 ~]# 2.远程主机收到的广播消息
Broadcast message from root@master231 on pts/1 (Sat 2025-01-11 11:56:40 CST):Yinzhengjie Server restarts after 90 seconds
The system is going down for reboot at Sat 2025-01-11 11:57:40 CST!
25.mount模块
25.1 mount模块概述
mount模块用于管理远程主机的挂载。
25.2 mount模块示例
	1.
[root@master231 ~]# vgsVG        #PV #LV #SN Attr   VSize   VFree ubuntu-vg   1   3   0 wz--n- <98.00g 29.00g
[root@master231 ~]#
[root@master231 ~]# lvcreate -L 10G -n yinzhengjie ubuntu-vg Logical volume "yinzhengjie" created.
[root@master231 ~]#
[root@master231 ~]# mkfs.xfs /dev/ubuntu-vg/yinzhengjie 2.永久挂载光盘,立即生效
[root@worker232 ~]# ansible 10.0.0.231 -m mount -a 'src=/dev/ubuntu-vg/yinzhengjie path=/mnt state=mounted fstype=xfs'3.临时取消挂载
[root@worker232 ~]# ansible 10.0.0.231 -m mount -a 'src=/dev/ubuntu-vg/yinzhengjie path=/mnt state=unmounted'4.永久取消挂载
[root@worker232 ~]# ansible 10.0.0.231 -m mount -a 'src=/dev/ubuntu-vg/yinzhengjie path=/mnt state=absent'
26.setup模块
26.1 setup模块概述
setup模块主要用来从远程主机上收集相关信息在ansible主机上显示。由于需要收集的信息比较多,此模块执行需要等待一段时间。
26.2 setup模块示例
	1.收集所有字段信息
[root@worker232 ~]# ansible 10.0.0.231 -m setup
10.0.0.231 | SUCCESS => {"ansible_facts": {"ansible_all_ipv4_addresses": ["172.17.0.1","10.0.0.231"],"ansible_all_ipv6_addresses": ["fe80::20c:29ff:fec7:ba1e"],"ansible_apparmor": {"status": "enabled"},"ansible_architecture": "x86_64",
...2.收集指定字段信息
[root@worker232 ~]# ansible 10.0.0.231 -m setup -a 'filter=ansible_hostname,all_ipv4_addresses,ansible_proc_cmdline,ansible_machine'
10.0.0.231 | SUCCESS => {"ansible_facts": {"ansible_all_ipv4_addresses": ["172.17.0.1","10.0.0.231"],"ansible_hostname": "master231","ansible_machine": "x86_64","ansible_proc_cmdline": {"BOOT_IMAGE": "/vmlinuz-5.15.0-130-generic","biosdevname": "0","net.ifnames": "0","ro": true,"root": "/dev/mapper/ubuntu--vg-ubuntu--lv"},"discovered_interpreter_python": "/usr/bin/python3"},"changed": false
}
[root@worker232 ~]#
27.debug模块
27.1 debug模块概述
debug模块可以用于输出信息,并且通过msg定制输出的信息内容,功能类似于echo命令。一般情况下不会单独使用,通常和Playbook结合使用。
27.2 debug模块示例
	1.输出内容
[root@worker232 ~]# ansible 10.0.0.231 -m debug -a 'msg="https://www.cnblogs.com/yinzhengjie"'
10.0.0.231 | SUCCESS => {"msg": "https://www.cnblogs.com/yinzhengjie"
}
[root@worker232 ~]# 2.定义运行级别【verbosity可以定义级别,表示后面加几个-v才能显示哟~】
[root@worker232 ~]# ansible 10.0.0.231 -m debug -a 'msg="https://www.cnblogs.com/yinzhengjie" verbosity=2'
10.0.0.231 | SKIPPED
[root@worker232 ~]#
[root@worker232 ~]# ansible 10.0.0.231 -m debug -a 'msg="https://www.cnblogs.com/yinzhengjie" verbosity=2' -vv
ansible [core 2.12.0]config file = /etc/ansible/ansible.cfgconfigured module search path = ['/root/.ansible/plugins/modules', '/usr/share/ansible/plugins/modules']ansible python module location = /usr/lib/python3/dist-packages/ansibleansible collection location = /root/.ansible/collections:/usr/share/ansible/collectionsexecutable location = /usr/bin/ansiblepython version = 3.10.12 (main, Nov  6 2024, 20:22:13) [GCC 11.4.0]jinja version = 3.0.3libyaml = True
Using /etc/ansible/ansible.cfg as config file
Skipping callback 'default', as we already have a stdout callback.
Skipping callback 'minimal', as we already have a stdout callback.
Skipping callback 'oneline', as we already have a stdout callback.
META: ran handlers
10.0.0.231 | SUCCESS => {"msg": "https://www.cnblogs.com/yinzhengjie"
}
META: ran handlers
META: ran handlers
[root@worker232 ~]#
28.sysctl模块
28.1 sysctl模块概述
sysctl模块用来修改远程主机上的内核参数。
28.2 sysctl模块示例
	1.立即修改远程主机的内核参数并写入"/etc/sysctl.conf"文件
[root@worker232 ~]# ansible 10.0.0.231 -m sysctl -a 'name=net.ipv4.ip_forward value=0'2.删除远程主机"/etc/sysctl.conf"的内核参数配置,但并不会修改内核参数
[root@worker232 ~]# ansible 10.0.0.231 -m sysctl -a 'name=net.ipv4.ip_forward state=absent'
29.pam_limits模块
29.1 pam_limits模块概述
pam_limits模块主要用于管理远程主机上的资源限制。
29.2 pam_limits模块示例
	1.将yinzhengjie用户的进程打开数(nproc)限制为4096
[root@worker232 ~]# ansible 10.0.0.231 -m pam_limits -a 'domain=yinzhengjie limit_type=hard limit_item=nproc value=4096'
30.其他模块
除了上面介绍的模块外,其实还有数千个模块没有介绍,后期如果有需要可以自行过滤查看对应的帮助文档。查看帮助文档的方法如下:
ansible-doc -l | grep '模块关键字'
ansible-doc '模块关键字'举个例子:
ansible-doc -l | grep yum
ansible-doc yum
三.可能会遇到的报错
1.dest '/tmp/jasonyin2020' must be an existing dir
报错信息:
[root@worker232 ~]# ansible 10.0.0.231 -m unarchive -a "src=/root/yinzhengjie.tar.gz dest=/tmp/jasonyin2020 owner=yinzhengjie"
An exception occurred during task execution. To see the full traceback, use -vvv. The error was: NoneType: None
10.0.0.231 | FAILED! => {"changed": false,"msg": "dest '/tmp/jasonyin2020' must be an existing dir"
}
[root@worker232 ~]# 错误原因:目录不存在导致的错误解决方案:指定远程主机存在的目录路径即可。
2.[WARNING]: module selinux not found in
报错信息:
[root@worker232 ~]# ansible-doc -s selinux
[WARNING]: module selinux not found in:
/root/.ansible/plugins/modules:/usr/share/ansible/plugins/modules:/usr/lib/python3/dist-packages/ansible/modules
[root@worker232 ~]# 错误原因:ansible-core软件版缺少selinux模块。解决方案:使用"ansible-galaxy collection install ansible.posix --no-cache"安装即可。