数据同步
elasticsearch中的酒店数据来自于mysql数据库,因此mysql数据发生改变时,elasticsearch也必须跟着改变,这个就是elasticsearch与mysql之间的数据同步。
异步通知
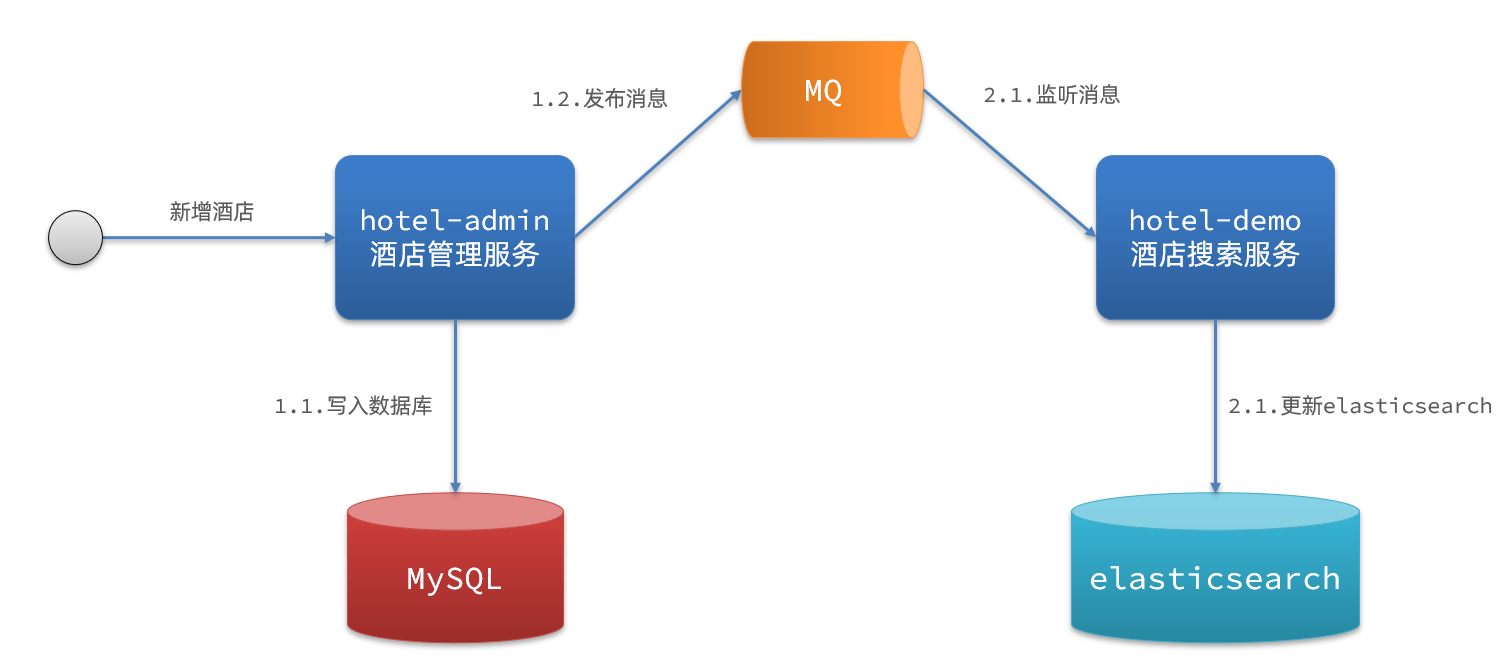
流程如下:
- hotel-admin对mysql数据库数据完成增、删、改后,发送MQ消息
- hotel-demo监听MQ,接收到消息后完成elasticsearch数据修改
MQ结构如图:

拉取MQ镜像
docker pull rabbitmq:3-management
拉取失败超时 Error response from daemon: Get “https://registry-1.docker.io/v2/“解决方案
https://registry-1.docker.io/v2/ 地址是 docker官方的镜像源,下载很慢的,一般会自己指定国内映射的加速镜像源。
修改或新建/etc/docker/daemon.json 文件

{"registry-mirrors" : ["https://2a6bf1988cb6428c877f723ec7530dbc.mirror.swr.myhuaweicloud.com","https://docker.m.daocloud.io","https://hub-mirror.c.163.com","https://mirror.baidubce.com","https://your_preferred_mirror","https://dockerhub.icu","https://docker.registry.cyou","https://docker-cf.registry.cyou","https://dockercf.jsdelivr.fyi","https://docker.jsdelivr.fyi","https://dockertest.jsdelivr.fyi","https://mirror.aliyuncs.com","https://dockerproxy.com","https://mirror.baidubce.com","https://docker.m.daocloud.io","https://docker.nju.edu.cn","https://docker.mirrors.sjtug.sjtu.edu.cn","https://docker.mirrors.ustc.edu.cn","https://mirror.iscas.ac.cn","https://docker.rainbond.cc"],"insecure-registries" : ["docker-registry.zjq.com"],"log-driver": "json-file","log-opts": {"max-size": "10m","max-file": "10"},"data-root": "/data/docker"
}
systemctl daemon-reload
systemctl restart docker
// 在执行上面命令时,以前创建的容器会被删除
docker pull rabbitmq:3-management
docker run \-e RABBITMQ_DEFAULT_USER=guest \-e RABBITMQ_DEFAULT_PASS=guest \--name mq \--hostname mq1 \-p 15672:15672 \-p 5672:5672 \-d \rabbitmq:3-management
重新加载镜像,创建并运行容器(注意:加载手动上传镜像(tar包文件),在创建运行容器时,必须要cd 到tar包文件所在目录下)

// 加载上传的镜像
docker load -i /usr/local/docker/tools/kibana.tarcd  /usr/local/docker/tools/
// 创建并运行容器
docker run -d \
--name kibana \
-e ELASTICSEARCH_HOSTS=http://es:9200 \
--network=es-net \
-p 5601:5601  \
kibana:7.12.1
通过MQ实现数据同步
1)引入依赖
<!--amqp--><dependency><groupId>org.springframework.boot</groupId><artifactId>spring-boot-starter-amqp</artifactId></dependency>
2)配置MQ服务
spring:... ...rabbitmq:host: 192.168.xxx.xxxxport: 5672username: guestpassword: guestvirtual-host: /
3) 声明队列交换机名称
hotel-admin(消息发送方)
hotel-demo(消息接收方)
创建相同包(cn.marw.hotel.constatnts)并在其下新建一个类MqConstants:

 1 package cn.marw.hotel.constatnts;
 2
 3     public class MqConstants {
 4     /**
 5      * 交换机
 6      */
 7     public final static String HOTEL_EXCHANGE = "hotel.topic";
 8     /**
 9      * 监听新增和修改的队列
10      */
11     public final static String HOTEL_INSERT_QUEUE = "hotel.insert.queue";
12     /**
13      * 监听删除的队列
14      */
15     public final static String HOTEL_DELETE_QUEUE = "hotel.delete.queue";
16     /**
17      * 新增或修改的RoutingKey
18      */
19     public final static String HOTEL_INSERT_KEY = "hotel.insert";
20     /**
21      * 删除的RoutingKey
22      */
23     public final static String HOTEL_DELETE_KEY = "hotel.delete";
24 }
4)发送方(发送MQ消息)
在hotel-admin中的增、删、改业务中分别发送MQ消息:
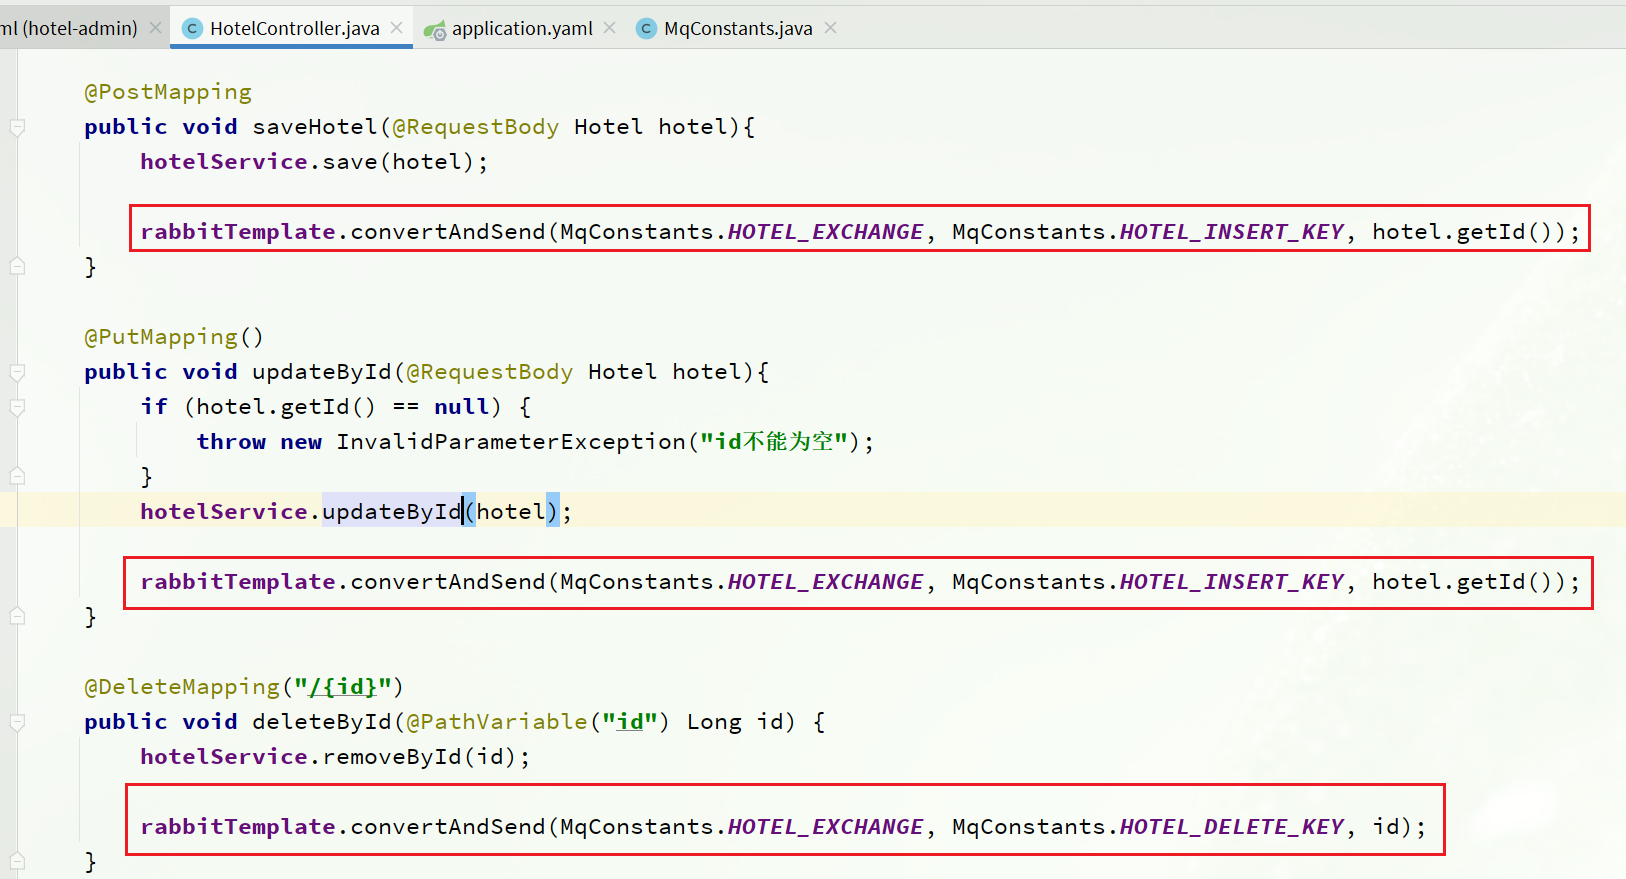
5)接收方(接受MQ消息)
hotel-demo接收到MQ消息要做的事情包括:
- 新增消息:根据传递的hotel的id查询hotel信息,然后新增一条数据到索引库
- 删除消息:根据传递的hotel的id删除索引库中的一条数据
定义接口:hotel-demo的cn.marw.hotel.service包下的IHotelService接口中添加 新增、删除业务
1 void deleteById(Long id);
2
3 void insertById(Long id);
实现接口:hotel-demo中的cn.marw.hotel.service.impl包下的HotelService中实现业务:
@Autowired
private RestHighLevelClient client;@Override
public void deleteById(Long id) {try {// 1.准备RequestDeleteRequest request = new DeleteRequest("hotel", id.toString());// 2.发送请求
        client.delete(request, RequestOptions.DEFAULT);} catch (IOException e) {throw new RuntimeException(e);}
}@Override
public void insertById(Long id) {try {// 0.根据id查询酒店数据Hotel hotel = getById(id);// 转换为文档类型HotelDoc hotelDoc = new HotelDoc(hotel);// 1.准备Request对象IndexRequest request = new IndexRequest("hotel").id(hotel.getId().toString());// 2.准备Json文档
        request.source(JSON.toJSONString(hotelDoc), XContentType.JSON);// 3.发送请求
        client.index(request, RequestOptions.DEFAULT);} catch (IOException e) {throw new RuntimeException(e);}
}
7)声明队列和交换机(通常消息的接收方,来完成声明)
声明方式:基于Bean和基于注解
7.1)基于Bean
7.1.1)在hotel-demo中,定义配置类,声明队列、交换机:

 1 @Configuration
 2 public class MqConfig {
 3     @Bean
 4     public TopicExchange topicExchange(){
 5         return new TopicExchange(MqConstants.HOTEL_EXCHANGE, true, false);
 6     }
 7
 8     @Bean
 9     public Queue insertQueue(){
10         return new Queue(MqConstants.HOTEL_INSERT_QUEUE, true);
11     }
12
13     @Bean
14     public Queue deleteQueue(){
15         return new Queue(MqConstants.HOTEL_DELETE_QUEUE, true);
16     }
17
18     @Bean
19     public Binding insertQueueBinding(){
20         return BindingBuilder.bind(insertQueue()).to(topicExchange()).with(MqConstants.HOTEL_INSERT_KEY);
21     }
22
23     @Bean
24     public Binding deleteQueueBinding(){
25         return BindingBuilder.bind(deleteQueue()).to(topicExchange()).with(MqConstants.HOTEL_DELETE_KEY);
26     }
27 }
7.1.2)编写监听器
在hotel-demo中的cn.marw.hotel.mq包新增一个类:
@Component
public class HotelListener {@Autowiredprivate IHotelService hotelService;/*** 监听酒店新增或修改的业务* @param id 酒店id*/@RabbitListener(queues = MqConstants.HOTEL_INSERT_QUEUE)public void listenHotelInsertOrUpdate(Long id){hotelService.insertById(id);}/*** 监听酒店删除的业务* @param id 酒店id*/@RabbitListener(queues = MqConstants.HOTEL_DELETE_QUEUE)public void listenHotelDelete(Long id){hotelService.deleteById(id);}
}
7.2)基于注解
 1 @Component
 2 public class HotelListener {
 3
 4     @Autowired
 5     private IHotelService hotelService;
 6
 7     @RabbitListener(bindings = @QueueBinding(
 8             value = @Queue(name = HotelMqConstants.INSERT_QUEUE_NAME),
 9             exchange = @Exchange(name = HotelMqConstants.EXCHANGE_NAME, type = ExchangeTypes.TOPIC),
10             key = HotelMqConstants.INSERT_KEY
11     ))
12     public void listenHotelInsert(Long hotelId){
13         // 新增
14         hotelService.saveById(hotelId);
15     }
16
17     @RabbitListener(bindings = @QueueBinding(
18             value = @Queue(name = HotelMqConstants.DELETE_QUEUE_NAME),
19             exchange = @Exchange(name = HotelMqConstants.EXCHANGE_NAME, type = ExchangeTypes.TOPIC),
20             key = HotelMqConstants.DELETE_KEY
21     ))
22     public void listenHotelDelete(Long hotelId){
23         // 删除
24         hotelService.deleteById(hotelId);
25     }
26 }
声明成功后,Rabbit MQ服务端就会出现对应的交换机和队列,如图


