虽然目前spring已经出现了6但是现如今大多数应用的还是spring5,因此毕设学习选择Spring5而非6
spring简介
- 控制反转(IOC):通过控制反转实现对象的解耦,提高代码的可维护性和可测试性。
- 面向切面编程(AOP):简化了横切关注点(如事务管理、日志记录等)的处理。
- 事务管理:为各种事务管理提供统一的 API,支持声明式事务控制。
- 数据访问:简化了数据库操作,支持 JDBC、ORM(如 Hibernate、JPA)等技术。
- Spring MVC:一个基于模型-视图-控制器(MVC)设计模式的 Web 框架,广泛用于构建 Web 应用。
- Spring Boot:一个简化 Spring 应用开发的框架,通过约定优于配置的理念,使得开发者可以快速构建和部署 Spring 应用。
- Spring Cloud:为微服务架构提供支持,解决分布式系统中的常见问题,如服务注册与发现、配置管理、负载均衡等。
SSM框架包含Spring(业务层框架)+SpringMVC(表现层框架)+Mybatis(持久化数据层框架),简单来说就是SpringMVC负责和视图交互,由SpringMVC实现页面动态变化,SpringMVC和Spring交互,由Spring进行业务处理,Spring和Mybatis进行交互,由Mybatis把内存中的数据持久保存到数据库中,这些框架简化了传统的Javaweb开发过程,包括Servlet,JSP,JDBC等技术的优化
Spring框架中IOC和AOP是两个核心内容,是Spring框架的核心思想
控制反转(IOC)
IOC 是一种设计原则,指的是控制权的转移,将对象的创建和依赖关系的管理从程序代码中抽离出来,交给框架或容器来负责。在传统的程序设计中,对象的创建和依赖关系是由程序员手动控制的,而在 IOC 中,控制权由容器(如 Spring 框架中的 ApplicationContext)来接管,程序员只需定义好依赖关系,容器会在运行时将依赖注入到相应的对象中,从而实现低耦合和高内聚。这种设计有助于提高程序的可维护性、可测试性和扩展性。
控制反转(Inversion of Control,IOC) 和 依赖注入(Dependency Injection,DI)
控制反转(IOC)是一个广泛的概念,强调将控制权转移到外部容器中。
依赖注入(DI)是控制反转的一种实现方式,专注于通过外部容器注入依赖对象来达到控制反转的效果。
IOC是一种设计理念,DI是IOC的一种实现方式
假设如下场景,假设我们一开始的需求是针对普通用户业务模块而实现的两个功能,而后需要新增一个VIP用户的,但是业务逻辑不变只是具体操作变了,针对需求变更以下是传统设计理念和IOC设计理念的不同
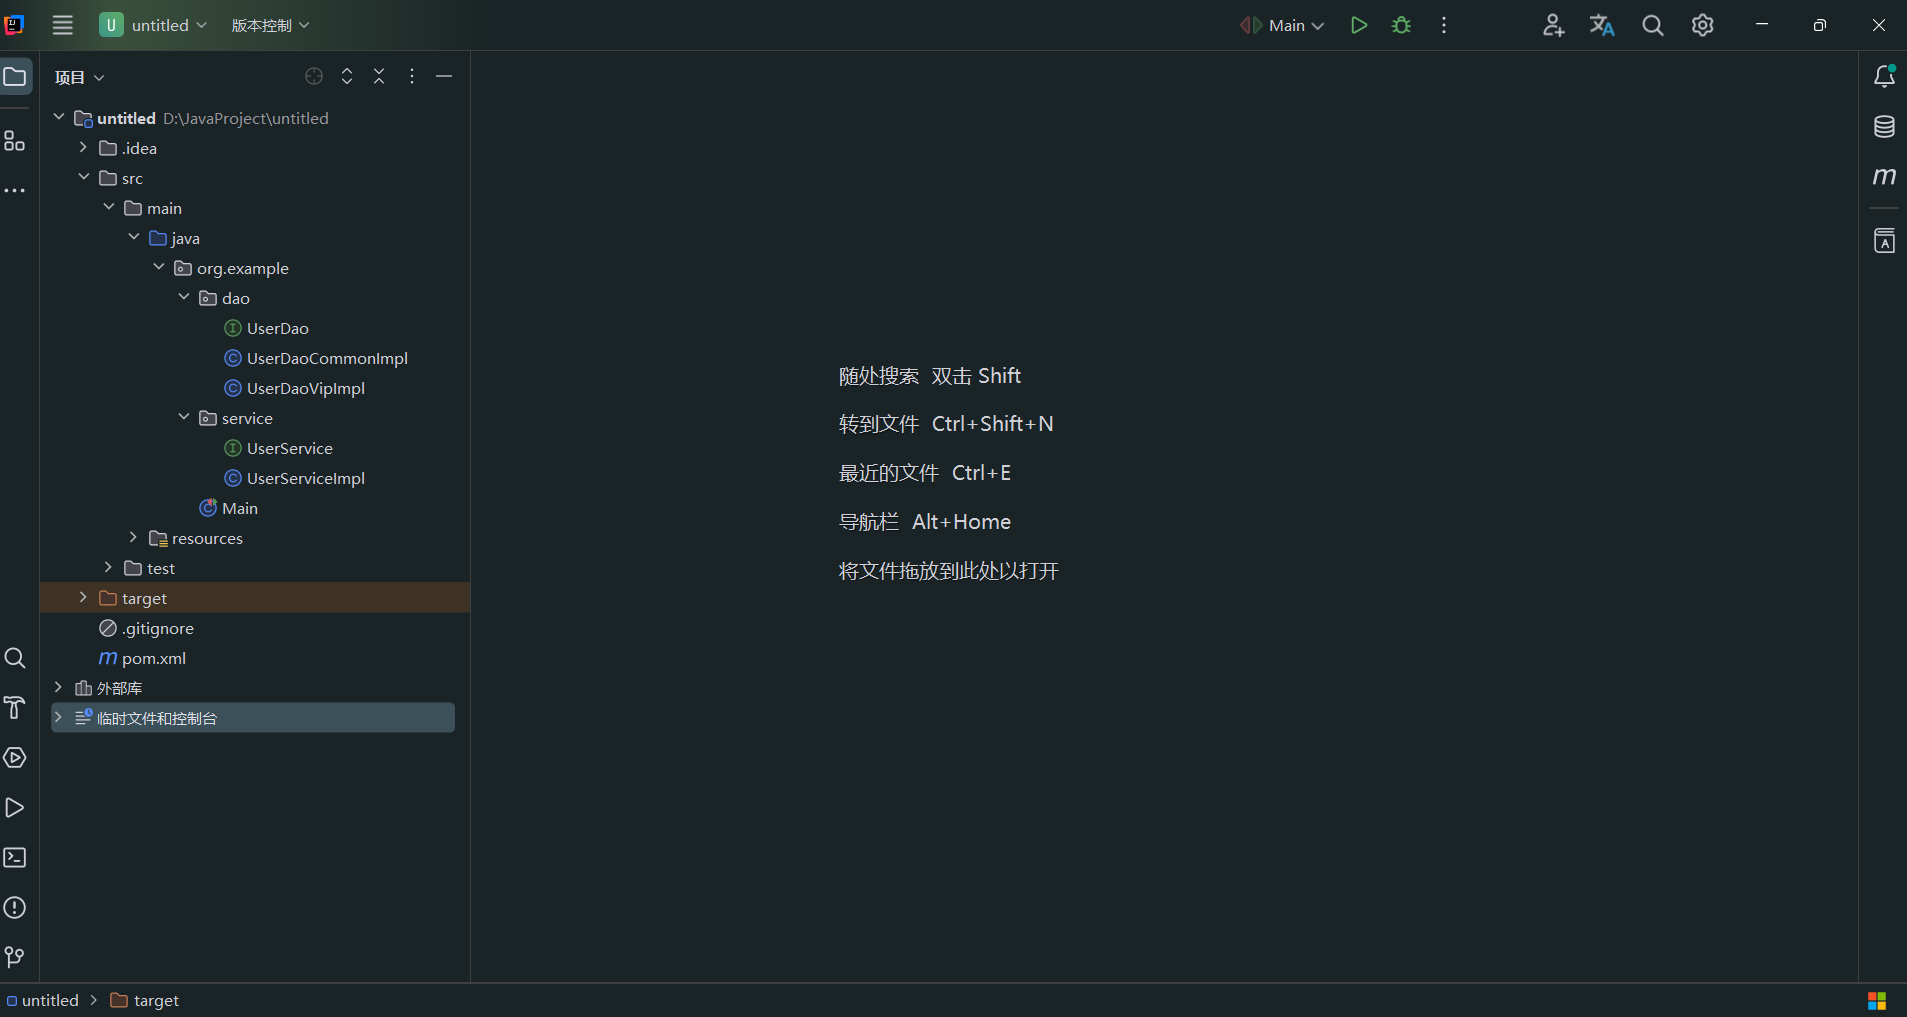
package org.example.dao;public interface UserDao {public void function1();public void function2();
}
package org.example.dao;public class UserDaoCommonImpl implements UserDao {@Overridepublic void function1() {System.out.println("执行普通用户操作1");}@Overridepublic void function2() {System.out.println("执行普通用户操作2");}
}package org.example.service;public interface UserService {public void service1();
}package org.example.service;import org.example.dao.UserDao;
import org.example.dao.UserDaoCommonImpl;public class UserServiceImpl implements UserService {private UserDao userDao = new UserDaoCommonImpl();@Overridepublic void service1() {System.out.println("执行业务操作1");userDao.function1();userDao.function2();}
}package org.example;import org.example.service.UserService;
import org.example.service.UserServiceImpl;
import org.junit.Test;public class Main {@Testpublic void mainTest(){UserService userService = new UserServiceImpl();userService.service1();}}
可以看到一开始没有VIP用户这个业务需求时我们的代码只是针对普通用户的,然而当我们需要新添加VIP用户时,我们不得不改变service的源代码
package org.example.service;public interface UserService {public void service1(String level);
}
package org.example.service;import org.example.dao.UserDao;
import org.example.dao.UserDaoCommonImpl;
import org.example.dao.UserDaoVipImpl;public class UserServiceImpl implements UserService {private UserDao userDao ;@Overridepublic void service1(String level) {System.out.println("执行业务操作1");switch (level) {case "common":userDao = new UserDaoCommonImpl();break;case "vip":userDao = new UserDaoVipImpl();break;}userDao.function1();userDao.function2();}
}package org.example;import org.example.service.UserService;
import org.example.service.UserServiceImpl;
import org.junit.Test;public class Main {@Testpublic void mainTest(){UserService userService = new UserServiceImpl();userService.service1("vip");}}
如果我们还要新增其他类型的用户依然需要改动业务层的源代码,可见其扩展性是极其差的,如果我们采用如下的设计方案
package org.example.service;import org.example.dao.UserDao;public interface UserService {public void setUserDao(UserDao userDao);public void service1();
}package org.example.service;import org.example.dao.UserDao;public class UserServiceImpl implements UserService {private UserDao userDao ;@Overridepublic void setUserDao(UserDao userDao) {this.userDao = userDao;}@Overridepublic void service1() {System.out.println("执行业务操作1");userDao.function1();userDao.function2();}
}package org.example;import org.example.dao.UserDaoVipImpl;
import org.example.service.UserService;
import org.example.service.UserServiceImpl;
import org.junit.Test;public class Main {@Testpublic void mainTest(){UserService userService = new UserServiceImpl();userService.setUserDao(new UserDaoVipImpl());userService.service1();}}这样如果后去再有新的用户类型,我们只需改变注入的对象类型即可,用户自己选择注入即可,而不涉及核心业务层代码,底层应该尽可能不变动,使得底层内容只会扩展增加而不需要改变原来的,只要不涉及核心业务,代码的变更造成的影响就小,解耦之后业务的主动权由程序员变为用户本身,用户可以根据自己去调用对应的业务,而不是由程序员改变对应的业务代码来满足用户需求
IOC容器
IOC(控制反转)容器是Spring框架的核心组件之一,它负责管理对象的生命周期和依赖关系。IOC容器的主要作用是通过依赖注入(DI)机制将对象的创建、配置和依赖关系的管理交给容器来完成,而不是由程序员显式地去实例化和管理。这样,开发者可以通过声明式的方式配置对象和它们之间的依赖关系,从而实现了控制反转。
本质:基于工厂模式,所有创建对象的操作由Spring配置文件完成,包括管理,这样配置文件就是一个IOC容器,生产存储本程序所有的对象实例,某一个类需要实例只需要到该容器中通过id去查找然后使用即可,以前是各个类想要使用某个功能必须自己创建实例,这样耦合度极高,为了解耦合,Spring进行了统一管理对象,而程序中的类无需关系实例,只需注重自己的业务功能即可
对象管理:IOC容器负责创建、初始化和销毁对象。在容器启动时,容器会根据配置文件或注解创建相应的对象,并在整个应用生命周期内进行管理。
依赖注入:IOC容器根据定义的依赖关系自动注入对象所需要的其他对象。这种依赖关系可以通过构造器注入、setter方法注入或字段注入来实现。通过依赖注入,减少了类之间的耦合,使得系统更加灵活和可扩展。
导入spring所需的依赖 ,使用spring框架进行实例的创建
<dependencies><dependency><groupId>junit</groupId><artifactId>junit</artifactId><version>RELEASE</version><scope>compile</scope></dependency><!-- https://mvnrepository.com/artifact/org.springframework/spring-context --><dependency><groupId>org.springframework</groupId><artifactId>spring-context</artifactId><version>5.3.18</version></dependency><dependency><groupId>commons-logging</groupId><artifactId>commons-logging</artifactId><version>1.2</version></dependency>
</dependencies>配置文件applicationcontext和bean
<?xml version="1.0" encoding="UTF-8"?>
<beans xmlns="http://www.springframework.org/schema/beans"xmlns:xsi="http://www.w3.org/2001/XMLSchema-instance"xsi:schemaLocation="http://www.springframework.org/schema/beans http://www.springframework.org/schema/beans/spring-beans.xsd"><!-- 配置文件的导入,用于集成不同的配置文件 --><import resource="bean.xml"/>
</beans><?xml version="1.0" encoding="UTF-8"?>
<beans xmlns="http://www.springframework.org/schema/beans"xmlns:xsi="http://www.w3.org/2001/XMLSchema-instance"xsi:schemaLocation="http://www.springframework.org/schema/beans http://www.springframework.org/schema/beans/spring-beans.xsd"><!--一个bean相当于一个实例,所有实例的创建由本配置文件进行,该配置文件就是IOC容器,统一管理Spring上下文的所有实例,程序需要对象就到该容器里面去取,通过id来识别想要的实例,如此之后创建实例不需要各个类去创建,而是由本配置文件统一创建所管理的实例对应的类型必须要有set方法通过反射创建实例Class.forName("bean标签对应class的内容为所创建类的路径"),然后通过newInstance创建实例--><!--进行有参构造创建实例id是唯一标识name是别名class是类的全名--><bean id="user1" class="org.example.pojo.User" name="user_one"><constructor-arg name="name" value="小明"/><constructor-arg name="age" value="18"/><constructor-arg name="gender" value="男"/></bean><!--property相当于属性,使用set方法进行赋值--><bean id="user2" class="org.example.pojo.User"><property name="name" value="李华" /><property name="age" value="20"/><property name="gender" value="男"/></bean><bean id="userDaoCommonImpl" class="org.example.dao.UserDaoCommonImpl"/><bean id="userDaoVipImpl" class="org.example.dao.UserDaoVipImpl"/><bean id="userService" class="org.example.service.UserServiceImpl"><!--value是具体的值,即基本属性,ref是引用IOC容器中其他的bean,即引用类型--><property name="userDao" ref="userDaoCommonImpl"/></bean></beans>package org.example.pojo;public class User {private String name;private int age;private String gender;public User() {}public User(String name, int age, String gender) {this.name = name;this.age = age;this.gender = gender;}public String getName() {return name;}public void setName(String name) {this.name = name;}public int getAge() {return age;}public void setAge(int age) {this.age = age;}public String getGender() {return gender;}public void setGender(String gender) {this.gender = gender;}@Overridepublic String toString() {return "User{" +"name='" + name + '\'' +", age=" + age +", gender='" + gender + '\'' +'}';}
}package org.example;import org.example.dao.UserDaoVipImpl;
import org.example.pojo.User;
import org.example.service.UserService;
import org.example.service.UserServiceImpl;
import org.junit.Test;
import org.springframework.context.ApplicationContext;
import org.springframework.context.support.ClassPathXmlApplicationContext;public class Main {@Testpublic void mainTest(){ApplicationContext context = new ClassPathXmlApplicationContext("applicationcontext.xml");User user1= (User) context.getBean("user1");User user2= (User) context.getBean("user2");UserService userService = (UserService) context.getBean("userService");System.out.println(user1.toString());System.out.println(user2.toString());userService.service1();}}
依赖注入(ID)
三种方式:构造器注入,set方法注入,扩展注入
bean对象创建依赖于容器,bean对象的所有属性由容器来注入,即创建依赖容器,容器注入属性
以下不同类型值的注入,记得要导入新的bean容器
package org.example.pojo;import java.util.List;
import java.util.Map;
import java.util.Properties;
import java.util.Set;public class Person {private String name;private User user;private String[] friends;private List<String> clothes;private Map<String, Integer> scores;private Set<String> hobbies;private Properties info;public String getName() {return name;}public void setName(String name) {this.name = name;}public User getUser() {return user;}public void setUser(User user) {this.user = user;}public String[] getFriends() {return friends;}public void setFriends(String[] friends) {this.friends = friends;}public Map<String, Integer> getScores() {return scores;}public void setScores(Map<String, Integer> scores) {this.scores = scores;}public Set<String> getHobbies() {return hobbies;}public void setHobbies(Set<String> hobbies) {this.hobbies = hobbies;}public Properties getInfo() {return info;}public void setInfo(Properties info) {this.info = info;}public List<String> getClothes() {return clothes;}public void setClothes(List<String> clothes) {this.clothes = clothes;}
}
<?xml version="1.0" encoding="UTF-8"?>
<beans xmlns="http://www.springframework.org/schema/beans"xmlns:xsi="http://www.w3.org/2001/XMLSchema-instance"xsi:schemaLocation="http://www.springframework.org/schema/beans http://www.springframework.org/schema/beans/spring-beans.xsd"><import resource="bean.xml"/><bean id="person" class="org.example.pojo.Person"><!-- 以下是各个类型的属性值的注入 --><property name="name" value="李雷"/><property name="user" ref="user1"/><property name="friends"><array><value></value><value>张三</value><value>李四</value><value>王五</value><value>赵六</value><value>钱七</value></array></property><property name="clothes"><list><value>蓝色上衣</value><value>黑色裤子</value></list></property><property name="scores"><map><entry key="数学" value="150"/><entry key="英语" value="150"/><entry key="语文" value="150"/></map></property><property name="hobbies"><set><value>打篮球</value><value>唱</value></set></property><property name="info"><props><prop key="学号">1234</prop><prop key="班级">5班</prop><prop key="性别">男</prop></props></property></bean>
</beans>
扩展方式注入
p 命名空间
p 命名空间是 Spring 的注入简化方式,通常用于设置 Bean 的属性值。通过 p 命名空间,你可以以更简洁的方式为 Bean 设置属性,而无需显式使用 <property> 标签
c 命名空间
c 命名空间是 构造函数注入简化方式,用于简化通过构造函数传入参数的配置。通常,构造函数注入在配置中需要使用 <constructor-arg> 标签,但 c 命名空间提供了一种更简洁的方式
bean的作用域
singleton:整个容器中只有一个 Bean 实例。
prototype:每次请求都会生成一个新的 Bean 实例。
request:每个 HTTP 请求一个新的 Bean 实例。
session:每个 HTTP 会话一个新的 Bean 实例。
application:整个应用共享一个 Bean 实例。
websocket:每个 WebSocket 会话一个新的 Bean 实例。
bean的自动装配
装配(Wiring)是指将对象之间的依赖关系建立起来的过程。在 Spring 中,装配通常指的是将一个 Bean 的依赖注入到另一个 Bean 的过程。装配使得 Spring 容器能够创建并管理对象之间的关系,从而支持松耦合的设计,使得各个组件之间可以独立开发和替换,而不需要修改核心业务逻辑
依赖(Dependency)在软件开发中指的是一个对象或类依赖于另一个对象或类才能完成其功能。具体来说,一个类 A 如果需要使用类 B 的某些功能或数据,A 就依赖于 B。依赖关系通常出现在两个类之间,一个类通过引用或调用另一个类的属性或方法来实现某个功能
Spring支持bean的自动装配,会自动在上下文中查找给bean装配属性,即自动在上下文也就是容器根据给出的规则查找和本set方法中相同名称或类型的bean对象进行装配
<?xml version="1.0" encoding="UTF-8"?>
<beans xmlns="http://www.springframework.org/schema/beans"xmlns:xsi="http://www.w3.org/2001/XMLSchema-instance"xsi:schemaLocation="http://www.springframework.org/schema/beans http://www.springframework.org/schema/beans/spring-beans.xsd"><!-- 配置文件的导入,用于集成不同的配置文件 --><import resource="bean.xml"/><import resource="bean_one.xml"/><import resource="bean_two.xml"/>
</beans><?xml version="1.0" encoding="UTF-8"?>
<beans xmlns="http://www.springframework.org/schema/beans"xmlns:xsi="http://www.w3.org/2001/XMLSchema-instance"xsi:schemaLocation="http://www.springframework.org/schema/beans http://www.springframework.org/schema/beans/spring-beans.xsd"><bean id="userDao" class="org.example.dao.UserDaoVipImpl"/><!-- 通过名称和类型自动装配,byName依靠id且唯一,set方法后面的名称也要一致,byType依靠类型唯一,且属性的类型也要一样 --><bean id="userServiceImpl1" class="org.example.service.UserServiceImpl" autowire="byName"/><!--<bean id="userServiceImpl2" class="org.example.service.UserServiceImpl" autowire="byType"/>-->
</beans>
package org.example;import org.example.pojo.Person;
import org.example.service.UserService;
import org.junit.Test;
import org.springframework.context.ApplicationContext;
import org.springframework.context.support.ClassPathXmlApplicationContext;public class Main {@Testpublic void mainTest(){ApplicationContext context = new ClassPathXmlApplicationContext("applicationcontext.xml");UserService userService1 = context.getBean("userServiceImpl1",UserService.class);userService1.service1();}} 还可以直接通过注解的方式实现,通过注解可以省略set方法
package org.example.service;public interface UserService {public void service1();
}<?xml version="1.0" encoding="UTF-8"?>
<beans xmlns="http://www.springframework.org/schema/beans"xmlns:xsi="http://www.w3.org/2001/XMLSchema-instance"xmlns:context="http://www.springframework.org/schema/context"xsi:schemaLocation="http://www.springframework.org/schema/beans http://www.springframework.org/schema/beans/spring-beans.xsdhttp://www.springframework.org/schema/context http://www.springframework.org/schema/context/spring-context.xsd"><!-- 注解自动配置的支持 --><context:annotation-config/><!-- 配置文件的导入,用于集成不同的配置文件 --><import resource="bean.xml"/><import resource="bean_one.xml"/><import resource="bean_two.xml"/>
</beans>package org.example.service;import org.example.dao.UserDao;
import org.example.pojo.User;
import org.springframework.beans.factory.annotation.Autowired;
import org.springframework.beans.factory.annotation.Qualifier;public class UserServiceImpl implements UserService {@Autowiredprivate UserDao userDao ;@Qualifier("user1")@Autowiredprivate User user;@Overridepublic void service1() {System.out.println("执行业务操作1");System.out.println(user.toString());userDao.function1();userDao.function2();}
}package org.example;import org.example.pojo.Person;
import org.example.service.UserService;
import org.junit.Test;
import org.springframework.context.ApplicationContext;
import org.springframework.context.support.ClassPathXmlApplicationContext;public class Main {@Testpublic void mainTest(){ApplicationContext context = new ClassPathXmlApplicationContext("applicationcontext.xml");UserService userService = context.getBean("userService",UserService.class);userService.service1();}}
Spring注解开发
Spring注解开发的出现是为了提升开发效率、简化配置,并使代码更加简洁、易于理解和维护。
@Component:将一个普通的Java类标识为Spring的bean,并让Spring管理它的生命周期,通过@value赋值。
@Autowired:自动注入依赖的bean。
@Controller:标识一个类是Spring MVC的控制器。
@Service:标识一个类是Spring服务层的bean。
@Repository:标识一个类是Spring的数据访问层的bean。
<?xml version="1.0" encoding="UTF-8"?>
<beans xmlns="http://www.springframework.org/schema/beans"xmlns:xsi="http://www.w3.org/2001/XMLSchema-instance"xmlns:context="http://www.springframework.org/schema/context"xsi:schemaLocation="http://www.springframework.org/schema/beans http://www.springframework.org/schema/beans/spring-beans.xsdhttp://www.springframework.org/schema/context http://www.springframework.org/schema/context/spring-context.xsd"><context:annotation-config/><context:component-scan base-package="org.example.pojo"/><context:component-scan base-package="org.example.dao"/><bean id="userService" class="org.example.service.UserServiceImpl"/>
</beans>
package org.example.pojo;import org.springframework.beans.factory.annotation.Value;
import org.springframework.context.annotation.Scope;
import org.springframework.stereotype.Component;// 单例模式
@Scope("prototype")
@Component
public class User {@Value("李华")private String name;@Value("18")private int age;@Value("男")private String gender;public User() {}public User(String name, int age, String gender) {this.name = name;this.age = age;this.gender = gender;}public String getName() {return name;}public void setName(String name) {this.name = name;}public int getAge() {return age;}public void setAge(int age) {this.age = age;}public String getGender() {return gender;}public void setGender(String gender) {this.gender = gender;}@Overridepublic String toString() {return "User{" +"name='" + name + '\'' +", age=" + age +", gender='" + gender + '\'' +'}';}
}package org.example.dao;import org.springframework.stereotype.Component;@Component
public class UserDaoVipImpl implements UserDao{@Overridepublic void function1() {System.out.println("执行VIP用户操作1");}@Overridepublic void function2() {System.out.println("执行VIP用户操作2");}
}package org.example.service;import org.example.dao.UserDao;
import org.example.pojo.User;
import org.springframework.beans.factory.annotation.Autowired;
import org.springframework.stereotype.Component;
import org.springframework.stereotype.Service;import javax.annotation.Resource;public class UserServiceImpl implements UserService {@Resourceprivate UserDao userDao ;@Autowiredprivate User user;@Overridepublic void service1() {System.out.println("执行业务操作1");System.out.println(user.toString());userDao.function1();userDao.function2();}
}package org.example;import org.example.pojo.Person;
import org.example.service.UserService;
import org.junit.Test;
import org.springframework.context.ApplicationContext;
import org.springframework.context.support.ClassPathXmlApplicationContext;public class Main {@Testpublic void mainTest(){ApplicationContext context = new ClassPathXmlApplicationContext("applicationcontext.xml");UserService userService = context.getBean("userService",UserService.class);userService.service1();}}
@Resource和@Autowired的区别是前者先按照name然后再按照type找寻,而后者直接按照type查询,结合@Qualifier来区分相同类型的实例
类型和名称的对应关系,变量名称和bean中的id字段进行匹配,变量类型和bean中的class字段进行匹配自动装配得到对应的类
@Component结合配置扫描包可以实现创建bean实例的效果,并且可以统一管理,扫描相当于把包下的类进行注册到配置里面,即<bean></bean>,通过注解把实例注册到容器中,扫描了的包注解才能生效
JavaConfig实现配置
javaconfig拜托了xml配置文件,由一个java配置类实现所有的配置通过@Configuration这个注解
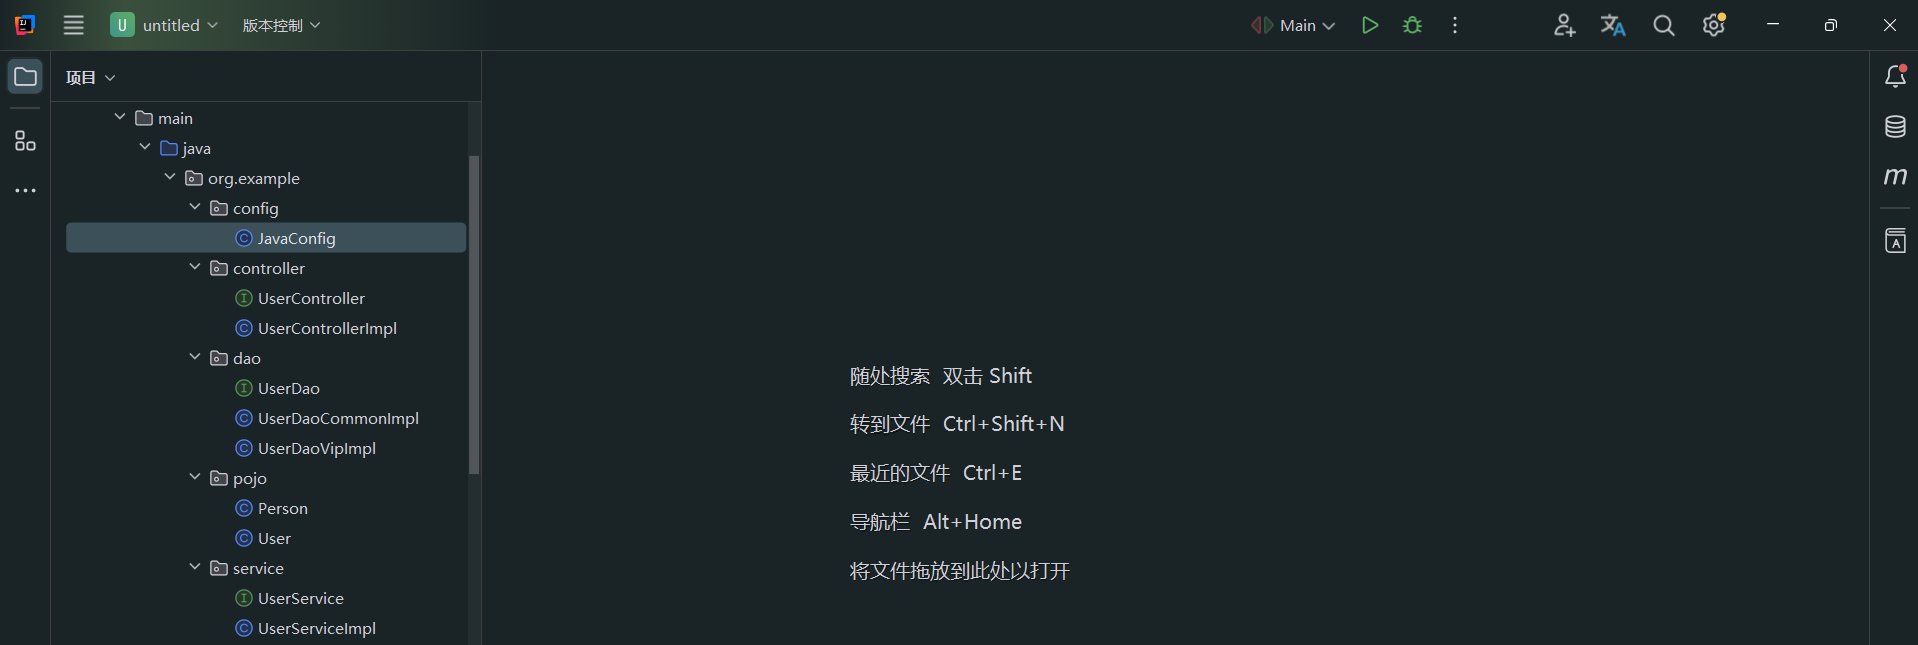
package org.example.config;import org.example.controller.UserController;
import org.example.controller.UserControllerImpl;
import org.example.dao.UserDao;
import org.example.dao.UserDaoCommonImpl;
import org.example.dao.UserDaoVipImpl;
import org.example.pojo.User;
import org.example.service.UserService;
import org.example.service.UserServiceImpl;
import org.springframework.context.annotation.Bean;
import org.springframework.context.annotation.ComponentScan;
import org.springframework.context.annotation.ComponentScans;
import org.springframework.context.annotation.Configuration;// 使用java类型作为配置文件,相当于applicationContext.xml
@Configuration
// 扫描组件
@ComponentScan(basePackages = {"org.example.controller","org.example.dao","org.example.pojo","org.example.service"})
public class JavaConfig {/** @Bean相当于xml内注册一个<bean></bean>* 方法名称为实例的id*返回值类型为实例的class* */@Beanpublic User user() {return new User();}@Beanpublic UserService userService() {return new UserServiceImpl();}@Beanpublic UserDao userDao() {return new UserDaoVipImpl();}@Beanpublic UserController userController() {return new UserControllerImpl();}}
package org.example.dao;import org.springframework.stereotype.Repository;@Repository
public class UserDaoVipImpl implements UserDao{@Overridepublic void function1() {System.out.println("执行VIP用户操作1");}@Overridepublic void function2() {System.out.println("执行VIP用户操作2");}
}package org.example.service;import org.example.dao.UserDao;
import org.example.pojo.User;
import org.springframework.beans.factory.annotation.Autowired;
import org.springframework.beans.factory.annotation.Qualifier;
import org.springframework.stereotype.Service;import javax.annotation.Resource;@Service
public class UserServiceImpl implements UserService {@Autowired@Qualifier(value = "userDaoVip")private UserDao userDao ;@Autowiredprivate User user;@Overridepublic void service1() {System.out.println("执行业务操作1");System.out.println(user.toString());userDao.function1();userDao.function2();}
}package org.example.controller;import org.example.service.UserService;
import org.springframework.beans.factory.annotation.Autowired;
import org.springframework.stereotype.Controller;@Controller
public class UserControllerImpl implements UserController {@Autowiredprivate UserService userService;@Overridepublic void connect() {userService.service1();}
}AOP(面向切面编程)
静态代理: 代理类在编译时就确定,无法灵活扩展;适用于代理类较少的场景。
动态代理: 代理类在运行时动态生成,能自动代理任意实现接口的目标类,适合于代理类较多的场景。
package org.example.pojo;public interface RealRole {public void service();
}
package org.example.pojo;public class Role1 implements RealRole{@Overridepublic void service() {System.out.println("Role1 service");}
}package org.example.pojo;public class Role2 implements RealRole{@Overridepublic void service() {System.out.println("Role2 service");}
}package org.example.pojo;public class ProxyRole {private RealRole realRole;public void setRealRole(RealRole realRole) {this.realRole = realRole;}public void proxyService(){// 切入公共业务System.out.println("Common service");realRole.service();}
}package org.example.pojo;public class Customer {public static void main(String[] args) {ProxyRole proxyRole = new ProxyRole();proxyRole.setRealRole(new Role1());proxyRole.proxyService();proxyRole.setRealRole(new Role2());proxyRole.proxyService();}
} 
以上就是静态代理模式的举例说明,但是实际当中一般采用动态代理,利用反射的原理这样可以避免修改源代码
package org.example.pojo;import org.springframework.cglib.proxy.InvocationHandler;
import org.springframework.cglib.proxy.Proxy;import java.lang.reflect.Method;public class DynamicProxy implements InvocationHandler {private Object target;public void setTarget(Object target) {this.target = target;}// 反射获取代理类public Object getProxy(){return Proxy.newProxyInstance(this.getClass().getClassLoader(), target.getClass().getInterfaces() , this);}@Overridepublic Object invoke(Object o, Method method, Object[] objects) throws Throwable {// 通过反射在下原来的业务前后添加新的业务addService1();addService2();System.out.println(method.getName()+"执行前");Object result = method.invoke(target, objects);System.out.println(method.getName()+"执行后");addService3();return result;}public void addService1(){System.out.println("Proxy service1");}public void addService2(){System.out.println("Proxy service2");}public void addService3(){System.out.println("Proxy service3");}}
package org.example.pojo;public class Customer {public static void main(String[] args) {// 真实角色的业务执行RealRole realRole = new Role1();realRole.service();System.out.println("==================");DynamicProxy dynamicProxy = new DynamicProxy();dynamicProxy.setTarget(realRole);// 此时的对象已经的通过反射得到的添加完新业务的对象realRole = (RealRole) dynamicProxy.getProxy();// 代理角色的业务执行realRole.service();}
}
SpringAOP
切面(Aspect): 模块化横切关注点(如日志、事务)的组件,包含 通知 和 切点。
连接点(Join Point): 程序执行过程中可插入切面的点(如方法调用、异常抛出)。
通知(Advice): 切面在连接点执行的具体动作,分为 @Before、@After、@Around、@AfterReturning、@AfterThrowing 五种类型。
切点(Pointcut): 通过表达式(如 execution(...))定义哪些连接点会被切面拦截,用于筛选目标方法。
目标对象(Target Object): 被切面增强的原始对象(如业务逻辑类实例)。
代理(Proxy): Spring AOP 动态生成的对象(JDK 动态代理或 CGLIB 代理),用于包裹目标对象并织入切面逻辑。
织入(Weaving): 将切面应用到目标对象的过程,Spring AOP 通过 运行时动态代理 实现。
配置实现AOP
<?xml version="1.0" encoding="UTF-8"?>
<beans xmlns="http://www.springframework.org/schema/beans"xmlns:context="http://www.springframework.org/schema/context"xmlns:aop="http://www.springframework.org/schema/aop"xmlns:xsi="http://www.w3.org/2001/XMLSchema-instance"xsi:schemaLocation="http://www.springframework.org/schema/beans http://www.springframework.org/schema/beans/spring-beans.xsdhttp://www.springframework.org/schema/context http://www.springframework.org/schema/context/spring-context.xsdhttp://www.springframework.org/schema/aop http://www.springframework.org/schema/aop/spring-aop.xsd"><bean id="AfterLog" class="org.example.log.AfterLog"/><bean id="BeforeLog" class="org.example.log.BeforeLog"/><context:annotation-config>true</context:annotation-config><context:component-scan base-package="org.example"/><aop:config><aop:pointcut id="pointcut" expression="execution(* org.example.service.UserServiceImpl.*(..))"/><aop:advisor advice-ref="BeforeLog" pointcut-ref="pointcut"/><aop:advisor advice-ref="AfterLog" pointcut-ref="pointcut"/></aop:config></beans>
package org.example.dao;import org.springframework.stereotype.Repository;public interface UserDao {public void add();public void delete();public void update();public void query();
}package org.example.dao;import org.springframework.stereotype.Repository;@Repository
public class UserDaoImpl implements UserDao {@Overridepublic void add() {System.out.println("添加一个用户");}@Overridepublic void delete() {System.out.println("删除一个用户");}@Overridepublic void update() {System.out.println("修改一个用户");}@Overridepublic void query() {System.out.println("查找一个用户");}
}package org.example.service;public interface UserService {public void add();public void delete();public void update();public void query();
}package org.example.service;import org.example.dao.UserDao;
import org.springframework.beans.factory.annotation.Autowired;
import org.springframework.beans.factory.annotation.Qualifier;
import org.springframework.stereotype.Service;@Service
public class UserServiceImpl implements UserService {@Qualifier("userDaoImpl")@Autowiredprivate UserDao userDao;@Overridepublic void add() {userDao.add();}@Overridepublic void delete() {userDao.delete();}@Overridepublic void update() {userDao.update();}@Overridepublic void query() {userDao.query();}
}package org.example.log;import org.springframework.aop.MethodBeforeAdvice;import java.lang.reflect.Method;
import java.util.Arrays;public class BeforeLog implements MethodBeforeAdvice {@Overridepublic void before(Method method, Object[] args, Object target) throws Throwable {System.out.println("Before 日志记录");System.out.println("执行方法: " + method.getName());System.out.println("参数: " + Arrays.toString(args));System.out.println("业务逻辑 : " + target);}
}package org.example.log;import org.springframework.aop.AfterReturningAdvice;import java.lang.reflect.Method;
import java.util.Arrays;public class AfterLog implements AfterReturningAdvice {@Overridepublic void afterReturning(Object returnValue, Method method, Object[] args, Object target) throws Throwable {System.out.println("After 日志记录");System.out.println("执行方法: " + method.getName());System.out.println("参数: " + Arrays.toString(args));System.out.println("业务逻辑 : " + target);System.out.println("返回值: " + returnValue);}
}package org.example;import org.example.service.UserService;
import org.junit.Test;
import org.springframework.context.ApplicationContext;
import org.springframework.context.support.ClassPathXmlApplicationContext;public class Main {@Testpublic void mainTest(){ApplicationContext context = new ClassPathXmlApplicationContext("applicationContext.xml");UserService userService =context.getBean("userServiceImpl", UserService.class);userService.add();userService.delete();userService.update();userService.query();}
}
另一种形式
<?xml version="1.0" encoding="UTF-8"?>
<beans xmlns="http://www.springframework.org/schema/beans"xmlns:context="http://www.springframework.org/schema/context"xmlns:aop="http://www.springframework.org/schema/aop"xmlns:xsi="http://www.w3.org/2001/XMLSchema-instance"xsi:schemaLocation="http://www.springframework.org/schema/beans http://www.springframework.org/schema/beans/spring-beans.xsdhttp://www.springframework.org/schema/context http://www.springframework.org/schema/context/spring-context.xsdhttp://www.springframework.org/schema/aop http://www.springframework.org/schema/aop/spring-aop.xsd"><context:annotation-config>true</context:annotation-config><context:component-scan base-package="org.example"/><bean id="testAspect" class="org.example.log.TestAspect"/><aop:config><aop:pointcut id="pointcut" expression="execution(* org.example.service.UserServiceImpl.*(..))"/><aop:aspect ref="testAspect"><aop:before method="before" pointcut-ref="pointcut"/><aop:after method="after" pointcut-ref="pointcut"/></aop:aspect></aop:config></beans>
package org.example.log;public class TestAspect {public void before() {System.out.println("before");}public void after() {System.out.println("after");}
}
简化使用注解实现
<?xml version="1.0" encoding="UTF-8"?>
<beans xmlns="http://www.springframework.org/schema/beans"xmlns:context="http://www.springframework.org/schema/context"xmlns:aop="http://www.springframework.org/schema/aop"xmlns:xsi="http://www.w3.org/2001/XMLSchema-instance"xsi:schemaLocation="http://www.springframework.org/schema/beans http://www.springframework.org/schema/beans/spring-beans.xsdhttp://www.springframework.org/schema/context http://www.springframework.org/schema/context/spring-context.xsdhttp://www.springframework.org/schema/aop http://www.springframework.org/schema/aop/spring-aop.xsd"><context:annotation-config/><aop:aspectj-autoproxy/><context:component-scan base-package="org.example"/></beans>
package org.example.log;import org.aspectj.lang.annotation.After;
import org.aspectj.lang.annotation.Aspect;
import org.aspectj.lang.annotation.Before;
import org.springframework.stereotype.Component;@Component
@Aspect
public class TestAspect {@Before("execution(* org.example.service.UserServiceImpl.*(..))")public void before() {System.out.println("before");}@After("execution(* org.example.service.UserServiceImpl.*(..))")public void after() {System.out.println("after");}
}

