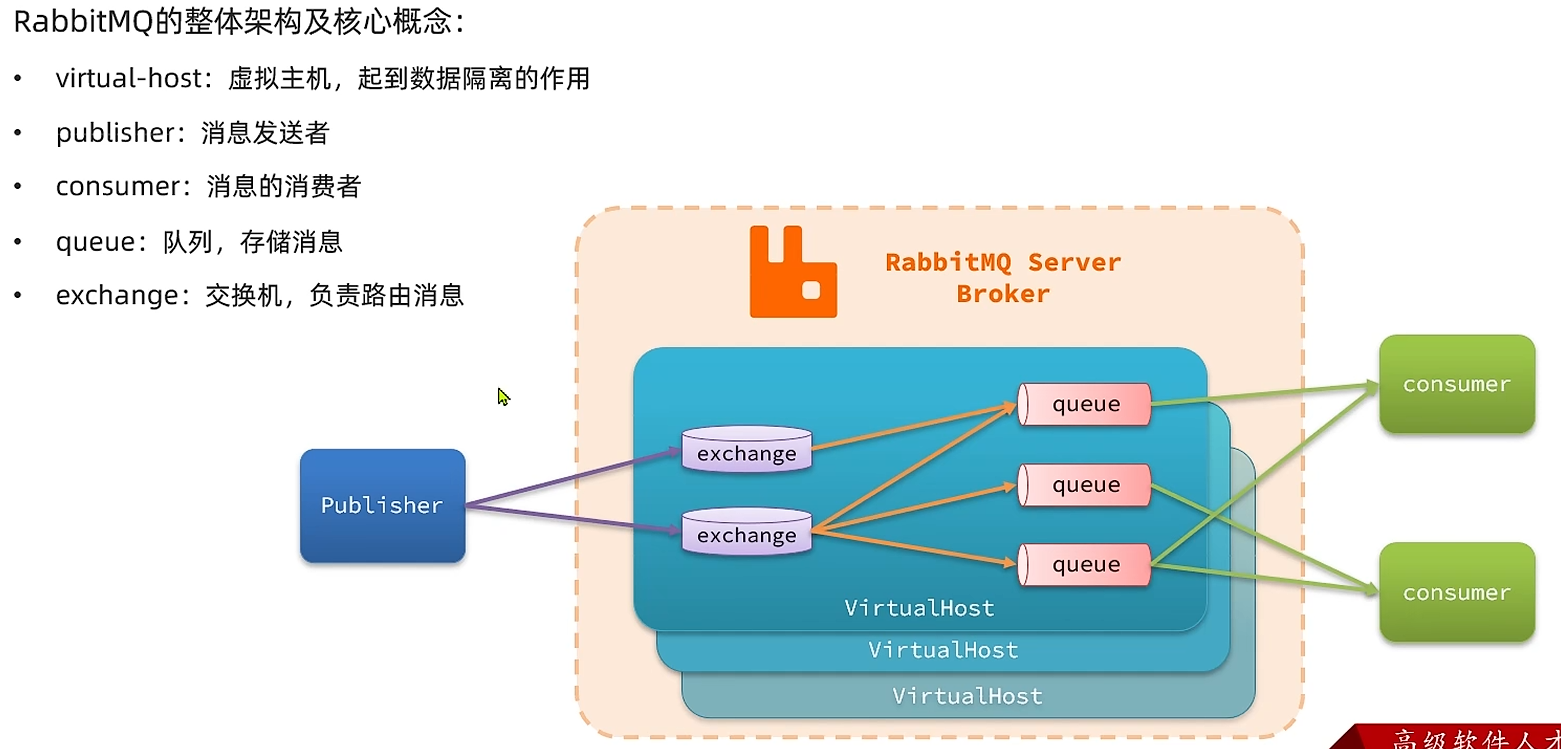
MQ基础认识
MQ结合JAVA客户端
依赖
<!--AMQP依赖,包含RabbitMQ-->
<dependency><groupId>org.springframework.boot</groupId><artifactId>spring-boot-starter-amqp</artifactId>
</dependency>
配置文件
spring:rabbitmq:host: 8.217.155.191port: 5672virtual-host: / #虚拟主机username: admin #用户名password: 123456 #密码
快速入门案例
发送消息
/**
* 发送消息到队列simple.queue
*/
@Test
public void sendMsg2Queue() {
String queueName = "simple.queue";String message = "hello";rabbitTemplate.convertAndSend(queueName,message);
}
消费者接收消息
/**
* 监听simple.queue队列的消费者
* @param msg
*/
@RabbitListener(queues = "simple.queue")
public void listenSimpleQueue(String msg) {System.out.println("simple.queue接收到的消息为:"+msg);
}
work模型
Work queues,任务模型。简单来说就是让多个消费者绑定到一个队列,共同消费队列中的消息
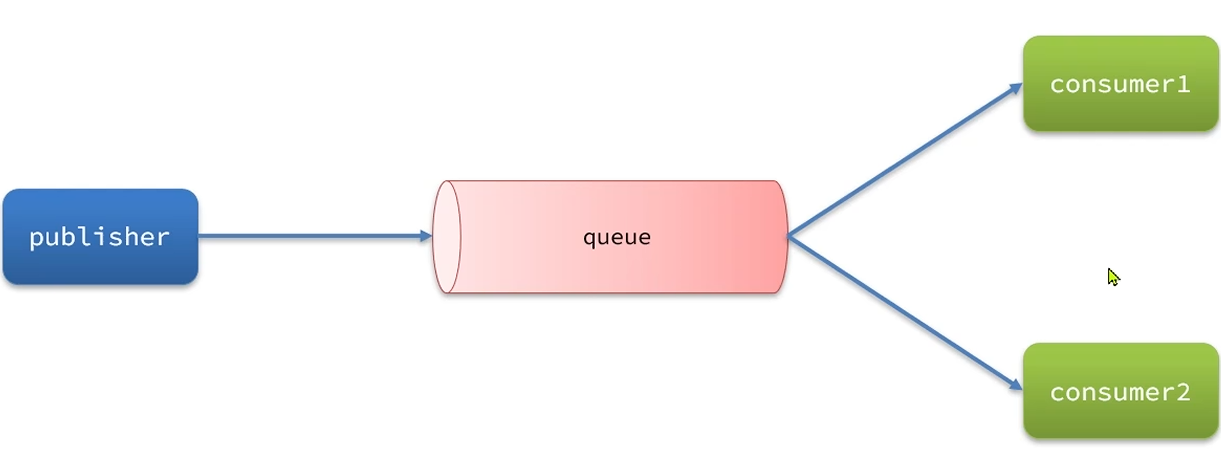
模拟WorkQueue,实现一个队列绑定多个消费者:
1.在RabbitMO的控制台创建一个队列,名为work.queue
2.在publisher服务中定义测试方法,在1秒内产生50条消息,发送到work.queue
3.在consumer服务中定义两个消息监听者,都监听work.queue队列
4.消费者1每秒处理50条消息,消费者2每秒处理5条消息
发送消息:
/**
* 发送消息到队列work.queue
*/
@Test
public void sendMsg2QueueWork() throws InterruptedException {String queueName = "work.queue";for (int i = 1; i <= 50; i++) {rabbitTemplate.convertAndSend(queueName,"msg-"+i);Thread.sleep(20);}
}
消费者1、1
/**
* 监听work.queue队列的消费者1
* @param msg
*/
@RabbitListener(queues = "work.queue")
public void listenWorkQueue_1(String msg) {System.out.println("work.queue的消费者1接收到的消息为:"+msg);
}/**
* 监听work.queue队列的消费者2
* @param msg
*/
@RabbitListener(queues = "work.queue")
public void listenWorkQueue_2(String msg) throws InterruptedException {System.err.println("work.queue的消费者2接收到的消息为:"+msg);Thread.sleep(200);
}
设置预分配参数,确保消息被消费后才发下一个消息,不分配参数时,每一个消费者都会被发送一个消息。
spring:rabbitmq:listener:simple:prefetch: 1 #预分配数量
fanout交换机
真正生产环境都会经过exchange来发送消息,而不是直接发送到队列,交换机的类型有以下三种:
Fanout:广播、Direct:定向、Topic:话题
Fanout Exchange 会将接收到的消息广播到每一个跟其绑定的queue,所以也叫广播模式
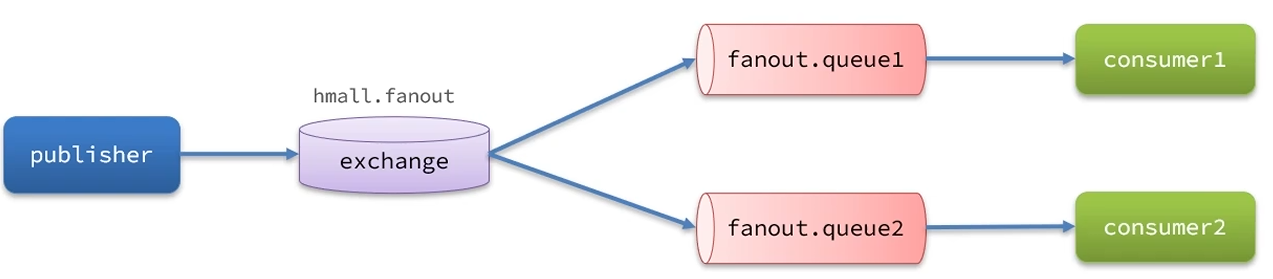
利用SpringAMQP演示FanoutExchange的使用:
1.在RabbitMQ控制台中,声明队列fanout.queue1和fanout.queue2
2.在RabbitMQ控制台中,声明交换机hmall.fanout,将两个队列与其绑定
3.在consumer服务中,编写两个消费者方法,分别监听fanout.queue1和fanout.queue2
4.在publisher中编写测试方法,向hmall.fanout发送消息
发送消息:
/**
* 发送消息到交换机hmall.fanout
*/
@Test
public void sendMsg2fanout() {String exchangeName = "hmall.fanout";String message = "hello";rabbitTemplate.convertAndSend(exchangeName,null,message);
}
消费者:
/**
* 监听fanout.queue1队列的消费者
* @param msg
*/
@RabbitListener(queues = "fanout.queue1")
public void listenFanoutQueue1(String msg) {System.out.println("fanout.queue1的消费者接收到的消息为:"+msg);
}/**
* 监听fanout.queue2队列的消费者
* @param msg
*/
@RabbitListener(queues = "fanout.queue2")
public void listenFanoutQueue2(String msg) {System.err.println("fanout.queue2的消费者接收到的消息为:"+msg);
}
交换机的作用是什么:接收publisher发送的消息,将消息按照规则路由到与之绑定的队列,FanoutExchange的会将消息路由到每个绑定的队列
direct交换机
Direct Exchange 会将接收到的消息根据规则路由到指定的Queue,因此称为定向路由
1.每一个Queue都与Exchange设置一个BindingKey
2.发布者发送消息时,指定消息的RoutingKey
3.Exchange将消息路由到BindingKey与消息RoutingKey一致的队列
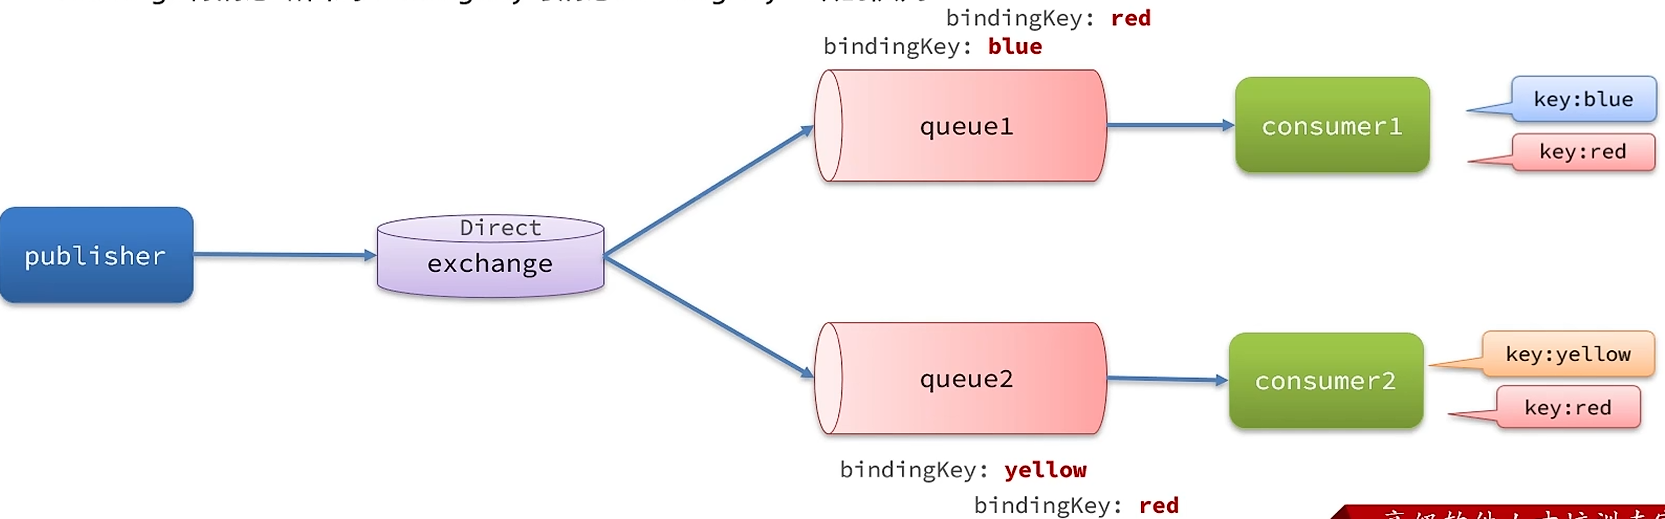
利用SpringAMQP演示DirectExchange的使用:
1.在RabbitMQ控制台中,声明队列direct.queue1和direct.queue2
2.在RabbitMQ控制台中,声明交换机hmall.direct,将两个队列与其绑定
3.在consumer服务中,编写两个消费者方法,分别监听direct.queue1和direct.queue2
4.在publisher中编写测试方法,利用不同的RoutingKey向hmal.direct发送消息
发送消息:
/**
* 发送消息到交换机hmall.direct
*/
@Test
public void sendMsg2direct() {String exchangeName = "hmall.direct";rabbitTemplate.convertAndSend(exchangeName,"red","red_msg");rabbitTemplate.convertAndSend(exchangeName,"blue","blue_msg");rabbitTemplate.convertAndSend(exchangeName,"yellow","yellow_msg");
}
消费者
/**
* 监听direct.queue1队列的消费者
* @param msg
*/
@RabbitListener(queues = "direct.queue1")
public void listenDirectQueue1(String msg) {System.out.println("direct.queue1的消费者(red,blue)接收到的消息为:"+msg);
}/**
* 监听direct.queue2队列的消费者
* @param msg
*/
@RabbitListener(queues = "direct.queue2")
public void listenDirectQueue2(String msg) {System.out.println("direct.queue2的消费者(red,yellow)接收到的消息为:"+msg);
}
topic交换机
TopicExchange与DirectExchange类似,区别在于routingKey可以是多个单词的列表,并且以.分割
Queue与Exchange指定BindingKey时可以使用通配符
:代指0个或多个单词,*:代指一个单词
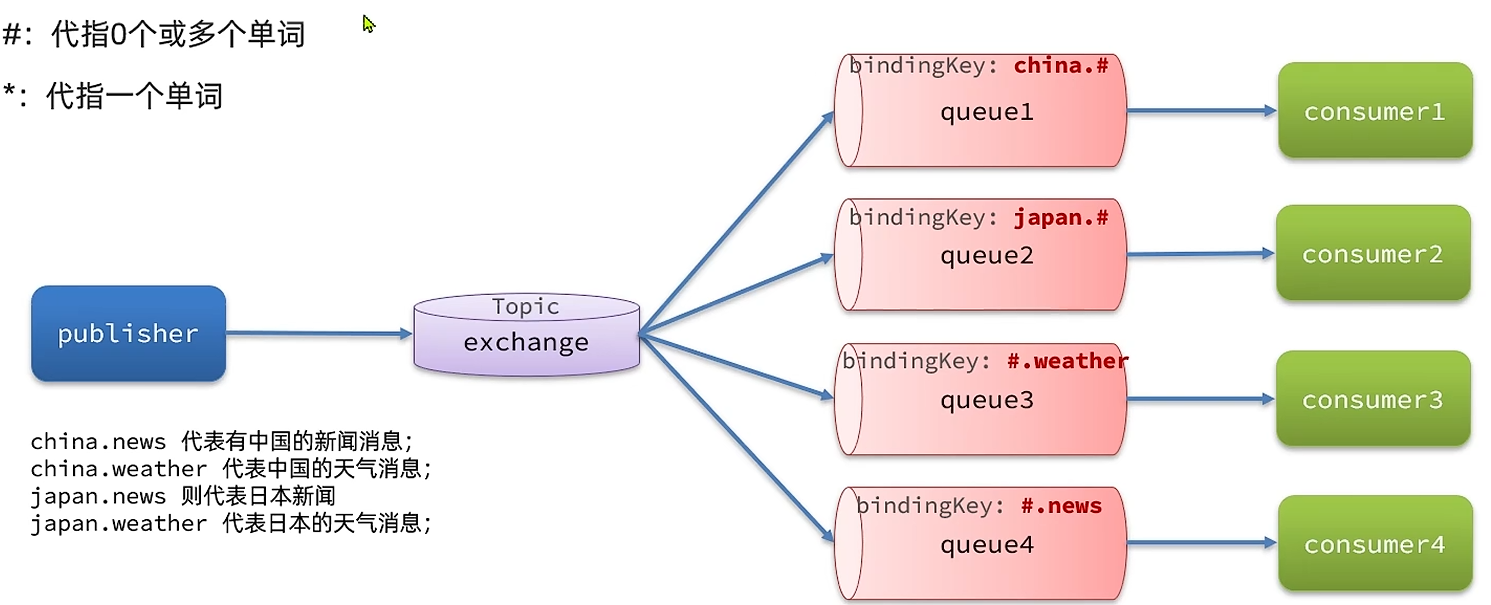
利用SpringAMQP演示DirectExchange的使用:
1.在RabbitMO控制台中,声明队列topic.queue1和topic.queue2
2.在RabbitMQ控制台中,声明交换机hmall.topic,将两个队列与其绑定
3.在consumer服务中,编写两个消费者方法,分别监听topic.queue1和topic.queue2
4.在publisher中编写测试方法,利用不同的RoutingKey向hmall.topic发送消息
发送消息
/**
* 发送消息到交换机hmall.topic
*/
@Test
public void sendMsg2topic() {String exchangeName = "hmall.topic";rabbitTemplate.convertAndSend(exchangeName,"china.news","china news");rabbitTemplate.convertAndSend(exchangeName,"china.food","china food");rabbitTemplate.convertAndSend(exchangeName,"japan.news","japan news");rabbitTemplate.convertAndSend(exchangeName,"news","news");rabbitTemplate.convertAndSend(exchangeName,"china","china");
}
消费者
/**
* 监听topic.queue1队列的消费者
* @param msg
*/
@RabbitListener(queues = "topic.queue1")
public void listenTopicQueue1(String msg) {System.out.println("topic.queue1的消费者(china.#)接收到的消息为:"+msg);
}/**
* 监听topic.queue2队列的消费者
* @param msg
*/
@RabbitListener(queues = "topic.queue2")
public void listenTopicQueue2(String msg) {System.out.println("topic.queue2的消费者(#.news)接收到的消息为:"+msg);
}
声明队列和交换机
方式一:写bean
FanoutConfiguration.java
/*** 写bean配置交换机和队列*/
@Configuration
public class FanoutConfiguration {//交换机@Beanpublic TopicExchange topicExchange() {return new TopicExchange("hmall.topic1");}//队列1@Beanpublic Queue topicQueue3() {return new Queue("topic.queue3");}//队列2@Beanpublic Queue topicQueue4() {return new Queue("topic.queue4");}//binding@Beanpublic Binding topicQueue3Binding(Queue topicQueue3,TopicExchange topicExchange) {return BindingBuilder.bind(topicQueue3).to(topicExchange).with("china.#");}//binding@Beanpublic Binding topicQueue4Binding(Queue topicQueue4,TopicExchange topicExchange) {return BindingBuilder.bind(topicQueue4).to(topicExchange).with("#.news");}
}
方式二:在消费者上写注解
/**
* 监听topic.queue3队列的消费者
* @param msg
*/
@RabbitListener(bindings = @QueueBinding(value = @Queue("topic.queue3"),exchange = @Exchange(value = "hmall.topic1",type = ExchangeTypes.TOPIC),key = {"china.#"}
))
public void listenTopicQueue3(String msg) {System.out.println("topic.queue3的消费者(china.#)接收到的消息为:"+msg);
}/**
* 监听topic.queue4队列的消费者
* @param msg
*/
@RabbitListener(bindings = @QueueBinding(value = @Queue("topic.queue4"),exchange = @Exchange(value = "hmall.topic1",type = ExchangeTypes.TOPIC),key = {"#.news"}
))
public void listenTopicQueue4(String msg) {System.out.println("topic.queue4的消费者(#.news)接收到的消息为:"+msg);
}
消息转换器
测试利用SpringAMQP发送对象类型的消息:
1.声明一个队列,名为object.queue
2.编写单元测试,向队列中直接发送一条消息,消息类型为Map
3.在控制台查看消息,总结你能发现的问题
发现mq收到的消息为乱码,应该改变原来的序列化器为json类型
坐标
<!--Jackson-->
<dependency><groupId>com.fasterxml.jackson.dataformat</groupId><artifactId>jackson-dataformat-xml</artifactId>
</dependency>
在消费者和生产者端都配置:
@Bean
public MessageConverter jacksonMessageConvertor(){return new Jackson2JsonMessageConverter();
}