🧑💻 写在开头
点赞 + 收藏 === 学会🤣🤣🤣
前段时间突然接到一个需求,项目中要实现特定水印功能,不同的用户查看时展示用户特有的水印,这样可以在资源外流的时候追究到责任人。
查找搜集了很多方法,有通过CSS伪元素添加水印的、还可以使用CSS重复背景图片、还有使用svg的,最后综合考虑了下,还是打算通过canvas来绘制水印。使用Canvas绘制水印是一种高度可定制的方式,它的拓展性非常好。
一,实现的思路
通过Canvas绘制水印的思路并不复杂,通过以下几步就可以简单实现- 提供一个父级容器,限定水印的展示范围
- 创建一个水印元素,用于盛装水印
- 通过Canvas元素创建一个画布,并绘制水印文本,生成水印图片,
- 将水印图片作为水印元素的背景,并将水印元素添加到父级容器中
二,具体实现
(一) 创建父级容器
一般情况下都是以body作为父级容器,有时也会出现特殊情况,比如局部水印,这时候需要自己创建一个父级容器。<!--创建一个div作为父级容器--> <div id="water-mark"></div>
(二) 创建水印元素
创建水印元素,并给其设置对应的样式
function cerateWatermark(){//获取父元素,用于包裹水印let parentEl = document.getElementById("water-mark");//设置父元素的定位为相对定位parentEl.style.position = "relative";//创建水印元素const waterMarkEl = document.createElement("div");//水印元素不会成为鼠标事件的targetwaterMarkEl.style.pointerEvents = "none";//设置与父级容器的定位waterMarkEl.style.top = "0";waterMarkEl.style.left = "0";//设置水印元素定位 为绝对定位waterMarkEl.style.position = "absolute";waterMarkEl.style.zIndex = "99999";//获取父元素的宽高,水印元素与其保持一致const {clientWidth,clientHeight} = parentEl;waterMarkEl.style.width = `${clientWidth}px`;waterMarkEl.style.height = `${clientHeight}px`;
}
(三) 创建画布
// 设置水印文本的基本配置
const defaultConfig = {/** 文本颜色 */color: "#c0c4cc",/** 文本透明度 */opacity: 0.5,/** 文本字体大小 */size: 16,/** 文本字体 */family: "serif",/** 文本倾斜角度 */angle: -20,/** 一处水印所占宽度(数值越大水印密度越低) */width: 300,/** 一处水印所占高度(数值越大水印密度越低) */height: 200,/** 水印文本,暂时放到这里,一般会提取出来将其作为一个全局变量*/backupText:"水印文本"
}function createBase64(){// 解构配置const {color,opacity,size,family,angle,width,height,backupText} = defaultConfig;// 创建一个画布const canvasEl = document.createElement("canvas");//设置宽高canvasEl.width = width;canvasEl.height = height;//创建 context 对象,getContext("2d") 对象是内建的 HTML5 对象,//拥有多种绘制路径、矩形、圆形、字符以及添加图像的方法const ctx = canvasEl.getContext("2d");if(ctx){// 设置颜色ctx.fillStyle = color;// 设置透明度ctx.globalAlpha = opacity;//设置字体ctx.font = `${size}px ${family}`;//设置倾斜度ctx.rotate((Math.PI/180)\*angle);//设置水印文本ctx.fillText(backupText,0,height/2);}return canvasEl.toDataURL()
}
(四) 将水印元素添加进容器
function cerateWatermark(){...//设置水印元素的背景waterMarkEl.style.background = `url(${createBase64()}) left top repeat`;// 将水印元素 添加进容器parentEl.appendChild(waterMarkEl)
}
三,基本实现效果

四,水印防御机制
上面只是实现了最基本的水印功能,还有很多问题需要解决。类似水印被删除或隐藏的情况。
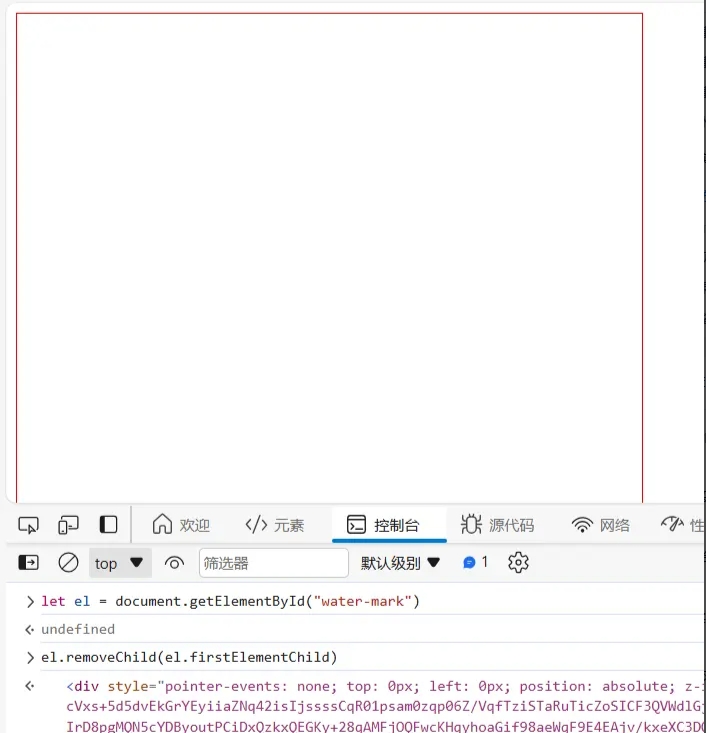
在上面的例子中,我们创建了一个div作为水印元素,并将生成的水印图片作为其背景图片,如果直接在控制台将div元素删除或隐藏,对应的水印也会消失。
(一) MutationObserver
为了避免出现这种情况,可以使用MutationObserver 监听器 来监听父级容器和水印元素的变化。MutationObserver 提供了监视对 DOM 树所做更改的能力,任何对DOM树做更改的操作都会被其监听到,因此当监听到水印元素或父级容器被删除或修改时可以在其回调函数中重新绘制。
(二) 实现过程
根据上面的思路,可以分为以下几步来完成- 创建监听器
- 给监听器赋值并传入回调函数
- 启动监听
//将父级容器 和水印元素 提升为全局变量
let parentEl = undefined;
let waterMarkEl = undefined;//设置监听器
const observer = {watermarkElMutationObserver: undefined,parentElMutationObserver: undefined,
}//创建水印
function createWatermark(){//获取父元素,用于包裹水印// let parentEl = document.getElementById("water-mark");parentEl = document.getElementById("water-mark");...//创建水印元素// const waterMarkEl = document.createElement("div");waterMarkEl = document.createElement("div");...// 监听水印元素和容器元素addMutationListener(parentEl);
}// 添加监听器
function addMutationListener(targetNode){console.log('--监听器--',targetNode);const mutationCallback = (mutationList)=>{//水印的防御 (防止用户手动删除水印或通过css隐藏水印)console.log('--回调函数--',mutationList)mutationList.forEach(mutation => {switch (mutation.type) {case "childList":mutation.removedNodes.forEach((item)=>{item === waterMarkEl && targetNode.appendChild(waterMarkEl);});break;}});}//创建观察器实例并传入回调observer.watermarkElMutationObserver = new MutationObserver(mutationCallback);observer.parentElMutationObserver = new MutationObserver(mutationCallback);//以上述配置 启动水印元素监听器,开始观察目标节点observer.watermarkElMutationObserver.observe(waterMarkEl,{// 观察目标节点属性是否变动,默认为 trueattributes:true,// 观察目标子节点是否有添加或者删除,默认为 falsechildList:true,// 是否拓展到观察所有后代节点,默认为 falsesubtree:true})// 启动父级容器 监听器,observer.parentElMutationObserver.observe(targetNode,{attributes:true,childList:true,subtree:true})
}
(三) 结果展示
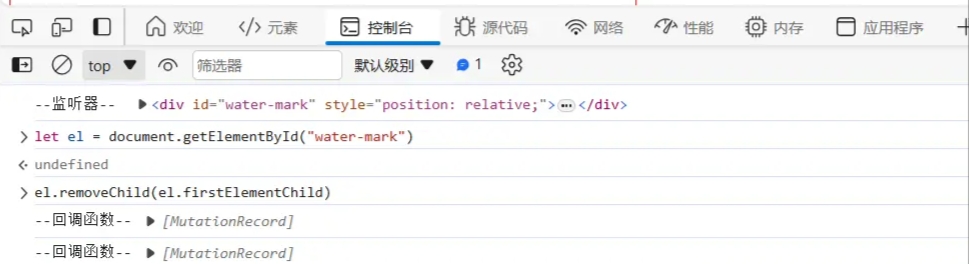
如上图所示,删除了子节点后水印仍然展示。
(四) 完整代码
<template><div id="water-mark"></div>
</template><script>
import { defineComponent, ref ,onMounted} from 'vue';export default defineComponent({setup() {//先做下水印的基本配置const defaultConfig = {color:"#c0c4cc",opacity: 0.5,size: 16,family: "serif",angle: -20,width: 120,height: 80,backupText:"水印文本"}// 父级容器  let parentEl = undefined;let waterMarkEl = undefined;//设置监听器const observer = {watermarkElMutationObserver: undefined,parentElMutationObserver: undefined,}//创建base64图片function createBase64(){const {color,opacity,size,family,angle,width,height,backupText} = defaultConfig;//创建一个画布const canvasEl = document.createElement("canvas");//设置宽高canvasEl.width = width;canvasEl.height = height;//创建 context 对象// getContext("2d") 对象是内建的 HTML5 对象,拥有多种绘制路径、矩形、圆形、字符以及添加图像的方法const ctx = canvasEl.getContext("2d");if(ctx){// 设置颜色ctx.fillStyle = color;ctx.globalAlpha = opacity;ctx.font = `${size}px ${family}`;ctx.rotate((Math.PI/180)*angle);ctx.fillText(backupText,0,height/2);}return canvasEl.toDataURL()}// 添加监听器function addMutationListener(targetNode){console.log('--监听器--',targetNode);const mutationCallback = (mutationList)=>{//水印的防御 (防止用户手动删除水印或通过css隐藏水印)console.log('--回调函数--',mutationList)mutationList.forEach(mutation => {switch (mutation.type) {case "childList":mutation.removedNodes.forEach((item)=>{item === waterMarkEl && targetNode.appendChild(waterMarkEl);});break;}});}//创建观察器实例并传入回调observer.watermarkElMutationObserver = new MutationObserver(mutationCallback);observer.parentElMutationObserver = new MutationObserver(mutationCallback);//已上述配置开始观察目标节点observer.watermarkElMutationObserver.observe(waterMarkEl,{// 观察目标节点属性是否变动,默认为 trueattributes:true,// 观察目标子节点是否有添加或者删除,默认为 falsechildList:true,// 是否拓展到观察所有后代节点,默认为 falsesubtree:true})observer.parentElMutationObserver.observe(targetNode,{attributes:true,childList:true,subtree:true})}//创建水印function createWatermark(){//获取父元素,用于包裹水印parentEl = document.getElementById("water-mark");//设置父元素的定位parentEl.style.position = "relative";//创建水印元素waterMarkEl = document.createElement("div");//水印元素不会成为鼠标事件的targetwaterMarkEl.style.pointerEvents = "none";waterMarkEl.style.top = "0";waterMarkEl.style.left = "0";waterMarkEl.style.position = "absolute";waterMarkEl.style.zIndex = "99999";//设置水印元素的宽高const {clientWidth,clientHeight} = parentEl;waterMarkEl.style.width = `${clientWidth}px`;waterMarkEl.style.height = `${clientHeight}px`;//设置水印元素的背景waterMarkEl.style.background = `url(${createBase64()}) left top repeat`// 将水印元素 添加进容器parentEl.appendChild(waterMarkEl);// 监听水印元素和容器元素addMutationListener(parentEl);}onMounted(()=>{createWatermark();})return {createWatermark,};},
});
</script><style>#water-mark{width:300px;height:300px;border:1px solid red;
}
</style>
五,深入扩展
除此之外,还有容器大小变化,频繁的操作DOM节点需要添加防抖节流机制,监听器可能重复添加等等问题,解决这些问题的完整代码放到GitHub上了,有兴趣可以去查看下。
完整代码地址:seapack-template/src/hooks/useWatermark.ts at master · seapack-hub/seapack-template · GitHub
最终效果如下图:
本文转载于:https://juejin.cn/post/7423698585969262627
如果对您有所帮助,欢迎您点个关注,我会定时更新技术文档,大家一起讨论学习,一起进步。