一、 网络基础知识
1.1网卡

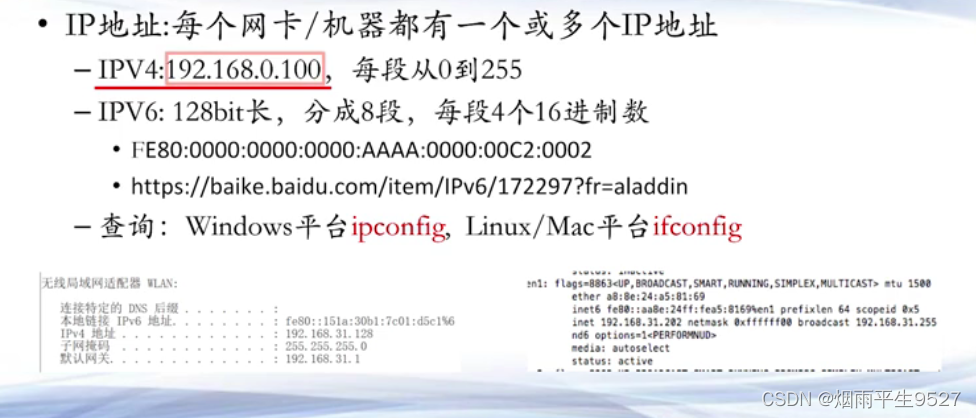
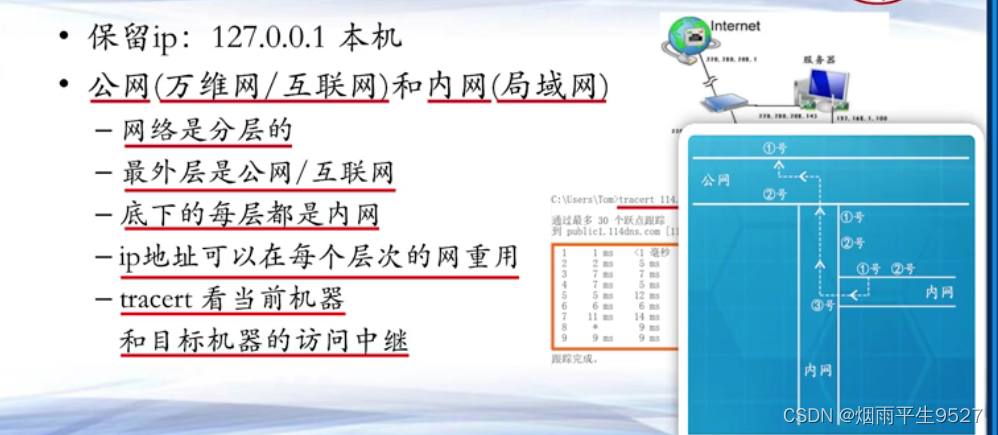
1.2IP地址
1.3端口

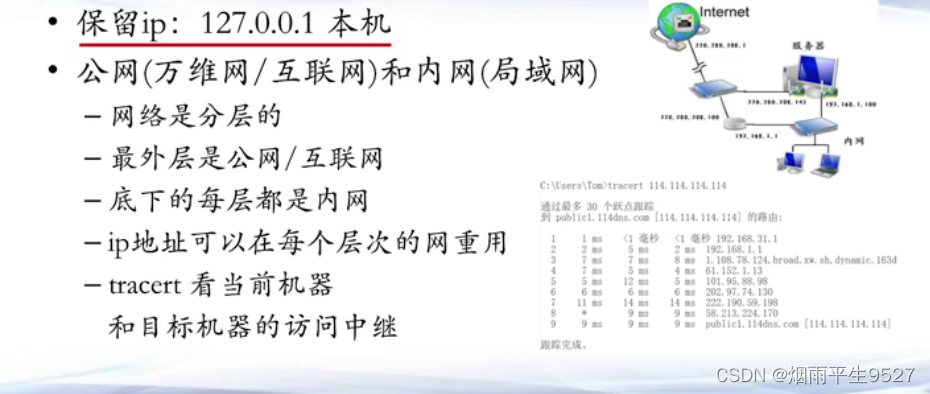
1.4保留IP
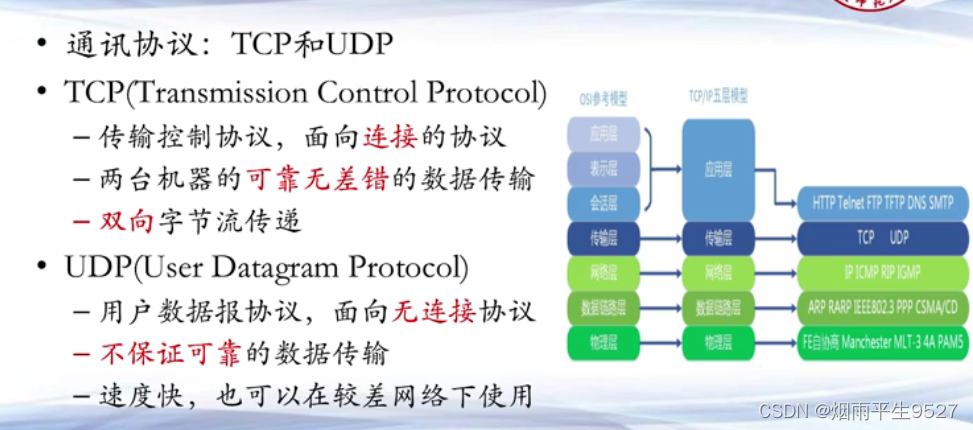
 1.5网络协议
 二、UDP 编程
2.1相关概念
计算机通讯:数据从一个IP的port出发(发送方),运输到另外一个IP的port(接收方)
UDP:无连接无状态的通讯协议,
-发送方发送消息,如果接收方刚好在目的地,则可以接受。如果不在,那这个消息就丢失了
-发送方也无法得知是否发送成功
-UDP的好处就是简单,节省,经济
2.2相关类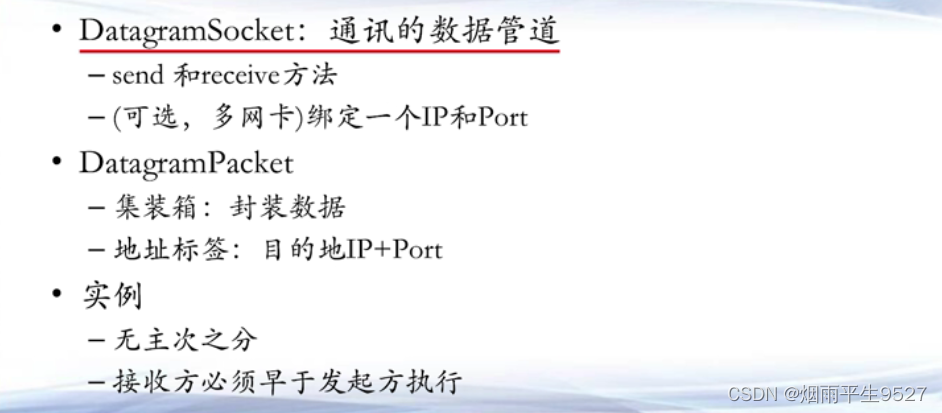
2.3实现代码
package org.example;import java.net.DatagramPacket;
import java.net.DatagramSocket;
import java.net.InetAddress;public class UdpRecv {public static void main(String[] args) throws Exception {// 创建 DatagramSocket 并绑定到端口 3000DatagramSocket ds = new DatagramSocket(3000);// 创建一个字节数组缓冲区来接收数据byte[] buf = new byte[1024];// 创建 DatagramPacket 用于接收数据DatagramPacket dp = new DatagramPacket(buf, 1024);System.out.println("UdpRecv:我在等待信息");// 接收来自发送者的数据,此处可能会抛出 IOExceptionds.receive(dp);System.out.println("UdpRecv:我接收到信息");// 解析接收到的数据并构建消息字符串String strRecv = new String(dp.getData(), 0, dp.getLength()) +" from " + dp.getAddress().getHostAddress() + ":" + dp.getPort();System.out.println(strRecv);// 休眠 1 秒Thread.sleep(1000);System.out.println("UdpRecv:我要发送信息");// 要发送的字符串消息String str = "hello world 222";// 创建 DatagramPacket 用于发送数据DatagramPacket dp2 = new DatagramPacket(str.getBytes(), str.length(),InetAddress.getByName("127.0.0.1"), dp.getPort());// 发送消息数据,此处可能会抛出 IOExceptionds.send(dp2);System.out.println("UdpRecv:我发送信息结束");// 关闭 DatagramSocketds.close();}
}
package org.example;import java.net.DatagramPacket;
import java.net.DatagramSocket;
import java.net.InetAddress;public class UdpSend {public static void main(String[] args) throws Exception {// 创建 DatagramSocket,不需要绑定到指定端口,系统会自动分配一个可用端口DatagramSocket ds = new DatagramSocket();// 要发送的字符串消息String str = "hello world";// 创建 DatagramPacket 用于发送数据DatagramPacket dp = new DatagramPacket(str.getBytes(), str.length(),InetAddress.getByName("127.0.0.1"), 3000);System.out.println("UdpSend: 我要发送信息");// 发送消息数据,此处可能会抛出 IOExceptionds.send(dp);System.out.println("UdpSend: 我发送信息结束");// 休眠 1 秒Thread.sleep(1000);// 创建一个字节数组缓冲区来接收数据byte[] buf = new byte[1024];// 创建 DatagramPacket 用于接收数据DatagramPacket dp2 = new DatagramPacket(buf, 1024);System.out.println("UdpSend: 我在等待信息");// 接收来自接收方的数据,此处可能会抛出 IOExceptionds.receive(dp2);System.out.println("UdpSend: 我接收到信息");// 解析接收到的数据并构建消息字符串String str2 = new String(dp2.getData(), 0, dp2.getLength()) +" from " + dp2.getAddress().getHostAddress() + ":" + dp2.getPort();System.out.println(str2);// 关闭 DatagramSocketds.close();}
}
UdpSend 类:
创建了一个 DatagramSocket 对象 ds,它用于发送UDP数据包。由于未指定端口,系统会自动分配一个可用的端口。
构建了要发送的字符串消息 str。
创建了一个 DatagramPacket 对象 dp,用于封装要发送的数据。
通过 ds.send(dp) 发送数据包到指定的目标主机 IP 地址和端口。
程序暂停 1 秒(Thread.sleep(1000)),然后准备接收来自接收者的数据。
创建一个字节数组缓冲区 buf 和一个用于接收数据的 DatagramPacket 对象 dp2。
使用 ds.receive(dp2) 接收来自接收者的数据。
解析接收到的数据,构建消息字符串 str2,包括发送者的 IP 地址和端口。
关闭 ds。
UdpRecv 类:
创建了一个 DatagramSocket 对象 ds,它用于接收UDP数据包,绑定到端口 3000。
创建了一个字节数组缓冲区 buf 和一个用于接收数据的 DatagramPacket 对象 dp。
使用 ds.receive(dp) 接收来自发送者的数据。
解析接收到的数据,构建消息字符串 strRecv,包括发送者的 IP 地址和端口。
程序暂停 1 秒(Thread.sleep(1000)),然后准备发送数据。
构建要发送的字符串消息 str。
创建一个用于发送数据的 DatagramPacket 对象 dp2,并发送数据包到之前发送者的 IP 地址和端口。
关闭 ds。
三、TCP 编程
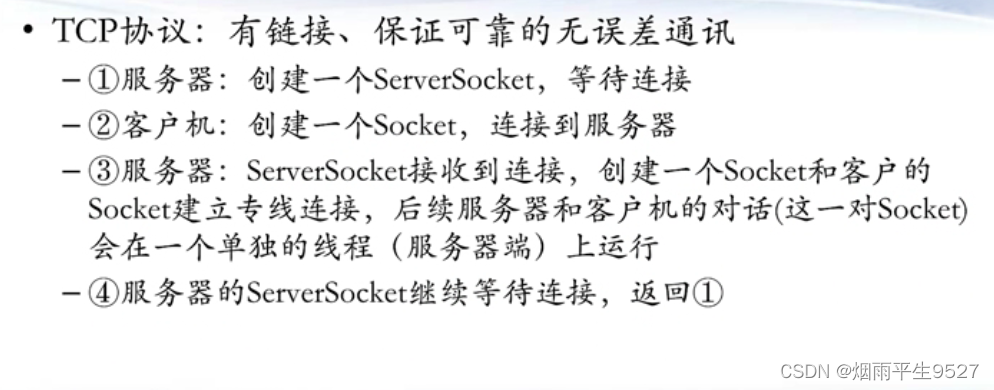
3.1相关概念
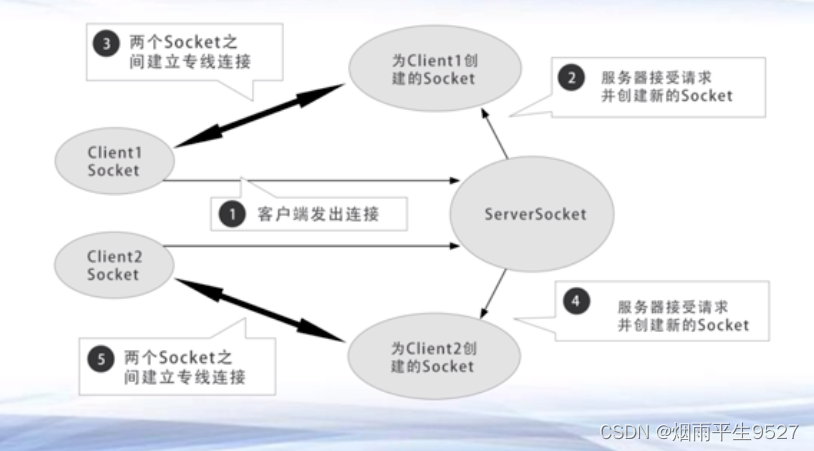
3.2相关类
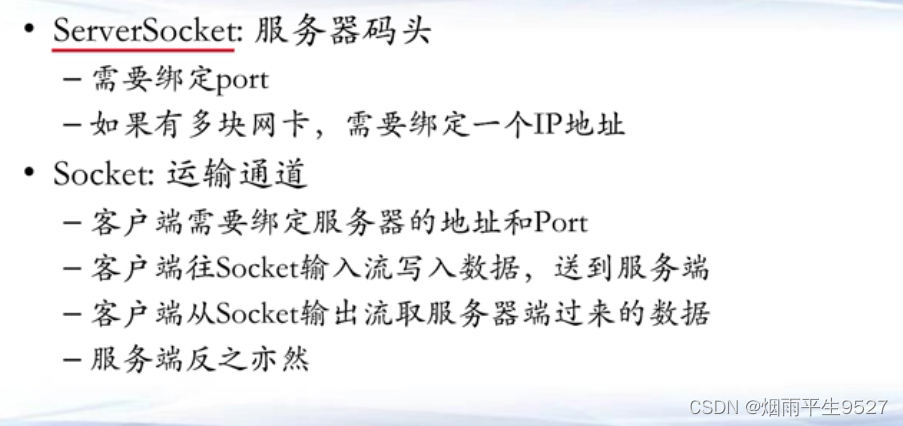
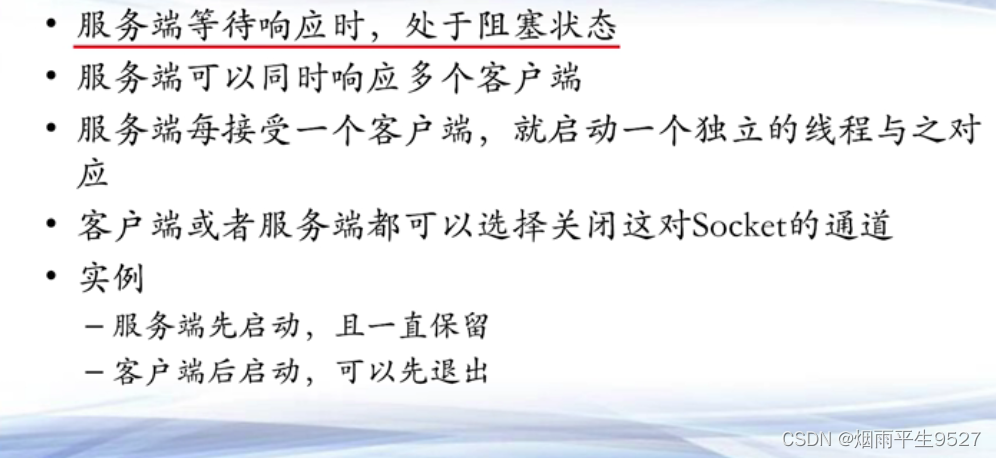 3.3实现代码
import java.io.BufferedReader;
import java.io.InputStream;
import java.io.InputStreamReader;
import java.io.OutputStream;
import java.net.ServerSocket;
import java.net.Socket;public class TcpServer {public static void main(String[] args) {try {// 创建服务器套接字,驻守在8001端口ServerSocket ss = new ServerSocket(8001);System.out.println("Server: Waiting for client to connect...");// 阻塞,等待客户端连接Socket s = ss.accept();// 打开输入流(从客户端接收数据)InputStream ips = s.getInputStream();// 打开输出流(向客户端发送数据)OutputStream ops = s.getOutputStream();System.out.println("Server: Welcome to the Java world");// 向客户端发送一句话ops.write("Hello, Client!".getBytes());// 从客户端读取一句话BufferedReader br = new BufferedReader(new InputStreamReader(ips));String clientMessage = br.readLine();System.out.println("Client said: " + clientMessage);// 关闭输入流、输出流和套接字ips.close();ops.close();s.close();ss.close();} catch (Exception e) {e.printStackTrace();}}
}
这是一个简单的TCP服务器,它通过创建 ServerSocket 对象在8001端口驻守,等待客户端的连接。一旦有客户端连接,它会打开输入流来接收客户端的数据,同时打开输出流来发送数据给客户端。这种方式实现了简单的单向通信
package org.example;
import java.io.BufferedReader;
import java.io.DataOutputStream;
import java.io.InputStream;
import java.io.InputStreamReader;
import java.io.OutputStream;
import java.net.InetAddress;
import java.net.Socket;public class TcpClient {public static void main(String[] args) {try {// 创建套接字,连接到服务器的 IP 地址和端口Socket s = new Socket(InetAddress.getByName("127.0.0.1"), 8001); // 需要服务器先开启// 开启通道的输入流,从服务器接收数据InputStream ips = s.getInputStream();BufferedReader brNet = new BufferedReader(new InputStreamReader(ips));// 开启通道的输出流,向服务器发送数据OutputStream ops = s.getOutputStream();DataOutputStream dos = new DataOutputStream(ops);// 创建键盘输入的 BufferedReaderBufferedReader brKey = new BufferedReader(new InputStreamReader(System.in));System.out.println("Type your message (type 'quit' to exit):");while (true) {String strWord = brKey.readLine();if (strWord.equalsIgnoreCase("quit")) {break;} else {System.out.println("I want to send: " + strWord);// 向服务器发送数据,并在末尾加入换行符dos.writeBytes(strWord + System.getProperty("line.separator"));// 从服务器接收数据并打印System.out.println("Server said: " + brNet.readLine());}}// 关闭输出流、输入流、套接字等资源dos.close();brNet.close();brKey.close();s.close();} catch (Exception e) {e.printStackTrace();}}
}
这是一个简单的TCP客户端,它连接到服务器的IP地址和端口,通过输入流接收服务器的响应,并通过输出流发送用户输入的数据。用户可以输入消息,程序会将消息发送到服务器并等待服务器的回复。输入"quit"后,程序退出。
四、HTTP 编程
4.1相关概念


4.2相关类
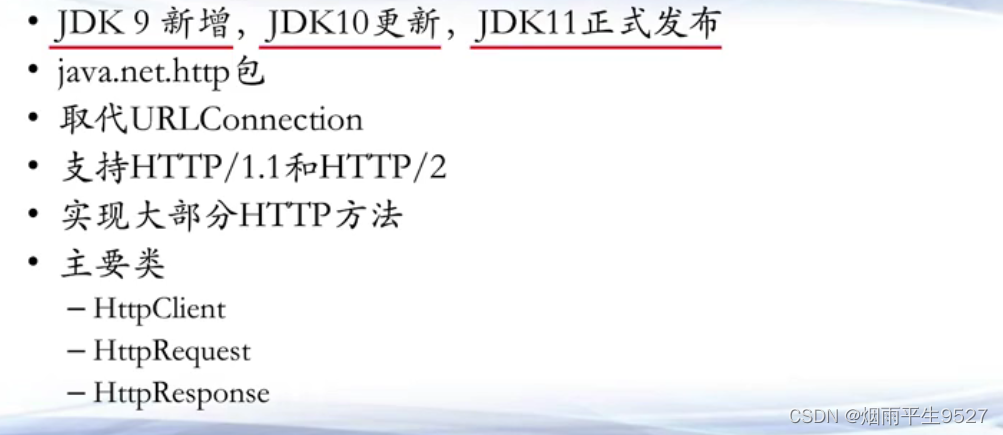
4.3相关代码
import java.io.IOException;
import java.net.URI;
import java.net.http.HttpClient;
import java.net.http.HttpRequest;
import java.net.http.HttpResponse;public class JDKHttpClientGetTest {public static void main(String[] args) throws IOException, InterruptedException {doGet();}public static void doGet() {try {// 创建 HttpClient 实例HttpClient client = HttpClient.newHttpClient();// 创建 HttpRequest 请求对象,指定请求的 URIHttpRequest request = HttpRequest.newBuilder(URI.create("http://www.baidu.com")).build();// 发送 GET 请求并获取响应HttpResponse<String> response = client.send(request, HttpResponse.BodyHandlers.ofString());// 输出响应内容System.out.println(response.body());} catch (Exception e) {e.printStackTrace();}}
}
import java.io.IOException;
import java.net.URI;
import java.net.URLEncoder;
import java.net.http.HttpClient;
import java.net.http.HttpRequest;
import java.net.http.HttpResponse;public class JDKHttpClientPostTest {public static void main(String[] args) throws IOException, InterruptedException {doPost();}public static void doPost() {try {// 创建 HttpClient 实例HttpClient client = HttpClient.newBuilder().build();// 构建 POST 请求的参数String requestBody = "tAddress=" + URLEncoder.encode("1 Market Street", "UTF-8") +"&tCity=" + URLEncoder.encode("San Francisco", "UTF-8") +"&sState=CA";// 创建 HttpRequest 请求对象,指定请求的 URI、请求方法和请求体HttpRequest request = HttpRequest.newBuilder().uri(URI.create("https://tools.usps.com/go/ZipLookupAction.action")).header("User-Agent", "HTTPie/0.9.2").header("Content-Type", "application/x-www-form-urlencoded;charset=utf-8").POST(HttpRequest.BodyPublishers.ofString(requestBody)).build();// 发送 POST 请求并获取响应HttpResponse<String> response = client.send(request, HttpResponse.BodyHandlers.ofString());// 输出响应内容System.out.println("Status Code: " + response.statusCode());System.out.println("Headers: " + response.headers());System.out.println("Body: " + response.body());} catch (Exception e) {e.printStackTrace();}}
}
4.4扩展
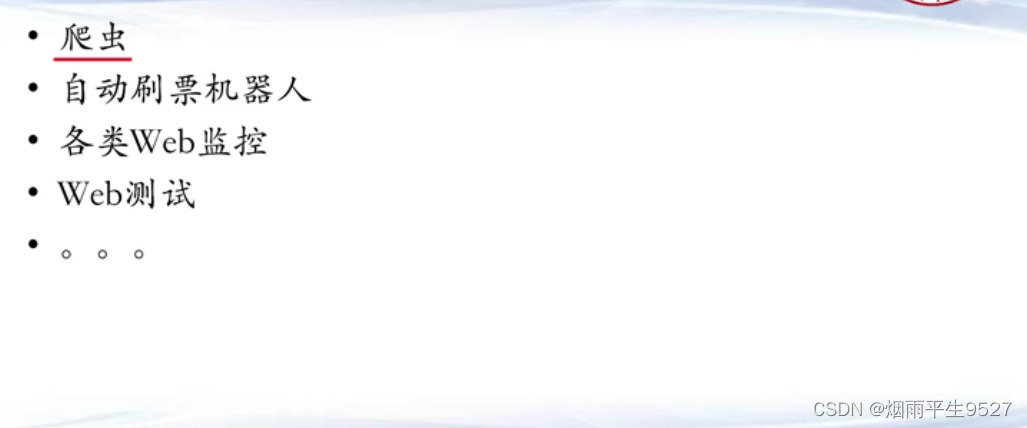 五、NIO 编程(同步非阻塞)
5.1相关概念
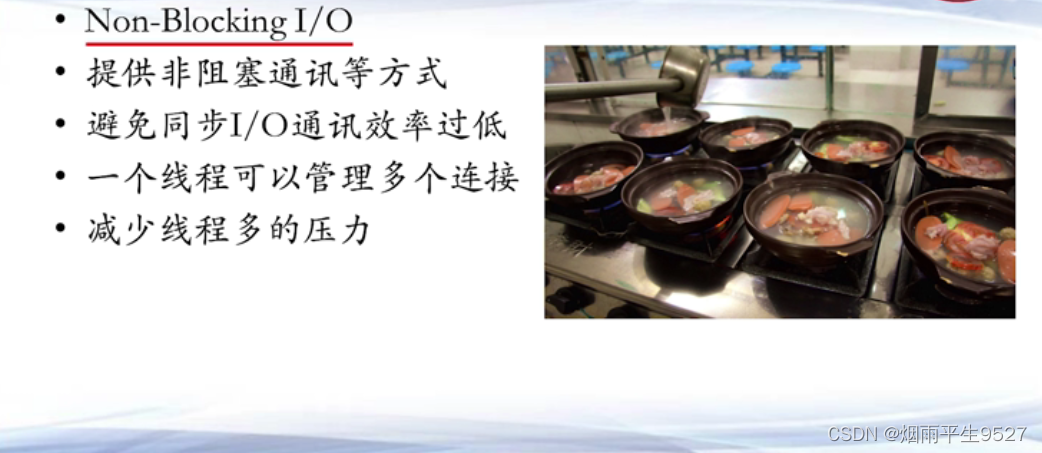
5.2相关类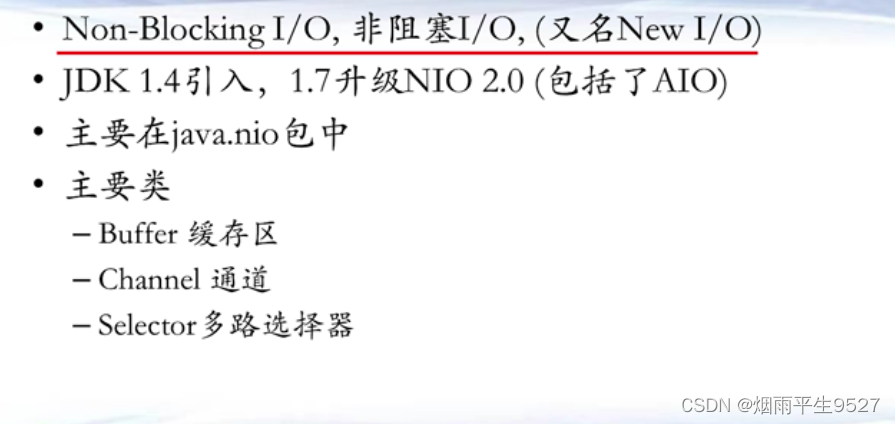
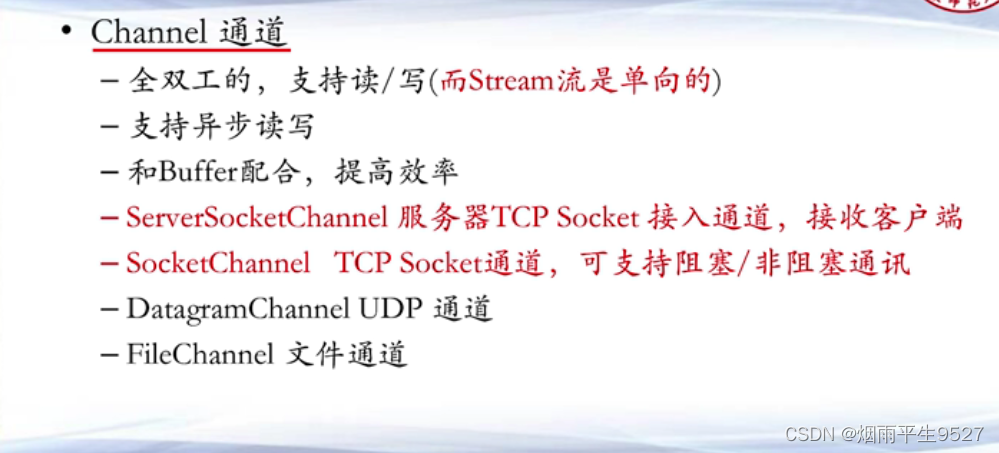
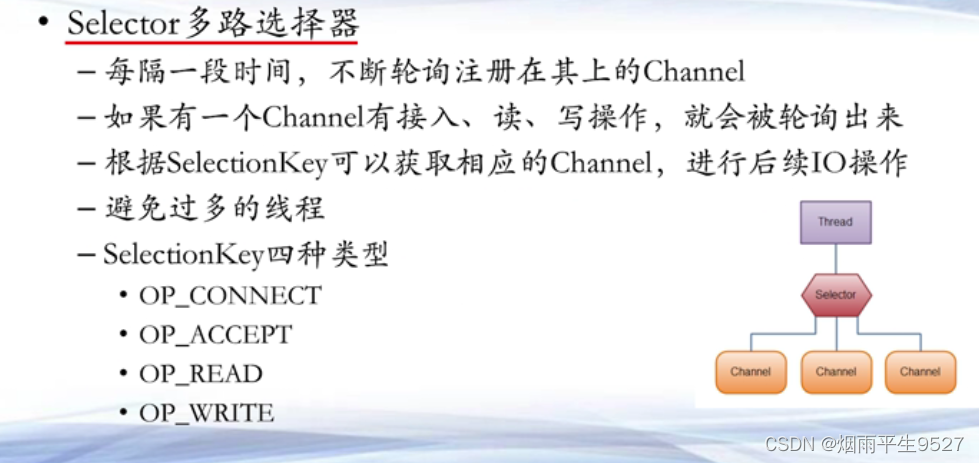 5.3原理图
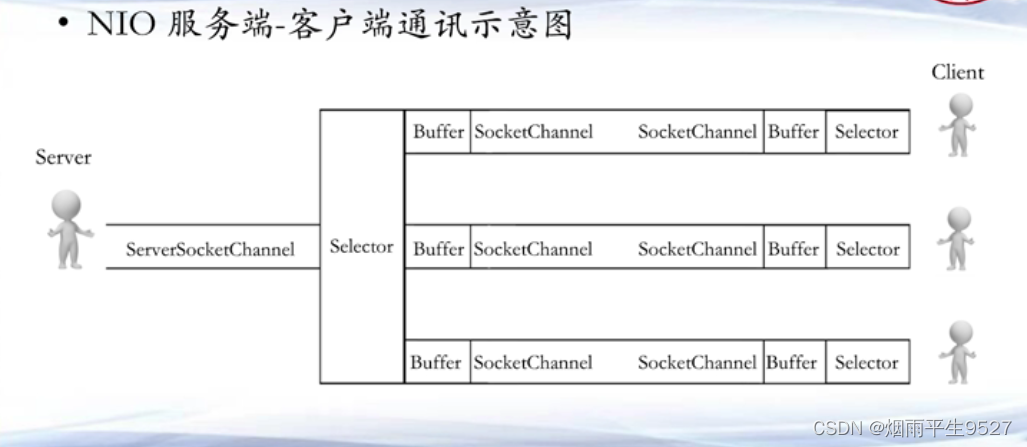
5.4相关代码
import java.io.IOException;
import java.net.InetSocketAddress;
import java.nio.ByteBuffer;
import java.nio.channels.*;
import java.util.Iterator;
import java.util.Set;public class NioServer {public static void main(String[] args) throws IOException {int port = 8001;Selector selector = null;ServerSocketChannel servChannel = null;try {// 打开选择器,用于监控通道上的事件selector = Selector.open();// 打开服务器通道servChannel = ServerSocketChannel.open();// 配置服务器通道为非阻塞模式servChannel.configureBlocking(false);// 绑定端口并设置最大连接数servChannel.socket().bind(new InetSocketAddress(port), 1024);// 将服务器通道注册到选择器上,监听连接事件servChannel.register(selector, SelectionKey.OP_ACCEPT);System.out.println("服务器在8001端口守候");} catch (IOException e) {e.printStackTrace();System.exit(1);}while (true) {try {// 阻塞等待就绪的事件,select()方法会返回就绪的通道数量selector.select(1000);Set<SelectionKey> selectedKeys = selector.selectedKeys();Iterator<SelectionKey> it = selectedKeys.iterator();SelectionKey key = null;while (it.hasNext()) {key = it.next();it.remove();try {handleInput(selector, key);} catch (Exception e) {if (key != null) {// 出现异常时取消选择键,并关闭通道key.cancel();if (key.channel() != null)key.channel().close();}}}} catch (Exception ex) {ex.printStackTrace();}}}// 处理通道上的事件public static void handleInput(Selector selector, SelectionKey key) throws IOException {if (key.isValid()) {// 处理新接入的请求消息if (key.isAcceptable()) {// Accept the new connectionServerSocketChannel ssc = (ServerSocketChannel) key.channel();SocketChannel sc = ssc.accept();sc.configureBlocking(false);// 将新连接的通道注册到选择器上,监听读事件sc.register(selector, SelectionKey.OP_READ);}if (key.isReadable()) {// 读取客户端发送的数据SocketChannel sc = (SocketChannel) key.channel();ByteBuffer readBuffer = ByteBuffer.allocate(1024);int readBytes = sc.read(readBuffer);if (readBytes > 0) {readBuffer.flip();byte[] bytes = new byte[readBuffer.remaining()];readBuffer.get(bytes);String request = new String(bytes, "UTF-8"); // 接收到的输入System.out.println("client said: " + request);String response = request + " 666";doWrite(sc, response);} else if (readBytes < 0) {// 通道读取到-1表示连接已关闭,取消选择键并关闭通道key.cancel();sc.close();}}}}// 向通道写入数据public static void doWrite(SocketChannel channel, String response) throws IOException {if (response != null && response.trim().length() > 0) {byte[] bytes = response.getBytes();ByteBuffer writeBuffer = ByteBuffer.allocate(bytes.length);writeBuffer.put(bytes);writeBuffer.flip();channel.write(writeBuffer);}}
}
import java.io.IOException;
import java.net.InetSocketAddress;
import java.nio.ByteBuffer;
import java.nio.channels.*;
import java.util.Iterator;
import java.util.Set;
import java.util.UUID;public class NioClient {public static void main(String[] args) {String host = "127.0.0.1";int port = 8001;Selector selector = null;SocketChannel socketChannel = null;try {// 创建选择器selector = Selector.open();// 打开SocketChannel并设置为非阻塞模式socketChannel = SocketChannel.open();socketChannel.configureBlocking(false);// 尝试连接服务器if (socketChannel.connect(new InetSocketAddress(host, port))) {// 如果连接成功,注册到多路复用器,发送请求消息,读应答socketChannel.register(selector, SelectionKey.OP_READ);doWrite(socketChannel);} else {// 连接尚未完成,注册为连接就绪状态socketChannel.register(selector, SelectionKey.OP_CONNECT);}} catch (IOException e) {e.printStackTrace();System.exit(1);}while (true) {try {// 选择就绪的通道selector.select(1000);Set<SelectionKey> selectedKeys = selector.selectedKeys();Iterator<SelectionKey> it = selectedKeys.iterator();SelectionKey key = null;while (it.hasNext()) {key = it.next();it.remove();try {// 处理每个通道的事件handleInput(selector, key);} catch (Exception e) {if (key != null) {key.cancel();if (key.channel() != null)key.channel().close();}}}} catch (Exception e) {e.printStackTrace();}}}public static void handleInput(Selector selector, SelectionKey key) throws IOException {if (key.isValid()) {// 连接就绪,进行连接操作if (key.isConnectable()) {SocketChannel sc = (SocketChannel) key.channel();if (sc.finishConnect()) {// 连接成功,注册为读事件sc.register(selector, SelectionKey.OP_READ);doWrite(sc);}}if (key.isReadable()) {SocketChannel sc = (SocketChannel) key.channel();ByteBuffer readBuffer = ByteBuffer.allocate(1024);int readBytes = sc.read(readBuffer);if (readBytes > 0) {readBuffer.flip();byte[] bytes = new byte[readBuffer.remaining()];readBuffer.get(bytes);String body = new String(bytes, "UTF-8");System.out.println("Server said: " + body);} else if (readBytes < 0) {// 对端链路关闭key.cancel();sc.close();}}}}public static void doWrite(SocketChannel sc) throws IOException {// 生成随机消息String str = UUID.randomUUID().toString();byte[] bytes = str.getBytes();ByteBuffer writeBuffer = ByteBuffer.allocate(bytes.length);writeBuffer.put(bytes);writeBuffer.flip();// 发送消息sc.write(writeBuffer);}
}
六、AIO 编程(异步非阻塞)
6.1相关概念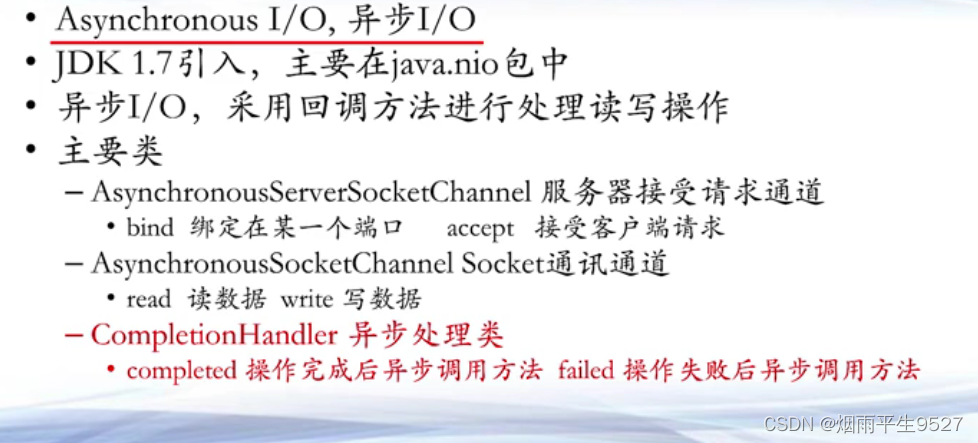
6.2相关代码
import java.io.IOException;
import java.net.InetSocketAddress;
import java.nio.ByteBuffer;
import java.nio.CharBuffer;
import java.nio.channels.AsynchronousServerSocketChannel;
import java.nio.channels.AsynchronousSocketChannel;
import java.nio.channels.CompletionHandler;
import java.nio.charset.Charset;
import java.nio.charset.CharsetDecoder;
import java.util.concurrent.TimeUnit;public class AioServer {public static void main(String[] args) throws IOException {// 创建异步服务器端通道并绑定到指定的端口AsynchronousServerSocketChannel server = AsynchronousServerSocketChannel.open();server.bind(new InetSocketAddress("localhost", 8001));System.out.println("服务器在8001端口守候");// 异步地等待客户端连接server.accept(null, new CompletionHandler<AsynchronousSocketChannel, Object>() {@Overridepublic void completed(AsynchronousSocketChannel channel, Object attachment) {// 继续等待下一个客户端连接server.accept(null, this);// 准备缓冲区以读取数据ByteBuffer buffer = ByteBuffer.allocate(1024);// 异步地读取客户端发来的数据channel.read(buffer, buffer, new CompletionHandler<Integer, ByteBuffer>() {@Overridepublic void completed(Integer bytesRead, ByteBuffer attachment) {attachment.flip(); // 将缓冲区反转,以准备从中读取数据CharBuffer charBuffer = CharBuffer.allocate(1024);CharsetDecoder decoder = Charset.defaultCharset().newDecoder();decoder.decode(attachment, charBuffer, false);charBuffer.flip();String data = new String(charBuffer.array(), 0, charBuffer.limit());System.out.println("客户端消息: " + data);// 将处理后的数据返回给客户端channel.write(ByteBuffer.wrap((data + " 666").getBytes()));try {channel.close();} catch (IOException e) {e.printStackTrace();}}@Overridepublic void failed(Throwable exc, ByteBuffer attachment) {System.out.println("读取错误: " + exc.getMessage());}});}@Overridepublic void failed(Throwable exc, Object attachment) {System.out.println("连接失败: " + exc.getMessage());}});// 保持服务器运行,不断循环等待连接和读取数据try {while (true) {TimeUnit.SECONDS.sleep(5); // 暂停5秒}} catch (InterruptedException e) {e.printStackTrace();}}
}
每一个Comp let ionHandler都可以定义两个方法:comp leted和failed方法。当操作成功完成,将自动回调completed方法;如果操作发生异常,那么将自动回调failed方法。
6.3 3种I/O的区别
 七、 Netty编程
7.1Netty库介绍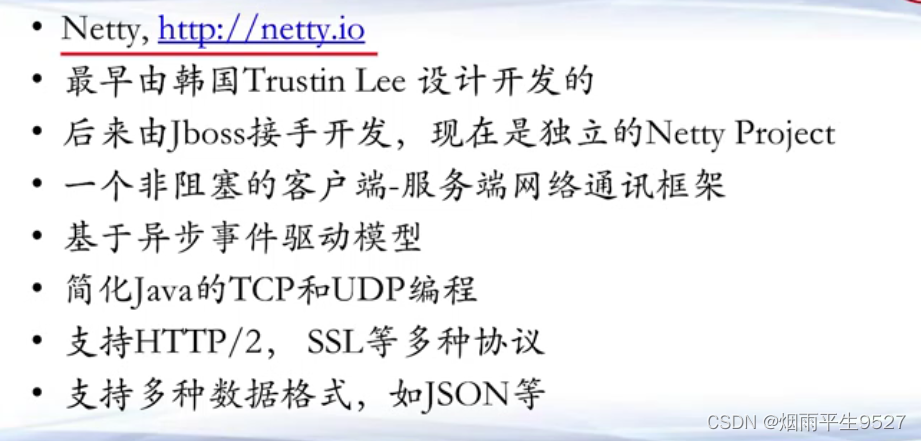
7.2关键概念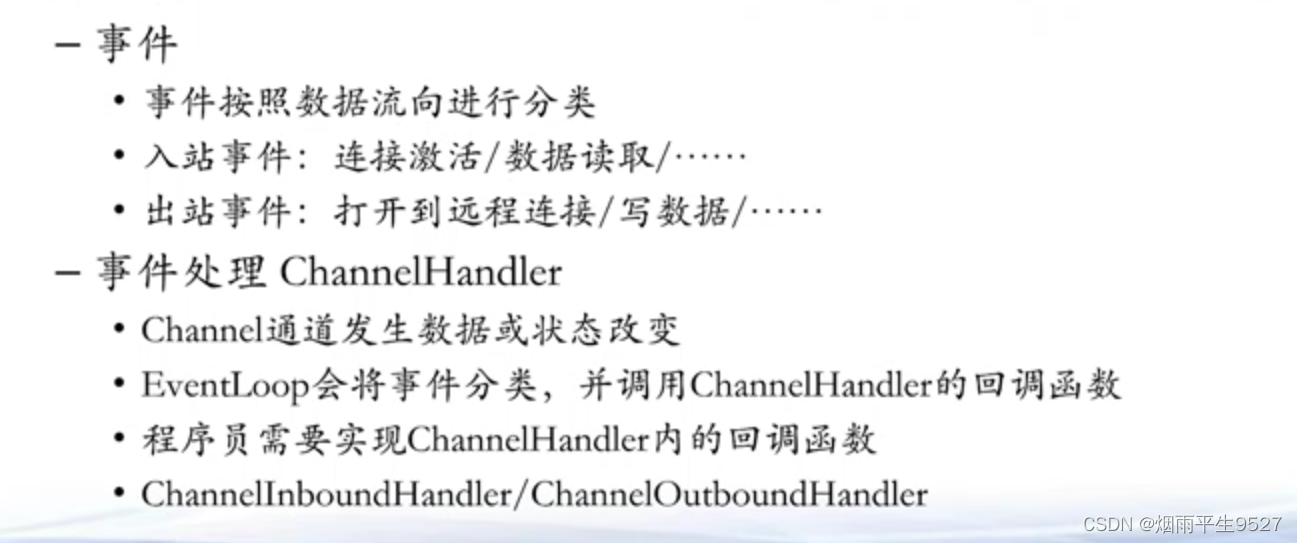
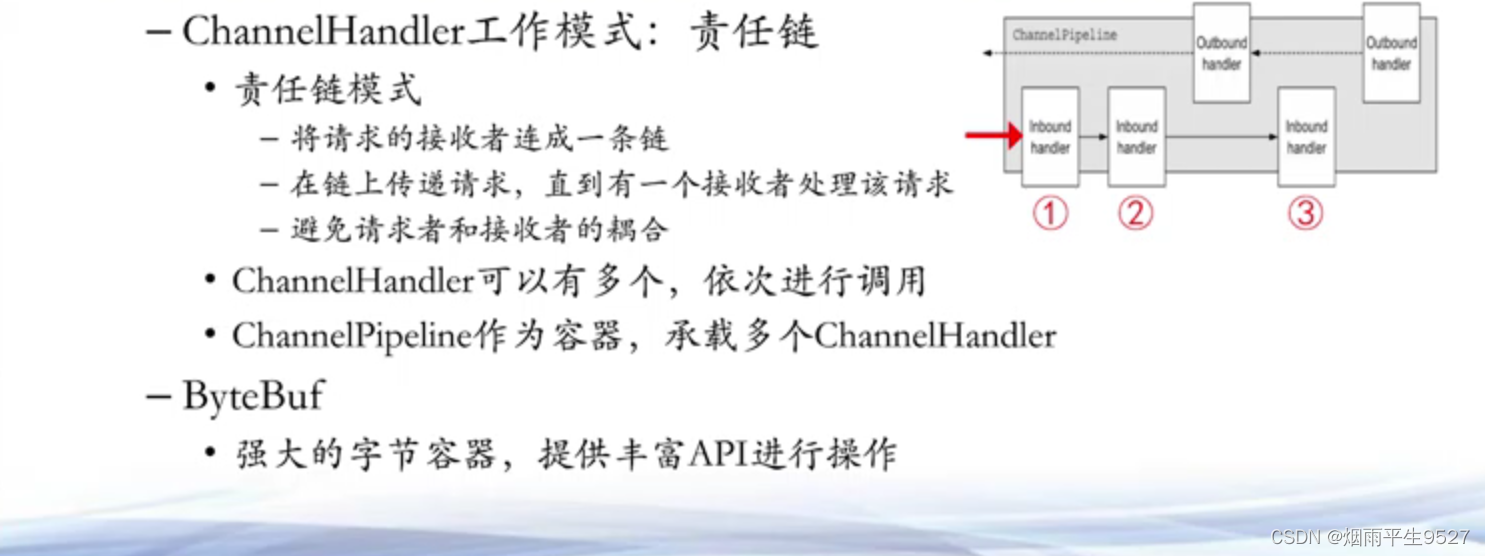
7.3相关配置
<dependency>
<groupId>io.netty</groupId>
<artifactId>netty-all</artifactId> <!-- Use 'netty-all' for 4.0 or above -->
<version>4.1.33.Final</version>
</dependency>
7.4相应代码实例
略
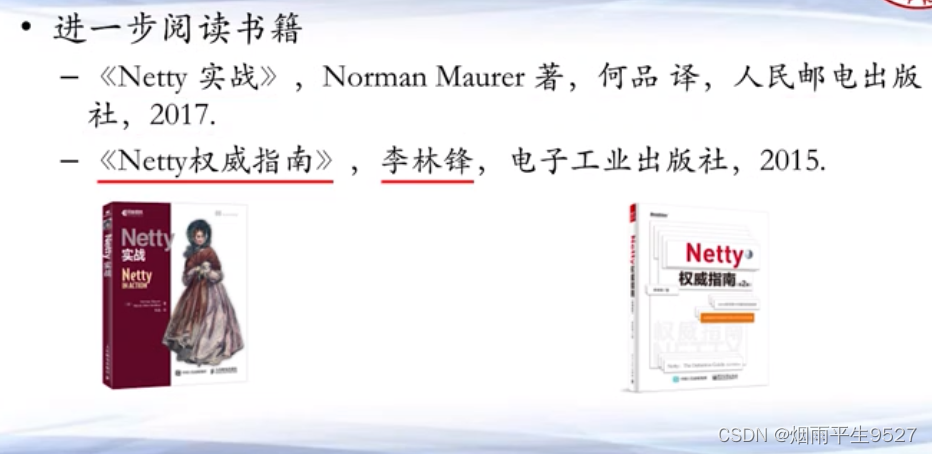
7.5进一步

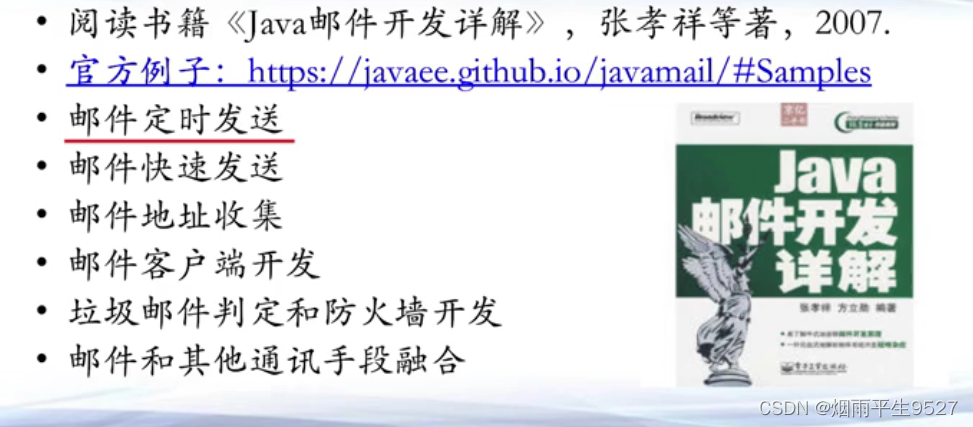
八、邮件基础
8.1邮件的基础知识
8.1.1相关概念
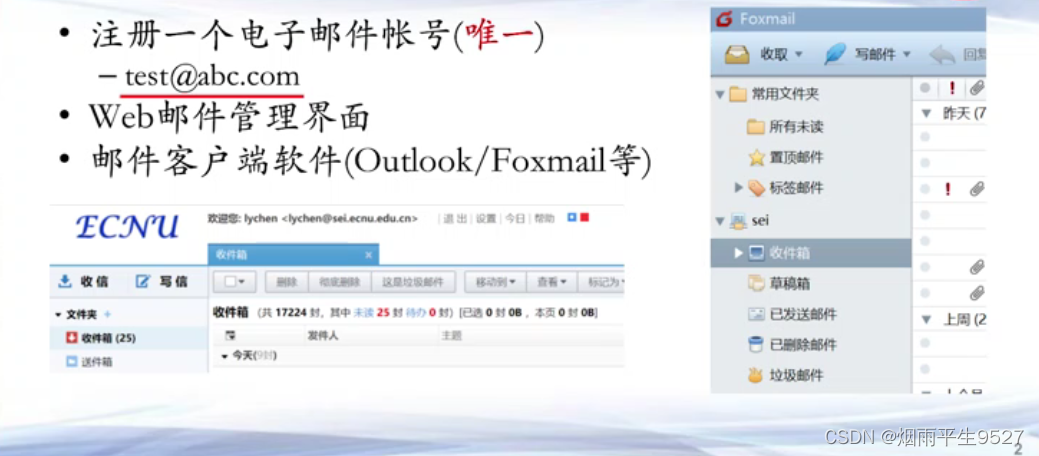
邮件:一封信,包括发件人/收件人/文本/图片/附件等
邮件客户端
邮件服务端
- 发送邮件服务器
- 接受邮件服务器
8.1.2基础原理
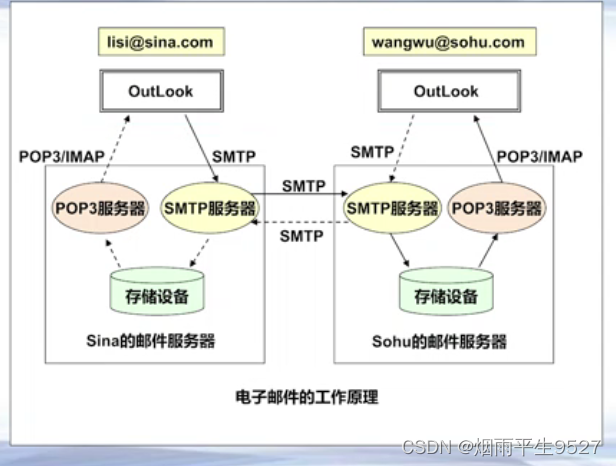
邮件客户端
- Foxmail
- OutLook(Express, Microsoft Outlook)
-Thunderbird (linux平台)
邮件服务端
- Microsoft Exchange Server
- IBM Lotus Notes
- SendMail, Qmail, James
8.1.3主要协议

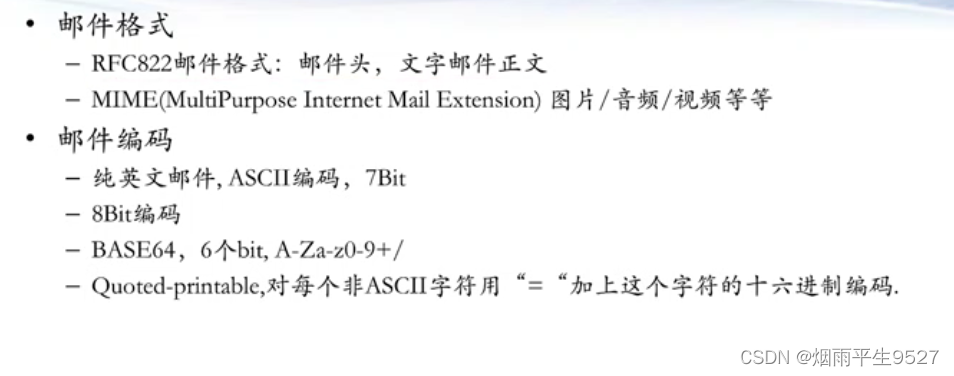
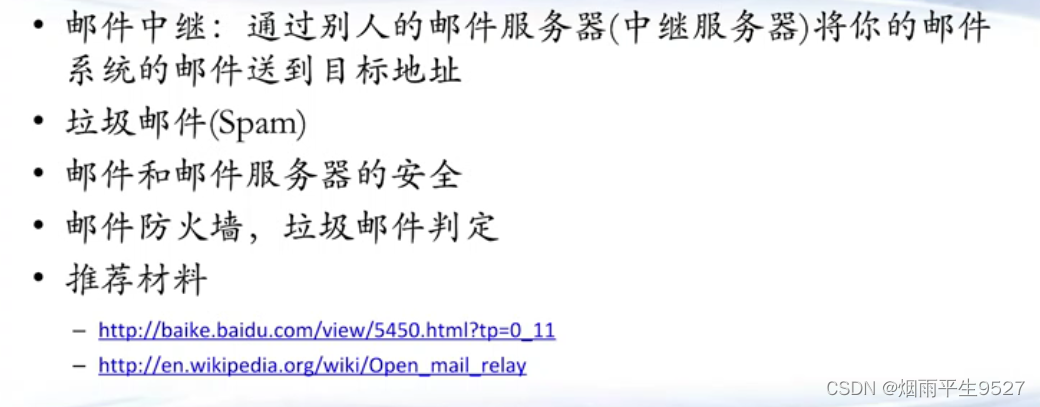
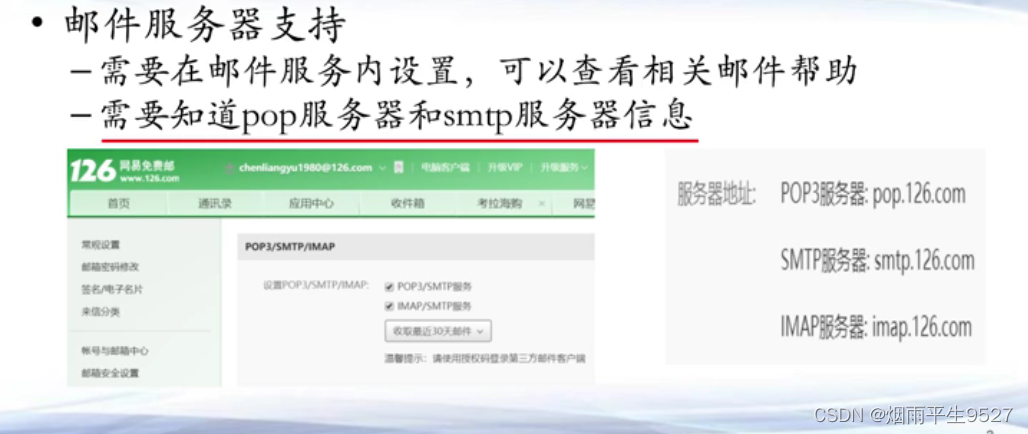
8.1.4服务器配置
8.2编程
8.2.1配置文件
<dependency>
<groupId>com.sun.mail</groupId>
<artifactId>javax.mail</artifactId>
<version>1.6.2</version>
</dependency>
8.2.2相关类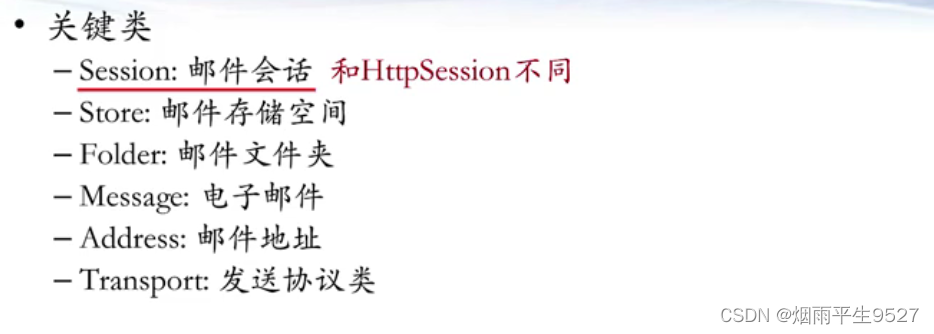
8.2.3收件箱
package org.example;import javax.mail.*;
import java.util.Properties;public class MailClientRecv {private Session session;private Store store;private String username = "xxxxx@qq.com";private String password = "xxxxxxxx";private String popServer = "pop.qq.com";public void init() throws Exception {// 设置属性Properties props = new Properties();props.put("mail.store.protocol", "pop3");// 创建Session对象session = Session.getInstance(props, null);session.setDebug(false); // 设置为true会输出跟踪日志// 创建Store对象并连接到收邮件服务器store = session.getStore("pop3");store.connect(popServer, username, password);}public void receiveMessage() throws Exception {String folderName = "inbox";Folder folder = store.getFolder(folderName);if (folder == null) {throw new Exception(folderName + "邮件夹不存在");}// 打开信箱folder.open(Folder.READ_ONLY);System.out.println("您的收件箱有" + folder.getMessageCount() + "封邮件.");System.out.println("您的收件箱有" + folder.getUnreadMessageCount() + "封未读的邮件.");// 读取邮件Message[] messages = folder.getMessages();// 遍历前3封邮件for (int i = 0; i < Math.min(messages.length, 3); i++) {System.out.println("------第" + (i + 1) + "封邮件-------");// 获取邮件信息Message message = messages[i];// 打印发件人和主题Address[] fromAddresses = message.getFrom();if (fromAddresses.length > 0) {System.out.println("发件人: " + fromAddresses[0]);}System.out.println("主题: " + message.getSubject());System.out.println();}// 关闭邮件夹folder.close(false);}public void close() throws Exception {store.close();}public static void main(String[] args) throws Exception {MailClientRecv client = new MailClientRecv();// 初始化client.init();// 接收邮件client.receiveMessage();// 关闭连接client.close();}
}
8.2.4发件箱
package org.example;import javax.mail.*;
import javax.mail.internet.MimeMessage;
import java.util.Properties;public class MailClientSend {private Session session; // 定义会话对象,用于创建邮件会话private Transport transport; // 定义传输对象,用于发送邮件private String username = "xxxxxxx@qq.com"; // 发件人的邮箱账号private String password = "xxxxxxxxxxx"; // 发件人的邮箱密码private String smtpServer = "smtp.qq.com"; // SMTP服务器的地址public void init() throws Exception {// 设置属性Properties props = new Properties();props.put("mail.transport.protocol", "smtp"); // 设置邮件传输协议为smtpprops.put("mail.smtp.host", smtpServer); // 设置发送邮件服务器props.put("mail.smtp.port", "25"); // 设置发送邮件服务器的端口号props.put("mail.smtp.auth", "true"); // SMTP服务器需要身份验证// 创建Session对象session = Session.getInstance(props, new Authenticator() {public PasswordAuthentication getPasswordAuthentication() {return new PasswordAuthentication(username, password); // 返回发件人的账号和密码}});session.setDebug(true); // 输出跟踪日志,方便调试// 创建Transport对象transport = session.getTransport();}public void sendMessage() throws Exception {// 创建一个邮件Message msg = TextMessage.generate(); // 调用TextMessage类的generate方法生成一个邮件
//Message msg = HtmlMessage.generate();
//Message msg = AttachmentMessage.generate();// 发送邮件transport.connect(); // 连接到SMTP服务器transport.sendMessage(msg, msg.getAllRecipients()); // 发送邮件给所有收件人// 打印结果System.out.println("邮件已经成功发送");}public void close() throws Exception {transport.close(); // 关闭连接}public static void main(String[] args) throws Exception {MailClientSend client = new MailClientSend(); // 创建一个MailClientSend对象// 初始化client.init(); // 调用init方法初始化会话和传输对象// 发送邮件client.sendMessage(); // 调用sendMessage方法发送邮件// 关闭连接client.close(); // 调用close方法关闭连接}
}
文本邮件
package org.example;import javax.mail.*;
import javax.mail.internet.InternetAddress;
import javax.mail.internet.MimeMessage;
import java.util.Date;
import java.util.Properties;// 这是一个用Java编写的文本邮件生成类
public class TextMessage {public static MimeMessage generate() throws Exception {String from = "xxxxxx@qq.com"; // 定义发件人的邮箱地址String to = "xxxxx@qq.com"; // 定义收件人的邮箱地址String subject = "test"; // 定义邮件的主题String body = "您好,这是来自一封chenliangyu的测试邮件"; // 定义邮件的正文内容// 创建Session实例对象Session session = Session.getDefaultInstance(new Properties()); // 获取默认的会话对象,不需要验证账户// 创建MimeMessage实例对象MimeMessage message = new MimeMessage(session); // 用会话对象创建一个邮件对象// 设置发件人message.setFrom(new InternetAddress(from)); // 用InternetAddress类封装发件人的地址// 设置收件人message.setRecipients(Message.RecipientType.TO, InternetAddress.parse(to)); // 用InternetAddress类解析收件人的地址,并设置为收件人类型为TO(主要收件人)// 设置发送日期message.setSentDate(new Date()); // 设置邮件的发送日期为当前日期// 设置邮件主题message.setSubject(subject); // 设置邮件的主题为字符串subject// 设置纯文本内容的邮件正文message.setText(body); // 设置邮件的正文为字符串body,注意这里是纯文本内容,不支持HTML格式// 保存并生成最终的邮件内容message.saveChanges(); // 保存邮件的所有设置,并生成最终的内容// 把MimeMessage对象中的内容写入到文件中//msg.writeTo(new FileOutputStream("e:/test.eml")); // 这一行是注释掉的,如果需要把邮件内容写入到本地文件中,可以取消注释,并指定文件路径和名称return message; // 返回生成好的邮件对象}
}
网页文件
package org.example;import javax.mail.*;
import javax.mail.internet.InternetAddress;
import javax.mail.internet.MimeMessage;
import java.util.Date;
import java.util.Properties;public class HtmlMessage {public static MimeMessage generate() throws Exception {String from = "lychen@sei.ecnu.edu.cn"; // 发件人地址String to = "chenliangyu1980@126.com"; // 收件人地址String subject = "HTML邮件";String body = "<a href=\"http://www.ecnu.edu.cn\">" +"<h4>欢迎大家访问我们的网站</h4></a></br>" +"<img src=\"https://news.ecnu.edu.cn/_upload/article/images/2e/e2/6b554d0\">";// 创建Session实例对象Session session = Session.getDefaultInstance(new Properties());// 创建MimeMessage实例对象MimeMessage message = new MimeMessage(session);// 设置发件人message.setFrom(new InternetAddress(from));// 设置收件人message.setRecipients(Message.RecipientType.TO, InternetAddress.parse(to));// 设置发送日期message.setSentDate(new Date());// 设置邮件主题message.setSubject(subject);// 设置HTML格式的邮件正文message.setContent(body, "text/html;charset=gb2312"); // 修正 charset 冒号为等号// 保存并生成最终的邮件内容message.saveChanges();// 把MimeMessage对象中的内容写入到文件中//msg.writeTo(new FileOutputStream("e:/HtmlMessage.eml"));return message;}
}
附件文件
import javax.mail.*;
import javax.mail.internet.InternetAddress;
import javax.mail.internet.MimeBodyPart;
import javax.mail.internet.MimeMessage;
import javax.mail.internet.MimeMultipart;
import javax.activation.DataHandler;
import javax.activation.URLDataSource;
import java.util.Properties;
import java.net.URL;public class AttachmentMessage {public static MimeMessage generate() throws Exception {String from = "lychen@sei.ecnu.edu.cn"; // 发件人地址String to = "chenliangyu1980@126.com"; // 收件人地址String subject = "多附件邮件"; // 邮件主题String body = "<a href=\"http://www.ecnu.edu.cn\">" +"欢迎大家访问我们的网站</a></br>";// 创建Session实例对象Session session = Session.getDefaultInstance(new Properties());// 创建MimeMessage实例对象MimeMessage message = new MimeMessage(session);message.setFrom(new InternetAddress(from));message.setRecipients(Message.RecipientType.TO, InternetAddress.parse(to));message.setSubject(subject);// 创建代表邮件正文和附件的各个MimeBodyPart对象MimeBodyPart contentPart = createContent(body); // 创建邮件正文部分MimeBodyPart attachPart1 = createAttachment("http://example.com/ecnu4.jpg"); // 创建附件部分1MimeBodyPart attachPart2 = createAttachment("http://example.com/ecnu5.jpg"); // 创建附件部分2// 创建用于组合邮件正文和附件的MimeMultipart对象MimeMultipart allMultipart = new MimeMultipart("mixed"); // 指定Multipart类型为mixed,表示组合正文和附件allMultipart.addBodyPart(contentPart); // 添加邮件正文部分allMultipart.addBodyPart(attachPart1); // 添加附件部分1allMultipart.addBodyPart(attachPart2); // 添加附件部分2// 设置整个邮件内容为最终组合出的MimeMultipart对象message.setContent(allMultipart); // 将组合的Multipart对象设置为邮件内容message.saveChanges(); // 保存邮件设置和内容// message.writeTo(new FileOutputStream("e:/ComplexMessage.eml"));return message;}public static MimeBodyPart createContent(String body) throws Exception {MimeBodyPart htmlBodyPart = new MimeBodyPart();htmlBodyPart.setContent(body, "text/html;charset=gb2312"); // 设置邮件正文为HTML格式return htmlBodyPart;}public static MimeBodyPart createAttachment(String filename) throws Exception {// 创建保存附件的MimeBodyPart对象,并加入附件内容和相应信息MimeBodyPart attachPart = new MimeBodyPart();URLDataSource fds = new URLDataSource(new URL(filename)); // 使用URLDataSource读取网络图片attachPart.setDataHandler(new DataHandler(fds)); // 设置附件的数据处理器attachPart.setFileName(fds.getName()); // 设置附件的文件名return attachPart;}
}
8.2.5进一步学习
