TensorFlow中slim包的具体用法
- 1、训练脚本文件(该文件包含数据下载打包、模型训练,模型评估流程)
- 3、模型训练
- 1、数据集相关模块:
- 2、设置网络模型模块
- 3、数据预处理模块
- 4、定义损失loss
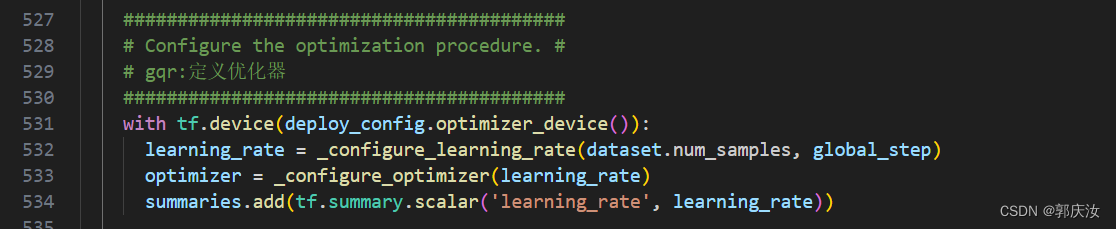
- 5、定义优化器模块
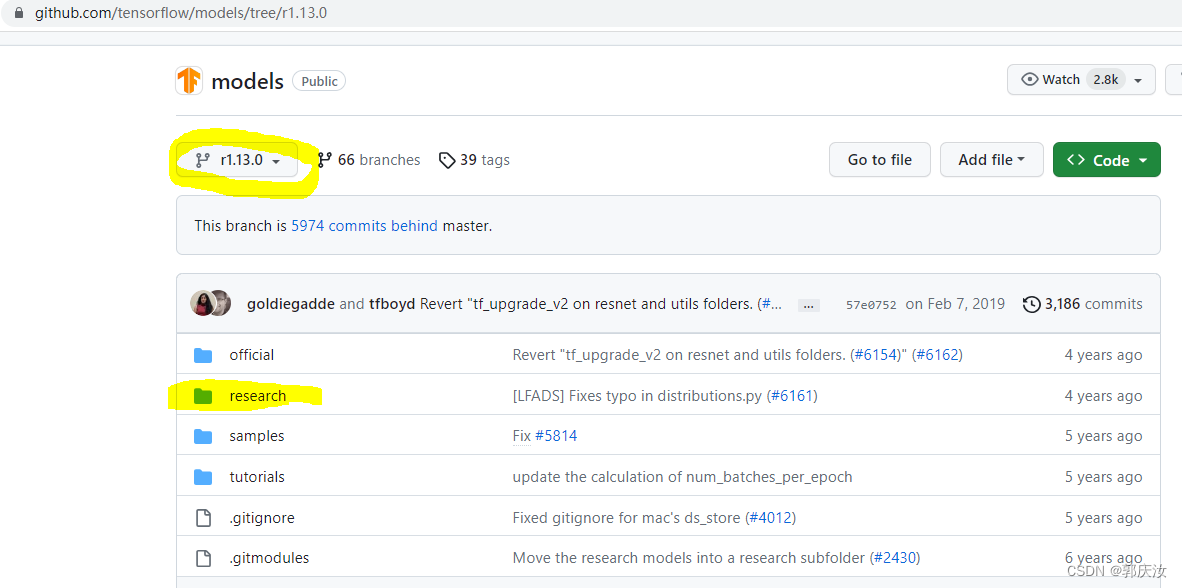
本次使用的TensorFlow版本是1.13.0
地址:https://github.com/tensorflow/models/tree/r1.13.0
到tensorflow-models的GitHub下载research下面的slim这个包到本地
TensorFlow中slim包的目录结构:
-- slim|-- BUILD|-- README.md|-- WORKSPACE|-- __init__.py|-- datasets| |-- __init__.py| |-- __pycache__| | |-- __init__.cpython-37.pyc| | |-- dataset_utils.cpython-37.pyc| | |-- download_and_convert_cifar10.cpython-37.pyc| | |-- download_and_convert_flowers.cpython-37.pyc| | `-- download_and_convert_mnist.cpython-37.pyc| |-- build_imagenet_data.py| |-- cifar10.py| |-- dataset_factory.py| |-- dataset_utils.py| |-- download_and_convert_cifar10.py| |-- download_and_convert_flowers.py| |-- download_and_convert_imagenet.sh| |-- download_and_convert_mnist.py| |-- download_imagenet.sh| |-- flowers.py| |-- imagenet.py| |-- imagenet_2012_validation_synset_labels.txt| |-- imagenet_lsvrc_2015_synsets.txt| |-- imagenet_metadata.txt| |-- mnist.py| |-- preprocess_imagenet_validation_data.py| `-- process_bounding_boxes.py|-- deployment| |-- __init__.py| |-- model_deploy.py| `-- model_deploy_test.py|-- download_and_convert_data.py # 下载相应的数据集,并将数据打包成TF-record的格式|-- eval_image_classifier.py # 测试模型分类效果|-- export_inference_graph.py|-- export_inference_graph_test.py|-- nets| |-- __init__.py| |-- alexnet.py| |-- alexnet_test.py| |-- cifarnet.py| |-- cyclegan.py| |-- cyclegan_test.py| |-- dcgan.py| |-- dcgan_test.py| |-- i3d.py| |-- i3d_test.py| |-- i3d_utils.py| |-- inception.py| |-- inception_resnet_v2.py| |-- inception_resnet_v2_test.py| |-- inception_utils.py| |-- inception_v1.py| |-- inception_v1_test.py| |-- inception_v2.py| |-- inception_v2_test.py| |-- inception_v3.py| |-- inception_v3_test.py| |-- inception_v4.py| |-- inception_v4_test.py| |-- lenet.py| |-- mobilenet| | |-- README.md| | |-- __init__.py| | |-- conv_blocks.py| | |-- madds_top1_accuracy.png| | |-- mnet_v1_vs_v2_pixel1_latency.png| | |-- mobilenet.py| | |-- mobilenet_example.ipynb| | |-- mobilenet_v2.py| | `-- mobilenet_v2_test.py| |-- mobilenet_v1.md| |-- mobilenet_v1.png| |-- mobilenet_v1.py| |-- mobilenet_v1_eval.py| |-- mobilenet_v1_test.py| |-- mobilenet_v1_train.py| |-- nasnet| | |-- README.md| | |-- __init__.py| | |-- nasnet.py| | |-- nasnet_test.py| | |-- nasnet_utils.py| | |-- nasnet_utils_test.py| | |-- pnasnet.py| | `-- pnasnet_test.py| |-- nets_factory.py| |-- nets_factory_test.py| |-- overfeat.py| |-- overfeat_test.py| |-- pix2pix.py| |-- pix2pix_test.py| |-- resnet_utils.py| |-- resnet_v1.py| |-- resnet_v1_test.py| |-- resnet_v2.py| |-- resnet_v2_test.py| |-- s3dg.py| |-- s3dg_test.py| |-- vgg.py| `-- vgg_test.py|-- preprocessing| |-- __init__.py| |-- cifarnet_preprocessing.py| |-- inception_preprocessing.py| |-- lenet_preprocessing.py| |-- preprocessing_factory.py| `-- vgg_preprocessing.py|-- scripts # gqr:存储的是相关的模型训练脚本 | |-- export_mobilenet.sh| |-- finetune_inception_resnet_v2_on_flowers.sh| |-- finetune_inception_v1_on_flowers.sh| |-- finetune_inception_v3_on_flowers.sh| |-- finetune_resnet_v1_50_on_flowers.sh| |-- train_cifarnet_on_cifar10.sh| `-- train_lenet_on_mnist.sh|-- setup.py|-- slim_walkthrough.ipynb`-- train_image_classifier.py # 训练模型的脚本1、训练脚本文件(该文件包含数据下载打包、模型训练,模型评估流程)
scripts/finetune_resnet_v1_50_on_flowers.sh
#!/bin/bash
# Copyright 2017 The TensorFlow Authors. All Rights Reserved.
#
# Licensed under the Apache License, Version 2.0 (the "License");
# you may not use this file except in compliance with the License.
# You may obtain a copy of the License at
#
# http://www.apache.org/licenses/LICENSE-2.0
#
# Unless required by applicable law or agreed to in writing, software
# distributed under the License is distributed on an "AS IS" BASIS,
# WITHOUT WARRANTIES OR CONDITIONS OF ANY KIND, either express or implied.
# See the License for the specific language governing permissions and
# limitations under the License.
# ==============================================================================
#
# This script performs the following operations:
# 1. Downloads the Flowers dataset
# 2. Fine-tunes a ResNetV1-50 model on the Flowers training set.
# 3. Evaluates the model on the Flowers validation set.
#
# Usage:
# cd slim
# ./slim/scripts/finetune_resnet_v1_50_on_flowers.sh
set -e# Where the pre-trained ResNetV1-50 checkpoint is saved to.
PRETRAINED_CHECKPOINT_DIR=/tmp/checkpoints   # gqr:预训练模型存放路径# Where the training (fine-tuned) checkpoint and logs will be saved to.
TRAIN_DIR=/tmp/flowers-models/resnet_v1_50# Where the dataset is saved to.
DATASET_DIR=/tmp/flowers    # gqr:数据集存放路径# Download the pre-trained checkpoint.
if [ ! -d "$PRETRAINED_CHECKPOINT_DIR" ]; thenmkdir ${PRETRAINED_CHECKPOINT_DIR}
fi
if [ ! -f ${PRETRAINED_CHECKPOINT_DIR}/resnet_v1_50.ckpt ]; thenwget http://download.tensorflow.org/models/resnet_v1_50_2016_08_28.tar.gztar -xvf resnet_v1_50_2016_08_28.tar.gzmv resnet_v1_50.ckpt ${PRETRAINED_CHECKPOINT_DIR}/resnet_v1_50.ckptrm resnet_v1_50_2016_08_28.tar.gz
fi# Download the dataset
python download_and_convert_data.py \--dataset_name=flowers \--dataset_dir=${DATASET_DIR}# Fine-tune only the new layers for 3000 steps.
python train_image_classifier.py \--train_dir=${TRAIN_DIR} \--dataset_name=flowers \--dataset_split_name=train \--dataset_dir=${DATASET_DIR} \--model_name=resnet_v1_50 \--checkpoint_path=${PRETRAINED_CHECKPOINT_DIR}/resnet_v1_50.ckpt \--checkpoint_exclude_scopes=resnet_v1_50/logits \--trainable_scopes=resnet_v1_50/logits \--max_number_of_steps=3000 \--batch_size=32 \--learning_rate=0.01 \--save_interval_secs=60 \--save_summaries_secs=60 \--log_every_n_steps=100 \--optimizer=rmsprop \--weight_decay=0.00004# Run evaluation.
python eval_image_classifier.py \--checkpoint_path=${TRAIN_DIR} \--eval_dir=${TRAIN_DIR} \--dataset_name=flowers \--dataset_split_name=validation \--dataset_dir=${DATASET_DIR} \--model_name=resnet_v1_50# Fine-tune all the new layers for 1000 steps.
python train_image_classifier.py \--train_dir=${TRAIN_DIR}/all \--dataset_name=flowers \--dataset_split_name=train \--dataset_dir=${DATASET_DIR} \--checkpoint_path=${TRAIN_DIR} \--model_name=resnet_v1_50 \--max_number_of_steps=1000 \--batch_size=32 \--learning_rate=0.001 \--save_interval_secs=60 \--save_summaries_secs=60 \--log_every_n_steps=100 \--optimizer=rmsprop \--weight_decay=0.00004# Run evaluation.
python eval_image_classifier.py \--checkpoint_path=${TRAIN_DIR}/all \--eval_dir=${TRAIN_DIR}/all \--dataset_name=flowers \--dataset_split_name=validation \--dataset_dir=${DATASET_DIR} \--model_name=resnet_v1_50
以上文件以下载并打包flowers数据集为例会调用slim/datasets下的****download_and_convert_flowers.py
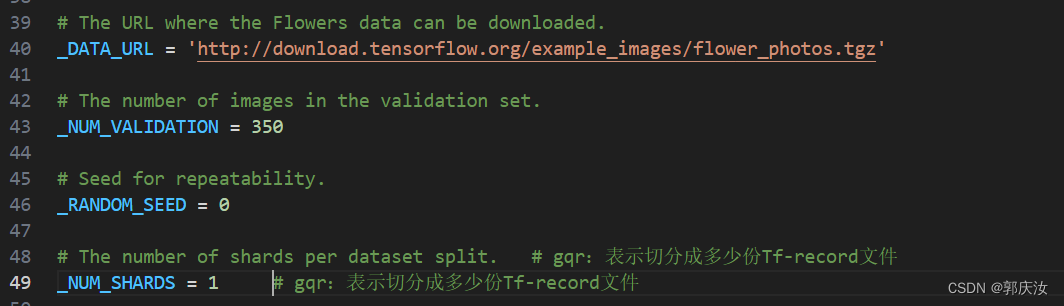
代码43行:_NUM_VALIDATION = 350值的意思的测试数据集的数量,我们一般2,8分数据集,这里只用填写测试集的数据代码会自动吧总数据集分成2部分
代码48行:_NUM_SHARDS = 1这个的意思是生成几个tfrecord文件,这个数量是根据你数据量来划分

代码190行:dataset_utils.download_and_uncompress_tarball(_DATA_URL, dataset_dir) 函数为下载数据集函数,如果本地已经存在数据集,可将将其注释掉

代码210行:_clean_up_temporary_files(dataset_dir) 函数为打包完毕后删除下载的数据集文件,如果需要下载的数据集可以将其注释掉
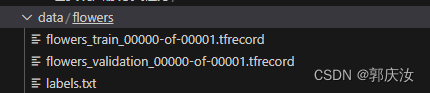
上述文件执行完毕后,会得到以下文件
3、模型训练
模型训练文件为

以下是该文件中各个模块相关内容
1、数据集相关模块:

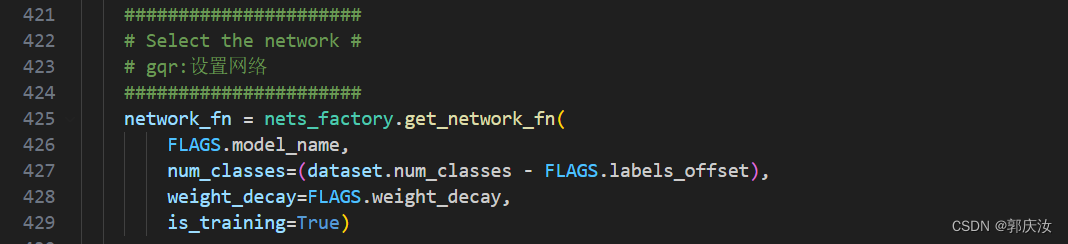
2、设置网络模型模块
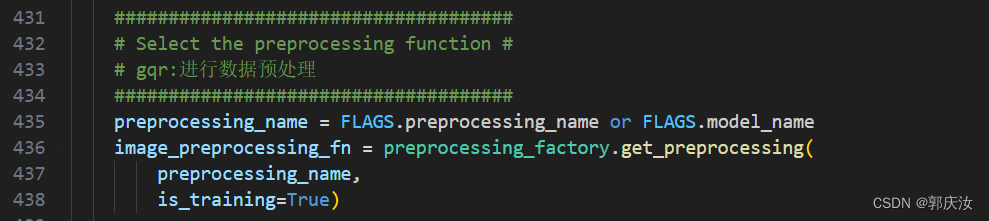
3、数据预处理模块
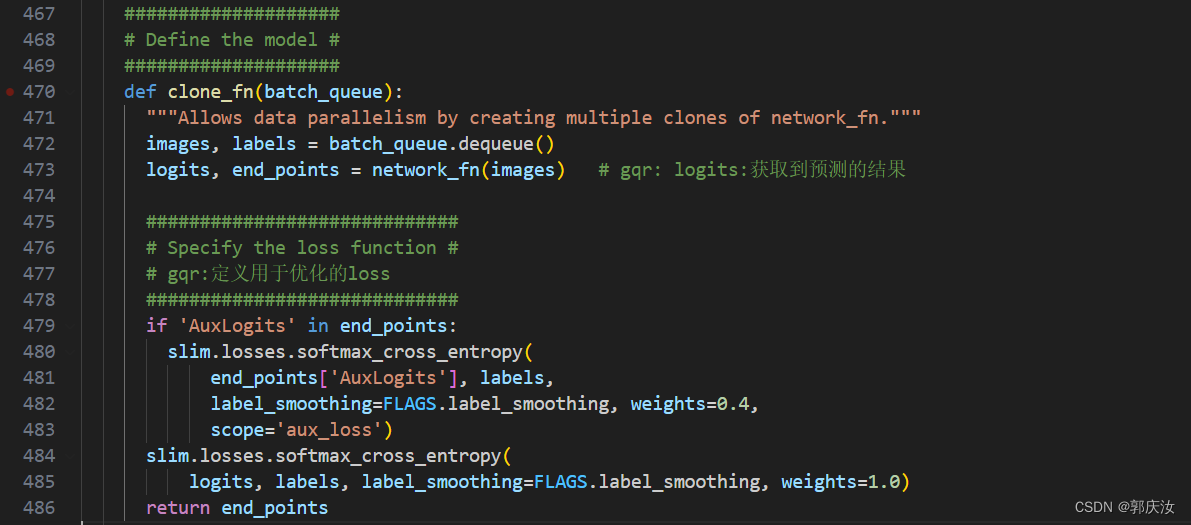
4、定义损失loss
5、定义优化器模块
运行训练指令:
python train_image_classifier.py \--train_dir=./data/flowers-models/resnet_v1_50\--dataset_name=flowers \--dataset_split_name=train \--dataset_dir=./data/flowers \--model_name=resnet_v1_50 \--checkpoint_path=./data/checkpoints/resnet_v1_50.ckpt \--checkpoint_exclude_scopes=resnet_v1_50/logits \--trainable_scopes=resnet_v1_50/logits \--max_number_of_steps=3000 \ --batch_size=32 \--learning_rate=0.01 \--save_interval_secs=60 \--save_summaries_secs=60 \--log_every_n_steps=100 \--optimizer=rmsprop \--weight_decay=0.00004
–dataset_name=指定模板
–model_name=指定预训练模板
–dataset_dir=指定训练集目录
–checkpoint_exclude_scopes=指定忘记那几层的参数,不带进训练里面,记住提取特征的部分
–train_dir=训练参数存放地址
–trainable_scopes=设定只对那几层变量进行调整,其他层都不进行调整,不设定就会对所有层训练(所以是必须要给定的)
–learning_rate=学习率
–optimizer=优化器
–checkpoint_path:预训练模型存放地址
–max_number_of_steps=训练步数
–batch_size=一次训练所选取的样本数。 (Batch Size的大小影响模型的优化程度和速度。同时其直接影响到GPU内存的使用情况,假如你GPU内存不大,该数值最好设置小一点。)
–weight_decay=即模型中所有参数的二次正则化超参数(这个的加入就是为了防止过拟合加入正则项,weight_decay 是乘在正则项的前面,控制正则化项在损失函数中所占权重的)
注意:在模型训练前,需要下载预训练模型,
wget http://download.tensorflow.org/models/resnet_v1_50_2016_08_28.tar.gz
解压后存放在相应目录