聊一聊vue里面组件之间的传值
首先总结一下vue里面传值的几种关系:

如上图所示, A与B、A与C、B与D、C与F组件之间是父子关系; B与C之间是兄弟关系;A与D、A与E之间是隔代关系; D与F是堂兄关系,针对以上关系 我们把组件之间传值归类为:
1.父子组件之间的通讯
2.非父子组件之间的通讯(兄弟组件 隔代关系组件)
vue里面组件通许的方式:
- props/$emit
- $children / $parent
- ref / refs
- provide / reject
- eventBus
- $attrs / $linteners
- vuex
- localStorage / sessionStorage
1.父组件向子组件传值
<template><div class="section"><com-article :articles="articleList"></com-article></div>
</template>
<script>
import comArticle from './test/article.vue'
export default {name: 'HelloWorld',components: { comArticle },data() {return { articleList: ['1', '2', '3'] }}
}
</script><template><div><span v-for="(item, index) in articles" :key="index">{{ item }}</span></div><script>export default {props: ['articles']}
</script>
2.子组件向父组件传值
<template><div class="section"><com-article :articles="articleList" @onEmitIndex="onEmitIndex"></com-article><p>{{ currentIndex }}</p></div>
</template>
<script>
import comArticle from './test/article.vue'
export default {name: 'HelloWorld',components: { comArticle },data() {return { currentIndex: -1, articleList: ['小姐姐', '小妹妹', '小富婆'] }},methods: {onEmitIndex(idx) {this.currentIndex = idx}}
}
</script>// prop 只可以从上一级组件传递到下一级组件(父子组件),即所谓的单向数据流。而且 prop
只读,不可被修改,所有修改都会失效并警告。<template><div><div v-for="(item, index) in articles" :key="index" @click="emitIndex(index)">{{ item }}</div></div>
</template><script>
export default {props: ['articles'],methods: {emitIndex(index) {this.$emit('onEmitIndex', index)}}
}
</script>
二. $children / $parent 直接简单点写法:
this.$parentthis.$children
这种方式是直接通过children 或者parent获取组件上的所有对象实例,并且他还是一个数组,我们一般要获取需要这么写
this.$children[0].age,通过索引获取到自己想要的子组件,当子组件比较多的时候,如果后期某个子组件删除了或者新增,对应的索引有可能会发生变化,既不利于维护,所以在实际开发中用的比较少。
同样的this. $parent获取父组件的所有实例对象,当涉及到公共子组件的时候,定义的名称可能耦合性比较高,如果以这种方式去修改父组件的状态,很容易出问题,甚至调试都很不方便,所以也一般用的比较少。
3. ref / refs
ref:如果在普通的 DOM 元素上使用,引用指向的就是DOM 元素,可以操作dom元素的方法,如果用在子组件上,引用就指向组件实例,可以通过实例直接调用子组件的方法或数据
<template><span>{{name}}</span>
</template>
<script>
export default {data() {return {name: 'xxxx'}},
}
</script><template><component-a ref="comA"></component-a><span ref="spanRef">1234</span><a-button type="primary" @click="handleClick">xx</a-button>
</template>
<script>
export default {methods: {handleClick(){console.log(this.$refs.spanRef.innerHtml); // 1234const comA = this.$refs.comA;console.log(comA.name)}},
}
</script>
4.provide / reject
5.eventBus
eventBus可以作为全局组件通信(任意的两个组件,没有任何关联的组件),可以直接进行交流的通讯方案,eventBus通常用来做全局范围内通信的一个常用方案,非常灵活 使用简单而且很轻
在vue2里面的使用:
import Vue from 'vue'
// main.js 中// 第一种定义方式
Vue.prototype.$eventBus = new Vue()// 第二种定义方式
window.eventBus = new Vue();**触发事件:**
// params 多个参数
this.$eventBus.$emit('eventName', param1,param2,...)//使用方式二定义时
eventBus.$emit('eventName', param1,param2,...)**监听事件**
//使用方式一定义时
this.$eventBus.$on('eventName', (param1,param2,...)=>{//需要执行 逻辑代码// params 多个参数
})//使用方式二定义时
eventBus.$on('eventName', (param1,param2,...)=>{//需要执行 逻辑代码
})**移除事件,在开发过程中,当离开当前页面时要取消坚挺,避免事件被反复出发,和造成内存泄漏**
//使用方式一定义时
this.$eventBus.$off('eventName');//使用方式二定义时
eventBus.$off('eventName');
EventBus的原理是什么? 直接上代码
class MyEventBus {constructor() {// 存储所有事件对应的回调的对应关系/*** key : [ callback, callback ]*/this.items = {};}// 监听$on(eventName, callback) {if (!this.items[eventName]) {//一个事件可能有多个监听者this.items[eventName] = [];}this.items[eventName].push(callback)// 简化版写法 等同于上面// (this.items[eventName] ||= []).push(callback)}// 触发监听$emit(eventName, ...args) {if (!this.items[eventName]) return;this.items[eventName].forEach(ca => ca(...args))}// 去掉监听$off(eventName) {this.items[eventName] = []}
}
export default new MyEventBus();
Vue3种移除了$on $off等自带自定义事件的相关方法,因此在vue3中使用mitt来代替eventBus
//在utils目录下,新建 mitt.js 文件,写入下面代码进行封装import mitt from 'mitt'const emitter =new mitt()export default emitter// 在使用中直接引入import emitter from '../api/mitt'emitter.on('foo', e => console.log(e) ) //emitteremitter.emit('foo', 'emitter')// 用法 引入封装好的mitt即可直接使用mitt,但需要注意:注册事件最好在钩子onMounted中进行,并且注册的事件需要在onUnmounted钩子中移除。如果不移除同样有可能会造成反复调用,和内存泄漏等问题// 引入 mittimport emitter from '../api/mitt'// 注册emitter.on('eventName', function(e) {console.log(e)})// 调用emitter.emit('eventName', 'emitter')// 移除emitter.off('eventName')5. $attrs / $linteners
$attrs:用于多层次组件传递参数(组件标签的attribute,class和style除外),爷爷辈组件向孙子辈组件传递参数(注:参数不能被父辈prop识别,一旦被父辈prop识别且获取,则孙子辈组件不能获取到该参数) 并且 v-bind不能被简写
$listeners:用于多层次组件传递事件监听器,爷爷辈组件向父辈、孙子辈、曾孙子辈……组件传递事件(与 $attrs 不同,不存在半路被拦截的情况)v-on 不能用简写 @,虽然不报错,但是也不生效
<template><div>GrandFather:<index1 :dataMessage="dataMessage" :dataCode="dataCode" :dataList="dataList" :grendClick="grendClick"@hancleClick="handleClick" @handleSelect="handleSelect" aaa="this is a undefiend" /></div>
</template><script>
import Index1 from "./index1";
export default {props: { dataStatus: Number },components: { Index1 },data() {return {a: 0,dataMessage: 1234,dataCode: "400",dataList: [1, 2, 3, 4, 5],};},methods: {handleClick() {console.log(1234);},handleSelect() {console.log(456);},grendClick() {console.log("grendClick");},},
};
</script><script>
import Index2 from './index2.vue';
export default {inheritAttrs: false,components: { Index2},props: {dataMessage: {default: 0,type: Number},grendClick: {default: () => {return Function}}},data() { return {  adus: '12345'  } },created() {// 这个从一级组件的dataMessage被当前页截取了。console.log(this.dataMessage, 'dataMessage');},methods: {handleClickB() {console.log('this is B');this.grendClick()},},
}
</script><template><div><span>GrandSon</span><a-button type="primary" @click="handleClickC">GrandSon</a-button><span ref="spanRef">1234</span></div>
</template><script>
export default {inheritAttrs: false,methods: {handleClickC() {console.log(this.$attrs, 'attrs'); // 从最上级带过来的变量console.log(this.$listeners, 'listeners'); // 从最上级带过来方法},},
}
</script>
关于Vue的inheritAttrs的理解:
vue官网对于inheritAttrs的属性解释:默认情况下父作用域的不被认作 props 的 attribute 绑定 (attribute bindings) 将会“回退”且作为普通的 HTML attribute 应用在子组件的根元素上。
如果你不希望组件的根元素继承特性,你可以在组件的选项中设置 inheritAttrs: false。
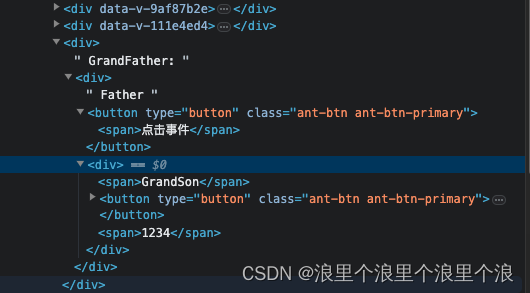
直接看效果: 当设置为true,默认是为true的

当设置为false时后:这也算的上是一点点小优化策略吧
7.localStorage / sessionStorage
这个我们用的应该是比较多的,我们在vue里面用的比较多的Vul-ls
import Vue from 'vue'
import Storage from 'vue-ls'// vue-ls 的配置
const storageOptions = {namespace: 'vue_',   // key 键的前缀(随便起)name: 'ls',          // 变量名称(随便起) 使用方式:Vue.变量名称 或 this.$变量名称storage: 'local'     // 作用范围:local、session、memory
}Vue.use(Storage, storageOptions)
就不做具体的操作了
浏览器缓存里面有个可以监听缓存变化的方法:废话不多说 上代码
export const resetSetItem = (key: string, newVal: string) => {if (key === 'reportcenterList') {// 创建一个StorageEvent事件const newStorageEvent = document.createEvent('StorageEvent')const storage = {setItem: function (k, val) {sessionStorage.setItem(k, val)// 初始化创建的事件newStorageEvent.initStorageEvent('setItem', false, false, k, null, val, null, null)// 派发对象window.dispatchEvent(newStorageEvent)}}return storage.setItem(key, newVal)}
}// 调用resetSetItem('reportcenterList', JSON.stringify(val))console.log('监听到数据变化')const reportcenterList = sessionStorage.getItem('reportcenterList') || ''
