目录
前言(可以根据图示找到需要的尺寸,便于理解)
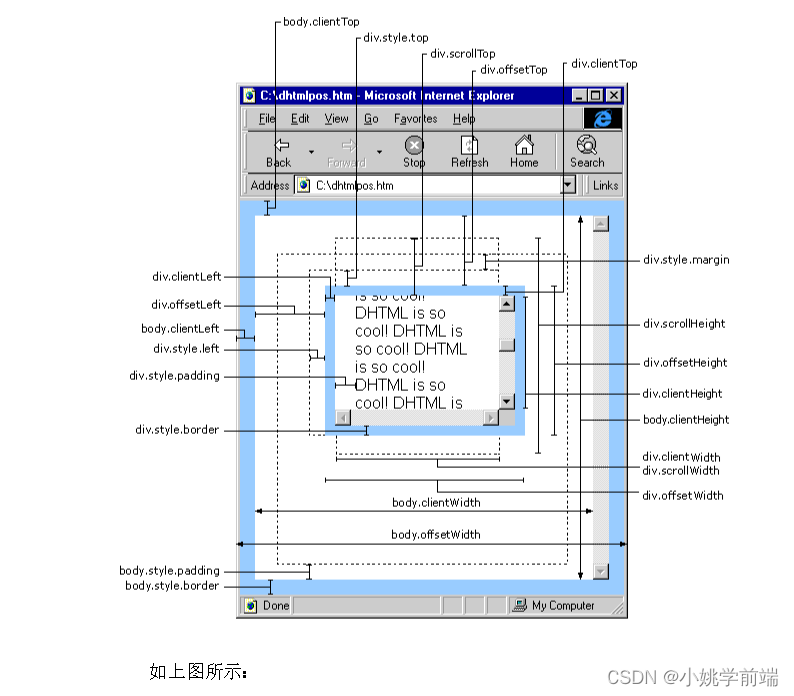
内尺寸
clientWidth 包含左右padding和宽度width(忽略滚动条的宽度)
clientHeight 包含上下padding和height(忽略滚动条的高度)
clientTop 获取元素上边框的大小
clientLeft 获取元素左边框的大小
外尺寸
offsetWidth 包含左右padding 和 width 以及 border,包含滚动条宽度
offsetHeight 包含上下padding 和 height 以及border ,包含滚动条高度
offsetParent:获取当前元素对象具有定位属性的父级元素
offsetLeft 指的是 当前元素的左边框距离 offsetParent 左边框的距离
offsetTop 指的是 当前元素的上边框距离 offsetParent 上边框的距离
相关代码 (重在理解)
滚动尺寸(案例中会用到,常用)
滚动尺寸scrollWidth( scrollHeight )(重点理解)
垂直滚动条与元素顶部距离scrollTop
水平滚动条与元素左边距离 scrollLeft
相关代码
案例(要理解)
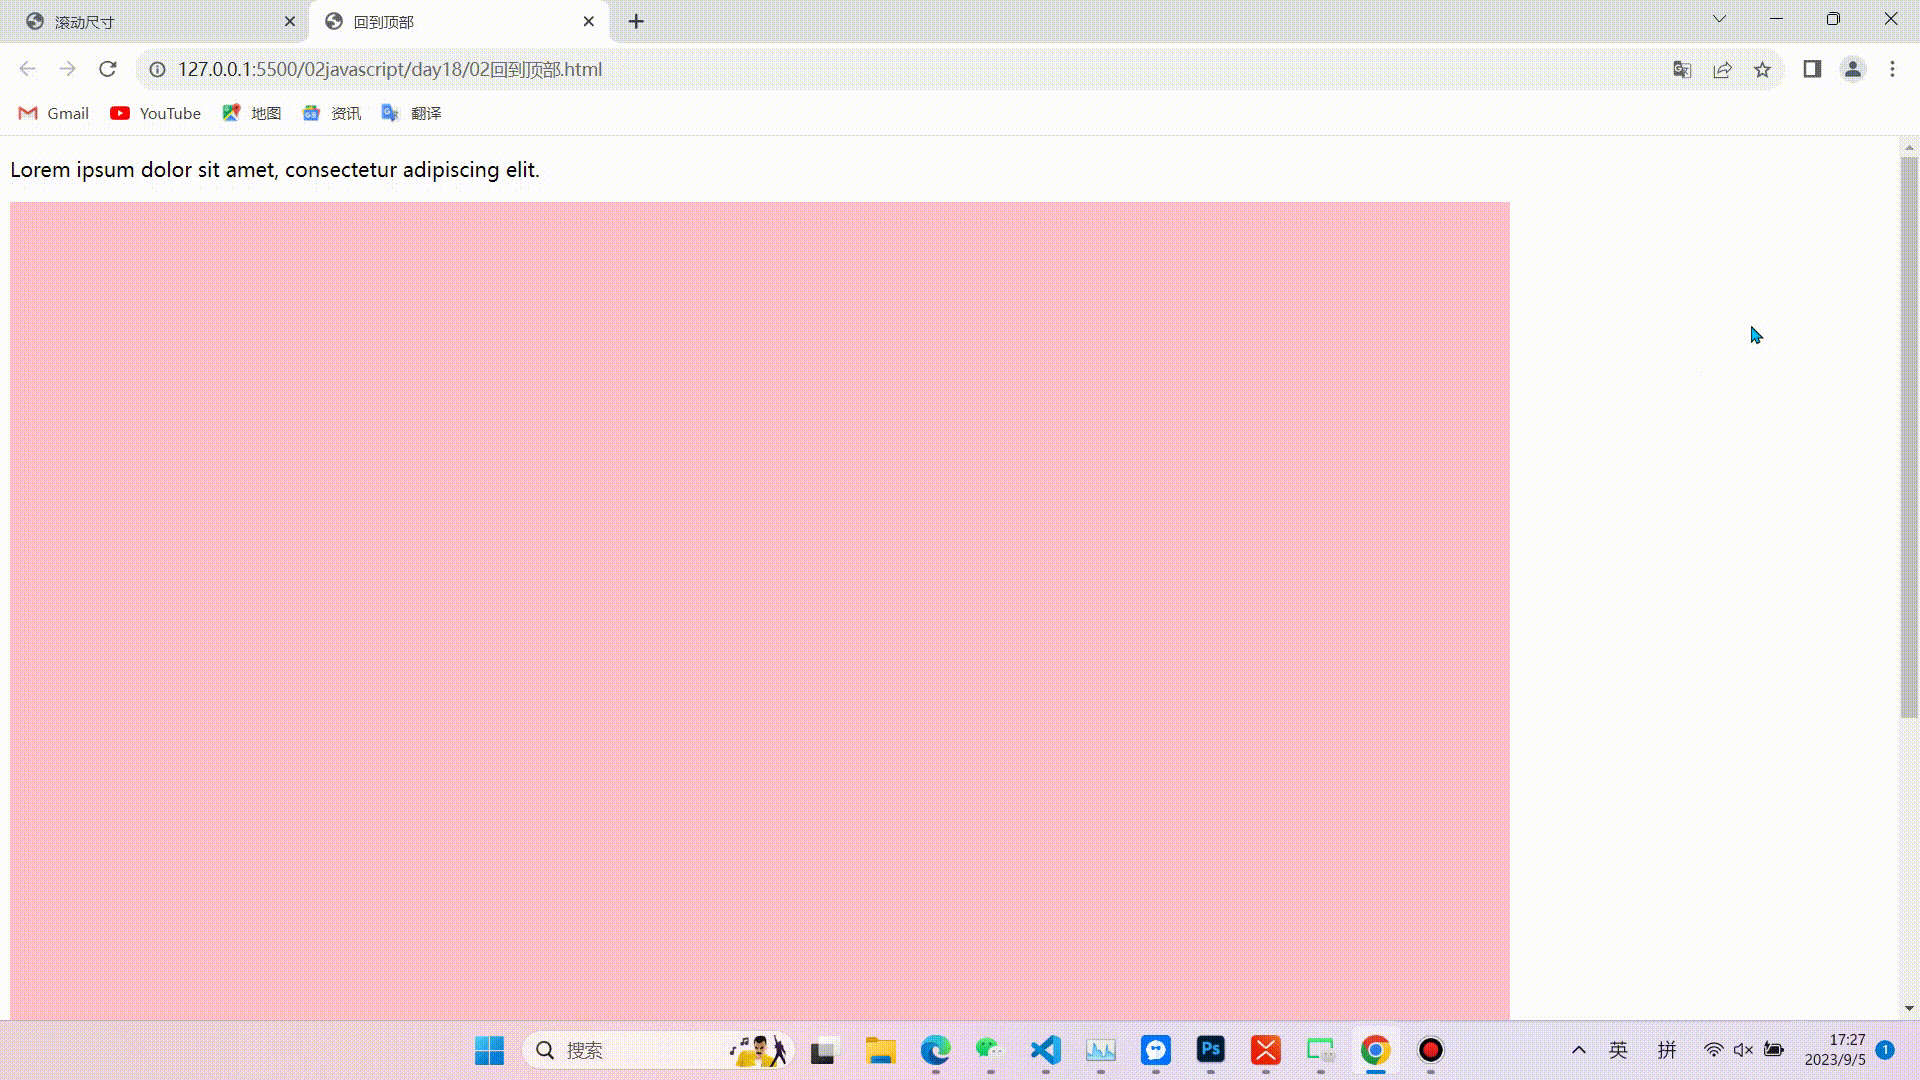
1.缓慢回到顶部
效果图
相关代码(代码较长,且注释比较详细不在逐行讲解,重点掌握实现的思路和对知识点的运用)
2.懒加载(会单独写一篇文章来讲)
前言(可以根据图示找到需要的尺寸,便于理解)
在js中我们可以通过dom操作获取想要得到的尺寸,并对其进行一系列操作使其可以帮助我们实现动态布局、响应式设计、动画效果、碰撞检测等一系列功能。在这篇文章中,我们将了解常用的dom尺寸,并配合相关案例,来帮助我们了解和掌握这部分知识。
内尺寸
内尺寸
clientWidth 包含左右padding和宽度width(忽略滚动条的宽度)
clientHeight 包含上下padding和height(忽略滚动条的高度)
clientTop 获取元素上边框的大小
clientLeft 获取元素左边框的大小
外尺寸
外尺寸(常用)
offsetWidth 包含左右padding 和 width 以及 border,包含滚动条宽度
offsetHeight 包含上下padding 和 height 以及border ,包含滚动条高度
offsetParent:获取当前元素对象具有定位属性的父级元素
offsetParent:获取当前元素对象具有定位属性的父级元素,如果所有的父级元素都没 定位属性,那么在标准浏览器下,offsetParent 指的是body,ie下是html
body和html 的offsetParent 都是null
offsetLeft 指的是 当前元素的左边框距离 offsetParent 左边框的距离
offsetTop 指的是 当前元素的上边框距离 offsetParent 上边框的距离
相关代码 (重在理解)
<!DOCTYPE html>
<html lang="en">
<head><meta charset="UTF-8"><meta name="viewport" content="width=device-width, initial-scale=1.0"><title>dom中常用尺寸</title><style>*{margin: 0;padding: 0;}.wp{width: 300px;height: 300px;border: 10px #f00 solid;padding: 10px;margin: 20px auto;overflow: auto;}.far{width: 600px;margin: 20px auto;border: 10px #f60 solid;padding: 50px 0;position: relative;}</style>
</head>
<body><div class="far"><div class="wp">豫章故郡,洪都新府,星分翼轸,地接衡庐豫章故郡,洪都新府,星分翼轸,地接衡庐豫章故郡,洪都新府,星分翼轸,地接衡庐豫章故郡,洪都新府,星分翼轸,地接衡庐豫章故郡,洪都新府,星分翼轸,地接衡庐豫章故郡,洪都新府,星分翼轸,地接衡庐豫章故郡,洪都新府,星分翼轸,地接衡庐豫章故郡,洪都新府,星分翼轸,地接衡庐豫章故郡,洪都新府,星分翼轸,地接衡庐豫章故郡,洪都新府,星分翼轸,地接衡庐豫章故郡,洪都新府,星分翼轸,地接衡庐豫章故郡,洪都新府,星分翼轸,地接衡庐豫章故郡,洪都新府,星分翼轸,地接衡庐豫章故郡,洪都新府,星分翼轸,地接衡庐豫章故郡,洪都新府,星分翼轸,地接衡庐豫章故郡,洪都新府,星分翼轸,地接衡庐豫章故郡,洪都新府,星分翼轸,地接衡庐豫章故郡,洪都新府,星分翼轸,地接衡庐</div></div>
</body>
</html>
<script>let wp = document.querySelector('.wp')/*内尺寸clientWidth 包含左右padding和宽度width(忽略滚动条的宽度)clientHeight 包含上下padding和height(忽略滚动条的高度)clientTop 获取元素上边框的大小clientLeft 获取元素左边框的大小外尺寸offsetWidth 包含左右padding 和 width 以及 border,包含滚动条宽度offsetHeight 包含上下padding 和 height 以及border ,包含滚动条高度offsetParent:获取当前元素对象具有定位属性的父级元素,如果所有的父级元素都没定位属性,那么在标准浏览器下,offsetParent 指的是body,ie下是htmlbody和html 的offsetParent 都是nulloffsetLeft 指的是 当前元素的左边框距离  offsetParent 左边框的距离offsetTop 指的是 当前元素的上边框距离  offsetParent 上边框的距离*/console.log(wp.clientWidth,wp.clientHeight,wp.clientTop,wp.clientLeft);let body = document.body;console.log(body.clientWidth,body.clientHeight);console.log(wp.offsetWidth,wp.offsetHeight);//获取当前元素的定位父元素console.log(wp.offsetParent,wp.offsetLeft,wp.offsetTop);
</script>
滚动尺寸(案例中会用到,常用)
滚动尺寸scrollWidth( scrollHeight )(重点理解)
scrollWidth滚动尺寸 返回值,当子级元素内容宽度大于 目标元素内容宽度的时候,那么
scrollWidth=子级盒模型的宽度+左右padding ; 当子级元素内容宽度小于目标元素内容的时候
scrollWidth = width + 左右padding
scrollHeight 和 scrollWidth一致
垂直滚动条与元素顶部距离scrollTop
scrollTop 垂直滚动条与元素顶部距离,可以理解为元素内容被卷上去的高度,可以设置该值
水平滚动条与元素左边距离 scrollLeft
scrollLeft 水平滚动条与元素左边距离,可以理解为元素内容被卷到左边的宽度,可以设置该值
相关代码
<!DOCTYPE html>
<html lang="en">
<head><meta charset="UTF-8"><meta name="viewport" content="width=device-width, initial-scale=1.0"><title>滚动尺寸</title><style>*{margin: 0;padding: 0;}.wp{width: 400px;height: 400px;border: 1px #000 solid;overflow: auto;padding: 0 30px;}.cont{width: 800px;height: 800px;background: pink;}#toTop{width: 60px;height: 60px;background-color: pink;text-align: center;line-height: 30px;position: fixed;right: 10px;bottom: 10px;cursor: pointer;user-select: none;}</style>
</head>
<body><div class="wp"><div class="cont">滕王高阁临江,飞羽阿打卡搭嘎含税单价<br>滕王高阁临江,飞羽阿打卡搭嘎含税单价<br>滕王高阁临江,飞羽阿打卡搭嘎含税单价<br>滕王高阁临江,飞羽阿打卡搭嘎含税单价<br>滕王高阁临江,飞羽阿打卡搭嘎含税单价<br>滕王高阁临江,飞羽阿打卡搭嘎含税单价<br>滕王高阁临江,飞羽阿打卡搭嘎含税单价<br>滕王高阁临江,飞羽阿打卡搭嘎含税单价<br>滕王高阁临江,飞羽阿打卡搭嘎含税单价<br>滕王高阁临江,飞羽阿打卡搭嘎含税单价<br>滕王高阁临江,飞羽阿打卡搭嘎含税单价<br>滕王高阁临江,飞羽阿打卡搭嘎含税单价<br>滕王高阁临江,飞羽阿打卡搭嘎含税单价<br>滕王高阁临江,飞羽阿打卡搭嘎含税单价<br>滕王高阁临江,飞羽阿打卡搭嘎含税单价<br></div></div><button id="btn">点击获取卷上去的高度</button><div style="height: 2000px;"></div><span id="toTop">回到 <br> 顶部</span>
</body>
</html>
<script>/*scrollWidth滚动尺寸 返回值,当子级元素内容宽度大于 目标元素内容宽度的时候,那么scrollWidth=子级盒模型的宽度+左右padding  ; 当子级元素内容宽度小于目标元素内容的时候scrollWidth = width + 左右paddingscrollHeight 和 scrollWidth一致scrollTop  垂直滚动条与元素顶部距离,可以理解为元素内容被卷上去的高度,可以设置该值scrollLeft 水平滚动条与元素左边距离,可以理解为元素内容被卷到左边的宽度,可以设置该值*/let wp = document.querySelector('.wp') let btn = document.querySelector('#btn')console.log(wp.scrollWidth,wp.scrollHeight,wp.scrollTop);btn.onclick=function(){wp.scrollTop = 400;console.log(wp.scrollTop);}//回到顶部let timmer;let totop= document.querySelector('#toTop')toTop.onclick = function(){//首先获取卷上去的高度clearInterval(timmer)timmer = setInterval(function(){let h = document.documentElement.scrollTop;console.log(h);if(h>0){h-=100;document.documentElement.scrollTop == h;}else{document.documentElement.scrollTop == 0;clearInterval(timmer)}},20);}
</script>
案例(要理解)
1.缓慢回到顶部
效果图
相关代码(代码较长,且注释比较详细不在逐行讲解,重点掌握实现的思路和对知识点的运用)
<!DOCTYPE html>
<html>
<head><title>回到顶部</title><style>#backToTop {position: fixed;bottom: 20px;right: 20px;width: 50px;height: 50px;background-color: #333;color: #fff;font-size: 20px;text-align: center;line-height: 50px;cursor: pointer;opacity: 0.7;transition: opacity 0.3s;}#backToTop:hover {opacity: 1;}.wp{height: 3000px;width: 1200px;background-color: pink;}</style>
</head>
<body><div id="content"><!-- Your page content here --><p>Lorem ipsum dolor sit amet, consectetur adipiscing elit.</p><!-- ... --></div><div class="wp"></div><div id="backToTop">^</div><script>// 获取“回到顶部”按钮元素var btn = document.getElementById("backToTop");// 添加点击事件监听btn.addEventListener("click", function() {// 获取当前滚动位置var scrollTop = document.documentElement.scrollTop || document.body.scrollTop;// 定义一个动画函数function scrollToTop() {// 计算每一帧滚动的距离var scrollStep = Math.max(scrollTop / 30, 10);// 获取当前滚动位置var currentScrollTop = document.documentElement.scrollTop || document.body.scrollTop;// 如果还没有到达顶部,则继续滚动if (currentScrollTop > 0) {// 计算下一帧的滚动位置var newScrollTop = currentScrollTop - scrollStep;// 设置滚动位置document.documentElement.scrollTop = newScrollTop;document.body.scrollTop = newScrollTop;// 使用 setTimeout 调用下一帧滚动setTimeout(scrollToTop, 10);}}// 启动滚动动画scrollToTop();});// 监听页面滚动事件,控制按钮的显示与隐藏window.addEventListener("scroll", function() {var scrollTop = document.documentElement.scrollTop || document.body.scrollTop;if (scrollTop > 300) {btn.style.display = "block";} else {btn.style.display = "none";}});</script>
</body>
</html>
2.懒加载(会单独写一篇文章来讲)
对于懒加载的内容,我会单独写一篇文章进行详细介绍,以便更好地解释懒加载的概念、原理和使用方法,并综合使用DOM尺寸的情况进行说明。期待您的关注和期待!在文章完成后,我将很高兴为您提供反馈或帮助。谢谢!


![[VSCode] 替换掉/去掉空行](https://img-blog.csdnimg.cn/f7d004f2c4d74e63b2121af213b8230b.png)
![TypeError [ERR_UNKNOWN_FILE_EXTENSION]: Unknown file extension “.ts“ for xxx](https://img-blog.csdnimg.cn/97d9fd1f2630479caa2743923d23df8c.png)