文章目录
- Nginx
- 什么是Nginx
- Linux安装与配置Nginx
- 编译安装Nginx
- nignx使用
- nginx默认首页配置
- 案例
- localtion的匹配规则
- Nginx虚拟主机
- 基于多IP的虚拟主机
- 基于多端口的虚拟主机
- 基于域名的虚拟机主机
- 反向代理
- 案例①
- 案例②
- 负载均衡
- 案例①
- 案例②
- 分配策略
- 动静分离
- 案例
- 配置Nginx网关服务器
- Nginx借助keepalive实现高可用集群
- 实现效果
- 案例
- nginx配置文件结构图
Nginx
什么是Nginx
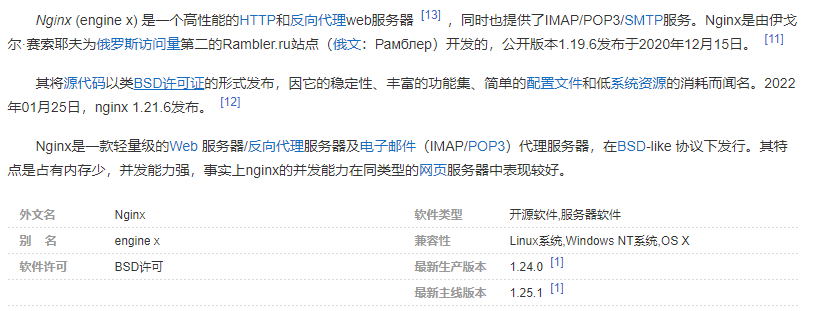
Nginx(发音为"engine-x")是一款开源的高性能Web服务器和反向代理服务器。因它的稳定性、丰富的功能集、简单的配置文件和低系统资源的消耗而闻名。
下图来自百度百科
Nginx的特点
-
高性能、高并发
-
扩展性好
-
异步非阻塞的事件驱动模型
IO模型
同步阻塞:程序在进行I/O操作时会被阻塞,直到I/O操作完成后才会继续执行下一步,期间程序会一直阻塞等待,直到得到操作结果为止。这种方式下,程序需要等待操作完成后才能进行下一步操作,因此效率较低
异步阻塞:程序在进行I/O操作时不会阻塞,而是可以继续执行其他操作。但是,当I/O操作完成后,程序必须等待操作完成后才能处理I/O的结果。这种方式下,程序可以不停顿地进行其他操作,但是需要等待I/O操作完成后才能处理I/O的结果
同步非阻塞:程序进行I/O操作时不会阻塞,但是需要不停地轮询I/O操作是否完成,直到I/O操作完成后才能进行下一步操作。这种方式下,程序可以不停顿地进行其他操作,但是需要不停地轮询I/O操作是否完成,因此效率较低
异步非阻塞:程序进行I/O操作时不会阻塞,而且可以继续执行其他操作。当I/O操作完成后,程序会收到通知,并进行处理。这种方式下,程序可以不停顿地进行其他操作,而且只需要在I/O操作完成后才处理I/O的结果,因此效率较高
Linux安装与配置Nginx
编译安装Nginx
官方文档:https://nginx.org/en/docs/
nginx rpm包下载地址:http://nginx.org/packages/rhel/7/x86_64/RPMS/
nginx源码包下载地址:http://nginx.org/download/
安装依赖
[root@nginx ~]# yum install -y make gcc-c++ pcre pcre-devel zlib-devel openssl openssl-devel
下载源码包
[root@nginx ~]# mkdir /usr/java
[root@nginx ~]# wget -O /usr/java/nginx-1.8.0.tar.gz  http://nginx.org/download/nginx-1.8.0.tar.gz
解压编译安装
[root@nginx ~]# cd /usr/java/
[root@nginx java]# tar -zxvf nginx-1.8.0.tar.gz
[root@nginx java]# cd nginx-1.8.0
[root@nginx nginx-1.8.0]# ls
auto  CHANGES  CHANGES.ru  conf  configure  contrib  html  LICENSE  man  README  src
[root@nginx nginx-1.8.0]# ./configure
[root@nginx nginx-1.8.0]# ls
auto  CHANGES  CHANGES.ru  conf  configure  contrib  html  LICENSE  Makefile  man  objs  README  src
# 生成了Makefile
[root@nginx nginx-1.8.0]# make && make install
安装完成查看nginx的安装目录
[root@nginx nginx-1.8.0]# whereis nginx
nginx: /usr/local/nginx
[root@nginx nginx-1.8.0]# tree /usr/local/nginx/
/usr/local/nginx/
├── conf
│   ├── fastcgi.conf
│   ├── fastcgi.conf.default
│   ├── fastcgi_params
│   ├── fastcgi_params.default
│   ├── koi-utf
│   ├── koi-win
│   ├── mime.types
│   ├── mime.types.default
│   ├── nginx.conf
│   ├── nginx.conf.default
│   ├── scgi_params
│   ├── scgi_params.default
│   ├── uwsgi_params
│   ├── uwsgi_params.default
│   └── win-utf
├── html
│   ├── 50x.html
│   └── index.html
├── logs
└── sbin└── nginx
查看nginx版本并开启Nginx
[root@nginx nginx-1.8.0]# cd /usr/local/nginx/sbin/
[root@nginx sbin]# ./nginx -v      # 查看nginx版本
nginx version: nginx/1.8.0
[root@nginx sbin]# ./nginx         # 启动nginx
[root@nginx sbin]# curl localhost
<!DOCTYPE html>
<html>
<head>
<title>Welcome to nginx!</title>
<style>body {width: 35em;margin: 0 auto;font-family: Tahoma, Verdana, Arial, sans-serif;}
</style>
</head>
<body>
<h1>Welcome to nginx!</h1>
<p>If you see this page, the nginx web server is successfully installed and
working. Further configuration is required.</p><p>For online documentation and support please refer to
<a href="http://nginx.org/">nginx.org</a>.<br/>
Commercial support is available at
<a href="http://nginx.com/">nginx.com</a>.</p><p><em>Thank you for using nginx.</em></p>
</body>
</html>
查看端口
防火墙放行80端口
[root@nginx sbin]# firewall-cmd --zone=public --add-port=80/tcp --permanent
success
[root@nginx sbin]# firewall-cmd --reload
success
浏览器访问
[root@nginx sbin]# hostname -I
192.168.200.10

nignx使用
nginx              # 启动
nginx  -V          # 查看当前版本及编译配置信息
nginx  -t          # 检查配置文件语法是否正确
nginx  -s  stop    # 直接关闭worker子进程
nginx  -s  quit    # 等待worker子进程正确处理完请求后关闭
nginx  -s  reload  # 重新读取配置文件
nginx  -s  reopen  # 重新打开日志记录
nginx默认首页配置
[root@nginx nginx]# whereis nginx
nginx: /usr/local/nginx
[root@nginx nginx]# ls
client_body_temp  conf  fastcgi_temp  html  logs  proxy_temp  sbin  scgi_temp  uwsgi_temp
[root@nginx nginx]# vim conf/nginx.conf
worker_processes  1;
events {worker_connections  1024;
}http {include       mime.types;default_type  application/octet-stream;sendfile        on;keepalive_timeout  65;# 我们刚刚访问的网页就是访问的这台虚拟主机出现的效果    server {    # 配置虚拟主机listen       80;         # 监听80端口server_name  localhost;  # IP或主机名或域名location / {             # 配置URL路径的匹配规则root   html;         # 指定网站的根目录为html目录index  index.html index.htm;  # 指定默认访问的文件名为index.html或index.htm}error_page   500 502 503 504  /50x.html; # 错误页面处理方式location = /50x.html {   # 配置当出现500、502、503、504错误时,显示的错误页面路径root   html;         # 指定错误页面的根目录为html目录}}
}
案例
要求:修改配置文件要求访问本机IP监听8080端口,访问chenshiren.org页面时会显示Hi CSQ
# 1.修改配置文件
[root@nginx nginx]# vim conf/nginx.conf
listen       8080;  # 修改内容# 2.修改hosts映射
[root@nginx nginx]# cat /etc/hosts
127.0.0.1   localhost localhost.localdomain localhost4 localhost4.localdomain4
::1         localhost localhost.localdomain localhost6 localhost6.localdomain6
192.168.200.10 chenshiren.org # 添加这一行# 3.添加html文件
[root@nginx nginx]# echo "<b>Hi CSQ</b>" > /usr/local/nginx/html/hello.html # 4.Nginx的可执行文件路径添加到了系统的环境变量中
# 这样你以后要开启Nginx 直接输入 nginx 开启即可不用再次输入绝对路径
[root@nginx nginx]# echo ${PATH}
/usr/local/sbin:/usr/local/bin:/usr/sbin:/usr/bin:/root/bin
[root@nginx ~]# echo "export  PATH=/usr/local/sbin:/usr/local/bin:/usr/sbin:/usr/bin:/root/bin:/usr/local/nginx/sbin/" >> /etc/profile
[root@nginx ~]# source /etc/profile# 5.重新加载配置文件
[root@nginx nginx]# nginx -s reload
访问
[root@nginx nginx]# curl chenshiren.org:8080/hello.html
<b>Hi CSQ</b>
如果你想要用 windows 访问的话需要给 windows 主机添加映射
只须在hosts文件里面添加如下信息
192.168.200.10 chenshiren.org

浏览器访问

如果我们在nginx.conf文件中添加hello.html为默认访问文件名的话那么你直接输入chenshiren.org:8080就可以直接访问 如下图

localtion的匹配规则
精确匹配:使用"=“前缀来进行精确匹配。例如:location = /path,只会匹配到完全等于”/path"的请求路径
location = /image.jpg {root /image;}
# "root"指令指定了服务器上存放静态文件的根目录,即"/image"目录
# 所以,Nginx会在"/image"目录下寻找名为"image.jpg"的文件
# 如果该文件存在,Nginx会将该文件返回给用户;如果不存在,则返回404错误
正则表达式匹配:使用"“或”*“前缀来进行正则表达式匹配。例如:location ~ /path,会匹配到符合正则表达式”/path"的请求路径,区分大小写;location ~* /path,会匹配到符合正则表达式"/path"的请求路径,不区分大小写。
location ~* \.(GIF|png|jpg|jpeg) {root /home;}
可以看到是不区分大小写的

前缀匹配:使用"^~“前缀来进行前缀匹配。例如:location ^~ /path,会匹配到以”/path"开头的请求路径。
location ^~ /image/ {root /home;}
# 这个配置使用了前缀匹配,只要请求路径以"/image/"开头,不管后面是什么
# 都会匹配到该配置。例如,"/image/abc.jpg"等都会匹配到对应的文件。
通用匹配:使用location /来进行通用匹配,它会匹配到所有请求路径
location / {root /home;}
# 当用户请求的URL路径为"/"时,Nginx会在指定的"root"目录下寻找与请求路径匹配的文件
# 如果找到了对应的文件,Nginx会将该文件返回给用户作为响应
# 如果找不到文件,Nginx会返回404错误。
Nginx虚拟主机
基于多IP的虚拟主机
基于多IP的虚拟主机:listen监听不同网卡的IP,端口可相同
1. 添加多个IP
[root@nginx ~]# vim /etc/sysconfig/network-scripts/ifcfg-ens34
# 添加如下信息
IPADDR=192.168.200.10
PREFIX=24
IPADDR1=192.168.200.20
PREFIX1=24
IPADDR2=192.168.200.30
PREFIX2=24
[root@nginx ~]#  ip  a2. 编辑nginx.conf文件
worker_processes  1;
events {worker_connections  1024;
}
http {include       mime.types;default_type  application/octet-stream;sendfile        on;keepalive_timeout  65;server {listen       8000;server_name  192.168.200.10;location /IP10 {root html;index hello.html;}error_page   500 502 503 504  /50x.html;location = /50x.html {root   html;}}server {listen       8000;server_name  192.168.200.20;location /IP20 { alias /html/IP20;          index 20.html;}   error_page   500 502 503 504  /50x.html;location = /50x.html {root   html;}   }   server {listen       8000;server_name  192.168.200.30;location /IP30 {alias /html/IP30;index 30.html;}}
}3. 创建文件写入html
[root@nginx ~]# mkdir -p /html/{IP20,IP30}
[root@nginx ~]# echo "I am 192.168.200.20" > /html/IP20/20.html
[root@nginx ~]# echo "I am 192.168.200.30" > /html/IP30/30.html4. 重新读取配置文件
[root@nginx nginx]# nginx -s reload5. 查看端口
[root@nginx nginx]# netstat -tlnp |grep 8000
tcp        0      0 0.0.0.0:8000       0.0.0.0:*     LISTEN     17038/nginx: master 6. 防火墙开放8000端口
[root@nginx nginx]# firewall-cmd --add-port=8000/tcp --permanent
[root@nginx nginx]# firewall-cmd --reload
访问浏览器
[root@nginx nginx]# hostname -I
192.168.200.10 192.168.200.20 192.168.200.30 


基于多端口的虚拟主机
基于多端口的虚拟主机:listen监听不同端口
1. 编辑nginx.conf文件
[root@nginx nginx]# vim conf/nginx.conf
worker_processes  1;
events {worker_connections  1024;
}
http {include       mime.types;default_type  application/octet-stream;sendfile        on;keepalive_timeout  65;server {listen       8001;server_name  localhost;location /port8001 {root html;index hello.html;}error_page   500 502 503 504  /50x.html;location = /50x.html {root   html;}}server {listen       8002;server_name  localhost;location /port8002 { alias /port/8002;index 8002.html;}   }   server {listen       8003;server_name  localhost;location /port8003 {alias /port/8003;index 8003.html;}}
}2. 检查并重新加载配置文件
[root@nginx nginx]# nginx -t
nginx: the configuration file /usr/local/nginx/conf/nginx.conf syntax is ok
nginx: configuration file /usr/local/nginx/conf/nginx.conf test is successful
# 看到OK就是说明配置文件没问题
[root@nginx nginx]# nginx -s reload3. 修改html文件
[root@nginx ~]# mkdir -p /port/{8002,8003}
[root@nginx ~]# echo "<b>8002</b>" > /port/8002/8002.html
[root@nginx ~]# echo "<b>8003</b>" > /port/8003/8003.html4. 查看端口
[root@nginx nginx]# netstat -tlnp |grep 800*
tcp        0      0 0.0.0.0:8001    0.0.0.0:*     LISTEN      17038/nginx: master
tcp        0      0 0.0.0.0:8002    0.0.0.0:*     LISTEN      17038/nginx: master
tcp        0      0 0.0.0.0:8003    0.0.0.0:*     LISTEN      17038/nginx: master 5. 防火墙放行
[root@nginx nginx]# firewall-cmd --add-port=8001/tcp --permanent
[root@nginx nginx]# firewall-cmd --add-port=8002/tcp --permanent
[root@nginx nginx]# firewall-cmd --add-port=8003/tcp --permanent
[root@nginx nginx]# firewall-cmd --reload
浏览器访问
[root@nginx nginx]# hostname -I
192.168.200.10


基于域名的虚拟机主机
基于域名的虚拟主机:server_name为不同域名
1. 添加hosts映射
[root@nginx ~]# vim /etc/hosts
127.0.0.1   localhost localhost.localdomain localhost4 localhost4.localdomain4
::1         localhost localhost.localdomain localhost6 localhost6.localdomain6
# 添加如下内容
192.168.200.10 chenshiren.student.org
192.168.200.10 csq.student.org
192.168.200.10 Linux.student.org2. 编辑配置文件nginx.conf
worker_processes  1;
events {worker_connections  1024;
}http {include       mime.types;default_type  application/octet-stream;sendfile        on;keepalive_timeout  65;server {listen       8000;server_name  chenshiren.student.org;location /chenshiren {root html;}error_page   500 502 503 504  /50x.html;location = /50x.html {root   html;}}server {listen       8000;server_name  csq.student.org;location /domaincsq { alias /html/domaincsq;}   }   server {listen       8000;server_name  linux.student.org;location /domainlinux {alias /html/domainlinux;}}
}3. 创建html文件
[root@nginx ~]# mkdir /html/{domaincsq,domainlinux}
[root@nginx ~]# echo "csq.student.org" > /html/domaincsq/domain.html
[root@nginx ~]# echo "linux.student.org" > /html/domainlinux/domain.html
[root@nginx ~]# echo "chenshiren.student.org" > /usr/local/nginx/html/domain.html4. 检查并重新加载配置文件
[root@nginx nginx]# nginx -t
nginx: the configuration file /usr/local/nginx/conf/nginx.conf syntax is ok
nginx: configuration file /usr/local/nginx/conf/nginx.conf test is successful
# 看到OK就是说明配置文件没问题
[root@nginx nginx]# nginx -s reload
用curl访问
[root@nginx ~]# hostname -I
192.168.200.10
[root@nginx ~]# curl chenshiren.student.org:8000/chenshiren/domain.html
chenshiren.student.org
[root@nginx ~]# curl csq.student.org:8000/domaincsq/domain.html
csq.student.org
[root@nginx ~]# curl linux.student.org:8000/domainlinux/domain.html
linux.student.org
添加windows hosts映射

浏览器访问


反向代理
反向代理:当外部客户端发送请求时,反向代理服务器将请求转发到内部真实服务器,并将响应返回给客户端。客户端并不知道自己正在与真实服务器通信,而是与反向代理服务器进行通信。反向代理服务器可以根据不同的规则和算法,对请求进行负载均衡,将请求转发给多个真实服务器,从而提高系统的性能和可靠性。
想象一下你去餐厅吃饭,你点了一份菜单上的菜品。但你并不直接与厨房的厨师交流,而是将你的点餐通过服务员传递给厨师,然后服务员将菜品端到你面前。在这个例子中,服务员就是反向代理服务器。它接收你的请求,并将请求转发给真正处理请求的服务器,然后将结果返回给你。你并不知道实际上是哪个厨师准备了你的菜,你只与服务员接触。
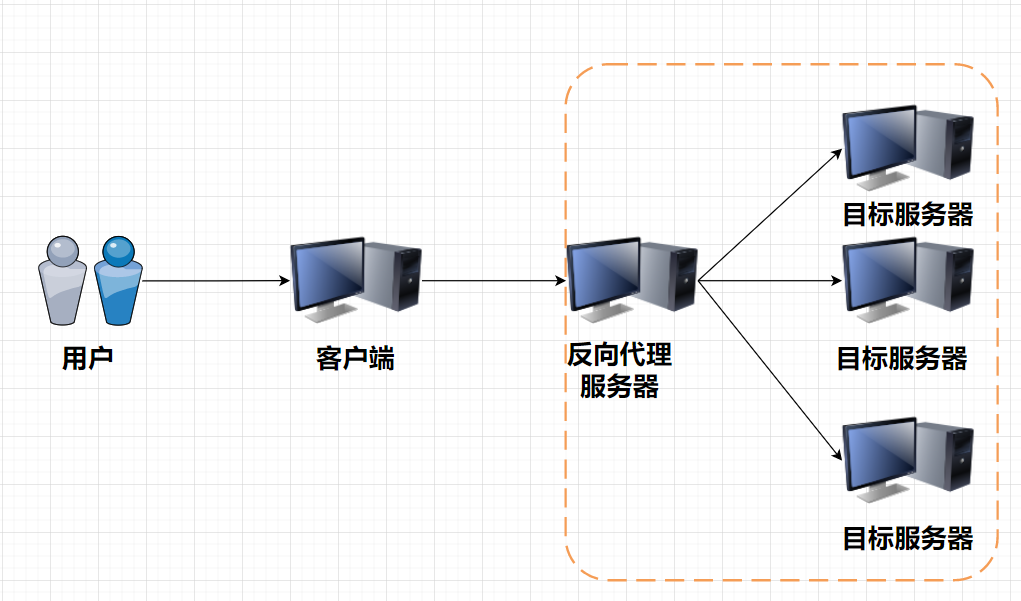
正向代理:当客户端发送请求时,请求先发送到正向代理服务器,然后由代理服务器向目标服务器发送请求,并将目标服务器的响应返回给客户端。正向代理服务器可以代表客户端向目标服务器发起请求,隐藏客户端的真实IP地址和身份信息。常见的应用场景是在内网无法直接访问外网时,通过配置代理服务器,让代理服务器代表内网客户端向外网服务器发起请求,从而实现对外网的访问。
如果你想要购买一本海外的图书,但你所在的国家无法直接访问海外的网站。你找到了一个代购服务,你将你想要购买的书名和款项交给代购服务,代购服务帮你在海外的网站上购买,并将书寄到你的地址。在这个例子中,代购服务就是正向代理。它代表你去请求海外的网站并获取信息,然后将结果返回给你。你并不直接与海外的网站交互,而是通过代购服务来实现。

案例①
当你访问www.csq.org的(Nginx首页),最终代理到www.baidu.com(首页)
1. 修改host映射
[root@nginx ~]# vim /etc/hosts
127.0.0.1   localhost localhost.localdomain localhost4 localhost4.localdomain4
::1         localhost localhost.localdomain localhost6 localhost6.localdomain6
192.168.200.10 www.csq.org  # 添加这一行2. 修改配置文件nginx.confserver {listen       80;server_name  www.csq.org;location / {proxy_pass http://www.baidu.com;}
3. 重新读取配置文件
[root@nginx ~]# nginx -s reload4. curl访问
[root@nginx ~]# curl www.csq.org
<!DOCTYPE html>
# ....(省略)....
<title>百度一下,你就知道</title></head>
# ....(省略)....
如果你需要访问 Windows 则需要配置 Windows 的hosts映射
案例②
当你访问192.168.200.10:8000/apache1 会跳转到 apache1的首页 当你访问192.168.200.10:8000/apache2 会跳转到apache2的首页
1. 配置两台Apache服务器
apache1 192.168.200.20
apache2 192.168.200.30
2. 安装apache
yum install -y httpd
3. 配置http文件
sed -i "s/Listen 80/Listen 9999/g" /etc/httpd/conf/httpd.conf
4. 创建html主页文件
mkdir -p /var/www/html/apache1/
echo "192.168.200.20:9999 apache1"
5. 重启httpd服务
systemctl restart httpd
nginx端配置
1.配置nginx.conf文件server {listen       8000;server_name  192.168.200.10;location / {root html;index index.html index.htm;}location ~ /apache1 {proxy_pass http://192.168.200.20:9999;}location ~ /apache2 {proxy_pass http://192.168.200.30:9988;}
2. 重新读取配置文件
nginx -s reload
浏览器访问


负载均衡
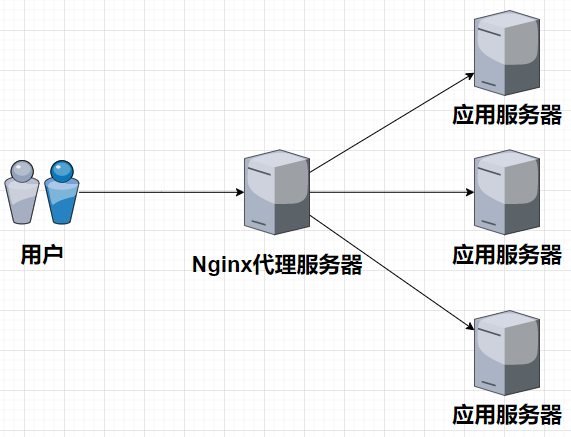
当一个网站需要应对大量的请求时,单一的服务器可能无法承受这个压力,导致网站响应缓慢或者宕机。这种情况下引入负载均衡来解决这个问题。Nginx 负载均衡是一种为了提高系统可用性和可拓展性而设计的解决方案,它可以将请求分配给多个服务器,以避免单个服务器因为过载而导致整个系统的不可用。
Nginx 负载均衡的核心机制是:Nginx 服务器接收客户端请求,将请求分配给后端的多个服务器中的其中一个,收集相应的响应,并将响应返回给客户端。
Nginx要实现负载均衡,则必须通过upstream模块配置后端服务器组
案例①
当用户访问nginx 8000端口时,根据请求策略,分配到不同的Tomcat中
1. 编写两个tomcat服务器的默认站点文件
[root@localhost ~]# mkdir -p /opt/tomcat/apache-tomcat-8.0.52/webapps/csq/
[root@localhost ~]# echo "This is 192.168.200.20:8080 tomcat1" >> /opt/tomcat/apache-tomcat-8.0.52/webapps/csq/hehe.html2. 防火墙开放8080端口
[root@localhost ~]# firewall-cmd --add-port=8080/tcp --permanent
success
[root@localhost ~]# firewall-cmd --reload
success3. 启动tomcat
[root@localhost bin]# ./startup.sh4. 浏览器测试访问5. 修改nginx.conf配置文件
upstream colony {server 192.168.200.20:8080;server 192.168.200.30:8080;
}server {listen       8000;server_name  192.168.200.10;location / {proxy_pass http://colony;}
5. 重新读取nginx配置文件
[root@nginx ~]# nginx -s reload
浏览器访问


每次刷新都会按照顺序依次将请求分配给不同的后端服务器,直到重复分配。默认分配策略
案例②
当用户访问nginx 8000端口时,因为我tomcat1性能较好,tomcat2性能较差,要求用户访问tomcat1较多次,tomat2较少次
1. 修改nginx.conf配置文件upstream colony {server 192.168.200.20:8080 weight=9;server 192.168.200.30:8080 weight=3;}server {listen       8000;server_name  192.168.200.10;location / {proxy_pass http://colony;}
2. 重新读入配置文件
[root@nginx ~]# nginx -s reload
浏览器访问
每次刷新大概率会选择tomcat1这台服务器
分配策略
NGINX负载均衡可以采用不同的分配策略,比如轮询、加权轮询等。它会接收用户的请求,然后根据策略选择其中一台服务器,并将请求转发给它。这样,每台服务器都能够承担一部分请求,避免单一服务器过载。同时,如果其中一台服务器出现故障,NGINX负载均衡会自动将请求转发给其他正常的服务器,保证用户的请求不会被中断。
常用的分配策略有:
轮询:nginx 默认使用的是轮询策略。它会将请求按照顺序轮流分配到每个后端服务器上。如果其中某个后端服务器宕机,nginx会自动将请求转发到其他可用的后端服务器上
例如:有三台服务器 A、B、C,第一个请求分发给 A,第二个请求分发给 B,第三个请求分发给 C,然后再从头开始循环。
如下案例:

ip_hash:nginx根据客户端的IP地址进行哈希运算,将同一个IP的请求始终分发给同一个后端服务器。这样可以确保相同IP的客户端的会话状态一直保持在同一台服务器上。

加权轮询:nginx根据后端服务器的权重值分配请求。权重越高的服务器,处理请求的频率越高。
例如:服务器 A 的权重为 3,服务器 B 的权重为 2,服务器 C 的权重为 1,那么在一轮循环中,服务器 A 将处理 3 个请求,服务器 B 处理 2 个请求,服务器 C 处理 1 个请求。

fair:fair策略是nginx负载均衡器的一种分配策略,它根据后端服务器的响应时间来分配请求,将请求发送给响应时间最短的服务器。

fair第三方模块下载地址:https://github.com/gnosek/nginx-upstream-fair
动静分离
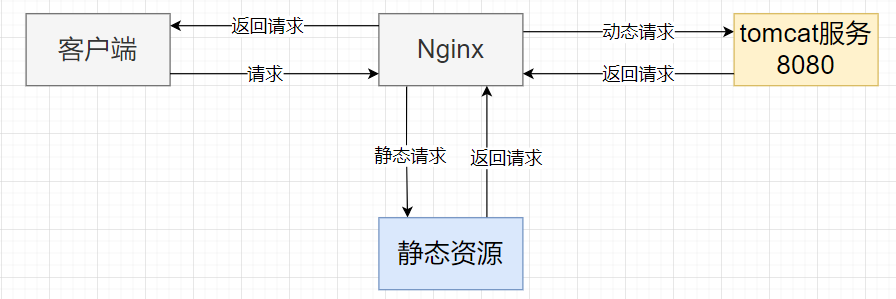
Nginx 动静分离是一种将动态请求和静态请求分别交给不同服务器处理的架构设计模式,通过将静态资源与动态请求分开处理,这样可以提高性能、减少资源浪费、简化架构。
静态资源和动态请求的区别:
-
静态资源:包括图片、CSS、JavaScript 等静态文件,它们的内容在请求期间不会发生变化。
-
动态请求:包括由后端应用程序生成的动态内容,例如根据用户请求生成的 HTML 页面、API 接口的响应等。
动静分离的原理:
- 静态资源由 Nginx 直接提供服务:Nginx 作为静态资源的服务器,可以直接响应客户端的静态资源请求,而无需将请求转发到后端应用服务器。
- 动态请求由后端应用服务器处理:Nginx 通过反向代理将动态请求转发给后端应用服务器处理,后端应用服务器根据请求生成动态内容,并将结果返回给 Nginx,最后由 Nginx 将结果返回给客户端。
案例
在tomcat服务器9988端口和tomcat9999端口下部署jsp页面,jsp页面里面包含静态资源(图片),当用户访问nginx服务器地址,实现动静分离。
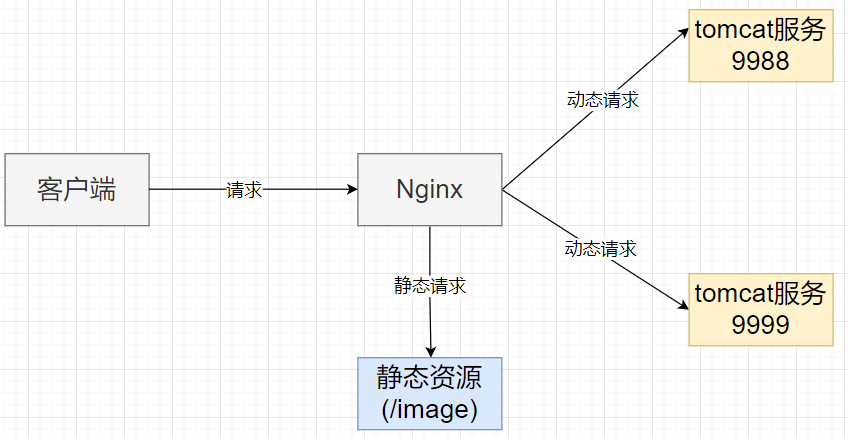
配置静态资源
1. 配置nginx静态资源,修改配置文件upstream colony {server 192.168.200.20:9988 weight=8;server 192.168.200.30:9999 weight=2;}server {listen       8000;server_name  192.168.200.10;location /image {alias /image;autoindex on;}location / {proxy_pass http://colony;}
2. 创建静态资源目录
mkdir /image/3. 上传图片到/image目录下4. 重新读取nginx端的配置文件
nginx -s reload
访问/image静态资源

配置动态资源
1. 在webapps下创建动态资源文件
mkdir webapps/csq/2. 修改tomcat端口
vim conf/server.xml<Connector port="9988" protocol="HTTP/1.1"connectionTimeout="20000"redirectPort="8443" />3. 防火墙放行9988端口
firewall-cmd --add-port=9988/tcp --permanent
fire4. 创建编写trends.jsp
vim webapps/csq/trends.jsp
<b> 192.168.200.20 9999 </b>
</br>
<img src="/image/image.jpg"/>5. 开启tomcat服务器
cd bin/
./startup.sh
访问动态资源

如果将静态资源删除?
# 将/image下的资源移动到/home目录下再次访问
mv /image/image.jpg /home/
可以发现已经访问不到静态资源了

配置Nginx网关服务器
1. 移除tomcat1和tomcat2暴露的端口
[root@localhost ~]# firewall-cmd --list-port
8080/tcp 9988/tcp
[root@localhost ~]# firewall-cmd --remove-port=8080/tcp --permanent
success
[root@localhost ~]# firewall-cmd --remove-port=9988/tcp --permanent
success
[root@localhost ~]# firewall-cmd --reload
[root@localhost ~]# firewall-cmd --list-all
public (active)target: defaulticmp-block-inversion: nointerfaces: ens34sources: services: dhcpv6-client sshports: protocols: masquerade: noforward-ports: source-ports: icmp-blocks: rich rules:
2. 设置firewall 只能通过192.168.200.10这个IP访问tomcat服务器
[root@localhost ~]# firewall-cmd --add-rich-rule="rule family="ipv4" source address="192.168.200.10" port protocol="tcp" port="9988" accept" --permanent
success
[root@localhost ~]# firewall-cmd --reload
success
访问tomcat服务器
通过nginx访问tomcat服务器

Nginx借助keepalive实现高可用集群
在一个大型的网站系统中,通常会有多台服务器同时提供服务,为了保证这些服务器的负载均衡和高可用性,我们可以使用Nginx的keepalive模块。这个模块可以在多台服务器间共享状态信息,根据服务的负载情况进行动态调度,将请求分发到最优的服务器上,提高系统的整体性能和稳定性。
另外,在一个高可用集群中,如果主服务器发生故障,需要及时将服务切换到备份服务器上,保证服务的持续可用性。keepalive模块可以监测主服务器的状态,一旦检测到主服务器故障,它会自动将虚拟IP切换到备份服务器上,确保服务的连续性和可靠性。这样,即使主服务器出现故障,用户也可以无感知地继续使用服务。
实现效果
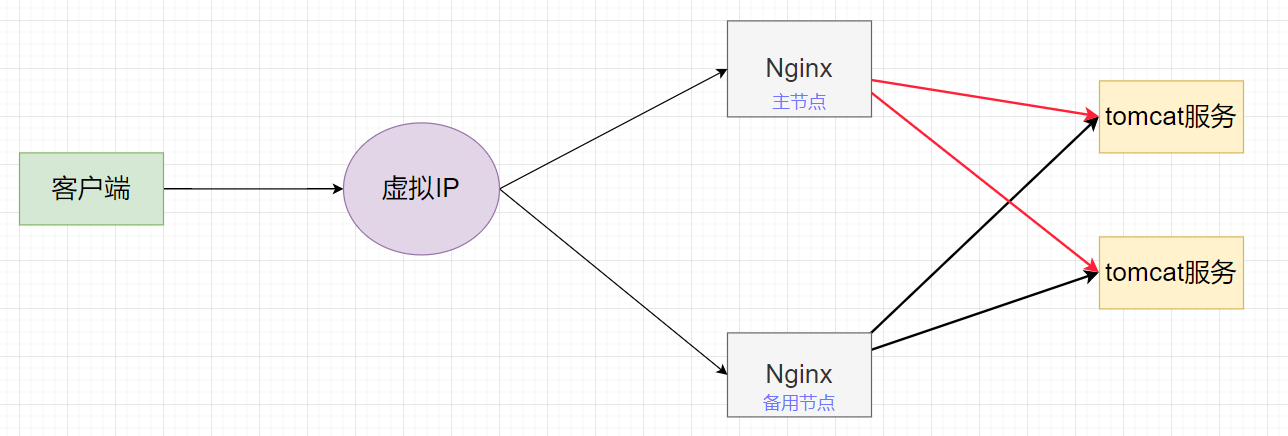
案例
需要两台服务器192.168.200.10和192.168.200.11
两台服务器上都安装nginx
两台服务器端口都设置为8000
# 192.168.200.10 nginx.conf文件
upstream colony {server 192.168.200.20:9988 weight=8;server 192.168.200.30:9999 weight=2;}server {listen       8000;server_name  192.168.200.10;location /image {alias /image;autoindex on;}location / {proxy_pass http://colony;}
# 192.168.200.11 nginx.conf文件upstream colony {server 192.168.200.20:9988 weight=8;server 192.168.200.30:9999 weight=2;}server {listen       8000;server_name  192.168.200.11;location /image {alias /image;autoindex on;}location / {proxy_pass http://colony;}
两台服务器都安装keepalived
# 使用yum安装
[root@localhost ~]# yum install -y keepalived
配置keepalived文件
[root@localhost ~]# vim /etc/keepalived/keepalived.conf
# 修改如下内容
# ...(省略)...
state MASTER           # 备用节点改为 BACKUP
interface ens34        # 网卡
# ...(省略)...
virtual_ipaddress {192.168.200.200 # 虚拟IP}
# ...(省略)...
把两台服务器都开启keepalived并设置开机自启
[root@localhost ~]# systemctl restart keepalived
[root@localhost ~]# systemctl enable keepalived
浏览器测试

模拟宕机情况
当192.168.200.10服务器宕机了我们再次访问浏览器看是否能访问到tomcat1和tomcat2服务
[root@localhost ~]# systemctl stop keepalived
可以访问

如果两台nginx都宕机了就访问不到了
nginx配置文件结构图
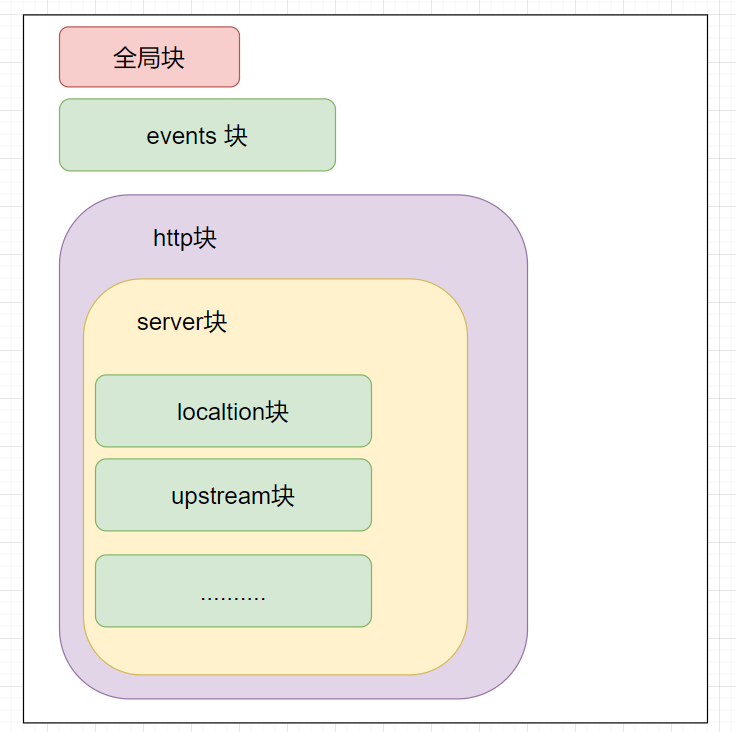
[root@localhost conf]# vim nginx.conf#user  nobody;
worker_processes  1;#error_log  logs/error.log;
#error_log  logs/error.log  notice;
#error_log  logs/error.log  info;#pid        logs/nginx.pid;events {worker_connections  1024;
}http {include       mime.types;default_type  application/octet-stream;#log_format  main  '$remote_addr - $remote_user [$time_local] "$request" '#                  '$status $body_bytes_sent "$http_referer" '#                  '"$http_user_agent" "$http_x_forwarded_for"';#access_log  logs/access.log  main;sendfile        on;#tcp_nopush     on;#keepalive_timeout  0;keepalive_timeout  65;#gzip  on;server {listen       80;server_name  localhost;#charset koi8-r;#access_log  logs/host.access.log  main;location / {root   html;index  index.html index.htm;}#error_page  404              /404.html;# redirect server error pages to the static page /50x.html#error_page   500 502 503 504  /50x.html;location = /50x.html {root   html;}# proxy the PHP scripts to Apache listening on 127.0.0.1:80##location ~ \.php$ {#    proxy_pass   http://127.0.0.1;#}# pass the PHP scripts to FastCGI server listening on 127.0.0.1:9000##location ~ \.php$ {#    root           html;#    fastcgi_pass   127.0.0.1:9000;#    fastcgi_index  index.php;#    fastcgi_param  SCRIPT_FILENAME  /scripts$fastcgi_script_name;#    include        fastcgi_params;#}# deny access to .htaccess files, if Apache's document root# concurs with nginx's one##location ~ /\.ht {#    deny  all;#}}# another virtual host using mix of IP-, name-, and port-based configuration##server {#    listen       8000;#    listen       somename:8080;#    server_name  somename  alias  another.alias;#    location / {#        root   html;#        index  index.html index.htm;#    }#}# HTTPS server##server {#    listen       443 ssl;#    server_name  localhost;#    ssl_certificate      cert.pem;#    ssl_certificate_key  cert.key;#    ssl_session_cache    shared:SSL:1m;#    ssl_session_timeout  5m;#    ssl_ciphers  HIGH:!aNULL:!MD5;#    ssl_prefer_server_ciphers  on;#    location / {#        root   html;#        index  index.html index.htm;#    }#}}
- 全局块: 全局块是配置文件的最外层,用于设置全局性的配置指令。它包含了整个 Nginx 配置的全局设置,如 worker_processes、error_log等。
- events 块: events 块用于配置 Nginx 的事件模型和连接处理。可以设置 worker_connections 来限制每个 worker 进程能够同时处理的连接数
- http 块: http 块是配置 HTTP 服务器的主要部分,用于配置 HTTP 相关的配置指令。它包含了 server 块、upstream 块、location 块等。
- http -> server 块: server 块定义了一个虚拟主机(或称为 server 块),用于处理特定的域名或 IP 地址的请求。它包含了 server_name、listen、location 等指令。
- http -> server -> location 块: location 块用于匹配请求的 URL 路径,并指定相应的处理规则。可以使用正则表达式或精确路径来匹配请求路径,并配置相应的指令,如 root、proxy_pass、try_files 等。
- http -> upstream 块: upstream 块用于配置反向代理,指定后端服务器的地址和负载均衡策略。可以配置多个 upstream 组,每个组可以包含多个服务器。
nginx.conf 配置文件还可以包含一些其他块和指令,如 include、log_format、if 等。这些指令可以用来引入其他配置文件、定义日志格式、实现条件判断等功能。


