文章目录
- transformer
- 原理
- 代码的基础准备
- 位置编码
- Encoder block
- multi-head attention
- Feed Forward
- 自定义encoder block
- Deconder block
- Encoder
- Decoder
- transformer
- 自定义loss 和 学习率
- mask生成函数
- 训练
- 翻译
transformer
这边讲一下这几年如日中天的新的seq2seq模式的transformer,这个模型解决了RNN训练时不能并行训练的慢,提出了self-attention机制,并关注到了注意力机制,也为之后的发展引领了新的时尚。
原理
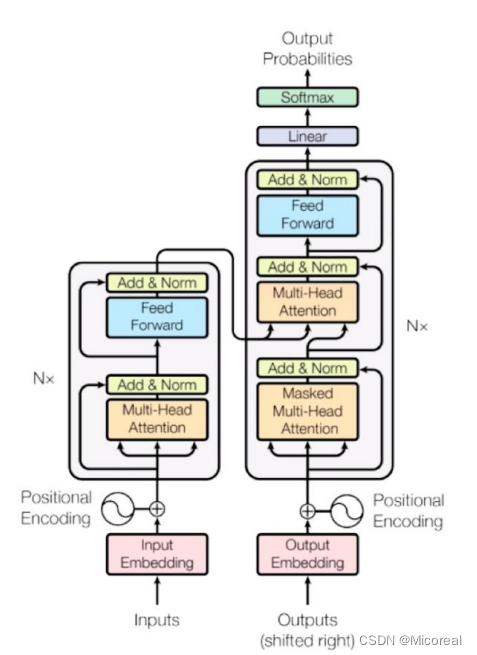
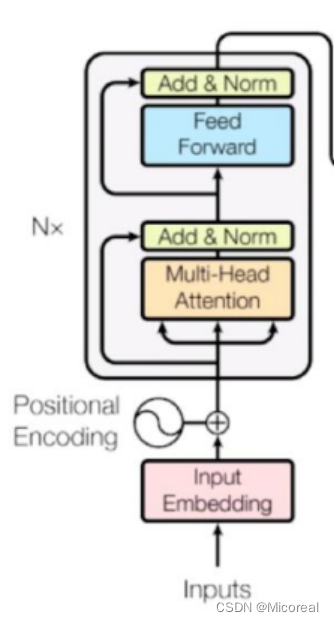
我们首先看一下transformer这个的结构图,然后根据这个结构图进行实现代码
代码的基础准备
import numpy as np
import pandas as pd
import tensorflow as tf
import unicodedata
import re
from sklearn.model_selection import train_test_split
# 数据处理,主要和业务相关,当工作的时候绝大多数也就是将业务和代码相连接,这是十分重要的
# -----------------------------------------------------------------------------
# 数据预处理 去除重读的因子 和带空格以及特殊标点符号的东西
def preprocess_sentence(i):# NFD是转换方法,把每一个字节拆开,Mn是重音,所以去除i = ''.join(c for c in unicodedata.normalize('NFD',i) if unicodedata.category(c)!='Mn')# 把英文或者西班牙文变成纯小写,翻译与大写小写无关,降低影响,并且去掉头尾的空格i = i.lower().strip()# 在单词与跟在其后的标点符号之间插入一个空格i = re.sub(r"([?.!,¿])", r" \1 ", i)# 因为可能有多余空格,所以处理一下i = re.sub(r'[" "]+', " ", i)# 除了 (a-z, A-Z, ".", "?", "!", ","),将所有字符替换为空格i = re.sub(r"[^a-zA-Z?.!,¿]+", " ", i)i = i.rstrip().strip()i = '<start> ' + i + ' <end>'return idef load_dataset(path, num_examples):# lines就是读取之后的每一行的数据列表lines = open(path, encoding='UTF-8').read().strip().split('\n')# i就是一个样本,一个英文样本或者一个西班牙的样本word_pairs = [[preprocess_sentence(i) for i in line.split('\t')]for line in lines[:num_examples]]# 我们这边想要拿英文翻译成西班牙文,而我们查看data当中发现英语在左侧 西班牙语在右侧,所以英语左边应该是inputinputs,targets =zip(*word_pairs)# Tokenizer帮我们把词语式的转换为id式的,filters是黑名单 英语和西班牙语的需要额外自己分别训练inputs_tokenizer = tf.keras.preprocessing.text.Tokenizer(filters='')targets_tokenizer = tf.keras.preprocessing.text.Tokenizer(filters='')# 训练词袋inputs_tokenizer.fit_on_texts(inputs)targets_tokenizer.fit_on_texts(targets)# 把英文或西班牙文转化为数字 sparseinputs_tensor = inputs_tokenizer.texts_to_sequences(inputs)targets_tensor = targets_tokenizer.texts_to_sequences(targets)# 还需要补长或者截断 没有maxlen 就是自动取最长的进行补0inputs_tensor = tf.keras.preprocessing.sequence.pad_sequences(inputs_tensor, padding='post')targets_tensor = tf.keras.preprocessing.sequence.pad_sequences(targets_tensor, padding='post')return inputs_tensor, targets_tensor, inputs_tokenizer, targets_tokenizerdata_path = './data_spa_en/spa.txt'
# 需要训练的数据量 这边取全部,如果觉得训练太久,这边就选小一点
num_examples = 118964
# inp_lang targ_lang 是tokenizer
input_tensor, target_tensor, input_tokenizer, target_tokenizer = load_dataset(data_path, num_examples)
# 这边就不定义测试集了,对于nlp领域来说准确性一般没有什么作用
input_tensor_train, input_tensor_val, target_tensor_train, target_tensor_val = train_test_split(input_tensor, target_tensor, test_size=0.2)
batch_size = 64
embedding_dim = 256
units = 1024
# 训练集
dataset = tf.data.Dataset.from_tensor_slices((input_tensor_train,target_tensor_train)).shuffle(len(input_tensor_train))
dataset = dataset.batch(batch_size,drop_remainder=True)max_input_length = max(len(t) for t in input_tensor)
max_target_length = max(len(t) for t in target_tensor)
input_tokenizer_length = len(input_tokenizer.word_index)
target_tokenizer_length = len(target_tokenizer.word_index)
# -----------------------------------------------------------------------------
这个和之前的那个seq2seq的实现是完全一致的,这边就不细说。
位置编码
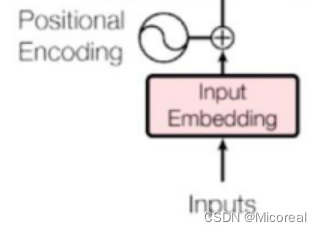
然后我们先实现的是这个位置编码这一部分,首先我们知道的是,我们的inputs的输入会先经过embedding层形状变成(batch-size,num-steps,embedding-dim),然后我们需要加上一个关于位置的矩阵,这个位置矩阵,包含着就是位置的信息,我们这边采用比较常见的sin-cos的方法去构建:
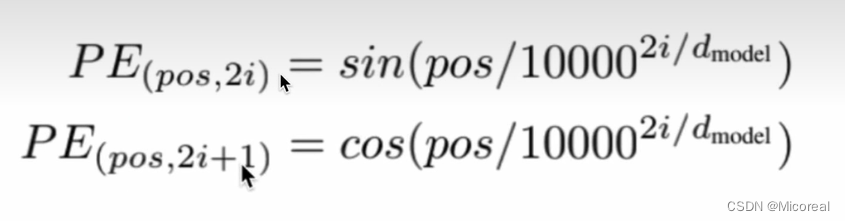
pos的意思就是一句话当中的第几个字,而i代表的就是这个字我们不是经过了embedding之后的第几个维度,也就对应着我们上面的那个输入经过了embedding之后的形状,而这个位置编码实际上就是为了满足让后面的元素和前面的元素相构成关系,也就是前面几个元素的关系和可以推出下一个元素,这样的道理。
具体的数学证明见下:

这边就不细说了,这还是很简单的。
理解了上面,关于如何提取出位置编码,这边就需要有相关的小技巧,我们使用切片的方式进行进行调整。
# 这一步完成的是位置编码
# -----------------------------------------------------------------------------
# # PE(pos, 2i)   = sin(pos / 10000^(2i/d_model))
# # PE(pos, 2i+1)  = cos(pos / 10000^(2i/d_model))
def get_position_embedding(sentence_length, d_model):# sentense_length就是句子的长度num-step d_model就是embedding_dim# 首先我们知道位置编码生成之后需要和外面的embedding后的数据进行相加 形成带有位置信息的数据# 而外面的embedding的data的形状是(batch-size,num-step,embedding-dim)# 所以相对应的生成就可以得到# 先根据公式来写 pos就是对应的哪一个字 i对应的就是第几个embedding-dim dmodel就是embedding-dim# pos先不考虑batch-size那一维度,先扩展维度,从(num-step)变成(num-step,1)pos = np.arange(sentence_length).reshape(-1,1)i = np.arange(d_model).reshape(1,-1)x = pos / np.power(10000,(2 * (i // 2)) / np.float32(d_model))# 利用切片得到相对应的sin 和 cossinx = np.sin(x[:, 0::2])cosx = np.cos(x[:, 1::2])# 凑成sin cos sin cos 的格式position_embedding = np.zeros((sentence_length,d_model))position_embedding[:, 0::2] = sinxposition_embedding[:, 1::2] = cosx# 最后就是维度扩展,方便后续的相加position_embedding = position_embedding.reshape(1,sentence_length,d_model)return tf.cast(position_embedding, dtype=tf.float32)position_embedding = get_position_embedding(5, 4)
print(position_embedding.shape)
print(position_embedding)
# -----------------------------------------------------------------------------
当然也可以封装到一个类当中,这边你们可以自己去实现一下
然后关于评价一下这个位置编码,我们这边使用绘制热力图进行展示:
import matplotlib as mpl
import matplotlib.pyplot as plt
%matplotlib inline# 评估位置编码
# -----------------------------------------------------------------------------
position_embedding = get_position_embedding(50, 256)
print(position_embedding.shape)
print(position_embedding)
def plot_position_embedding(position_embedding):plt.pcolormesh(position_embedding[0], cmap = 'RdBu')plt.xlabel('Depth')plt.xlim((0, 256))plt.ylabel('Position')plt.colorbar()plt.show()
# -----------------------------------------------------------------------------
plot_position_embedding(position_embedding)
输出:
(1, 50, 256)
图片1
图片1:
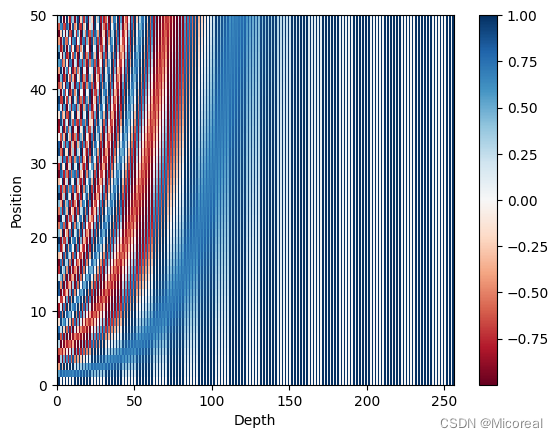
我们可以发现对于每一个字来说他的对应的值都是不一样的,这就很有效,不过对于sin cos 这种方式的实现来说,我们取的embedding的大小还会导致位置编码是否有效,这需要作为参数方程进行查看。
Encoder block
原理图:
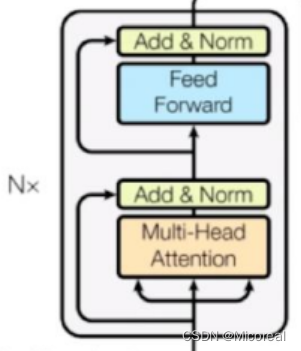
multi-head attention
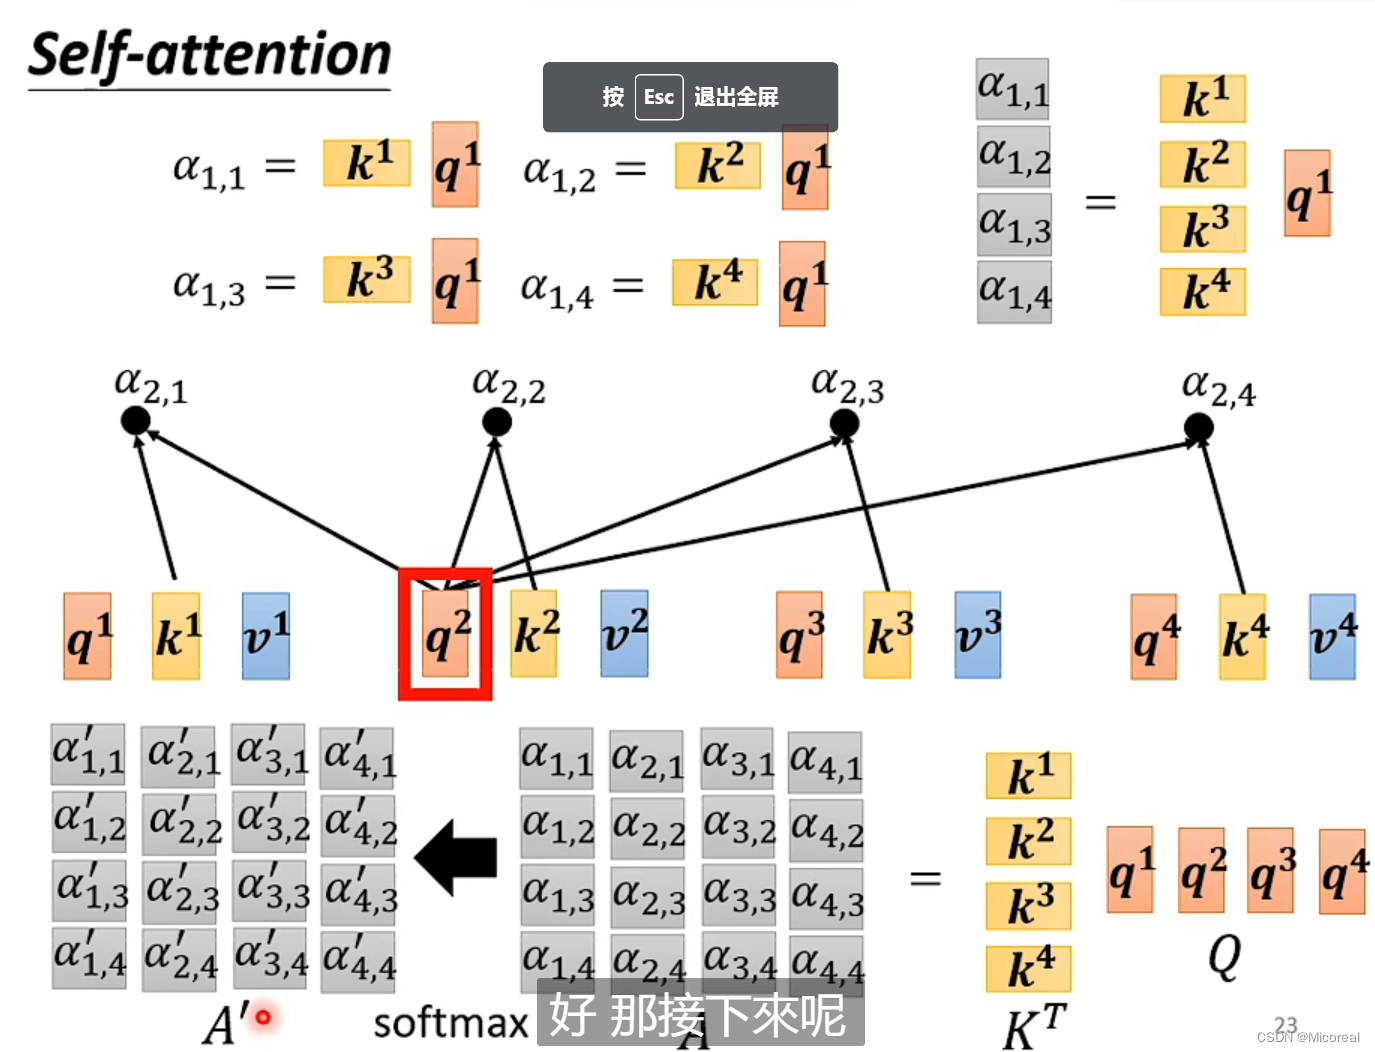
首先需要实现就是这个多头注意力机制,multi-head attention:
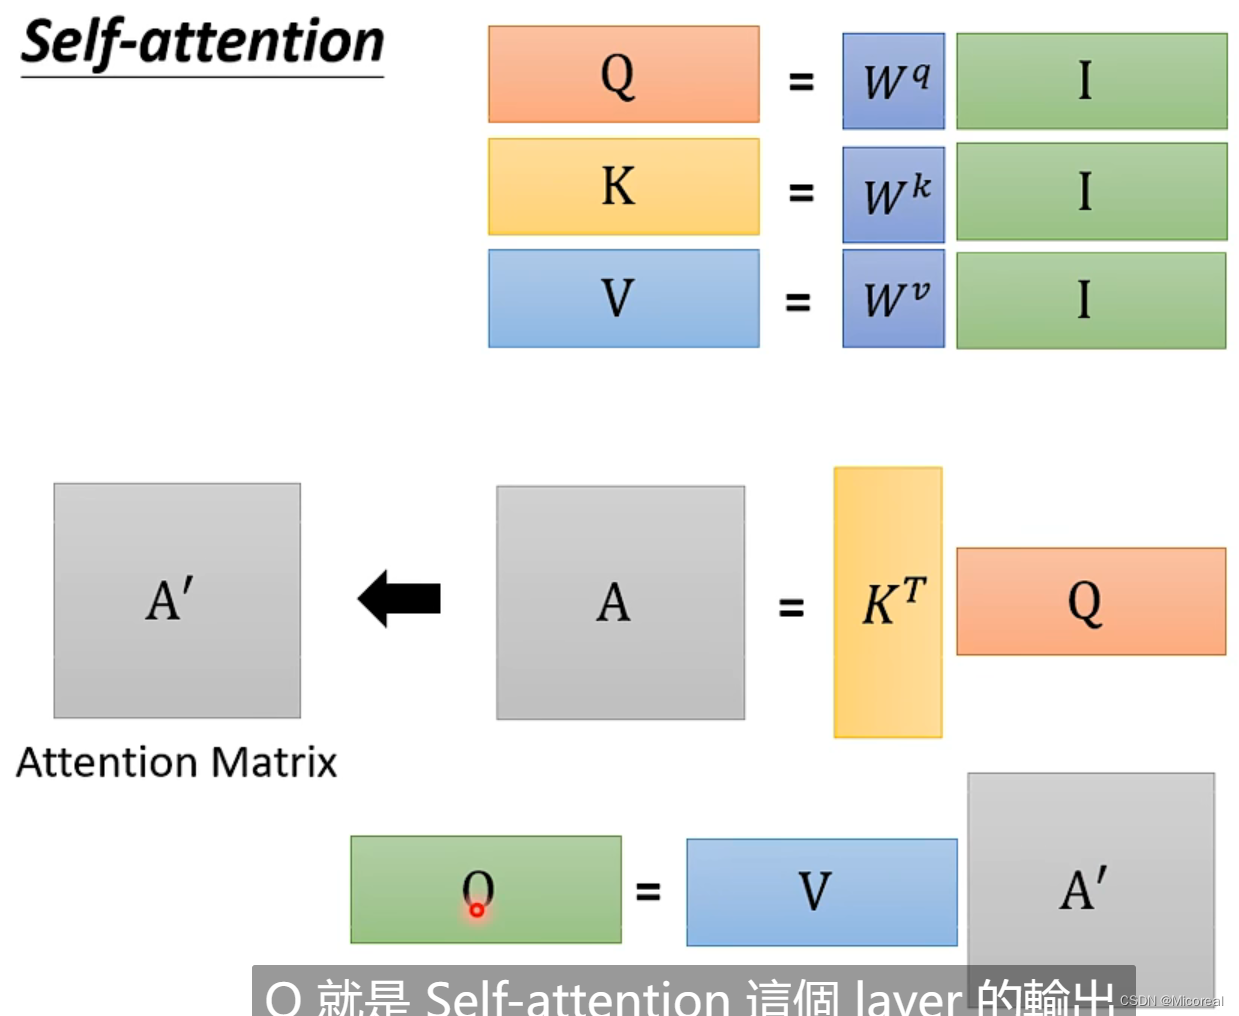
先看一下self-attention的数学实现方式:
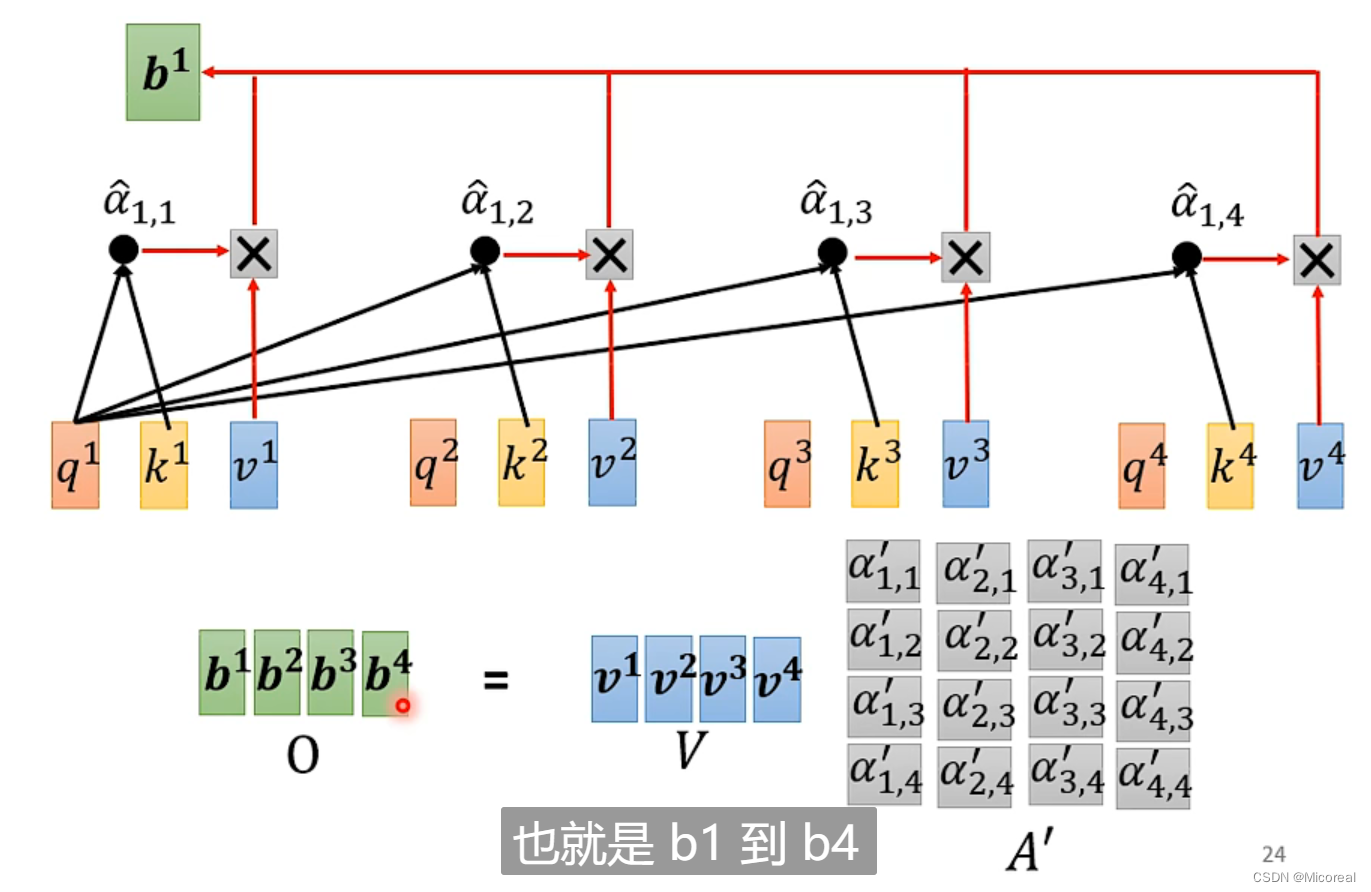
总结:
而关于多头就是实现几次的样式:
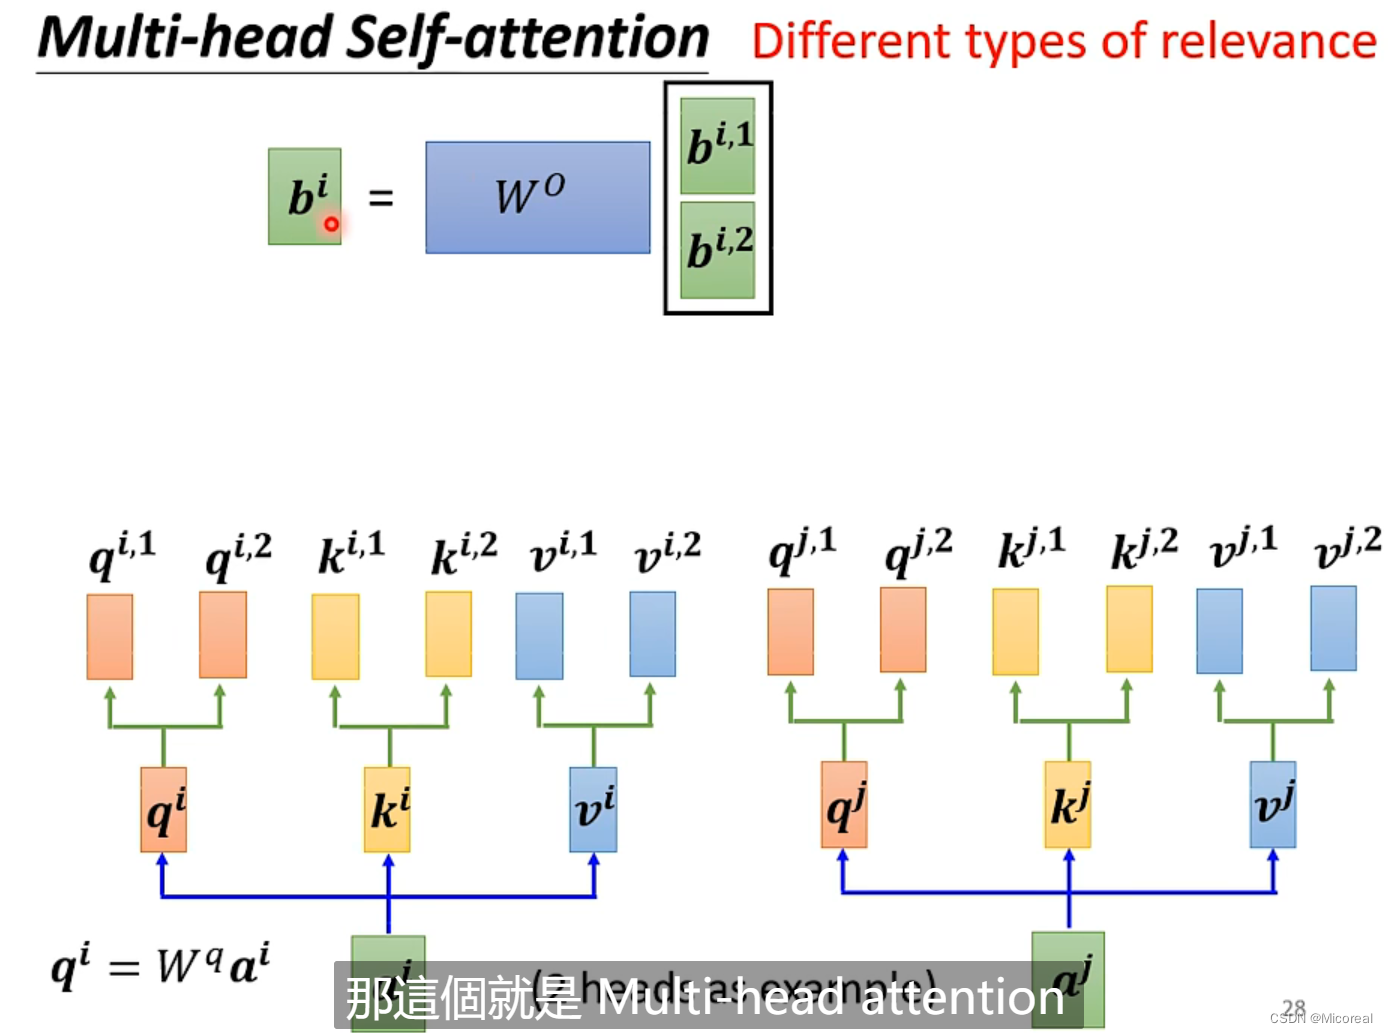
这边的原理讲解有点复杂,之后会另开专栏进行讲解,这边理解数学即可,只需要理解我们这边的注意力机制计算的是我们的输入的词语与词语之间的关系。
# 多头注意力的实现
# -----------------------------------------------------------------------------
# 定义多头注意力机制
class MultiHeadAttention(keras.layers.Layer):def __init__(self,d_model,num_heads):super().__init__()self.d_model = d_modelself.num_heads = num_headsself.WQ = keras.layers.Dense(self.d_model)self.WK = keras.layers.Dense(self.d_model)self.WV = keras.layers.Dense(self.d_model)self.dense = keras.layers.Dense(self.d_model)# 这边下面就需要进行分头计算 为了让头变多的同时 计算代价和参数代价不会随之增长,这边采用除法的操作assert self.d_model % self.num_heads == 0self.depth = self.d_model // self.num_headsdef call(self,q,k,v,mask):# 输入的input实际上是embedding之后加上位置编码之后的数据,形状就是(batch-size,step-nums,embedding-dim)# 首先就是先生成q,k,vq = self.WQ(q)k = self.WK(k)v = self.WV(v)# 这边进行分头 然后已知qkv的形状是(batch-size,step-nums,d_model)# 然后将其形状都变成(batch-size,nums-head,step-nums,depth),也就是由于batch-size和step-num都有其含义,这边我们不能进行拆解,所以就把d_model拆解成一个代表第几个头 一个代表的就是参数# 而为什么需要拆解成(batch-size,nums-head,step-nums,depth) 而不是(batch-size,step-nums,nums-head,depth)# 原因就是我们后面的计算明显是要用相同的nums-head的情况下去运算,这样子方便# 还有这边需要使用轴滚动 不能直接使用reshape直接进行调换形状 二者的原理不一样q = tf.reshape(q,(tf.shape(q)[0],-1,self.num_heads,self.depth))q = tf.transpose(q,[0,2,1,3])k = tf.reshape(k, (tf.shape(k)[0], -1, self.num_heads, self.depth))k = tf.transpose(k, [0, 2, 1, 3])v = tf.reshape(v, (tf.shape(q)[0], -1, self.num_heads, self.depth))v = tf.transpose(v, [0, 2, 1, 3])# 开始计算缩放点积运算 此时q k 的形状(batch-size,nums-head,step-nums,depth)# 计算得到的Matrix_kq形状就是(batch-size,nums-head,step-nums,step-nums)Matrix_kq = tf.matmul(q,k,adjoint_b=True)if mask is not None:# 带有mask多头的注意力机制 后面再来解析Matrix_kq += (mask * (-1e9))# 然后这边两个数据相乘之后,数据太大了,这边可以做一个softmax 你用relu也可以# 不过需要注意的是,我们需要对于行做softmax,取决于我们对于k的理解Matrix_kq = tf.nn.softmax(Matrix_kq,axis=-1)output = tf.transpose(tf.matmul(Matrix_kq, v),[0,2,1,3])# 再对于注意力机制进行合并 生成的数据就是(batch-size,nums-step,d_model)的数据output = tf.reshape(output,(tf.shape(output)[0],-1,self.d_model))return output
# -----------------------------------------------------------------------------
Feed Forward
前馈网络:实际上就是两层全连接层,这边就只给出代码了
# 前馈网络
# -----------------------------------------------------------------------------
class FeedForward(keras.layers.Layer):def __init__(self,d_model, dim):super().__init__()self.dense1 = keras.layers.Dense(dim,activation='relu')self.dense2 = keras.layers.Dense(d_model)def call(self,x):return self.dense2(self.dense1(x))
# -----------------------------------------------------------------------------
自定义encoder block
# 自定义encoder block
# -----------------------------------------------------------------------------
class EncoderBlock(keras.layers.Layer):def __init__(self,d_model, num_heads, feed_dim, rate=0.1):super().__init__()self.attention = MultiHeadAttention(d_model,num_heads)self.feed = FeedForward(d_model, feed_dim)# 做的是layer的标准化和之前采用的batch标准化不一样,batch针对的是不同特征的,layer针对的是相同特征的self.layer_norm1 = keras.layers.LayerNormalization(epsilon=1e-6)self.layer_norm2 = keras.layers.LayerNormalization(epsilon=1e-6)# 下面两个层次用了做dropout,每次有10%的几率被drop掉self.dropout1 = keras.layers.Dropout(rate)self.dropout2 = keras.layers.Dropout(rate)def call(self,x,training,encoding_padding_mask):# x代表的就是训练的数据# training代表的是是否对于train状态下进行dropout,填入的是true or false# encoding_padding_mask代表的是将padding标识为不重要,避免注意力机制去关心那一块out1 = self.attention(x,x,x, encoding_padding_mask)out1 = self.dropout1(out1, training=training)# Resnet相加 很重要x = self.layer_norm1(x+out1)out2 = self.feed(x)out2 = self.dropout2(out2, training=training)output = self.layer_norm2(x+out2)return output
# -----------------------------------------------------------------------------
#来测试,结果和我们最初的输入维度一致,相当于做了两次残差连接
sample_encoder_layer = EncoderBlock(512, 8, 2048)
sample_input = tf.random.uniform((64, 50, 512))
sample_output = sample_encoder_layer(sample_input, False, None)
print(sample_output.shape)
Deconder block

代码见下:
# 自定义decoder block
# -----------------------------------------------------------------------------
class DecoderBlock(keras.layers.Layer):def __init__(self,d_model, num_heads, feed_dim, rate = 0.1):super().__init__()self.attention1 = MultiHeadAttention(d_model, num_heads)self.attention2 = MultiHeadAttention(d_model, num_heads)self.feed = FeedForward(d_model, feed_dim)self.layer_norm1 = keras.layers.LayerNormalization(epsilon=1e-6)self.layer_norm2 = keras.layers.LayerNormalization(epsilon=1e-6)self.layer_norm3 = keras.layers.LayerNormalization(epsilon=1e-6)self.dropout1 = keras.layers.Dropout(rate)self.dropout2 = keras.layers.Dropout(rate)self.dropout3 = keras.layers.Dropout(rate)def call(self, x, encoding_outputs, training, decoder_mask, encoder_decoder_padding_mask):# x就是下面传来的东西 encoding_outputs 就是encoding的输出 training同上# decoder_mask 就是遮住前面看过的东西和遮住padding的mask# encoder_decoder_padding_mask这个就是对应的maskout1 = self.attention1(x,x,x,decoder_mask)out1 = self.dropout1(out1,training=training)x = self.layer_norm1(x+out1)out2 = self.attention2(encoding_outputs,encoding_outputs,x, encoder_decoder_padding_mask)out2 = self.dropout2(out2, training=training)x = self.layer_norm2(x+out2)out3 = self.feed(x)out3 = self.dropout3(out3,training=training)output = self.layer_norm3(x+out3)return output
# -----------------------------------------------------------------------------# 测试一下
sample_decoder_layer = DecoderBlock(512, 8, 2048)
sample_decoder_input = tf.random.uniform((64, 50, 512))
sample_decoder_output= sample_decoder_layer(sample_decoder_input, sample_output, False, None, None)
print(sample_decoder_output.shape)
Encoder
样例代码:
# 定义Encoder
# -----------------------------------------------------------------------------
class Encoder(keras.layers.Layer):def __init__(self,num_layers, input_vocab_size, max_length,d_model, num_heads, feed_dim, rate=0.1):super().__init__()self.d_model = d_modelself.num_layers = num_layersself.max_length = max_lengthself.embedding = keras.layers.Embedding(input_vocab_size,self.d_model)self.position_embedding = get_position_embedding(max_length,self.d_model)self.dropout = keras.layers.Dropout(rate)self.encoder_blocks = [EncoderBlock(self.d_model,num_heads,feed_dim,rate) for _ in range(self.num_layers)]def call(self, x, training, encoder_padding_mask):# 一开始输入进去x的形状是(batch-size,num-step)embedding_x = self.embedding(x)# 因为位置编码值在-1和1之间,因此嵌入值乘以嵌入维度的平方根进行缩放,然后再与位置编码相加。embedding_x *= tf.math.sqrt(tf.cast(self.d_model, tf.float32))# 因为x长度比position_embedding可能要小,因此embedding切片后和x相加posotion_and_embedding_x = embedding_x + self.position_embedding[:, :tf.shape(x)[1], :]posotion_and_embedding_x = self.dropout(posotion_and_embedding_x, training=training)# 得到的x不断作为下一层的输入for i in range(self.num_layers):posotion_and_embedding_x = self.encoder_blocks[i](posotion_and_embedding_x, training, encoder_padding_mask)# x最终shape如下# x.shape: (batch_size, input_seq_len, d_model)return posotion_and_embedding_x
# -----------------------------------------------------------------------------
# 测试
sample_encoder_model = Encoder(2,8500,50,512, 8, 2048)
sample_encoder_model_input = tf.random.uniform((64, 37))
sample_encoder_model_output = sample_encoder_model(sample_encoder_model_input, False, encoder_padding_mask = None)
print(sample_encoder_model_output.shape)
Decoder

样例代码:
# 定义Decoder
# -----------------------------------------------------------------------------
class Decoder(keras.layers.Layer):def __init__(self, num_layers, target_vocab_size, max_length,d_model, num_heads, feed_dim, rate=0.1):super().__init__()self.d_model = d_modelself.num_layers = num_layersself.max_length = max_lengthself.embedding = keras.layers.Embedding(target_vocab_size, self.d_model)self.position_embedding = get_position_embedding(max_length, self.d_model)self.dropout = keras.layers.Dropout(rate)self.decoder_blocks = [DecoderBlock(self.d_model, num_heads, feed_dim, rate) for _ in range(self.num_layers)]def call(self, x, encoding_outputs, training,decoder_mask, encoder_decoder_padding_mask):embedding_x = self.embedding(x)embedding_x *= tf.math.sqrt(tf.cast(self.d_model, tf.float32))posotion_and_embedding_x = embedding_x + self.position_embedding[:, :tf.shape(x)[1], :]posotion_and_embedding_x = self.dropout(posotion_and_embedding_x, training=training)for i in range(self.num_layers):posotion_and_embedding_x= self.decoder_blocks[i](posotion_and_embedding_x, encoding_outputs, training,decoder_mask, encoder_decoder_padding_mask)return posotion_and_embedding_x# -----------------------------------------------------------------------------
# 测试
sample_decoder_model = Decoder(2, 8000,50,512, 8, 2048)
sample_decoder_model_input = tf.random.uniform((64, 37))
sample_decoder_model_output= sample_decoder_model(sample_decoder_model_input,sample_encoder_model_output,training = False, decoder_mask = None,encoder_decoder_padding_mask = None)print(sample_decoder_model_output.shape)
transformer

样例代码:
# 定义transformer
# -----------------------------------------------------------------------------
class Transformer(keras.Model):def __init__(self,num_layers, input_vocab_size, target_vocab_size,max_length, d_model, num_heads, feed_dim, rate=0.1):super().__init__()self.encoder = Encoder(num_layers,input_vocab_size,max_length,d_model,num_heads,feed_dim,rate)self.decoder = Decoder(num_layers,target_vocab_size,max_length,d_model,num_heads,feed_dim,rate)self.final_layer = keras.layers.Dense(target_vocab_size)def call(self, input, target, training, encoder_padding_mask,decoder_mask, encoder_decoder_padding_mask):encoder_output = self.encoder(input,training,encoder_padding_mask)decoder_output = self.decoder(target,encoder_output,training,decoder_mask,encoder_decoder_padding_mask)predict = self.final_layer(decoder_output)return predict# -----------------------------------------------------------------------------
# 测试
sample_transformer = Transformer(2, 8500, 8000, 50,512, 8, 2048, rate = 0.1)
temp_input = tf.random.uniform((64, 26))
temp_target = tf.random.uniform((64, 26))# 得到输出
predictions = sample_transformer(temp_input, temp_target, training = False,encoder_padding_mask = None,decoder_mask = None,encoder_decoder_padding_mask = None)
# 输出shape
print(predictions.shape)
自定义loss 和 学习率
# 自定义的学习率调整设计实现
# -----------------------------------------------------------------------------
class CustomizedSchedule(keras.optimizers.schedules.LearningRateSchedule):def __init__(self, d_model, warmup_steps=4000):super().__init__()self.d_model = tf.cast(d_model, tf.float32)self.warmup_steps = warmup_stepsdef __call__(self, step):step = tf.cast(step,tf.float32)arg1 = tf.math.rsqrt(step)arg2 = step * (self.warmup_steps ** (-1.5))arg3 = tf.math.rsqrt(self.d_model)return arg3 * tf.math.minimum(arg1, arg2)learning_rate = CustomizedSchedule(d_model)
optimizer = keras.optimizers.Adam(learning_rate,beta_1=0.9,beta_2=0.98,epsilon=1e-9)loss_object = keras.losses.SparseCategoricalCrossentropy(from_logits=True, reduction='none')
def loss_function(real, pred):# 损失做了掩码处理,是padding的地方不计算损失mask = tf.math.logical_not(tf.math.equal(real, 0))loss_ = loss_object(real, pred)mask = tf.cast(mask, dtype=loss_.dtype)loss_ *= maskreturn tf.reduce_mean(loss_)
# -----------------------------------------------------------------------------
mask生成函数
def create_mask(input,target):encoder_padding_mask = tf.cast(tf.math.equal(input, 0), tf.float32)[:, tf.newaxis, tf.newaxis, :]encoder_decoder_padding_mask = encoder_padding_mask# 创建下三角型look_ahead_mask = (1 - tf.linalg.band_part(tf.ones((tf.shape(target)[1], tf.shape(target)[1])), -1, 0))decoder_padding_mask = tf.cast(tf.math.equal(target, 0), tf.float32)[:, tf.newaxis, tf.newaxis, :]decoder_mask = tf.maximum(look_ahead_mask, decoder_padding_mask)return encoder_padding_mask, decoder_mask, encoder_decoder_padding_mask
训练
# 训练
# -----------------------------------------------------------------------------
train_loss = keras.metrics.Mean(name = 'train_loss')
train_accuracy = keras.metrics.SparseCategoricalAccuracy(name = 'train_accuracy')
@tf.function
def train_step(input, target):tar_inp = target[:, :-1]  # 没带endtar_real = target[:, 1:]  # 没有startencoder_padding_mask, decoder_mask, encoder_decoder_padding_mask = create_mask(input, tar_inp)with tf.GradientTape() as tape:predictions = transformer(input, tar_inp, True,encoder_padding_mask,decoder_mask,encoder_decoder_padding_mask)loss = loss_function(tar_real, predictions)gradients = tape.gradient(loss, transformer.trainable_variables)optimizer.apply_gradients(zip(gradients, transformer.trainable_variables))train_loss(loss)train_accuracy(tar_real, predictions)epochs = 200
for epoch in range(epochs):start = time.time()# reset后就会从零开始累计train_loss.reset_states()train_accuracy.reset_states()for (batch, (input, target)) in enumerate(dataset.take(batch_size)):train_step(input, target)if batch % 100 == 0:print('Epoch {} Batch {} Loss {:.4f} Accuracy {:.4f}'.format(epoch + 1, batch, train_loss.result(),train_accuracy.result()))print('Epoch {} Loss {:.4f} Accuracy {:.4f}'.format(epoch + 1, train_loss.result(), train_accuracy.result()))print('Time take for 1 epoch: {} secs\n'.format(time.time() - start))# loss是一个正常的指标,accuracy只是机器翻译的一个参考指标,可以看趋势
# -----------------------------------------------------------------------------
翻译
# 预测
# -----------------------------------------------------------------------------
def translate(inp_sentence):# 对输入的语言做和训练时同样的预处理后,再进行word转idsentence = preprocess_sentence(inp_sentence)# text到id的转换inputs = [input_tokenizer.word_index[i] for i in sentence.split(' ')]# 加paddinginputs = keras.preprocessing.sequence.pad_sequences([inputs], maxlen=50, padding='post')# 转换为tf张量encoder_input = tf.convert_to_tensor(inputs)decoder_input = tf.expand_dims([target_tokenizer.word_index['<start>']], 1)result = ''for i in range(max_length):# 产生mask并传给transformerencoder_padding_mask, decoder_mask, encoder_decoder_padding_mask = create_mask(encoder_input, decoder_input)predictions= transformer(encoder_input,decoder_input,False,encoder_padding_mask,decoder_mask,encoder_decoder_padding_mask)# print('-'*20)# print(predictions)# 预测值就是概率最大的那个的索引,那最后一个维度中最大的那个值predicted_id = tf.argmax(predictions[0][0]).numpy()result += target_tokenizer.index_word[predicted_id] + ' '# 如果等于end id,预测结束if target_tokenizer.index_word[predicted_id] == '<end>':break# 如果predicted_id不是end id,添加到新的decoder_input中decoder_input = tf.expand_dims([predicted_id], 1)print('Input: %s' % (sentence))print('Predicted translation: {}'.format(result))translate(u'happy')
# -----------------------------------------------------------------------------