1►新增带Layout组件的页面
直接在views文件夹下面新增weather.vue。然后随便写一个123,现在先让我们页面能跳过去先。
让页面能跳过去,有好几种方法:
1、在菜单管理自己添加一个菜单,然后把菜单分配给某个角色,再把该角色分给某个人。【然而超级管理员什么时候都能看到此菜单,因为超级管理员能无视一切权限问题】
2、在路由文件(router/index.js直接写相关路由),然后可以手动切换浏览器网址进入该路由。
本次例子利用使用自己添加菜单的方法,这样比较简单。简单如下图:
组件地址:默认是views目录下面的文件
路由地址:点击这个功能访问的url
意思就是点击这个路由地址可以进入这个组件

组件路径一定要写对,写不对直接进不去相应的组件。路由地址可以乱写,但是起码也要有点“path”的样子吧?
先随便在weather.vue写一句话来测试一下:

发现页面也出来了:

现在我们可以开始专注页面了。
2►专注weather业务
首先.vue文件的代码如下:
<template><div v-loading="loading"><el-row style="margin-top: 30px;" :gutter="20"><el-col :offset="10" :span="4"><el-button type="success" @click="handleWeather">当前城市天气</el-button></el-col></el-row><el-row :gutter="20" v-if="city.length>0"><el-col :offset="2" :span="20"><el-descriptions title="当前实时天气"><el-descriptions-item label="当前城市">{{ city }}</el-descriptions-item><el-descriptions-item label="温度">{{ weather.realtime.temperature }}℃</el-descriptions-item><el-descriptions-item label="风向">{{ weather.realtime.direct }}</el-descriptions-item><el-descriptions-item label="风力">{{ weather.realtime.power }}</el-descriptions-item><el-descriptions-item label="湿度">{{ weather.realtime.humidity }}%</el-descriptions-item><el-descriptions-item label="天气状况">{{ weather.realtime.info }}</el-descriptions-item></el-descriptions></el-col></el-row><el-row v-for="item in weather.future" :key="item.date" style="margin-top: 30px;" :gutter="20"><el-col :offset="2" :span="20"><el-descriptions :title="item.date" :column="4"><el-descriptions-item label="风向">{{ item.direct }}</el-descriptions-item><el-descriptions-item label="温度">{{ item.temperature }}</el-descriptions-item><el-descriptions-item label="天气情况">{{ item.weather }}</el-descriptions-item></el-descriptions></el-col></el-row></div>
</template><script>
import {getWeather} from "@/api/gzh/weather";export default {name: "weather",data() {return {loading:false,city: "",weather: {realtime: {},future: []}}},methods: {handleWeather() {this.loading=true;getWeather().then(res => {const weatherInfo = JSON.parse(res.msg);this.city = weatherInfo.result.citythis.weather.realtime = weatherInfo.result.realtimethis.weather.future = weatherInfo.result.futureconsole.log(weatherInfo)this.loading=flase;}).catch(err => {console.error(err)})}}
}
</script><style scoped></style>
然后是前端api调用代码:
import request from "@/utils/request";// 查询参数列表export function getWeather() {return request({url: '/getWeatherByLocalIP',method: 'get',})}
接下来是后端的工具类代码:
package com.ruoyi.web.controller.gzh;import com.ruoyi.common.core.domain.AjaxResult;
import com.ruoyi.common.utils.http.HttpUtils;
import org.springframework.web.bind.annotation.GetMapping;
import org.springframework.web.bind.annotation.RestController;import java.io.UnsupportedEncodingException;
import java.net.URLEncoder;@RestController
public class WeatherController {@GetMapping("/getWeatherByLocalIP")public AjaxResult getWeather() throws UnsupportedEncodingException {AjaxResult result = AjaxResult.success();String localCityName = GetLocationAndIP.getLocalCityName();//调用天气APIString encodeCity = URLEncoder.encode(localCityName, "UTF-8");System.out.println(encodeCity);String url = "http://apis.juhe.cn/simpleWeather/query?city=" + encodeCity + "&key=81fe33a6077267b2e4ae2967af47eeb7";String weatherInfo = HttpUtils.sendGet(url);result.put("msg", weatherInfo);return result;}}
然后是后端接口的代码:
package com.ruoyi.web.controller.gzh;import org.json.JSONException;
import org.json.JSONObject;import java.io.BufferedReader;
import java.io.IOException;
import java.io.InputStream;
import java.io.InputStreamReader;
import java.net.HttpURLConnection;
import java.net.URL;
import java.nio.charset.StandardCharsets;
import java.util.HashMap;
import java.util.Map;
import java.util.regex.Matcher;
import java.util.regex.Pattern;public class GetLocationAndIP {private static String readAll(BufferedReader rd) throws IOException {StringBuilder sb = new StringBuilder();int cp;while ((cp = rd.read()) != -1) {sb.append((char) cp);}return sb.toString();}public static JSONObject readJsonFromUrl(String url) throws IOException, JSONException {try (InputStream is = new URL(url).openStream()) {BufferedReader rd = new BufferedReader(new InputStreamReader(is, StandardCharsets.UTF_8));String jsonText = readAll(rd);return new JSONObject(jsonText);}}public Map<String, Object> getAddress() {String ip = "";// 这个网址似乎不能了用了// String chinaz = "http://ip.chinaz.com";// 改用了太平洋的一个网址String chinaz = "http://whois.pconline.com.cn/";StringBuilder inputLine = new StringBuilder();String read = "";URL url = null;HttpURLConnection urlConnection = null;BufferedReader in = null;Map<String, Object> map = new HashMap<>();try {url = new URL(chinaz);urlConnection = (HttpURLConnection) url.openConnection();// 如有乱码的,请修改相应的编码集,这里是 gbkin = new BufferedReader(new InputStreamReader(urlConnection.getInputStream(), "gbk"));while ((read = in.readLine()) != null) {inputLine.append(read).append("\r\n");}} catch (IOException e) {e.printStackTrace();} finally {if (in != null) {try {in.close();} catch (IOException e) {e.printStackTrace();}}}// 这个是之前的正则表达式,// Pattern p = Pattern.compile("\\<dd class\\=\"fz24\">(.*?)\\<\\/dd>");// 通过正则表达式匹配我们想要的内容,根据拉取的网页内容不同,正则表达式作相应的改变Pattern p = Pattern.compile("显示IP地址为(.*?)的位置信息");Matcher m = p.matcher(inputLine.toString());if (m.find()) {String ipstr = m.group(0);// 这里根据具体情况,来截取想要的内容ip = ipstr.substring(ipstr.indexOf("为") + 2, ipstr.indexOf("的") - 1);map.put("ip", ip);}JSONObject json = null;try {// 这里调用百度的ip定位api服务 详见 http://api.map.baidu.com/lbsapi/cloud/ip-location-api.htmjson = readJsonFromUrl("http://api.map.baidu.com/location/ip?ak=laOQElaF53xGGBjscGtrd10nN4j1zGki&ip=" + ip);//city = (((JSONObject) ((JSONObject) json.get("content")).get("address_detail")).get("city")).toString();map.put("city", ((JSONObject) ((JSONObject) json.get("content")).get("address_detail")).get("city").toString());} catch (Exception e) {e.printStackTrace();}return map;}public static String getLocalCityName() {GetLocationAndIP getLocationANDIp = new GetLocationAndIP();Map<String, Object> map = getLocationANDIp.getAddress();String city = map.get("city").toString();return city.substring(0, city.length() - 1);}public static void main(String[] args) {GetLocationAndIP getLocationANDIp = new GetLocationAndIP();Map<String, Object> map = getLocationANDIp.getAddress();String city = map.get("city").toString();String city_1 = city.substring(0, city.length() - 1);System.out.println(city_1);}
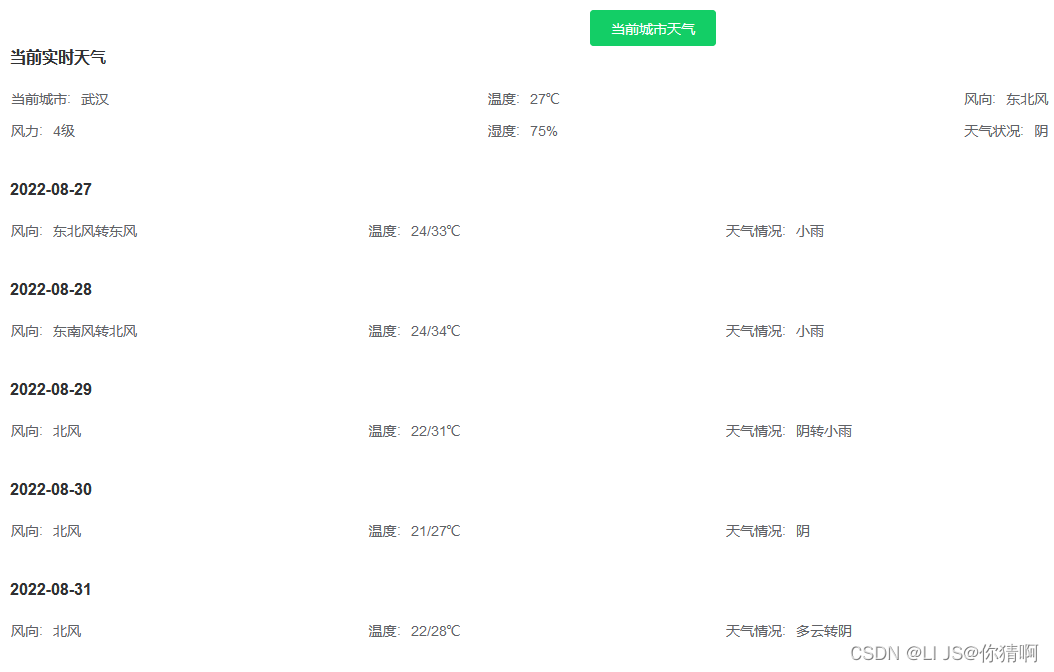
}由此,天气小demo就跑起来了,效果图如下: