K8S集群搭建
1. 基础环境
| IP | 节点名称 | 域名 | 规格 |
|---|---|---|---|
| 10.1.2.111 | k8s-master-1 | master01.k8s.io | 4核8G,50G |
| 10.1.2.112 | k8s-master-2 | master02.k8s.io | 4核8G,50G |
| 10.1.2.113 | k8s-cluster-endpoint,没有具体节点,只vip | master.k8s.io | |
| 10.1.2.180 | k8s-node-1 | 8核16G,50G | |
| 10.1.2.181 | k8s-node-2 | 8核16G,50G | |
| 10.1.2.182 | k8s-node-3 | 8核16G,50G | |
| 10.1.2.190 | k8s-harbor | harbor.k8s.io | 4核8G,100G |
| 10.1.2.191 | k8s-nfs-server | nfs.k8s.io | 4核8G,300G |
集群架构图如下:
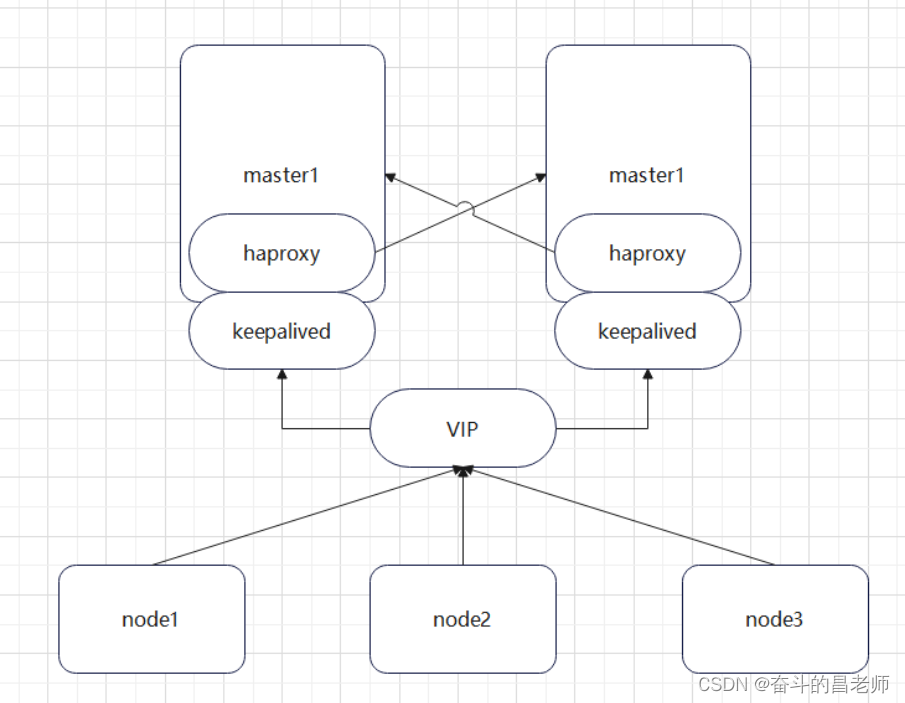
配置集群主要步骤包括:
-
kubeadm做集群初始化
-
需要安装keepalived,配置master的vip
-
安装haproxy,配置master的ha
-
初始化master1节点
-
配置calico网络,配置网络之后才能进行节点加入,包括master节点和node节点都需要先配置网络
-
初始化master2节点
-
加入node节点
2. kubeadm构建集群
构建k8s集群
kubeadm init \
--apiserver-advertise-address=10.1.2.111 \
--control-plane-endpoint=k8s-cluster-endpoint \
--image-repository registry.cn-hangzhou.aliyuncs.com/lfy_k8s_images \
--kubernetes-version v1.20.9 \
--service-cidr=10.96.0.0/16 \
--pod-network-cidr=192.168.0.0/16
上述
-
“–apiserver-advertise-address=10.1.2.111”改成nodeIP
-
“–pod-network-cidr=192.168.0.0/16”改的是pod的网段,外面访问不了,直接192就可以
-
“–service-cidr=10.96.0.0/16”改的是service的网段,是一个虚IP,因此
-
“–control-plane-endpoint=k8s-cluster-endpoint”,控制节点,实际上是master的管理域名,即hosts里面的那个域名,我这个地方填的是vip的域名
-
“–image-repository”,默认的k8s镜像获取地址
3. 安装keepalived
安装:
# 依赖
yum install -y conntrack-tools libseccomp libtool-ltdl
# 安装keepalived
yum install -y keepalived
master1的配置文件:
cat > /etc/keepalived/keepalived.conf <<EOF
! Configuration File for keepalivedglobal_defs {router_id k8s
}vrrp_script check_haproxy {script "killall -0 haproxy"interval 3weight -2fall 10rise 2
}vrrp_instance VI_1 {state MASTER interface eth0 virtual_router_id 51priority 250advert_int 1authentication {auth_type PASSauth_pass ceb1b3ec013d66163d6ab}virtual_ipaddress {10.1.2.113}track_script {check_haproxy}}
EOF
master2的配置文件:
cat > /etc/keepalived/keepalived.conf <<EOF
! Configuration File for keepalivedglobal_defs {router_id k8s
}vrrp_script check_haproxy {script "killall -0 haproxy"interval 3weight -2fall 10rise 2
}vrrp_instance VI_1 {state BACKUP interface eth0 virtual_router_id 51priority 200advert_int 1authentication {auth_type PASSauth_pass ceb1b3ec013d66163d6ab}virtual_ipaddress {10.1.2.113}track_script {check_haproxy}}
EOF
# 启动keepalived
systemctl start keepalived.service
# 设置开机启动
systemctl enable keepalived.service
# 查看启动状态
systemctl status keepalived.service
ip a s eth0
4. 安装haproxy
# 安装haproxy
yum install -y haproxy
# 启动 haproxy
systemctl start haproxy
# 开启自启
systemctl enable haproxy
cat > /etc/haproxy/haproxy.cfg << EOF
#---------------------------------------------------------------------
# Global settings
#---------------------------------------------------------------------
global# to have these messages end up in /var/log/haproxy.log you will# need to:# 1) configure syslog to accept network log events.  This is done#    by adding the '-r' option to the SYSLOGD_OPTIONS in#    /etc/sysconfig/syslog# 2) configure local2 events to go to the /var/log/haproxy.log#   file. A line like the following can be added to#   /etc/sysconfig/syslog##    local2.*                       /var/log/haproxy.log#log         127.0.0.1 local2chroot      /var/lib/haproxypidfile     /var/run/haproxy.pidmaxconn     4000user        haproxygroup       haproxydaemon # turn on stats unix socketstats socket /var/lib/haproxy/stats
#---------------------------------------------------------------------
# common defaults that all the 'listen' and 'backend' sections will
# use if not designated in their block
#---------------------------------------------------------------------
defaultsmode                    httplog                     globaloption                  httplogoption                  dontlognulloption http-server-closeoption forwardfor       except 127.0.0.0/8option                  redispatchretries                 3timeout http-request    10stimeout queue           1mtimeout connect         10stimeout client          1mtimeout server          1mtimeout http-keep-alive 10stimeout check           10smaxconn                 3000
#---------------------------------------------------------------------
# kubernetes apiserver frontend which proxys to the backends
#---------------------------------------------------------------------
frontend kubernetes-apiservermode                 tcpbind                 *:16443option               tcplogdefault_backend      kubernetes-apiserver
#---------------------------------------------------------------------
# round robin balancing between the various backends
#---------------------------------------------------------------------
backend kubernetes-apiservermode        tcpbalance     roundrobinserver      master01.k8s.io   10.1.2.111:6443 checkserver      master02.k8s.io   10.1.2.112:6443 check
#---------------------------------------------------------------------
# collection haproxy statistics message
#---------------------------------------------------------------------
listen statsbind                 *:1080stats auth           admin:awesomePasswordstats refresh        5sstats realm          HAProxy\ Statisticsstats uri            /admin?stats
EOF
5. 初始化master1节点
# 创建文件夹
mkdir /usr/local/kubernetes/manifests -p
# 到manifests目录
cd /usr/local/kubernetes/manifests/
# 新建yaml文件
vi kubeadm-config.yaml
kubeadm-config.yaml文件内容:
apiServer:certSANs:- guankong-ctrl-k8s01- guankong-ctrl-k8s02- k8s-cluster-endpoint- 10.1.2.111- 10.1.2.112- 10.1.2.113- 127.0.0.1extraArgs:authorization-mode: Node,RBACtimeoutForControlPlane: 4m0s
apiVersion: kubeadm.k8s.io/v1beta2
certificatesDir: /etc/kubernetes/pki
clusterName: kubernetes
controlPlaneEndpoint: "master.k8s.io:16443"
controllerManager: {}
dns: type: CoreDNS
etcd:local:    dataDir: /var/lib/etcd
imageRepository: registry.aliyuncs.com/google_containers
kind: ClusterConfiguration
kubernetesVersion: v1.20.9
networking: dnsDomain: cluster.local  podSubnet: 10.244.0.0/16serviceSubnet: 10.1.0.0/16
scheduler: {}
然后执行master节点init:
# 查看kubelet发现不对,需要更改变为正确
swapoff -a
systemctl daemon-reload
kubeadm init --config kubeadm-config.yaml --ignore-preflight-errors=Swap
然后得到如下结果:
Your Kubernetes control-plane has initialized successfully!To start using your cluster, you need to run the following as a regular user:mkdir -p $HOME/.kubesudo cp -i /etc/kubernetes/admin.conf $HOME/.kube/configsudo chown $(id -u):$(id -g) $HOME/.kube/configAlternatively, if you are the root user, you can run:export KUBECONFIG=/etc/kubernetes/admin.confYou should now deploy a pod network to the cluster.
Run "kubectl apply -f [podnetwork].yaml" with one of the options listed at:https://kubernetes.io/docs/concepts/cluster-administration/addons/You can now join any number of control-plane nodes by copying certificate authorities
and service account keys on each node and then running the following as root:kubeadm join master.k8s.io:16443 --token 8ya83c.0aviiwbjb1eorrp1 \--discovery-token-ca-cert-hash sha256:fded3b3f22275c13a0637cd7e2592f6ec7b5e9cc8d611c01a37d20a36c4748d0 \--control-plane Then you can join any number of worker nodes by running the following on each as root:kubeadm join master.k8s.io:16443 --token 8ya83c.0aviiwbjb1eorrp1 \--discovery-token-ca-cert-hash sha256:fded3b3f22275c13a0637cd7e2592f6ec7b5e9cc8d611c01a37d20a36c4748d0
查看集群状态:
# 查看集群状态
kubectl get cs
# 查看pod
kubectl get pods -n kube-system
给节点添加label,用于亲和性调度
kubectl label node k8s-master-1 kubernetes.io/node=master1
6. 配置calico网络
配置了k8s的master1之后,需要添加k8s网络,不然节点加入时候无法互通。
配置calico网络:
mkdir /usr/local/kubernetes/manifests/calico -p
cd /usr/local/kubernetes/manifests/calico
wget https://docs.projectcalico.org/v3.14/manifests/calico.yaml --no-check-certificate
修改calico.yaml:
修改pod网段,查看pod cidr:
kubectl get nodes -o jsonpath='{.items[*].spec.podCIDR}'
# 加到calico的网段上
# 把calico.yaml里pod所在网段改成kubeadm init时选项--pod-network-cidr所指定的网段,
# 直接用vim编辑打开此文件查找192,按如下标记进行修改:
# no effect. This should fall within `--cluster-cidr`.
# - name: CALICO_IPV4POOL_CIDR
#   value: "192.168.0.0/16"
# Disable file logging so `kubectl logs` works.
- name: CALICO_DISABLE_FILE_LOGGING
value: "true"# 把两个#及#后面的空格去掉,并把192.168.0.0/16改成10.244.0.0/16
# no effect. This should fall within `--cluster-cidr`.
- name: CALICO_IPV4POOL_CIDR
value: "10.244.0.0/16"
# Disable file logging so `kubectl logs` works.
- name: CALICO_DISABLE_FILE_LOGGING
value: "true"
安装calico网络:
kubectl apply -f calico.yaml
等拉完镜像了,可以查看到节点已经准备完毕
 [root@guankong-ctrl-k8s01 calico]#  kubectl get nodes
NAME                  STATUS   ROLES                  AGE   VERSION
k8s-master-1  Ready    control-plane,master   35m   v1.20.9
7. 初始化master2节点
复制master1上的文件到master2中:
ssh root@55.241.105.95 mkdir -p /etc/kubernetes/pki/etcdscp /etc/kubernetes/admin.conf root@55.241.105.95:/etc/kubernetesscp /etc/kubernetes/pki/{ca.*,sa.*,front-proxy-ca.*} root@55.241.105.95:/etc/kubernetes/pkiscp /etc/kubernetes/pki/etcd/ca.* root@55.241.105.95:/etc/kubernetes/pki/etcd
然后把上述的,返回的内容加到集群中来:
kubeadm join master.k8s.io:16443 --token 8ya83c.0aviiwbjb1eorrp1 \--discovery-token-ca-cert-hash sha256:fded3b3f22275c13a0637cd7e2592f6ec7b5e9cc8d611c01a37d20a36c4748d0 \--control-plane
8. 添加node节点
kubeadm join master.k8s.io:16443 --token 8ya83c.0aviiwbjb1eorrp1 \--discovery-token-ca-cert-hash sha256:fded3b3f22275c13a0637cd7e2592f6ec7b5e9cc8d611c01a37d20a36c4748d0
至此,k8s集群搭建完毕,可以通过命令查看k8s的运行状态:
[root@guankong-ctrl-k8s02 ~]# kubectl get nodes
NAME                  STATUS   ROLES                  AGE    VERSION
k8s-master-1    Ready    <none>                 111d   v1.20.9
k8s-master-2    Ready    <none>                 111d   v1.20.9
k8s-node-1    Ready    <none>                 111d   v1.20.9
k8s-node-2   Ready    control-plane,master   111d   v1.20.9
k8s-node-3   Ready    control-plane,master   110d   v1.20.9