这里给大家分享我在网上总结出来的一些知识,希望对大家有所帮助

追忆Scoped
偶然想起了一次面试,二面整体都聊完了,该做的算法题都做出来了,该背的八股文也背的差不多了,面试官频频点头,似乎对我的基础和项目经验都很是满意。嗯,我内心os本次面试应该十拿九稳了。
突然,面试官说:「我的主技术栈是React,Vue写的很少,对Vue中style样式中的scoped有点兴趣,你知道vue中为什么有这个么?」
我不假思索:「哦, 这个主要是为了做样式隔离,避免组件间和父子组件间的样式覆盖问题。有点类似React中使用的StyleModule,也是可以避免不同组件间样式覆盖问题。」
回答完之后我又开始暗自得意,回答的多么巧妙,既回答了问题,又表明自己对React也是有一点了解的。
可能面试官看出了我的得意之色,点点头之后又问出了一个问题:「知道是怎么实现的么?」
我先茫然的盯着面试官的脸看了两秒钟,然后在我已有的知识库中搜索,搜索一遍又一遍,发现这可能是我的一个盲区,我确实不太清楚实现原理啊!!
面试官可能看出了我对于此的知识匮乏,很和善的说「我就是感兴趣,随便问问」。
啊,事已至此,我只能对面试官露出一个尴尬却不失礼貌的微笑说「这块我确实没有仔细思考过,我下来会详细研究一下这款,具体是如何现在scoped的。」
「好,那本次面试就到这里吧,回去等通知吧!」面试官和蔼的说。
虽然最后面试顺利通过,但是这个问题我觉得还是有必要记录下:”Vue中Style中的Scoped属性是如何实现样式隔离的?“
初见Scoped
我们初次见到scoped应该是在Vue Loader中的Scoped Css文档中。
子组件的根元素
使用 scoped 后,父组件的样式将不会渗透到子组件中。
深度作用选择器
如果你希望 scoped 样式中的一个选择器能够作用得“更深”,例如影响子组件,你可以使用 >>> 操作符:
<style scoped>
.a >>> .b { /* ... */ }
</style>
.a[data-v-f3f3eg9] .b { /* ... */ }
注意:像Sass之类的预处理器无法正确解析>>>。这种情况下可以使用/deep/或::v-deep操作符取而代之,两者都是>>>的别名,同样可以正常工作。
实战Scoped
style标签无scoped标识
<style lang="less" >
.demo {a {color: red;}
}
</style>
编译之后
.demo a {color: red;
}
style表现中有scoped标识
<style lang="less" scoped>
.demo {a {color: red;}
}
</style>
编译之后
.demo a[data-v-219e4e87] {color: red;
}
父子组件中同时修改a标签样式
// 子组件
<style scoped>
a {color: green;
}
</style>
// 父组件
<style lang="less" scoped>
.demo {a {color: red;}
}
</style>
编译完之后,父组件样式对子组件样式没有影响
/* 子组件 a 标签样式 */
a[data-v-458323f2] {color: green;
}
/* 父组件 a 标签样式 */
.demo a[data-v-219e4e87] {color: red;
}
如果想父组件对子组件的样式产生影响,就需要使用更深级的选择器 >>> 或 /deep/或 ::v-deep使父组件的样式对子组件产生影响。
<style lang="less" scoped>
.demo {/deep/ a {color: red;}
}
</style>
编译完之后
a[data-v-458323f2] {color: green;
}
.demo[data-v-ca3944e4] a {color: red;
}
我们可以看到 编译后的 /deep/ a被替换成了 a标签,实现了父组件对子组件样式的修改。
解密Scoped实现
回顾初见Scoped,我们是在vue-loader的说明文档中了解到的scoped的用法,所以我们从vue-loader包入手,发现compiler.ts中:
try {// Vue 3.2.13+ ships the SFC compiler directly under the `vue` package// making it no longer necessary to have @vue/compiler-sfc separately installed.compiler = require('vue/compiler-sfc')
} catch (e) {try {compiler = require('@vue/compiler-sfc')} catch (e) {}
}
@vue/compiler-sfc包中, @vue/compiler-sfc包的 compileStyle.ts文件中有一个 doCompileStyle()函数,然后我们大致看下这个函数的作用: export function doCompileStyle(options: SFCAsyncStyleCompileOptions
): SFCStyleCompileResults {
// 只保留了部分主要流程代码const plugins = (postcssPlugins || []).slice()plugins.unshift(cssVarsPlugin({ id: id.replace(/^data-v-/, ''), isProd }))if (trim) {plugins.push(trimPlugin())}if (scoped) {// 引入了scoped插件plugins.push(scopedPlugin(id))}try {// 调用postcssresult = postcss(plugins).process(source, postCSSOptions)} catch (e) {}
}
doCompileStyle()主要做了一件事,就是按需引入postcss需要的插件,其中就有scoped的插件。这个scoped插件应该就是Scoped Css的核心了。
我们看下scopedPlugin插件都做了什么
const scopedPlugin = () => {return {postcssPlugin: 'vue-sfc-scoped',Rule(rule) {processRule(id, rule)}
}function processRule(id: string, rule: Rule) {
/* import selectorParser from 'postcss-selector-parser'
* 通过 postcss-selector-parser 获取css AST
*/rule.selector = selectorParser(selectorRoot => {selectorRoot.each(selector => {rewriteSelector(id, selector, selectorRoot)})}).processSync(rule.selector)
}function rewriteSelector(id: string,selector: selectorParser.Selector,selectorRoot: selectorParser.Root
) {let node: selectorParser.Node | null = nulllet shouldInject = true// find the last child node to insert attribute selectorselector.each(n => {// DEPRECATED ">>>" and "/deep/" combinatorif (n.type === 'combinator' &&(n.value === '>>>' || n.value === '/deep/')) {n.value = ' 'n.spaces.before = n.spaces.after = ''// warn(//   `the >>> and /deep/ combinators have been deprecated. ` +//     `Use :deep() instead.`// )//   可以结束本次循环return false}if (n.type === 'pseudo') {const { value } = n// deep: inject [id] attribute at the node before the ::v-deep// combinator.if (value === ':deep' || value === '::v-deep') {if (n.nodes.length) {// .foo ::v-deep(.bar) -> .foo[xxxxxxx] .bar// replace the current node with ::v-deep's inner selectorlet last: selectorParser.Selector['nodes'][0] = nn.nodes[0].each(ss => {selector.insertAfter(last, ss)last = ss})// insert a space combinator before if it doesn't already have oneconst prev = selector.at(selector.index(n) - 1)if (!prev || !isSpaceCombinator(prev)) {selector.insertAfter(n,selectorParser.combinator({value: ' '}))}selector.removeChild(n)} else {// DEPRECATED usage in v3// .foo ::v-deep .bar -> .foo[xxxxxxx] .bar// warn(//   `::v-deep usage as a combinator has ` +//     `been deprecated. Use :deep(<inner-selector>) instead.`// )const prev = selector.at(selector.index(n) - 1)if (prev && isSpaceCombinator(prev)) {selector.removeChild(prev)}selector.removeChild(n)}return false}}if (n.type !== 'pseudo' && n.type !== 'combinator') {node = n}})if (node) {;(node as selectorParser.Node).spaces.after = ''} else {// For deep selectors & standalone pseudo selectors,// the attribute selectors are prepended rather than appended.// So all leading spaces must be eliminated to avoid problems.selector.first.spaces.before = ''}if (shouldInject) {//  给seletor的node节点添加属性 idselector.insertAfter(// If node is null it means we need to inject [id] at the start// insertAfter can handle `null` herenode as any,selectorParser.attribute({attribute: id,value: id,raws: {},quoteMark: `"`}))}
}
上述是保留了主要流程的插件代码,至此,我们可以得出scoped的实现方案就是通过postcss插件这种形式实现。
大家如果没有理解上述插件的原理,下面我提供个简单的插件代码,方便大家在node平台上运行理解。
简易流程:
const postcss = require('postcss');
// 解析Css AST
const selectorParser = require('postcss-selector-parser');postcss([
{postcssPlugin: 'post-test-plugin',Rule(rule) {console.log(rule.selector, 'rule.selector');rule.selector = selectorParser(selectorRoot => {selectorRoot.each(selector => {let node = null;selector.each(n => {if(n.type === 'combinator'  && n.value === '/deep/') {n.value = ' ';return false;}if(n.type !=='pseudo' && n.type !=='combinator') {node= n;}})selector.insertAfter(node,selectorParser.attribute({attribute: '123456',}))})}).processSync(rule.selector)console.log(rule.selector, 'after ruleSelector');}
}
]).process(`/deep/ a { color: red }; b:hover{ color: blue }`).then(res =>{ console.log(res.css); // [123456]  a { color: red }; b[123456]:hover{ color: blue }
});
关于Debug的一个小技巧
上述解密部分有的朋友可能会疑惑,怎么就能刚好定位到这些文件呢?这里给大家分享一个debug的小技巧,主要适用于vscode编辑器。以本次scoped分析为例:
通过源码我们大概分析出可能是compiler-sfc包中的插件进行的scoped操作,那么我们直接在猜测位置打下断点如图所示:

然后打开package.json文件,在scripts命令行上有调试按钮,点击调试选择build命令:
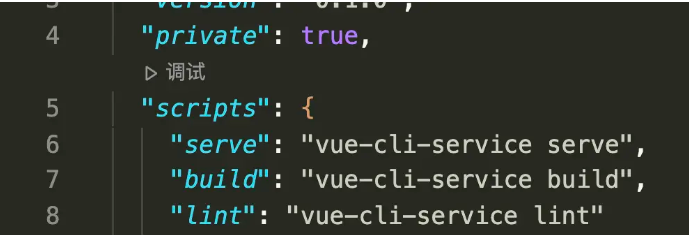
然后自动开始执行npm run build,定位到我们刚才打的断点那里:

左侧有调用堆栈和当前变量以及调试按钮,然后就可以一步步进行调试啦。
至此,Vue的Scoped Css对你来说应该不再陌生了吧,如果还是有疑惑,可以按照上述步骤自行调试解惑哦~
本文转载于:
https://juejin.cn/post/7254083731488849957
如果对您有所帮助,欢迎您点个关注,我会定时更新技术文档,大家一起讨论学习,一起进步。


