目的
本文目的:实现用户关注和取消关注功能。(完整代码附在文章末尾)
相关知识
在我之前的文章 《使用Redis构建简易社交网站(1)-创建用户与动态界面》中提到了如何实现简易社交网站中创建新用户和创建新动态功能。
那这篇文章将教会你掌握:1.redis基本命令,2.python基本命令。
redis基本命令
zscore:返回有序集合中指定成员的分值。
conn = redis.Redis()
conn.zscore("testzset", "member1")
conn.zscore("testzset", "not_exists_member")testzset内容如下:
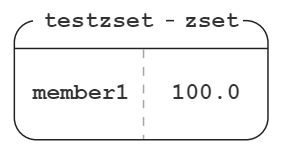
执行结果:
100.0
None
zadd:将成员加入到有序集合中,并确保其在正确的位置上。
conn = redis.Redis()
conn.zadd("testzset", "member2", 3)
conn.zadd("testzset", "member1", 2)
conn.zadd("testzset", "member3", 1)
执行后:
member3
member1
member2执行结果:1,1,1
hincrby:为哈希中指定域的值增加增量 increment,用于统计。
conn = redis.Redis()
conn.hincrby("testhash", "field1", 1)
执行前:
{'field1': '1'}
执行后:
{'field1': '2'}
zrem:从有序集合中移除指定成员。
conn = redis.Redis()
conn.zrem("testzset", "member1")
执行前:
member3
member1
member2
执行后:
member3
member2执行结果:1
pipeline:将多条命令按照先后顺序放进一个队列中,一般配合execute一同使用,原子性(atomic)地执行队列里的命令。
conn = redis.Redis()
pipe = conn.pipeline(True) # 事务开始
pipe.incr("counter")
pipe.incr("counter")
pipe.incr("counter")
pipe.execute() # 事务执行执行结果:[1, 2, 3],通过下标即可获取对应命令的执行结果。
python基本命令
使用格式化拼接字符串:
"My name is %s, I'm %i years old"%('educoder', 2)执行结果:"My name is educoder, I'm 2 years old"
返回当前时间的时间戳。
time.time()
将字符串转换为整型数据:
int("1")
执行结果:1
取一个数的相反数:
a = 1b = -aprint b
执行结果:-1
实战例题
编写 follow(uid, other_uid) 函数,实现关注用户的功能,具体参数与要求如下:
- 方法参数
uid为当前用户编号,other_uid为被关注的用户编号; - 避免重复关注的实现:如果被关注的用户编号已经在当前用户的关注列表
following:{uid}中,则不重复关注,直接返回None; - 建立关注关系的实现:使用事务一次性提交:
- 将被关注的用户编号加入到当前用户的关注列表
following:{uid}中,分值为当前时间戳。 - 将当前用户编号加入到被关注用户的粉丝列表中
followers:{other_uid},分值为当前时间戳。
- 将被关注的用户编号加入到当前用户的关注列表
- 修改统计数据的实现:若关系建立成功,则使用事务一次性提交:
- 将当前用户详情
user:{uid}中的关注数following加1 - 将被关注用户详情
user:{other_uid}中的粉丝数followers加1
- 将当前用户详情
- 返回执行结果的实现:返回
True
编写 unfollow(uid, other_uid) 函数,实现取消关注的功能,具体参数与要求如下:
- 方法参数
uid为当前用户编号,other_uid为被取消关注的用户编号; - 避免重复取消关注的实现:如果被关注的用户编号已经不在当前用户的关注列表
following:{uid}中,则不重复取消关注,直接返回None; - 删除关注关系的实现:使用事务一次性提交:
- 从当前用户的关注列表
following:{uid}中移除被取消关注用户编号。 - 从被取消关注用户的粉丝列表中
followers:{other_uid}移除当前用户编号。
- 从当前用户的关注列表
- 修改统计数据的实现:若关系删除成功,则使用事务一次性提交:
- 将当前用户详情
user:{uid}中的关注数following减1 - 将被取消关注用户详情
user:{other_uid}中的粉丝数followers减1
- 将当前用户详情
- 返回执行结果的实现:返回
True
注意: 关注列表和粉丝列表均为有序集合,存储成员时,分值均为当前时间戳; 用户详情为上一关中创建的哈希结构。
测试输入:
94
预期输出:
测试 follow 方法...
用户 9 关注 用户 4
关注结果: True
用户 9 的关注列表内容为: ['4']
用户 4 的粉丝列表内容为: ['9']
用户 9 的用户详情为: {'login_name': 'test_user9', 'posts': '0', 'real_name': 'Test user9', 'followers': '0', 'following': '1', 'id': '9'}
用户 4 的用户详情为: {'login_name': 'test_user4', 'posts': '0', 'real_name': 'Test user4', 'followers': '1', 'following': '0', 'id': '4'}用户 9 再次关注 用户 4
关注结果: None测试 unfollow 方法...
用户 9 取消关注 用户 4
取消关注结果: True
用户 9 的关注列表内容为: []
用户 4 的粉丝列表内容为: []
用户 9 的用户详情为: {'login_name': 'test_user9', 'posts': '0', 'real_name': 'Test user9', 'followers': '0', 'following': '0', 'id': '9'}
用户 4 的用户详情为: {'login_name': 'test_user4', 'posts': '0', 'real_name': 'Test user4', 'followers': '0', 'following': '0', 'id': '4'}用户 9 再次取消关注 用户 4
取消关注结果: None
code.py
#code.py
#-*- coding:utf-8 -*-import re
import time
import redisconn = redis.Redis()# 关注用户
def follow(uid, other_uid):# 请在下面完成要求的功能#********* Begin *********#fkey1 = "following:%s"%(uid)fkey2 = "followers:%s"%(other_uid)if conn.zscore(fkey1, other_uid):return Nonenow = time.time()pipe = conn.pipeline(True)pipe.zadd(fkey1, other_uid, now)pipe.zadd(fkey2, uid, now)following, followers = pipe.execute()pipe.hincrby("user:%s"%(uid), 'following', int(following))pipe.hincrby("user:%s"%(other_uid), 'followers', int(followers))pipe.execute()return True#********* End *********## 取消关注
def unfollow(uid, other_uid):# 请在下面完成要求的功能#********* Begin *********#fkey1 = "following:%s"%(uid)fkey2 = "followers:%s"%(other_uid)if not conn.zscore(fkey1, other_uid):return Nonepipe = conn.pipeline(True)pipe.zrem(fkey1, other_uid)pipe.zrem(fkey2, uid)following, followers = pipe.execute()pipe.hincrby("user:%s"%(uid), 'following', -int(following))pipe.hincrby("user:%s"%(other_uid), 'followers', -int(followers))pipe.execute()return True#********* End *********## 创建新用户
def create_user(login_name, real_name):login_name = login_name.lower()if conn.hget("users", login_name):return Noneuid = conn.incr("user:id")pipe = conn.pipeline(True)pipe.hset("users", login_name, uid)pipe.hmset("user:%i"%(uid), {'login_name': login_name,'id': uid,'real_name': real_name,'followers': 0,'following': 0,'posts': 0,'last_signup': time.time(),})pipe.execute()return uid# 为用户创建新动态
def create_post(uid, content):pipe = conn.pipeline(True)pipe.hget("user:%i"%(uid), 'login_name')pipe.incr("post:id")login_name, pid = pipe.execute()if not login_name:return Nonepipe.hmset("post:%i"%(pid), {'id': pid,'uid': uid,'content': content,'posted': time.time(),'user_name': login_name,})pipe.hincrby("user:%i"%(uid), 'posts')pipe.execute()return pid
read.py
#read.py
#-*- coding:utf-8 -*-import os
import sys
import time
import redis
import pprint
from code import *conn = redis.Redis()
retry_time = 0
while True:try:conn.ping()breakexcept redis.exceptions.ConnectionError:os.system("redis-server > /dev/null 2>&1 &")retry_time += 1if retry_time > 3:breakpipe = conn.pipeline(True)
pipe.delete("users", "user:id")
keys = conn.keys("user:*") + conn.keys("followers:*") + conn.keys("following:*")
for key in keys:pipe.delete(key)
pipe.execute()# 创建测试数据
join_str = " "
for i in xrange(10):login_name = "test_user%i"%(i+1)real_name = join_str.join(login_name.split("_")).capitalize()create_user(login_name, real_name)uid = int(sys.stdin.readline().strip())
other_uid = int(sys.stdin.readline().strip())print "测试 follow 方法..."
print "用户 %i 关注 用户 %i"%(uid, other_uid)
f_result = follow(uid, other_uid)
print "关注结果: " + str(f_result)
print "用户 %i 的关注列表内容为: %s"%(uid, str(conn.zrange("following:%i"%(uid), 0, -1)))
print "用户 %i 的粉丝列表内容为: %s"%(other_uid, str(conn.zrange("followers:%i"%(other_uid), 0, -1)))
uid_info = conn.hgetall("user:%i"%(uid))
uid_info.pop("last_signup", "404")
other_uid_info = conn.hgetall("user:%i"%(other_uid))
other_uid_info.pop("last_signup", "404")
print "用户 %i 的用户详情为: %s"%(uid, str(uid_info))
print "用户 %i 的用户详情为: %s"%(other_uid, str(other_uid_info))
printprint "用户 %i 再次关注 用户 %i"%(uid, other_uid)
oth_f_result = follow(uid, other_uid)
print "关注结果: " + str(oth_f_result)
printprint "测试 unfollow 方法..."
print "用户 %i 取消关注 用户 %i"%(uid, other_uid)
unf_result = unfollow(uid, other_uid)
print "取消关注结果: " + str(unf_result)
print "用户 %i 的关注列表内容为: %s"%(uid, str(conn.zrange("following:%i"%(uid), 0, -1)))
print "用户 %i 的粉丝列表内容为: %s"%(other_uid, str(conn.zrange("followers:%i"%(other_uid), 0, -1)))
uid_info = conn.hgetall("user:%i"%(uid))
uid_info.pop("last_signup", "404")
other_uid_info = conn.hgetall("user:%i"%(other_uid))
other_uid_info.pop("last_signup", "404")
print "用户 %i 的用户详情为: %s"%(uid, str(uid_info))
print "用户 %i 的用户详情为: %s"%(other_uid, str(other_uid_info))
printprint "用户 %i 再次取消关注 用户 %i"%(uid, other_uid)
oth_unf_result = unfollow(uid, other_uid)
print "取消关注结果: " + str(oth_unf_result)pipe = conn.pipeline(True)
pipe.delete("users", "user:id")
keys = conn.keys("user:*") + conn.keys("followers:*") + conn.keys("following:*")
for key in keys:pipe.delete(key)
pipe.execute()