01、什么是分布式数据对象
在可信组网环境下,多个相互组网认证的设备将各自创建的对象加入同一个 sessionId,使得加入的多个数据对象之间可以同步数据,也就是说,当某一数据对象属性发生变更时,其他数据对象会检测到这一变更,同时将自身属性更新。此时,该 sessionId 下的所有数据对象属性相同,这样的数据对象称之为分布式数据对象。此外,分布式数据对象可以被动退出 sessionId,当分布式数据对象退出 sessionId 后,该对象将检测不到其他对象的变更。
02、分布式数据对象能力
1、 分布式数据对象创建
2、 分布式数据对象查询
3、 分布式数据对象修改
4、 分布式数据对象删除
5、 分布式数据对象保存
6、 分布式数据对象订阅(数据变更,上下线)
7、分布式数据对象加入、退出分布式组网
03、前提准备
1、 开发工具:DevEco Studio 3.1.0.501
2、API:9
3、 SDK 版本:3.2.12.5
04、创建一个新的项目
新建项目,选择 API9 版本,stage 模型。

05、权限申请
1、 使用到的权限
○ ohos.permission.DISTRIBUTED_DATASYNC
○ 允许不同设备间的数据交换
○ 权限级别:normal
○ 授权方式:user_grant
○ ACL 使能:TRUE
2、配置文件申明
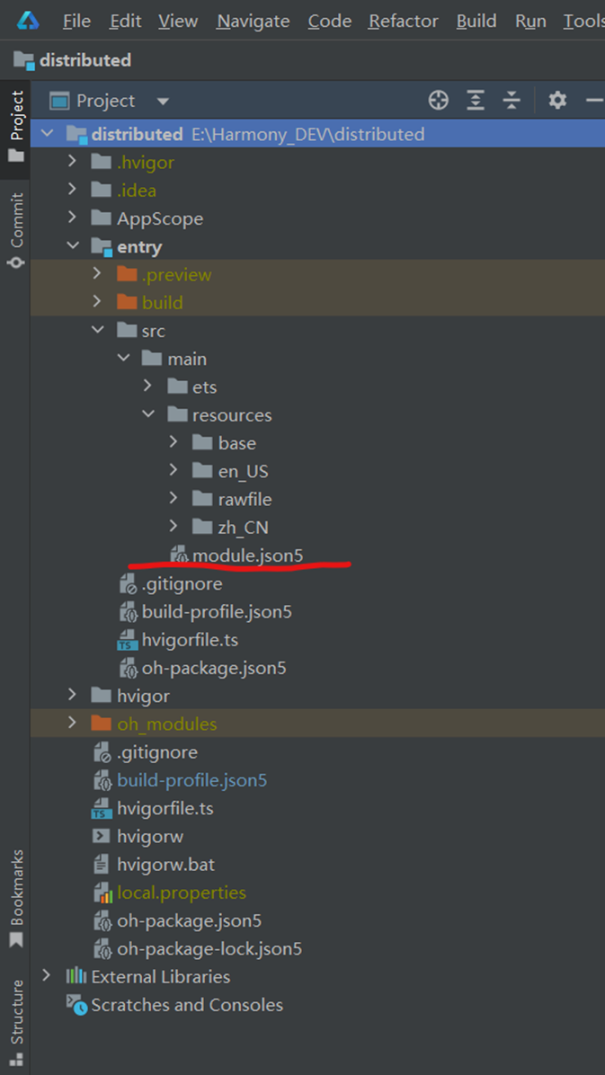
首先,在项目的模块级目录下找到并打开 module.json5 文件,如下图:
在 module 下的对象里添加如下申明:

此时,配置文件中的权限申明就完成了,但是,此时我们还不能获得这些权限。由于 ohos.permission.DISTRIBUTED_DATASYNC 权限是 ACL 使能为 TRUE 的权限,需要在签名工具文件中说明一下。
如何找到对应的签名工具文件呢?我们在安装 DevEco Studio 的时候是下载好了 OpenHarmony 的 SDK 的,此时在 OpenHarmony 文件夹中,打开 “Sdk\OpenHarmony SDK 版本\toolchains\lib” 该路径,此时在 lib 文件夹中,咱们可以找到两个 json 文件,分别为 UnsgnedDebugProfileTemplate.json 和 UnsgnedReleasedProfileTemplate.json,点击并打开这两个文件,添加如下权限:

3、权限申请编码
在申请 ohos.permission.DISTRIBUTED_DATASYNC 权限时,其文档中将其标注为用户手动授权的权限,此时需要我们动态申请权限,在项目中,我们新建一个 ets 文件,我这里取名为 RequestPermission.ets。
首先,导入以下包:
import abilityAccessCtrl, { Permissions } from '@ohos.abilityAccessCtrl';import bundleManager from '@ohos.bundle.bundleManager';import common from '@ohos.app.ability.common';
获取访问控制模块对象实例:
let atManager = abilityAccessCtrl.createAtManager();
编写如下方法(这里使用的是异步函数):
export async function checkAccessTokenID(permission: Array<Permissions>) {// 获取应用程序的accessTokenIDlet tokenId: number;let grantStatus: Array<abilityAccessCtrl.GrantStatus> = []try {let bundleInfo: bundleManager.BundleInfo = await bundleManager.getBundleInfoForSelf(bundleManager.BundleFlag.GET_BUNDLE_INFO_WITH_APPLICATION);let appInfo: bundleManager.ApplicationInfo = bundleInfo.appInfo;tokenId = appInfo.accessTokenId;} catch (err) {console.error(`getBundleInfoForSelf failed, code is ${err.code}, message is ${err.message}`);}// 校验应用是否被授予权限,若申请多个权限,建议循环检查多个权限for (let index = 0;index < permission.length; index++) {try {grantStatus.push(await atManager.checkAccessToken(tokenId, permission[index]))} catch (err) {console.error(`checkAccessToken failed, code is ${err.code}, message is ${err.message}`);}}return grantStatus;
}export async function checkPermission(context: common.UIAbilityContext, permissions: Array<Permissions>) {let grantStatus: Array<abilityAccessCtrl.GrantStatus> = await checkAccessTokenID(permissions)for (let i = 0; i < grantStatus.length; i++) {if (grantStatus[i] === abilityAccessCtrl.GrantStatus.PERMISSION_GRANTED) {console.info(`${permissions[i].toString()} 已授权`)} else {//申请权限console.info('开始向用户申请权限')requestPermissionFromUser(context, permissions)}}
}
export async function requestPermissionFromUser(context: common.UIAbilityContext, permissions: Array<Permissions>) {// requestPermissionsFromUser会判断权限的授权状态来决定是否唤起弹窗atManager.requestPermissionsFromUser(context, permissions).then((data) => {let grantStatus: Array<number> = data.authResultslet length: number = grantStatus.lengthfor (let i = 0;i < length; i++) {if (grantStatus[i] === 0) {// 用户授权,可以继续访问目标操作console.info(`${permissions[i].toString()} 权限申请成功`)} else {// 用户拒绝授权,提示用户必须授权才能访问当前页面的功能,并引导用户到系统设置中打开相应的权限console.info(`${permissions[i].toString()} 权限申请被用户拒绝`)}}// 授权成功})
}
此时,我们申请权限的方法就算编写完成了,在应用入口,即 EntryAbility.ts 文件中的
onCreate(want: Want, launchParam: AbilityConstant.LaunchParam)
方法中回调权限申请函数:
requestPermissionFromUser(this.context, PERMISSIONS)
其中,PERMISSIONS 定义如下:const PERMISSIONS:Array<Permissions>=['ohos.permission.DISTRIBUTED_DATASYNC']
到此,我们的权限申请就算完完全全完成啦,当用户第一次安装并打开应用的时候,应用会向用户通过弹窗形式申请权限,用户点击授权即可赋予应用相应的权限啦~
06、上手分布式数据对象代码开发
登录了同一华为帐号的 HarmonyOS 设备已经默认了进行了组网认证,所以在进行分布式数据对象开发之前无需再进行多设备组网认证这一阶段的开发,开发变得相对简单了起来。首先,咱们制作一个简易 UI 界面(UI 界面仅供参考),如下图所示:
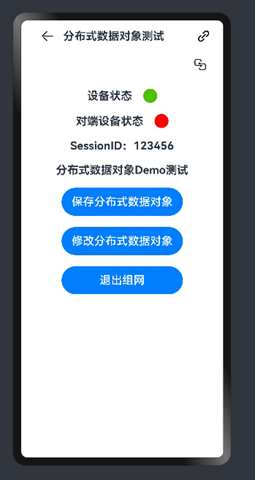
相信对于有 HarmonyOS 开发经验的小伙伴们来说这样的 UI 界面制作并不困难,其中红色圆点、绿色圆点为设备状态,当设备状态发生改变如下线时,颜色变为红色,UI 界面代码如下:
import router from '@ohos.router'
import { DistributedDeviceManageFunc } from '../modules/DistributedDeviceManager/DistributedDeviceManagerFunctions'
import DistributedObjectFunc from '../modules/DistributedObject/DistributedObjectFunctions'
import { ContinuationDeviceManagerDialog } from '../view/ContinuationDeviceManagerDialog'
import { DistributedDeviceManagerDialog } from '../view/DistributedDeviceManagerDialog'AppStorage.SetOrCreate('distributedDeviceList', [])
AppStorage.SetOrCreate('message', '分布式数据对象Demo测试')
AppStorage.SetOrCreate('statusColor', '#ff4fc100')
AppStorage.SetOrCreate('distributedColor', '#ffff0000')@Entry
@Component
struct DistributedObjectDemo {@StorageLink('message') message: string = ''@StorageLink('statusColor') statusColor: string = ''@StorageLink('distributedColor') distributedColor: string = ''@StorageLink('distributedObj') distributedObj: DistributedObjectFunc = new DistributedObjectFunc()@BuildernavigationTitle() {Row({ space: '10vp' }) {Button({ type: ButtonType.Normal }) {Image($rawfile('ic_public_back.svg')).size({width: '24vp',height: '24vp'})}.width('36vp').height('36vp').backgroundColor(Color.White).borderRadius('10vp').onClick(() => {DistributedDeviceManageFunc.release()router.back()})Text('分布式数据对象测试').fontWeight(FontWeight.Bold).fontSize('20vp')Blank()Button({ type: ButtonType.Normal }) {Image($rawfile('ic_public_connection_filled.svg')).size({width: '24vp',height: '24vp'})}.width('36vp').height('36vp').backgroundColor(Color.White).borderRadius('10vp').onClick(() => {this.distributedDeviceManagerDialogController.open()})}.padding('5vp').width('90%')}build() {Navigation() {Column({ space: '20vp' }) {Row({ space: '20vp' }) {Text(`设备状态`).fontSize('20vp').fontWeight(FontWeight.Bold)Circle().width('25vp').height('25vp').fill(this.statusColor)}Row({ space: '20vp' }) {Text(`对端设备状态`).fontSize('20vp').fontWeight(FontWeight.Bold)Circle().width('25vp').height('25vp').fill(this.distributedColor)}Text(`SessionID:${this.distributedObj.getSessionId()}`).fontSize('20vp').fontWeight(FontWeight.Bold)Text(this.message).fontSize('20vp').fontWeight(FontWeight.Bold).maxLines(2)Button('保存分布式数据对象').buttonStyles().onClick(() => {this.distributedObj.saveDistributedObject()})Button('修改分布式数据对象').buttonStyles().onClick(() => {this.distributedObj.updateDistributedObject()})Button('退出组网').buttonStyles().onClick(() => {this.distributedObj.exit()router.back()})}.width('100%')}.width('100%').height('100%').mode(NavigationMode.Auto).titleMode(NavigationTitleMode.Mini).hideBackButton(true).title(this.navigationTitle())}
}@Extend(Button) function buttonStyles() {.fontSize('20vp').width('60%').height('50vp')
}
现在,我们的页面制作就完成啦,下面开始重头戏——分布式数据对象开发流程
1、导入模块
import distributedObject from '@ohos.data.distributedDataObject'
2、初始化 distributedObject. DataObject 对象
定义一个 distributedObject. DataObject 类型的变量。
mDistributedObject: distributedObject.DataObject
调用 distributedObject. Create()函数创建一个 distributedObject. DataObject 对象,并将其返回给定义的变量 mDistributedObject。
this.mDistributedObject = distributedObject.create(globalThis.context, {name: 'jack',age: 18,isVis: false})
在 create()方法中存在两个参数,context 和 resource,context 的类型为 Context,resource 类型为 object,在这里我是在 entryAbility.ts 文件下的 onWindowStageCreate()方法里面定义了一个全局变量 globalThis.context。
globalThis.context = this.context
3、设置组网 sessionId
this.mDistributedObject.setSessionId(this.mSessionId)
在 setSessionId()函数中,参数 sessionId 为 string 类型,表示分布式对象组网唯一标识符,设置同步的 sessionId,当可信组网中有多个设备时,多个设备间的对象如果设置为同一个 sessionId,就能自动同步。
4、开启设备状态监听
globalThis.statusCallback = (sessionId: string, networkId: string, status: string) => {AppStorage.Set('message', `组网设备状况变更,id:${sessionId} status:${status} networkId:${networkId}`)if (status == 'online') {AppStorage.Set('distributedColor', '#ff4fc100')} else if (status == 'offline') {AppStorage.Set('distributedColor', '#ffff0000')}
}
this.mDistributedObject.on("status", globalThis.statusCallback)
(sessionId: string, networkId: string, status: string)为 callback 回调函数返回的值,我们可以使用这些返回值判断设备上下线状态,其中 status 参数返回值为 online 或者 offline,表示设备对端设备上下线。
5、开启分布式数据对象同步监听
globalThis.changeCallback = (sessionId: string, fields: Array<string>) => {console.info('分布式数据对象发生变化')if (fields != null && fields != undefined) {AppStorage.Set('message', `data change:${fields} sessionId:${sessionId}`)}}this.mDistributedObject.on("change", globalThis.changeCallback)
当同一组网内分布式数据对象发生改变时,同一组网中的所有分布式数据对象同步发生变化,变化后的值为某一分布式数据对象改变后的值(sessionId: string, fields: Array<string>)为 callback 回调函数返回值,其中,sessionId 为组网唯一标识符,field 为分布式数据对象的数据变更列表。
此时此刻,分布式数据对象就基本上开发完成啦。
如果有小伙伴想要修改分布式数据对象的属性,可以直接修改
// @ts-ignorethis.mDistributedObject.name = 'lucy'// @ts-ignorethis.mDistributedObject.age = 25
注意:根据当前版本 IDE 的编码插件情况,不能直接写 this.mDistributedObject.age = 25,此时咱们需要加上// @ts-ignore 就可以啦。
最后,使用完分布式数据对象后大家要记得释放资源哦(注销所有监听,退出组网 sessionId,将分布式数据对象设置为空值)
this.mDistributedObject.off("change")this.mDistributedObject.off("status")this.mDistributedObject.setSessionId()this.mDistributedObject = nullthis.mSessionId = null
如果有小伙伴有两部或两部以上的华为设备,可以将程序烧录到设备中,体验一下分布式数据对象能力的快乐~
