一、概述
文档版面分析是针对图片或页面扫描图像上感兴趣的区域进行定位和分类的过程。其主要目标在于让机器能够理解文档结构,即将文档图像划分为不同类型内容的区域,并分析这些区域之间的关系。这是进行内容识别之前的关键步骤,它通常可以分为页面分割和逻辑结构分析两个方面。
页面分割方法侧重于外观特征,通过使用视觉线索将页面划分为不同的区域。这些区域通常包括文本、图形、图像和表格等不同的元素。页面分割方法通过识别和分离这些元素,以便对不同类型的内容进行后续处理和分析。
逻辑结构分析更加侧重于对区域内容的语义理解和分类。它致力于为每个区域提供更细粒度的语义标签,例如识别段落文本区域,并将其与标题或文档标题等内容区分开来。逻辑结构分析旨在对文档中的内容进行更深入的语义理解,以便后续对文档进行更精确的处理和理解。
二、NDK开发
Android NDK允许开发人员使用原生语言如C和C++编写代码,并将其与Java代码混合使用。NDK旨在构建性能优化的应用程序,也可用于将现有的C/C++库集成到Android应用程序中。
在特定情况下,使用Android NDK能够提升应用程序的性能和响应速度。尤其是在需要处理大量数据或执行计算密集型任务的应用中,使用C/C++等原生语言能够带来更高的性能和更优秀的用户体验。此外,NDK还能避免重复编写代码,使开发者能够轻松地将现有的C/C++库整合到Android应用程序中。
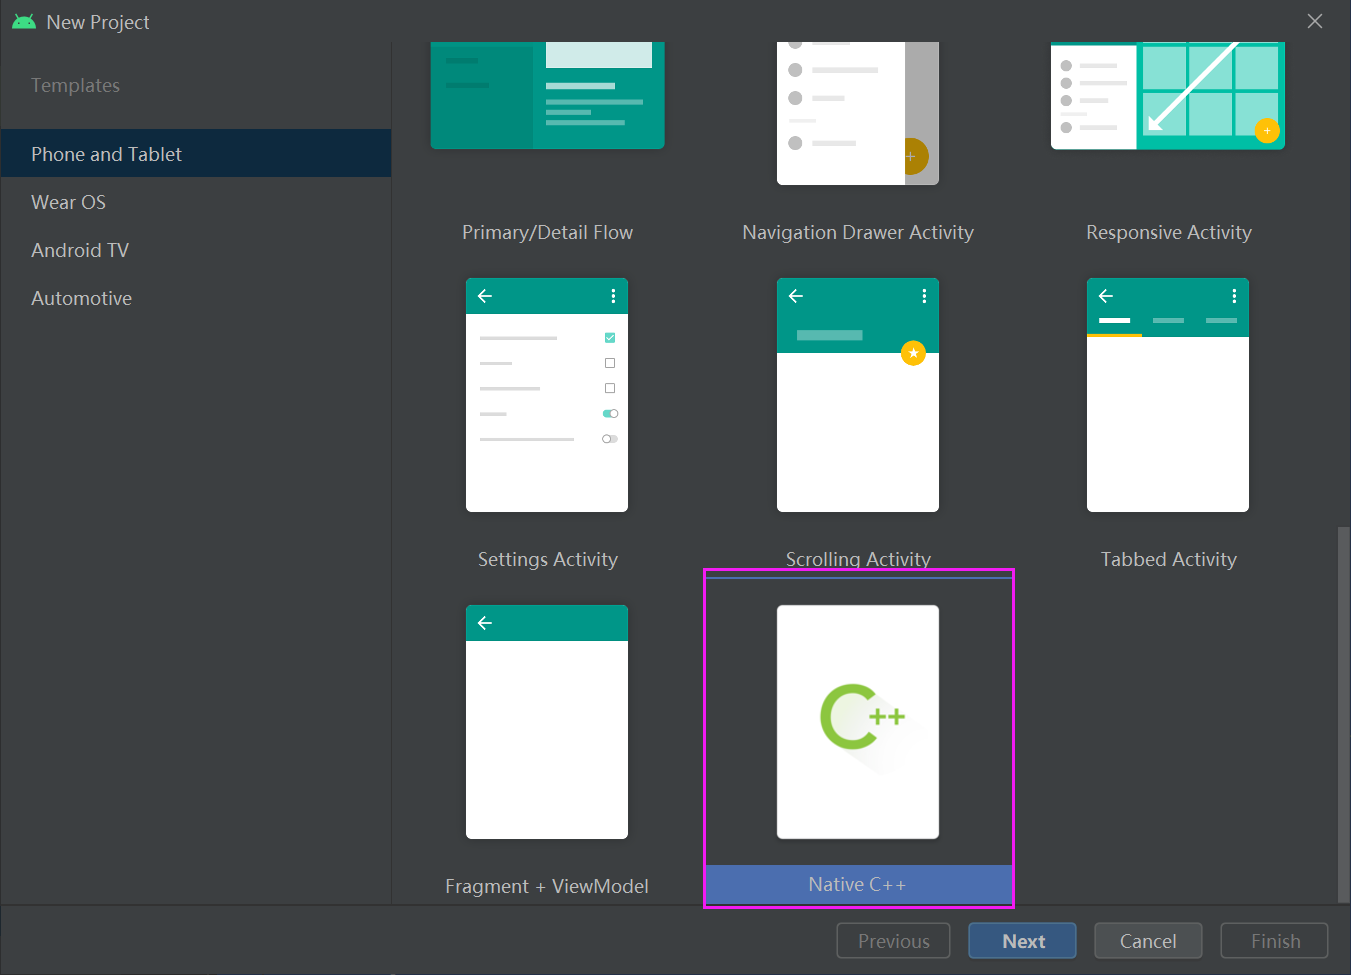
1.创建工程
创建一个Native C++工程:
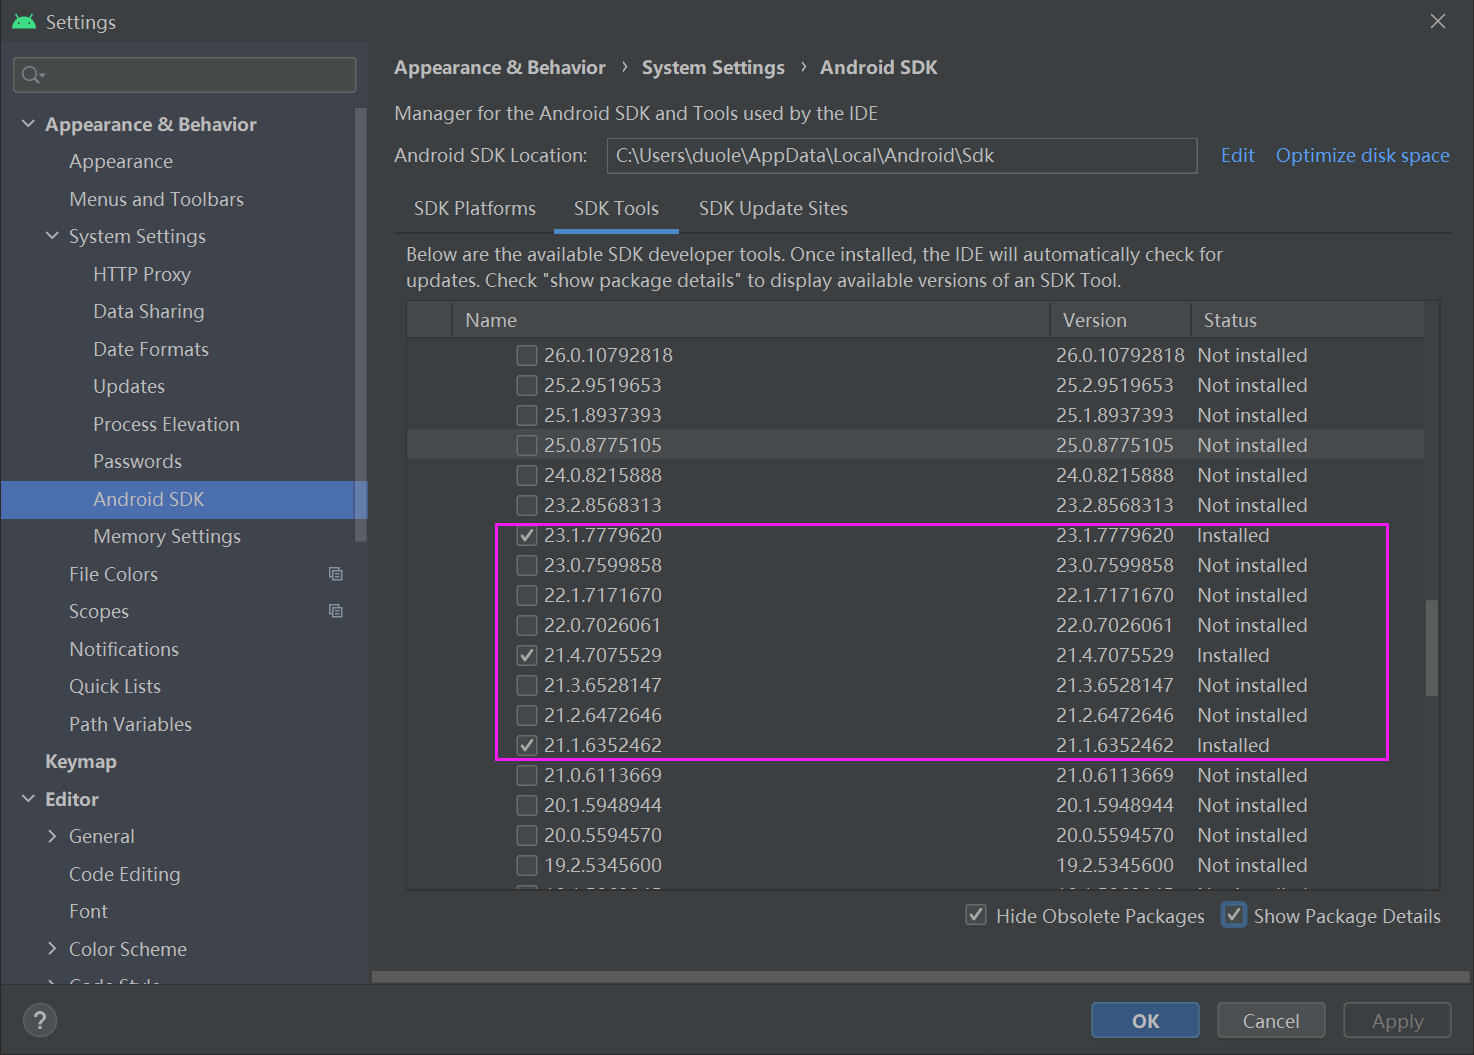
2. 安装NDK:
选择要使用的NDK,可通过Android Studio中的SDK Manager安装NDK,也可以手动从Android开发者网站下载并安装。
3. 配置项目Gradle:
在项目的build.gradle文件中,添加适当的配置,如下:
plugins {id 'com.android.application'
}android {compileSdk 33defaultConfig {applicationId "com.example.layout_analysis"minSdk 30targetSdk 33versionCode 1versionName "1.0"testInstrumentationRunner "androidx.test.runner.AndroidJUnitRunner"externalNativeBuild {cmake {cppFlags ''}}}buildTypes {release {minifyEnabled falseproguardFiles getDefaultProguardFile('proguard-android-optimize.txt'), 'proguard-rules.pro'}}compileOptions {sourceCompatibility JavaVersion.VERSION_1_8targetCompatibility JavaVersion.VERSION_1_8}externalNativeBuild {cmake {path file('src/main/cpp/CMakeLists.txt')version '3.10.2'}}buildFeatures {viewBinding true}
}dependencies {implementation 'androidx.appcompat:appcompat:1.2.0'implementation 'com.google.android.material:material:1.3.0'implementation 'androidx.constraintlayout:constraintlayout:2.0.4'testImplementation 'junit:junit:4.+'androidTestImplementation 'androidx.test.ext:junit:1.1.2'androidTestImplementation 'androidx.test.espresso:espresso-core:3.3.0'
}
4. 创建C/C++代码:
在Android Studio中,可通过右键单击app目录,在Project视图中选择New->C/C++ Source File,并选择相应的C或C++文件类型。在文件中编写代码,并保存到app/src/main/cpp目录下。
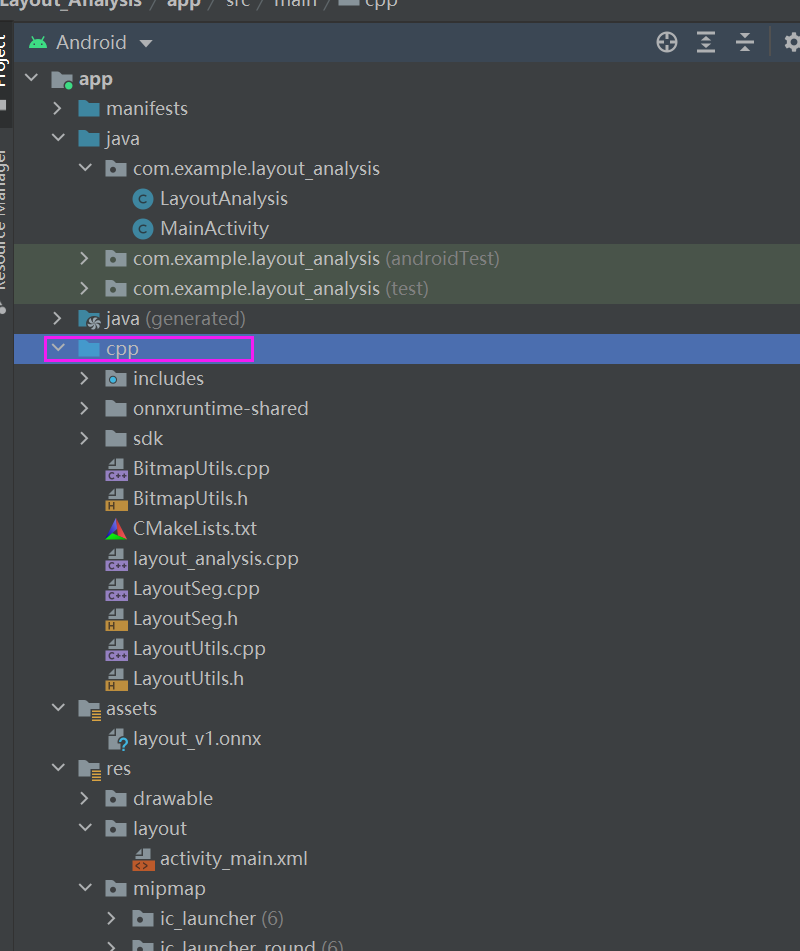
5.导入模型
在与CPP同期目录下创建一个assets目录,把使用的到模型放到这个目录下:

C++实现接口如下:
#include "LayoutSeg.h"
#include <numeric>
#include <android/log.h>
#include <android/asset_manager.h>
#include <android/asset_manager_jni.h>namespace LT
{void *getModelDataFromAssets(AAssetManager *mgr, const char *modelName, int &size) {if (mgr == NULL) {return NULL;}AAsset *asset = AAssetManager_open(mgr, modelName, AASSET_MODE_UNKNOWN);if (asset == NULL) {return NULL;}off_t bufferSize = AAsset_getLength(asset);void *modelData = malloc(bufferSize + 1);size = AAsset_read(asset, modelData, bufferSize);AAsset_close(asset);return modelData;}bool LayoutSeg::read_model(const std::string& modelPath){if (_batchSize < 1) _batchSize = 1;try{
#ifdef _WIN32std::wstring model_path(modelPath.begin(), modelPath.end());_OrtSession = new Ort::Session(_OrtEnv, model_path.c_str(), _OrtSessionOptions);
#else_OrtSession = new Ort::Session(_OrtEnv, modelPath.c_str(), _OrtSessionOptions);
#endifOrt::AllocatorWithDefaultOptions allocator;//init input_inputNodesNum = _OrtSession->GetInputCount();
#if ORT_API_VERSION < ORT_OLD_VISON_inputName = _OrtSession->GetInputName(0, allocator);_inputNodeNames.push_back(_inputName);
#else_inputName = std::move(_OrtSession->GetInputNameAllocated(0, allocator));_inputNodeNames.push_back(_inputName.get());
#endif//cout << _inputNodeNames[0] << endl;Ort::TypeInfo inputTypeInfo = _OrtSession->GetInputTypeInfo(0);auto input_tensor_info = inputTypeInfo.GetTensorTypeAndShapeInfo();_inputNodeDataType = input_tensor_info.GetElementType();_inputTensorShape = input_tensor_info.GetShape();if (_inputTensorShape[0] == -1){_isDynamicShape = true;_inputTensorShape[0] = _batchSize;}if (_inputTensorShape[2] == -1 || _inputTensorShape[3] == -1) {_isDynamicShape = true;_inputTensorShape[2] = _netHeight;_inputTensorShape[3] = _netWidth;}//init output_outputNodesNum = _OrtSession->GetOutputCount();
#if ORT_API_VERSION < ORT_OLD_VISON_output_name0 = _OrtSession->GetOutputName(0, allocator);_outputNodeNames.push_back(_output_name0);
#else_output_name0 = std::move(_OrtSession->GetOutputNameAllocated(0, allocator));_outputNodeNames.push_back(_output_name0.get());
#endifOrt::TypeInfo type_info_output0(nullptr);type_info_output0 = _OrtSession->GetOutputTypeInfo(0); //output0auto tensor_info_output0 = type_info_output0.GetTensorTypeAndShapeInfo();_outputNodeDataType = tensor_info_output0.GetElementType();_outputTensorShape = tensor_info_output0.GetShape();}catch (const std::exception&) {return false;}return true;}bool LayoutSeg::read_model(AAssetManager *mgr,const std::string modelPath){if (_batchSize < 1) _batchSize = 1;try{int dbModelDataLength = 0;void *dbModelData = getModelDataFromAssets(mgr, modelPath.c_str(), dbModelDataLength);_OrtSession = new Ort::Session(_OrtEnv, dbModelData, dbModelDataLength, _OrtSessionOptions);free(dbModelData);// _OrtSession = new Ort::Session(_OrtEnv, modelPath.c_str(), _OrtSessionOptions);Ort::AllocatorWithDefaultOptions allocator;//init input_inputNodesNum = _OrtSession->GetInputCount();
#if ORT_API_VERSION < ORT_OLD_VISON_inputName = _OrtSession->GetInputName(0, allocator);_inputNodeNames.push_back(_inputName);
#else_inputName = std::move(_OrtSession->GetInputNameAllocated(0, allocator));_inputNodeNames.push_back(_inputName.get());
#endif//cout << _inputNodeNames[0] << endl;Ort::TypeInfo inputTypeInfo = _OrtSession->GetInputTypeInfo(0);auto input_tensor_info = inputTypeInfo.GetTensorTypeAndShapeInfo();_inputNodeDataType = input_tensor_info.GetElementType();_inputTensorShape = input_tensor_info.GetShape();if (_inputTensorShape[0] == -1){_isDynamicShape = true;_inputTensorShape[0] = _batchSize;}if (_inputTensorShape[2] == -1 || _inputTensorShape[3] == -1) {_isDynamicShape = true;_inputTensorShape[2] = _netHeight;_inputTensorShape[3] = _netWidth;}//init output_outputNodesNum = _OrtSession->GetOutputCount();
#if ORT_API_VERSION < ORT_OLD_VISON_output_name0 = _OrtSession->GetOutputName(0, allocator);_outputNodeNames.push_back(_output_name0);
#else_output_name0 = std::move(_OrtSession->GetOutputNameAllocated(0, allocator));_outputNodeNames.push_back(_output_name0.get());
#endifOrt::TypeInfo type_info_output0(nullptr);type_info_output0 = _OrtSession->GetOutputTypeInfo(0); //output0auto tensor_info_output0 = type_info_output0.GetTensorTypeAndShapeInfo();_outputNodeDataType = tensor_info_output0.GetElementType();_outputTensorShape = tensor_info_output0.GetShape();}catch (const std::exception&) {return false;}return true;}int LayoutSeg::Preprocessing(const std::vector<cv::Mat>&srcImgs, std::vector<cv::Mat>&outSrcImgs, std::vector<cv::Vec4d>¶ms){outSrcImgs.clear();cv::Size input_size = cv::Size(_netWidth, _netHeight);for (int i = 0; i < srcImgs.size(); ++i){cv::Mat temp_img = srcImgs[i];cv::Vec4d temp_param = { 1,1,0,0 };if (temp_img.size() != input_size){cv::Mat borderImg;LetterBox(temp_img, borderImg, temp_param, input_size, false, false, true, 32);//cout << borderImg.size() << endl;outSrcImgs.push_back(borderImg);params.push_back(temp_param);}else{outSrcImgs.push_back(temp_img);params.push_back(temp_param);}}int lack_num = _batchSize - srcImgs.size();if (lack_num > 0){for (int i = 0; i < lack_num; ++i){cv::Mat temp_img = cv::Mat::zeros(input_size, CV_8UC3);cv::Vec4d temp_param = { 1,1,0,0 };outSrcImgs.push_back(temp_img);params.push_back(temp_param);}}return 0;}bool LayoutSeg::detect(cv::Mat & srcImg, std::vector<OutputSeg>&output){std::vector<cv::Mat> input_data = { srcImg };std::vector<std::vector<OutputSeg>> tenp_output;if (OnnxBatchDetect(input_data, tenp_output)){output = tenp_output[0];return true;}else return false;}bool LayoutSeg::OnnxBatchDetect(std::vector<cv::Mat>&srcImgs, std::vector<std::vector<OutputSeg>>&output){std::vector<cv::Vec4d> params;std::vector<cv::Mat> input_images;cv::Size input_size(_netWidth, _netHeight);//preprocessingPreprocessing(srcImgs, input_images, params);cv::Mat blob = cv::dnn::blobFromImages(input_images, 1 / 255.0, input_size, cv::Scalar(0, 0, 0), true, false);int64_t input_tensor_length = VectorProduct(_inputTensorShape);std::vector<Ort::Value> input_tensors;std::vector<Ort::Value> output_tensors;input_tensors.push_back(Ort::Value::CreateTensor<float>(_OrtMemoryInfo, (float*)blob.data, input_tensor_length, _inputTensorShape.data(), _inputTensorShape.size()));output_tensors = _OrtSession->Run(Ort::RunOptions{ nullptr },_inputNodeNames.data(),input_tensors.data(),_inputNodeNames.size(),_outputNodeNames.data(),_outputNodeNames.size());//post-processfloat* all_data = output_tensors[0].GetTensorMutableData<float>();_outputTensorShape = output_tensors[0].GetTensorTypeAndShapeInfo().GetShape();int net_width = _outputTensorShape[1];int64_t one_output_length = VectorProduct(_outputTensorShape) / _outputTensorShape[0];for (int img_index = 0; img_index < srcImgs.size(); ++img_index){cv::Mat output0 = cv::Mat(cv::Size((int)_outputTensorShape[2], (int)_outputTensorShape[1]), CV_32F, all_data).t(); //[bs,116,8400]=>[bs,8400,116]all_data += one_output_length;float* pdata = (float*)output0.data;int rows = output0.rows;std::vector<int> class_ids;//结果id数组std::vector<float> confidences;//结果每个id对应置信度数组std::vector<cv::Rect> boxes;//每个id矩形框for (int r = 0; r < rows; ++r) { //stridecv::Mat scores(1, _className.size(), CV_32F, pdata + 4);cv::Point classIdPoint;double max_class_socre;minMaxLoc(scores, 0, &max_class_socre, 0, &classIdPoint);max_class_socre = (float)max_class_socre;if (max_class_socre >= _classThreshold){//rect [x,y,w,h]float x = (pdata[0] - params[img_index][2]) / params[img_index][0]; //xfloat y = (pdata[1] - params[img_index][3]) / params[img_index][1]; //yfloat w = pdata[2] / params[img_index][0]; //wfloat h = pdata[3] / params[img_index][1]; //hint left = MAX(int(x - 0.5 * w + 0.5), 0);int top = MAX(int(y - 0.5 * h + 0.5), 0);class_ids.push_back(classIdPoint.x);confidences.push_back(max_class_socre);boxes.push_back(cv::Rect(left, top, int(w + 0.5), int(h + 0.5)));}pdata += net_width;//下一行}std::vector<int> nms_result;cv::dnn::NMSBoxes(boxes, confidences, _classThreshold, _nmsThreshold, nms_result);std::vector<std::vector<float>> temp_mask_proposals;cv::Rect holeImgRect(0, 0, srcImgs[img_index].cols, srcImgs[img_index].rows);std::vector<OutputSeg> temp_output;for (int i = 0; i < nms_result.size(); ++i) {int idx = nms_result[i];OutputSeg result;result.id = class_ids[idx];result.confidence = confidences[idx];result.box = boxes[idx] & holeImgRect;temp_output.push_back(result);}output.push_back(temp_output);}if (output.size())return true;elsereturn false;}
}6. 导入依赖库
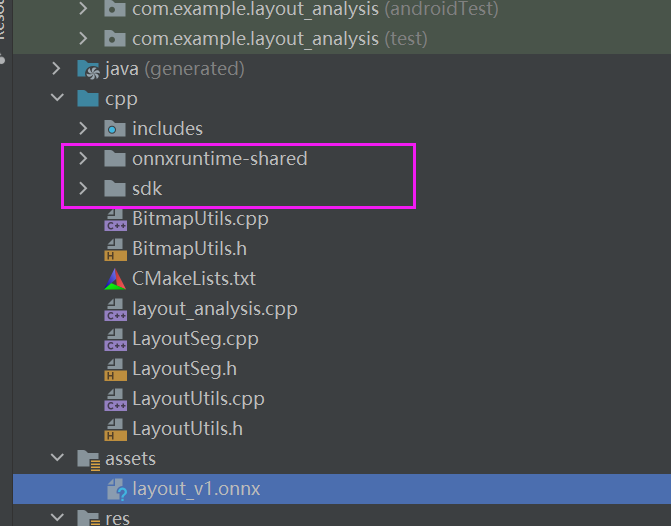
处理图像要依赖onnxruntime和opencv这两个库,可以在它们的官网找到相对应的安卓NDK库,下载之后放到与C++代码同期目录
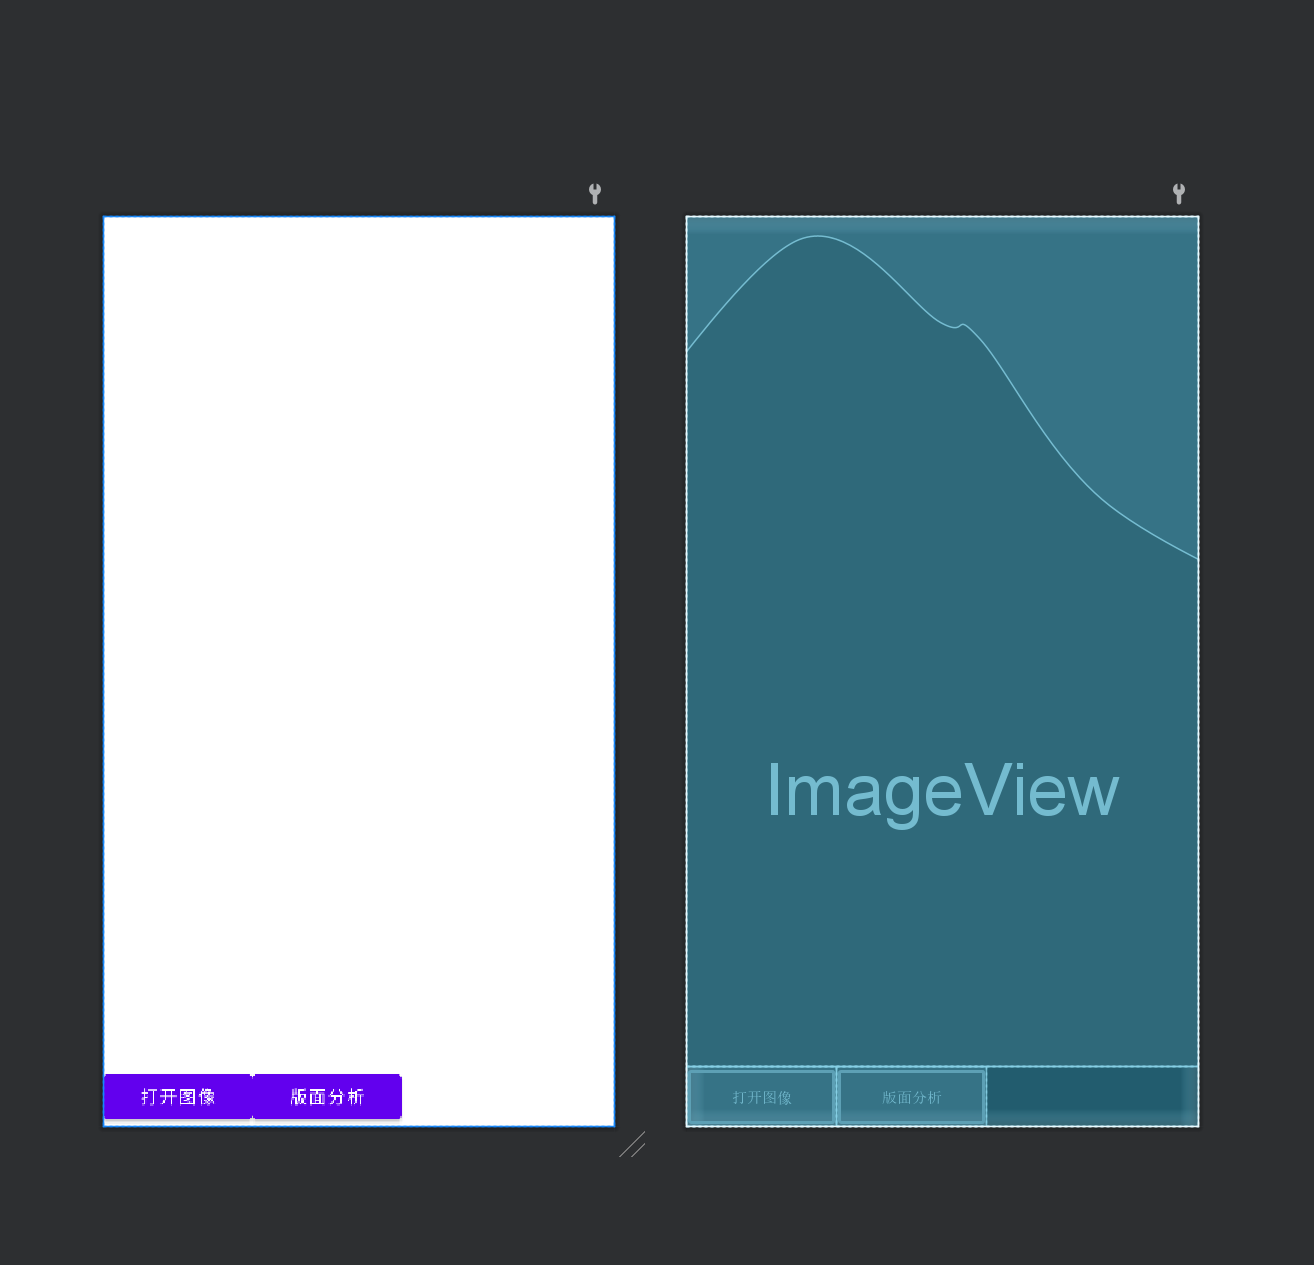
7. UI布局
UI中要实现的控件是显示图像的view、打开图像按键、处理图像按键:
<?xml version="1.0" encoding="utf-8"?>
<LinearLayout xmlns:android="http://schemas.android.com/apk/res/android"android:orientation="vertical"android:layout_width="fill_parent"android:layout_height="fill_parent"><ImageViewandroid:id="@+id/imageView"android:layout_width="fill_parent"android:layout_height="fill_parent"android:layout_weight="1" /><LinearLayoutandroid:orientation="horizontal"android:layout_width="fill_parent"android:layout_height="wrap_content"><Buttonandroid:id="@+id/btn_openImage"android:layout_width="120dp"android:layout_height="match_parent"android:text="打开图像" /><Buttonandroid:id="@+id/btn_layout"android:layout_width="120dp"android:layout_height="match_parent"android:text="版面分析" /></LinearLayout></LinearLayout>
8.Jave中定义接口
在jave添加java接口类,只定义要使用的接口,然后在JNI里面实现接口:
package com.example.layout_analysis;
import android.content.res.AssetManager;
import android.graphics.Bitmap;public class LayoutAnalysis {//初始化public native boolean init(AssetManager mgr);public  native Bitmap layout(Bitmap bitmap);static {System.loadLibrary("layout_analysis");}}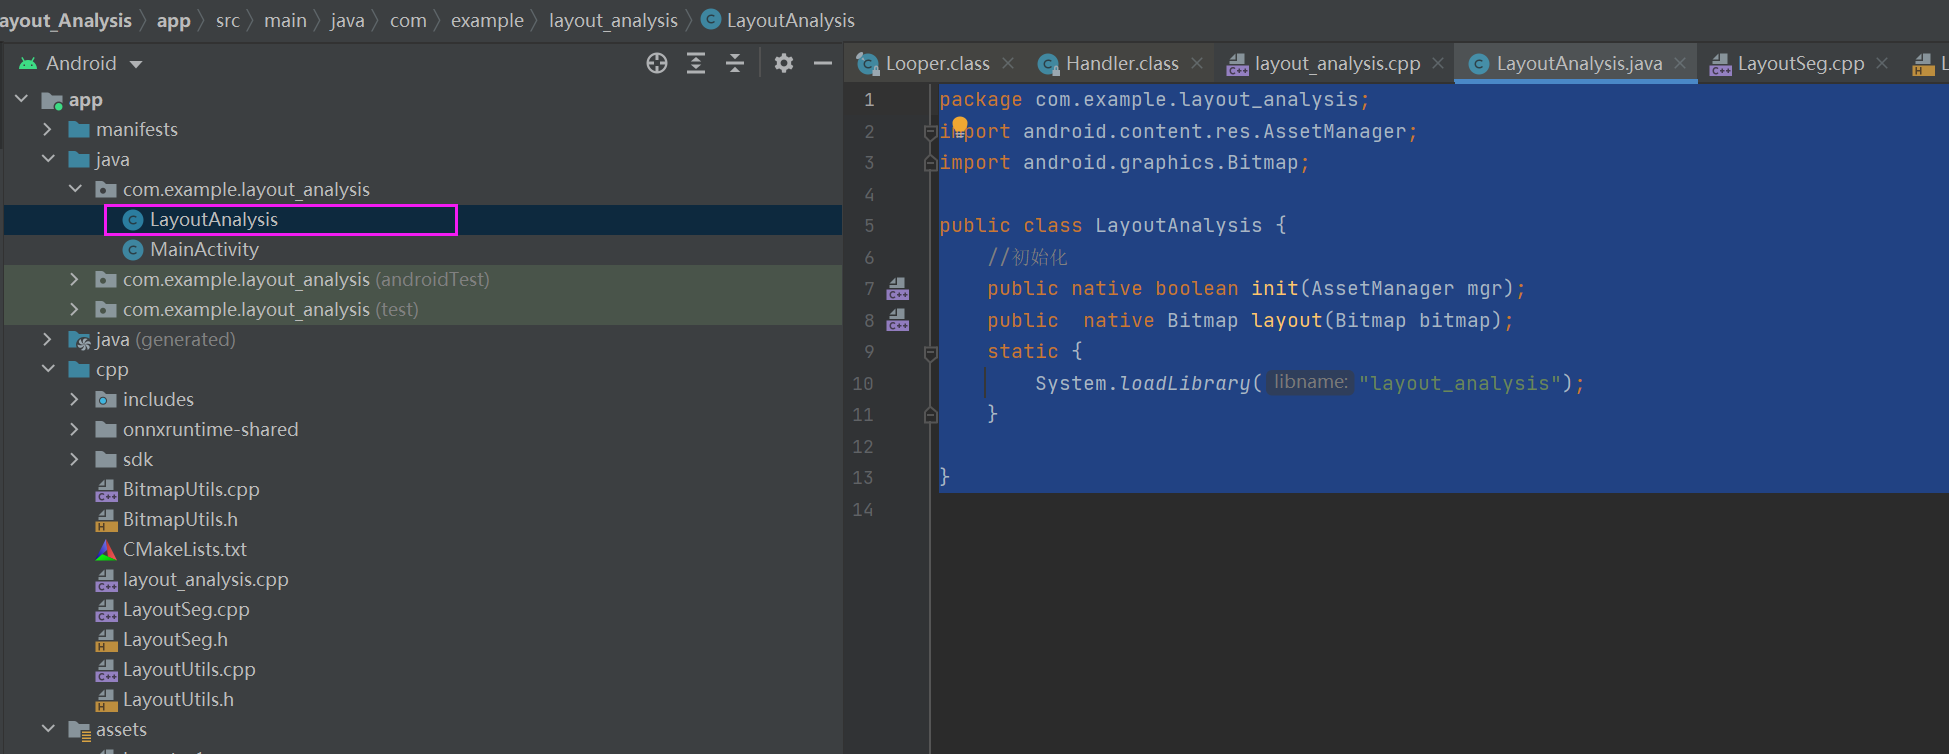
9.JNI实现Java接口
在CPP目录中添加Native cpp文件,使用extern “C”,这表示该函数按照C语言的方式进行编译,以便与Java进行交互。
函数原型为:
extern "C" JNIEXPORT jobject JNICALL Java_com_example_layout_1analysis_LayoutAnalysis_xxx(JNIEnv *env, jobject, jobject image) {}
参数包括:
JNIEnv *env: JNI环境指针,用于在JNI函数中与Java进行交互。jobject: 这个参数并没有在函数中使用,通常用作隐式的this指针。jobject image: 这是一个表示图像的Java对象的引用,JNI函数可能会使用它来处理图像数据。
在这个JNI函数内部,应该有代码来处理传入的image对象,可能会进行图像处理或布局分析。这个函数可能会使用JNI提供的函数来获取图像的数据,并在C/C++环境中对其进行处理。
需要根据具体的需求在该函数内添加代码来处理传入的图像对象,进行相关的图像布局分析或处理,并根据需要返回相关的数据给Java层调用。
整体代码如下:
#include <jni.h>
#include <string>
#include "LayoutSeg.h"
#include "BitmapUtils.h"static LT::LayoutSeg *layout_seg;JNIEXPORT jint JNI_OnLoad(JavaVM* vm, void* reserved)
{layout_seg = new LT::LayoutSeg();return JNI_VERSION_1_4;
}extern "C" JNIEXPORT void JNI_OnUnload(JavaVM* vm, void* reserved)
{}extern "C" JNIEXPORT jboolean JNICALL
Java_com_example_layout_1analysis_LayoutAnalysis_init(JNIEnv* env, jobject thiz, jobject assetManager)
{AAssetManager *mgr = AAssetManager_fromJava(env, assetManager);layout_seg->read_model(mgr);return JNI_TRUE;
}extern "C" JNIEXPORT jobject JNICALL
Java_com_example_layout_1analysis_LayoutAnalysis_layout(JNIEnv *env,jobject, jobject image)
{cv::Mat cv_RGBA;bitmapToMat(env,image,cv_RGBA);cv::Mat cv_BGR;cv::cvtColor(cv_RGBA, cv_BGR, cv::COLOR_RGBA2BGR);std::vector<LT::OutputSeg> result;layout_seg->detect(cv_BGR,result);std::vector<cv::Scalar> color;srand(time(0));for (int i = 0; i < 10; i++){int b = (rand() + 50) % 255;int g = (rand() + 10) % 255;int r = (rand() + 100) % 255;color.push_back(cv::Scalar(b, g, r));}LT::DrawPred(cv_BGR, result, layout_seg->_className, color);cv::cvtColor(cv_BGR, cv_RGBA, cv::COLOR_BGR2RGBA);matToBitmap(env,cv_RGBA,image);return image;
}
10. 配置CMake:
创建CMakeLists.txt文件,并配置需要构建的C/C++源文件和库文件,以及其他构建选项。示例CMakeLists.txt文件如下:
cmake_minimum_required(VERSION 3.10.2)
project("layout_analysis")## 添加opencv 库
set(OpenCV_DIR "${CMAKE_SOURCE_DIR}/sdk/native/jni")
find_package(OpenCV REQUIRED)
if (OpenCV_FOUND)message(STATUS "OpenCV_LIBS: ${OpenCV_LIBS}")message(STATUS "OpenCV_INCLUDE_DIRS: ${OpenCV_INCLUDE_DIRS}")
else ()message(FATAL_ERROR "opencv Not Found!")
endif (OpenCV_FOUND)##添加onnxruntime库
include(${CMAKE_CURRENT_SOURCE_DIR}/onnxruntime-shared/OnnxRuntimeWrapper.cmake)find_package(OnnxRuntime REQUIRED)
if (OnnxRuntime_FOUND)message(STATUS "OnnxRuntime_LIBS: ${OnnxRuntime_LIBS}")message(STATUS "OnnxRuntime_INCLUDE_DIRS: ${OnnxRuntime_INCLUDE_DIRS}")
else ()message(FATAL_ERROR "onnxruntime Not Found!")
endif (OnnxRuntime_FOUND)add_library(layout_analysis SHARED layout_analysis.cpp LayoutUtils.cpp LayoutSeg.cpp BitmapUtils.cpp)find_library(log-lib log)target_link_libraries(layout_analysis  ${log-lib} ${OnnxRuntime_LIBS} ${OpenCV_LIBS} jnigraphics)
11.Java中调用接口
在Java的MainActivity中调用JNI实现实现的接口:
package com.example.layout_analysis;
import androidx.appcompat.app.AppCompatActivity;import android.content.Intent;
import android.graphics.Bitmap;
import android.graphics.BitmapFactory;
import android.graphics.Matrix;
import android.media.ExifInterface;
import android.net.Uri;
import android.os.Bundle;
import android.util.Log;
import android.view.View;
import android.widget.Button;
import android.widget.ImageView;import com.example.layout_analysis.databinding.ActivityMainBinding;import java.io.FileNotFoundException;
import java.io.IOException;public class MainActivity extends AppCompatActivity {private ActivityMainBinding binding;private LayoutAnalysis layout = new LayoutAnalysis();private static final int SELECT_IMAGE = 1;private ImageView imageView;private Bitmap bitmap = null;private Bitmap showImage = null;private Bitmap bitmapCopy = null;@Overrideprotected void onCreate(Bundle savedInstanceState) {super.onCreate(savedInstanceState);binding = ActivityMainBinding.inflate(getLayoutInflater());setContentView(binding.getRoot());imageView = (ImageView) findViewById(R.id.imageView);//初始化类boolean ret_init = layout.init(getAssets());if (!ret_init){Log.e("MainActivity", "LayoutAnalysis Init failed");}//打开图像Button openFile = (Button) findViewById(R.id.btn_openImage);openFile.setOnClickListener(new View.OnClickListener(){@Overridepublic void onClick(View arg0){Intent i = new Intent(Intent.ACTION_PICK);i.setType("image/*");startActivityForResult(i, SELECT_IMAGE);}});//版面分析Button btn_print = (Button) findViewById(R.id.btn_layout);btn_print.setOnClickListener(new View.OnClickListener(){@Overridepublic void onClick(View arg0){if (showImage == null) {return;}Bitmap bitmap = layout.layout(showImage);imageView.setImageBitmap(bitmap);}});}@Overrideprotected void onActivityResult(int requestCode, int resultCode, Intent data){super.onActivityResult(requestCode, resultCode, data);if (resultCode == RESULT_OK && null != data) {Uri selectedImage = data.getData();try{if (requestCode == SELECT_IMAGE) {bitmap = decodeUri(selectedImage);showImage = bitmap.copy(Bitmap.Config.ARGB_8888, true);bitmapCopy = bitmap.copy(Bitmap.Config.ARGB_8888, true);imageView.setImageBitmap(bitmap);}}catch (FileNotFoundException e){Log.e("MainActivity", "FileNotFoundException");return;}}}private Bitmap decodeUri(Uri selectedImage) throws FileNotFoundException{// Decode image sizeBitmapFactory.Options o = new BitmapFactory.Options();o.inJustDecodeBounds = true;BitmapFactory.decodeStream(getContentResolver().openInputStream(selectedImage), null, o);// The new size we want to scale tofinal int REQUIRED_SIZE = 640;// Find the correct scale value. It should be the power of 2.int width_tmp = o.outWidth, height_tmp = o.outHeight;int scale = 1;while (true) {if (width_tmp / 2 < REQUIRED_SIZE|| height_tmp / 2 < REQUIRED_SIZE) {break;}width_tmp /= 2;height_tmp /= 2;scale *= 2;}// Decode with inSampleSizeBitmapFactory.Options o2 = new BitmapFactory.Options();o2.inSampleSize = scale;Bitmap bitmap = BitmapFactory.decodeStream(getContentResolver().openInputStream(selectedImage), null, o2);// Rotate according to EXIFint rotate = 0;try{ExifInterface exif = new ExifInterface(getContentResolver().openInputStream(selectedImage));int orientation = exif.getAttributeInt(ExifInterface.TAG_ORIENTATION, ExifInterface.ORIENTATION_NORMAL);switch (orientation) {case ExifInterface.ORIENTATION_ROTATE_270:rotate = 270;break;case ExifInterface.ORIENTATION_ROTATE_180:rotate = 180;break;case ExifInterface.ORIENTATION_ROTATE_90:rotate = 90;break;}}catch (IOException e){Log.e("MainActivity", "ExifInterface IOException");}Matrix matrix = new Matrix();matrix.postRotate(rotate);return Bitmap.createBitmap(bitmap, 0, 0, bitmap.getWidth(), bitmap.getHeight(), matrix, true);}}
实现效果: