目录
🍧1. 什么是 Spring ?
🫖1.1 容器
🍙1.2 IoC
🥽1.3 汽车类——传统写法
🍘1.4 汽车类——IoC 写法
🌭2. 配置 maven 国内源
🌮2.1 在设置中勾选文件
🍤2.2 在 settings.xml 中配置国内源
🍥2.3 删除本地仓库的所有 jar 包,重新下载
🍢3. 创建一个 Spring 项目
🥣3.1 创建一个普通的 Maven 项目
🍬3.2 添加 Spring 依赖
🫖3.3 创建一个启动测试类
🥮4. ApplicationContext 与 BeanFactory
🍚5. getBean 的多种写法
🍭5.1 根据 名称 获取 Bean 对象
🧃5.2 根据 类型 获取 Bean 对象
🍉5.3 根据 名称 + 类型 获取 Bean
1. 什么是 Spring ?
Spring 指的是 Spring Framework (Spring 框架),用一句话来概括 Spring,那就是就 Spring 是包含了众多工具方法的 IoC 容器。将这个定义进一步拆分去理解的话,那就变成,什么是容器?什么是 IoC 容器了。
1.1 容器
直观上去理解,那就是容器是用来装东西的,像水杯拿来装水的。之前的文章中介绍的各种数据结构,像 List / Map / LinkedList 等,这些都是存储数据的容器。而 Tomcat ,则是 Web 容器。
1.2 IoC
Spring 是一个 IoC 容器。IoC = Inversion of Control,翻译成中文就是 “控制权反转”。在传统的程序开发中,对象的生命周期都是由程序员来控制的。程序员需要在哪个节点 new 一个对象,就手动创建。而在 Spring 中,对象的生命周期,不再由程序员或当前的代码片段来控制,而是由 Spring 来控制,即实现了控制权的翻转。听起来有点抽象,但通过下面列举的案例,会让同学们对控制权反转的概念有进一步的印象。
1.3 汽车类——传统写法
package Traditional;public class Car {private Framework framework;public Car(){this.framework = new Framework();}public void init(){System.out.println("Car init");framework.init();}
}
package Traditional;public class Framework {private Bottom bottom;public Framework(){this.bottom = new Bottom();}public void init(){System.out.println("Framework init");bottom.init();}
}
package Traditional;public class Bottom {private Tire tire;public Bottom(){this.tire = new Tire();}public void init(){System.out.println("Bottom init");tire.init();}
}
package Traditional;public class Tire {private int size = 15;public void init(){System.out.println("执行了 Tire init, size:"+size);}
}package Traditional;public class Test {public static void main(String[] args) {Car car = new Car();car.init();}
}输出:
Car init
Framework init
Bottom init
执行了 Tire init, size:15
如果当我们想自定义轮胎的大小,而不是上面写的那样默认是 15 时,代码就必须修改成以下形式:
package Traditional;public class Tire {private int size = 15;public Tire(int size){this.size = size;}public void init(){System.out.println("执行了 Tire init, size:"+size);}
}
package Traditional;public class Bottom {private Tire tire;public Bottom(int size){this.tire = new Tire(size);}public void init(){System.out.println("Bottom init");tire.init();}
}package Traditional;public class Car {private Framework framework;public Car(int size){this.framework = new Framework(size);}public void init(){System.out.println("Car init");framework.init();}
}package Traditional;public class Test {public static void main(String[] args) {Car car = new Car(20);car.init();}
}输出:
Car init
Framework init
Bottom init
执行了 Tire init, size:20
当需要设定轮胎尺寸的时候,牵一发动全身,依次修改了所有类。
1.4 汽车类——IoC 写法
package IoC;public class Car {private Framework framework;public Car(Framework framework){this.framework = framework;}public void init(){System.out.println("Car init");framework.init();}
}
package IoC;public class Framework {private Bottom bottom;public Framework(Bottom bottom){this.bottom = bottom;}public void init(){System.out.println("Framework init");bottom.init();}
}package IoC;public class Bottom {private Tire tire;public Bottom(Tire tire){this.tire = tire;}public void init(){System.out.println("Bottom init");tire.init();}
}package IoC;public class Tire {private int size = 15;public Tire(int size){this.size = size;}public void init(){System.out.println("Tire init, Size:"+size);}
}package IoC;/*
* 模拟 IoC*/
public class Test {private Tire tire;private Bottom bottom;private Framework framework;private Car car;public Test(){this.tire = new Tire(100);this.bottom = new Bottom(this.tire);this.framework = new Framework(this.bottom);this.car = new Car(this.framework);}public static void main(String[] args) {Test test = new Test();test.car.init();}
}输出:
Car init
Framework init
Bottom init
Tire init, Size:100
可以看到,后面要修改轮胎尺寸只要在 Test 的构造方法里修改即可。也就表明了,IoC 这种方法,让类与类之间进行了解耦合。
2. 配置 maven 国内源
2.1 在设置中勾选文件
为了成功创建 Spring / Spring Boot,需要配置 maven 国内源。IDEA 中,有两份配置文件,所以在后续的配置过程中,要设置两次:给当前的项目配置以及给以后的新项目进行配置,如下图:

勾选 settings.xml 配置文件以及本次仓库文件如下: 
2.2 在 settings.xml 中配置国内源
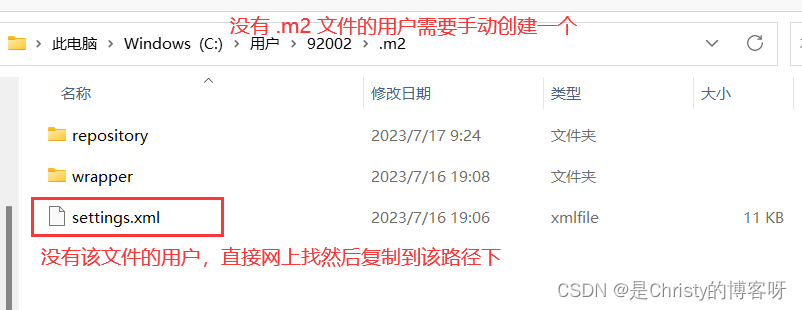
有上述文件的用户,需要将以下代码复制到<mirrors><mirrors>标签里面,完成国内源的配置:
<mirror><id>alimaven</id><name>aliyun maven</name><url>http://maven.aliyun.com/nexus/content/groups/public/</url><mirrorOf>central</mirrorOf>
</mirror>
2.3 删除本地仓库的所有 jar 包,重新下载
C:\Users\92002\.m2\repository
删除该文件夹下的所有文件。
3. 创建一个 Spring 项目
3.1 创建一个普通的 Maven 项目

出现上述情况,便是 maven 国内源配置成功。
3.2 添加 Spring 依赖
pom.xml 文件中,添加 Spring 依赖:
<dependencies><dependency><groupId>org.springframework</groupId><artifactId>spring-context</artifactId><version>5.2.3.RELEASE</version></dependency><dependency><groupId>org.springframework</groupId><artifactId>spring-beans</artifactId><version>5.2.3.RELEASE</version></dependency></dependencies>3.3 创建一个启动测试类
创建一个 Bean 对象
package com.IoC.demo;public class UserService {public void sayHi(){System.out.println("Hi, UserService ~");}
}
将 Bean 存储到 Spring 中
在 resources 下创建一个文件,以让人知道意思的方式进行命名,此处命名为 spring_config.xml ,在这个文件里面添加以下代并添加 Bean 对象:

<?xml version="1.0" encoding="UTF-8"?>
<beans xmlns="http://www.springframework.org/schema/beans"xmlns:xsi="http://www.w3.org/2001/XMLSchema-instance"xmlns:content="http://www.springframework.org/schema/context"xsi:schemaLocation="http://www.springframework.org/schema/beans http://www.springframework.org/schema/beans/spring-beans.xsd http://www.springframework.org/schema/context https://www.springframework.org/schema/context/spring-context.xsd"><bean id="user" class="com.IoC.demo.UserService"></bean>
</beans>
创建一个测试类来获取 Bean 对象
import com.IoC.demo.UserService;
import org.springframework.context.ApplicationContext;
import org.springframework.context.support.ClassPathXmlApplicationContext;public class Test {public static void main(String[] args) {// 1. 先得到 spring 上下文对象ApplicationContext context = new ClassPathXmlApplicationContext("spring_config.xml");// 2. 获取 Bean 对象【依赖查找 -》 IoC 的一种实现方式】UserService userService = (UserService) context.getBean("user");// 3. 使用 Bean 对象(非必须)userService.sayHi();}
}
4. ApplicationContext 与 BeanFactory
前面使用了 ApplicationContext 来得到 Spring 的上下文对象,下面使用 BeanFactory 来进行同样的操作:
import com.IoC.demo.UserService;
import org.springframework.beans.factory.BeanFactory;
import org.springframework.beans.factory.xml.XmlBeanDefinitionReader;
import org.springframework.beans.factory.xml.XmlBeanFactory;
import org.springframework.core.io.ClassPathResource;public class Test2 {public static void main(String[] args) {// 1. 得到 Spring 上下文对象BeanFactory context =new XmlBeanFactory(new ClassPathResource("spring_config.xml"));// 2. 获取 BeanUserService userService = (UserService) context.getBean("user");// 3. 使用 BeanuserService.sayHi();}
}

可以得到一样的结果。那二者有何区别呢?
相同点:两者都是容器管理对象,都可以获取 Bean,但要知道的是,BeanFactory 已经被弃用。
不同点:
1. ApplicationContext 是 BeanFactory 的子类,子类拥有父类的所有属性,也就意味着 ApplicationContext 拥有更多的功能。
2. 加载 Bean 的机制不同:BeanFactory 懒加载,按需加载,即使用一个 Bean,才加载一个 Bean,而 ApplicationContext 会一次性加载所有的 Bean 对象,虽然在一开始的时候会比较的慢,但后续获取对象飞快。
下面通过给 Bean 对象创建构造方法来看看这两种不同的加载方式把:
package com.IoC.demo;public class UserService {public UserService(){System.out.println("hello~");}public void sayHi(){System.out.println("Hi, UserService ~");}
}
对于 ApplicationContext 来说:
import com.IoC.demo.UserService;
import org.springframework.context.ApplicationContext;
import org.springframework.context.support.ClassPathXmlApplicationContext;public class Test {public static void main(String[] args) {// 1. 先得到 spring 上下文对象ApplicationContext context = new ClassPathXmlApplicationContext("spring_config.xml");
//        // 2. 获取 Bean 对象【依赖查找 -》 IoC 的一种实现方式】
//        UserService userService = (UserService) context.getBean("user");
//        // 3. 使用 Bean 对象(非必须)
//        userService.sayHi();}
}
而对于 BeanFactory 来说:
import com.IoC.demo.UserService;
import org.springframework.beans.factory.BeanFactory;
import org.springframework.beans.factory.xml.XmlBeanDefinitionReader;
import org.springframework.beans.factory.xml.XmlBeanFactory;
import org.springframework.core.io.ClassPathResource;public class Test2 {public static void main(String[] args) {// 1. 得到 Spring 上下文对象BeanFactory context =new XmlBeanFactory(new ClassPathResource("spring_config.xml"));
//        // 2. 获取 Bean
//        UserService userService = (UserService) context.getBean("user");
//        // 3. 使用 Bean
//        userService.sayHi();
}
}
import com.IoC.demo.UserService;
import org.springframework.beans.factory.BeanFactory;
import org.springframework.beans.factory.xml.XmlBeanDefinitionReader;
import org.springframework.beans.factory.xml.XmlBeanFactory;
import org.springframework.core.io.ClassPathResource;public class Test2 {public static void main(String[] args) {// 1. 得到 Spring 上下文对象BeanFactory context =new XmlBeanFactory(new ClassPathResource("spring_config.xml"));// 2. 获取 BeanUserService userService = (UserService) context.getBean("user");
//        // 3. 使用 Bean
//        userService.sayHi();}
}
5. getBean 的多种写法
5.1 根据 名称 获取 Bean 对象
UserService userService = (UserService) context.getBean("user");5.2 根据 类型 获取 Bean 对象
UserService userService = context.getBean(UserService.class);这样就不需要强制类型转换了。但这里存在一个问题,那就是如果像 Spring 中注入多个同一类型的 Bean 对象该怎么办?
<bean id="user" class="com.IoC.demo.UserService"></bean>
<bean id="user1" class="com.IoC.demo.UserService"></bean>
IDEA 便会报错,说找到了两个,不知道是哪个:
5.3 根据 名称 + 类型 获取 Bean
UserService userService = context.getBean("user",UserService.class);


