概要
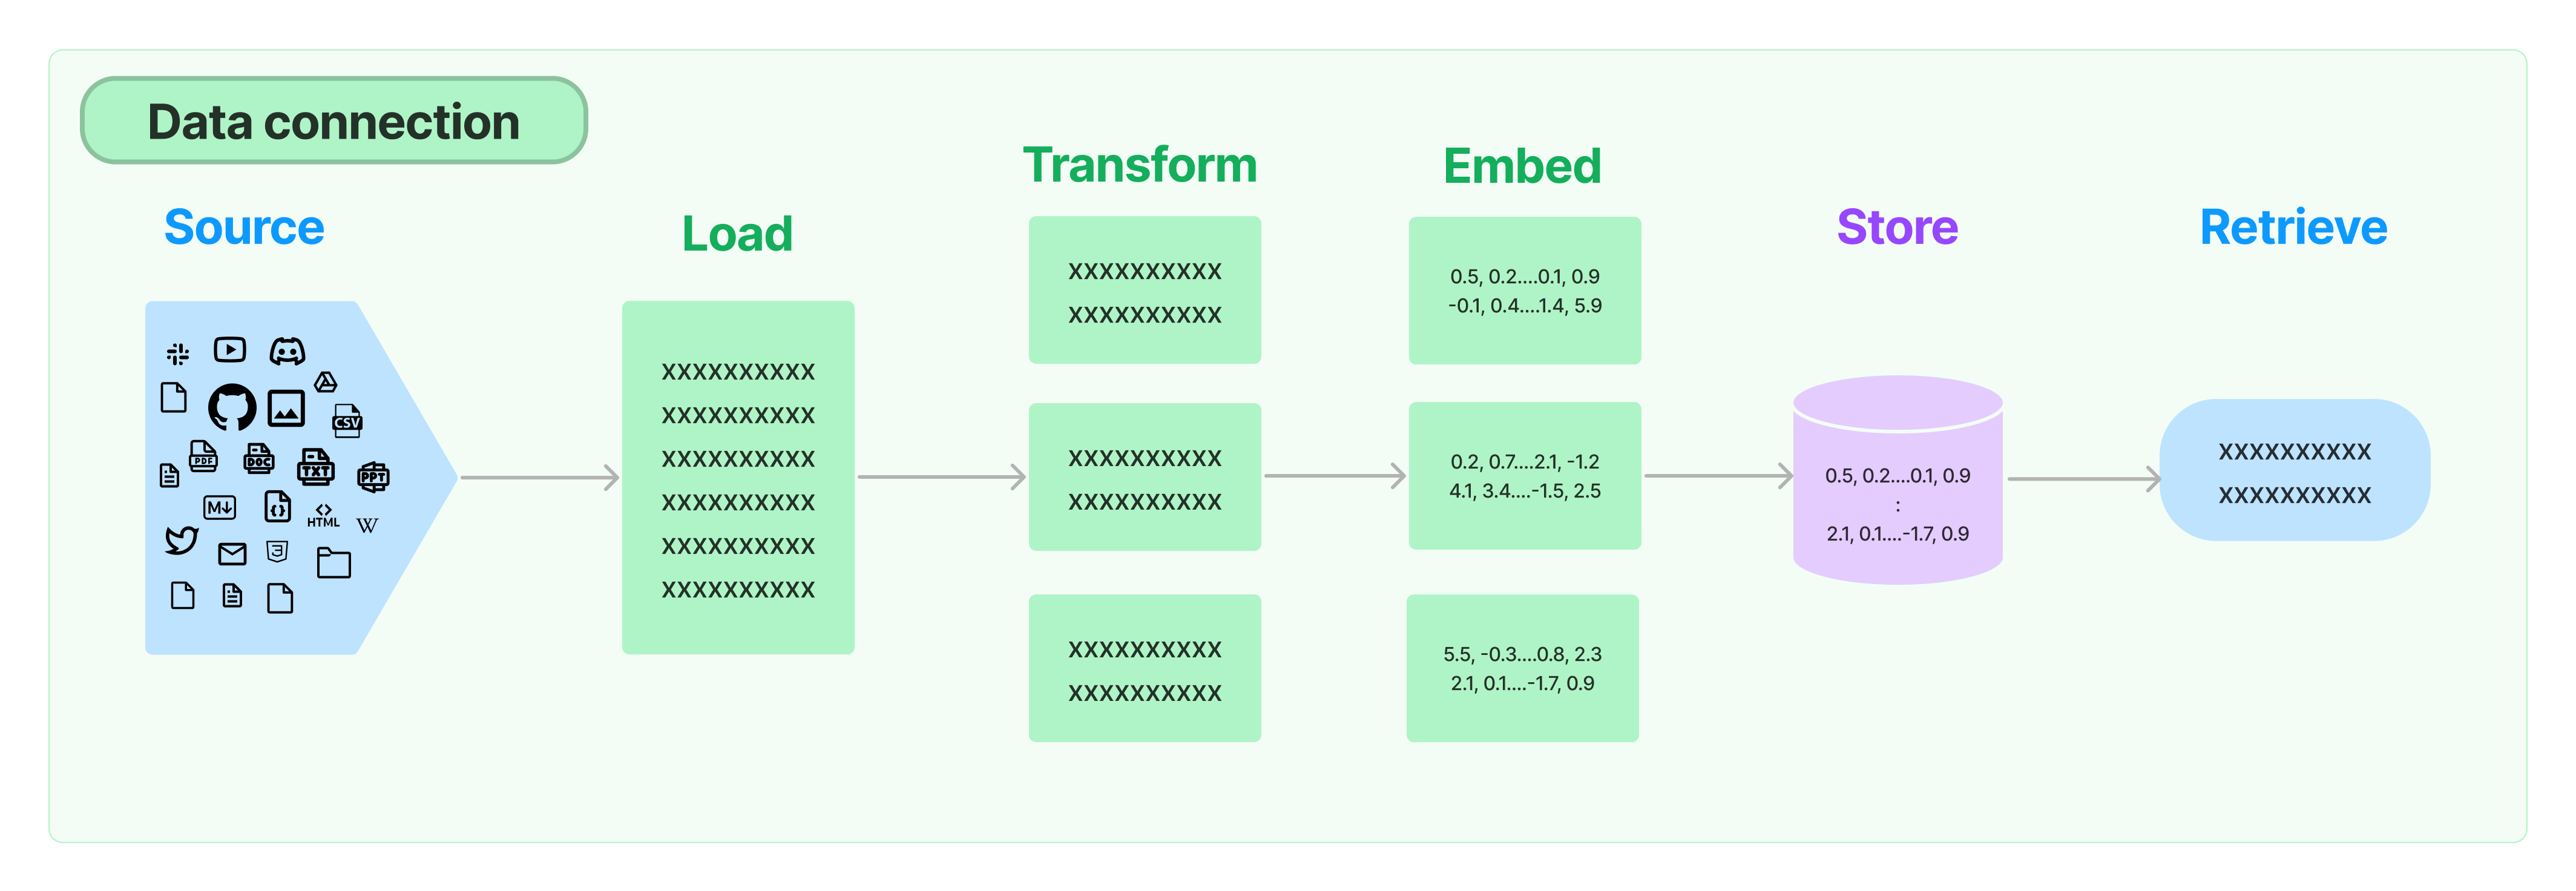
许多LLM申请需要特定于用户的数据,这些数据不属于模型训练集的一部分。 LangChain 为您提供了通过以下方式加载、转换、存储和查询数据的构建块:
- Document loaders : 从许多不同来源加载文档
- Document transformers:拆分文档、将文档转换为问答格式、删除冗余文档等。
- Text embedding models:获取非结构化文本并将其转换为浮点数列表
- Vector stores:存储和搜索嵌入数据
- Retrievers:Query your data
Document loaders(加载文档)
使用文档加载器从文档源加载数据。文档是一段文本和关联的元数据。例如,有一些文档加载器可以加载简单的 .txt 文件、加载任何网页的文本内容,甚至加载 YouTube 视频的脚本。
文档加载器提供了一个“加载”方法,用于从配置的源将数据加载为文档。它们还可以选择实现“延迟加载”,以便将数据延迟加载到内存中。
加载文件
最简单的加载程序将文件作为文本读入,并将其全部放入一个文档中。
from langchain.document_loaders import TextLoaderloader = TextLoader("./index.md")
loader.load()
结果:
[Document(page_content='---\nsidebar_position: 0\n---\n# Document loaders\n\nUse document loaders to load data from a source as `Document`\'s. A `Document` is a piece of text\nand associated metadata. For example, there are document loaders for loading a simple `.txt` file, for loading the text\ncontents of any web page, or even for loading a transcript of a YouTube video.\n\nEvery document loader exposes two methods:\n1. "Load": load documents from the configured source\n2. "Load and split": load documents from the configured source and split them using the passed in text splitter\n\nThey optionally implement:\n\n3. "Lazy load": load documents into memory lazily\n', metadata={'source': '../docs/docs_skeleton/docs/modules/data_connection/document_loaders/index.md'})
]
1.加载CSV文件
逗号分隔值 (CSV) 文件是使用逗号分隔值的分隔文本文件。文件的每一行都是一条数据记录。每条记录由一个或多个字段组成,以逗号分隔。
加载CSV 数据: 每行就是一个文档。
from langchain.document_loaders.csv_loader import CSVLoaderloader = CSVLoader(file_path='./example_data/mlb_teams_2012.csv')
data = loader.load()
print(data)
结果:
[Document(page_content='Team: Nationals\n"Payroll (millions)": 81.34\n"Wins": 98', lookup_str='', metadata={'source': './example_data/mlb_teams_2012.csv', 'row': 0}, lookup_index=0), Document(page_content='Team: Reds\n"Payroll (millions)": 82.20\n"Wins": 97', lookup_str='', metadata={'source': './example_data/mlb_teams_2012.csv', 'row': 1}, lookup_index=0), Document(page_content='Team: Yankees\n"Payroll (millions)": 197.96\n"Wins": 95', lookup_str='', metadata={'source': './example_data/mlb_teams_2012.csv', 'row': 2}, lookup_index=0), Document(page_content='Team: Giants\n"Payroll (millions)": 117.62\n"Wins": 94', lookup_str='', metadata={'source': './example_data/mlb_teams_2012.csv', 'row': 3}, lookup_index=0)]
自定义 csv 解析和加载
有关支持哪些 csv 参数的更多信息,请参阅 csv 模块文档。
# 注意csv_args参数
loader = CSVLoader(file_path='./example_data/mlb_teams_2012.csv', csv_args={'delimiter': ',','quotechar': '"','fieldnames': ['MLB Team', 'Payroll in millions', 'Wins']
})data = loader.load()
print(data)
结果:
[Document(page_content='Team: Nationals\n"Payroll (millions)": 81.34\n"Wins": 98', lookup_str='', metadata={'source': './example_data/mlb_teams_2012.csv', 'row': 0}, lookup_index=0), Document(page_content='Team: Reds\n"Payroll (millions)": 82.20\n"Wins": 97', lookup_str='', metadata={'source': './example_data/mlb_teams_2012.csv', 'row': 1}, lookup_index=0), Document(page_content='Team: Yankees\n"Payroll (millions)": 197.96\n"Wins": 95', lookup_str='', metadata={'source': './example_data/mlb_teams_2012.csv', 'row': 2}, lookup_index=0), Document(page_content='Team: Giants\n"Payroll (millions)": 117.62\n"Wins": 94', lookup_str='', metadata={'source': './example_data/mlb_teams_2012.csv', 'row': 3}, lookup_index=0)]
指定一列来标识文档来源(Specify a column to identify the document source)
使用 source_column 参数指定从每行创建文档的来源。否则,就取file_path 字段当做来源。
当使用从 CSV 文件加载的文档用于使用sources回答问题的链时,这非常有用。
loader = CSVLoader(file_path='./example_data/mlb_teams_2012.csv', source_column="Team")data = loader.load()
print(data)
结果:
[Document(page_content='Team: Nationals\n"Payroll (millions)": 81.34\n"Wins": 98', lookup_str='', metadata={'source': 'Nationals', 'row': 0}, lookup_index=0), Document(page_content='Team: Reds\n"Payroll (millions)": 82.20\n"Wins": 97', lookup_str='', metadata={'source': 'Reds', 'row': 1}, lookup_index=0), Document(page_content='Team: Yankees\n"Payroll (millions)": 197.96\n"Wins": 95', lookup_str='', metadata={'source': 'Yankees', 'row': 2}, lookup_index=0), Document(page_content='Team: Giants\n"Payroll (millions)": 117.62\n"Wins": 94', lookup_str='', metadata={'source': 'Giants', 'row': 3}, lookup_index=0)]
2.文件目录(File Directory)
如何加载目录中的所有文档。默认情况下使用 UnstructedLoader。
from langchain.document_loaders import DirectoryLoader
我们可以使用 glob 参数来控制加载哪些文件。请注意,这里它不会加载 .rst 文件或 .html 文件。
loader = DirectoryLoader('../', glob="**/*.md")
docs = loader.load()
len(docs)
显示进度条(Show a progress bar)
默认情况下不会显示进度条。要显示进度条,请安装 tqdm 库(即:执行:pip install tqdm),并将 show_progress参数设置为 True。
# 注意show_progress参数
loader = DirectoryLoader('../', glob="**/*.md", show_progress=True)
docs = loader.load()
结果:
Requirement already satisfied: tqdm in /Users/jon/.pyenv/versions/3.9.16/envs/microbiome-app/lib/python3.9/site-packages (4.65.0)# 进度条0it [00:00, ?it/s]
使用多线程(Use multithreading)
默认情况下,加载发生在一个线程中。为了利用多个线程,请将use_multithreading标志设置为 true。
# 使用多线程进行加载:use_multithreading=True
loader = DirectoryLoader('../', glob="**/*.md", use_multithreading=True)
docs = loader.load()
更改加载器类(Change loader class)
默认情况下,是使用 UnstructedLoader类进行加载。但是,您可以很容易地更改加载程序的类型。
from langchain.document_loaders import TextLoader
# loader_cls指定加载器类
loader = DirectoryLoader('../', glob="**/*.md", loader_cls=TextLoader)
docs = loader.load()
len(docs)
# 结果1
如果需要加载Python源代码文件,请使用PythonLoader。
from langchain.document_loaders import PythonLoader
# loader_cls指定python加载器类
loader = DirectoryLoader('../../../../../', glob="**/*.py", loader_cls=PythonLoader)
docs = loader.load()
len(docs)
# 结果691
使用 TextLoader 自动检测文件编码(Auto detect file encodings with TextLoader)
在此示例中,我们将看到一些策略,这些策略在使用 TextLoader 类从目录加载大量任意文件时非常有用。
path = '../../../../../tests/integration_tests/examples'
loader = DirectoryLoader(path, glob="**/*.txt", loader_cls=TextLoader)
A. 默认行为
loader.load()
结果:
<pre style="white-space:pre;overflow-x:auto;line-height:normal;font-family:Menlo,'DejaVu Sans Mono',consolas,'Courier New',monospace"><span style="color: #800000; text-decoration-color: #800000">╭─────────────────────────────── </span><span style="color: #800000; text-decoration-color: #800000; font-weight: bold">Traceback </span><span style="color: #bf7f7f; text-decoration-color: #bf7f7f; font-weight: bold">(most recent call last)</span><span style="color: #800000; text-decoration-color: #800000"> ────────────────────────────────╮</span>
<span style="color: #800000; text-decoration-color: #800000">│</span> <span style="color: #bfbf7f; text-decoration-color: #bfbf7f">/data/source/langchain/langchain/document_loaders/</span><span style="color: #808000; text-decoration-color: #808000; font-weight: bold">text.py</span>:<span style="color: #0000ff; text-decoration-color: #0000ff">29</span> in <span style="color: #00ff00; text-decoration-color: #00ff00">load</span>                             <span style="color: #800000; text-decoration-color: #800000">│</span>
<span style="color: #800000; text-decoration-color: #800000">│</span>
<span style="color: #ff0000; text-decoration-color: #ff0000; font-weight: bold">RuntimeError: </span>Error loading ..<span style="color: #800080; text-decoration-color: #800080">/../../../../tests/integration_tests/examples/</span><span style="color: #ff00ff; text-decoration-color: #ff00ff">example-non-utf8.txt</span>
</pre>
上面有所省略
文件 example-non-utf8.txt 使用不同的编码,load() 函数失败,并显示一条有用的消息,指示哪个文件解码失败。
在 TextLoader 的默认行为下,任何文档加载失败都会导致整个加载过程失败,并且不会加载任何文档。
B. 无声的失败(B. Silent fail)
我们可以将参数silent_errors传递给DirectoryLoader来跳过无法加载的文件并继续加载过程。
# 指定参数:silent_errors,跳过无法加载的文件
loader = DirectoryLoader(path, glob="**/*.txt", loader_cls=TextLoader, silent_errors=True)
docs = loader.load()
结果:
Error loading ../../../../../tests/integration_tests/examples/example-non-utf8.txt
这样我们在加载多个文件时:
doc_sources = [doc.metadata['source']  for doc in docs]
doc_sources
其结果:
['../../../../../tests/integration_tests/examples/whatsapp_chat.txt','../../../../../tests/integration_tests/examples/example-utf8.txt']
C. 自动检测编码(C. Auto detect encodings)
我们还可以通过将 autodetect_encoding 传递给加载器类,要求 TextLoader 在失败之前自动检测文件编码。
# 指定autodetect_encoding 参数,自动检测文件编码
text_loader_kwargs={'autodetect_encoding': True}
loader = DirectoryLoader(path, glob="**/*.txt", loader_cls=TextLoader, loader_kwargs=text_loader_kwargs)
docs = loader.load()doc_sources = [doc.metadata['source']  for doc in docs]
doc_sources
结果:
['../../../../../tests/integration_tests/examples/example-non-utf8.txt','../../../../../tests/integration_tests/examples/whatsapp_chat.txt','../../../../../tests/integration_tests/examples/example-utf8.txt']
3.HTML
如何将 HTML 文档加载为我们可以在下游使用的文档格式。
from langchain.document_loaders import UnstructuredHTMLLoader
loader = UnstructuredHTMLLoader("example_data/fake-content.html")
data = loader.load()
data
结果:
[Document(page_content='My First Heading\n\nMy first paragraph.', lookup_str='', metadata={'source': 'example_data/fake-content.html'}, lookup_index=0)]
使用 BeautifulSoup4 加载 HTML
我们还可以使用 BeautifulSoup4 使用 BSHTMLLoader 加载 HTML 文档。这会将 HTML 中的文本提取到 page_content 中,并将页面标题作为标题提取到元数据中。
from langchain.document_loaders import BSHTMLLoader
loader = BSHTMLLoader("example_data/fake-content.html")
data = loader.load()
data
结果:
[Document(page_content='\n\nTest Title\n\n\nMy First Heading\nMy first paragraph.\n\n\n', metadata={'source': 'example_data/fake-content.html', 'title': 'Test Title'})]
4.JSON
JSON Lines 是一种文件格式,其中每一行都是有效的 JSON 值。
JSONLoader 使用指定的 jq 语法来解析 JSON 文件。它使用 jq python 包。查看本手册以获取 jq 语法的详细文档。
# 注意,正常情况下,我们执行:pip install jq
#!pip install jq
from langchain.document_loaders import JSONLoader
import json
from pathlib import Path
from pprint import pprint
file_path='./example_data/facebook_chat.json'
# 读取并解析json文件
data = json.loads(Path(file_path).read_text())
# 美观打印
pprint(data)
结果:
{'image': {'creation_timestamp': 1675549016, 'uri': 'image_of_the_chat.jpg'},'is_still_participant': True,'joinable_mode': {'link': '', 'mode': 1},'magic_words': [],'messages': [{'content': 'Bye!','sender_name': 'User 2','timestamp_ms': 1675597571851},{'content': 'Hi! Im interested in your bag. Im offering $50. Let ''me know if you are interested. Thanks!','sender_name': 'User 1','timestamp_ms': 1675549022673}],'participants': [{'name': 'User 1'}, {'name': 'User 2'}],'thread_path': 'inbox/User 1 and User 2 chat','title': 'User 1 and User 2 chat'}
使用 JSONLoader
假设我们有兴趣提取 JSON 数据的 messages 键中的内容字段下的值。这可以通过 JSONLoader 轻松完成,如下所示。
# JSONLoader 加载
loader = JSONLoader(file_path='./example_data/facebook_chat.json',jq_schema='.messages[].content')data = loader.load()
pprint(data)
JSON 行文件
如果要从 JSON Lines 文件加载文档,请传递 json_lines=True 并指定 jq_schema 以从单个 JSON 对象中提取内容到 page_content字段。
file_path = './example_data/facebook_chat_messages.jsonl'
pprint(Path(file_path).read_text())
结果:
# 原始数据('{"sender_name": "User 2", "timestamp_ms": 1675597571851, "content": "Bye!"}\n''{"sender_name": "User 1", "timestamp_ms": 1675597435669, "content": "Oh no ''worries! Bye"}\n''{"sender_name": "User 2", "timestamp_ms": 1675596277579, "content": "No Im ''sorry it was my mistake, the blue one is not for sale"}\n')
使用JSONLoader:
loader = JSONLoader(file_path='./example_data/facebook_chat_messages.jsonl',# 指明需要提取的字段jq_schema='.content',json_lines=True)data = loader.load()
pprint(data)
结果:
[Document(page_content='Bye!', metadata={'source': 'langchain/docs/modules/indexes/document_loaders/examples/example_data/facebook_chat_messages.jsonl', 'seq_num': 1}),Document(page_content='Oh no worries! Bye', metadata={'source': 'langchain/docs/modules/indexes/document_loaders/examples/example_data/facebook_chat_messages.jsonl', 'seq_num': 2}),Document(page_content='No Im sorry it was my mistake, the blue one is not for sale', metadata={'source': 'langchain/docs/modules/indexes/document_loaders/examples/example_data/facebook_chat_messages.jsonl', 'seq_num': 3})]
另一个写法是:设置 jq_schema='.'并指定 content_key:
loader = JSONLoader(file_path='./example_data/facebook_chat_messages.jsonl',jq_schema='.',content_key='sender_name',json_lines=True)data = loader.load()
pprint(data)
这样就是 提取当前路径下的key为sender_name的值,如下:
[Document(page_content='User 2', metadata={'source': 'langchain/docs/modules/indexes/document_loaders/examples/example_data/facebook_chat_messages.jsonl', 'seq_num': 1}),Document(page_content='User 1', metadata={'source': 'langchain/docs/modules/indexes/document_loaders/examples/example_data/facebook_chat_messages.jsonl', 'seq_num': 2}),Document(page_content='User 2', metadata={'source': 'langchain/docs/modules/indexes/document_loaders/examples/example_data/facebook_chat_messages.jsonl', 'seq_num': 3})]
提取元数据(Extracting metadata)
通常,我们希望将 JSON 文件中可用的元数据包含到我们根据内容创建的文档中。
下面演示了如何使用 JSONLoader 提取元数据。
重点注意: 在上一个未收集元数据的示例中,我们在模式中直接指定了可以从page_content中提取的值。
.messages[].content
在当前示例中,我们必须告诉加载器迭代messages字段中的记录。 故jq_schema 必须是:
.messages[]
这允许我们将记录(dict)传递到必须实现的metadata_func函数中。 metadata_func 负责识别 记录中 的哪些信息应包含在最终 Document 对象中存储的元数据中。
此外,我们现在必须在加载器中通过 content_key 参数显式指定需要从中提取哪个key的value给page_content 字段。
# 定义元数据提取函数
def metadata_func(record: dict, metadata: dict) -> dict:metadata["sender_name"] = record.get("sender_name")metadata["timestamp_ms"] = record.get("timestamp_ms")return metadata# metadata_func指定元数据提取函数,jq_schema指定提取的key路径,content_key指定需要提取的key
loader = JSONLoader(file_path='./example_data/facebook_chat.json',jq_schema='.messages[]',content_key="content",metadata_func=metadata_func
)data = loader.load()
pprint(data)
结果:
[Document(page_content='Bye!', metadata={'source': '/Users/avsolatorio/WBG/langchain/docs/modules/indexes/document_loaders/examples/example_data/facebook_chat.json', 'seq_num': 1, 'sender_name': 'User 2', 'timestamp_ms': 1675597571851}),Document(page_content='Oh no worries! Bye', metadata={'source': '/Users/avsolatorio/WBG/langchain/docs/modules/indexes/document_loaders/examples/example_data/facebook_chat.json', 'seq_num': 2, 'sender_name': 'User 1', 'timestamp_ms': 1675597435669})]
现在,您将看到文档包含与我们提取的内容关联的元数据。
参考地址:
https://python.langchain.com/docs/modules/data_connection/document_loaders/how_to/file_directory
