了解自动装配两个核心
@Import注解的作用
@Import说Spring框架经常会看到的注解,它有以下几个作用:
- 导入
@Configuration类下所有的@bean方法中创建的bean。 - 导入
import指定的bean,例如@Import(AService.class),就会生成AService的bean,并将其导入到Spring容器中。 - 结合
ImportSelector接口类导如指定类。(后文会展开介绍)
ImportSelector详解
ImportSelector接口则是前者的辅助者,如果我们希望可以选择性的导入一些类,我们就可以继承ImportSelector接口编写一个ImportSelector类,告知容器需要导入的类。就以Spring Boot为例,它有个@EnableAutoConfiguration注解,其工作原理就是基于内部的@Import({AutoConfigurationImportSelector.class})注解将AutoConfigurationImportSelector导入容器中,Spring就会调用其selectImports方法获取需要导入的类,并将这些类导入容器中。
@Overridepublic String[] selectImports(AnnotationMetadata annotationMetadata) {if (!isEnabled(annotationMetadata)) {return NO_IMPORTS;}AutoConfigurationEntry autoConfigurationEntry = getAutoConfigurationEntry(annotationMetadata);//返回需要导入的类的字符串数组return StringUtils.toStringArray(autoConfigurationEntry.getConfigurations());}
使用示例
可能上文的原理对没有接触源码的读者比较模糊,所以我们不妨写一个demo来了解一下这个注解。我们现在有一个需求,希望通过import注解按需将Student类或者User类导入容器中。首先我们看看user类代码,没有任何实现,代码示例如下:
public class User {
}
Student 类代码同理,没有任何实现仅仅做测试使用
public class Student {
}完成测试类的创建之后,我们就以用户类为例,创建UserConfig 代码如下:
@Configuration
public class UserConfig {@Beanpublic User getUser() {return new User();}
}然后编写ImportSelector 首先类,编写自己的导入逻辑,可以看到笔者简单实现了一个selectImports方法返回UserConfig的类路径。
public class CustomImportSelector implements ImportSelector {private static Logger logger = LoggerFactory.getLogger(CustomImportSelector.class);/*** importingClassMetadata:被修饰的类注解信息*/@Overridepublic String[] selectImports(AnnotationMetadata importingClassMetadata) {logger.info("获取到的注解类型:{}",importingClassMetadata.getAnnotationTypes().toArray());// 如果被CustomImportSelector导入的组件是类,那么我们就实例化UserConfigif (!importingClassMetadata.isInterface()) {return new String[] { "com.example.UserConfig" };}// 此处不要返回nullreturn new String[] { "com.example.StudentConfig" };}
}
完成这些步骤我们就要来到最关键的一步了,在Spring Boot启动类中使用@Import导入CustomImportSelector
@SpringBootApplication
@Configuration
@Import(CustomImportSelector.class)
public class DemoApplication {public static void main(String[] args) {SpringApplication.run(DemoApplication.class, args);}}为了测试我们编写这样一个controller看看bean是否会导入到容器中
@RestController
public class MyController {private static Logger logger = LoggerFactory.getLogger(MyController.class);@Autowiredprivate User user;@RequestMapping("hello")public String hello() {logger.info("user:{}", user);return "hello";}
}结果测试我们发现user不为空,说明CustomImportSelector确实将UserConfig导入到容器中,并将User导入到容器中了。
从源码角度了解ImportSelector工作原理
关于源码分析其实也很好做,感兴趣的读者可以直接在CustomImportSelector打个断点就能知道工作原理了:
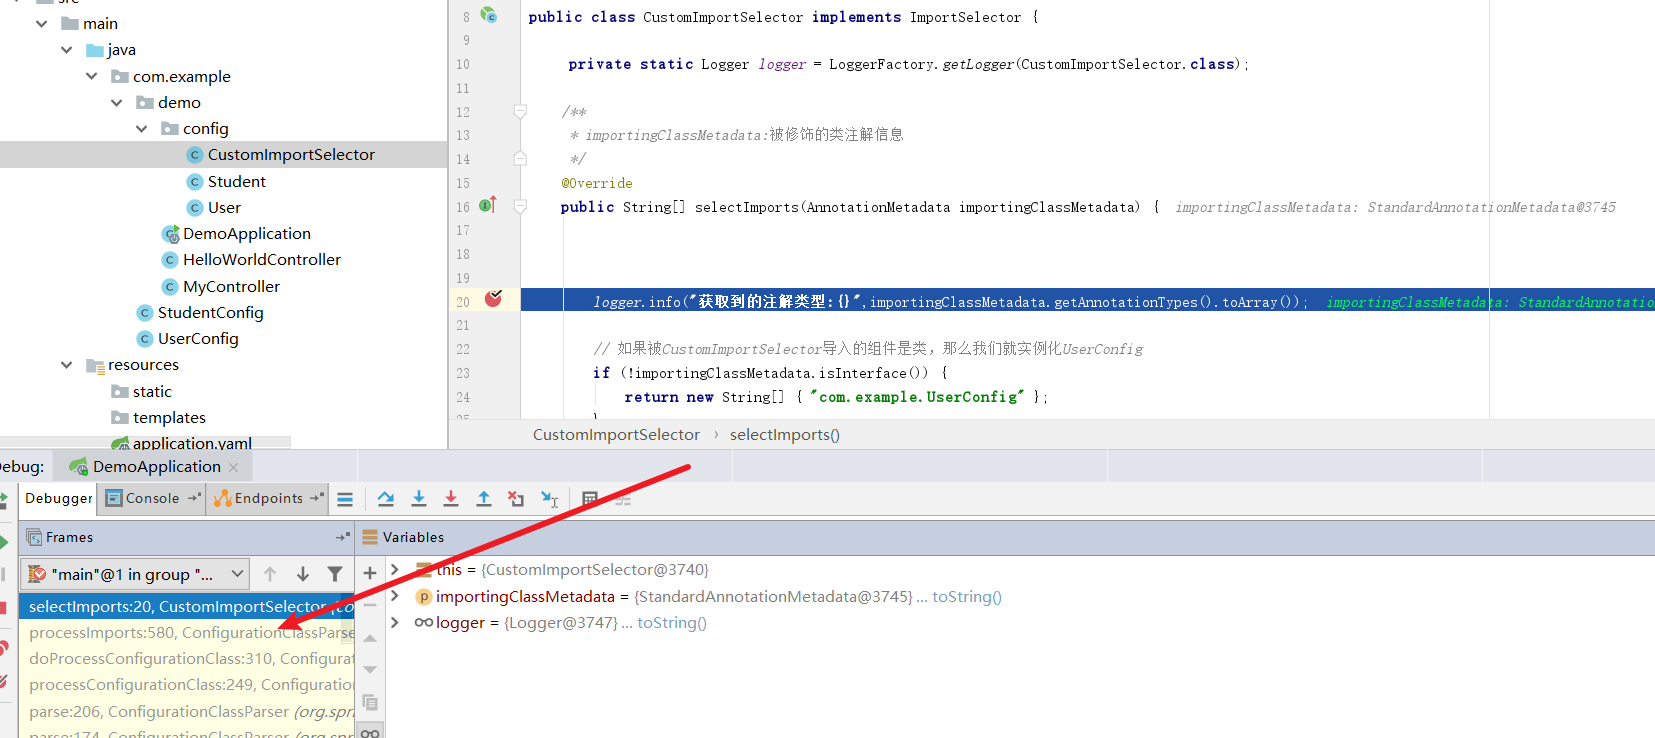
断点之后我们不妨用以终为始的方式了解一下过程,首先入口是AbstractApplicationContext的refresh()方法,它会调用一个invokeBeanFactoryPostProcessors(beanFactory);进行bean工厂后置操作
@Overridepublic void refresh() throws BeansException, IllegalStateException {synchronized (this.startupShutdownMonitor) {.........invokeBeanFactoryPostProcessors(beanFactory);........}
}
步入代码,可以看到容器会不断遍历各个postProcessor 即容器后置处理器,然后执行他们的逻辑
for (BeanFactoryPostProcessor postProcessor : beanFactoryPostProcessors) {.....//执行各个postProcessor 的逻辑invokeBeanDefinitionRegistryPostProcessors(currentRegistryProcessors, registry, beanFactory.getApplicationStartup());
}
重点来了,遍历过程中得到一个ConfigurationClassPostProcessor,这个类就会得到我们的CustomImportSelector,然后执行selectImports获取需要导入的类信息,最终会生成一个Set<ConfigurationClass> configClasses = new LinkedHashSet<>(parser.getConfigurationClasses());
如下图所示可以看到configClasses就包含UserConfig

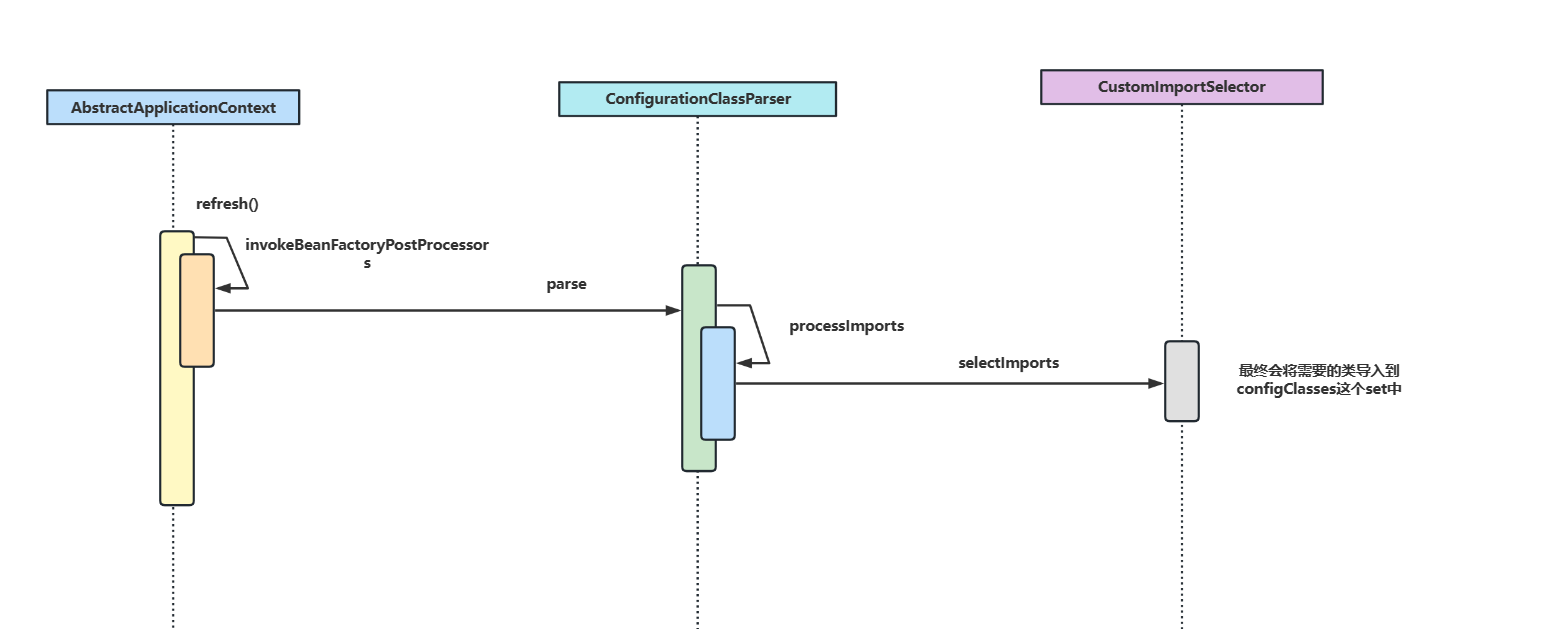
总结一下核心流程的时序图
完成上述步骤后ConfigurationClassPostProcessor就会通过这个set集合执行loadBeanDefinitions方法将需要的bean导入到容器中,进行后续IOC操作。

上图代码如下所示:
//configClasses 中就包含了UserConfig类
Set<ConfigurationClass> configClasses = new LinkedHashSet<>(parser.getConfigurationClasses());configClasses.removeAll(alreadyParsed);//执行	loadBeanDefinitions	this.reader.loadBeanDefinitions(configClasses);
Spring Boot自动装配原理(重点)
了解了import原理后,我们了解Spring Boot自动装配原理也很简单了,我们不妨看看Spring Boot的@SpringBootApplication这个注解中包含一个@EnableAutoConfiguration注解,我们不妨点入看看,可以看到它包含一个@Import(AutoConfigurationImportSelector.class)注解,从名字上我们可以知晓这是一个ImportSelector的实现类。
所以我们不妨看看它的selectImports逻辑,可以看到它会通过getAutoConfigurationEntry方法获取需要装配的类,然后通过StringUtils.toStringArray切割返回。所以我们不妨看看getAutoConfigurationEntry
@Overridepublic String[] selectImports(AnnotationMetadata annotationMetadata) {if (!isEnabled(annotationMetadata)) {return NO_IMPORTS;}AutoConfigurationEntry autoConfigurationEntry = getAutoConfigurationEntry(annotationMetadata);return StringUtils.toStringArray(autoConfigurationEntry.getConfigurations());}
查看getAutoConfigurationEntry方法,我们可以看到它通过getCandidateConfigurations获取各个xxxxAutoConfigure,并返回结果
protected AutoConfigurationEntry getAutoConfigurationEntry(AnnotationMetadata annotationMetadata) {if (!isEnabled(annotationMetadata)) {return EMPTY_ENTRY;}AnnotationAttributes attributes = getAttributes(annotationMetadata);//获取所有xxxxAutoConfigureList<String> configurations = getCandidateConfigurations(annotationMetadata, attributes);//移除不需要的configurations = removeDuplicates(configurations);Set<String> exclusions = getExclusions(annotationMetadata, attributes);checkExcludedClasses(configurations, exclusions);configurations.removeAll(exclusions);configurations = getConfigurationClassFilter().filter(configurations);fireAutoConfigurationImportEvents(configurations, exclusions);//返回结果return new AutoConfigurationEntry(configurations, exclusions);}
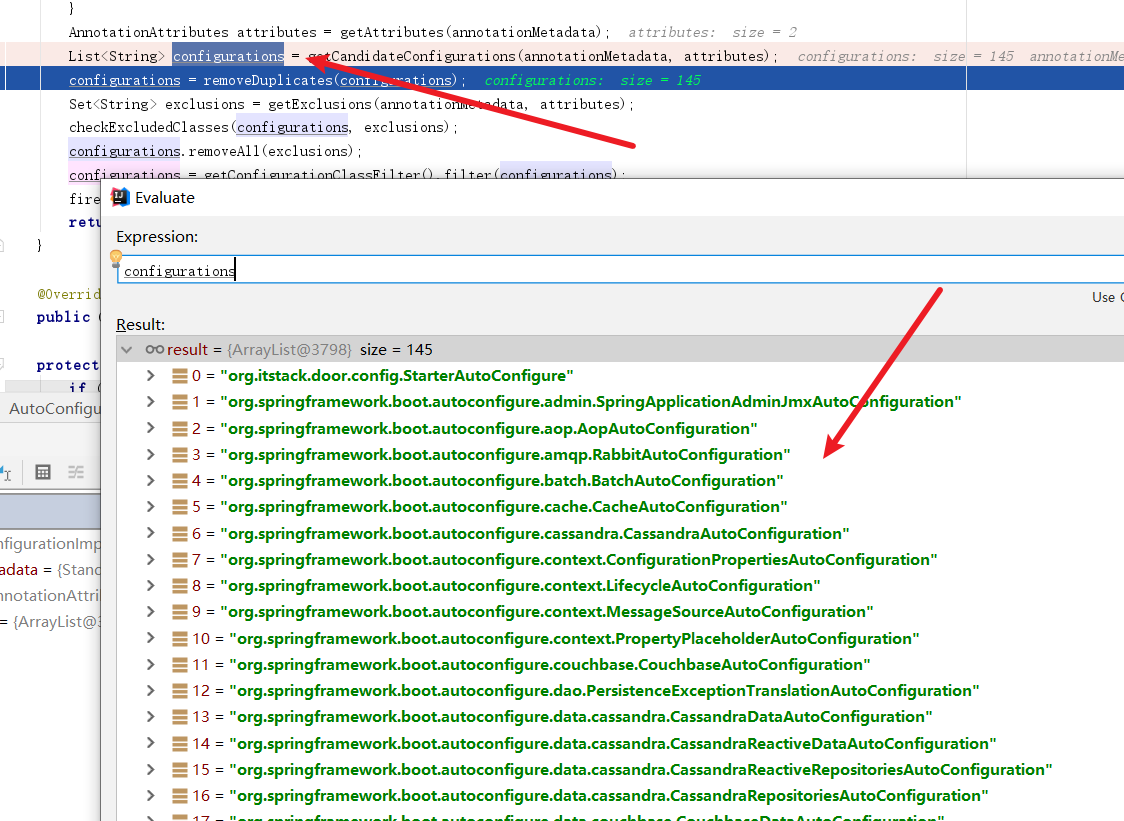
而getCandidateConfigurations实际上是会通过一个loadSpringFactories方法,如下所示遍历获取所有含有META-INF/spring.factories的jar包
private static Map<String, List<String>> loadSpringFactories(ClassLoader classLoader) {Map<String, List<String>> result = (Map)cache.get(classLoader);if (result != null) {return result;} else {HashMap result = new HashMap();try {//解析这个配置文件获取所有配置类然后返回Enumeration urls = classLoader.getResources("META-INF/spring.factories");.....return result;} catch (IOException var14) {throw new IllegalArgumentException("Unable to load factories from location [META-INF/spring.factories]", var14);}}}最终结果过滤解析,回到我们上文说的beanDefinitionMap中,最终通过IOC完成自动装配。
实践1-手写Spring Boot Starter中间件
了解自动装配我们不妨自己写一个中间件实践一下,现在需求如下,我们希望某些类的接口只有某几个用户可以访问,所以我们希望编写一个中间件判断请求用户是什么身份,如果没有权限则直接返回报错。
首先我们编写一个注解DoDoor ,用key记录传入的用户id,returnJson返回没有权限的响应结果
@Retention(RetentionPolicy.RUNTIME)
@Target(ElementType.METHOD)
public @interface DoDoor {String key() default "";String returnJson() default "";}
然后在编写StarterServiceProperties ,使用ConfigurationProperties将itstack.door前缀的值和当前类userStr绑定。
/*** 通过"itstack.door前缀的配置获取userStr信息*/
@ConfigurationProperties("itstack.door")
public class StarterServiceProperties {private String userStr;public String getUserStr() {return userStr;}public void setUserStr(String userStr) {this.userStr = userStr;}}完成后在编写StarterService 这个类会将userStr切割成数组,例如我们传111,222,最终就会得到[111,222]
public class StarterService {private String userStr;public StarterService(String userStr) {this.userStr = userStr;}public String[] split(String separatorChar) {return StringUtils.split(this.userStr, separatorChar);}}
这些佐料写完之后,我们就可以编写一个AOP类了,可以看到这个AOP做的是很简单,就是拦截带有DoDoor的请求,将注解key配置的值和我们的userStr数组比对,若包含则放行,反之拦截。
@Aspect
@Component
public class DoJoinPoint {private Logger logger = LoggerFactory.getLogger(DoJoinPoint.class);@Autowiredprivate StarterService starterService;@Pointcut("@annotation(org.itstack.door.annotation.DoDoor)")public void aopPoint() {}@Around("aopPoint()")public Object doRouter(ProceedingJoinPoint jp) throws Throwable {//获取内容Method method = getMethod(jp);DoDoor door = method.getAnnotation(DoDoor.class);//获取字段值String keyValue = getFiledValue(door.key(), jp.getArgs());logger.info("itstack door handler method:{} value:{}", method.getName(), keyValue);if (null == keyValue || "".equals(keyValue)) return jp.proceed();//配置内容String[] split = starterService.split(",");//白名单过滤for (String str : split) {if (keyValue.equals(str)) {return jp.proceed();}}//拦截return returnObject(door, method);}private Method getMethod(JoinPoint jp) throws NoSuchMethodException {Signature sig = jp.getSignature();MethodSignature methodSignature = (MethodSignature) sig;return getClass(jp).getMethod(methodSignature.getName(), methodSignature.getParameterTypes());}private Class<? extends Object> getClass(JoinPoint jp) throws NoSuchMethodException {return jp.getTarget().getClass();}//返回对象private Object returnObject(DoDoor doGate, Method method) throws IllegalAccessException, InstantiationException {Class<?> returnType = method.getReturnType();String returnJson = doGate.returnJson();if ("".equals(returnJson)) {return returnType.newInstance();}return JSON.parseObject(returnJson, returnType);}//获取属性值private String getFiledValue(String filed, Object[] args) {String filedValue = null;for (Object arg : args) {try {if (null == filedValue || "".equals(filedValue)) {filedValue = BeanUtils.getProperty(arg, filed);} else {break;}} catch (Exception e) {if (args.length == 1) {return args[0].toString();}}}return filedValue;}}
编写我们的AutoConfigure ,根据条件决定上述的类是否导入
@Configuration
@ConditionalOnClass(StarterService.class)
@EnableConfigurationProperties(StarterServiceProperties.class)
public class StarterAutoConfigure {@Autowiredprivate StarterServiceProperties properties;@Bean@ConditionalOnMissingBean@ConditionalOnProperty(prefix = "itstack.door", value = "enabled", havingValue = "true")StarterService starterService() {return new StarterService(properties.getUserStr());}@Bean@ConditionalOnMissingBean@ConditionalOnProperty(prefix = "itstack.door", value = "enabled", havingValue = "true")DoJoinPoint doJoinPoint() {return new DoJoinPoint();}}
完成后编写一个spring.factories,导入这个AutoConfigure
org.springframework.boot.autoconfigure.EnableAutoConfiguration=org.itstack.door.config.StarterAutoConfigure
修改一下pom,本地打个包
<dependency><groupId>org.springframework.boot</groupId><artifactId>spring-boot-starter-aop</artifactId>
</dependency><plugin><groupId>org.apache.maven.plugins</groupId><artifactId>maven-jar-plugin</artifactId><version>2.3.2</version><configuration><archive><addMavenDescriptor>false</addMavenDescriptor><index>true</index><manifest><addDefaultSpecificationEntries>true</addDefaultSpecificationEntries><addDefaultImplementationEntries>true</addDefaultImplementationEntries></manifest><manifestEntries><Implementation-Build>${maven.build.timestamp}</Implementation-Build></manifestEntries></archive></configuration>
</plugin>
在其他应用中导入
<dependency><groupId>org.itatack.demo</groupId><artifactId>door-spring-boot-starter</artifactId><version>1.0.1-SNAPSHOT</version></dependency>
编写配置
server:port: 9887spring:application:name: demo# 自定义中间件配置
itstack:door:enabled: trueuserStr: 1001,aaaa,ccc #白名单用户ID,多个逗号隔开
然后在导入这个中间件的应用中编写一个方法测试@DoDoor
@RestController
public class HelloWorldController {@Autowiredprivate ApplicationContext applicationContext;@DoDoor(key = "userId", returnJson = "{\"code\":\"1111\",\"info\":\"非白名单可访问用户拦截!\"}")@RequestMapping(path = "/user", method = RequestMethod.GET)public Map queryUserInfo(@RequestParam String userId) {Map<String, DoJoinPoint> beansOfType = applicationContext.getBeansOfType(DoJoinPoint.class);Map resultMap = new HashMap<>();resultMap.put("虫虫:" + userId, "天津市南开区旮旯胡同100号");return resultMap;}}
测试结果
C:\Users\xxxx>curl http://localhost:9887/user?userId=1001132
{"code":"1111","info":"非白名单可访问用户拦截!"}
C:\Users\xxx>curl http://localhost:9887/user?userId=1111
{"code":"1111","info":"非白名单可访问用户拦截!"}
C:\Users\xx>curl http://localhost:9887/user?userId=1001
{"虫虫:1001":"天津市南开区旮旯胡同100号"}
源码是借鉴小傅哥的,感兴趣的读者可以参考:
Spring Boot 中间件开发(一)《服务治理中间件之统一白名单验证》
实践2-通用日志组件
需求介绍
微服务项目中,基于日志排查问题是非常重要的手段,而日志属于非功能范畴的一个职责,所以我们希望将日志打印和功能解耦。AOP就是非常不错的手段,但是在每个服务中都编写一个切面显然是非常不可取的。
所以我们希望通过某种手段会编写一个通用日志打印工具,只需一个注解即可实现对方法的请求响应进行日志打印。
所以我们这个例子仍然是利用自动装配原理编写一个通用日志组件。
实现步骤
- 创建日志插件模块
cloud-component-logging-starter,并引入我们需要的依赖,如下所示,因为笔者要对spring-web应用进行拦截所以用到的starter-web和aop模块,以及为了打印响应结果,笔者也用到hutool,完整的依赖配置如下所示:
<dependencies><dependency><groupId>org.springframework.boot</groupId><artifactId>spring-boot-starter-web</artifactId></dependency><dependency><groupId>org.springframework.boot</groupId><artifactId>spring-boot-starter-aop</artifactId></dependency><dependency><groupId>cn.hutool</groupId><artifactId>hutool-all</artifactId></dependency></dependencies>
- 编写日志注解,如下所示,该注解的value用于记录当前方法要执行的操作,例如某方法上
@SysLog("获取用户信息"),当我们的aop拦截到之后,就基于该注解的value打印该方法的功能。
@Target(ElementType.METHOD)
@Retention(RetentionPolicy.RUNTIME)
public @interface SysLog {/*** 记录方法要执行的操作** @return*/String value();
}- 编写环绕切面逻辑,代码如下所示,逻辑非常简单,拦截到了切面后若报错则打印报错的逻辑,反之打印正常请求响应结果。
@Aspect
public class SysLogAspect {private static Logger logger = LoggerFactory.getLogger(SysLogAspect.class);@Pointcut("@annotation(com.zsy.annotation.SysLog)")public void logPointCut() {}@Around("logPointCut()")public Object around(ProceedingJoinPoint joinPoint) throws Throwable {MethodSignature signature = (MethodSignature) joinPoint.getSignature();Method method = signature.getMethod();//类名String className = joinPoint.getTarget().getClass().getName();//方法名String methodName = signature.getName();SysLog syslog = method.getAnnotation(SysLog.class);//获取当前方法进行的操作String operator =syslog.value();long beginTime = System.currentTimeMillis();Object returnValue = null;Exception ex = null;try {returnValue = joinPoint.proceed();return returnValue;} catch (Exception e) {ex = e;throw e;} finally {long cost = System.currentTimeMillis() - beginTime;if (ex != null) {logger.error("业务请求:[类名: {}][执行方法: {}][执行操作: {}][耗时: {}ms][请求参数: {}][发生异常]",className, methodName, operator, joinPoint.getArgs(), ex);} else {logger.info("业务请求:[类名: {}][执行方法: {}][执行操作: {}][耗时: {}ms][请求参数: {}][响应结果: {}]",className, methodName, operator, cost, joinPoint.getArgs(), JSONUtil.toJsonStr(returnValue));}}}
}
- 编写配置类
@Configuration
public class SysLogAutoConfigure {@Beanpublic SysLogAspect getSysLogAspect() {return new SysLogAspect();}
}- 新建
spring.factories告知要导入Spring容器的类,内容如下
org.springframework.boot.autoconfigure.EnableAutoConfiguration=\
com.zsy.config.SysLogAutoConfigure
- 其他服务引入进行测试,以笔者为例,方法如下
@SysLog("获取用户信息")@GetMapping("getByCode/{accountCode}")public ResultData<AccountDTO> getByCode(@PathVariable(value = "accountCode") String accountCode) {log.info("远程调用feign接口,请求参数:{}", accountCode);return accountFeign.getByCode(accountCode);}
请求之后输出结果如下
2023-02-16 00:08:08,085 INFO SysLogAspect:58 - 业务请求:[类名: com.zsy.order.controller.OrderController][执行方法: getByCode][执行操作: 获取用户信息][耗时: 892ms][请求参数: [zsy]][响应结果: {"data":{"accountCode":"zsy","amount":10000,"accountName":"zsy","id":1},"message":"操作成功","success":true,"status":100,"timestamp":1676477287856}]
参考文献
SpringBoot 自动装配原理
@Import、ImportSelector注解使用及源码分析
SpringBoot封装我们自己的Starter
Spring Boot 中间件开发(一)《服务治理中间件之统一白名单验证》
SpringCloud Alibaba微服务实战三十一 - 业务日志组件
Spring全解系列 - @Import注解