Linux 安装 mysql
1、数据库(mysql)
数据文件 - 数据库过了系统
2、c/s
mysql 服务器
mysql 客户端
ip
port : 3306
3、关系型 于 非关系型数据库(nosql)
nosql可以解决一些关系型数据库所无法实现的场景引用。
一、数据库介绍
1. 数据库概念
数据库 :是存放数据的仓库,它是一个按数据结构来存储和管理数据的计算机软件系统。
数据库管理系统 : 是数据库系统的核心组成部分,主要完成对数据库的操作与管理功能,例如实现数据的存储,查询,修改,删除,及数据库用户的管理,权限管理等。
RDBMS : 关系数据库管理系统(Relational Database Management System)。
SQL : 结构化查询语言(Structured Query Language).
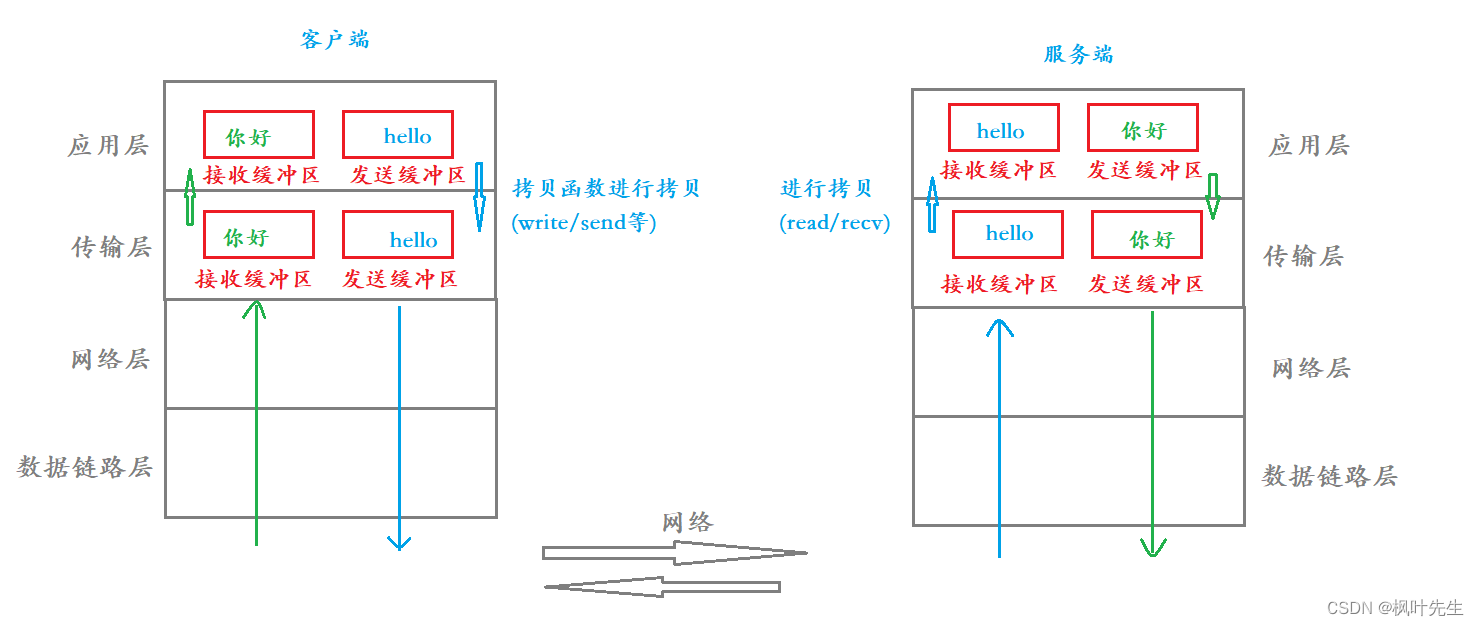
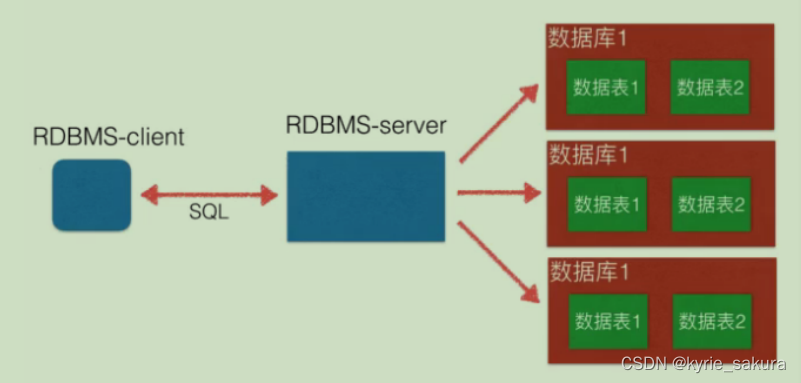
mysql数据库是一种C/S模型(即客户端和服务端模型),客户单通过用户名,密码登录连接服务器。连接成功后才可以进行数据库的操作(增删改查)。如下图:
2. 数据库分类
型数据库 :
指采用了关系模型来组织数据的数据库,关系模型就是指二维表格模型,而一个关系型数据库就是由二维表及其之间的联系所组成的一个数据组织。
关系型数据库核心元素:数据行(一条记录),数据列(字段), 数据表(数据行的集合),数据库(数据表的集合)。
关系型数据库产品: oracle , mysql, sqlite ,DB2, Microsoft Sql Server
非关系型数据库(nosql) :
指非关系型的,分布式的,且一般不保证遵循ACID原则的数据存储系统。非关系型数据库以键值对存储,且结构不固定。(ACID,指 原子性,一致性,隔离性,持久性).
非关系型数据库产品: memcache , redis , mongodb, hbase
二、mysql 安装及设置
这里介绍ubuntu发行版本上使用apt命令安装的步骤。不同发行版本安装方法有所不同。
1.安装mysql
安装前首先切换到管理员身份:sudo su ,然后再执行 apt install mysql-server 安装。
stu@stu-virtual-machine:~$ sudo su
[sudo] stu 的密码:
root@stu-virtual-machine:/home/stu# apt install mysql-server
正在读取软件包列表... 完成
正在分析软件包的依赖关系树
正在读取状态信息... 完成
将会同时安装下列软件:
libcgi-fast-perl libcgi-pm-perl libevent-core-2.1-7 libevent-pthreads-2.1-7
libfcgi-perl
libhtml-template-perl libmecab2 mecab-ipadic mecab-ipadic-utf8 mecab-utils
mysql-client-8.0
mysql-client-core-8.0 mysql-server-8.0 mysql-server-core-8.0
建议安装:
libipc-sharedcache-perl mailx tinyca
下列【新】软件包将被安装:
libcgi-fast-perl libcgi-pm-perl libevent-core-2.1-7 libevent-pthreads-2.1-7
libfcgi-perl
libhtml-template-perl libmecab2 mecab-ipadic mecab-ipadic-utf8 mecab-utils
mysql-client-8.0
mysql-client-core-8.0 mysql-server mysql-server-8.0 mysql-server-core-8.0
升级了 0 个软件包,新安装了 15 个软件包,要卸载 0 个软件包,有 220 个软件包未被升级。
需要下载 31.0 MB 的归档。
解压缩后会消耗 258 MB 的额外空间。
您希望继续执行吗? [Y/n] y
2.初始化配置
初始化配置使用命令:mysql_secure_installation
2.1设置数据库不进行密码强校验
root@stu-virtual-machine:/home/stu# mysql_secure_installation
Securing the MySQL server deployment.
Connecting to MySQL using a blank password.
VALIDATE PASSWORD COMPONENT can be used to test passwords
and improve security. It checks the strength of password
and allows the users to set only those passwords which are
secure enough. Would you like to setup VALIDATE PASSWORD component?
Press y|Y for Yes, any other key for No: N (输入N,不进行密码的强校验)
2.2设置root管理员密码,注意是数据库的管理员的。密码不回显,根据提示输入两遍。
Please set the password for root here.
New password: (此处密码不回显)
Re-enter new password: (此处密码不回显)
2.3设置是否要删除匿名用户,这里不删除。
By default, a MySQL installation has an anonymous user,
allowing anyone to log into MySQL without having to have
a user account created for them. This is intended only for
testing, and to make the installation go a bit smoother.
You should remove them before moving into a production
environment.
Remove anonymous users? (Press y|Y for Yes, any other key for No) : N
... skipping.
2.4设置是否允许root用户远程登录,这里设置允许
Normally, root should only be allowed to connect from
'localhost'. This ensures that someone cannot guess at
the root password from the network.
Disallow root login remotely? (Press y|Y for Yes, any other key for No) : N
... skipping.
2.5是否删除’test’库,这里选择不删除
By default, MySQL comes with a database named 'test' that
anyone can access. This is also intended only for testing,
and should be removed before moving into a production
environment.
Remove test database and access to it? (Press y|Y for Yes, any other key for No)
: N
... skipping.
2.6设置修改的权限立即生效,此时所有配置初始化完成。
Reloading the privilege tables will ensure that all changes
made so far will take effect immediately.
Reload privilege tables now? (Press y|Y for Yes, any other key for No) : y
Success.
All done!
root@stu-virtual-machine:/home/stu#
3.数据库服务启动停止
3.1 检查服务器状态,
命令为:service mysql status 或者 systemctl status mysql.service
root@stu-virtual-machine:/home/stu# service mysql status
● mysql.service - MySQL Community Server
Loaded: loaded (/lib/systemd/system/mysql.service; enabled; vendor preset:
enabled)
Active: active (running) since Mon 2021-06-21 13:36:08 CST; 24min ago
Main PID: 4672 (mysqld)
Status: "Server is operational"
Tasks: 39 (limit: 4617)
Memory: 335.5M
CGroup: /system.slice/mysql.service
└─4672 /usr/sbin/mysqld
6月 21 13:36:07 stu-virtual-machine systemd[1]: Starting MySQL Community
Server...
6月 21 13:36:08 stu-virtual-machine systemd[1]: Started MySQL Community Server.
root@stu-virtual-machine:/home/stu#
3.2 重启|停止|启动,数据库的命令:
如果不是管理员需要在命令前面加上 sudo
重启: /etc/init.d/mysql restart
停止: /etc/init.d/mysql stop
启动: /etc/init.d/mysql start
或者执行如下命令
root@stu-virtual-machine:/home/stu# service mysql restart
root@stu-virtual-machine:/home/stu# service mysql stop
root@stu-virtual-machine:/home/stu# service mysql start
3.3 连接数据库命令 mysql -uroot -p
root@stu-virtual-machine:/home/stu# mysql -uroot -p
Enter password: (此处输入设置的密码,如果没有密码直接回车)
Welcome to the MySQL monitor. Commands end with ; or \g.
Your MySQL connection id is 8
Server version: 8.0.25-0ubuntu0.20.04.1 (Ubuntu)
Copyright (c) 2000, 2021, Oracle and/or its affiliates.
Oracle is a registered trademark of Oracle Corporation and/or its
affiliates. Other names may be trademarks of their respective
owners.
Type 'help;' or '\h' for help. Type '\c' to clear the current input statement.
mysql> quit (退出数据库客户端的命令)
4.配置文件位置
配置文件在如下位置,需要修改可以用 vi 打开更改
root@stu-virtual-machine:/home/stu# vi /etc/mysql/mysql.conf.d/mysqld.cnf
例如,需远程登录,则需要将bind-address改为0.0.0.0,如下
29 # Instead of skip-networking the default is now to listen only on
30 # localhost which is more compatible and is not less secure.
31 bind-address = 127.0.0.1 (改为0.0.0.0)
5.安装c/c++开发库
安装开发c/c++的库,命令:apt install libmysqlclient-dev
stu@stu-virtual-machine:~$ sudo su
[sudo] stu 的密码:
root@stu-virtual-machine:/home/stu# apt install libmysqlclient-dev
正在读取软件包列表... 完成
正在分析软件包的依赖关系树
正在读取状态信息... 完成
将会同时安装下列软件:
libssl-dev libssl1.1 zlib1g-dev
建议安装:
libssl-doc
下列【新】软件包将被安装:
libmysqlclient-dev libssl-dev zlib1g-dev
下列软件包将被升级:
libssl1.1
升级了 1 个软件包,新安装了 3 个软件包,要卸载 0 个软件包,有 219 个软件包未被升级。
需要下载 4,594 kB 的归档。
解压缩后会消耗 18.4 MB 的额外空间。
您希望继续执行吗? [Y/n] y
测试c语言连接数据库,这里连接’test’库,没有自己创建,注意‘111111’是数据库密码,需要输入自己的。
#include <stdio.h>
#include <stdlib.h>
#include <mysql/mysql.h>int main()
{MYSQL mysql_con;MYSQL * mysql = mysql_init(&mysql_con);if(mysql == NULL){printf("mysql init failed\n");exit(1);}mysql = mysql_real_connect(mysql,"localhost","root","123456","kyrie",3306,NULL,0);if(mysql == NULL){printf("连接失败\n");exit(1);}printf("连接成功");mysql_close(mysql);exit(0);
}
另一种:
#include <stdio.h>
#include <mysql/mysql.h>
int main()
{
MYSQL connect;//mysql连接对象
mysql_init(&connect);
//连接到mysql
if(mysql_real_connect(&connect,"localhost","root","111111","test",0,NULL,0))
{
printf("连接mysql成功\n");
}
else
{
printf("err:%s\n",mysql_error(&connect));
printf("连接mysql失败\n");
}
//关闭mysql连接
mysql_close(&connect);
return 0;
}
编译时,需要指定 -l指定mysqlclient这个库:
stu@stu-virtual-machine:~/lg$ gcc -o mysqltest mysqltest.c -lmysqlclient
stu@stu-virtual-machine:~/lg$
运行程序时要注意,有些情况使系统用管理员身份运行可以成功:
root@stu-virtual-machine:/home/stu/lg# ./mysqltest
连接mysql成功
root@stu-virtual-machine:/home/stu/lg#
但普通用户可能出现失败,此时需要更改mysql数据库管理员密码,并设置好加密方式。要注意一个是
linux系统管理员root,还有一个是Mysql数据库的管理员,名字也是root。不要混淆。
stu@stu-virtual-machine:~/lg$ ./mysqltest
err:Access denied for user 'root'@'localhost'
连接mysql失败
stu@stu-virtual-machine:~/lg$
6.用户管理与授权
查看用户信息
mysql> select user,host,plugin from mysql.user;
创建用户 示例:
mysql> create user 'stu'@'localhost' identified by 'Iabc_123456';
创建用户指定加密方式 示例:
mysql> create user 'stu1'@'localhost' identified WITH mysql_native_password by
'Iabc_123456';
更新用户密码,指定加密方式,注意密码强度大小写数字
ALTER user 'root'@'localhost' IDENTIFIED WITH mysql_native_password BY
'Iabc_123456';
授权用户对那些数据库的那些表可以进行操作 示例:
指定user_name用户可以从任意地点登录访问所有数据库的所有表
GRANT ALL PRIVILEGES ON *.* TO 'user_name'@'%' identified by '密码'
GRANT ALL ON database_name.table_name TO 'user_name'@'localhost'
删除用户
drop user 'name'@'localhost';
7 .win安装mysql及navicat工具
令一份安装文档
