title: Ehcache 快速入门 categories:
-
编程 -
Java -
中间件 -
缓存 tags: -
Java -
中间件 -
缓存 -
Ehcache abbrlink: 2720adf1 date: 2022-02-17 22:34:30 permalink: /pages/c4647d/
Ehcache 快速入门
EhCache 是一个纯 Java 的进程内缓存框架,具有快速、精干等特点,是 Hibernate 中默认的 CacheProvider。

一、简介
Ehcache 虽然也支持分布式模式,但是分布式方案不是很好好,建议只将其作为单机的进程内缓存使用。
Ehcache 特性
优点
-
快速、简单 -
支持多种缓存策略:LRU、LFU、FIFO 淘汰算法 -
缓存数据有两级:内存和磁盘,因此无需担心容量问题 -
缓存数据会在虚拟机重启的过程中写入磁盘 -
可以通过 RMI、可插入 API 等方式进行分布式缓存 -
具有缓存和缓存管理器的侦听接口 -
支持多缓存管理器实例,以及一个实例的多个缓存区域 -
提供 Hibernate 的缓存实现
缺点
-
使用磁盘 Cache 的时候非常占用磁盘空间 -
不保证数据的安全 -
虽然支持分布式缓存,但效率不高(通过组播方式,在不同节点之间同步数据)。
Ehcache 集群
Ehcache 目前支持五种集群方式:
-
RMI -
JMS -
JGroup -
Terracotta -
Ehcache Server
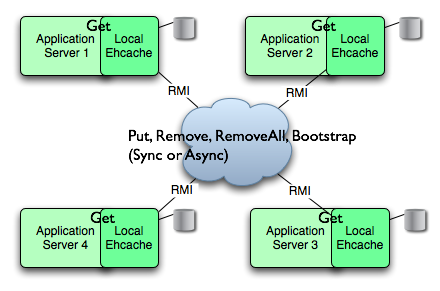
RMI
使用组播方式通知所有节点同步数据。
如果网络有问题,或某台服务宕机,则存在数据无法同步的可能,导致数据不一致。
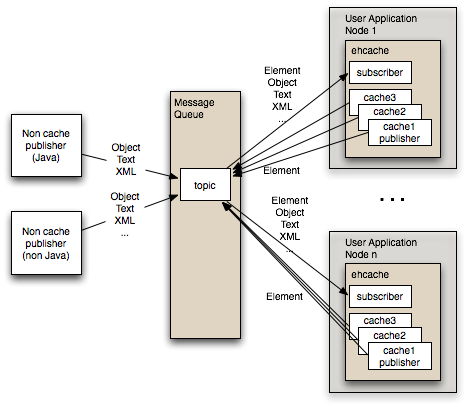
JMS
JMS 类似 MQ,所有节点订阅消息,当某节点缓存发生变化,就向 JMS 发消息,其他节点感知变化后,同步数据。
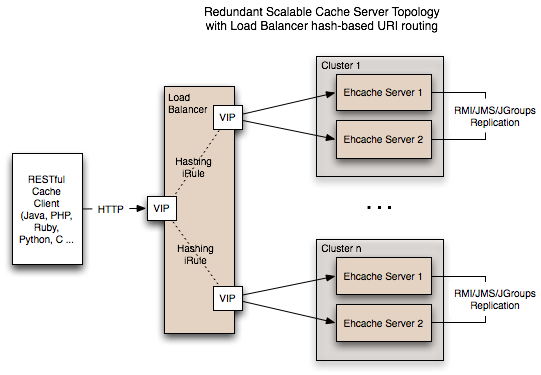
Cache Server
二、快速入门
引入 Ehcache
如果你的项目使用 maven 管理,添加以下依赖到你的 pom.xml 中。
<dependency>
  <groupId>net.sf.ehcache</groupId>
  <artifactId>ehcache</artifactId>
  <version>2.10.2</version>
  <type>pom</type>
</dependency>
如果你的项目不使用 maven 管理,请在 Ehcache 官网下载地址 下载 jar 包。
Spring 提供了对于 Ehcache 接口的封装,可以更简便的使用其功能。接入方式如下:
如果你的项目使用 maven 管理,添加以下依赖到你的pom.xml中。
spring-context-support这个 jar 包中含有 Spring 对于缓存功能的抽象封装接口。
<dependency>
  <groupId>org.springframework</groupId>
  <artifactId>spring-context-support</artifactId>
  <version>4.1.4.RELEASE</version>
</dependency>
添加配置文件
(1)在 classpath 下添加 ehcache.xml 添加一个名为 helloworld 的缓存。
<?xml version="1.0" encoding="UTF-8"?>
<ehcache xmlns:xsi="http://www.w3.org/2001/XMLSchema-instance"
         xsi:noNamespaceSchemaLocation="http://ehcache.org/ehcache.xsd">

  <!-- 磁盘缓存位置 -->
  <diskStore path="java.io.tmpdir/ehcache"/>

  <!-- 默认缓存 -->
  <defaultCache
          maxEntriesLocalHeap="10000"
          eternal="false"
          timeToIdleSeconds="120"
          timeToLiveSeconds="120"
          maxEntriesLocalDisk="10000000"
          diskExpiryThreadIntervalSeconds="120"
          memoryStoreEvictionPolicy="LRU"/>

  <!-- helloworld缓存 -->
  <cache name="helloworld"
         maxElementsInMemory="1000"
         eternal="false"
         timeToIdleSeconds="5"
         timeToLiveSeconds="5"
         overflowToDisk="false"
         memoryStoreEvictionPolicy="LRU"/>
</ehcache>
Ehcache 工作示例
Ehcache 会自动加载 classpath 根目录下名为 ehcache.xml 文件。
EhcacheDemo 的工作步骤如下:
-
在 EhcacheDemo 中,我们引用 ehcache.xml声明的名为 helloworld 的缓存来创建Cache对象; -
然后我们用一个键值对来实例化 Element对象; -
将 Element对象添加到Cache; -
然后用 Cache的 get 方法获取Element对象。
public class EhcacheDemo {
    public static void main(String[] args) throws Exception {
        // Create a cache manager
        final CacheManager cacheManager = new CacheManager();

        // create the cache called "helloworld"
        final Cache cache = cacheManager.getCache("helloworld");

        // create a key to map the data to
        final String key = "greeting";

        // Create a data element
        final Element putGreeting = new Element(key, "Hello, World!");

        // Put the element into the data store
        cache.put(putGreeting);

        // Retrieve the data element
        final Element getGreeting = cache.get(key);

        // Print the value
        System.out.println(getGreeting.getObjectValue());
    }
}
输出
Hello, World!
三、Ehcache API
Element、Cache、CacheManager是 Ehcache 最重要的 API。
-
Element- 缓存的元素,它维护着一个键值对。 -
Cache- 它是 Ehcache 的核心类,它有多个Element,并被CacheManager管理。它实现了对缓存的逻辑行为。 -
CacheManager-Cache的容器对象,并管理着Cache的生命周期。CacheManager 支持两种创建模式:单例(Singleton mode)和实例(InstanceMode)。
创建 CacheManager
下面的代码列举了创建 CacheManager 的五种方式。
使用静态方法create()会以默认配置来创建单例的CacheManager实例。
newInstance()方法是一个工厂方法,以默认配置创建一个新的CacheManager实例。
此外,newInstance()还有几个重载函数,分别可以通过传入String、URL、InputStream参数来加载配置文件,然后创建CacheManager实例。
// 使用Ehcache默认配置获取单例的CacheManager实例
CacheManager.create();
String[] cacheNames = CacheManager.getInstance().getCacheNames();

// 使用Ehcache默认配置新建一个CacheManager实例
CacheManager.newInstance();
String[] cacheNames = manager.getCacheNames();

// 使用不同的配置文件分别创建一个CacheManager实例
CacheManager manager1 = CacheManager.newInstance("src/config/ehcache1.xml");
CacheManager manager2 = CacheManager.newInstance("src/config/ehcache2.xml");
String[] cacheNamesForManager1 = manager1.getCacheNames();
String[] cacheNamesForManager2 = manager2.getCacheNames();

// 基于classpath下的配置文件创建CacheManager实例
URL url = getClass().getResource("/anotherconfigurationname.xml");
CacheManager manager = CacheManager.newInstance(url);

// 基于文件流得到配置文件,并创建CacheManager实例
InputStream fis = new FileInputStream(new File
("src/config/ehcache.xml").getAbsolutePath());
try {
 CacheManager manager = CacheManager.newInstance(fis);
} finally {
 fis.close();
}
添加缓存
需要强调一点,Cache对象在用addCache方法添加到CacheManager之前,是无效的。
使用 CacheManager 的 addCache 方法可以根据缓存名将 ehcache.xml 中声明的 cache 添加到容器中;它也可以直接将 Cache 对象添加到缓存容器中。
Cache有多个构造函数,提供了不同方式去加载缓存的配置参数。
有时候,你可能需要使用 API 来动态的添加缓存,下面的例子就提供了这样的范例。
// 除了可以使用xml文件中配置的缓存,你也可以使用API动态增删缓存
// 添加缓存
manager.addCache(cacheName);

// 使用默认配置添加缓存
CacheManager singletonManager = CacheManager.create();
singletonManager.addCache("testCache");
Cache test = singletonManager.getCache("testCache");

// 使用自定义配置添加缓存,注意缓存未添加进CacheManager之前并不可用
CacheManager singletonManager = CacheManager.create();
Cache memoryOnlyCache = new Cache("testCache", 5000, false, false, 5, 2);
singletonManager.addCache(memoryOnlyCache);
Cache test = singletonManager.getCache("testCache");

// 使用特定的配置添加缓存
CacheManager manager = CacheManager.create();
Cache testCache = new Cache(
 new CacheConfiguration("testCache", maxEntriesLocalHeap)
 .memoryStoreEvictionPolicy(MemoryStoreEvictionPolicy.LFU)
 .eternal(false)
 .timeToLiveSeconds(60)
 .timeToIdleSeconds(30)
 .diskExpiryThreadIntervalSeconds(0)
 .persistence(new PersistenceConfiguration().strategy(Strategy.LOCALTEMPSWAP)));
 manager.addCache(testCache);
删除缓存
删除缓存比较简单,你只需要将指定的缓存名传入removeCache方法即可。
CacheManager singletonManager = CacheManager.create();
singletonManager.removeCache("sampleCache1");
基本缓存操作
Cache 最重要的两个方法就是 put 和 get,分别用来添加 Element 和获取 Element。
Cache 还提供了一系列的 get、set 方法来设置或获取缓存参数,这里不一一列举,更多 API 操作可参考官方 API 开发手册。
/**
 * 测试:使用默认配置或使用指定配置来创建CacheManager
 *
 * @author Zhang Peng
 */
public class CacheOperationTest {
    private final Logger log = LoggerFactory.getLogger(CacheOperationTest.class);

    /**
     * 使用Ehcache默认配置(classpath下的ehcache.xml)获取单例的CacheManager实例
     */
    @Test
    public void operation() {
        CacheManager manager = CacheManager.newInstance("src/test/resources/ehcache/ehcache.xml");

        // 获得Cache的引用
        Cache cache = manager.getCache("userCache");

        // 将一个Element添加到Cache
        cache.put(new Element("key1", "value1"));

        // 获取Element,Element类支持序列化,所以下面两种方法都可以用
        Element element1 = cache.get("key1");
        // 获取非序列化的值
        log.debug("key:{}, value:{}", element1.getObjectKey(), element1.getObjectValue());
        // 获取序列化的值
        log.debug("key:{}, value:{}", element1.getKey(), element1.getValue());

        // 更新Cache中的Element
        cache.put(new Element("key1", "value2"));
        Element element2 = cache.get("key1");
        log.debug("key:{}, value:{}", element2.getObjectKey(), element2.getObjectValue());

        // 获取Cache的元素数
        log.debug("cache size:{}", cache.getSize());

        // 获取MemoryStore的元素数
        log.debug("MemoryStoreSize:{}", cache.getMemoryStoreSize());

        // 获取DiskStore的元素数
        log.debug("DiskStoreSize:{}", cache.getDiskStoreSize());

        // 移除Element
        cache.remove("key1");
        log.debug("cache size:{}", cache.getSize());

        // 关闭当前CacheManager对象
        manager.shutdown();

        // 关闭CacheManager单例实例
        CacheManager.getInstance().shutdown();
    }
}
四、Ehcache 配置
Ehcache 支持通过 xml 文件和 API 两种方式进行配置。
详情参考:Ehcache 官方 XML 配置手册
xml 配置方式
Ehcache 的CacheManager构造函数或工厂方法被调用时,会默认加载 classpath 下名为ehcache.xml的配置文件。如果加载失败,会加载 Ehcache jar 包中的ehcache-failsafe.xml文件,这个文件中含有简单的默认配置。 ehcache.xml 配置参数说明:
-
name:缓存名称。 -
maxElementsInMemory:缓存最大个数。 -
eternal:缓存中对象是否为永久的,如果是,超时设置将被忽略,对象从不过期。 -
timeToIdleSeconds:置对象在失效前的允许闲置时间(单位:秒)。仅当 eternal=false 对象不是永久有效时使用,可选属性,默认值是 0,也就是可闲置时间无穷大。 -
timeToLiveSeconds:缓存数据的生存时间(TTL),也就是一个元素从构建到消亡的最大时间间隔值,这只能在元素不是永久驻留时有效,如果该值是 0 就意味着元素可以停顿无穷长的时间。 -
maxEntriesLocalDisk:当内存中对象数量达到 maxElementsInMemory 时,Ehcache 将会对象写到磁盘中。 -
overflowToDisk:内存不足时,是否启用磁盘缓存。 -
diskSpoolBufferSizeMB:这个参数设置 DiskStore(磁盘缓存)的缓存区大小。默认是 30MB。每个 Cache 都应该有自己的一个缓冲区。 -
maxElementsOnDisk:硬盘最大缓存个数。 -
diskPersistent:是否在 VM 重启时存储硬盘的缓存数据。默认值是 false。 -
diskExpiryThreadIntervalSeconds:磁盘失效线程运行时间间隔,默认是 120 秒。 -
memoryStoreEvictionPolicy:当达到 maxElementsInMemory 限制时,Ehcache 将会根据指定的策略去清理内存。默认策略是 LRU(最近最少使用)。你可以设置为 FIFO(先进先出)或是 LFU(较少使用)。 -
clearOnFlush:内存数量最大时是否清除。
API 配置方式
xml 配置的参数也可以直接通过编程方式来动态的进行配置(dynamicConfig 没有设为 false)。
Cache cache = manager.getCache("sampleCache");
CacheConfiguration config = cache.getCacheConfiguration();
config.setTimeToIdleSeconds(60);
config.setTimeToLiveSeconds(120);
config.setmaxEntriesLocalHeap(10000);
config.setmaxEntriesLocalDisk(1000000);
也可以通过disableDynamicFeatures()方式关闭动态配置开关。配置以后你将无法再以编程方式配置参数。
Cache cache = manager.getCache("sampleCache");
cache.disableDynamicFeatures();
五、Spring 集成 Ehcache
Spring3.1 开始添加了对缓存的支持。和事务功能的支持方式类似,缓存抽象允许底层使用不同的缓存解决方案来进行整合。
Spring4.1 开始支持 JSR-107 注解。
注:我本人使用的 Spring 版本为 4.1.4.RELEASE,目前 Spring 版本仅支持 Ehcache2.5 以上版本,但不支持 Ehcache3。
绑定 Ehcache
org.springframework.cache.ehcache.EhCacheManagerFactoryBean这个类的作用是加载 Ehcache 配置文件。 org.springframework.cache.ehcache.EhCacheCacheManager这个类的作用是支持 net.sf.ehcache.CacheManager。
spring-ehcache.xml的配置
<?xml version="1.0" encoding="UTF-8"?>
<beans xmlns="http://www.springframework.org/schema/beans"
       xmlns:xsi="http://www.w3.org/2001/XMLSchema-instance"
       xmlns:cache="http://www.springframework.org/schema/cache"
       xsi:schemaLocation="http://www.springframework.org/schema/beans
        http://www.springframework.org/schema/beans/spring-beans-3.0.xsd
        http://www.springframework.org/schema/cache
        http://www.springframework.org/schema/cache/spring-cache-3.2.xsd">

  <description>ehcache缓存配置管理文件</description>

  <bean id="ehcache" class="org.springframework.cache.ehcache.EhCacheManagerFactoryBean">
    <property name="configLocation" value="classpath:ehcache/ehcache.xml"/>
  </bean>

  <bean id="cacheManager" class="org.springframework.cache.ehcache.EhCacheCacheManager">
    <property name="cacheManager" ref="ehcache"/>
  </bean>

  <!-- 启用缓存注解开关 -->
  <cache:annotation-driven cache-manager="cacheManager"/>
</beans>
使用 Spring 的缓存注解
开启注解
Spring 为缓存功能提供了注解功能,但是你必须启动注解。 你有两个选择: (1) 在 xml 中声明 像上一节 spring-ehcache.xml 中的做法一样,使用<cache:annotation-driven/>
<cache:annotation-driven cache-manager="cacheManager"/>
(2) 使用标记注解 你也可以通过对一个类进行注解修饰的方式在这个类中使用缓存注解。 范例如下:
@Configuration
@EnableCaching
public class AppConfig {
}
注解基本使用方法
Spring 对缓存的支持类似于对事务的支持。 首先使用注解标记方法,相当于定义了切点,然后使用 Aop 技术在这个方法的调用前、调用后获取方法的入参和返回值,进而实现了缓存的逻辑。 下面三个注解都是方法级别:
@Cacheable
表明所修饰的方法是可以缓存的:当第一次调用这个方法时,它的结果会被缓存下来,在缓存的有效时间内,以后访问这个方法都直接返回缓存结果,不再执行方法中的代码段。 这个注解可以用condition属性来设置条件,如果不满足条件,就不使用缓存能力,直接执行方法。 可以使用key属性来指定 key 的生成规则。
@CachePut
与@Cacheable不同,@CachePut不仅会缓存方法的结果,还会执行方法的代码段。 它支持的属性和用法都与@Cacheable一致。
@CacheEvict
与@Cacheable功能相反,@CacheEvict表明所修饰的方法是用来删除失效或无用的缓存数据。 下面是@Cacheable、@CacheEvict和@CachePut基本使用方法的一个集中展示:
@Service
public class UserService {
    // @Cacheable可以设置多个缓存,形式如:@Cacheable({"books", "isbns"})
    @Cacheable(value={"users"}, key="#user.id")
    public User findUser(User user) {
        return findUserInDB(user.getId());
    }

    @Cacheable(value = "users", condition = "#user.getId() <= 2")
    public User findUserInLimit(User user) {
        return findUserInDB(user.getId());
    }

    @CachePut(value = "users", key = "#user.getId()")
    public void updateUser(User user) {
        updateUserInDB(user);
    }

    @CacheEvict(value = "users")
    public void removeUser(User user) {
        removeUserInDB(user.getId());
    }

    @CacheEvict(value = "users", allEntries = true)
    public void clear() {
        removeAllInDB();
    }
}
@Caching
如果需要使用同一个缓存注解(@Cacheable、@CacheEvict或@CachePut)多次修饰一个方法,就需要用到@Caching。
@Caching(evict = { @CacheEvict("primary"), @CacheEvict(cacheNames="secondary", key="#p0") })
public Book importBooks(String deposit, Date date)
@CacheConfig
与前面的缓存注解不同,这是一个类级别的注解。 如果类的所有操作都是缓存操作,你可以使用@CacheConfig来指定类,省去一些配置。
@CacheConfig("books")
public class BookRepositoryImpl implements BookRepository {
 @Cacheable
 public Book findBook(ISBN isbn) {...}
}
参考资料
-
官方 -
Ehcache 官网 -
Ehcache Github
-
-
文章 -
Ehcache 优缺点以及分布式详解 -
Ehcache 详细解读 -
注释驱动的 Spring cache 缓存介绍 -
Spring 官方文档第 36 章缓存抽象 选择下载器: 下载此0条链接 当前处于选择模式 点击/拖拽 鼠标左键 选择链接 点击/拖拽 鼠标右键 取消选择链接 按住 ALT键 点击/拖拽 鼠标左键 取消选择链接
-
本文由 mdnice 多平台发布