网络
安卓主页的网络框架:OkHttp
在OkHttp的基础上进行封装的:Retrofit框架,更常使用
OkHttp学习
在使用网络请求的时候,先添加网络访问权限:
<uses-permission android:name="android.permission.INTERNET" />
类似还有其他:
<!--网络权限--><uses-permission android:name="android.permission.INTERNET" /><!--写文件权限--><uses-permission android:name="android.permission.WRITE_EXTERNAL_STORAGE" /><!--读文件权限--><uses-permission android:name="android.permission.READ_EXTERNAL_STORAGE" />
除此之外,还有添加两个依赖:
在app-build.gradle-dependencies下:
implementation("com.squareup.okhttp3:okhttp:4.9.0")
// 网络请求日志打印
implementation("com.squareup.okhttp3:logging-interceptor:4.9.0")
在高版本下,需要满足HTTPS的要求,如果你调试使用的是HTTP的接口,要加上:
android:usesCleartextTraffic="true"
没有请求的接口?
这个网站可以模拟接口请求:点我
或者
使用 天气预报
Get请求
同步请求
private val BaseUrl = "http://www.tianqiapi.com"val client = OkHttpClient.Builder()//build构造者设计模式.connectTimeout(10, TimeUnit.SECONDS)//链接超时时间.readTimeout(10, TimeUnit.SECONDS)//读取超时时间.writeTimeout(10, TimeUnit.SECONDS)//写超时时间,也就是请求超时.build()//get方法fun get(url: String){//创建一个子线程Thread(Runnable {val string2 = BaseUrl + urlprintln("string2 = ${string2}")val request: Request = Request.Builder()//build构造者设计模式.url(string2)//请求地址.build()//client对象 与 request产生关联,返回一个Call对象val call: Call = client.newCall(request)//执行,返回一个Response对象(execute()是同步请求)val response: Response = call.execute()//获取bodyval body:String? = response.body?.string()//结果打印Log.e("OKHTTP", "get response body = ${body}")println("get response body = ${body}")}).start()}
异步请求
///异步get请求fun getAsync(url: String){val string2 = BaseUrl + urlprintln("string2 = ${string2}")val request: Request = Request.Builder()//build构造者设计模式.url(string2)//请求地址.build()//client对象 与 request产生关联,返回一个Call对象val call: Call = client.newCall(request)//执行,返回一个Response对象(enqueue()是异步请求)val response: Unit = call.enqueue(object :Callback{override fun onFailure(call: Call, e: IOException) {Log.e("OKHTTP", "get response body = ${e.message}")println("error = ${e.message}")}override fun onResponse(call: Call, response: Response) {//获取bodyval body:String? = response.body?.string()//结果打印Log.e("OKHTTP", "get response body = ${body}")println("get response body = ${body}")}})}
Post请求
同步请求
//post方法fun post(url: String){//创建一个子线程Thread(Runnable {//创建bodyval body2 = FormBody.Builder().add("key", "value")//添加参数.add("key2", "value2").build()val string2 = BaseUrl + urlprintln("string2 = ${string2}")val request: Request = Request.Builder()//build构造者设计模式.url(string2)//请求地址.post(body2)//接口参数.build()//client对象 与 request产生关联,返回一个Call对象val call: Call = client.newCall(request)//执行,返回一个Response对象(execute()是同步请求)val response: Response = call.execute()//获取bodyval body:String? = response.body?.string()//结果打印Log.e("OKHTTP", "get response body = ${body}")println("get response body = ${body}")}).start()}
异步请求
//post异步方法fun postAsync(url: String){//创建bodyval body2 = FormBody.Builder().add("key", "value")//添加参数.add("key2", "value2").build()val string2 = BaseUrl + urlprintln("string2 = ${string2}")val request: Request = Request.Builder()//build构造者设计模式.url(string2)//请求地址.post(body2)//接口参数.build()//client对象 与 request产生关联,返回一个Call对象val call: Call = client.newCall(request)//执行,返回一个Response对象(enqueue()是同步请求)val response: Unit = call.enqueue(object :Callback{override fun onFailure(call: Call, e: IOException) {TODO("Not yet implemented")}override fun onResponse(call: Call, response: Response) {//获取bodyval body:String? = response.body?.string()//结果打印Log.e("OKHTTP", "get response body = ${body}")println("get response body = ${body}")}})}
拦截器
LoggingInterceptor
//继承Interceptor
class LoggingInterceptor : Interceptor{//重写方法override fun intercept(chain: Interceptor.Chain): Response {//获取当前请求的时间戳val time_start = System.nanoTime()//获取请求对象var request = chain.request()//获取响应对象var response = chain.proceed(request)//获取bodyvar buffer = okio.Buffer()request.body?.writeTo(buffer)var requestBodyString = buffer.readUtf8()//打印Log.e("OKHTTP", String.format("request: %s, params: %s", request.url, requestBodyString))val businessData: String = response.body?.string() ?: "空"Log.e("OKHTTP", businessData);//此处需要创建新的response并返回,非直接返回return response}}
GSON解析
首先,添加依赖:
implementation 'com.google.code.gson:gson:2.8.6'
JSON转model
import com.google.gson.Gsonfun main(){//json串val json ="{\"uid\":\"00001\",\"userName\":\"Freeman\",\"telNumber\":\"13000000000\"}";//创建一个gson对象var gson = Gson()//json转modelval account = gson.fromJson<Account>(json, Account::class.java);//打印某一个账号的名字println(account.userName)//打印所有属性println(account.toString())}class Account{var uid: String = "001"var userName: String = "jack"var password: String = "123456"var telNumber: String = "130000000"override fun toString(): String {return "Account(uid='$uid', userName='$userName', password='$password', telNumber='$telNumber')"}
}
model转JSON
//model转Json
println("model转Json ${gson.toJson(account)}")
JsonToKotlin插件:可以将json转化为模型定义属性
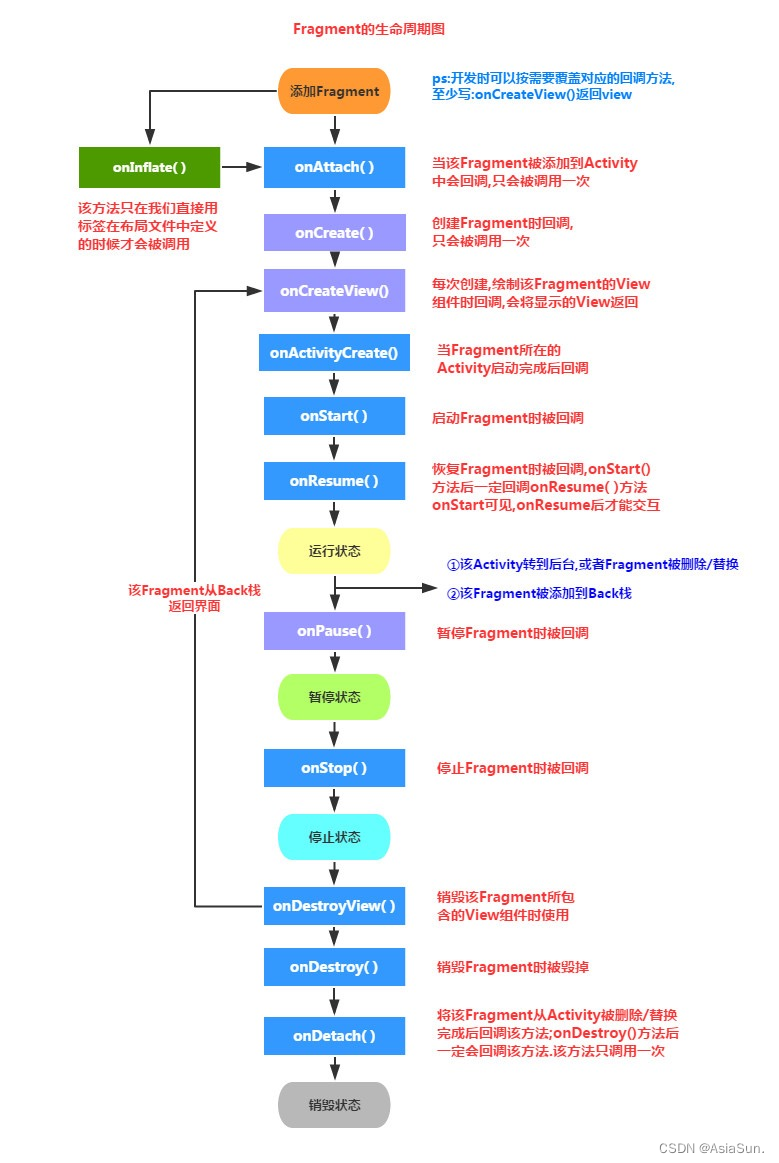
Fragment
fragment不能单独使用,要嵌在activity里面
fragment的生命周期,受宿主(activity)的生命周期的影响
fragment的生命周期:
//Activity
class FragmentStudyActivity : AppCompatActivity() {override fun onCreate(savedInstanceState: Bundle?) {super.onCreate(savedInstanceState)setContentView(R.layout.activity_fragment_study)//创建fragment对象val fragment = FragmentStudy()//传递数据//创建一个bundleval bundle = Bundle()bundle.putInt("key1", 22)bundle.putString("key2", "wwwwwwww")//赋值fragment.arguments = bundle//并联关系val beginTransaction = supportFragmentManager.beginTransaction()//将某个layout的id拿到,添加到fragment上beginTransaction.add(R.id.container, fragment)//添加到事务里面beginTransaction.commitAllowingStateLoss()}
}//Fragment
class FragmentStudy :Fragment(){var key1 = 2var key2 = "qqqqq"override fun onCreateView(inflater: LayoutInflater,container: ViewGroup?,savedInstanceState: Bundle?): View? {//        return inflater.inflate(R.layout.activity_third, container, false)//创建一个textViewval textView = TextView(context)textView.text = key2textView.setTextSize(22F)textView.gravity = Gravity.CENTERreturn textView}override fun onViewCreated(view: View, savedInstanceState: Bundle?) {super.onViewCreated(view, savedInstanceState)key1 = arguments?.getInt("key1") ?: 3key2 = arguments?.getString("key2") ?: "pppp"println("key1 = ${key1}")println("key2 = ${key2}")//该view,就是上面创建的TextViewval textView = view as TextViewtextView.text = key2}}