今天我们分享MobileNet V2实现遥感影像土地利用的图像分类。
数据集
本次使用的数据集是UC Merced Land-Use Dataset。UC Merced Land-Use Dataset 是一个用于研究的 21 级土地利用图像遥感数据集,均提取自 USGS National Map Urban Area Imagery(美国地质调查局国家地图城市地区图像) 系列,其被用于全国各地的城市地区。此数据集公共领域图像的像素分辨率为 1 英尺(0.3 米),图像像素大小为 256*256,包含 21 个类别的场景图像共计 2100 张,其中每个类别有 100 张。这 21 个类别分别是:农业、飞机、棒球场、海滩、建筑物、树丛、密集住宅、森林、高速公路、高尔夫球场、港口、路口、中型住宅、移动家庭公园、立交桥、停车场、河、跑道、稀疏住宅、储油罐。 

数据集划分
首先我们可以对数据集进行划分,按训练集、验证集、测试集比例7:1.5:1.5进行划分。
import os
import shutil
import random

# 设置数据集根目录
data_root = './datasets/UCMerced_LandUse/Images'  # 替换成你的数据集根目录

# 设置训练集、验证集、测试集的目录
train_dir = './datasets/train'
val_dir = './datasets/val'
test_dir = './datasets/test'

# 创建目录
os.makedirs(train_dir, exist_ok=True)
os.makedirs(val_dir, exist_ok=True)
os.makedirs(test_dir, exist_ok=True)

# 获取所有子文件夹列表
class_folders = sorted(os.listdir(data_root))

# 定义训练集、验证集、测试集比例
train_ratio = 0.7
val_ratio = 0.15
test_ratio = 0.15

for class_folder in class_folders:
    class_path = os.path.join(data_root, class_folder)
    images = os.listdir(class_path)
    random.shuffle(images)  # 随机打乱顺序

    num_images = len(images)
    num_train = int(num_images * train_ratio)
    num_val = int(num_images * val_ratio)

    train_images = images[:num_train]
    val_images = images[num_train:num_train + num_val]
    test_images = images[num_train + num_val:]

    # 移动图像到对应目录
    for img in train_images:
        src = os.path.join(class_path, img)
        dest = os.path.join(train_dir, class_folder, img)
        os.makedirs(os.path.dirname(dest), exist_ok=True)
        shutil.copy(src, dest)

    for img in val_images:
        src = os.path.join(class_path, img)
        dest = os.path.join(val_dir, class_folder, img)
        os.makedirs(os.path.dirname(dest), exist_ok=True)
        shutil.copy(src, dest)

    for img in test_images:
        src = os.path.join(class_path, img)
        dest = os.path.join(test_dir, class_folder, img)
        os.makedirs(os.path.dirname(dest), exist_ok=True)
        shutil.copy(src, dest)
划分完毕后,数据集分别保存在train、val、test三个文件夹内。每个文件夹内有21个子文件夹分别对应21类。
MobileNet V2
MobileNet-v2的主要思想就是在v1的基础上引入了线性瓶颈 (Linear Bottleneck)和逆残差 (Inverted Residual)来提高网络的表征能力,同样也是一种轻量级的卷积神经网络。 

import torch.nn as nn
import numpy as np
import math

def conv3x3(input_channel, output_channel, stride):
    return nn.Sequential(
        nn.Conv2d(input_channel, output_channel, 3, stride, 1, bias=False),
        nn.BatchNorm2d(output_channel),
        nn.ReLU6(inplace=True)
    )

def conv1x1(input_channel, output_channel):
    return nn.Sequential(
        nn.Conv2d(input_channel, output_channel, 1, 1, 0, bias=False),
        nn.BatchNorm2d(output_channel),
        nn.ReLU6(inplace=True)
    )

def make_divisible(x, divisible_by=8):
    return int(np.ceil(x * 1. / divisible_by) * divisible_by)

class InvertedResidual(nn.Module):
    def __init__(self, input_channel, out_channel, stride, expand_ratio):
        super().__init__()
        assert stride in [1, 2], 'Stride value is greater than 2'

        hidden_dimension = round(input_channel * expand_ratio)
        self.identity = stride == 1 and input_channel == out_channel

        if expand_ratio == 1:
            self.conv = nn.Sequential(
                #depthwise convolution
                nn.Conv2d(hidden_dimension, hidden_dimension, 3, stride, 1, groups=hidden_dimension, bias=False),
                nn.BatchNorm2d(hidden_dimension),
                nn.ReLU6(inplace=True),

                #pointwise linear
                nn.Conv2d(hidden_dimension, out_channel, 1, 1, 0, bias=False),
                nn.BatchNorm2d(out_channel)
            )
        else:
            self.conv = nn.Sequential(
                # pointwise conv
                nn.Conv2d(input_channel, hidden_dimension, 1, 1, 0, bias=False),
                nn.BatchNorm2d(hidden_dimension),
                nn.ReLU6(inplace=True),

                # depthwise conv
                nn.Conv2d(hidden_dimension, hidden_dimension, 3, stride, 1, groups=hidden_dimension, bias=False),
                nn.BatchNorm2d(hidden_dimension),
                nn.ReLU6(inplace=True),

                # pointwise-linear
                nn.Conv2d(hidden_dimension, out_channel, 1, 1, 0, bias=False),
                nn.BatchNorm2d(out_channel),
            )

    def forward(self, x):
        if self.identity:
            return x + self.conv(x)
        else:
            return self.conv(x)

class MobileNetV2(nn.Module):
    def __init__(self, input_channel,  n_classes=10, width_multipler=1.0):
        super(MobileNetV2, self).__init__()
        block = InvertedResidual
        first_channel = 32
        last_channel = 1280
        # setting of inverted residual blocks
        self.cfgs = [
            # t, c, n, s
            [1,  16, 1, 1],
            [6,  24, 2, 2],
            [6,  32, 3, 2],
            [6,  64, 4, 2],
            [6,  96, 3, 1],
            [6, 160, 3, 2],
            [6, 320, 1, 1],
        ]

        self.last_channel = make_divisible(last_channel * width_multipler) if width_multipler > 1.0 else last_channel
        self.features = [conv3x3(input_channel, first_channel, 2)]

        for t, c, n, s in self.cfgs:
            output_channel = make_divisible(c * width_multipler) if t > 1 else c
            for i in range(n):
                if i == 0:
                    self.features.append(block(first_channel, output_channel, s, expand_ratio=t))
                else:
                    self.features.append(block(first_channel, output_channel, 1, expand_ratio=t))
                first_channel = output_channel
        # building last several layers
        self.features.append(conv1x1(first_channel, self.last_channel))
        # make it nn.Sequential
        self.features = nn.Sequential(*self.features)

        # building classifier
        self.classifier = nn.Linear(self.last_channel, n_classes)
        self._initialize_weights()


    def forward(self, x):
        x = self.features(x)
        x = x.mean(3).mean(2)
        x = self.classifier(x)
        return x

    def _initialize_weights(self):
        for m in self.modules():
            if isinstance(m, nn.Conv2d):
                n = m.kernel_size[0] * m.kernel_size[1] * m.out_channels
                m.weight.data.normal_(0, math.sqrt(2. / n))
                if m.bias is not None:
                    m.bias.data.zero_()
            elif isinstance(m, nn.BatchNorm2d):
                m.weight.data.fill_(1)
                m.bias.data.zero_()
            elif isinstance(m, nn.Linear):
                m.weight.data.normal_(0, 0.01)
                m.bias.data.zero_()
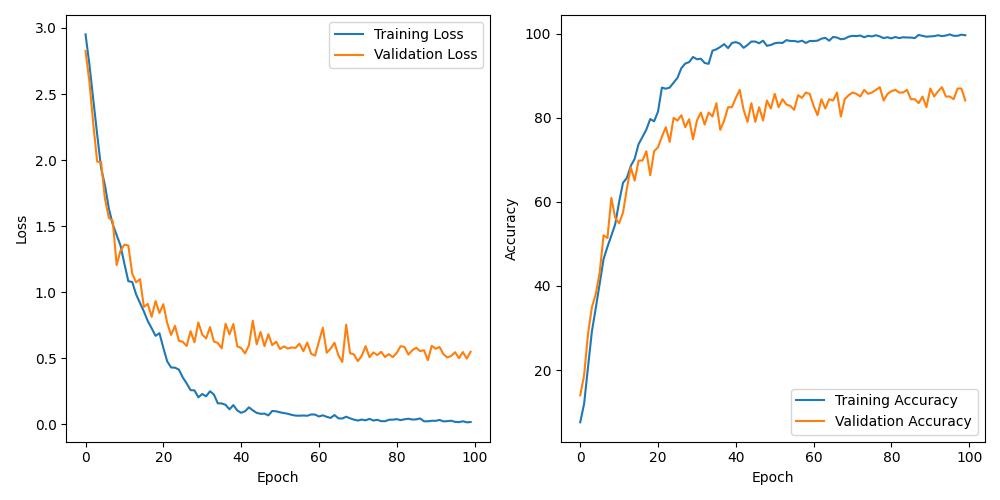
训练过程
精度与测试
「精度」
import torch
import torchvision.transforms as transforms
from torchvision import datasets


# 定义测试集目录
test_dir = './datasets/test'

# 加载测试集数据
transform = transforms.Compose([
    transforms.Resize((256, 256)),  # 图像调整为模型输入大小
    transforms.ToTensor(),
    transforms.Normalize((0.5,), (0.5,))
])

test_data = datasets.ImageFolder(root=test_dir, transform=transform)
test_loader = torch.utils.data.DataLoader(test_data, batch_size=32, shuffle=False)

device = torch.device("cuda" if torch.cuda.is_available() else "cpu")
# 加载模型
model = torch.load('full_model.pth')

model.eval()

# 对测试集进行验证
correct = 0
total = 0
with torch.no_grad():
    for images, labels in test_loader:
        images, labels = images.to(device), labels.to(device)
        outputs = model(images)
        _, predicted = torch.max(outputs, 1)
        total += labels.size(0)
        correct += (predicted == labels).sum().item()

accuracy = 100*correct / total
print(f"Accuracy on test set: {accuracy}")
 「测试」 这里我们从测试集中选取一张森林影像
from PIL import Image
import torch
import torchvision.transforms as transforms
import torch.nn.functional as F

class_name=['agricultural','airplane','baseballdiamond','beach','buildings','chaparral','denseresidential','forest'
,'freeway','golfcourse','harbor','intersection','mediumresidential','mobilehomepark','overpass','parkinglot','river','runway','sparseresidential','storagetanks','tenniscourt']

device = torch.device("cuda" if torch.cuda.is_available() else "cpu")
# 加载模型
model = torch.load('full_model.pth')
model.eval()

# 加载测试集数据
transform = transforms.Compose([
    transforms.Resize((256, 256)),  # 图像调整为模型输入大小
    transforms.ToTensor(),
    transforms.Normalize((0.5,), (0.5,))
])

# 加载单张图片
single_image_path = './datasets/test/forest/forest06.tif'
single_image = Image.open(single_image_path)
single_image = transform(single_image).unsqueeze(0)  # 对图片进行预处理和批处理

# 使用模型进行预测
with torch.no_grad():
    single_image = single_image.to(device)
    output = model(single_image)
    probabilities = F.softmax(output, dim=1)
    _, predicted_class = torch.max(output, 1)

print(f"Predicted class: {class_name[predicted_class.item()]}")  # 输出预测的类别

总结
感兴趣的可以按文末方式,免费获取数据集、完整代码与训练结果。
获取方法
如有需要,请关注微信公众号「DataAssassin」后,后台回复「024」领取。
更多pytorch与tensorflow2网络结构见下图。加入星球可免费获取下列所有网络结构。 「tensorflow2」  「pytorch」
 加入前不要忘了领取优惠券哦!
本文由 mdnice 多平台发布
