目录
1、使用规则
2、更新机制
3、使用if进行条件渲染
4、if ... else ...语句和子组件状态
5、嵌套if语句
ArkTS提供了渲染控制的能力。条件渲染可根据应用的不同状态,使用if、else和else if渲染对应状态下的UI内容。
1、使用规则
- 支持if、else和else if语句。
- if、else if后跟随的条件语句可以使用状态变量。
- 允许在容器组件内使用,通过条件渲染语句构建不同的子组件。
- 条件渲染语句在涉及到组件的父子关系时是“透明”的,当父组件和子组件之间存在一个或多个if语句时,必须遵守父组件关于子组件使用的规则。
- 每个分支内部的构建函数必须遵循构建函数的规则,并创建一个或多个组件。无法创建组件的空构建函数会产生语法错误。
- 某些容器组件限制子组件的类型或数量,将条件渲染语句用于这些组件内时,这些限制将同样应用于条件渲染语句内创建的组件。例如,Grid容器组件的子组件仅支持GridItem组件,在Grid内使用条件渲染语句时,条件渲染语句内仅允许使用GridItem组件。
2、更新机制
当if、else if后跟随的状态判断中使用的状态变量值变化时,条件渲染语句会进行更新,更新步骤如下:
- 评估if和else if的状态判断条件,如果分支没有变化,无需执行以下步骤。如果分支有变化,则执行2、3步骤:
- 删除此前构建的所有子组件。
- 执行新分支的构造函数,将获取到的组件添加到if父容器中。如果缺少适用的else分支,则不构建任何内容。
条件可以包括Typescript表达式。对于构造函数中的表达式,此类表达式不得更改应用程序状态。
3、使用if进行条件渲染
以下案例说明了如何使用if进行条件渲染:
@Entry
@Component
struct RenderTestDemo1Page {@State count: number = 0;build() {Column() {Text(`count=${this.count}`)if (this.count > 0) {Text(`count is positive`).fontColor(Color.Green)}Button('increase count').onClick(() => {this.count++;}).margin({top: 12})Button('decrease count').onClick(() => {this.count--;}).margin({top: 12})}}
}
运行结果如下:
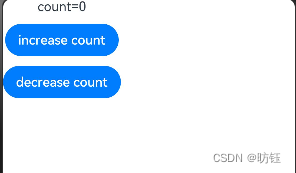
if语句的每个分支都包含一个构建函数。此类构建函数必须创建一个或多个子组件。在初始渲染时,if语句会执行构建函数,并将生成的子组件添加到其父组件中。
每当if或else if条件语句中使用的状态变量发生变化时,条件语句都会更新并重新评估新的条件值。如果条件值评估发生了变化,这意味着需要构建另一个条件分支。此时ArkUI框架将:
- 删除所有以前渲染的(早期分支的)组件。
- 执行新分支的构造函数,将生成的子组件添加到其父组件中。
在以上示例中,如果count从0增加到1,那么if语句更新,条件count > 0将重新评估,评估结果将从false更改为true。因此,将执行条件为真分支的构造函数,创建一个Text组件,并将它添加到父组件Column中。如果后续count更改为0,则Text组件将从Column组件中删除。由于没有else分支,因此不会执行新的构造函数。
4、if ... else ...语句和子组件状态
以下示例包含if ... else ...语句与拥有@State装饰变量的子组件。
@Component
struct CounterView {@State counter: number = 0;label: string = 'unknown';build() {Row() {Text(`${this.label}`)Button(`counter ${this.counter} +1`).onClick(() => {this.counter += 1;})}}
}@Entry
@Component
struct RenderTestDemo2Page {@State toggle: boolean = true;build() {Column() {if (this.toggle) {CounterView({ label: 'CounterView #positive' })} else {CounterView({ label: 'CounterView #negative' })}Button(`toggle ${this.toggle}`).onClick(() => {this.toggle = !this.toggle;})}}
}
运行结果如下:

CounterView(label为 'CounterView #positive')子组件在初次渲染时创建。此子组件携带名为counter的状态变量。当修改CounterView.counter状态变量时,CounterView(label为 'CounterView #positive')子组件重新渲染时并保留状态变量值。当MainView.toggle状态变量的值更改为false时,MainView父组件内的if语句将更新,随后将删除CounterView(label为 'CounterView #positive')子组件。与此同时,将创建新的CounterView(label为 'CounterView #negative')实例。而它自己的counter状态变量设置为初始值0。
CounterView(label为 'CounterView #positive')和CounterView(label为 'CounterView #negative')是同一自定义组件的两个不同实例。if分支的更改,不会更新现有子组件,也不会保留状态。
以下示例展示了条件更改时,若需要保留counter值所做的修改。
@Component
struct TestDemo3CounterView {@Link counter: number;label: string = 'unknown';build() {Row() {Text(`${this.label}`)Button(`counter ${this.counter} +1`).onClick(() => {this.counter += 1;})}}
}@Entry
@Component
struct RenderTestDemo3Page {@State toggle: boolean = true;@State counter: number = 0;build() {Column() {if (this.toggle) {TestDemo3CounterView({ counter: $counter, label: 'CounterView #positive' })} else {TestDemo3CounterView({ counter: $counter, label: 'CounterView #negative' })}Button(`toggle ${this.toggle}`).onClick(() => {this.toggle = !this.toggle;})}}
}
运行结果如下:
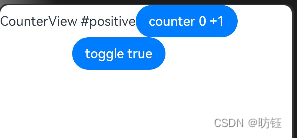
此处,@State counter变量归父组件所有。因此,当CounterView组件实例被删除时,该变量不会被销毁。CounterView组件通过@Link装饰器引用状态。状态必须从子级移动到其父级(或父级的父级),以避免在条件内容或重复内容被销毁时丢失状态。
5、嵌套if语句
条件语句的嵌套对父组件的相关规则没有影响。
@Entry
@Component
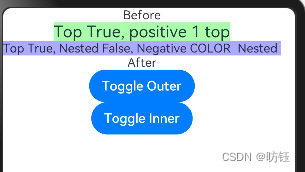
struct RenderTestDemo4Page {@State toggle: boolean = false;@State toggleColor: boolean = false;build() {Column() {Text('Before').fontSize(15)if (this.toggle) {Text('Top True, positive 1 top').backgroundColor('#aaffaa').fontSize(20)// 内部if语句if (this.toggleColor) {Text('Top True, Nested True, positive COLOR  Nested ').backgroundColor('#00aaaa').fontSize(15)} else {Text('Top True, Nested False, Negative COLOR  Nested ').backgroundColor('#aaaaff').fontSize(15)}} else {Text('Top false, negative top level').fontSize(20).backgroundColor('#ffaaaa')if (this.toggleColor) {Text('positive COLOR  Nested ').backgroundColor('#00aaaa').fontSize(15)} else {Text('Negative COLOR  Nested ').backgroundColor('#aaaaff').fontSize(15)}}Text('After').fontSize(15)Button('Toggle Outer').onClick(() => {this.toggle = !this.toggle;})Button('Toggle Inner').onClick(() => {this.toggleColor = !this.toggleColor;})}}
}
运行结果如下:
