脑机接口基准之母—MOABB数据库介绍:
18、MOABB:BCI创新模型基准测试的群虫之心-CSDN博客
Dataset:
BNCI 2014-001 Motor Imagery dataset. (BCI IV2a):
https://paperswithcode.com/dataset/bci-competition-4-version-iia
BNCI 2014-002 Motor Imagery dataset. (BCI IV2a,与001参考电极不同):
https://paperswithcode.com/dataset/bnci-2014-002-motor-imagery-dataset-1
BNCI 2014-004 Motor Imagery dataset.(BCI IV2b):
https://paperswithcode.com/dataset/bnci-2014-004-motor-imagery-dataset
BNCI 2015-001 Motor Imagery dataset(5s的右手、双脚持续的运动想象图像):
https://paperswithcode.com/dataset/bnci-2015-001-motor-imagery-dataset-1
BNCI 2015-004 Motor Imagery dataset(7s的5项不同的心理任务MT):
https://paperswithcode.com/dataset/bnci-2015-004-motor-imagery-dataset-1
另外,欢迎大家加入此群聊,今天新建的,用于脑机接口技术交流和知识分享(公益性质),欢迎各位粉丝和有志从事BCI领域的同僚加入!本人专注于研发BCI领域的深度学习模型,致力于研发一种可以媲美EEGNet的新型CNN模型,工作也是脑机接口技术方向,目前就职于国内脑机接口一所龙头企业(研究院)

代码:
导入数据:
from braindecode.datasets import MOABBDataset#1、导入数据
subject_id = 1
# BNCI2014001 表示 BCIC IV 2a 数据集   subject_ids表示试验者编号
dataset = MOABBDataset(dataset_name="BNCI2014001", subject_ids=[subject_id])
想导入哪个数据直接更换dataset_name编号即可,换被试直接更改subject_id即可
其他处理和剩余代码(时间仓促,3点开会,直接贴上后续代码,代码备注详尽!)
from braindecode.datasets import MOABBDataset
#--------------------------------------------------------------------------------------------------------------
#1、导入数据
subject_id = 1
# BNCI2014001 表示 BCIC IV 2a 数据集   subject_ids表示试验者编号
dataset = MOABBDataset(dataset_name="BNCI2014001", subject_ids=[subject_id])
#--------------------------------------------------------------------------------------------------------------
#2、滤波处理
from braindecode.preprocessing import (exponential_moving_standardize, preprocess, Preprocessor)
from numpy import multiplylow_cut_hz = 4.  # low cut frequency for filtering
high_cut_hz = 38.  # high cut frequency for filtering
# Parameters for exponential moving standardization
factor_new = 1e-3
init_block_size = 1000
# Factor to convert from V to uV
factor = 1e6preprocessors = [Preprocessor('pick_types', eeg=True, meg=False, stim=False),  # Keep EEG sensorsPreprocessor(lambda data: multiply(data, factor)),  # Convert from V to uVPreprocessor('filter', l_freq=low_cut_hz, h_freq=high_cut_hz),  # Bandpass filterPreprocessor(exponential_moving_standardize,  # Exponential moving standardizationfactor_new=factor_new, init_block_size=init_block_size)
]# Transform the data
preprocess(dataset, preprocessors)
#--------------------------------------------------------------------------------------------------------------
#3、剪切计算窗口
from braindecode.preprocessing import create_windows_from_eventstrial_start_offset_seconds = -0.5 #截取试验之前0.5s数据,4.5s=1125数据点
# Extract sampling frequency, check that they are same in all datasets
sfreq = dataset.datasets[0].raw.info['sfreq']
assert all([ds.raw.info['sfreq'] == sfreq for ds in dataset.datasets])
# Calculate the trial start offset in samples.
trial_start_offset_samples = int(trial_start_offset_seconds * sfreq)# Create windows using braindecode function for this. It needs parameters to define how
# trials should be used.
windows_dataset = create_windows_from_events(dataset,trial_start_offset_samples=trial_start_offset_samples,trial_stop_offset_samples=0,preload=True)
#--------------------------------------------------------------------------------------------------------------
#4、数据切分
splitted = windows_dataset.split('session')
train_set = splitted['0train']
valid_set = splitted['1test']
#--------------------------------------------------------------------------------------------------------------
#5、创建模型
import torch
from braindecode.util import set_random_seeds
from braindecode.models import ShallowFBCSPNet
from braindecode.models import EEGITNet
from braindecode.models import EEGResNet
from braindecode.models import EEGInceptioncuda = torch.cuda.is_available()  # check if GPU is available, if True chooses to use it
device = 'cuda' if cuda else 'cpu'
if cuda:torch.backends.cudnn.benchmark = True
# Set random seed to be able to roughly reproduce results
# Note that with cudnn benchmark set to True, GPU indeterminism
# may still make results substantially different between runs.
# To obtain more consistent results at the cost of increased computation time,
# you can set `cudnn_benchmark=False` in `set_random_seeds`
# or remove `torch.backends.cudnn.benchmark = True`
seed = 20200220
#seed = 0
set_random_seeds(seed=seed, cuda=cuda)n_classes = 4
# Extract number of chans and time steps from dataset
n_chans = train_set[0][0].shape[0] #22Channels
input_window_samples = train_set[0][0].shape[1] #4.5s=1125model = ShallowFBCSPNet(n_chans,n_classes,input_window_samples=input_window_samples,final_conv_length='auto')
#model = EEGITNet(in_channels=n_chans,n_classes=n_classes,input_window_samples=input_window_samples)#model = EEGResNet(in_chans=n_chans,n_classes=n_classes,n_first_filters=8,input_window_samples=input_window_samples,final_pool_length = 'auto')
#model = EEGInception(in_channels=n_chans,n_classes=n_classes,input_window_samples=input_window_samples)
# Send model to GPU
if cuda:model.cuda()
#--------------------------------------------------------------------------------------------------------------
#6、模型训练
from skorch.callbacks import LRScheduler
from skorch.helper import predefined_split
from braindecode import EEGClassifier
# These values we found good for shallow network:
lr = 0.0625 * 0.01
#lr = 0.001
weight_decay = 0
# For deep4 they should be:
# lr = 1 * 0.01
# weight_decay = 0.5 * 0.001
batch_size = 64
n_epochs = 500clf = EEGClassifier(model,criterion=torch.nn.NLLLoss,optimizer=torch.optim.AdamW,train_split=predefined_split(valid_set),  # using valid_set for validationoptimizer__lr=lr,optimizer__weight_decay=weight_decay,batch_size=batch_size,callbacks=["accuracy", ("lr_scheduler", LRScheduler('CosineAnnealingLR', T_max=n_epochs - 1)),],device=device,
)
# Model training for a specified number of epochs. `y` is None as it is already supplied
# in the dataset.
from sklearn.model_selection import train_test_split
from sklearn.model_selection import cross_val_score# X_train, X_test, y_train, y_test = train_test_split(train_set, y=None, test_size=0.4, random_state=0)
# scores = cross_val_score(clf, train_set,y=None,cv=5)
# scores
# print("Accuracy: %0.2f (+/- %0.2f)" % (scores.mean(), scores.std() * 2))
clf.fit(train_set, y=None, epochs=n_epochs)
#--------------------------------------------------------------------------------------------------------------
#7、输出结果图像
import matplotlib.pyplot as plt
from matplotlib.lines import Line2D
import pandas as pd# Extract loss and accuracy values for plotting from history object
results_columns = ['train_loss', 'valid_loss', 'train_accuracy', 'valid_accuracy']
df = pd.DataFrame(clf.history[:, results_columns], columns=results_columns,index=clf.history[:, 'epoch'])# get percent of misclass for better visual comparison to loss
df = df.assign(train_misclass=100 - 100 * df.train_accuracy,valid_misclass=100 - 100 * df.valid_accuracy)plt.style.use('seaborn')
fig, ax1 = plt.subplots(figsize=(8, 3))
df.loc[:, ['train_loss', 'valid_loss']].plot(ax=ax1, style=['-', ':'], marker='o', color='tab:blue', legend=False, fontsize=14)ax1.tick_params(axis='y', labelcolor='tab:blue', labelsize=14)
ax1.set_ylabel("Loss", color='tab:blue', fontsize=14)ax2 = ax1.twinx()  # instantiate a second axes that shares the same x-axisdf.loc[:, ['train_misclass', 'valid_misclass']].plot(ax=ax2, style=['-', ':'], marker='o', color='tab:red', legend=False)
ax2.tick_params(axis='y', labelcolor='tab:red', labelsize=14)
ax2.set_ylabel("Misclassification Rate [%]", color='tab:red', fontsize=14)
ax2.set_ylim(ax2.get_ylim()[0], 85)  # make some room for legend
ax1.set_xlabel("Epoch", fontsize=14)# where some data has already been plotted to ax
handles = []
handles.append(Line2D([0], [0], color='black', linewidth=1, linestyle='-', label='Train'))
handles.append(Line2D([0], [0], color='black', linewidth=1, linestyle=':', label='Valid'))
plt.legend(handles, [h.get_label() for h in handles], fontsize=14)
plt.tight_layout()
plt.show()
plt.savefig('acc_loss.png')
#--------------------------------------------------------------------------------------------------------------
#8、混淆矩阵
# from sklearn.metrics import confusion_matrix
# from braindecode.visualization import plot_confusion_matrix# # generate confusion matrices
# # get the targets
# y_true = valid_set.get_metadata().target
# y_pred = clf.predict(valid_set)# # generating confusion matrix
# confusion_mat = confusion_matrix(y_true, y_pred)# # add class labels
# # label_dict is class_name : str -> i_class : int
# label_dict = valid_set.datasets[0].windows.event_id.items()
# # sort the labels by values (values are integer class labels)
# labels = list(dict(sorted(list(label_dict), key=lambda kv: kv[1])).keys())# # plot the basic conf. matrix
# plot_confusion_matrix(confusion_mat, class_names=labels)
#--------------------------------------------------------------------------------------------------------------
from sklearn.metrics import confusion_matrix
from braindecode.visualization import plot_confusion_matrix
# generate confusion matrices
# get the targets
y_true = valid_set.get_metadata().target
y_pred = clf.predict(valid_set)# generating confusion matrix
confusion_mat = confusion_matrix(y_true, y_pred)# add class labels
# label_dict is class_name : str -> i_class : int
# 命令改变的地方 调用方式改变
label_dict = valid_set.datasets[0].window_kwargs[0][1]['mapping']
# sort the labels by values (values are integer class labels)
# 有所改变  但是意思没变
labels = [k for k, v in sorted(label_dict.items(), key=lambda kv: kv[1])]# plot the basic conf. matrix
plot_confusion_matrix(confusion_mat, class_names=labels)
plt.savefig('混淆矩阵.png')
import torchvision.models as models
from torchsummary import summary
summary(model,(1,22,1125),batch_size=64,device="cuda")
print(model)
Result:
1、MOABB-BNCI 2014-001


ShallowFBCSPNet-Sub1

2、MOABB-BNCI 2014-004
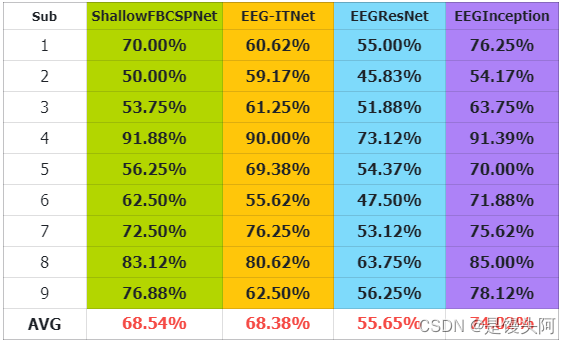

ShallowFBCSPNet-Sub4
3、MOABB-BNCI 2015-001
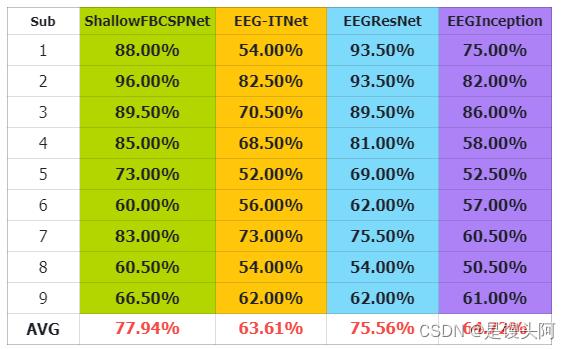

ShallowFBCSPNet-Sub1
4、ShallowFBCSPNet-Sub1

ShallowFBCSPNet-Sub4
上述4个数据给出了其中一个模型的混淆矩阵图,后续我会加上其余的混淆矩阵,希望看到这篇博客的人士:学生也好,工作人员也好,加入我们,大家一起学习,一起进步,共同在脑机接口-算法研发这条路上共同奋进!
——2024年1月5日,15:00 于北京-馒头


![[足式机器人]Part2 Dr. CAN学习笔记-动态系统建模与分析 Ch02-6频率响应与滤波器](https://img-blog.csdnimg.cn/direct/f9a8fa930fc6421dbcd62135ce82cce5.png#pic_center)


