Android中的SPI实现
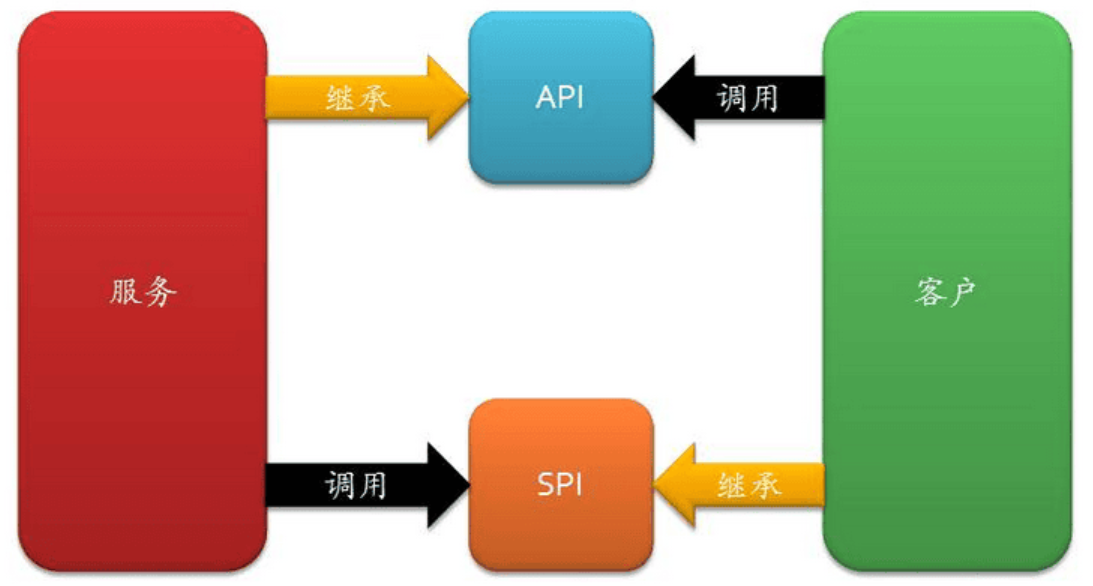
SPI是JVM世界中的标准API,但在Android应用程序中并不常用。然而,它可以非常有用地实现插件架构。让我们探讨一下如何在Android中利用SPI。
问题
在Android中,不同的提供者为推送功能提供服务,而在大型项目中,使用单一实现是不可行的。以下是一些可用的提供者:
- FCM(Firebase Cloud Messaging):主要的推送服务实现,但需要Google服务,可能无法在所有设备上使用。
- ADM(Amazon Device Messaging):Amazon设备(Kindle设备)上的实现,仅在Amazon设备上运行。
- HCM(Huawei Cloud Messaging):华为设备上的实现。
- Baidu(Baidu Push SDK):主要用于中国的推送服务实现。
由于有如此多的服务,管理和初始化它们变得具有挑战性。
当我们需要为不同的应用程序构建提供不同的服务集时,问题变得更加困难。以下是一些示例:
- Google Play控制台不允许发布包含百度服务的应用程序。因此,百度服务应仅包含在面向中国的构建中。
- Amazon设备消息传递仅适用于Amazon设备,因此在仅针对Amazon应用商店的构建中包含它是有意义的。
- 华为实现在面向华为商店的构建中是有意义的。
解决方案
为了解决这个问题,我们可以从创建推送服务实现的抽象层开始。这个抽象层应该放在一个单独的Gradle模块中,以便它可以轻松地作为其他实现模块的依赖项添加。
抽象层
我们可以通过创建以下通用接口来为推送服务定义抽象层:
package com.kurantsov.pushserviceimport android.content.Context/*** Interface used to provide push service implementation via SPI*/
interface PushService {/*** Type of the push service implementation*/val type: PushServiceType/*** Priority of the push service implementation*/val priority: PushServicePriority/*** Returns if the push service implementation is available on the device*/fun isAvailable(context: Context): Boolean/*** Initializes push service*/fun initialize(context: Context)
}/*** Describes type of the push service implementation*/
interface PushServiceType {val name: Stringval description: String
}sealed class PushServicePriority(val value: Int) {object High : PushServicePriority(0)object Medium : PushServicePriority(1)object Low : PushServicePriority(2)
}
实现
然后,我们可以基于推送服务提供者实现一个通用接口。
为此,我们可以为每个实现创建一个Gradle模块。
Firebase Cloud Messaging实现示例:
package com.kurantsov.pushservice.firebaseimport android.content.Context
import android.util.Log
import com.google.android.gms.common.ConnectionResult
import com.google.android.gms.common.GoogleApiAvailability
import com.google.firebase.ktx.Firebase
import com.google.firebase.messaging.ktx.messaging
import com.kurantsov.pushservice.PushService
import com.kurantsov.pushservice.PushServiceManager
import com.kurantsov.pushservice.PushServicePriority
import com.kurantsov.pushservice.PushServiceTypeclass FirebasePushService : PushService {override val type: PushServiceType = FirebasePushServiceTypeoverride val priority: PushServicePriority = PushServicePriority.Highoverride fun isAvailable(context: Context): Boolean {val availability =GoogleApiAvailability.getInstance().isGooglePlayServicesAvailable(context)return availability == ConnectionResult.SUCCESS}override fun initialize(context: Context) {Firebase.messaging.token.addOnCompleteListener { task ->if (!task.isSuccessful) {Log.w(TAG, "Fetching FCM registration token failed", task.exception)}val token = task.resultPushServiceManager.setPushToken(token, FirebasePushServiceType)}}private companion object {const val TAG = "FirebasePushService"}
}object FirebasePushServiceType : PushServiceType {override val name: String = "FCM"override val description: String = "Firebase"
}
Amazon Device Messaging实现示例:
package com.kurantsov.pushservice.amazonimport android.content.Context
import com.amazon.device.messaging.ADM
import com.kurantsov.pushservice.PushService
import com.kurantsov.pushservice.PushServicePriority
import com.kurantsov.pushservice.PushServiceType/*** Amazon device messaging implementation of the push service*/
class AmazonPushService : PushService {override val type: PushServiceType = AmazonPushServiceTypeoverride val priority: PushServicePriority = PushServicePriority.Highoverride fun isAvailable(context: Context): Boolean {return isAmazonServicesAvailable}override fun initialize(context: Context) {val adm = ADM(context)adm.registrationId?.let { token ->handleRegistrationSuccess(token)} ?: run {adm.startRegister()}}
}object AmazonPushServiceType : PushServiceType {override val name: String = "ADM"override val description: String = "Amazon"
}/*** Returns if amazon device messaging is available on the device*/
val isAmazonServicesAvailable: Boolean by lazy {try {Class.forName("com.amazon.device.messaging.ADM")true} catch (e: ClassNotFoundException) {false}
}
实现注册
为了使实现通过SPI“可发现”,我们需要进行注册。这可以通过在META-INF/services/{接口的全限定名}中添加实现的完全限定名称来完成。这需要在提供接口实现的每个模块中完成。
Firebase实现文件示例内容:
com.kurantsov.pushservice.firebase.FirebasePushService
请注意,要将服务文件夹的完整路径包含在模块的结果AAR中,路径是:{模块路径}/src/main/resources/META-INF/services
Android Studio项目视图中的SPI注册示例

用法
最后一步是使用接口实现。以下是SPI使用示例:
import java.util.ServiceLoaderprivate fun listImplementations(context: Context) {//Loading push service implementationsval serviceLoader = ServiceLoader.load(PushService::class.java)//Logging implementationsserviceLoader.sortedBy { pusService -> pusService.priority.value }.forEach { pushService ->val isAvailable = pushService.isAvailable(context)Log.d(TAG, "Push service implementation - ${pushService.type.description}, " +"available - $isAvailable")}
}
示例输出如下:
Push service implementation - Firebase, available - true
Push service implementation - Amazon, available - false
Push service implementation - Huawei, available - true
Push service implementation - Baidu, available - true
完整代码请参考
https://github.com/ArtsemKurantsou/SPI4Android
额外内容
PushServiceManager
以下是一个更“真实”的示例,展示了PushServiceManager的用法:
package com.kurantsov.pushserviceimport android.content.Context
import android.util.Log
import java.util.ServiceLoader
import java.util.concurrent.CopyOnWriteArraySet
import java.util.concurrent.atomic.AtomicBooleanobject PushServiceManager {private const val TAG = "PushServiceManager"var pushToken: PushToken = PushToken.NotInitializedprivate setprivate val isInitialized: AtomicBoolean = AtomicBoolean(false)private val tokenChangedListeners: MutableSet<OnPushTokenChangedListener> =CopyOnWriteArraySet()private var selectedPushServiceType: PushServiceType? = nullfun initialize(context: Context) {if (isInitialized.get()) {Log.d(TAG, "Push service is initialized already")return}synchronized(this) {if (isInitialized.get()) {Log.d(TAG, "Push service is initialized already")return}performServiceInitialization(context)}}private fun performServiceInitialization(context: Context) {//Loading push service implementationsval serviceLoader = ServiceLoader.load(PushService::class.java)val selectedImplementation = serviceLoader.sortedBy { pusService -> pusService.priority.value }.firstOrNull { pushService ->val isAvailable = pushService.isAvailable(context)Log.d(TAG, "Checking push service - ${pushService.type.description}, " +"available - $isAvailable")isAvailable}if (selectedImplementation != null) {selectedImplementation.initialize(context)selectedPushServiceType = selectedImplementation.typeisInitialized.set(true)Log.i(TAG, "Push service initialized with ${selectedImplementation.type.description}")} else {Log.e(TAG, "Push service implementation failed. No implementations found!")throw IllegalStateException("No push service implementations found!")}}/*** Adds listener for the push token updates. Called immediately if token is available* already.*/fun addOnPushTokenChangedListener(listener: OnPushTokenChangedListener) {tokenChangedListeners.add(listener)val currentToken = pushTokenif (currentToken is PushToken.Initialized) {listener.onPushTokenChanged(currentToken)}}/*** Removes listener for the push token updates.*/fun removeOnPushTokenChangedListener(listener: OnPushTokenChangedListener) {tokenChangedListeners.remove(listener)}/*** Called by push service implementation to notify about push token change.*/fun setPushToken(token: String, serviceType: PushServiceType) {if (selectedPushServiceType != serviceType) {Log.w(TAG, "setPushToken called from unexpected implementation. " +"Selected implementation - ${selectedPushServiceType?.description}, " +"Called by - ${serviceType.description}")return}val initializedToken = PushToken.Initialized(token, serviceType)this.pushToken = initializedTokentokenChangedListeners.forEach { listener ->listener.onPushTokenChanged(initializedToken)}}/*** Called by push service implementation to notify about push message.*/fun processMessage(message: Map<String, String>, sender: String) {Log.d(TAG, "processMessage: sender - $sender, message - $message")}}
PushServiceInitializer
为了简化推送服务的最终集成,我们可以使用App启动库,这样“app”模块就不需要添加其他内容。
Initializer:
package com.kurantsov.pushserviceimport android.content.Context
import android.util.Log
import androidx.startup.Initializerclass PushServiceInitializer : Initializer<PushServiceManager> {override fun create(context: Context): PushServiceManager {runCatching {PushServiceManager.initialize(context)}.onFailure { e ->Log.e(TAG, "create: failed to initialize push service", e)}.onSuccess {Log.d(TAG, "create: Push service initialized successfully")}return PushServiceManager}override fun dependencies(): List<Class<out Initializer<*>>> = emptyList()private companion object {const val TAG = "PushServiceInitializer"}
}
AndroidManifest:
<?xml version="1.0" encoding="utf-8"?>
<manifest xmlns:android="http://schemas.android.com/apk/res/android"xmlns:tools="http://schemas.android.com/tools"><application><providerandroid:name="androidx.startup.InitializationProvider"android:authorities="${applicationId}.androidx-startup"android:exported="false"tools:node="merge"><meta-dataandroid:name="com.kurantsov.pushservice.PushServiceInitializer"android:value="androidx.startup" /></provider></application>
</manifest>
编译时实现选择
由于使用了推送服务实现的SPI,我们有几个模块提供了实现。要将其添加到最终的apk中,我们只需要在实现模块上添加依赖关系。
有几种方法可以在编译时添加/删除依赖项。例如:
我们可以创建几个应用程序的构建变体,并使用基于变体的依赖关系(例如,如果我们有华为变体,我们可以使用huaweiImplementation而不是implementation;这样只会为中国变体添加依赖项)。
基于编译标志进行依赖项的添加。
以下是基于标志的方法示例( app/build.gradle.kts):
dependencies {implementation(project(":push-service:core"))implementation(project(":push-service:firebase"))if (getBooleanProperty("amazon")) {implementation(project(":push-service:amazon"))}if (getBooleanProperty("huawei")) {implementation(project(":push-service:huawei"))}if (getBooleanProperty("baidu")) {implementation(project(":push-service:baidu"))}
}fun getBooleanProperty(propertyName: String): Boolean {return properties[propertyName]?.toString()?.toBoolean() == true
}
然后,我们可以在编译过程中使用命令行中的-P{标志名称}={值}来添加这些标志。以下是添加所有实现的命令示例:
gradle :app:assemble -Pamazon=true -Phuawei=true -Pbaidu=true
aar/apk中的SPI实现
您可以使用Android Studio内置的apk资源管理器验证aar/apk文件中的SPI实现。
在aar文件中,META-INF/services文件夹位于classes.jar内部。Firebase实现aar示例:
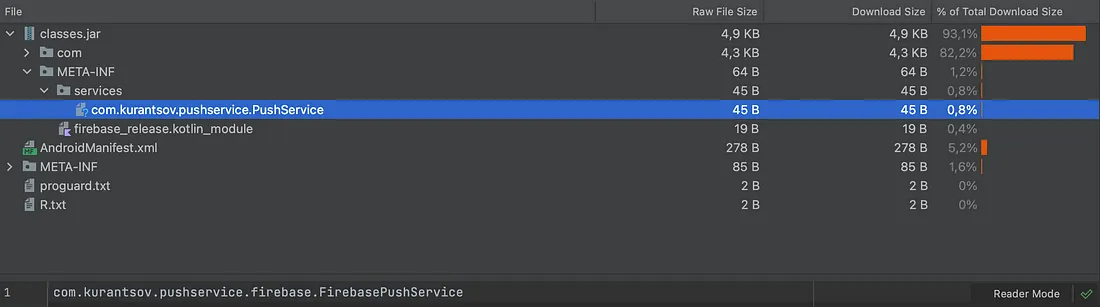
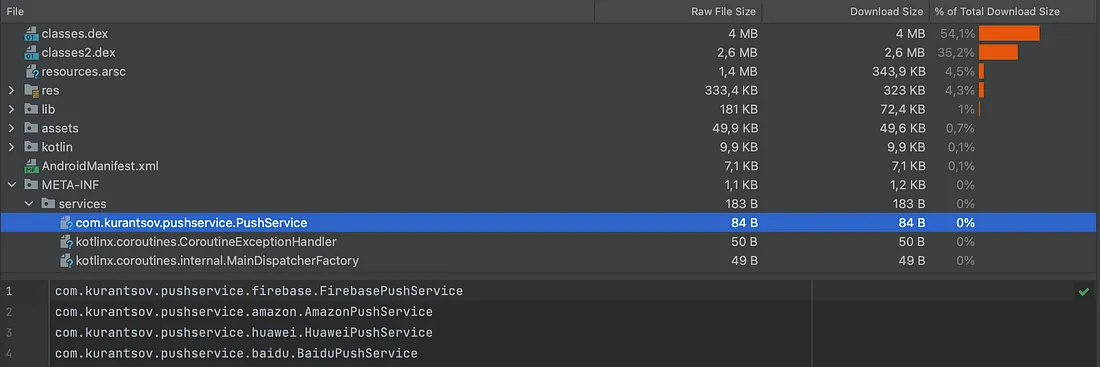
在apk文件中,META-INF/services文件夹位于apk根目录中。以下是最终apk示例:
参考链接
https://github.com/ArtsemKurantsou/SPI4Android
https://en.wikipedia.org/wiki/Service_provider_interface
https://developer.android.com/topic/libraries/app-startup