相关文章
WebKit Inside: CSS 样式表的解析
WebKit Inside: CSS 样式表的匹配时机
WebKit Inside: Acitvie 样式表
当WebView解析完所有外部与内联样式表,就要进入到CSS样式表的匹配阶段。
1 相关类图
WebKit中参与CSS样式表匹配的主要类如下图所示:
1.1 Document
Document代表将HTML文件解析后的DOM文档。
1.2 Style::Scope
Style::Scope代表整个文档里面的所有样式表。
Style::SCope里面的2个属性:
m_styleSheetsForStyleSheetList数组,存储文档里面所有的样式表。
m_activeStyleSheets数组,存储文档里所有生效的Active样式表。
有关Active样式表,可以参看《WebKit Iniside: Active 样式表》。
1.3 Style::Resolver
Style::Resolver用来对一个DOM元素Element匹配其相关样式。
ScopeRuleSets管理RuleSet。
ScopeRuleSets里面的2个属性:
m_authorStyle存储着所有「作者样式表」的StyleRule。
m_userStyle存着所有「用户样式表」的StyleRule。
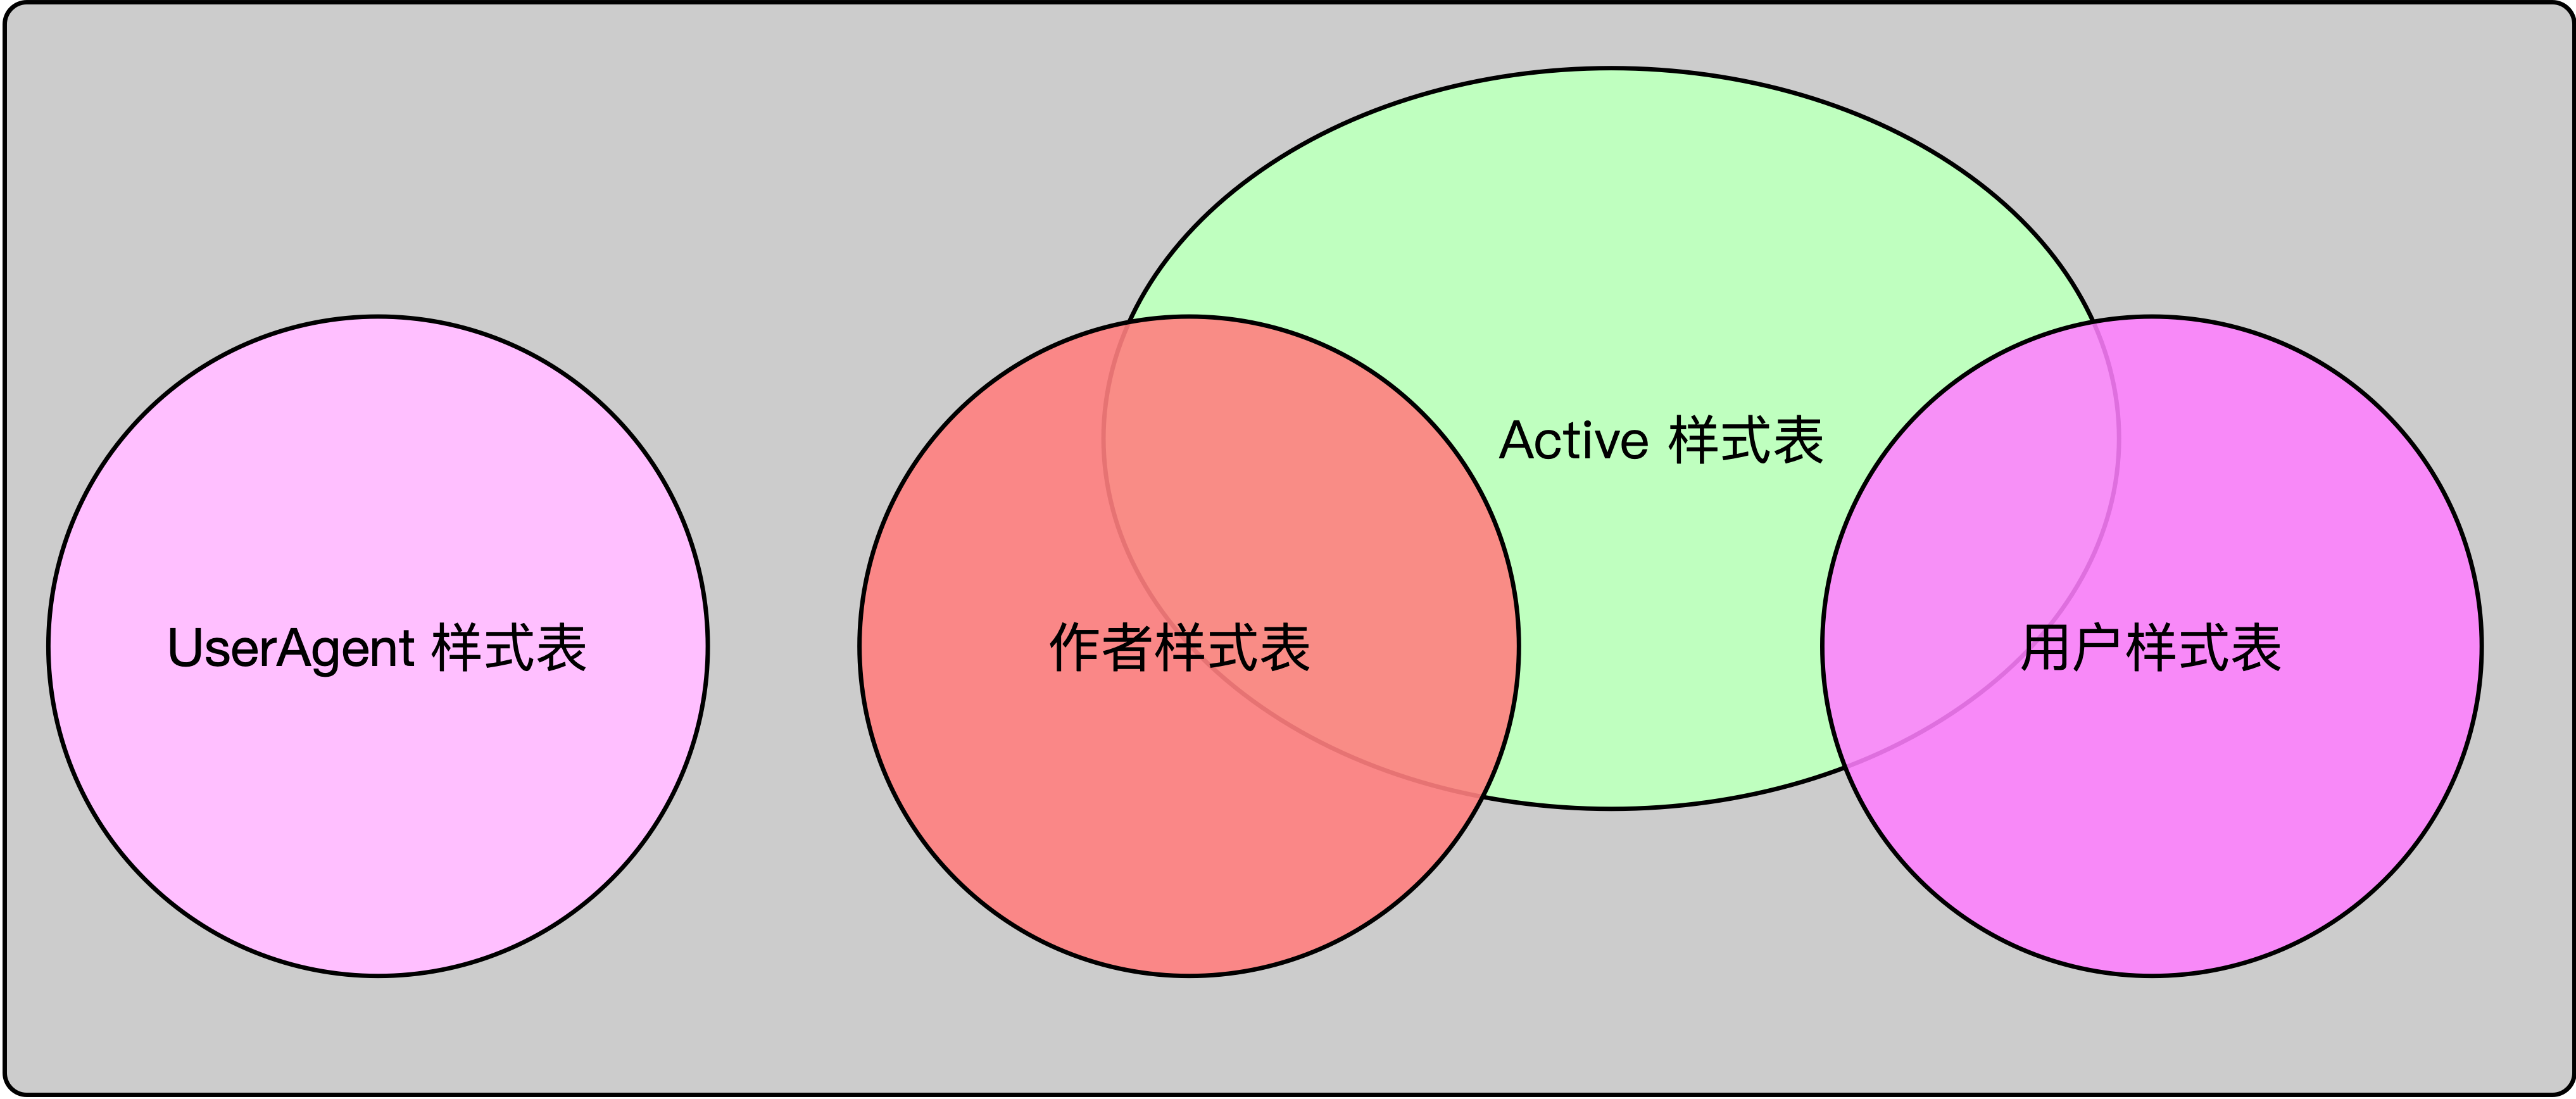
1.4 样式表的分类
在这里介绍一下:
-
UserAgent样式表 -
作者(
Author)样式表 -
用户(
User)样式表 -
Active样式表
之间的关系。
UserAgent样式表就是浏览器内置的样式表。
平时我们即使在HTML页面里面不提供任何样式表,但是显示出来的元素仍具有一些默认样式,就是UserAgent样式表的功劳。
作者样式表就是编写HTML页面的作者提供的样式表,由页面内<link> <style>标签提供。
用户样式表指浏览器通常允许网页浏览者自己编写样式表给页面使用,这样的样式表叫用户样式表。
Active样式表是那些在HTML里面真正起作用,生效的样式表。
Active样式表可能来源于作者样式表,也可能来源于用户样式表。
1.5 RuleSet
RuleSet内部分门别类存储各类StyleRule数据。
RuleSet里有许多Map。
Map的key就是StyleRule中的selector名。
Map的value是一个StyleData数组,因为一个selector可能对应多条StyleRule。
从图中可以看到,StyleData持有StyleRule。
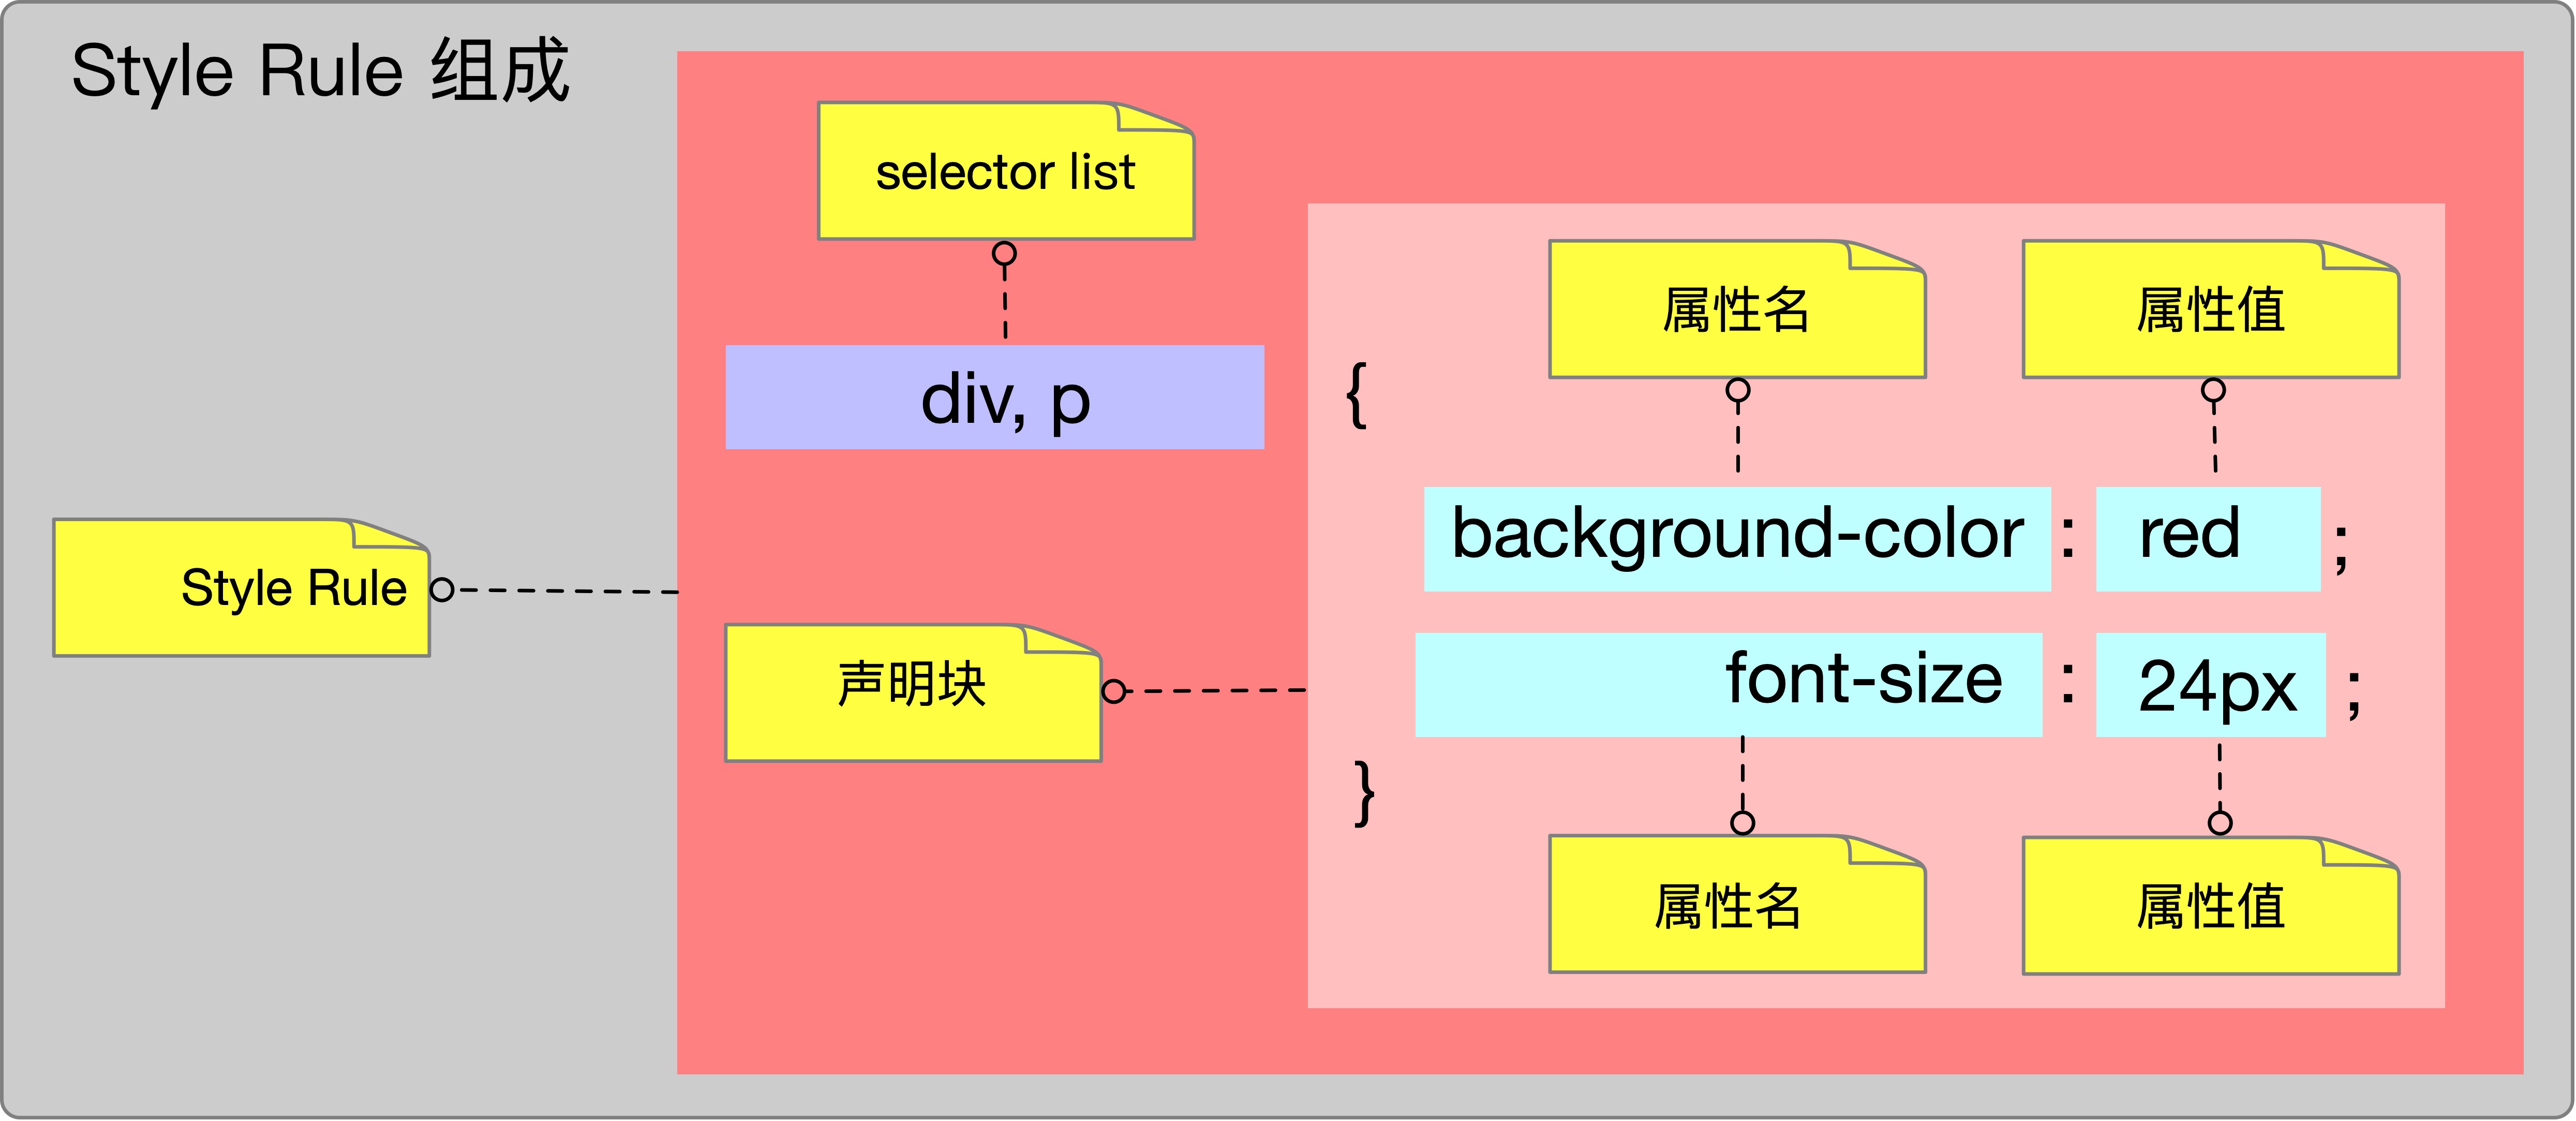
1.6 StyleRule
StyleRule就是将HTML页面里样式表解析之后的数据结构。
StyleRule的组成如下图所示:
1.7 ElementRuleCollector
ElementRuleCollector针对某一个元素Element,收集所有与这个Element相匹配的样式。
最终,所有与这个Element匹配的样式,存储在MatchResult中。
1.8 MatchResult
MatchResult存储与某个Element匹配的所有样式,实际上存储的是匹配样式的属性名和属性值。
MatchResult分3个属性分别存储:
m_userAgentDeclarations存储userAgent样式表的值。
m_authorDeclarations存储作者样式表的值。
m_userDeclarations存储用户样式表的值。
1.9 Element
Element就是要进行样式匹配的元素。
Style::TreeResolver会依次遍历整个DOM树,对DOM树上的每个Element元素进行匹配。
1.10 Style::TreeResolver
Style::TreeResolver用来遍历DOM树上的Element元素。
被遍历的Element元素,会进行样式匹配。
1.11 Styleable
Styleable在匹配中用处不大,主要是封装了Element,作为函数参数传递。
1.12 Style::Update
Style::Update将整个DOM树上,所有Element匹配的样式存储在一个Map中。
Map的key就是Element。
Map的value是ElementUpdate。
1.13 ElementUpdate
ElementUpdate封装了最后的匹配结果RenderStyle。
1.14 ResolvedStyle
ResolvedStyle主要是作为函数返回值,封装了最后的匹配结果RenderStyle。
1.15 Resolver::State
一个Element最终的匹配结果RenderStyle对象,由Resolver::State创建出来。
1.16 RenderStyle
RenderStyle存储最终的匹配结果。
为什么是最终的匹配结果?
它和MatchResult有什么区别?
MatchResult存储的都是样式表里面原始的值。
比如,如果一个样式表里面有一条关于字号的属性被匹配上:
font-size: 20pt;
那么,MatchResult里面存储的属性名是font-size,属性值是20pt。
而在RenderStyle中,存储的属性值会被计算成对应的px值。
也就是pt值被转换成了对应的px值。
1.17 Style::Builder
RenderStyle中最终的属性值,就是由Style::Builder进行转换。
1.18 PropertyCascade
PropertyCascade封装了MatchResult,用于计算RenderStyle。
1.19 BuilderState
BuilderState封装了RenderStyle,用于Style::Builder对RenderStyle的计算。
1.20 Style::BuilderGenerated
Style::Builder把最终对RenderStyle的计算,转交给Style::BuilderGenerated来完成。
CSS样式表的匹配涉及的类比较多。
清楚了这些主要类的作用,CSS匹配的大致过程基本上也就比较清楚了。
2 CSS 匹配入口
CSS匹配入口调用栈如下:
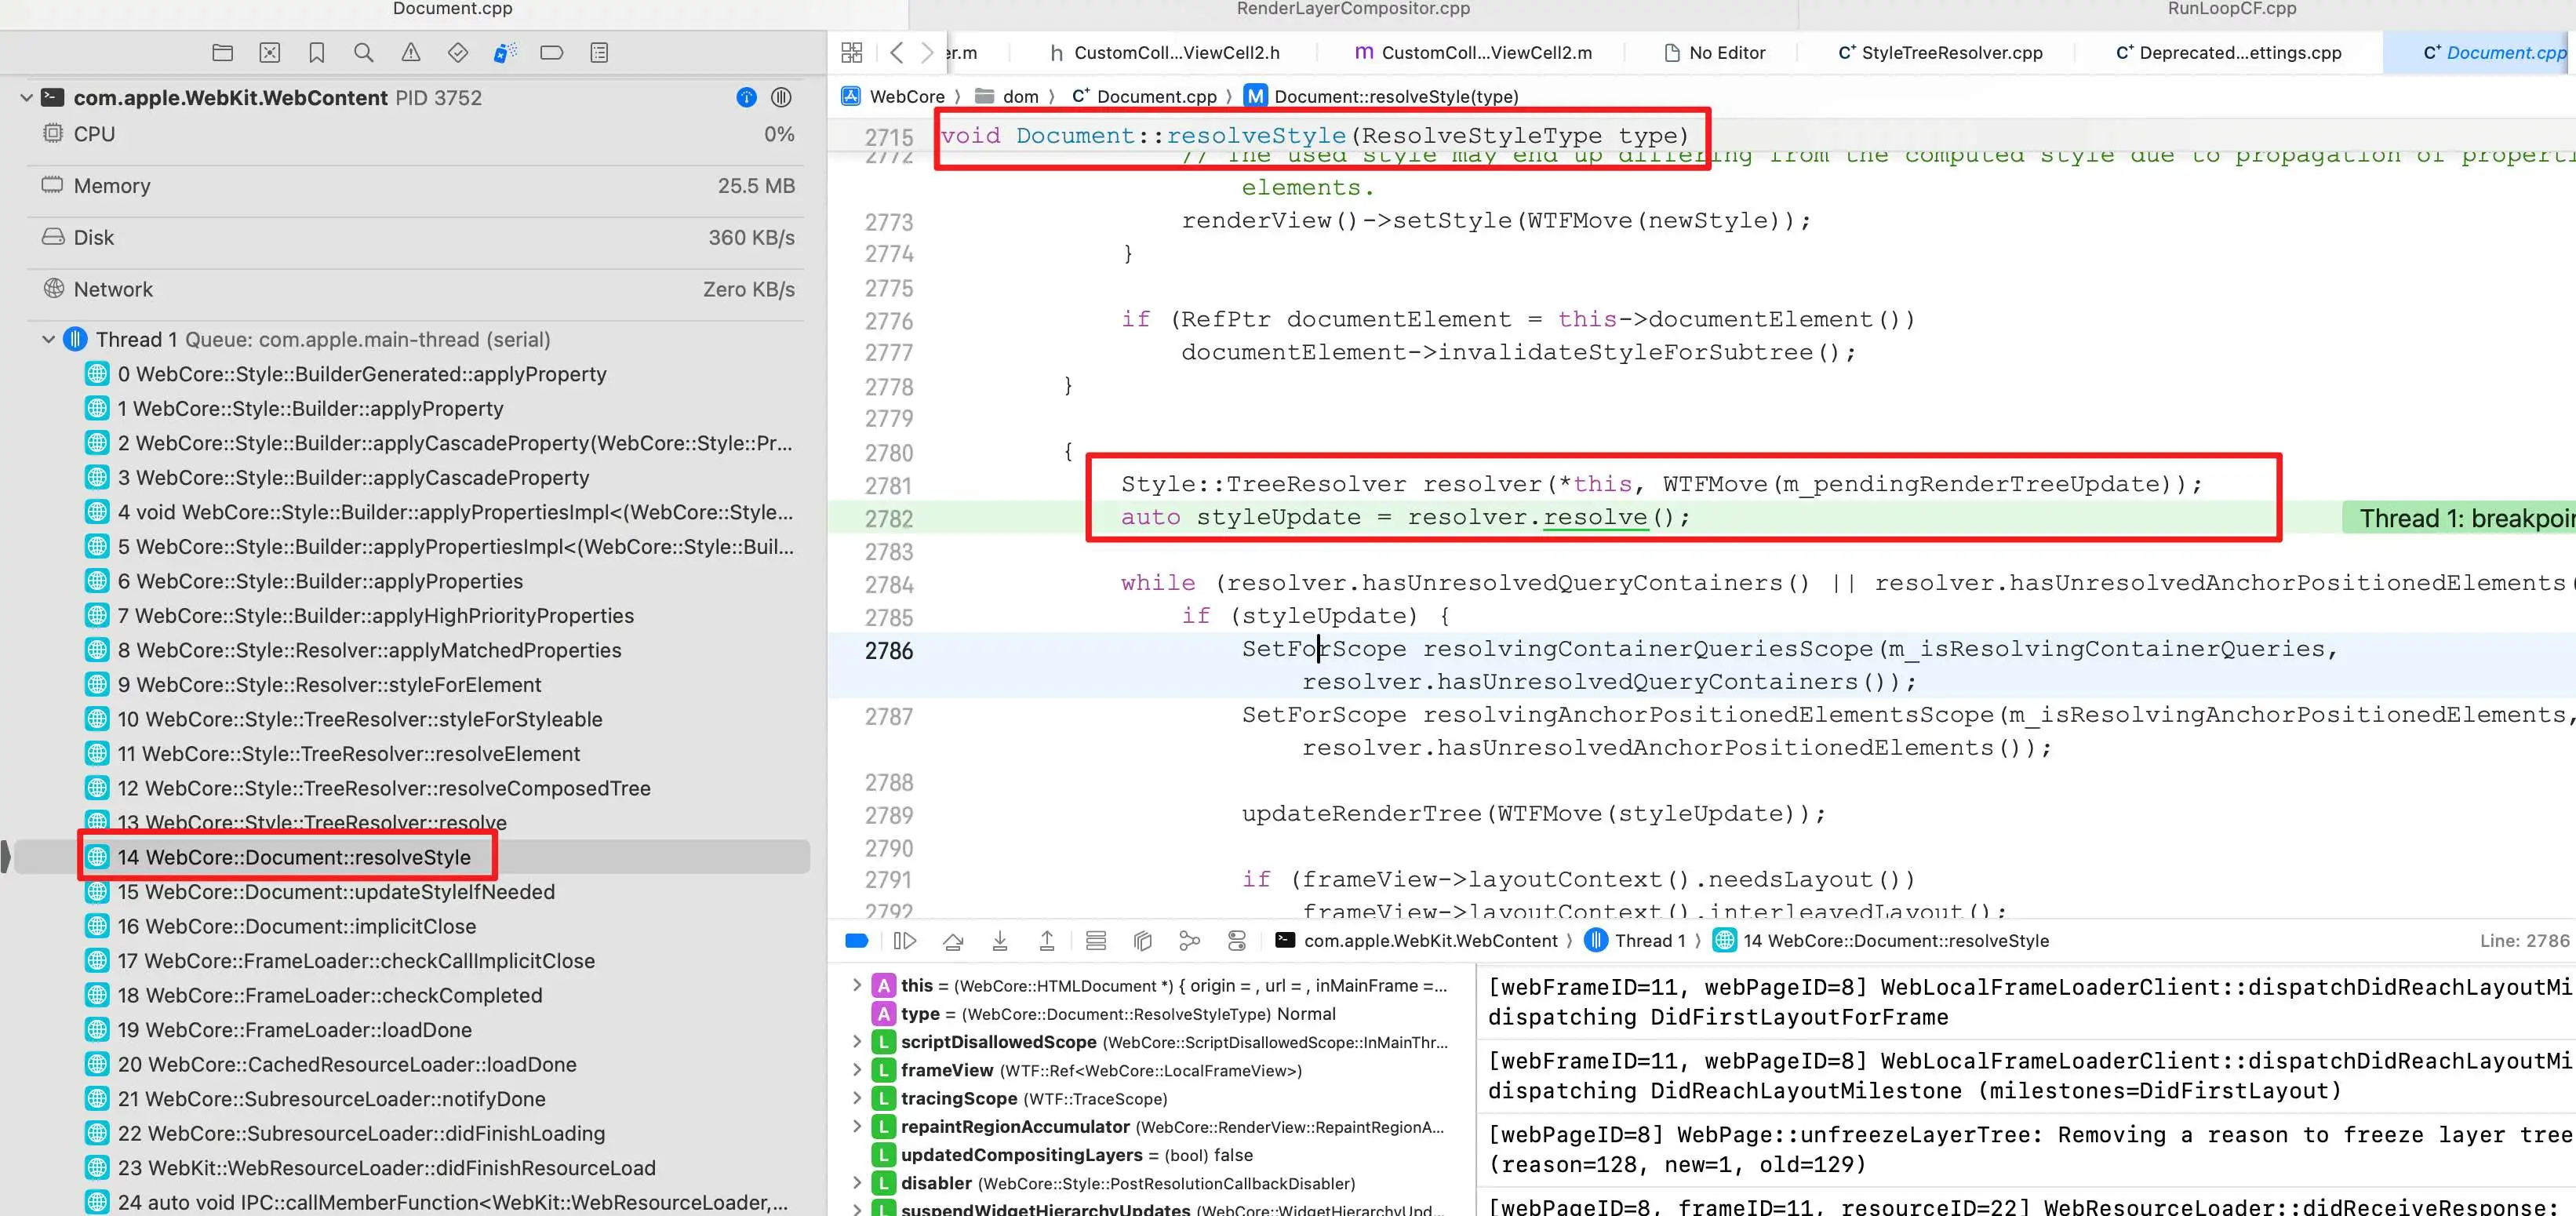
上图可以看到,CSS匹配入口的函数为:
void Document::resolveStyle(ResolveStyleType type)
这个函数内部创建Style::TreeResolver对象,开始样式的匹配:
Style::TreeResolver resolver(*this, WTFMove(m_pendingRenderTreeUpdate));
auto styleUpdate = resolver.resolve();
3 DOM 树的遍历
DOM树的遍历涉及很多栈的操作。
在遍历之前,下面函数:
std::unique_ptr<Update> TreeResolver::resolve()
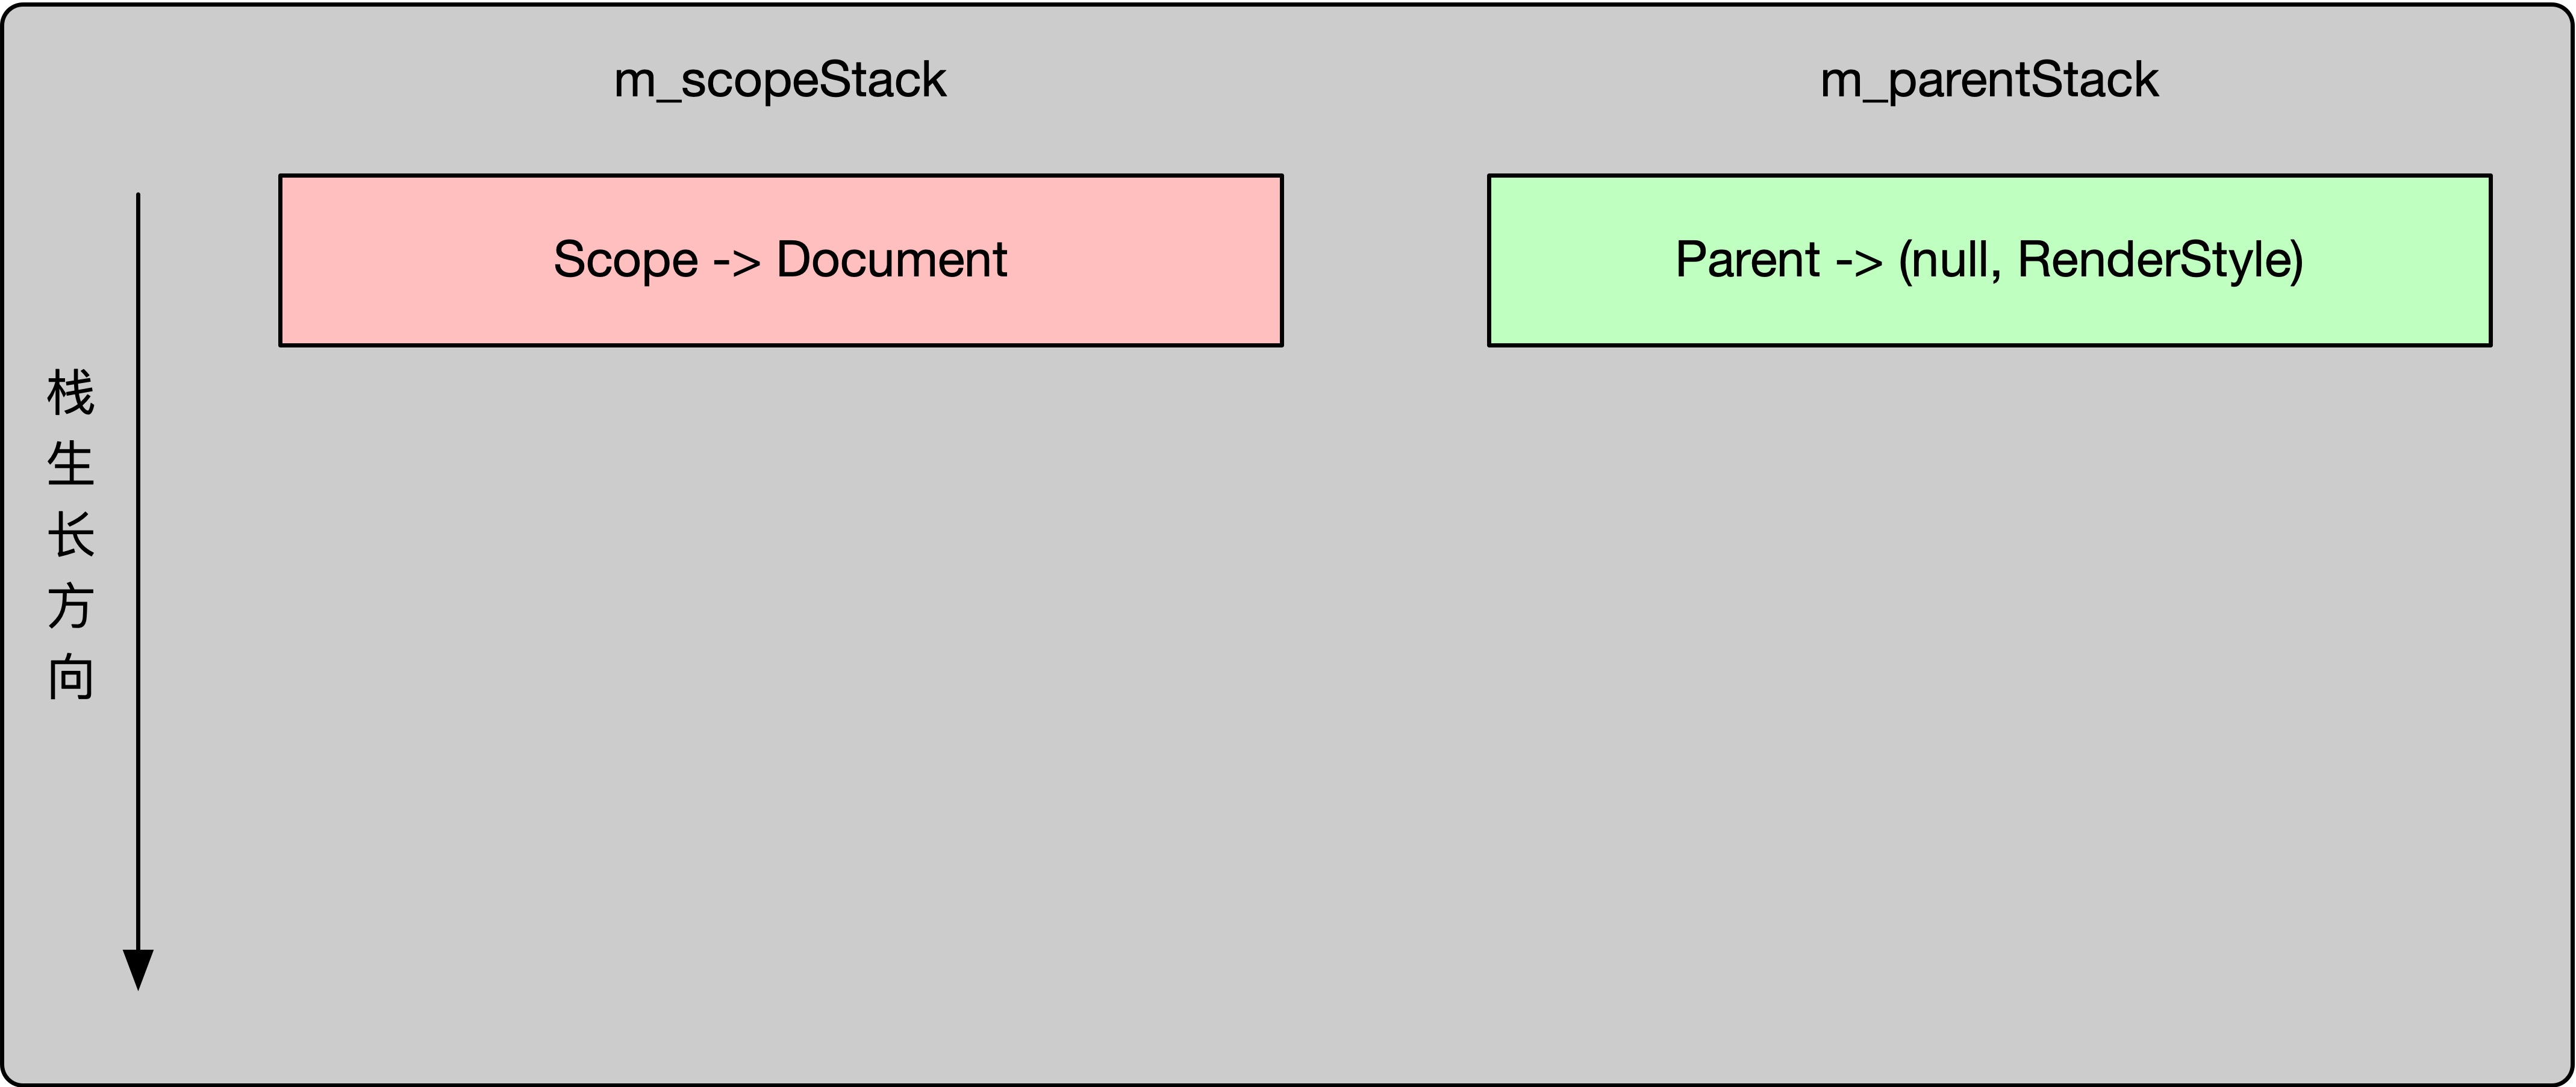
会设置2个栈:
m_scopeStack.append(adoptRef(*new Scope(m_document, *m_update)));
m_parentStack.append(Parent(m_document));resolveComposedTree();
m_scopeStack存储的是Style::TreeResolver::Scope对象。
Style::TreeResolver::Scope代表当前的样式匹配,适用的范围。
通常情况下,在整个匹配过程中,m_scopeStack栈里面会只有一个元素,也就是:
adoptRef(*new Scope(m_document, *m_update))
除非在匹配过程中遇到 Shadow DOM。
因为Shadow DOM和当前文档的样式表是隔离的,互不影响的。
m_parentStack存储的是Style::TreeResolver::Parent对象。
Style::TreeResolver::Parent代表当前正在匹配元素Element的父元素,以及这个父元素的RenderStyle对象。
在遍历之前,m_scopeStack和m_parentStack的存储值如下:
遍历DOM在下面函数中完成:
void TreeResolver::resolveComposedTree()
我们先忽略匹配过程,专门看下遍历的逻辑,关注下遍历的顺序。
首先看下与遍历相关的迭代器的类图:
类图中又引入了2个栈结构:
m_contextStack栈顶存储当前真正的迭代器实现,这个迭代器引用当前正在遍历的节点。
m_ancestorSiblingStack栈顶存储当前正在遍历节点的父节点的相邻兄弟节点。
遍历的代码如下:
void TreeResolver::resolveComposedTree()
{ASSERT(m_parentStack.size() == 1);ASSERT(m_scopeStack.size() == 1);auto descendants = composedTreeDescendants(m_document);auto it = descendants.begin();auto end = descendants.end();// 1. it 是开始迭代器,类型为 ComposedTreeIterator//    end 是结束迭代器,类型也为 ComposedTreeIterator,它内部的状态都是 nullwhile (it != end) {// 2. pop m_parentStack,直到 m_parentStack 的 size 等于当前节点的深度//    一开始遍历的时候,HTML 节点的深度为 1popParentsToDepth(it.depth());// 3. 获取正在遍历的节点auto& node = *it;// 4. 获取 m_parentStack 的栈顶元素,它是当前遍历节点的父节点auto& parent = this->parent();...// 5. Element 类继承自 Node 类,这里进行强转auto& element = downcast<Element>(node);if (it.depth() > Settings::defaultMaximumRenderTreeDepth) {resetStyleForNonRenderedDescendants(element);it.traverseNextSkippingChildren();continue;}auto* style = existingStyle(element);auto change = Change::None;auto descendantsToResolve = DescendantsToResolve::None;auto resolutionType = determineResolutionType(element, style, parent.descendantsToResolve, parent.change);if (resolutionType) {element.resetComputedStyle();...// 6. 给当前 Element 节点进行样式匹配auto [elementUpdate, elementDescendantsToResolve] = resolveElement(element, style, *resolutionType);...}...// 7. 如果当前遍历的节点没有匹配到任何样式,说明这个节点是不能渲染出来,比如 HEAD 节点if (!shouldIterateChildren) {// 8. 跳转到当前遍历节点相邻的兄弟节点,比如从 HEAD 节点跳转到 BODY 节点it.traverseNextSkippingChildren();continue;}...// 9. 如果当前节点匹配样式成功,将当前节点压入 m_parentStackpushParent(element, *style, change, descendantsToResolve, isInDisplayNoneTree ? IsInDisplayNoneTree::Yes : IsInDisplayNoneTree::No);// 10. 遍历移动到当前节点的第一个子节点it.traverseNext();}// 11. 整个 DOM 树遍历结束,pop m_parentStack 到 size = 1popParentsToDepth(1);
}
代码注释1创建了2个ComposedTreeIterator对象:it和end。
it是开始迭代器,与之相关的栈结构为:
end是结束迭代器,其内部结构都是null。
代码注释2``pop``m_parentStack,使其size等于当前遍历节点的深度。
由于开始遍历的节点是HTML节点,其深度等于1,因此这里对m_parentStack没有影响。
代码注释3从迭代器获取当前正在遍历的节点。
代码注释4从m_ParentStack获取栈顶元素。
代码注释5将当前遍历的Node节点,强转为Element,因为Element继承自Node。
代码注释6对当前遍历的Element匹配相关的样式。
代码注释7判断,如果当前遍历的节点,没有匹配到任何样式,那么,说明这个节点是不可以渲染的,比如HEAD节点。
如果出现了这种情况,就需要将当前遍历的节点移动到它的相邻兄弟节点上。
代码注释8正是做了这个操作。
代码注释9,如果当前遍历的节点正确匹配到了样式,那么,将其压入m_parentStack栈中。
代码注释10,将当前遍历的节点移动到其第一个子节点。
代码注释11,整个DOM树遍历结束,pop``m_parentStack,使其size等于1。
下图给出了一个完整DOM树完整遍历的流程:
4 匹配过程
CSS样式表匹配最终是为了获得MatchResult对象。
在上面遍历每一个DOM节点时,会经历下面的调用栈:
auto TreeResolver::resolveElement(Element& element, const RenderStyle* existingStyle, ResolutionType resolutionType) -> std::pair<ElementUpdate, DescendantsToResolve>ResolvedStyle TreeResolver::styleForStyleable(const Styleable& styleable, ResolutionType resolutionType, const ResolutionContext& resolutionContext, const RenderStyle* existingStyle)ResolvedStyle Resolver::styleForElement(Element& element, const ResolutionContext& context, RuleMatchingBehavior matchingBehavior)
上面调用栈最后一个函数的关键实现如下:
ResolvedStyle Resolver::styleForElement(Element& element, const ResolutionContext& context, RuleMatchingBehavior matchingBehavior)
{// 1. 创建 Resolver::State 对象,以及 Resolver::State 内部持有的 RenderStyle 对象auto state = initializeStateAndStyle(element, context);...// 2. 创建 ElementRuleCollector 对象,准备收集 Element 匹配的样式//    m_ruleSets 包含了页面里面所有的 StyleRuleElementRuleCollector collector(element, m_ruleSets, context.selectorMatchingState);...if (matchingBehavior == RuleMatchingBehavior::MatchOnlyUserAgentRules)collector.matchUARules();else// 3. 收集匹配的样式collector.matchAllRules(m_matchAuthorAndUserStyles, matchingBehavior != RuleMatchingBehavior::MatchAllRulesExcludingSMIL);...
}
代码注释1,创建 Resolver::State 对象,以及 Resolver::State 内部持有的 RenderStyle 对象。
在这个函数中,还会继承父元素中可继承的CSS样式:
state.style()->inheritFrom(*state.parentStyle());
代码注释2,创建ElementRuleCollector对象,准备收集Element匹配的样式。
其中,Resolver对象的属性m_ruleSets正是ScopeRuleSets,包含了页面所有的StyleRule。
代码注释3,收集匹配的样式。
代码注释3的函数,主要实现如下:
void ElementRuleCollector::matchAllRules(bool matchAuthorAndUserStyles, bool includeSMILProperties)
{// 1. 匹配 UserAgent 样式matchUARules();// Now we check user sheet rules.if (matchAuthorAndUserStyles)// 2. 匹配 UserStyle 样式matchUserRules();...if (matchAuthorAndUserStyles) {...// 3. 匹配 Author 样式collectMatchingRules(CascadeLevel::Author);// 4. 对匹配的样式根据优先级排序sortMatchedRules();....// Inline style behaves as if it has higher specificity than any rule.// 5. 添加标签里面的 style 属性addElementInlineStyleProperties(includeSMILProperties);// Rules from the host scopes override inline style.// 6. 从匹配的 StyleRule 生成 MatchResulttransferMatchedRules(DeclarationOrigin::Author);}
}
代码注释1,匹配UserAgent样式,也就是默认样式。
代码注释2,匹配UserStyle样式。
代码注释3,匹配Author样式。
代码注释4,根据匹配成功样式的优先级,进行排序。
代码注释5,添加行样式,也就是添加标签的style属性。
代码注释6,将匹配成功的StyleRule对象,转换成MatchResult对象。
4.1 收集匹配的样式
无论匹配UserAgent样式、UserStyle样式、Author样式,最终代码都会调用到上面注释3的函数:
void ElementRuleCollector::collectMatchingRules(CascadeLevel level)
匹配的总体流程大致是相似的,下面以匹配Author样式为例介绍。
ElementRuleCollector::collectMatchingRules函数的实现如下:
void ElementRuleCollector::collectMatchingRules(CascadeLevel level)
{switch (level) {case CascadeLevel::Author: {// 1. 封装所有 Author 样式表的 StyleRule 到 MatchRequestMatchRequest matchRequest(m_authorStyle);// 2. 开始收集工作collectMatchingRules(matchRequest);if (isFirstMatchModeAndHasMatchedAnyRules())return;break;}...}
}
代码注释1,m_authorStyle是一个RuleSet对象,里面包含了所有Active样式表中的StyleRule。
这里将m_authorStyle再次封装到MatchRequest对象中。
代码注释2,调用了collectMatchingRules的一个重载函数,收集MatchRequest对象中匹配的样式。
重载的collectMatchingRules主要是根据不同的CSS选择器,进行匹配样式表的收集:
void ElementRuleCollector::collectMatchingRules(const MatchRequest& matchRequest)
{....// 1. 获取要匹配的元素节点auto& element = this->element();....// We need to collect the rules for id, class, tag, and everything else into a buffer and// then sort the buffer.// 2. 获取这个元素节点上的 id 选择器auto& id = element.idForStyleResolution();if (!id.isNull())// 3. 收集这个 id 下,所有匹配的 StyleRulecollectMatchingRulesForList(matchRequest.ruleSet.idRules(id), matchRequest);if (element.hasClass()) {for (auto& className : element.classNames())// 4. 遍历这个元素节点上的所有 class 选择器,收集每一个 class 上匹配的 StyleRulecollectMatchingRulesForList(matchRequest.ruleSet.classRules(className), matchRequest);}if (element.hasAttributesWithoutUpdate() && matchRequest.ruleSet.hasAttributeRules()) {Vector<const RuleSet::RuleDataVector*, 4> ruleVectors;for (auto& attribute : element.attributes()) {// 5. 遍历这个元素节点上的所有属性选择器,将对应的 StyleRule 收集到 ruleVectors 数组if (auto* rules = matchRequest.ruleSet.attributeRules(attribute.localName(), isHTML))ruleVectors.append(rules);}for (auto* rules : ruleVectors)// 6. 收集 ruleVectors 中匹配的 StyleRulecollectMatchingRulesForList(rules, matchRequest);}...// 7. 收集 tag 标签选择器下,所有匹配的 StyleRulecollectMatchingRulesForList(matchRequest.ruleSet.tagRules(element.localName(), isHTML), matchRequest);// 8. 收集 * 通用选择器下,所有匹配的 StyleRulecollectMatchingRulesForList(matchRequest.ruleSet.universalRules(), matchRequest);
}
代码注释1,获取要匹配的元素节点。
代码注释2,获取这个元素节点上的id选择器。
代码注释3,获取这个id选择器下,所有匹配的StyleRule。
从上面的类图可以知道,RuleSet内部,已经根据不同类型的选择器,构建了对应Map,这里:
matchRequest.ruleSet.idRules(id)
就是获取了这个id关联下的所有StyleRule。
下面的各个选择器也是类似的操作。
代码注释4,遍历这个元素节点上的所有class选择器,收集匹配的StyleRule。
代码注释5 6,遍历这个元素节点上所有的属性选择器,收集匹配的StyleRule。
代码注释7,收集这个元素tag标签选择器下,所有匹配的StyleRule。
代码注释8,收集*通用选择器下,所有匹配的StyleRule。
所有的匹配操作都调用collectMatchingRulesForList,下面看下这个函数的主要实现:
void ElementRuleCollector::collectMatchingRulesForList(const RuleSet::RuleDataVector* rules, const MatchRequest& matchRequest)
{...// 1. 遍历上一步函数中,传递下来的所有`StyleRule`,用来匹配for (auto& ruleData : *rules) {...auto addRuleIfMatches = [&] (const ScopingRootWithDistance& scopingRootWithDistance = { }) {unsigned specificity;if (ruleMatches(ruleData, specificity, matchRequest.styleScopeOrdinal, scopingRootWithDistance.scopingRoot.get()))// 3. 如果当前 StyleRule 匹配成功,就将这条 StyleRule 存储下来addMatchedRule(ruleData, specificity, scopingRootWithDistance.distance, matchRequest);};...// 2. 调用 addRuleIfMatches 闭包addRuleIfMatches();...}
}
代码注释1,遍历上一步函数中,传递下来的StyleRule数组。
从前面类图知道,RuleData内部封装了StyleRule。
代码注释2,调用定义在函数内部的addRuleIfMatches闭包。
代码注释3,如果当前StyleRule匹配成功,就将这条StyleRule存储下来。
存储的函数实现如下:
inline void ElementRuleCollector::addMatchedRule(const RuleData& ruleData, unsigned specificity, unsigned scopingRootDistance, const MatchRequest& matchRequest)
{auto cascadeLayerPriority = matchRequest.ruleSet.cascadeLayerPriorityFor(ruleData);// 将结果存储在 ElementCollector 对象中的 m_matchedRules 属性中m_matchedRules.append({ &ruleData, specificity, scopingRootDistance, matchRequest.styleScopeOrdinal, cascadeLayerPriority });
}
上面函数,将匹配的一条StyleRule存储在ElementCollector对象的m_matchedRules数组中。
注意存储的时候,除了存储StyleRule数据,还存储了specificity等其他参数,这些都与样式的优先级有关。
总结一匹配过程,每一个Element,都会创建一个全新的ElementRuleCollector对象来进行匹配过程,匹配的所有StyleRule会存储在m_matchedRules数组中。
4.2 排序
获取到匹配成功的StyleRule之后,上面说过,存储在m_matchedRules的数据还有其他优先级相关的数据,为接下来的排序做准备。
排序函数的调用在上面函数:
void ElementRuleCollector::matchAllRules(bool matchAuthorAndUserStyles, bool includeSMILProperties)
介绍时的注释4处。
排序函数的实现很简单,就是调用了std的排序函数:
void ElementRuleCollector::sortMatchedRules()
{std::sort(m_matchedRules.begin(), m_matchedRules.end(), compareRules);
}
std::sort函数使用一个比较函数compareRules进行降序排序,优先级越高,排序越靠前:
static inline bool compareRules(MatchedRule r1, MatchedRule r2)
{// For normal properties the earlier scope wins. This may be reversed by !important which is handled when resolving cascade.if (r1.styleScopeOrdinal != r2.styleScopeOrdinal)return r1.styleScopeOrdinal > r2.styleScopeOrdinal;if (r1.cascadeLayerPriority != r2.cascadeLayerPriority)return r1.cascadeLayerPriority < r2.cascadeLayerPriority;if (r1.specificity != r2.specificity)return r1.specificity < r2.specificity;// Rule with the smallest distance has priority.if (r1.scopingRootDistance != r2.scopingRootDistance)return r2.scopingRootDistance < r1.scopingRootDistance;return r1.ruleData->position() < r2.ruleData->position();
}
4.3 最终的匹配结果
前面说过,最终的匹配结果是存储在MatchResult对象中的属性。
而到目前为止,得到的还是存储在m_machedRules数组中的StyleRule。
在上面介绍的函数:
void ElementRuleCollector::matchAllRules(bool matchAuthorAndUserStyles, bool includeSMILProperties)
的注释6处,会将最终的匹配结果转换成MatchResult。
转换函数主要实现如下:
void ElementRuleCollector::transferMatchedRules(DeclarationOrigin declarationOrigin, std::optional<ScopeOrdinal> fromScope)
{...for (; m_matchedRuleTransferIndex < m_matchedRules.size(); ++m_matchedRuleTransferIndex) {// 1. 遍历存储在 m_matchedRules 当中匹配的 StyleRuleauto& matchedRule = m_matchedRules[m_matchedRuleTransferIndex];...// 2. 将每一条匹配的 StyleRule 添加到 MatchResult 对象中。addMatchedProperties({matchedRule.ruleData->styleRule().properties(),static_cast<uint8_t>(matchedRule.ruleData->linkMatchType()),matchedRule.ruleData->propertyAllowlist(),matchedRule.styleScopeOrdinal,FromStyleAttribute::No,matchedRule.cascadeLayerPriority,matchedRule.ruleData->isStartingStyle()}, declarationOrigin);}
}
代码注释1,遍历存储在m_matchedRules当中匹配的StyleRule。
代码注释2,将每一条匹配的StyleRule添加到MatchResult对象中。
添加到MatchResult的函数相关代码如下:
void ElementRuleCollector::addMatchedProperties(MatchedProperties&& matchedProperties, DeclarationOrigin declarationOrigin)
{// 1. 获取 MatchResult 对象中对应的属性声明数组auto& declarations = declarationsForOrigin(declarationOrigin);...// 2. 将匹配的 StyleRule 中的属性添加到 MatchResult 对象declarations.append(WTFMove(matchedProperties));
}
代码注释1,获取MatchResult对象中对应的属性生命数组。
从前面类图知道,MatchResult对象中有3个实例变量数组,分别用来存储UserAgent样式表属性、用户样式表属性、和作者样式表属性。
这里就是根据declarationOrigin的值,来获取对应的数组,相关代码如下:
Vector<MatchedProperties>& ElementRuleCollector::declarationsForOrigin(DeclarationOrigin declarationOrigin)
{switch (declarationOrigin) {case DeclarationOrigin::UserAgent: return m_result->userAgentDeclarations;case DeclarationOrigin::User: return m_result->userDeclarations;case DeclarationOrigin::Author: return m_result->authorDeclarations;}ASSERT_NOT_REACHED();return m_result->authorDeclarations;
}
上面代码中的m_result变量就是MatchResult类型。
代码注释2,将匹配的StyleRule 中的属性添加到MathResult对象。
到这里,一个元素节点的匹配过程结束了。
5 RenderStyle
前面介绍类图时说过,MatchResult存储的都是匹配的StyleRule的原始值,而RenderStyle里面才是存储的最终计算出来的值。
比如,MatchResult中可能存储的字号是20pt,而RenderStyle会将pt转换成最终的px值。
存储到RenderStyle中的过程,就在收集完匹配的StyleRule之后:
ResolvedStyle Resolver::styleForElement(Element& element, const ResolutionContext& context, RuleMatchingBehavior matchingBehavior)
{auto state = initializeStateAndStyle(element, context);auto& style = *state.style();....ElementRuleCollector collector(element, m_ruleSets, context.selectorMatchingState);...if (matchingBehavior == RuleMatchingBehavior::MatchOnlyUserAgentRules)collector.matchUARules();else// 1. 收集匹配的 StyleRule,结果存储在 MatchResult 对象中collector.matchAllRules(m_matchAuthorAndUserStyles, matchingBehavior != RuleMatchingBehavior::MatchAllRulesExcludingSMIL);...// 2. 将最终的结果存储到 RenderStyle 中applyMatchedProperties(state, collector.matchResult());...return { state.takeStyle(), WTFMove(elementStyleRelations), collector.releaseMatchResult() };
}
代码注释1,使用ElementRuleCollector收集匹配的StyleRule,存储到MatchResult。
代码注释2,将最终结果存储到RenderStyle。
存储到RenderStyle的调用栈如下图所示:

上图右边红框,BuilderState中m_style属性就是RenderStyle类型。
6 ScopeRuleSets
虽然上面讲完了CSS样式的匹配过程,但是,还有一个重要的类没有涉及,就是ScopeRuleSets。
从前面的类图可知,ScopeRuleSets内部有2个实例变量m_auhtorStyle和m_userStyle。
这2个实例变量使用Map,根据不同的选择器分门别类的存储了所有样式表的StyleRule,匹配过程使用的StyleRule就是来自这里。
接下来,我们就来看下,ScopeRuleSets是如何被设置的。
对于我们来说,最重要的是作者样式表,下面就来看下,作者样式表是怎么设置到ScopeRuleSets的。
首先看一下相关的调用栈:
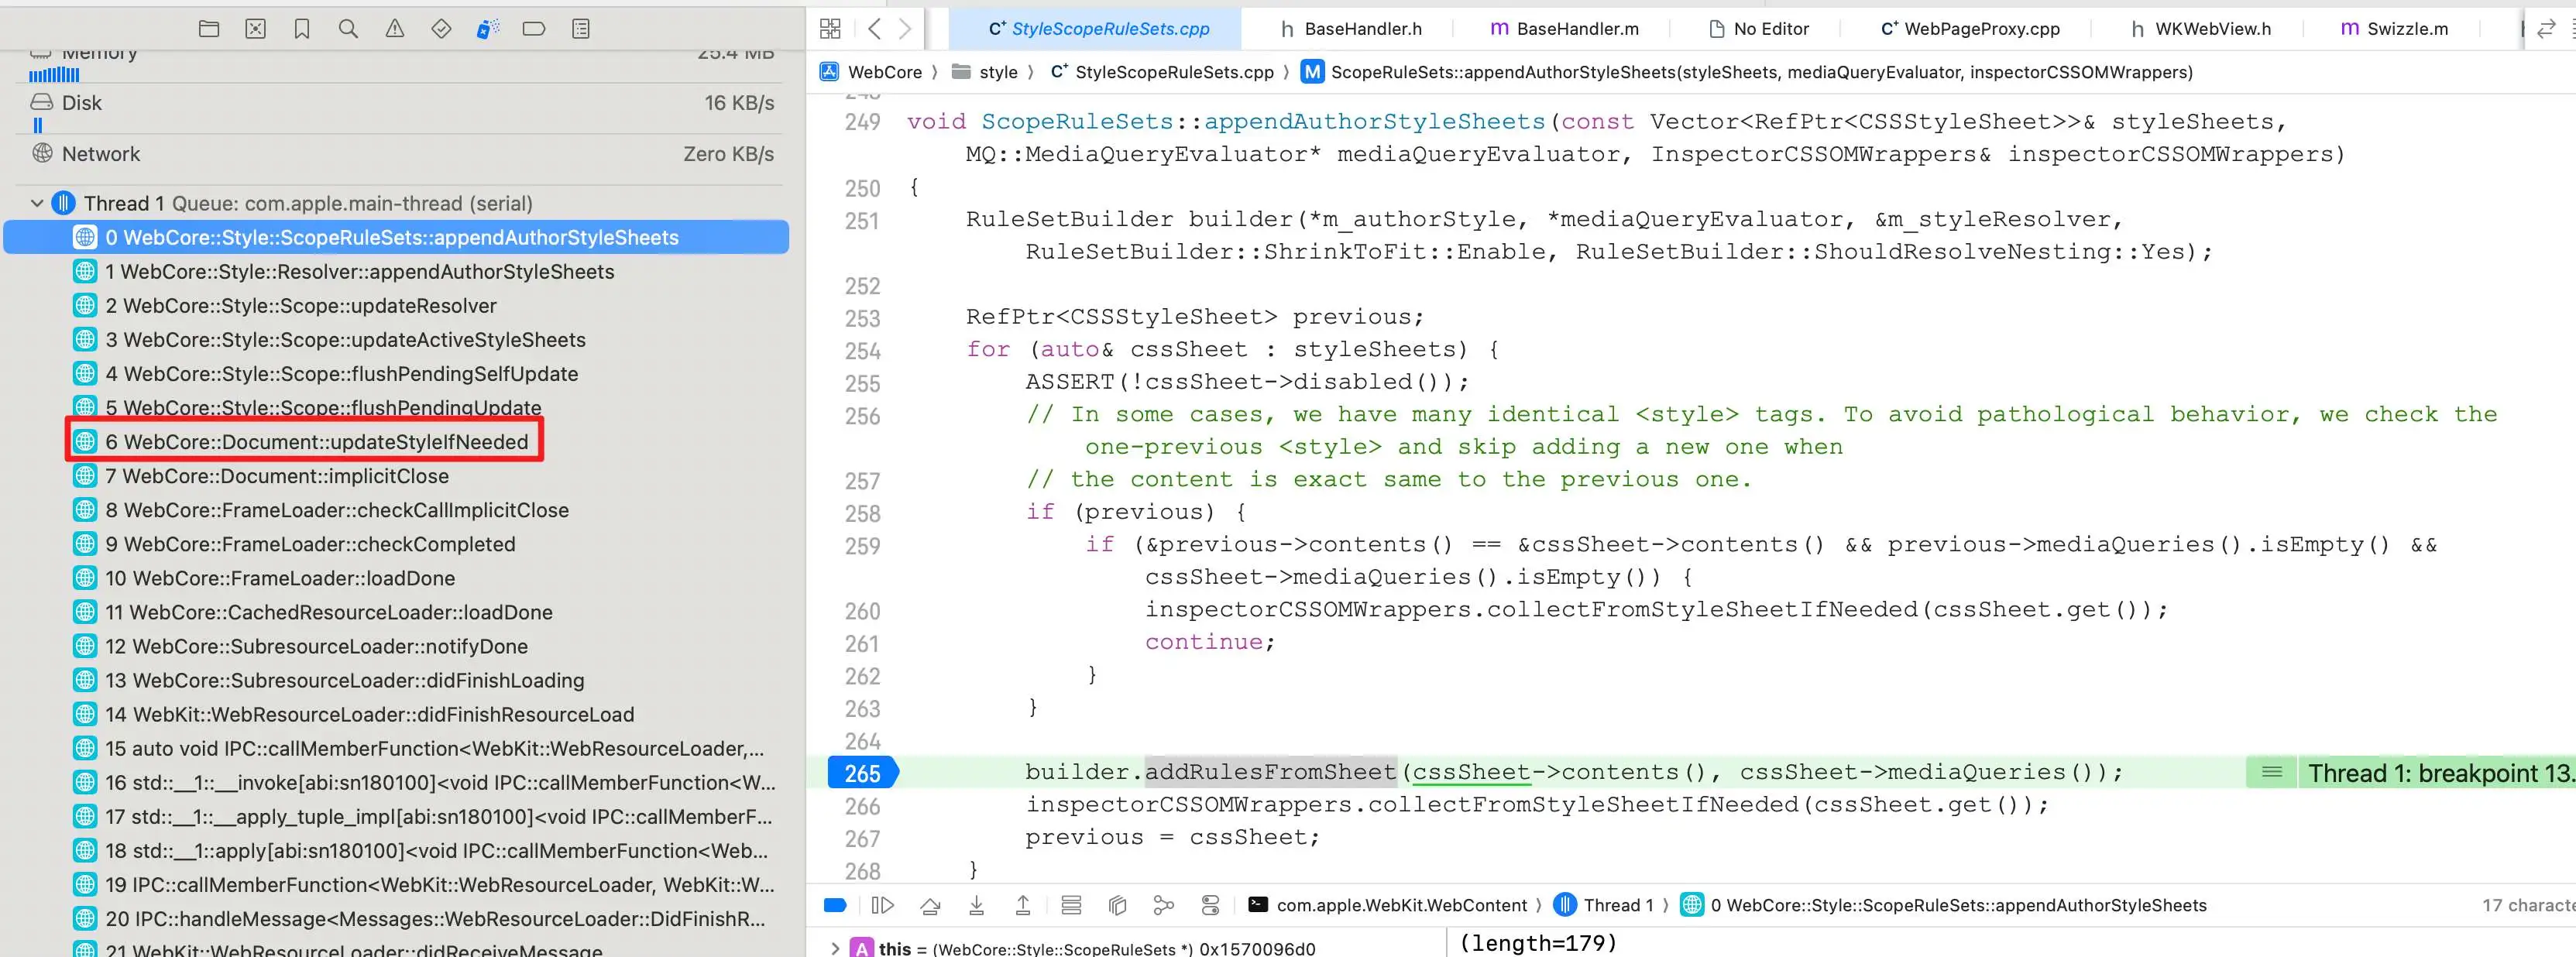
调用栈最上面的函数就是将作者样式表添加到ScopeRuleSets的地方,其主要实现为:
void ScopeRuleSets::appendAuthorStyleSheets(const Vector<RefPtr<CSSStyleSheet>>& styleSheets, MQ::MediaQueryEvaluator* mediaQueryEvaluator, InspectorCSSOMWrappers& inspectorCSSOMWrappers)
{// 1. 使用 ScopeRuleSets 的实例变量 m_authorStyle 创建一个 RuleSetBuilderRuleSetBuilder builder(*m_authorStyle, *mediaQueryEvaluator, &m_styleResolver, RuleSetBuilder::ShrinkToFit::Enable, RuleSetBuilder::ShouldResolveNesting::Yes);...for (auto& cssSheet : styleSheets) {// 2. 遍历所有的作者样式表...// 3. 将每一个张样式表中的 StyleRule 分门别类,存储到 m_authorStyle 中builder.addRulesFromSheet(cssSheet->contents(), cssSheet->mediaQueries());...}...
}
代码注释1,使用ScopeRuleSets的实例变量m_authorStyle创建一个RuleSetBuilder对象。
代码注释2,遍历所有的作者样式表。
代码注释3,将每一张作者样式表中的StyleRule 分门别类,存储到m_authorStyle中。
那上面调用栈调用的时机是什么时候呢?
从调用栈底部调用的函数可知,当页面里面所有用户样式表下载完成解析之后,就会调用上面的函数栈。
那上面调用栈和CSS匹配过程,又有怎样的关系呢?
上面函数调用栈截图左边有一个红框,这个红框里的函数首先设置ScopeRuleSets,设置完成之后,就会调用Document::resolveStyle函数,它正是匹配CSS样式的入口:
bool Document::updateStyleIfNeeded()
{...{...// 1. 设置 ScopeRuleSetsstyleScope().flushPendingUpdate();...}...// 2. 匹配 CSS 样式表的入口resolveStyle();return true;
}
代码注释1,设置ScopeRuleSets。
代码注释2,匹配CSS样式表的入口。
7 总结
从HTML解析成DOM树;
到CSS样式表的解析;
再到CSS样式表的匹配时机;
最后到CSS样式表的匹配过程。
WebKit渲染前的处理过程已经结束。
WebKit渲染树的构建正等着我们。
写到这里,总算告一小段落。
✿✿ヽ(°▽°)ノ✿
完一小结,撒花!
✿✿ヽ(°▽°)ノ✿