文章目录
- unordered_map 与 unordered_set
- 哈希表 (Hash Table)
- 哈希函数
- 哈希冲突
- 模拟实现
- 封装
- 补充:unordered_map 与 unordered_set 的使用
unordered_map 与 unordered_set
就和名字一样,这是 map、set 的无序版本(数据遍历出来是无序的),其底层不是红黑树,而是哈希表
● 为什么要设计这两个容器?
答案很简单:效率高
//我们用以下代码比较set和unordered_set的效率(测效率编译器用release版本)
#include <iostream>
#include <set>
#include <map>
#include<unordered_map>
#include<unordered_set>
#include<time.h>
#define N 1000000
int main(){set<int> s;unordered_set<int> us;srand(time(0));vector<int> v;v.reserve(N);for (int i = 0; i < N; i++) {//v.push_back(rand());//有大量重复数据时//v.push_back(rand() + i);//重复数据较少时 -- rand只能生成差不多 30000 个不同的数,通过 +i 减少重复数据v.push_back(i);//有序数据时}int begin1 = clock();for (auto e : v) {s.insert(e);}int end1 = clock();cout << "set插入用时:" << end1 - begin1 << endl;int begin2 = clock();for (auto e : v) {us.insert(e);}int end2 = clock();cout << "unordered_set插入用时:" << end2 - begin2 << endl << endl;int begin3 = clock();for (auto e : v) {s.find(e);}int end3 = clock();cout << "set查找(所有数据)用时:" << end3 - begin3 << endl;int begin4 = clock();for (auto e : v) {us.find(e);}int end4 = clock();cout << "unordered_set查找(所有数据)用时:" << end4 - begin4 << endl << endl;cout << "数据总数:" << N << endl;cout << "不同数据个数:" << s.size() << endl << endl;int begin5 = clock();for (auto e : v) {s.erase(e);}int end5 = clock();cout << "set删除(所有数据)用时:" << end5 - begin5 << endl;int begin6 = clock();for (auto e : v) {us.erase(e);}int end6 = clock();cout << "unordered_set删除(所有数据)用时:" << end6 - begin6 << endl;return 0;
}
结果:
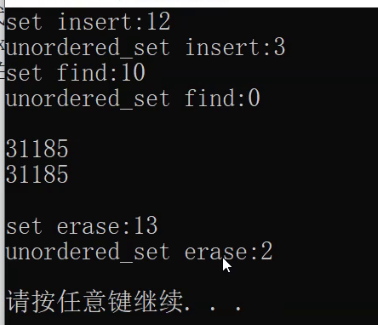
这是VS2022版本的测试结果
可以看见,除了有序以及查找所有数据的情况,unordered_set的效率都是比set高的
这是VS2019版本的测试结果:
nnd,我还以为换了个环境就能得到我想要的结果,按理说根据哈希表的特点无论是2022还是2019应该测出来unordered_set的查找应该比set要快才对,但即便我把数据增多到10000000也仍然是两个0……
也不算是一无所获……至少让我再一次明白了编译器的底层到底是什么是不能用我的常理去理解的……
这是老师的演示的结果(我们就以这个为准):
哈希表 (Hash Table)
也称散列表,其思想为让其中存储的 key 与存储位置(哈希地址)建立映射关系,如此其查找速度将会变得相当快
就比如想要统计某文章中26个字母各出现的次数,C语言期间我们可以通过 int arr[26] 数组去记录次数,下标 0 对应 a,25 对应z,如此建立起映射关系
哈希函数
哈希表建立映射关系所依赖的函数,这种转换函数称为 哈希(散列)函数
- 直接定址法
取关键字的某个线性函数为散列地址:Hash(Key)= A*Key + B - 除留余数法
%得余数 - 其他(之后如果发现有需要再补充)
哈希冲突
不同关键字通过相同哈希哈数计算出相同的哈希地址,该种现象称为哈希冲突
或哈希碰撞
解决哈希冲突两种常见的方法是:闭散列和开散列
闭散列
也称开放定址法,当发生哈希冲突时,如果哈希表未被装满,说明在哈希表中必然还有空位置,那么可以把key存放到冲突位置中的 “下一个” 空位置中去。
寻找空位置可以用线性探测(挨个或挨几个地往后找,但这样数据容易堆成一片降低效率)、二次探测(方法如其名)
这地方有人了?我给你往后找个最近的空位置坐
开散列
也称链地址法(开链法),哈希表不存储单个元素而是存储一条单链,各链表的头结点存储在哈希表中(显然每条单链上都是发生冲突的元素)
这根链子上有人挂着了?那你也挂这吧
模拟实现
简单功能的实现倒没什么难的
//实现方式一:闭散列 / 开放地址法 + 除留余数法
//开放定址法(闭散列)
namespace OpenAddress {enum State{EMPTY,EXIST,DELETE};template<class K, class V>struct HashData {pair<K, V> _kv;//一步步来,先认为是给map用的State _state = EMPTY;};template<class K, class V>class HashTable {public:bool Insert(pair<K, V> kv) {//●判断是否需要扩容 -- 依据负载因子(当前数据量/最大数据量 一般 < 0.7 或 0.8)//因为我们一开始没有给_table开空间,所以这里要加个判断if (_size == 0 || _size * 10 - _table.size() * 10 >= 7) {扩容方法一:创建新表(代码有些冗余)//int newsize = (_size == 0 ? 10 : _size * 2);//vector<HashDate<K, V>> newtable;//newtable.resize(newsize);转移旧数据(遍历旧表,按新的映射关系插入到新表中)//for (auto& e : _table) {//	if (e._state == EXIST) {//		int index = (e._kv).first % newsize;//		while (newtable[index]._state == EXIST) {//			index = (index + 1) % newtable.size();//		}//		newtable[index]._kv = e._kv;//	}//}//_table.swap(newtable);//扩容方法二:创建新哈希表,复用Insertint newsize = (_size == 0 ? 10 : _size * 2);HashTable<K, V> newhashtable;newhashtable._table.resize(newsize);for (auto e : _table) {if (e._state == EXIST)newhashtable.Insert(e._kv);}_table.swap(newhashtable._table);}//●插入int index = kv.first % _table.size();//有负载因子在不怕没空间while (_table[index]._state == EXIST) {index = (index + 1) % _table.size();//线性探测(往后一个一个找)}_table[index]._kv = kv;_table[index]._state = EXIST;_size++;return true;}HashData<K, V>* Find(const K& key) {if (_table.size() == 0)return nullptr;int hashi = key % _table.size();int index = hashi;//线性查找:从hashi下标开始往后一个一个找,遇到EMPTY状态结束,如果都找一圈了(全是删除状态)也返回while (_table[index]._state != EMPTY){if (_table[index]._state == EXIST && _table[index]._kv.first == key)return &_table[index];index = (index + 1) % _table.size();// 如果已经查找一圈,那么说明全是存在+删除if (index == hashi)break;}return nullptr;}bool Erase(const K& key){HashData<K, V>* ret = Find(key);if (ret){ret->_state = DELETE;--_size;return true;}elsereturn false;}private:vector<HashData<K, V>> _table;//哈希表(.size()表示)int _size = 0;				   //哈希表中实际存在的元素个数public:};void test_insert() {HashTable<int, int> ht;ht.Insert(make_pair(1, 5));ht.Insert(make_pair(2, 6));ht.Insert(make_pair(3, 7));cout << ht.Find(1)->_kv.second << endl;ht.Erase(1);if (ht.Find(1))cout << "1在" << endl;elsecout << "1不在" << endl;}
}
//哈西桶、链地址法(开散列)(不想手写了,所以借用了老师写的代码)
namespace HashBucket {template<class K,class V>struct HashNode{HashNode<K, V>* _next;pair<K, V> _kv;HashNode(const pair<K, V>& kv):_next(nullptr), _kv(kv){}};template<class K, class V>class HashTable {typedef HashNode<K, V> Node;public://析构函数,闭散列不写是因为vector自己就释放了,而这里不行~HashTable(){for (auto& cur : _tables){while (cur){Node* next = cur->_next;delete cur;cur = next;}cur = nullptr;}}Node* Find(const K& key){if (_tables.size() == 0)return nullptr;size_t hashi = key % _tables.size();Node* cur = _tables[hashi];while (cur){if (cur->_kv.first == key){return cur;}cur = cur->_next;}return nullptr;}bool Erase(const K& key){size_t hashi = key % _tables.size();Node* prev = nullptr;Node* cur = _tables[hashi];while (cur){if (cur->_kv.first == key){if (prev == nullptr){_tables[hashi] = cur->_next;}else{prev->_next = cur->_next;}delete cur;return true;}else{prev = cur;cur = cur->_next;}}return false;}bool Insert(const pair<K, V>& kv){if (Find(kv.first))return false;// 负载因因子==1时扩容if (_n == _tables.size()){//扩容方法一:按开放定址法的方法二一样Insert(但这里问题在于每次Insert都会开空间)/*size_t newsize = _tables.size() == 0 ? 10 : _tables.size()*2;HashTable<K, V> newht;newht.resize(newsize);for (auto cur : _tables){while (cur){newht.Insert(cur->_kv);cur = cur->_next;}}_tables.swap(newht._tables);*///扩容方法二:改变旧表数据指向,转移到新表中size_t newsize = _tables.size() == 0 ? 10 : _tables.size() * 2;vector<Node*> newtables(newsize, nullptr);//for (Node*& cur : _tables)for (auto& cur : _tables){while (cur){Node* next = cur->_next;size_t hashi = cur->_kv.first % newtables.size();// 头插到新表cur->_next = newtables[hashi];newtables[hashi] = cur;cur = next;}}_tables.swap(newtables);}size_t hashi = kv.first % _tables.size();// 头插Node* newnode = new Node(kv);newnode->_next = _tables[hashi];_tables[hashi] = newnode;++_n;return true;}private:vector<Node*> _tables; // 指针数组size_t _n = 0; // 存储有效数据个数};
}
封装
我们选择用哈希桶去进行封装
封装步骤:
- 改进哈希表:修改、增加模板参数
首先,我们知道map、set 肯定离不开key-value键值对
● 像Find这样的函数需要根据 key 去进行查找,所以Key的类型是必须知道的
——模板参数 K
● 以上是针对存储pair数据实现的哈希表,而现在你要存储不同数据
—— 模板参数 T 表示
● unordered_map存储pair<int ,char>这种 key-value 键值对,想要获取key则需要从存储的T中取出first;unordered_set存储int之类的类型,存储的T就是key,能直接取到
——获取key的方法不同,需要仿函数 KeyOfT 去指导获取key
● 哈希表里存储数据和位置之间的关系是计算来的,上面存储pair,我们就其中的first去计算,但我们这里默认了first就是整形,如果这是string呢?
——模板参数 HashiFunc ,用于将key转换为整形,用于计算数据在哈希表中映射的位置
- 增添哈希表迭代器
模板参数:const迭代器模板参数三兄弟 T Ref Ptr,此外哈希表的迭代器++操作时是需要用 key 去计算数据当前所处位置的
—— K、KeyOfT、HashiFunc
还要注意迭代器的成员变量
- 其他注意事项
函数返回值、unordered_set与unordered_map默认支持整形和string类型转换去计算哈希表映射位置、unordered_set与unordered_map的普通迭代器与const迭代器……
Hash.h
#include<vector>
#include<iostream>
using namespace std;
template<class T>
struct HashNode{HashNode<T>* _next;T _data;HashNode(const T& data):_next(nullptr), _data(data){}
};
//因为迭代器里需要哈希表的指针,所以需要前置声明哈希表
template<class K, class T, class KeyOfT, class Hash>
class HashTable;//老师似乎并没有给哈希表设置const迭代器,是因为这么写模板参数太多了吗?
template<class K, class Ref, class Ptr, class T, class KeyOfT, class HashiFunc>
// ++时需要计算当前哈希位置,故需要得知哈希表的大小
//可以整一个函数去访问哈希表的里的_tables,但这里我们试试用友元解决这个问题
struct __HashIterator {typedef __HashIterator<K, Ref, Ptr, T, KeyOfT, HashiFunc> Self;typedef HashNode<T> Node;//! ++计算时肯定需要_table里的元素,因此你需要让迭代器能访问到所处的哈希表typedef HashTable<K, T, KeyOfT, HashiFunc> HT;Node* _pnode;HT* _pht;__HashIterator(Node* pnode, HT* pht)//迭代器的初始化一般就是begin这些函数了,到时候传参数构造就行:_pnode(pnode), _pht(pht){}typedef __HashIterator<K, T&, T*, T, KeyOfT, HashiFunc> Iterator;__HashIterator(const Iterator& it):_pnode(it._pnode),_pht(it._pht){}bool operator!=(const Self& s) {return _pnode != s._pnode;}T& operator*() {return _pnode->_data;}T* operator->() {return &_pnode->_data;//自己的碎碎念:记得之前学过这么写是因为编译器会优化,使用时看似一个->实则两个,但这里写的……真的是两个->而不是一个->加一个*吗}Self& operator++() {if (_pnode->_next != nullptr) {_pnode = _pnode->next;}//去寻找下一个有数据的哈希桶else {KeyOfT kot;size_t hashi = kot(_pnode->data) % _pht->_tables.size();while (hashi < _pht->_tables.size()) {if (_pht->_tables[hashi] == nullptr) {hashi++;}else {_pnode = _pht->_tables[hashi];return *this;}}//后面没数据了_pnode = nullptr;return *this;}}
};
template<class K>
struct hashifunc {size_t operator()(const K& key) {return key;}
};
//类模板特化(string)
template<>
struct hashifunc<string> {size_t operator()(const string& s) {size_t hashi = 0;for (auto ch : s) {hashi += ch;hashi *= 31;//只是将每个字符的ASCII码值相加岂不是换个顺序就哈希冲突了?通过乘一个数解决这个问题(为什么是31?我不到啊)}return hashi;}
};template<class K, class T,class KeyOfT,class HashiFunc>//HashiFunc为仿函数,用于将传入的K转换为整形,以供hashi的计算
class HashTable {template<class K, class Ref, class Ptr, class T, class KeyOfT, class HashiFunc>friend struct __HashIterator;typedef HashNode<T> Node;
public://析构函数,闭散列不写是因为vector自己就释放了,而这里不行~HashTable(){for (auto& cur : _tables){while (cur){Node* next = cur->_next;delete cur;cur = next;}cur = nullptr;}}bool Erase(const K& key){HashiFunc hash;//一定记住仿函数得先实例化才能用啊淦size_t hashi = hash(key) % _tables.size();KeyOfT kot;Node* prev = nullptr;Node* cur = _tables[hashi];while (cur){if (kot(cur->_data) == key){if (prev == nullptr){_tables[hashi] = cur->_next;}else{prev->_next = cur->_next;}delete cur;_n--;return true;}else{prev = cur;cur = cur->_next;}}return false;}typedef __HashIterator<K, K&, K*, T, KeyOfT, HashiFunc> iterator;typedef __HashIterator<K, const K&, const K*, T, KeyOfT, HashiFunc> const_iterator;iterator begin() {//先找到有数据的哈希桶for (auto e : _tables) {if (e) {return iterator(e, this);}}return iterator(nullptr, this);}iterator end() {return iterator(nullptr, this);}const_iterator begin() const{//先找到有数据的哈希桶for (auto e : _tables) {if (e) {return iterator(e, this);}}return const_iterator(nullptr, this);}const_iterator end() const{return const_iterator(nullptr, this);}iterator Find(const K& key){if (_tables.size() == 0)return end();HashiFunc hash;size_t hashi = hash(key) % _tables.size();KeyOfT kot;Node* cur = _tables[hashi];while (cur){if (kot(cur->_data) == key) {return iterator(cur, this);}cur = cur->_next;}return end();}pair<iterator, bool> Insert(const T& data){HashiFunc hash;KeyOfT kot;iterator it = Find(kot(data));if (it != end()){return make_pair(it, false);}// 负载因因子==1时扩容if (_n == _tables.size()){//扩容方法一:按开放定址法的方法二一样Insert(但这里问题在于每次Insert都会开空间)/*size_t newsize = _tables.size() == 0 ? 10 : _tables.size()*2;HashTable<K, V> newht;newht.resize(newsize);for (auto cur : _tables){while (cur){newht.Insert(cur->_kv);cur = cur->_next;}}_tables.swap(newht._tables);*///扩容方法二:改变旧表数据指向,转移到新表中size_t newsize = _tables.size() == 0 ? 10 : _tables.size() * 2;vector<Node*> newtables(newsize, nullptr);//for (Node*& cur : _tables)for (auto& cur : _tables){while (cur){Node* next = cur->_next;size_t hashi = hash(kot(cur->_data)) % newtables.size();//HashFunc用于这种求数据在哈希表映射位置的情况// 头插到新表cur->_next = newtables[hashi];newtables[hashi] = cur;cur = next;}}_tables.swap(newtables);}size_t hashi = hash(kot(data)) % _tables.size();// 头插Node* newnode = new Node(data);newnode->_next = _tables[hashi];_tables[hashi] = newnode;++_n;return make_pair(iterator(newnode, this), true);}
private:vector<Node*> _tables; // 指针数组size_t _n = 0; // 存储有效数据个数
};
unordered_map.h
#pragma once
template<class K, class V, class HashiFunc = hashifunc<K>>
class unordered_map {
public:struct MapKeyOfT {const K& operator()(const pair<const K,V>& kv) {return kv.first;}};typedef typename HashTable<K, pair<const K, V>, MapKeyOfT, HashiFunc>::iterator iterator;typedef typename HashTable<K, pair<const K, V>, MapKeyOfT, HashiFunc>::const_iterator const_iterator;iterator begin() {return _ht.begin();}iterator end() {return _ht.end();}const_iterator begin() const{return _ht.begin();}const_iterator end() const{return _ht.end();}pair<iterator, bool> Insert(const pair<const K,V>& kv) {return _ht.Insert(kv);}bool Erase(const K& key) {return _ht.Erase(key);}iterator Find(const K& key) {return _ht.Find(key);}V& operator[](const K& key){pair<iterator, bool> ret = insert(make_pair(key, V()));return ret.first->second;}
private:HashTable<K, pair<const K, V>, MapKeyOfT, HashiFunc> _ht;
};
void test_unordered_map() {unordered_map<string, int> um;um.Insert(make_pair("好耶", 4));um.Insert(make_pair("不好", 5));um.Insert(make_pair("我去", 6));um.Erase("好耶");if (um.Find("好耶") != um.end()) cout << "存在" << endl;else cout << "不存在" << endl;cout << (*um.Find("我去")).second << endl;
}
unordered_set.h
#pragma once
template<class K, class HashiFunc = hashifunc<K>>
class unordered_set {
public:struct MapKeyOfT {const K& operator()(const K& key) {return key;}};//typedef typename HashTable<K, const K, MapKeyOfT, HashiFunc>::iterator iterator;//这么写要搭配HashTable<K, const K, MapKeyOfT, HashiFunc> _ht;食用typedef typename HashTable<K, K, MapKeyOfT, HashiFunc>::const_iterator iterator;typedef typename HashTable<K, K, MapKeyOfT, HashiFunc>::const_iterator const_iterator;iterator begin() {return _ht.begin();//和封装set时遇到的问题一样}iterator end() {return _ht.end();}const_iterator begin() const{return _ht.begin();}const_iterator end() const{return _ht.end();}pair<iterator, bool> Insert(const K& key) {return _ht.Insert(key);}bool Erase(const K& key) {return _ht.Erase(key);}iterator Find(const K& key) {return _ht.Find(key);}
private:HashTable<K, K, MapKeyOfT, HashiFunc> _ht;
};
void test_unordered_set() {unordered_set<int> um;um.Insert(1);um.Insert(3);um.Insert(4);um.Erase(1);if (um.Find(1) != um.end()) cout << "存在" << endl;else cout << "不存在" << endl;cout << *um.Find(3) << endl;
}
test.cpp
#define _CRT_SECURE_NO_WARNINGS
#include"Hash.h"
#include"unordered_map.h"
#include"unordered_set.h"
#include<string>
int main() {test_unordered_map();test_unordered_set();return 0;
}
补充:unordered_map 与 unordered_set 的使用
● 查找或是使用[]向unordered_map 中插入 key,如果成功了返回相应位置的迭代器,那失败了该如何确定呢?
就像我们上面实现的一样,失败了返回end()
● 想要查看某数据是否存在且不用 find 函数?
size_type count ( const key_type& k ) const;//有则返回 1,无则返回 0


