文章目录
- 线程的状态与切换
- 一、线程的状态
- 1、操作系统层面(5种)
- 2、Java_API层面(6种)
- 二、让出时间片 - yield
- 三、线程插队 - join
- 1、源码分析
- 2、应用1 - 等待线程结果
- 3、应用2 - 控制执行顺序
- 四、计时等待 - sleep
- 五、等待唤醒 - wait & notify
- 1、相关API
- 2、工作原理
- 3、wait 和 sleep 的区别
- 4、案例 - 基本使用
- 5、案例 - if 还是 while
- 6、案例 - 交替打印奇偶数
- 7、案例 - 生产者消费者
- 六、等待唤醒 - park & unpark
- 1、相关API
- 2、使用案例
- 3、工作原理
- 4、park 和 wait 的区别
- 七、等待唤醒 - Condition
- 1、相关API
- 2、使用案例 - 顺序打印
- 八、线程中断 - interrupt & stop
- 1、中断线程的两种方式
- 1)stop
- 2)interrupt
- 2、中断相关API
- 1)interrupt
- 2)isInterrupted
- 3、打断正常运行的线程
- 4、打断sleep、wait、join的线程
- 1)打断 sleep
- 2)打断 wait
- 3)打断 join
- 5、打断 park 的线程
- 6、案例:两阶段中止模式
- 九、线程状态与切换小结
线程的状态与切换
一、线程的状态
线程的状态指的是:线程在执行过程中所处的不同阶段。
1、操作系统层面(5种)
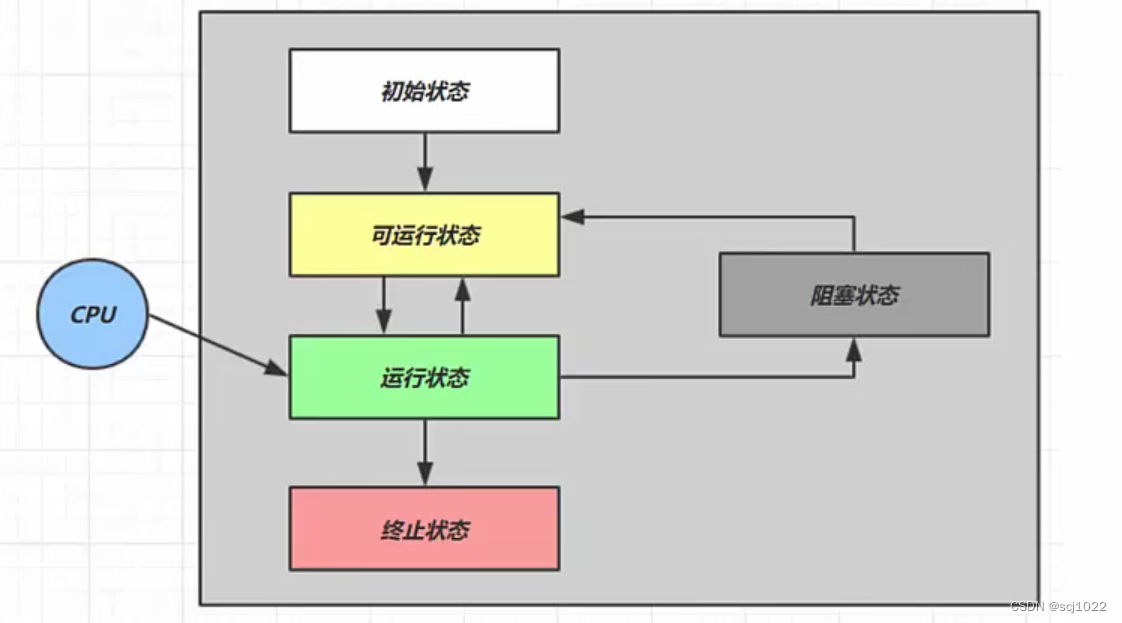
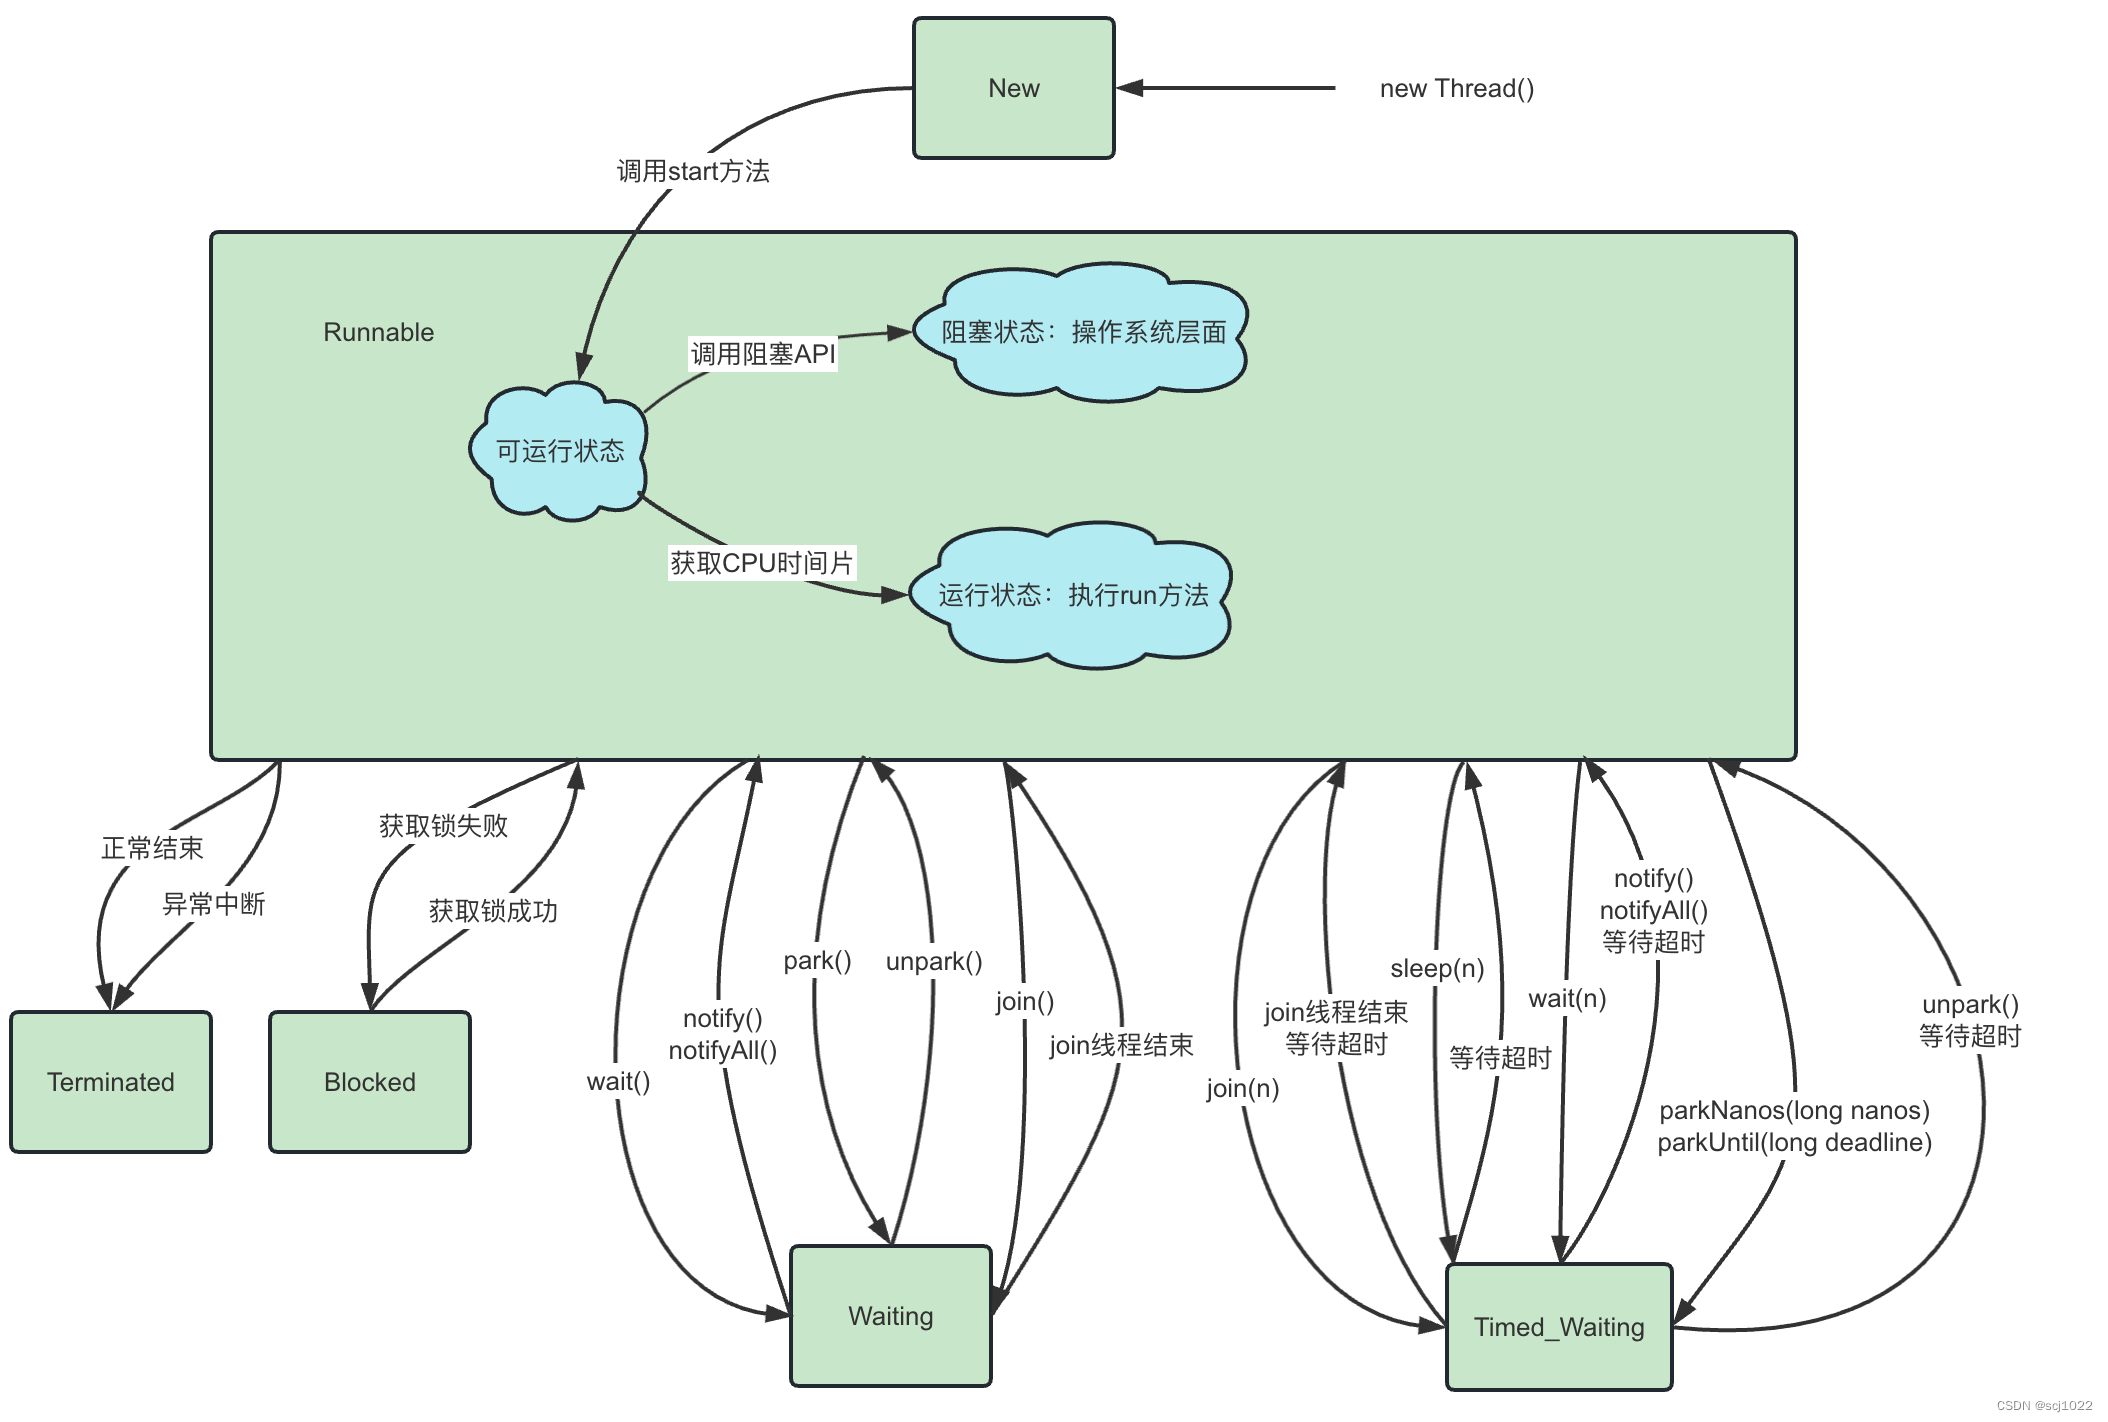
从操作系统层面,线程可分为 5种 状态:
-
初始状态
仅仅是在语言层面上创建了线程对象,还未与操作系统线程关联。
-
可运行状态
线程已创建,并且与操作系统相关联,可以由CPU调度执行。
当被cpu分配了时间片,会从
可运行状态转换至运行状态 -
运行状态
线程获取了cpu时间片,正在运行。
当cpu时间片用完,会从
运行状态转换至可运行状态,发生上下文切换。 -
阻塞状态
如果调用了阻塞API,如BIO读写文件,线程就会进入
阻塞状态如果调用了唤醒API,会由操作系统唤醒阻塞的线程,转换至
可运行状态与
可运行状态的区别是:任务调度器不会分配时间片给阻塞状态的线程 -
终止状态
表示线程已经执行完毕,生命周期已经结束,不会再转换为其它状态。
2、Java_API层面(6种)

在java.lang.Thread.State枚举类中,给出了6种线程状态:
-
NEW - 新建
线程对象刚被创建(
new Thread()),还没有开始执行(调用start()方法) -
RUNNABLE - 可运行/就绪
-
可运行状态调用了
start()方法,Java的线程对象就和操作系统的线程关联起来,CPU就可以调度线程执行run()方法。 -
运行状态线程获得了CPU时间片,真正开始执行
run()方法。 -
阻塞状态调用了操作系统的阻塞API(注意:这里的阻塞是操作系统层面的,和 BLOCKED 不一样)
-
-
BLOCKED - 阻塞
当线程试图获取一个锁对象,而该对象锁被其他线程持有时,该线程会进入
阻塞状态(获取到锁则变为可运行状态) -
WAITING - 无限等待
线程因为调用了不带超时参数的
wait()、join()方法而被挂起,进入无限等待状态。必须等 其他线程调用
notify或notifyAll方法唤醒 或join的线程执行完,才会变为可运行状态 -
TIMED_WAITING - 计时等待
线程因为调用了带有超时参数的
wait()、sleep()或者join()方法而被挂起,进入计时等待状态。这一状态会一直保持到 设置的时间到达 或 接收到唤醒通知
notify/notifyAll。 -
TERMINATED - 死亡/终止
线程 执行完其任务 或者 因异常退出而结束。
二、让出时间片 - yield
Thread类的静态方法 yield(),该方法会使当前线程让出CPU的使用权。
// 使当前线程主动让出当前CPU时间片,回到「可运行状态」,等待分配时间片。
public static native void yield();
yield() 方法的调用不会导致当前线程阻塞,它只是让当前线程暂停执行,转变为可运行状态。因此,执行完yield() 方法之后,两个线程可能会交替执行,也可能一个线程执行完了才轮到另一个线程执行,这取决于操作系统的调度策略。
三、线程插队 - join
Thread类的方法join(),会使当前线程阻塞,等待调用join方法的线程运行(插队),可以控制线程执行顺序。
// 等待调用join方法的线程运行,直到该线程运行结束(默认millis=0)
public final void join() throws InterruptedException {join(0);
}// 等待调用join方法的线程运行,最多等待n毫秒
public final synchronized void join(long millis) throws InterruptedException {...}
1、源码分析
public final synchronized void join(long millis) throws InterruptedException {// 开始时间long base = System.currentTimeMillis();// 经历的时间long now = 0;if (millis < 0) {throw new IllegalArgumentException("timeout value is negative");}if (millis == 0) {// 判断插队线程是否执行结束while (isAlive()) {wait(0);}} else {while (isAlive()) {// 剩余等待时间 = 最大等待时间 - 经历的时间long delay = millis - now;if (delay <= 0) {break;}// 此处不为 millis 是为了避免虚假唤醒导致多余等待wait(delay);now = System.currentTimeMillis() - base;}}
}
2、应用1 - 等待线程结果
public class GetResult {static int result = 0;public static void main(String[] args) throws InterruptedException {Thread t1 = new Thread(() -> {try {Thread.sleep(1000);result = 100;} catch (InterruptedException e) {e.printStackTrace();}}, "t1");t1.start();// 等待t1线程执行结束再获取结果t1.join();System.out.println(result);}
}
3、应用2 - 控制执行顺序
现在有T1、T2、T3三个线程,怎样保证T2在T1执行完后执行,T3在T2执行完后执行
public class RunInOrder {public static void main(String[] args) {Thread t1 = new Thread(() -> {System.out.println("t1线程开始执行");for (int i = 0; i < 10; i++) {System.out.println("t1 ========> " + i);}});Thread t2 = new Thread(() -> {// t2线程执行时,t1线程插队try {t1.join();} catch (InterruptedException e) {e.printStackTrace();}for (int i = 0; i < 10; i++) {System.out.println("t2 ========> " + i);}});Thread t3 = new Thread(() -> {// t3线程执行时,t2线程插队try {t2.join();} catch (InterruptedException e) {e.printStackTrace();}for (int i = 0; i < 10; i++) {System.out.println("t3 ========> " + i);}});t1.start();t2.start();t3.start();}
}
四、计时等待 - sleep
Thread类的静态方法 sleep(),该方法会使当前线程进入计时等待状态指定毫秒。
// 使当前正在执行的线程以指定的毫秒数暂停,进入Timed Waiting状态
public static native void sleep(long millis) throws InterruptedException;
等待指定毫秒后,当前线程会自动唤醒,从计时等待状态进入可运行状态,等待分配时间片。
注意事项:
- 任务调度器不会把时间片分配给【阻塞状态】的线程。
- 其它线程可以使用 interrupt 方法打断正在睡眠的线程,这时 sleep 方法会抛出 InterruptedException
五、等待唤醒 - wait & notify
1、相关API
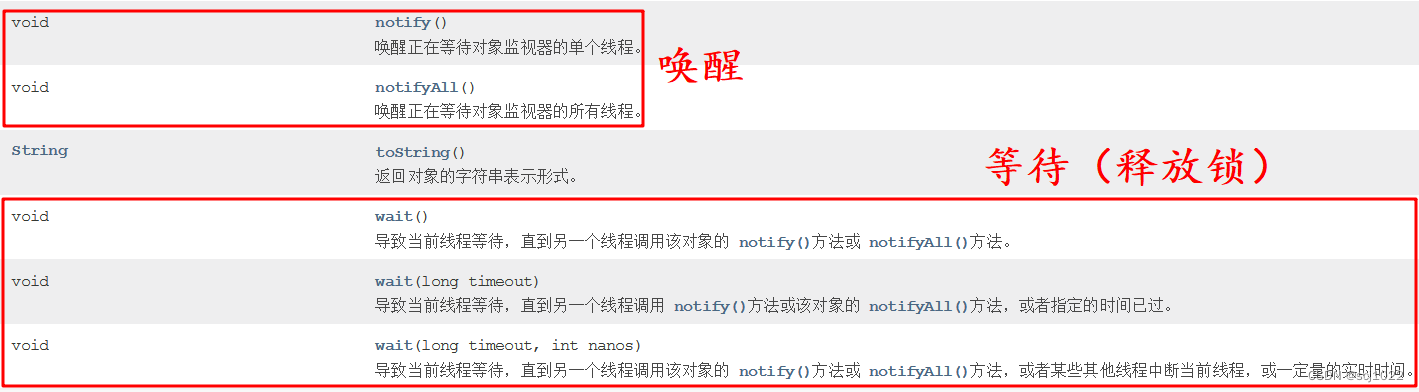
- wait 和 notify 是 Object 中的 等待唤醒方法,可以实现多个线程之间的协作。
- 必须获得此对象的锁,才能调用这几个方法。(在 同步方法 或 同步代码块 中)
- wait 方法会释放对象的锁,使线程进入 Monitor 的 WaitSet 等待区,从而让其他线程就机会获取对象的锁。
- notify 方法的唤醒是随机的,如果 Monitor 的 WaitSet 等待区有多个线程,notify 会随机选择一个唤醒。(竞争锁)
2、工作原理

每个Java对象都可以关联一个Monitor,Monitor中同一时刻只能有一个Owner
-
刚开始时 Monitor 中的 Owner 为 null
-
当 Thread-2 执行 synchronized 代码块时,会将 Monitor 的所有者 Owner 设置为 Thread-2,上锁成功。
-
当 Thread-2 占据锁时,如果 Thread-3,Thread-4 也来执行 synchronized 代码块,就会进入 EntryList中,变成 BLOCKED 状态
BLOCKED 线程会在 Owner 线程释放锁时唤醒
-
Owner 线程调用 wait 方法,即可进入 WaitSet 变为 WAITING 状态。
WAITING 线程会在 Owner 线程调用 notify 或 notifyAll 时唤醒,但唤醒后并不意味者立刻获得锁,仍需进入EntryList 重新竞争
3、wait 和 sleep 的区别
sleep() 和 wait() 都是使线程暂停执行一段时间的方法,二者的区别为:
【工作原理】
sleep()方法是Thread类的静态方法,是线程用来控制自身流程的- 它会使此线程暂停执行一段时间,而把执行机会让给其他线程,等到计时时间一到,此线程会自动苏醒。
wait()方法是Object类的方法,用于线程间的通信,它会使当前拥有对象锁的线程进入等待- 没有指定时间:直到其他线程用调用
notify()或notifyAll()时,线程才会苏醒。 - 指定计时时间:被其他线程唤醒 或 等计时时间到了自动苏醒
- 没有指定时间:直到其他线程用调用
【锁的处理】
sleep()方法的主要作用是让线程暂停一段时间,让出CPU给其他线程,但是线程的监控状态依然保持着,时间一到则自动恢复,不涉及线程间的通信,因此调用sleep()方法不会释放锁。wait()方法则不同,当调用wait()方法后,线程会释放掉它所占用的锁,进入等待状态,从而使线程所在对象中的其他synchronized数据可以被别的线程使用。
【使用方面】
sleep()方法可以在任何地方使用,而wait()方法必须在 同步方法 或 同步代码块中 使用。sleep()的过程中,有可能被其他对象调用它的interrupt(),产生InterruptedException异常。- 由于
sleep()不会释放锁标志,容易导致死锁问题的发生。一般情况下,推荐使用wait()方法。
4、案例 - 基本使用
public class WaitAndNotifyTest {public static void main(String[] args) {Object lockObj = new Object();new Thread(() -> {synchronized (lockObj) {System.out.println("A线程获取了锁,准备wait");try {lockObj.wait(); // 无限等待} catch (InterruptedException e) {e.printStackTrace();}System.out.println("A线程被唤醒,并且获取了锁");}}, "A线程").start();new Thread(() -> {String currentThread = Thread.currentThread().getName();// 确保A线程先获取锁try {Thread.sleep(2000);} catch (InterruptedException e) {e.printStackTrace();}synchronized (lockObj) {System.out.println("B线程获取了锁,准备唤醒A线程");lockObj.notify(); // 唤醒A线程System.out.println("B线程唤醒了A线程,还没有释放锁");}System.out.println("B线程释放了锁");}, "B线程").start();}
}
5、案例 - if 还是 while
class Number {private int num = 0;public synchronized void increment() throws InterruptedException {while (num == 0) {this.wait();}num++;System.out.println(Thread.currentThread().getName() + ":" + num);this.notifyAll();}
}
在多线程中,判断必须使用 while,使用 if 存在虚假唤醒问题,如下:
if (num == 0) {// 假设多个线程在这里wait// 如果使用if的话,线程被唤醒后,不会再次进行num == 0判断,这样就会导致num++多次。  // 如果使用while的话,线程被唤醒以后,会再次进行条件判断,则不会出现这样的问题。this.wait();
}
num++;
6、案例 - 交替打印奇偶数
/*** 使用 wait 和 notify 实现两个线程 交替打印1到100* 一个线程专门打印奇数 odd* 一个线程专门打印偶数 even*/
public class PrintOddAndEven {public static void main(String[] args) {NumberMode numberMode = new NumberMode();new Thread(new PrintOdd(numberMode)).start(); 	// 奇数打印线程new Thread(new PrintEven(numberMode)).start(); 	// 偶数打印线程}static class NumberMode {public int num = 1;}// 奇数线程任务static class PrintOdd implements Runnable {NumberMode numberMode;public PrintOdd(NumberMode numberMode) {this.numberMode = numberMode;}@Overridepublic void run() {while (numberMode.num < 100) {synchronized (numberMode) {if (numberMode.num % 2 != 0) {// 打印奇数System.out.println("奇数:" + numberMode.num);numberMode.num++;numberMode.notify();} else {try {System.out.println("奇数线程休息");numberMode.wait();} catch (InterruptedException e) {e.printStackTrace();}}}}}}// 偶数线程任务static class PrintEven implements Runnable {NumberMode numberMode;public PrintEven(NumberMode numberMode) {this.numberMode = numberMode;}@Overridepublic void run() {while (numberMode.num < 100) {synchronized (numberMode) {if (numberMode.num % 2 == 0) {// 打印偶数System.out.println("偶数:" + numberMode.num);numberMode.num++;numberMode.notify();} else {try {System.out.println("偶数线程休息");numberMode.wait();} catch (InterruptedException e) {e.printStackTrace();}}}}}}
}
7、案例 - 生产者消费者
生产者消费者模式是并发编程中经典的模式。生产者和消费者通过分离的执行工作解耦,以不同的速度生产和消费数据。
生产者消费者模式的好处:
- 简化了开发,你可以独立的或并发的编写消费者和生产者,它仅仅只需知道共享对象是谁。
- 生产者不需要知道谁是消费者或者有多少消费者,对消费者来说也是一样。
- 生产者和消费者可以以不同的速度执行。
- 分离的消费者和生产者在功能上能写出更简洁、可读、易维护的代码。
【案例分析】
public class ProducerConsumerMode {public static void main(String[] args) {List<String> dish = new ArrayList<>();      // 盘子new Thread(new Producer(dish)).start();     // 生产者new Thread(new Consumer(dish)).start();     // 消费者}/*** 消费者:吃包子*/static class Consumer implements Runnable {private final List<String> dish;public Consumer(List<String> dish) {this.dish = dish;}@Overridepublic void run() {while (true) {synchronized (dish) {// 如果盘子中没包子,等待,叫师傅做包子if (dish.isEmpty()) {try {dish.wait();} catch (InterruptedException e) {e.printStackTrace();}}String food = dish.remove(0);  // 从盘子中取出包子try {Thread.sleep(50);   //  吃包子的时间} catch (InterruptedException e) {e.printStackTrace();}System.out.println("吃货吃包子:" + food + " 盘子中剩余:" + dish.size());//  通知师傅做包子dish.notify();}}}}/*** 生产者:卖包子*/static class Producer implements Runnable {private int count = 0;private final List<String> dish;public Producer(List<String> dish) {this.dish = dish;}@Overridepublic void run() {// 生产包子的逻辑while (true) {// 生产者和消费者使用的是同一个集合,可以当做锁对象使用synchronized (dish) {// 如果盘子中包子数量已达100if (dish.size() >= 100) {// 师傅休息,等待吃货吃包子try {dish.wait();} catch (InterruptedException e) {e.printStackTrace();}}// 做包子count++;try {// 模拟做包子的时间Thread.sleep(50);} catch (InterruptedException e) {e.printStackTrace();}dish.add("[" + count + "]"); //放到盘子中System.out.println("包子铺师傅做包子:" + "[" + count + "] 盘子中还剩:" + dish.size());dish.notify();  // 通知吃货去吃包子}}}}
}
六、等待唤醒 - park & unpark
1、相关API
park 和 unpark 是 JUC并发包中,LockSupport类的静态方法
public class LockSupport {private static final sun.misc.Unsafe UNSAFE;// 暂停当前线程public static void park() {UNSAFE.park(false, 0L);}// 恢复某个线程的运行public static void unpark(Thread thread) {if (thread != null)UNSAFE.unpark(thread);}
}
package sun.misc;public final class Unsafe {public native void park(boolean isAbsolute, long time);public native void unpark(Object thread);
}
2、使用案例
/*** 先 park 再 unpark(park的时候会阻塞,然后unpark时被唤醒)*/
public class ParkAndUnparkTest1 {public static void main(String[] args) throws InterruptedException {Thread t1 = new Thread(() -> {System.out.println("park...");LockSupport.park();    // 此处会暂停,然后被unpark唤醒System.out.println("resume...");}, "t1");t1.start();Thread.sleep(2000);System.out.println("unpark...");LockSupport.unpark(t1);}
}
/*** 先 unpark 再 park(这种情况,park的时候是不会停止的)*/
public class ParkAndUnparkTest2 {public static void main(String[] args) throws InterruptedException {Thread t1 = new Thread(() -> {try {Thread.sleep(2000);} catch (InterruptedException e) {throw new RuntimeException(e);}System.out.println("park...");LockSupport.park();    // 此处不会暂停,会直接往下执行System.out.println("resume...");}, "t1");t1.start();Thread.sleep(1000);System.out.println("unpark...");LockSupport.unpark(t1);}
}
3、工作原理
每个线程都有自己的一个 Parker 对象,由三部分组成 _counter 、_cond 、 _mutex 。
打个比喻,线程是旅行者,Parker是携带的背包, _cond 是休息的帐篷,_mutex 是帐篷的锁,_counter是干粮(0耗尽 1充足)
- 调用 park ,就是要看需不需要停下来歇息
- 如果备用干粮耗尽(
_counter=0),那么钻进帐篷_cond歇息,并上锁_mutex - 如果备用干粮充足(
_counter=1),那么不需停留,继续前进
- 如果备用干粮耗尽(
- 调用 unpark,就好比补充干粮(
_counter=1)- 如果这时线程还在帐篷
_cond休息,就唤醒让他继续前进 - 如果这时线程还在运行,那么下次他调用 park 时,仅是消耗掉备用干粮(
_counter=0),不需停留继续前进 - 因为背包空间有限,多次调用 unpark 仅会补充一份备用干粮(
_counter最大为1)
- 如果这时线程还在帐篷
4、park 和 wait 的区别
-
wait 和 notify 是 Object 中的等待唤醒方法;park 和 unpark 是 JUC并发包 中 LockSupport 类的静态方法
-
wait 和 notify 必须在 同步方法 或 同步代码块 中使用;而 park 和 unpark 不必。
-
park 和 unpark 可以【阻塞】和【唤醒】指定的线程,
notify 是 随机唤醒一个等待线程,notifyAll 是唤醒所有等待线程。
-
park 和 unpark 可以先 unpark,而 wait 和 notify 不能先 notify
七、等待唤醒 - Condition
1、相关API
Condition 是 JUC包中的等待唤醒,通过和Lock的组合使用,实现精准的等待和唤醒
Condition 取代了对象监视器方法的使用
public interface Condition {// 等待void await() throws InterruptedException;void awaitUninterruptibly();long awaitNanos(long nanosTimeout) throws InterruptedException;boolean await(long time, TimeUnit unit) throws InterruptedException;boolean awaitUntil(Date deadline) throws InterruptedException;// 唤醒void signal();void signalAll();
}
Lock 取代了 synchornized 方法和语句
public interface Lock {// 获取监视器实例Condition newCondition();
}
2、使用案例 - 顺序打印
public class ConditionTest {public static void main(String[] args) {Print print = new Print();new Thread(() -> {for (int i = 0; i < 5; i++) print.printA();}, "A").start();new Thread(() -> {for (int i = 0; i < 5; i++) print.printB();}, "B").start();new Thread(() -> {for (int i = 0; i < 5; i++) print.printC();}, "C").start();}
}class Print {private int number = 1;// Lock锁对象private ReentrantLock lock = new ReentrantLock();// Condition对象private Condition condition1 = lock.newCondition();private Condition condition2 = lock.newCondition();private Condition condition3 = lock.newCondition();public void printA() {// 1. 加锁lock.lock();try {// 2. 判断等待if (number != 1) {condition1.await();}// 3. 业务代码System.out.println(Thread.currentThread().getName() + "=> AAA");number = 2;// 4. 指定唤醒condition2.signal();} catch (Exception e) {e.printStackTrace();} finally {// 5. 解锁lock.unlock();}}public void printB() {lock.lock();try {if (number != 2) {condition2.await();}System.out.println(Thread.currentThread().getName() + "=> BBB");number = 3;condition3.signal();} catch (Exception e) {e.printStackTrace();} finally {lock.unlock();}}public void printC() {lock.lock();try {if (number != 3) {condition3.await();}System.out.println(Thread.currentThread().getName() + "=> CCC");number = 1;condition1.signal();} catch (Exception e) {e.printStackTrace();} finally {lock.unlock();}}
}
八、线程中断 - interrupt & stop
1、中断线程的两种方式
1)stop
之前的做法:Thread.currentThread().stop(); (由于安全问题已弃用)
- 通过抛出
ThreadDeath的Error来达到停止线程的目的,Error的抛出可能发生在程序的任何一个地方。
public class Thread implements Runnable {@Deprecatedpublic final void stop() {// ...// The VM can handle all thread statesstop0(new ThreadDeath());}private native void stop0(Object o);
}
public class ThreadDeath extends Error {private static final long serialVersionUID = -4417128565033088268L;
}
由于抛出ThreadDeatch异常,会导致该线程释放所持有的锁,而这种释放的时间点是不可控的,可能会导致出现线程安全问题和数据不一致情况,比如在同步代码块中在执行数据更新操作时线程被突然停止。
2)interrupt
现在的做法:Thread.currentThread().interrupt();
- 将中断标记置为true,并不会使线程立即停止(可以通过
isInterrupted判断中断状态,来使线程停止)
public class Thread implements Runnable {// 将中断标记置为truepublic void interrupt() {if (this != Thread.currentThread())checkAccess();synchronized (blockerLock) {Interruptible b = blocker;if (b != null) {interrupt0();           // Just to set the interrupt flagb.interrupt(this);return;}}interrupt0();}
}
2、中断相关API
每个线程都有一个中断标记(线程的一个属性),用来表明该线程是否被中断(默认为false)。
1)interrupt
interrupt() 方法,只是将中断标记置为true,并不会使线程立即停止(可以通过判断中断状态,来使线程停止)
public class Thread implements Runnable {// 将中断标记置为truepublic void interrupt() {if (this != Thread.currentThread())checkAccess();synchronized (blockerLock) {Interruptible b = blocker;if (b != null) {interrupt0();           // Just to set the interrupt flagb.interrupt(this);return;}}interrupt0();}
}
2)isInterrupted
判断线程是否中断(通过中断标记来判断)
public class Thread implements Runnable {// 判断线程是否中断 - 不会清除中断标记public boolean isInterrupted() {return isInterrupted(false);}// 判断线程是否中断 - 判断完毕,清除中断标记(置为false)public static boolean interrupted() {return currentThread().isInterrupted(true);}// 判断线程是否中断(参数表示是否清除中断标记 - 重置为false)  private native boolean isInterrupted(boolean ClearInterrupted);
}
3、打断正常运行的线程
正常运行的线程,调用 interrupt() 方法,并不会停止,只会将 中断标记 置为 true。
public class ErrorInterruptRunning {public static void main(String[] args) throws InterruptedException {Thread t = new Thread(() -> {while (true) {System.out.println("while执行了");}});t.start();Thread.sleep(1000);// 线程t并不会停止 System.out.println("打断前:" + t.isInterrupted()); // falset.interrupt();System.out.println("打断后:" + t.isInterrupted()); // true}
}
可以通过isInterrupted判断中断状态,手动停止线程。
public class InterruptRunning {public static void main(String[] args) throws InterruptedException {Thread t = new Thread(() -> {while (true) {System.out.println("while执行了");// 通过`isInterrupted`判断中断状态,手动停止线程if(Thread.currentThread().isInterrupted()) {System.out.println("被打断了, 退出循环");break;}}});t.start();Thread.sleep(1000);System.out.println("打断前:" + t.isInterrupted()); // falset.interrupt();System.out.println("打断后:" + t.isInterrupted()); // true}
}
4、打断sleep、wait、join的线程
打断因为 sleep,wait,join 这几个方法导致阻塞的线程,会:
- 清除打断标记(将 打断标记 置为
false) - 抛出
InterruptedException异常
1)打断 sleep
public class InterruptSleep {public static void main(String[] args) throws InterruptedException {Thread thread = new Thread(() -> {try {System.out.println("Thread is sleeping...");Thread.sleep(5000); // 线程休眠5秒钟System.out.println("Thread is awake.");} catch (InterruptedException e) {System.out.println("Thread was interrupted while sleeping.");System.out.println("interrupt flag:" + Thread.currentThread().isInterrupted());}});thread.start(); // 启动线程// 主线程等待一段时间,中断正在sleep的线程Thread.sleep(2000);thread.interrupt();}
}
Thread is sleeping...
Thread was interrupted while sleeping.
interrupt flag:false
2)打断 wait
public class InterruptWait {public static void main(String[] args) throws InterruptedException {Object lock = new Object();Thread thread = new Thread(() -> {synchronized (lock) {try {System.out.println("Thread is waiting...");lock.wait(); // 线程等待System.out.println("Thread is awake.");} catch (InterruptedException e) {System.out.println("Thread was interrupted while waiting.");System.out.println("interrupt flag:" + Thread.currentThread().isInterrupted());}}});thread.start(); // 启动线程// 主线程等待一段时间,中断正在wait的线程Thread.sleep(2000);thread.interrupt();}
}
Thread is waiting...
Thread was interrupted while waiting.
interrupt flag:false
3)打断 join
public class InterruptJoin {public static void main(String[] args) throws InterruptedException {Thread thread1 = new Thread(() -> {try {System.out.println("Thread 1 is working...");Thread.sleep(3000); // 线程1休眠3秒钟System.out.println("Thread 1 is finished.");} catch (InterruptedException e) {System.out.println("Thread 1 was interrupted while sleeping.");}});Thread thread2 = new Thread(() -> {try {System.out.println("Thread 2 is working...");thread1.join(); // 等待线程1完成System.out.println("Thread 2 is finished.");} catch (InterruptedException e) {System.out.println("Thread 2 was interrupted while waiting for thread 1.");System.out.println("interrupt flag:" + Thread.currentThread().isInterrupted());}});thread1.start(); // 启动线程1thread2.start(); // 启动线程2// 主线程等待一段时间,中断被join阻塞的线程2Thread.sleep(2000);thread.interrupt();}}
Thread 1 is working...
Thread 2 is working...
Thread 2 was interrupted while waiting for thread 1.
interrupt flag:false
Thread 1 is finished.
5、打断 park 的线程
-
打断被
park()阻塞的线程,会使线程从park()阻塞的地方继续向下执行。 -
打断标记为
true时,park()失效,调用park()线程不会阻塞。打断标记为
false时,park()生效,调用park()线程会阻塞。
public class InterruptPark {public static void main(String[] args) throws InterruptedException {Thread t = new Thread(() -> {LockSupport.park();     // park()生效,阻塞在此处System.out.println("打断标记:" + Thread.currentThread().isInterrupted()); // trueLockSupport.park();     // 打断标记为true时,park()失效,直接向下执行System.out.println("打断标记为true时,park()失效,不会阻塞");Thread.interrupted();  // 将打断标记置为falseSystem.out.println("打断标记:" + Thread.currentThread().isInterrupted()); // falseLockSupport.park();    // 打断标记为false,park()生效,阻塞在此处System.out.println("park()生效,执行不到这里");});t.start();// 主线程等待一段时间,中断被park()阻塞的线程Thread.sleep(2000);t.interrupt();System.out.println("线程被interrupt了");}
}
6、案例:两阶段中止模式
在一个线程T1中,如何优雅的中断线程T2(这里的优雅指给T2一个料理后事的机会,如释放资源)
public class TwoParseTerminationTest {public static void main(String[] args) throws InterruptedException {TwoParseTermination twoParseTermination = new TwoParseTermination();twoParseTermination.start();Thread.sleep(3000);  			twoParseTermination.stop();}
}class TwoParseTermination {// 监控线程Thread monitorThread;// 启动监控线程public void start(){monitorThread = new Thread(()->{while(true) {// 判断是否被中止if (Thread.currentThread().isInterrupted()){System.out.println("线程结束。。正在料理后事中");break;}try {Thread.sleep(500);System.out.println("正在执行监控的功能");} catch (InterruptedException e) {// sleep期间出现异常,会清除打断标记,因此需要重置打断标记为trueThread.currentThread().interrupt();e.printStackTrace();}}});monitorThread.start();}// 停止监控线程public void stop(){monitorThread.interrupt();}
}
九、线程状态与切换小结