1> 思维导图
https://lingjun.life/wiki/EmbeddedNote/20QT
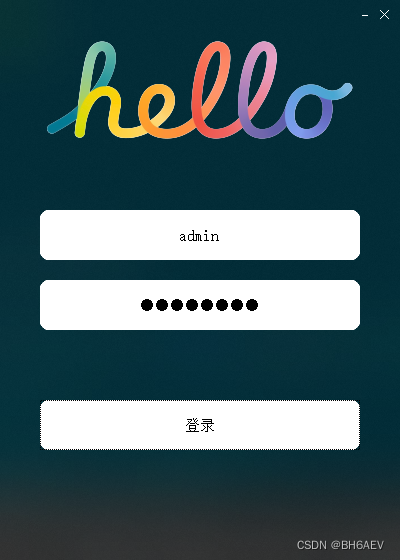
2>登录界面优化
使用手动连接,将登录框中的取消按钮使用qt4版本的连接到自定义的槽函数中,在自定义的槽函数中调用关闭函数
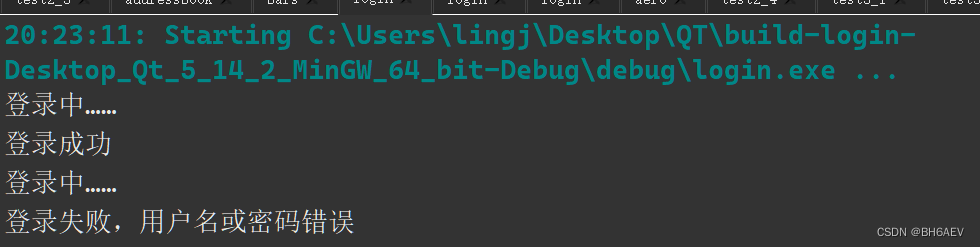
将登录按钮使用qt5版本的连接到自定义的槽函数中,在槽函数中判断ui界面上输入的账号是否为"admin",密码是否为"123456",如果账号密码匹配成功,则输出“登录成功”,并关闭该界面,如果匹配失败,则输出登录失败,并将密码框中的内容清空
mywidget.cpp
#include "mywidget.h"
#include <QPainterPath>
#include "aerowidget.h"MyWidget::MyWidget(QWidget *parent): QWidget(parent)
{// 窗口设置setWindowTitle("登录"); // 设置窗口标题setWindowFlag(Qt::FramelessWindowHint); // 设置窗口无边框resize(400,560); // 设置窗口大小setFixedSize(400,560); // 固定窗口大小// 设置窗口圆角矩形遮罩setMask(createMask());// 设置窗口图标setWindowIcon(QIcon("C:\\Users\\lingj\\Desktop\\QT\\test1_1\\favicon.ico"));// 创建并设置 QLabelQLabel *l1 = new QLabel(this);l1->setText("hello world");l1->setParent(this);l1->resize(320,100);l1->move(40,40);l1->setPixmap(QPixmap("D:\\MyProject\\Jun\\source\\images\\hello.png")); // 设置图片l1->setScaledContents(true); // 图片自适应大小// 创建 AeroWidgetAeroWidget aw(this);// 加入文本输入框username = new QLineEdit(this);username->move(40,210);username->resize(320,50);username->setStyleSheet("background-color:rgb(255,255,255);""border-radius:10px");username->setAlignment(Qt::AlignCenter);username->setPlaceholderText("账号\\电话\\邮箱");passwd = new QLineEdit(this);passwd->move(40,280);passwd->resize(320,50);passwd->setStyleSheet("background-color:rgb(255,255,255);""border-radius:10px");passwd->setAlignment(Qt::AlignCenter);passwd->setPlaceholderText("密码");passwd->setEchoMode(QLineEdit::Password); // 设置密码模式// 创建登录按钮QPushButton *p1 = new QPushButton("登录",this);p1->move(40,400);p1->resize(320,50);p1->setStyleSheet("background-color:rgb(255,255,255);""border-radius:10px");connect(p1, &QPushButton::clicked, this, &MyWidget::on_login_clicked); // 连接登录按钮的点击事件// 创建关闭按钮QPushButton *closeButton = new QPushButton("×", this); // Close buttoncloseButton->setFixedSize(20, 20);closeButton->move(width() - closeButton->width() - 5, 5);closeButton->setStyleSheet("background-color:transparent;color:white;font-size:16px;");connect(closeButton,SIGNAL(clicked()),this,SLOT(close())); // 连接关闭按钮的点击事件// 创建最小化按钮QPushButton *minimizeButton = new QPushButton("-", this); // Minimize buttonminimizeButton->setFixedSize(20, 20);minimizeButton->move(width() - minimizeButton->width() - closeButton->width() - 5, 5);minimizeButton->setStyleSheet("background-color:transparent;color:white;font-size:16px;");connect(minimizeButton, &QPushButton::clicked, this, &QWidget::showMinimized); // 连接最小化按钮的点击事件// 设置鼠标追踪setMouseTracking(true);
}MyWidget::~MyWidget()
{}void MyWidget::on_login_clicked()
{qDebug() << "登录中……" ;if(username->text()=="admin" & passwd->text()== "123456"){qDebug() << "登录成功";close();}else{qDebug() << "登录失败,用户名或密码错误";username->setText("");passwd->setText("");}
}// 创建窗口遮罩的函数
QRegion MyWidget::createMask() const
{int radius = 18; // 圆角半径QSize size = this->size();QRegion region;QPainterPath path;path.addRoundedRect(QRectF(QPointF(0, 0), size), radius, radius); // 创建圆角矩形路径region = QRegion(path.toFillPolygon().toPolygon()); // 转换为多边形区域return region;
}// 重写鼠标按下事件
void MyWidget::mousePressEvent(QMouseEvent *event)
{if (event->button() == Qt::LeftButton) {// 保存鼠标按下时的位置和窗口位置m_dragPos = event->globalPos() - frameGeometry().topLeft();event->accept();}
}// 重写鼠标移动事件
void MyWidget::mouseMoveEvent(QMouseEvent *event)
{if (event->buttons() & Qt::LeftButton) {// 移动窗口到鼠标位置move(event->globalPos() - m_dragPos);event->accept();}
}
mywidget.h
#ifndef MYWIDGET_H
#define MYWIDGET_H#include <QWidget>
#include <iostream>
#include <QIcon>
#include <QtWidgets>
#include <QLineEdit>
#include <QApplication>
#include <QGraphicsBlurEffect>
#include <QGraphicsOpacityEffect>
#include <QVBoxLayout>
#include <QLabel>
#include <QRegion>
#include <QtDebug>class MyWidget : public QWidget
{Q_OBJECTpublic:MyWidget(QWidget *parent = nullptr);~MyWidget();
protected:QRegion createMask() const;void mousePressEvent(QMouseEvent *event) override;void mouseMoveEvent(QMouseEvent *event) override;QPoint m_dragPos; // 用于保存鼠标按下时的位置和窗口位置之间的偏移量private slots:void on_login_clicked();
private:QLineEdit* username;QLineEdit* passwd;
};
#endif // MYWIDGET_H
aerowidget.cpp
#include "aerowidget.h"AeroWidget::AeroWidget(QWidget *parent) : QWidget(parent)
{_parent = parent;HWND hWnd = HWND(parent->winId());HMODULE hUser = GetModuleHandle(L"user32.dll");if (hUser) {pfun setWindowCompositionAttribute = (pfun)GetProcAddress(hUser, "SetWindowCompositionAttribute");if (setWindowCompositionAttribute) {AccentPolicy accent = { ACCENT_ENABLE_BLURBEHIND,0, 0, 0 };WindowCompositionAttributeData data;data.Attribute = WCA_ACCENT_POLICY;data.Data = reinterpret_cast<int *>(&accent) ;data.SizeOfData = sizeof(accent);setWindowCompositionAttribute(hWnd, &data);/*setWindowCompositionAttribute一个官方文档里面没有记录上去的函数,具体上网百度去该函数在此处用于设置毛玻璃背景*/}}parent->setAttribute(Qt::WA_TranslucentBackground);//设置窗口背景透明bgColor = QColor(255, 255, 255, 100);
}
//当毛玻璃的透明程度变化时就可以用下面的一个slot和一个函数来更新
void AeroWidget::valueChanged_Slot(int v)
{bgColor.setAlpha(v);//设置透明度this->update();//更新
}
void AeroWidget::setAlpha(int v)
{bgColor.setAlpha(v);//设置透明度this->update();//更新
}
void AeroWidget::paintEvent(QPaintEvent *ev)
{AERO(this->_parent,this->bgColor);//更新透明毛玻璃背景
}
aerowidget.h
#ifndef AEROWIDGET_H
#define AEROWIDGET_H#include <QWidget>
#include <QWidget>
#include <QtWin>
#include <qdialog.h>
#include <QGraphicsBlurEffect>
#include <QGraphicsPixmapItem>
#include <QPaintEvent>
#include <QPainter>
#include <QTimer>
#include <QDebug>
#include <QApplication>
#include <QDesktopWidget>
#include <QEvent>
#include <QMouseEvent>
#include <qscreen.h>
#include <QHBoxLayout>//水平
#include <QVBoxLayout>//垂直
#include <qspinbox.h>class AeroWidget : public QWidget
{Q_OBJECT
public:QWidget* _parent;explicit AeroWidget(QWidget *parent = nullptr);
public:void setParent(QWidget* p);//设置父类void setAlpha(int v);//设置透明度void paintEvent(QPaintEvent *ev);//绘图时间,在此函数中搞毛玻璃背景QColor bgColor;
private slots:void valueChanged_Slot(int v);//更新透明度
};//重要
enum AccentState
{ACCENT_DISABLED = 0,ACCENT_ENABLE_GRADIENT = 1,ACCENT_ENABLE_TRANSPARENTGRADIENT = 2,ACCENT_ENABLE_BLURBEHIND = 3,ACCENT_INVALID_STATE = 4
};
struct AccentPolicy
{AccentState AccentState;int AccentFlags;int GradientColor;int AnimationId;
};
enum WindowCompositionAttribute
{WCA_UNDEFINED = 0,WCA_NCRENDERING_ENABLED = 1,WCA_NCRENDERING_POLICY = 2,WCA_TRANSITIONS_FORCEDISABLED = 3,WCA_ALLOW_NCPAINT = 4,WCA_CAPTION_BUTTON_BOUNDS = 5,WCA_NONCLIENT_RTL_LAYOUT = 6,WCA_FORCE_ICONIC_REPRESENTATION = 7,WCA_EXTENDED_FRAME_BOUNDS = 8,WCA_HAS_ICONIC_BITMAP = 9,WCA_THEME_ATTRIBUTES = 10,WCA_NCRENDERING_EXILED = 11,WCA_NCADORNMENTINFO = 12,WCA_EXCLUDED_FROM_LIVEPREVIEW = 13,WCA_VIDEO_OVERLAY_ACTIVE = 14,WCA_FORCE_ACTIVEWINDOW_APPEARANCE = 15,WCA_DISALLOW_PEEK = 16,WCA_CLOAK = 17,WCA_CLOAKED = 18,WCA_ACCENT_POLICY = 19,WCA_FREEZE_REPRESENTATION = 20,WCA_EVER_UNCLOAKED = 21,WCA_VISUAL_OWNER = 22,WCA_LAST = 23
};
struct WindowCompositionAttributeData
{WindowCompositionAttribute Attribute;int * Data;int SizeOfData;
};
typedef int* (*pfun)(HWND hwnd, WindowCompositionAttributeData *data);//下面的宏其实是为了方便写绘图事件处理窗口内的模糊的代码,
//使用方式为 AERO(主窗口指针(本类中的_parent),bgColor)
#define AERO(t,bgColor) static bool v = false;\
if (v) return;\
QPainter painter(t);\
painter.setRenderHint(QPainter::Antialiasing);\
painter.setPen(Qt::NoPen);\
painter.setBrush(bgColor);\
painter.drawRoundedRect(rect(), 0, 0);\
v = true;#endif // AEROWIDGET_H
main.cpp
#include "mywidget.h"#include <QApplication>int main(int argc, char *argv[])
{QApplication a(argc, argv);MyWidget w;w.show();return a.exec();
}