Harbor高可用(haproxy和keepalived)
文章目录
- Harbor高可用(haproxy和keepalived)
- 1.Harbor高可用集群部署架构
- 1.1 主机初始化
- 1.1.1 设置网卡名和ip地址
- 1.1.2 设置主机名
- 1.1.3 配置镜像源
- 1.1.4 关闭防火墙
- 1.1.5 禁用SELinux
- 1.1.6 设置时区
- 1.2 安装 HAProxy
- 1.3 安装 Keepalived
- 1.4 测试访问
- 1.5 安装harbor
- 1.6 创建harbor仓库
- 1.7 在docker客户端验证
1.Harbor高可用集群部署架构
本示例中的Harbor高可用集群部署将基于以下环境进行。
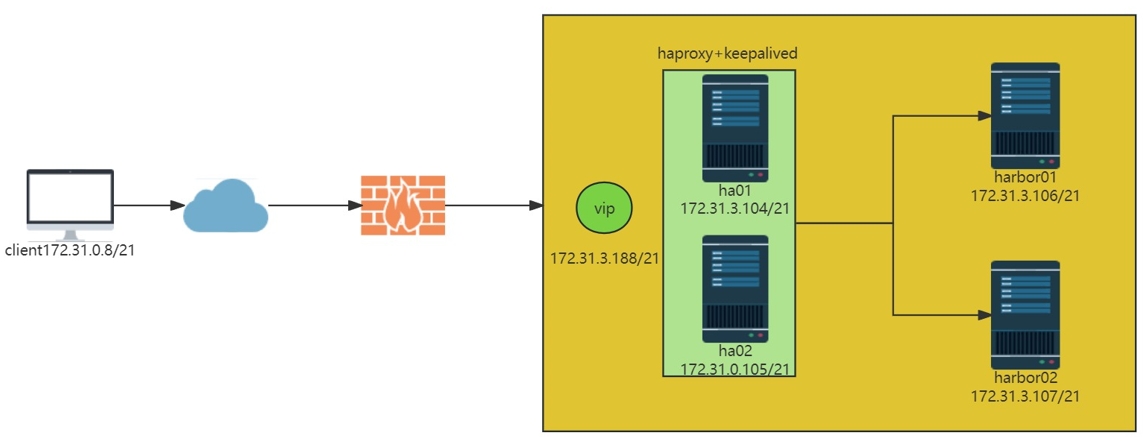
图1-1 Harbor高可用架构
表1-1 高可用Kubernetes集群规划
| 角色 | 机器名 | 机器配置 | ip地址 | 安装软件 |
|---|---|---|---|---|
| 提供高可用及负载均衡 | ha01.example.local | 2C2G | 172.31.3.104 | haproxy、keepalived |
| 提供高可用及负载均衡 | ha02.example.local | 2C2G | 172.31.3.105 | haproxy、keepalived |
| 容器镜像仓库1 | harbor01.example.local | 2C2G | 172.31.3.106 | docker、docker-compose、harbor |
| 容器镜像仓库2 | harbor02.example.local | 2C2G | 172.31.3.107 | docker、docker-compose、harbor |
| docker客户端 | client.example.local | 2C2G | 172.31.0.8 | docker |
| VIP,在ha01和ha02主机实现 | 172.31.3.188 |
1.1 主机初始化
1.1.1 设置网卡名和ip地址
Rocky 9和CentOS Stream 9:
# Rocky 9和CentOS Stream 9默认支持修改网卡名。
[root@rocky9 ~]# grep 'plugins' /etc/NetworkManager/NetworkManager.conf
#plugins=keyfile,ifcfg-rh
# 因为网卡命名方式默认是keyfile,默认不支持修改网卡名,既然官方已经默认是keyfile那这里就不去更改网卡名了。[root@rocky9 ~]# ETHNAME=`ip addr | awk -F"[ :]" '/^2/{print $3}'`[root@rocky9 ~]# nmcli con delete ${ETHNAME} && nmcli connection add type ethernet con-name ${ETHNAME} ifname ${ETHNAME} ipv4.method manual ipv4.address "172.31.0.9/21" ipv4.gateway "172.31.0.2" ipv4.dns "223.5.5.5,180.76.76.76" autoconnect yes && nmcli con reload && nmcli con up ${ETHNAME}
# 172.31.0.9/21中172.31.0.9是ip地址,21是子网位数;172.31.0.2是网关地址;223.5.5.5, 180.76.76.76都是DNS,根据自己的需求修改。[root@rocky9 ~]# ip addr
1: lo: <LOOPBACK,UP,LOWER_UP> mtu 65536 qdisc noqueue state UNKNOWN group default qlen 1000link/loopback 00:00:00:00:00:00 brd 00:00:00:00:00:00inet 127.0.0.1/8 scope host lovalid_lft forever preferred_lft foreverinet6 ::1/128 scope host valid_lft forever preferred_lft forever
2: ens160: <BROADCAST,MULTICAST,UP,LOWER_UP> mtu 1500 qdisc mq state UP group default qlen 1000link/ether 00:0c:29:37:62:95 brd ff:ff:ff:ff:ff:ffaltname enp3s0inet 172.31.0.9/21 brd 172.31.7.255 scope global noprefixroute ens160valid_lft forever preferred_lft foreverinet6 fe80::51ca:fd5d:3552:677d/64 scope link noprefixroute valid_lft forever preferred_lft forever
# 可以看到ip地址已修改。
Rocky 8、CentOS Stream 8和CentOS 7:
# Rocky 8、CentOS Stream 8和CentOS 7支持修改网卡名。
[root@rocky8 ~]# grep 'plugins' /etc/NetworkManager/NetworkManager.conf
#plugins=ifcfg-rh
# 因为网卡命名方式默认是ifcfg-rh,支持修改网卡名。# 修改网卡名称配置文件
[root@rocky8 ~]# sed -ri.bak '/^GRUB_CMDLINE_LINUX=/s@"$@ net.ifnames=0 biosdevname=0"@' /etc/default/grub
[root@rocky8 ~]# grub2-mkconfig -o /boot/grub2/grub.cfg
Generating grub configuration file ...
done# 修改网卡文件名
[root@rocky8 ~]# ETHNAME=`ip addr | awk -F"[ :]" '/^2/{print $3}'`
[root@rocky8 ~]# mv /etc/sysconfig/network-scripts/ifcfg-${ETHNAME} /etc/sysconfig/network-scripts/ifcfg-eth0[root@rocky8 ~]# shutdown -r now[root@rocky8 ~]# nmcli dev
DEVICE  TYPE      STATE      CONNECTION
eth0    ethernet  connected  Wired connection 1
lo      loopback  unmanaged  --
# 可以看到CONNECTION的名字是Wired connection 1,要改名才可以下面设置。[root@rocky8 ~]# ETHNAME=`ip addr | awk -F"[ :]" '/^2/{print $3}'`[root@rocky8 ~]# nmcli connection modify "Wired connection 1" con-name ${ETHNAME}
[root@rocky8 ~]# nmcli dev
DEVICE  TYPE      STATE      CONNECTION
eth0    ethernet  connected  eth0
lo      loopback  unmanaged  --  # 修改ip地址
[root@rocky8 ~]# nmcli con delete ${ETHNAME} && nmcli connection add type ethernet con-name ${ETHNAME} ifname ${ETHNAME} ipv4.method manual ipv4.address "172.31.0.8/21" ipv4.gateway "172.31.0.2" ipv4.dns "223.5.5.5,180.76.76.76" autoconnect yes && nmcli con reload && nmcli dev up eth0
# 172.31.0.8/21中172.31.0.8是ip地址,21是子网位数;172.31.0.2是网关地址;223.5.5.5, 180.76.76.76都是DNS,根据自己的需求修改。[root@rocky8 ~]# ip addr
1: lo: <LOOPBACK,UP,LOWER_UP> mtu 65536 qdisc noqueue state UNKNOWN group default qlen 1000link/loopback 00:00:00:00:00:00 brd 00:00:00:00:00:00inet 127.0.0.1/8 scope host lovalid_lft forever preferred_lft foreverinet6 ::1/128 scope host valid_lft forever preferred_lft forever
2: eth0: <BROADCAST,MULTICAST,UP,LOWER_UP> mtu 1500 qdisc mq state UP group default qlen 1000link/ether 00:0c:29:6f:65:d3 brd ff:ff:ff:ff:ff:ffaltname enp3s0altname ens160inet 172.31.0.8/21 brd 172.31.7.255 scope global noprefixroute eth0valid_lft forever preferred_lft foreverinet6 fe80::e9c9:aa93:4a58:2cc2/64 scope link noprefixroute valid_lft forever preferred_lft forever
# 重启系统后可以看到网卡名已经修改成eth0,ip地址也已修改。
Ubuntu:
# Ubuntu先启用root用户,并设置密码
raymond@ubuntu2204:~$ cat set_root_login.sh
#!/bin/bashread -p "请输入密码: " PASSWORD
echo ${PASSWORD} |sudo -S sed -ri 's@#(PermitRootLogin )prohibit-password@\1yes@' /etc/ssh/sshd_config
sudo systemctl restart sshd
sudo -S passwd root <<-EOF
${PASSWORD}
${PASSWORD}
EOFraymond@ubuntu2204:~$ bash set_root_login.sh
请输入密码: 123456
[sudo] password for raymond: New password: Retype new password: passwd: password updated successfullyraymond@ubuntu2204:~$ rm -rf set_root_login.sh# 使用root登陆,修改网卡名
root@ubuntu2204:~# sed -ri.bak '/^GRUB_CMDLINE_LINUX=/s@"$@net.ifnames=0 biosdevname=0"@' /etc/default/grub
root@ubuntu2204:~# grub-mkconfig -o /boot/grub/grub.cfg
Sourcing file `/etc/default/grub'
Sourcing file `/etc/default/grub.d/init-select.cfg'
Generating grub configuration file ...
Found linux image: /boot/vmlinuz-5.15.0-88-generic
Found initrd image: /boot/initrd.img-5.15.0-88-generic
Warning: os-prober will not be executed to detect other bootable partitions.
Systems on them will not be added to the GRUB boot configuration.
Check GRUB_DISABLE_OS_PROBER documentation entry.
done# Ubuntu 20.04设置ip地址
root@ubuntu2004:~# cat > /etc/netplan/00-installer-config.yaml <<-EOF
network:version: 2renderer: networkdethernets:eth0:dhcp4: nodhcp6: noaddresses: [172.31.0.20/21] gateway4: 172.31.0.2nameservers:addresses: [223.5.5.5, 180.76.76.76]
EOF
# 说明:Ubuntu20.04网卡配置文件是00-installer-config.yaml;172.31.0.20/21中172.31.0.20是ip地址,21是子网位数;172.31.0.2是网关地址;223.5.5.5, 180.76.76.76都是DNS,根据自己的需求修改。# Ubuntu 18.04设置ip地址
root@ubuntu1804:~# cat > /etc/netplan/01-netcfg.yaml <<-EOF
network:version: 2renderer: networkdethernets:eth0:dhcp4: nodhcp6: noaddresses: [172.31.0.18/21] gateway4: 172.31.0.2nameservers:addresses: [223.5.5.5, 180.76.76.76]
EOF
# 说明:Ubuntu18.04网卡配置文件是01-netcfg.yaml;172.31.0.18/21中172.31.0.18是ip地址,21是子网位数;172.31.0.2是网关地址;223.5.5.5, 180.76.76.76都是DNS,根据自己的需求修改。root@ubuntu2004:~# shutdown -r nowroot@ubuntu2004:~# ip addr
1: lo: <LOOPBACK,UP,LOWER_UP> mtu 65536 qdisc noqueue state UNKNOWN group default qlen 1000link/loopback 00:00:00:00:00:00 brd 00:00:00:00:00:00inet 127.0.0.1/8 scope host lovalid_lft forever preferred_lft foreverinet6 ::1/128 scope host valid_lft forever preferred_lft forever
2: eth0: <BROADCAST,MULTICAST,UP,LOWER_UP> mtu 1500 qdisc fq_codel state UP group default qlen 1000link/ether 00:0c:29:e5:98:6f brd ff:ff:ff:ff:ff:ffinet 172.31.0.20/21 brd 172.31.7.255 scope global eth0valid_lft forever preferred_lft foreverinet6 fe80::20c:29ff:fee5:986f/64 scope link valid_lft forever preferred_lft forever
# 重启系统后可以看到网卡名已经修改成eth0,ip地址也已修改。# Ubuntu 22.04设置ip地址
root@ubuntu2204:~# cat > /etc/netplan/00-installer-config.yaml <<-EOF
network:version: 2renderer: networkdethernets:eth0:dhcp4: nodhcp6: noaddresses: [172.31.0.22/21]routes:- to: defaultvia: 172.31.0.2nameservers:addresses: [223.5.5.5, 180.76.76.76]
EOF
# 说明:Ubuntu 22.04网卡配置文件是00-installer-config.yaml;172.31.0.22/21中172.31.0.22是ip地址,21是子网位数;172.31.0.2是网关地址,Ubuntu 22.04设置网关地址的方法发生了改变,参考上面的方法;223.5.5.5, 180.76.76.76都是DNS,根据自己的需求修改。root@ubuntu2204:~# shutdown -r now# 重启后使用新设置的ip登陆
root@ubuntu2204:~# ip addr
1: lo: <LOOPBACK,UP,LOWER_UP> mtu 65536 qdisc noqueue state UNKNOWN group default qlen 1000link/loopback 00:00:00:00:00:00 brd 00:00:00:00:00:00inet 127.0.0.1/8 scope host lovalid_lft forever preferred_lft foreverinet6 ::1/128 scope host valid_lft forever preferred_lft forever
2: eth0: <BROADCAST,MULTICAST,UP,LOWER_UP> mtu 1500 qdisc fq_codel state UP group default qlen 1000link/ether 00:0c:29:a7:be:f2 brd ff:ff:ff:ff:ff:ffaltname enp2s1altname ens33inet 172.31.0.22/21 brd 172.31.7.255 scope global eth0valid_lft forever preferred_lft foreverinet6 fe80::20c:29ff:fea7:bef2/64 scope link valid_lft forever preferred_lft forever
# 重启系统后可以看到网卡名已经修改成eth0,ip地址也已修改。
1.1.2 设置主机名
hostnamectl set-hostname ha01.example.local
hostnamectl set-hostname ha02.example.local
hostnamectl set-hostname harbor01.example.local
hostnamectl set-hostname harbor02.example.local
hostnamectl set-hostname client.example.local
1.1.3 配置镜像源
Rocky 8和9:
MIRROR=mirrors.sjtug.sjtu.edu.cn
sed -i.bak -e 's|^mirrorlist=|#mirrorlist=|g' -e 's|^#baseurl=http://dl.rockylinux.org/$contentdir|baseurl=https://'${MIRROR}'/rocky|g' /etc/yum.repos.d/[Rr]ocky*.repodnf clean all && dnf makecache
CentOS Stream 9:
cat update_mirror.pl
#!/usr/bin/perluse strict;
use warnings;
use autodie;# 要修改镜像源,请去修改url变量!
my $url = 'mirrors.aliyun.com';
my $mirrors = "https://$url/centos-stream";if (@ARGV < 1) {die "Usage: $0 <filename1> <filename2> ...\n";
}while (my $filename = shift @ARGV) {my $backup_filename = $filename . '.bak';rename $filename, $backup_filename;open my $input, "<", $backup_filename;open my $output, ">", $filename;while (<$input>) {s/^metalink/# metalink/;if (m/^name/) {my (undef, $repo, $arch) = split /-/;$repo =~ s/^\s+|\s+$//g;($arch = defined $arch ? lc($arch) : '') =~ s/^\s+|\s+$//g;if ($repo =~ /^Extras/) {$_ .= "baseurl=${mirrors}/SIGs/\$releasever-stream/extras" . ($arch eq 'source' ? "/${arch}/" : "/\$basearch/") . "extras-common\n";} else {$_ .= "baseurl=${mirrors}/\$releasever-stream/$repo" . ($arch eq 'source' ? "/" : "/\$basearch/") . ($arch ne '' ? "${arch}/tree/" : "os") . "\n";}}print $output $_;}
}rpm -q perl &> /dev/null || { echo -e "\\033[01;31m "安装perl工具,请稍等..."\033[0m";yum -y install perl ; }perl ./update_mirror.pl /etc/yum.repos.d/centos*.repodnf clean all && dnf makecache
CentOS Stream 8:
MIRROR=mirrors.aliyun.com
sed -i.bak -e 's|^mirrorlist=|#mirrorlist=|g' -e 's|^#baseurl=http://mirror.centos.org/$contentdir|baseurl=https://'${MIRROR}'/centos|g' /etc/yum.repos.d/CentOS-*.repodnf clean all && dnf makecache
CentOS 7:
MIRROR=mirrors.aliyun.com
sed -i.bak -e 's|^mirrorlist=|#mirrorlist=|g' -e 's|^#baseurl=http://mirror.centos.org|baseurl=https://'${MIRROR}'|g' /etc/yum.repos.d/CentOS-*.repoyum clean all && yum makecache
Ubuntu 22.04和20.04:
MIRROR=mirrors.aliyun.com
OLD_MIRROR=`sed -rn "s@^deb http(.*)://(.*)/ubuntu/? $(lsb_release -cs) main.*@\2@p" /etc/apt/sources.list`sed -i.bak 's/'${OLD_MIRROR}'/'${MIRROR}'/g' /etc/apt/sources.listapt update
Ubuntu 18.04:
MIRROR=mirrors.aliyun.com
OLD_MIRROR=`sed -rn "s@^deb http(.*)://(.*)/ubuntu/? $(lsb_release -cs) main.*@\2@p" /etc/apt/sources.list`sed -i.bak 's/'${OLD_MIRROR}'/'${MIRROR}'/g' /etc/apt/sources.listSECURITY_MIRROR=`sed -rn "s@^deb http(.*)://(.*)/ubuntu $(lsb_release -cs)-security main.*@\2@p" /etc/apt/sources.list`sed -i.bak 's/'${SECURITY_MIRROR}'/'${MIRROR}'/g' /etc/apt/sources.listapt update
1.1.4 关闭防火墙
# Rocky和CentOS
systemctl disable --now firewalld# CentOS 7
systemctl disable --now NetworkManager# Ubuntu
systemctl disable --now ufw
1.1.5 禁用SELinux
#CentOS
setenforce 0
sed -i 's#SELINUX=enforcing#SELINUX=disabled#g' /etc/selinux/config#Ubuntu
Ubuntu没有安装SELinux,不用设置
1.1.6 设置时区
ln -sf /usr/share/zoneinfo/Asia/Shanghai /etc/localtime
echo 'Asia/Shanghai' >/etc/timezone#Ubuntu还要设置下面内容
cat >> /etc/default/locale <<-EOF
LC_TIME=en_DK.UTF-8
EOF
1.2 安装 HAProxy
这里使用"一键编译安装haproxy脚本"安装haproxy,haproxy的具体安装方法请参考博客“https://raymond.blog.csdn.net/article/details/135938076”。
#!/bin/bash
#
#******************************************************************************************************************
#Author:        Raymond
#QQ:            88563128
#Date:          2024-01-26
#FileName:      install_harbor_http_v2_1.sh
#URL:           raymond.blog.csdn.net
#Description:   install_harbor_http for CentOS 7 & CentOS Stream 8/9 & Ubuntu 18.04/20.04/22.04 & Rocky 8/9
#Copyright (C): 2024 All rights reserved
#******************************************************************************************************************
SRC_DIR=/usr/local/src
COLOR="echo -e \\033[01;31m"
END='\033[0m'URL='https://mirrors.aliyun.com/docker-ce/linux/static/stable/x86_64/'
DOCKER_FILE=docker-24.0.7.tgz# Docker Compose下载地址:“https://github.com/docker/compose/releases/download/v2.23.3/docker-compose-linux-x86_64”,请提前下载。
DOCKER_COMPOSE_FILE=docker-compose-linux-x86_64# Harbor下载地址:“https://github.com/goharbor/harbor/releases/download/v2.10.0/harbor-offline-installer-v2.10.0.tgz”,请提前下载。
HARBOR_FILE=harbor-offline-installer-v
HARBOR_VERSION=2.10.0
TAR=.tgz
HARBOR_INSTALL_DIR=/apps
HARBOR_DOMAIN=harbor.raymonds.cc
NET_NAME=`ip addr |awk -F"[: ]" '/^2: e.*/{print $3}'`
IP=`ip addr show ${NET_NAME}| awk -F" +|/" '/global/{print $3}'`
HARBOR_ADMIN_PASSWORD=123456os(){OS_ID=`sed -rn '/^NAME=/s@.*="([[:alpha:]]+).*"$@\1@p' /etc/os-release`OS_RELEASE_VERSION=`sed -rn '/^VERSION_ID=/s@.*="?([0-9]+)\.?.*"?@\1@p' /etc/os-release`
}check_file (){cd ${SRC_DIR}if [ ${OS_ID} == "CentOS" -o ${OS_ID} == "Rocky" ] &> /dev/null;thenrpm -q wget &> /dev/null || { ${COLOR}"安装wget工具,请稍等..."${END};yum -y install wget &> /dev/null; }fiif [ ! -e ${DOCKER_FILE} ];then${COLOR}"缺少${DOCKER_FILE}文件,如果是离线包,请把文件放到${SRC_DIR}目录下"${END}${COLOR}'开始下载DOCKER二进制源码包'${END}wget ${URL}${DOCKER_FILE} || { ${COLOR}"DOCKER二进制安装包下载失败"${END}; exit; }elif [ ! -e ${DOCKER_COMPOSE_FILE} ];then${COLOR}"缺少${DOCKER_COMPOSE_FILE}文件,请把文件放到${SRC_DIR}目录下"${END}exitelif [ ! -e ${HARBOR_FILE}${HARBOR_VERSION}${TAR} ];then${COLOR}"缺少${HARBOR_FILE}${HARBOR_VERSION}${TAR}文件,请把文件放到${SRC_DIR}目录下"${END}exitelse${COLOR}"相关文件已准备好"${END}fi
}install_docker(){ ${COLOR}"开始安装Docker,请稍等..."${END}tar xf ${DOCKER_FILE}mv docker/* /usr/bin/cat > /lib/systemd/system/docker.service <<-EOF
[Unit]
Description=Docker Application Container Engine
Documentation=https://docs.docker.com
After=network-online.target firewalld.service
Wants=network-online.target[Service]
Type=notify
# the default is not to use systemd for cgroups because the delegate issues still
# exists and systemd currently does not support the cgroup feature set required
# for containers run by docker
ExecStart=/usr/bin/dockerd -H unix://var/run/docker.sock
ExecReload=/bin/kill -s HUP \$MAINPID
# Having non-zero Limit*s causes performance problems due to accounting overhead
# in the kernel. We recommend using cgroups to do container-local accounting.
LimitNOFILE=infinity
LimitNPROC=infinity
LimitCORE=infinity
# Uncomment TasksMax if your systemd version supports it.
# Only systemd 226 and above support this version.
#TasksMax=infinity
TimeoutStartSec=0
# set delegate yes so that systemd does not reset the cgroups of docker containers
Delegate=yes
# kill only the docker process, not all processes in the cgroup
KillMode=process
# restart the docker process if it exits prematurely
Restart=on-failure
StartLimitBurst=3
StartLimitInterval=60s[Install]
WantedBy=multi-user.target
EOFmkdir -p /etc/dockercat > /etc/docker/daemon.json <<-EOF
{"registry-mirrors": ["https://registry.docker-cn.com","https://hub-mirror.c.163.com","https://docker.mirrors.ustc.edu.cn"],"insecure-registries": ["${HARBOR_DOMAIN}"],"data-root": "/data/docker","exec-opts": ["native.cgroupdriver=systemd"],"max-concurrent-downloads": 10,"max-concurrent-uploads": 5,"log-opts": {"max-size": "300m","max-file": "2"  },"live-restore": true
}
EOFecho 'alias rmi="docker images -qa|xargs docker rmi -f"' >> ~/.bashrcecho 'alias rmc="docker ps -qa|xargs docker rm -f"' >> ~/.bashrcsystemctl daemon-reloadsystemctl enable --now docker &> /dev/nullsystemctl is-active docker &> /dev/null && ${COLOR}"Docker 服务启动成功"${END} || { ${COLOR}"Docker 启动失败"${END};exit; }docker version && ${COLOR}"Docker 安装成功"${END} || ${COLOR}"Docker 安装失败"${END}
}install_docker_compose(){${COLOR}"开始安装Docker Compose,请稍等..."${END}mv ${SRC_DIR}/${DOCKER_COMPOSE_FILE} /usr/bin/docker-composechmod +x /usr/bin/docker-composedocker-compose --version &&  ${COLOR}"Docker Compose 安装完成"${END} || ${COLOR}"Docker compose 安装失败"${END}
}install_harbor(){${COLOR}"开始安装Harbor,请稍等..."${END}[ -d ${HARBOR_INSTALL_DIR} ] || mkdir ${HARBOR_INSTALL_DIR}tar xf ${SRC_DIR}/${HARBOR_FILE}${HARBOR_VERSION}${TAR} -C ${HARBOR_INSTALL_DIR}/mv ${HARBOR_INSTALL_DIR}/harbor/harbor.yml.tmpl ${HARBOR_INSTALL_DIR}/harbor/harbor.ymlsed -ri.bak -e 's/^(hostname:) .*/\1 '${IP}'/' -e 's/^(https:)/#\1/' -e 's/  (port: 443)/#  \1/' -e 's@  (certificate: .*)@#  \1@' -e 's@  (private_key: .*)@#  \1@' -e 's/^(harbor_admin_password:) .*/\1 '${HARBOR_ADMIN_PASSWORD}'/' ${HARBOR_INSTALL_DIR}/harbor/harbor.ymlif [ ${OS_ID} == "CentOS" -o ${OS_ID} == "Rocky" ] &> /dev/null;thenrpm -q python3 &> /dev/null || { ${COLOR}"安装python3,请稍等..."${END};yum -y install python3 &> /dev/null; }elsedpkg -s python3 &>/dev/null || { ${COLOR}"安装python3,请稍等..."${END};apt -y install python3 &> /dev/null; }fi${HARBOR_INSTALL_DIR}/harbor/install.sh --with-trivy && ${COLOR}"Harbor 安装完成"${END} ||  ${COLOR}"Harbor 安装失败"${END}cat > /lib/systemd/system/harbor.service <<-EOF
[Unit]
Description=Harbor
After=docker.service systemd-networkd.service systemd-resolved.service
Requires=docker.service
Documentation=http://github.com/vmware/harbor[Service]
Type=simple
Restart=on-failure
RestartSec=5
ExecStart=/usr/bin/docker-compose -f /apps/harbor/docker-compose.yml up
ExecStop=/usr/bin/docker-compose -f /apps/harbor/docker-compose.yml down[Install]
WantedBy=multi-user.target
EOFsystemctl daemon-reload systemctl enable harbor &>/dev/null && ${COLOR}"Harbor已配置为开机自动启动"${END}
}set_swap_limit(){if [ ${OS_RELEASE_VERSION} == "18" -o ${OS_RELEASE_VERSION} == "20" ];thengrep -q "swapaccount=1" /etc/default/grub && { ${COLOR}'"WARNING: No swap limit support"警告,已设置'${END};exit; }${COLOR}'设置Docker的"WARNING: No swap limit support"警告'${END}sed -ri '/^GRUB_CMDLINE_LINUX=/s@"$@ swapaccount=1"@' /etc/default/grubupdate-grub &> /dev/null${COLOR}"10秒后,机器会自动重启"${END}sleep 10rebootfi
}main(){oscheck_file[ -f /usr/bin/docker ] && ${COLOR}"Docker已安装"${END} || install_docker[ -f /usr/bin/docker-compose ] && ${COLOR}"Docker Compose已安装"${END} || install_docker_composesystemctl is-active harbor &> /dev/null && ${COLOR}"Harbor已安装"${END} || install_harborset_swap_limit
}main# 分别在ha01和ha02执行安装
[root@ha01 ~]# bash install_haproxy_v2.sh[root@ha02 ~]# bash install_haproxy_v2.sh
1.3 安装 Keepalived
这里使用"一键编译安装keepalived脚本"安装keepalived,keepalived的具体安装方法请参考博客“https://raymond.blog.csdn.net/article/details/135876134”。
# "check_haproxy.sh"文件是haproxy健康检查文件。
# "check_haproxy.sh"文件是haproxy健康检查文件。
[root@ha01 ~]# cat /usr/local/src/check_haproxy.sh
#!/bin/bash
#
#**********************************************************************************************
#Author:        Raymond
#QQ:            88563128
#Date:          2022-01-09
#FileName:      check_haproxy.sh
#URL:           raymond.blog.csdn.net
#Description:   The test script
#Copyright (C): 2022 All rights reserved
#*********************************************************************************************
err=0
for k in $(seq 1 3);docheck_code=$(pgrep haproxy)if [[ $check_code == "" ]]; thenerr=$(expr $err + 1)sleep 1continueelseerr=0breakfi
doneif [[ $err != "0" ]]; thenecho "systemctl stop keepalived"/usr/bin/systemctl stop keepalivedexit 1
elseexit 0
fi[root@ha01 ~]# cat install_keepalived_v2.sh
#!/bin/bash
#
#************************************************************************************************************
#Author:        Raymond
#QQ:            88563128
#Date:          2024-01-26
#FileName:      install_keepalived_v2.sh
#URL:           raymond.blog.csdn.net
#Description:   install_keepalived for CentOS 7 & CentOS Stream 8/9 & Ubuntu 18.04/20.04/22.04 & Rocky 8/9
#Copyright (C): 2024 All rights reserved
#************************************************************************************************************
SRC_DIR=/usr/local/src
COLOR="echo -e \\033[01;31m"
END='\033[0m'
KEEPALIVED_URL=https://keepalived.org/software/
KEEPALIVED_FILE=keepalived-2.2.8.tar.gz
KEEPALIVED_INSTALL_DIR=/apps/keepalived
CPUS=`lscpu |awk '/^CPU\(s\)/{print $2}'`
NET_NAME=`ip a |awk -F"[: ]" '/^2/{print $3}'`
VIP=172.31.3.188os(){OS_ID=`sed -rn '/^NAME=/s@.*="([[:alpha:]]+).*"$@\1@p' /etc/os-release`OS_RELEASE_VERSION=`sed -rn '/^VERSION_ID=/s@.*="?([0-9]+)\.?.*"?@\1@p' /etc/os-release`
}check_file (){cd  ${SRC_DIR}if [ ${OS_ID} == "CentOS" -o ${OS_ID} == "Rocky" ] &> /dev/null;thenrpm -q wget &> /dev/null || { ${COLOR}"安装wget工具,请稍等..."${END};yum -y install wget &> /dev/null; }fiif [ ! -e ${KEEPALIVED_FILE} ];then${COLOR}"缺少${KEEPALIVED_FILE}文件,如果是离线包,请放到${SRC_DIR}目录下"${END}${COLOR}'开始下载Keepalived源码包'${END}wget ${KEEPALIVED_URL}${KEEPALIVED_FILE} || { ${COLOR}"Keepalived源码包下载失败"${END}; exit; }elif [ ! -e check_haproxy.sh ];then${COLOR}"缺少check_haproxy.sh文件,请把文件放到${SRC_DIR}目录下"${END}exitelse${COLOR}"相关文件已准备好"${END}fi
}install_keepalived(){${COLOR}"开始安装Keepalived,请稍等..."${END}${COLOR}"开始安装Keepalived依赖包,请稍等..."${END}if [ ${OS_ID} == "Rocky" -a ${OS_RELEASE_VERSION} == 8 ];thenMIRROR=mirrors.sjtug.sjtu.edu.cnif [ `grep -R "\[powertools\]" /etc/yum.repos.d/*.repo` ];thendnf config-manager --set-enabled powertoolselsecat > /etc/yum.repos.d/PowerTools.repo <<-EOF
[PowerTools]
name=PowerTools
baseurl=https://${MIRROR}/rocky/\$releasever/PowerTools/\$basearch/os/
gpgcheck=1
gpgkey=file:///etc/pki/rpm-gpg/RPM-GPG-KEY-rockyofficial
EOFfifiif [ ${OS_ID} == "CentOS" -a ${OS_RELEASE_VERSION} == 8 ];thenMIRROR=mirrors.aliyun.comif [ `grep -R "\[powertools\]" /etc/yum.repos.d/*.repo` ];thendnf config-manager --set-enabled powertoolselsecat > /etc/yum.repos.d/PowerTools.repo <<-EOF
[PowerTools]
name=PowerTools
baseurl=https://${MIRROR}/centos/\$stream/PowerTools/\$basearch/os/
gpgcheck=1
gpgkey=file:///etc/pki/rpm-gpg/RPM-GPG-KEY-centosofficial
EOFfifiif [ ${OS_RELEASE_VERSION} == 9 ];thenyum -y install make gcc ipvsadm autoconf automake openssl-devel libnl3-devel iptables-devel ipset file net-snmp-devel glib2-devel pcre2-devel libnftnl libmnl systemd-devel &> /dev/nullelif [ ${OS_RELEASE_VERSION} == 8 ];then	yum -y install make gcc ipvsadm autoconf automake openssl-devel libnl3-devel iptables-devel ipset-devel file-devel net-snmp-devel glib2-devel pcre2-devel libnftnl-devel libmnl-devel systemd-devel &> /dev/nullelif [ ${OS_RELEASE_VERSION} == 7 ];thenyum -y install make gcc libnfnetlink-devel libnfnetlink ipvsadm libnl libnl-devel libnl3 libnl3-devel lm_sensors-libs net-snmp-agent-libs net-snmp-libs openssh-server openssh-clients openssl openssl-devel automake iproute &> /dev/nullelif [ ${OS_RELEASE_VERSION} == "20" -o ${OS_RELEASE_VERSION} == "22" ];thenapt update &> /dev/null;apt -y install make gcc ipvsadm build-essential pkg-config automake autoconf libipset-dev libnl-3-dev libnl-genl-3-dev libssl-dev libxtables-dev libip4tc-dev libip6tc-dev libipset-dev libmagic-dev libsnmp-dev libglib2.0-dev libpcre2-dev libnftnl-dev libmnl-dev libsystemd-develseapt update &> /dev/null;apt -y install make gcc ipvsadm build-essential pkg-config automake autoconf iptables-dev libipset-dev libnl-3-dev libnl-genl-3-dev libssl-dev libxtables-dev libip4tc-dev libip6tc-dev libipset-dev libmagic-dev libsnmp-dev libglib2.0-dev libpcre2-dev libnftnl-dev libmnl-dev libsystemd-dev &> /dev/nullfitar xf ${KEEPALIVED_FILE}KEEPALIVED_DIR=`echo ${KEEPALIVED_FILE} | sed -nr 's/^(.*[0-9]).*/\1/p'`cd ${KEEPALIVED_DIR}./configure --prefix=${KEEPALIVED_INSTALL_DIR} --disable-fwmarkmake -j $CPUS && make install[ $? -eq 0 ] && $COLOR"Keepalived编译安装成功"$END ||  { $COLOR"Keepalived编译安装失败,退出!"$END;exit; }[ -d /etc/keepalived ] || mkdir -p /etc/keepalived &> /dev/nullread -p "请输入是主服务断或备用服务端,例如(MASTER或BACKUP): " STATEread -p "请输入优先级,例如(100或80): " PRIORITYcat > /etc/keepalived/keepalived.conf <<EOF
! Configuration File for keepalivedglobal_defs {router_id LVS_DEVELscript_user rootenable_script_security
}vrrp_script check_haoroxy {script "/etc/keepalived/check_haproxy.sh"interval 5weight -5fall 2  rise 1
}vrrp_instance VI_1 {state ${STATE}interface ${NET_NAME}virtual_router_id 51priority ${PRIORITY}advert_int 1authentication {auth_type PASSauth_pass 1111}virtual_ipaddress {${VIP} dev ${NET_NAME} label ${NET_NAME}:1   }track_script {check_haproxy}
}
EOFcp ./keepalived/keepalived.service /lib/systemd/system/cd  ${SRC_DIR}mv check_haproxy.sh /etc/keepalived/check_haproxy.shchmod +x /etc/keepalived/check_haproxy.shecho "PATH=${KEEPALIVED_INSTALL_DIR}/sbin:${PATH}" > /etc/profile.d/keepalived.shsystemctl daemon-reloadsystemctl enable --now keepalived &> /dev/null systemctl is-active keepalived &> /dev/null ||  { ${COLOR}"Keepalived 启动失败,退出!"${END} ; exit; }${COLOR}"Keepalived安装完成"${END}
}main(){oscheck_fileinstall_keepalived
}main# 分别在ha01和ha02执行安装
[root@ha01 ~]# bash install_keepalived_v2.sh
...
请输入是主服务断或备用服务端,例如(MASTER或BACKUP): MASTER
请输入优先级,例如(100或80): 100[root@ha02 ~]# bash install_keepalived_v2.sh
...
请输入是主服务断或备用服务端,例如(MASTER或BACKUP): BACKUP
请输入优先级,例如(100或80): 80
1.4 测试访问
浏览器访问:“http://172.31.3.188:9999/haproxy-status”验证,用户名密码: admin:123456
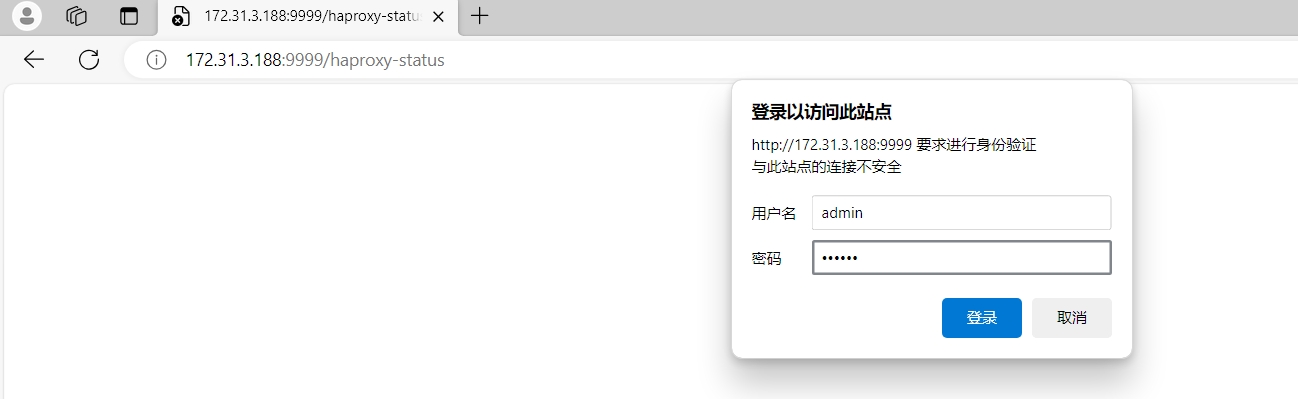
图1-2 haproxy状态页面登录界面
图1-3可以看到后端服务还不在线。
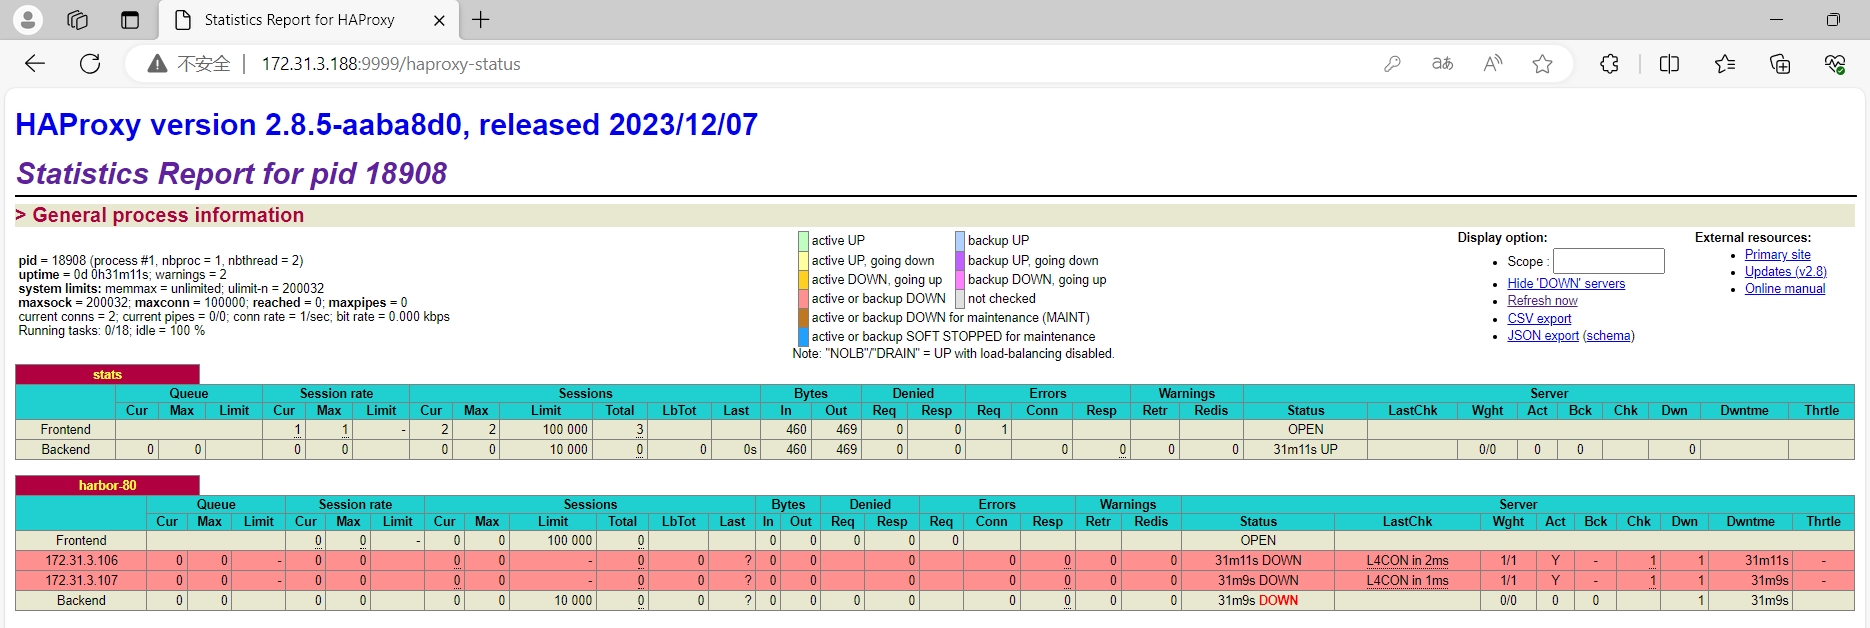
图1-3 haproxy状态页面
1.5 安装harbor
这里使用"基于docker二进制包一键安装Harbor脚本"安装harbor,harbor的具体安装方法请参考博客“https://raymond.blog.csdn.net/article/details/135882947”。
[root@harbor01 ~]# cat install_harbor_http_v2_1.sh
#!/bin/bash
#
#******************************************************************************************************************
#Author:        Raymond
#QQ:            88563128
#Date:          2024-01-26
#FileName:      install_harbor_http_v2_1.sh
#URL:           raymond.blog.csdn.net
#Description:   install_harbor_http for CentOS 7 & CentOS Stream 8/9 & Ubuntu 18.04/20.04/22.04 & Rocky 8/9
#Copyright (C): 2024 All rights reserved
#******************************************************************************************************************
SRC_DIR=/usr/local/src
COLOR="echo -e \\033[01;31m"
END='\033[0m'URL='https://mirrors.aliyun.com/docker-ce/linux/static/stable/x86_64/'
DOCKER_FILE=docker-24.0.7.tgz# Docker Compose下载地址:“https://github.com/docker/compose/releases/download/v2.23.3/docker-compose-linux-x86_64”,请提前下载。
DOCKER_COMPOSE_FILE=docker-compose-linux-x86_64# Harbor下载地址:“https://github.com/goharbor/harbor/releases/download/v2.10.0/harbor-offline-installer-v2.10.0.tgz”,请提前下载。
HARBOR_FILE=harbor-offline-installer-v
HARBOR_VERSION=2.10.0
TAR=.tgz
HARBOR_INSTALL_DIR=/apps
HARBOR_DOMAIN=harbor.raymonds.cc
NET_NAME=`ip addr |awk -F"[: ]" '/^2: e.*/{print $3}'`
IP=`ip addr show ${NET_NAME}| awk -F" +|/" '/global/{print $3}'`
HARBOR_ADMIN_PASSWORD=123456os(){OS_ID=`sed -rn '/^NAME=/s@.*="([[:alpha:]]+).*"$@\1@p' /etc/os-release`OS_RELEASE_VERSION=`sed -rn '/^VERSION_ID=/s@.*="?([0-9]+)\.?.*"?@\1@p' /etc/os-release`
}check_file (){cd ${SRC_DIR}if [ ${OS_ID} == "CentOS" -o ${OS_ID} == "Rocky" ] &> /dev/null;thenrpm -q wget &> /dev/null || { ${COLOR}"安装wget工具,请稍等..."${END};yum -y install wget &> /dev/null; }fiif [ ! -e ${DOCKER_FILE} ];then${COLOR}"缺少${DOCKER_FILE}文件,如果是离线包,请把文件放到${SRC_DIR}目录下"${END}${COLOR}'开始下载DOCKER二进制源码包'${END}wget ${URL}${DOCKER_FILE} || { ${COLOR}"DOCKER二进制安装包下载失败"${END}; exit; }elif [ ! -e ${DOCKER_COMPOSE_FILE} ];then${COLOR}"缺少${DOCKER_COMPOSE_FILE}文件,请把文件放到${SRC_DIR}目录下"${END}exitelif [ ! -e ${HARBOR_FILE}${HARBOR_VERSION}${TAR} ];then${COLOR}"缺少${HARBOR_FILE}${HARBOR_VERSION}${TAR}文件,请把文件放到${SRC_DIR}目录下"${END}exitelse${COLOR}"相关文件已准备好"${END}fi
}install_docker(){ ${COLOR}"开始安装Docker,请稍等..."${END}tar xf ${DOCKER_FILE}mv docker/* /usr/bin/cat > /lib/systemd/system/docker.service <<-EOF
[Unit]
Description=Docker Application Container Engine
Documentation=https://docs.docker.com
After=network-online.target firewalld.service
Wants=network-online.target[Service]
Type=notify
# the default is not to use systemd for cgroups because the delegate issues still
# exists and systemd currently does not support the cgroup feature set required
# for containers run by docker
ExecStart=/usr/bin/dockerd -H unix://var/run/docker.sock
ExecReload=/bin/kill -s HUP \$MAINPID
# Having non-zero Limit*s causes performance problems due to accounting overhead
# in the kernel. We recommend using cgroups to do container-local accounting.
LimitNOFILE=infinity
LimitNPROC=infinity
LimitCORE=infinity
# Uncomment TasksMax if your systemd version supports it.
# Only systemd 226 and above support this version.
#TasksMax=infinity
TimeoutStartSec=0
# set delegate yes so that systemd does not reset the cgroups of docker containers
Delegate=yes
# kill only the docker process, not all processes in the cgroup
KillMode=process
# restart the docker process if it exits prematurely
Restart=on-failure
StartLimitBurst=3
StartLimitInterval=60s[Install]
WantedBy=multi-user.target
EOFmkdir -p /etc/dockercat > /etc/docker/daemon.json <<-EOF
{"registry-mirrors": ["https://registry.docker-cn.com","https://hub-mirror.c.163.com","https://docker.mirrors.ustc.edu.cn"],"insecure-registries": ["${HARBOR_DOMAIN}"],"data-root": "/data/docker","exec-opts": ["native.cgroupdriver=systemd"],"max-concurrent-downloads": 10,"max-concurrent-uploads": 5,"log-opts": {"max-size": "300m","max-file": "2"  },"live-restore": true
}
EOFecho 'alias rmi="docker images -qa|xargs docker rmi -f"' >> ~/.bashrcecho 'alias rmc="docker ps -qa|xargs docker rm -f"' >> ~/.bashrcsystemctl daemon-reloadsystemctl enable --now docker &> /dev/nullsystemctl is-active docker &> /dev/null && ${COLOR}"Docker 服务启动成功"${END} || { ${COLOR}"Docker 启动失败"${END};exit; }docker version && ${COLOR}"Docker 安装成功"${END} || ${COLOR}"Docker 安装失败"${END}
}install_docker_compose(){${COLOR}"开始安装Docker Compose,请稍等..."${END}mv ${SRC_DIR}/${DOCKER_COMPOSE_FILE} /usr/bin/docker-composechmod +x /usr/bin/docker-composedocker-compose --version &&  ${COLOR}"Docker Compose 安装完成"${END} || ${COLOR}"Docker compose 安装失败"${END}
}install_harbor(){${COLOR}"开始安装Harbor,请稍等..."${END}[ -d ${HARBOR_INSTALL_DIR} ] || mkdir ${HARBOR_INSTALL_DIR}tar xf ${SRC_DIR}/${HARBOR_FILE}${HARBOR_VERSION}${TAR} -C ${HARBOR_INSTALL_DIR}/mv ${HARBOR_INSTALL_DIR}/harbor/harbor.yml.tmpl ${HARBOR_INSTALL_DIR}/harbor/harbor.ymlsed -ri.bak -e 's/^(hostname:) .*/\1 '${IP}'/' -e 's/^(https:)/#\1/' -e 's/  (port: 443)/#  \1/' -e 's@  (certificate: .*)@#  \1@' -e 's@  (private_key: .*)@#  \1@' -e 's/^(harbor_admin_password:) .*/\1 '${HARBOR_ADMIN_PASSWORD}'/' ${HARBOR_INSTALL_DIR}/harbor/harbor.ymlif [ ${OS_ID} == "CentOS" -o ${OS_ID} == "Rocky" ] &> /dev/null;thenrpm -q python3 &> /dev/null || { ${COLOR}"安装python3,请稍等..."${END};yum -y install python3 &> /dev/null; }elsedpkg -s python3 &>/dev/null || { ${COLOR}"安装python3,请稍等..."${END};apt -y install python3 &> /dev/null; }fi${HARBOR_INSTALL_DIR}/harbor/install.sh --with-trivy && ${COLOR}"Harbor 安装完成"${END} ||  ${COLOR}"Harbor 安装失败"${END}cat > /lib/systemd/system/harbor.service <<-EOF
[Unit]
Description=Harbor
After=docker.service systemd-networkd.service systemd-resolved.service
Requires=docker.service
Documentation=http://github.com/vmware/harbor[Service]
Type=simple
Restart=on-failure
RestartSec=5
ExecStart=/usr/bin/docker-compose -f ${HARBOR_INSTALL_DIR}/harbor/docker-compose.yml up
ExecStop=/usr/bin/docker-compose -f ${HARBOR_INSTALL_DIR}/harbor/docker-compose.yml down[Install]
WantedBy=multi-user.target
EOFsystemctl daemon-reload systemctl enable harbor &>/dev/null && ${COLOR}"Harbor已配置为开机自动启动"${END}
}set_swap_limit(){if [ ${OS_RELEASE_VERSION} == "18" -o ${OS_RELEASE_VERSION} == "20" ];thengrep -q "swapaccount=1" /etc/default/grub && { ${COLOR}'"WARNING: No swap limit support"警告,已设置'${END};exit; }${COLOR}'设置Docker的"WARNING: No swap limit support"警告'${END}sed -ri '/^GRUB_CMDLINE_LINUX=/s@"$@ swapaccount=1"@' /etc/default/grubupdate-grub &> /dev/null${COLOR}"10秒后,机器会自动重启"${END}sleep 10rebootfi
}main(){oscheck_file[ -f /usr/bin/docker ] && ${COLOR}"Docker已安装"${END} || install_docker[ -f /usr/bin/docker-compose ] && ${COLOR}"Docker Compose已安装"${END} || install_docker_composesystemctl is-active harbor &> /dev/null && ${COLOR}"Harbor已安装"${END} || install_harborset_swap_limit
}main# 分别在harbor01和harbor02执行安装
[root@harbor01 ~]# bash install_harbor_http_v2_1.sh[root@harbor02 ~]# bash install_harbor_http_v2_1.sh
图1-4可以看到后端服务已经在线了。
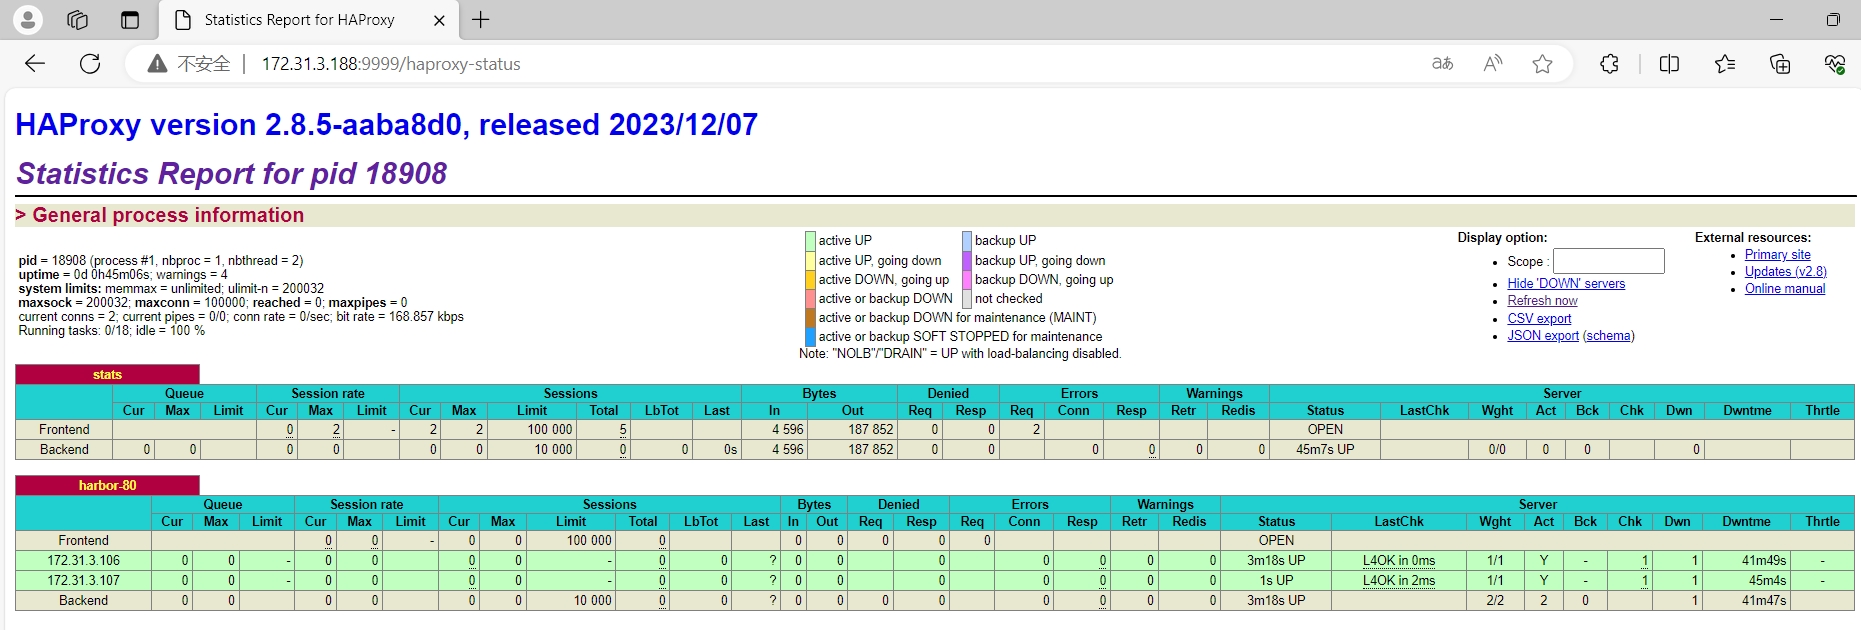
图1-4 haproxy状态页面
1.6 创建harbor仓库
在harbor01新建项目google_containers。
http://172.31.3.106/
用户名:admin 密码:123456
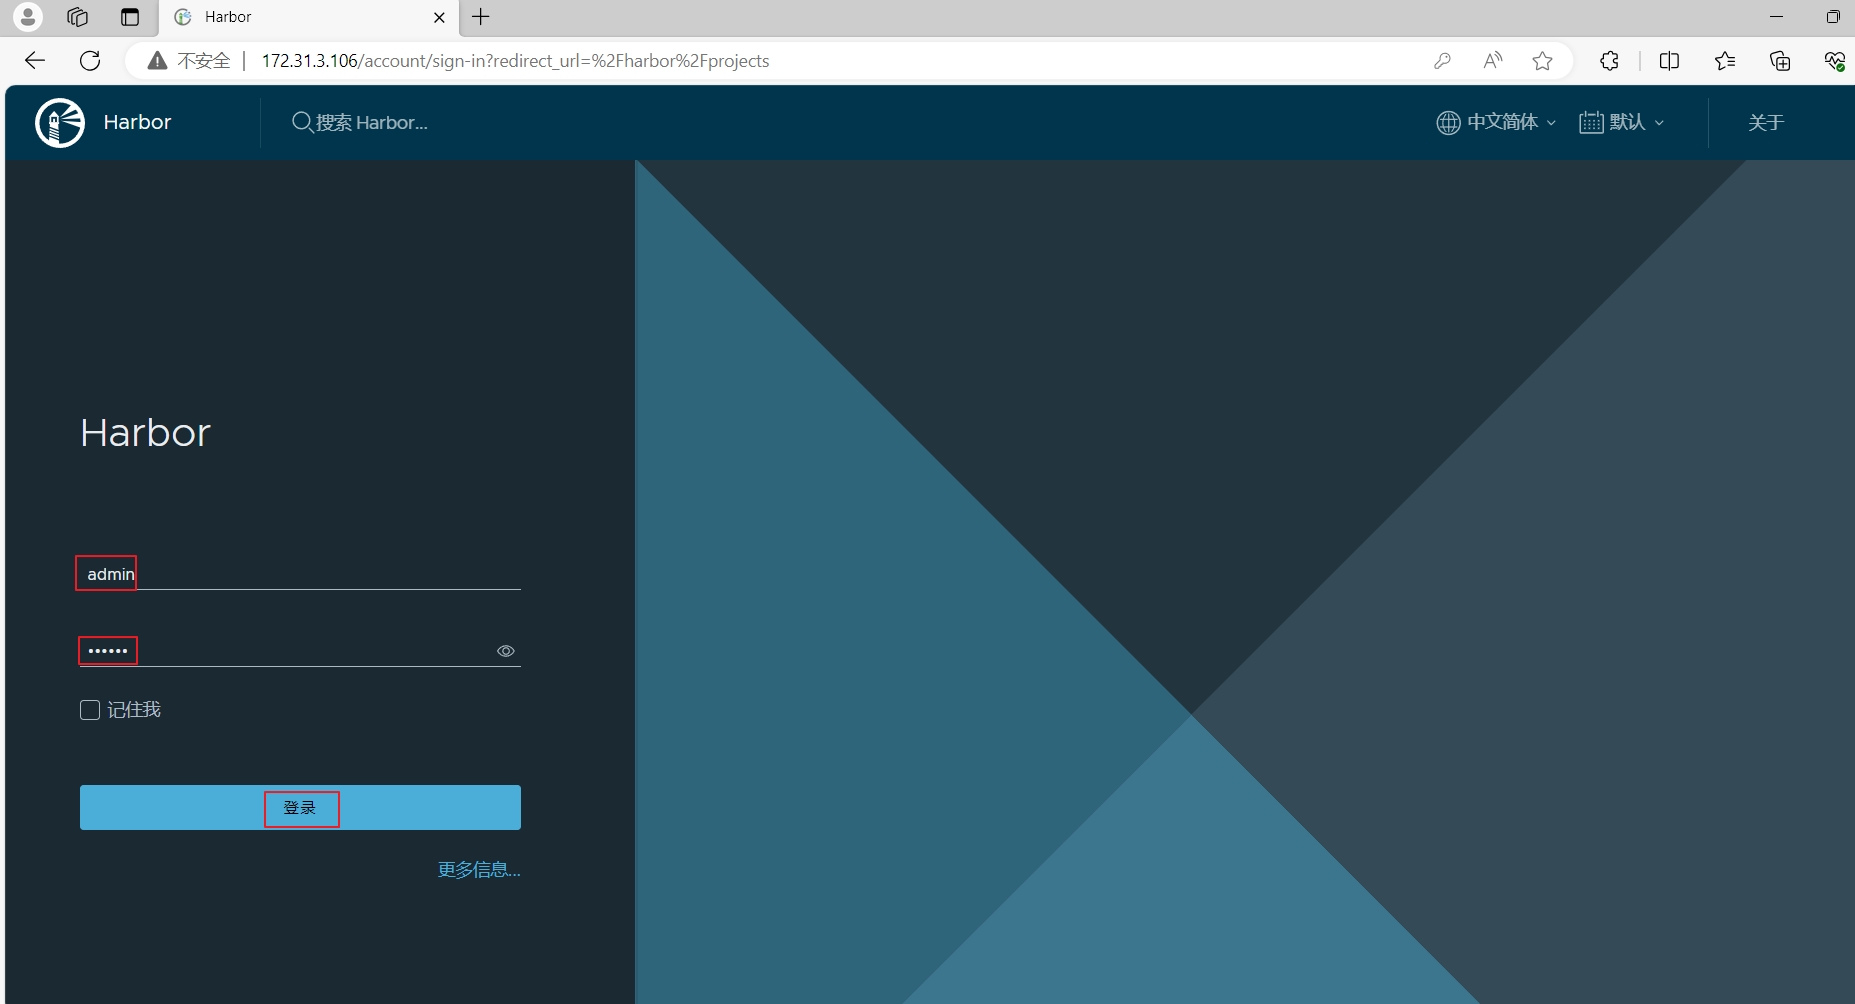
图1-5 登录harbor01
登录后,在“项目”下面选择“新建项目”。

图1-6 在harbor01上新建项目
项目名称设置为“google_containers”,访问级别后面勾选“公开”,然后选“确认”。
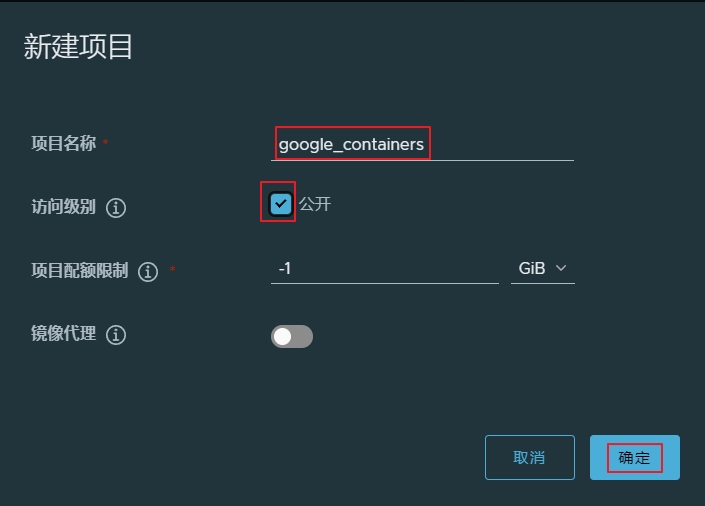
图1-7 在harbor01上创建google_containers项目
在harbor02新建项目google_containers
http://172.31.3.107/
用户名:admin 密码:123456
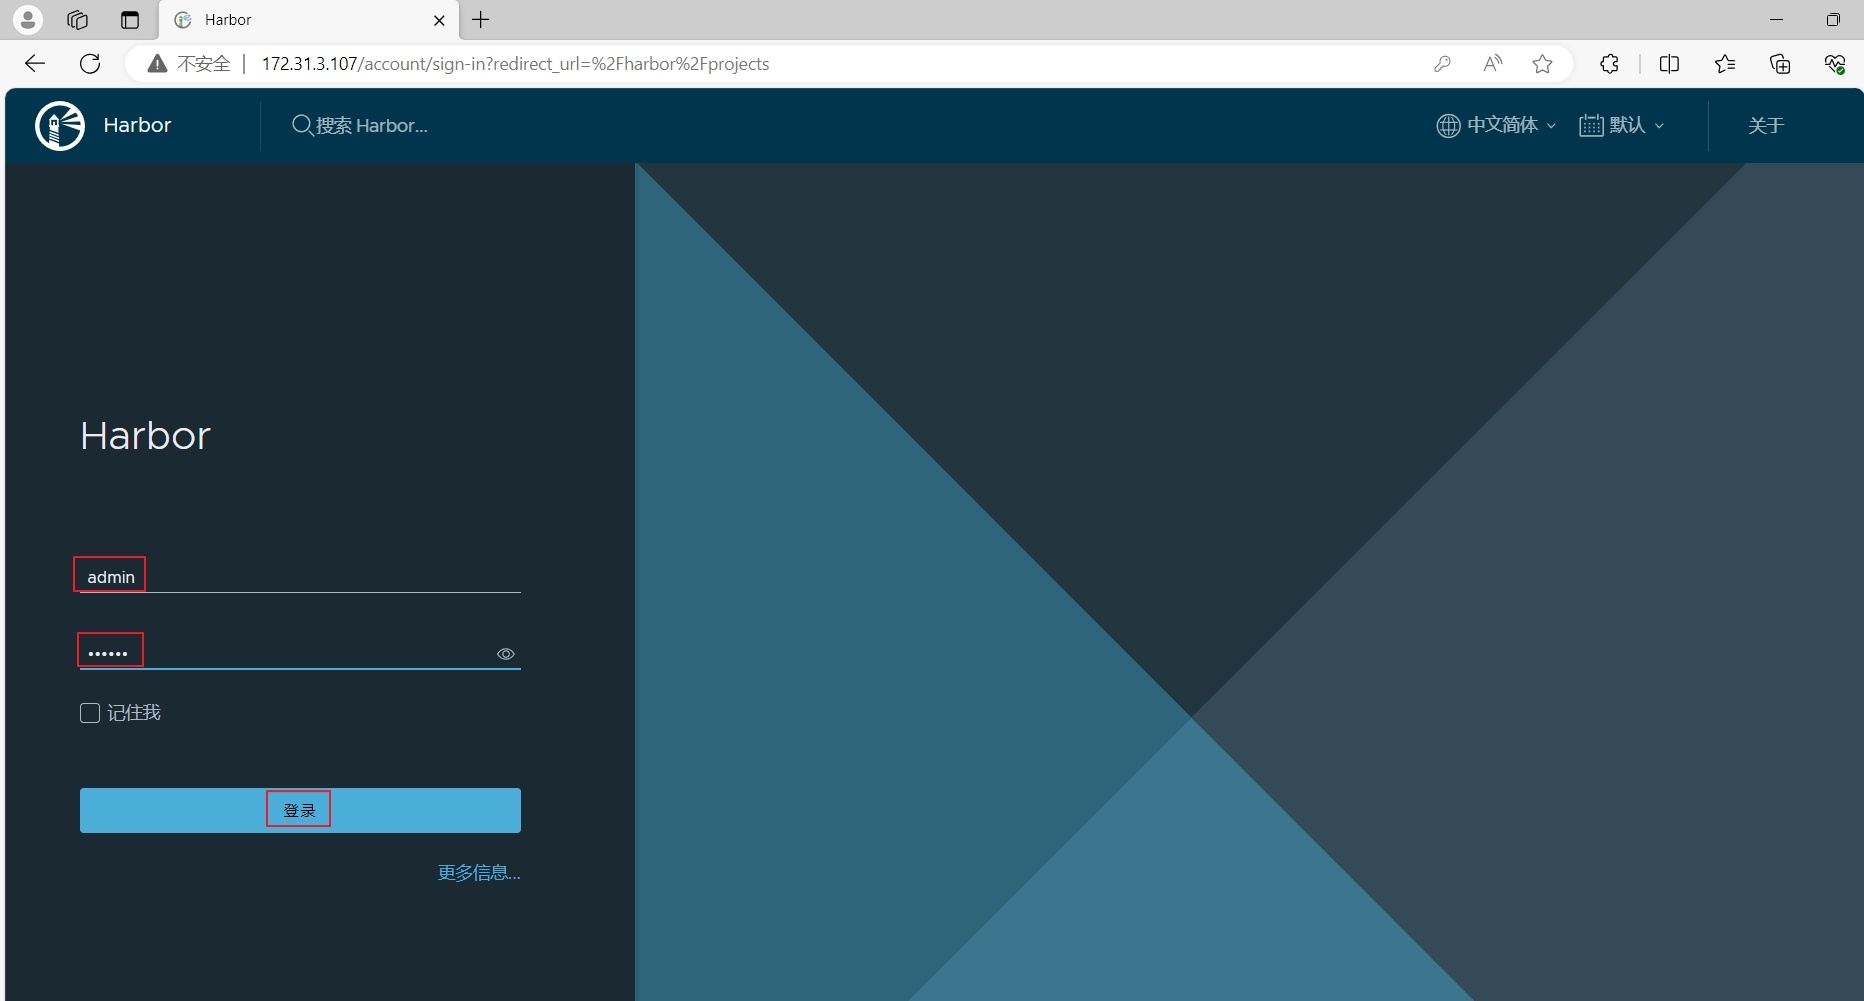
图1-8 登录harbor02
登录后,在“项目”下面选择“新建项目”。
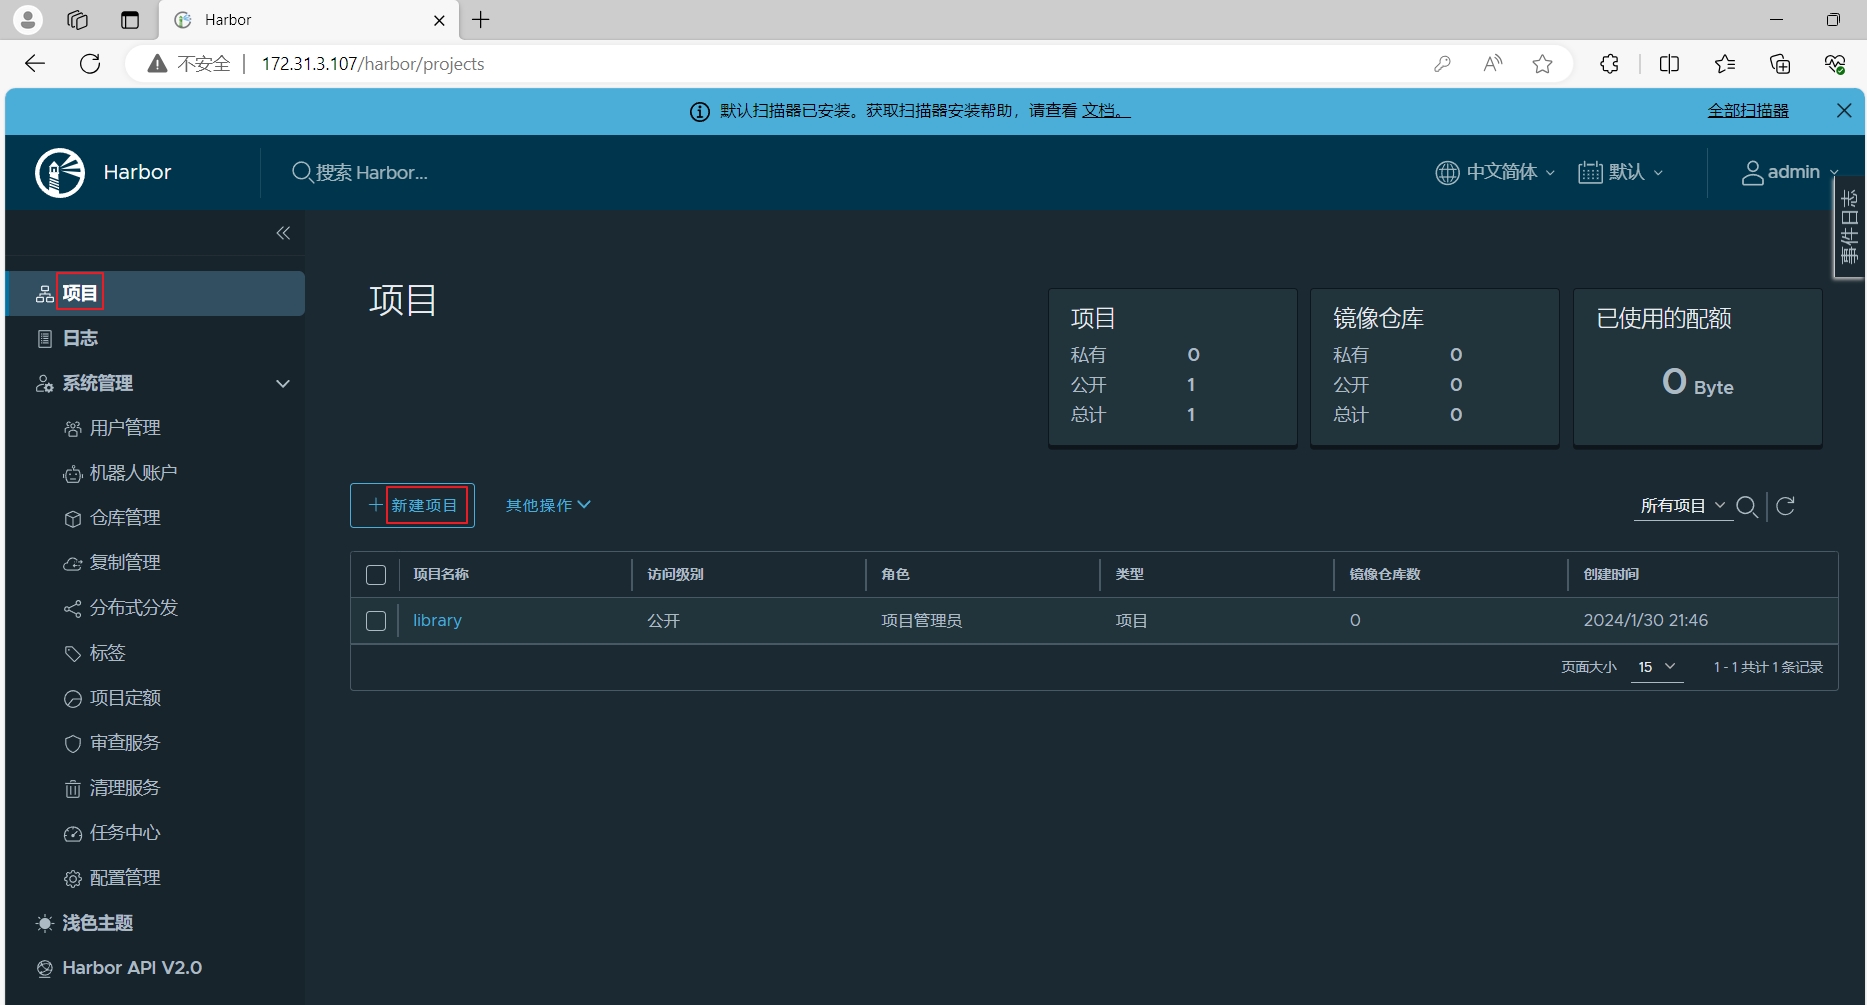
图1-9 在harbor02上新建项目
项目名称设置为“google_containers”,访问级别后面勾选“公开”,然后选“确认”。
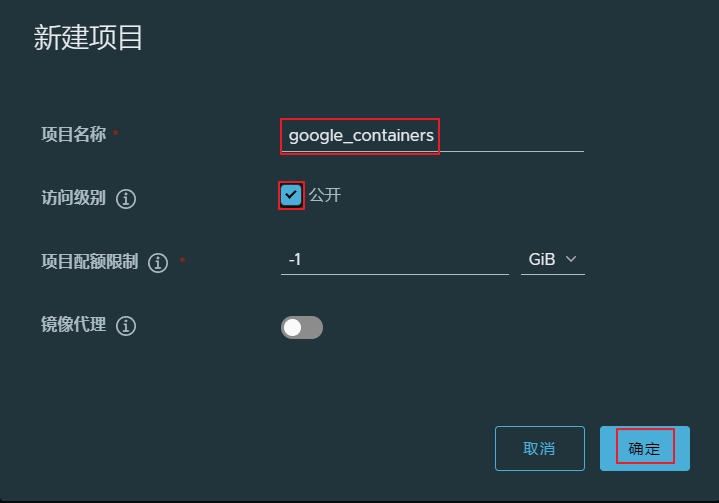
图1-10 在harbor01上创建google_containers项目
在harbor02上新建目标
在“系统管理”下面的“仓库管理”里面选择“新建目标”。
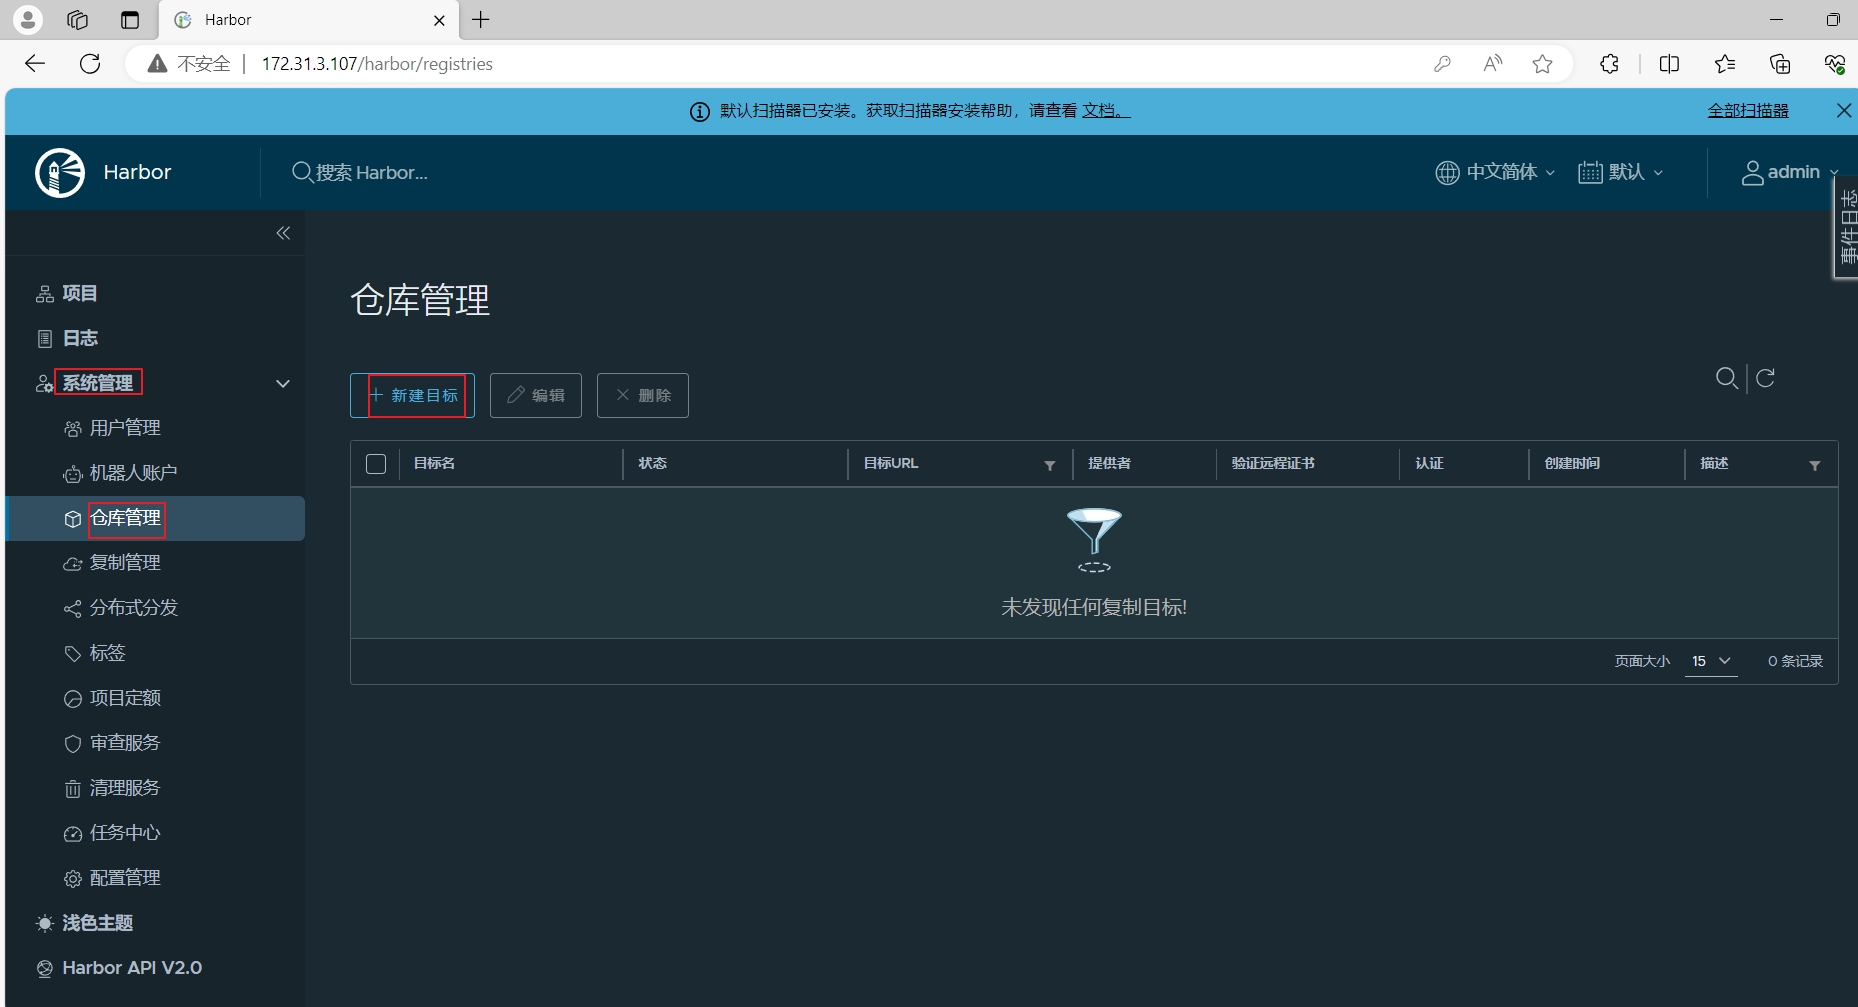
图1-11 在harbor02上新建目标
提供者设置为“Harbor”,目标名设置为“google_containers”,目标URL设置为harbor01的地址“http://172.31.3.106”,访问ID设置为harbor01的用户名“admin”,访问密码设置为harbor01的密码“123456”,然后“测试连接”,测试成功后选择“确定”。
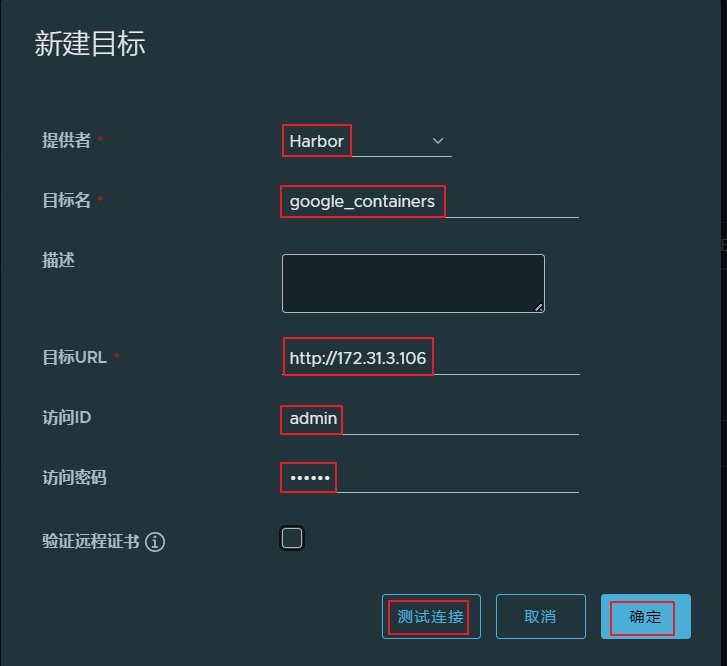
图1-12 在harbor02上新建目标
在harbor02上新建规则
在“系统管理”下面的“复制管理”里面选择“新建规则”。
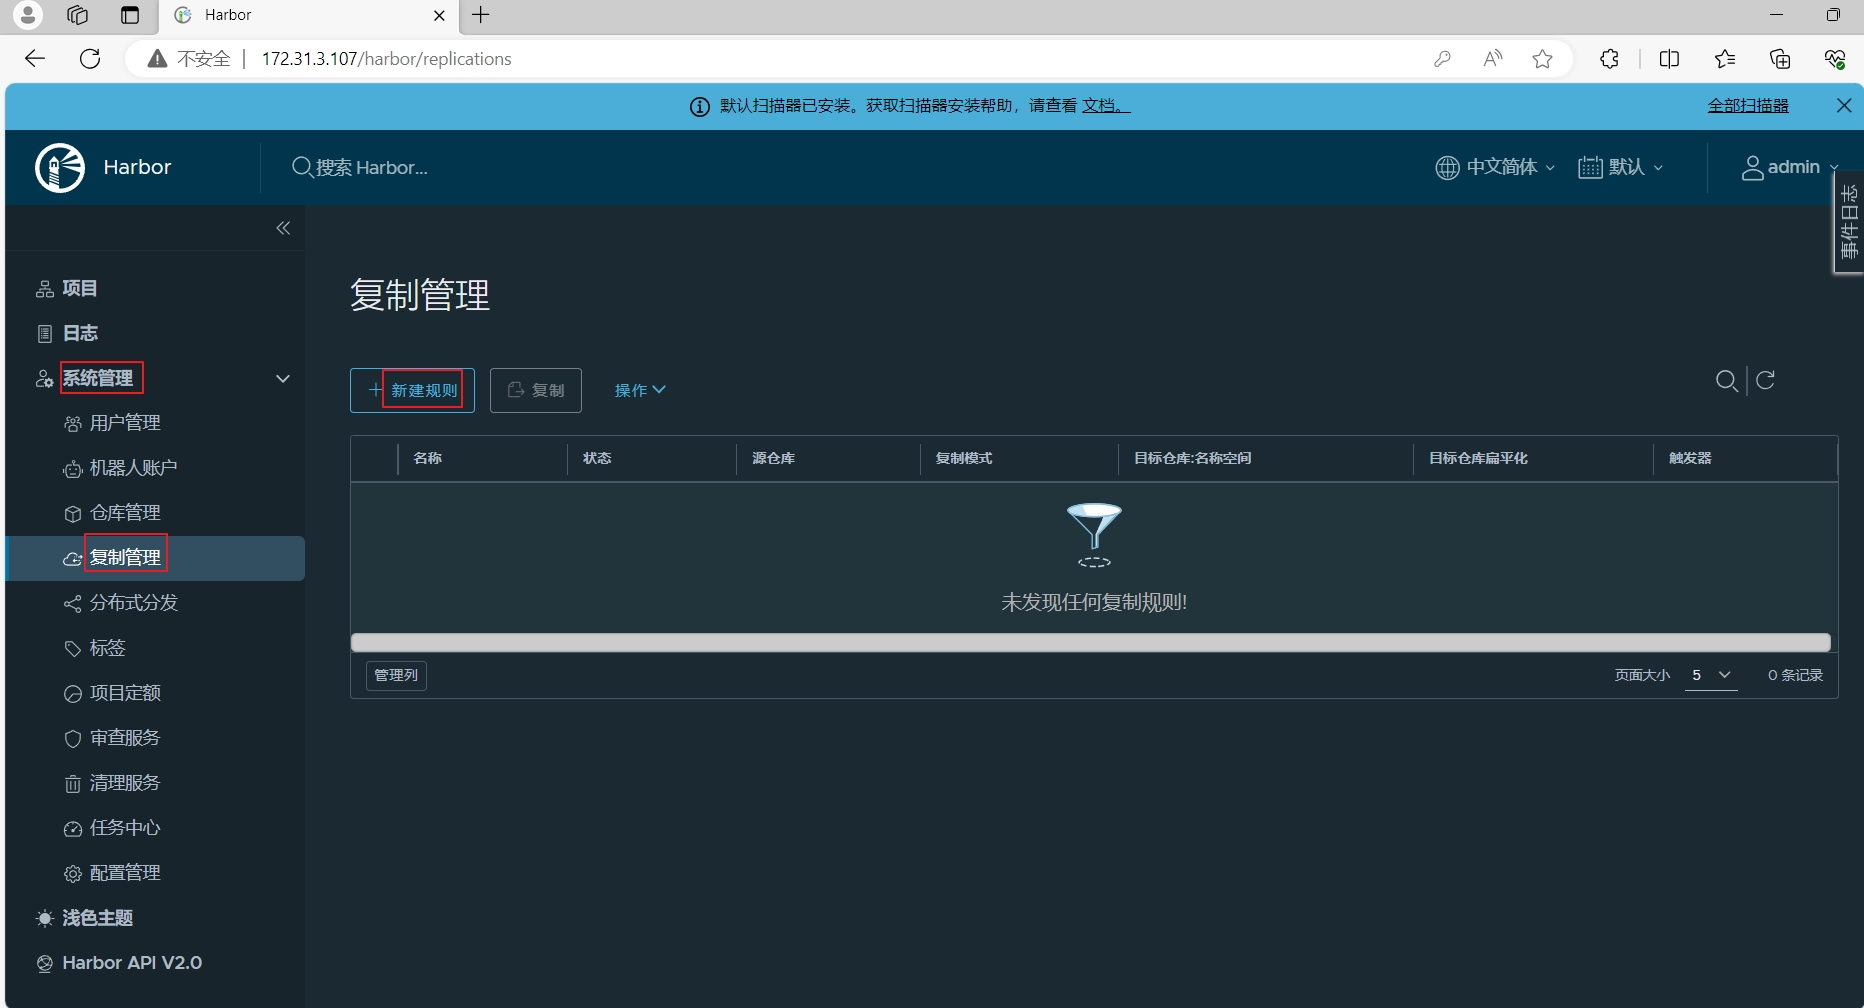
图1-13 在harbor02上新建规则
名称设置为“google_containers”,目标仓库选择“google_containers-http://172.31.0.106”,触发模式设置为“事件驱动”,勾选“删除本地资源时同时也删除远程的资源 ”,然后选择“保存”。

图1-14 在harbor02上新建规则
在harbor01上新建目标
在“系统管理”下面的“仓库管理”里面选择“新建目标”。
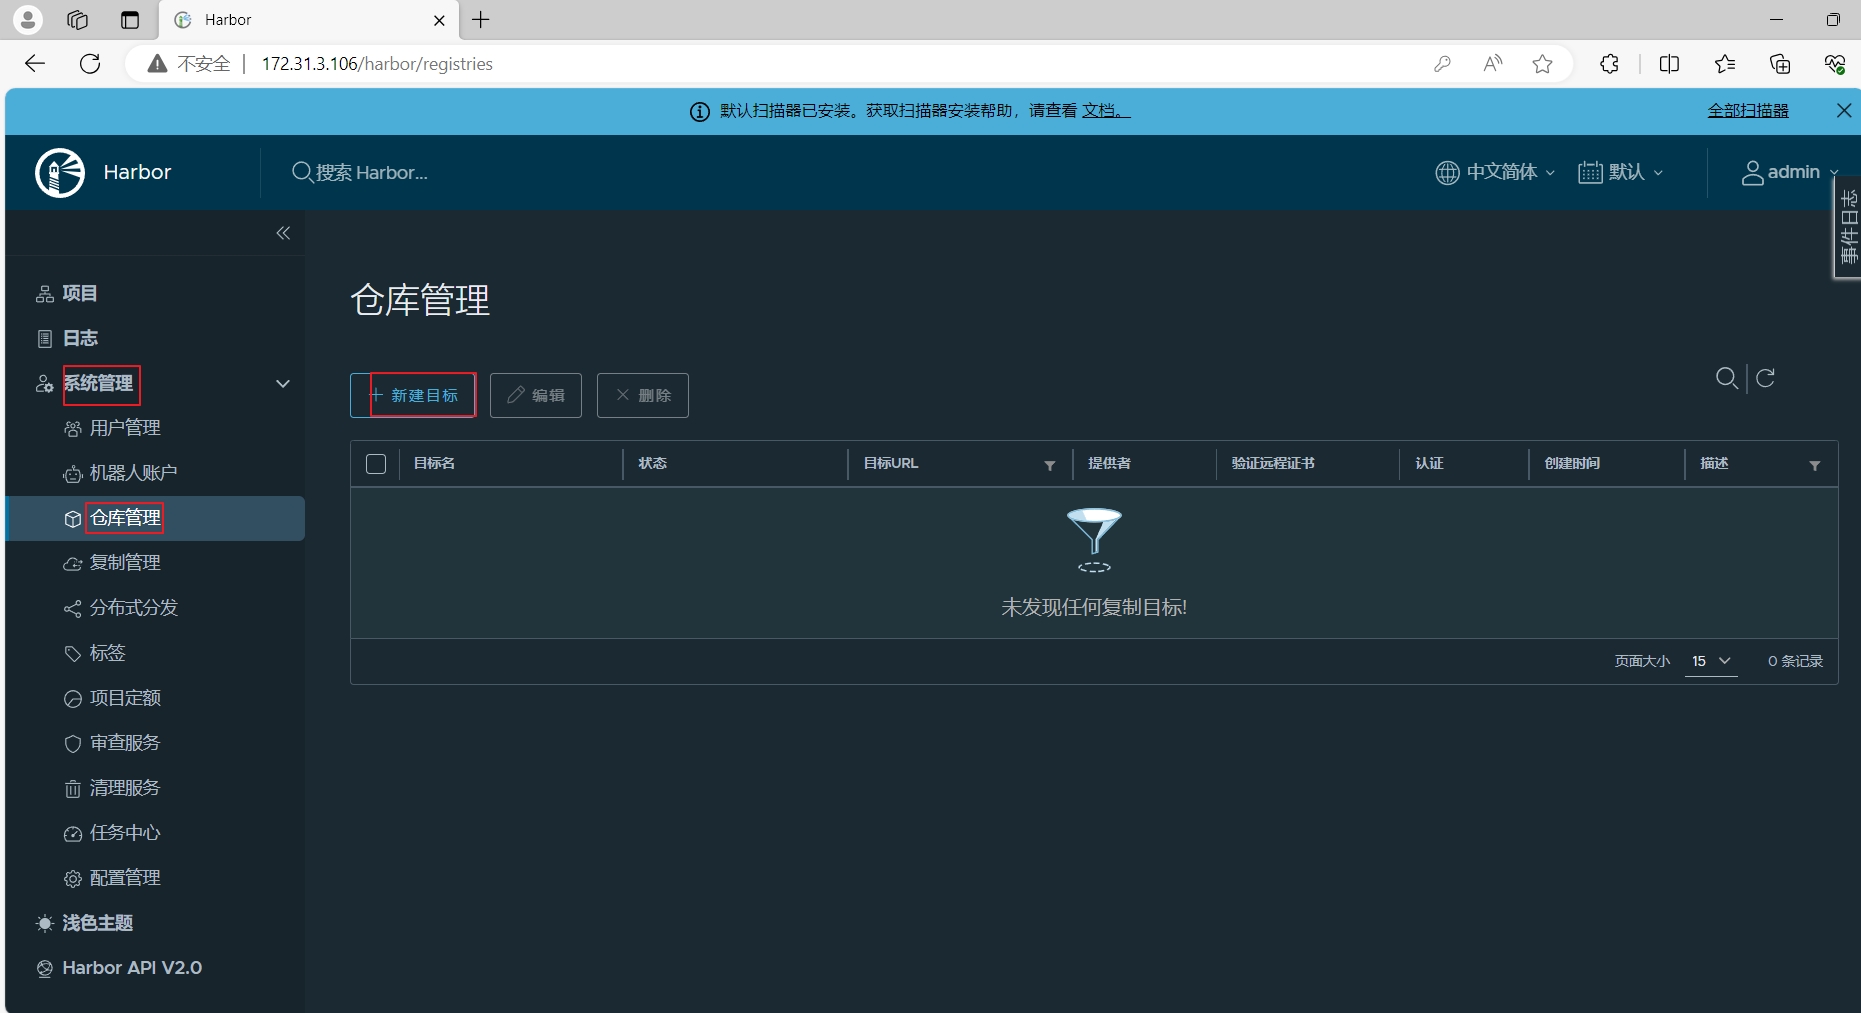
图1-15 在harbor01上新建目标
提供者设置为“Harbor”,目标名设置为“google_containers”,目标URL设置为harbor01的地址“http://172.31.3.107”,访问ID设置为harbor01的用户名“admin”,访问密码设置为harbor01的密码“123456”,然后“测试连接”,测试成功后选择“确定”。
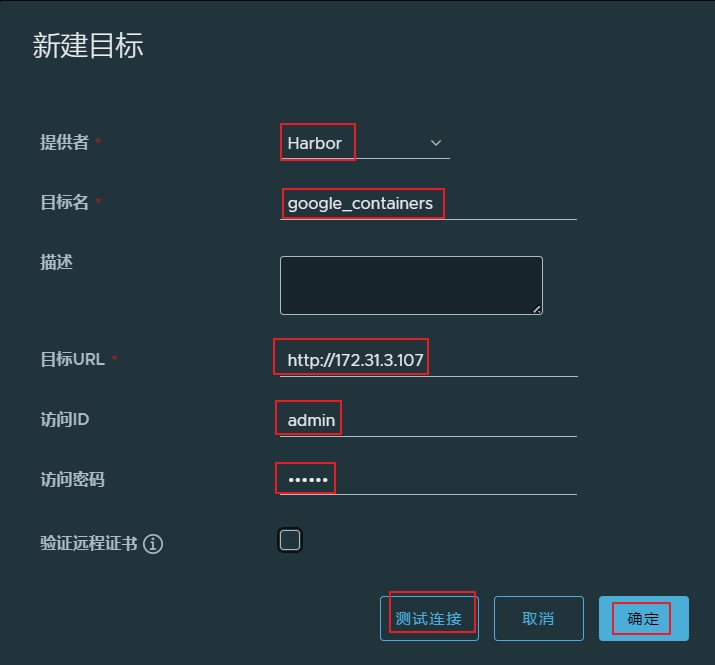
图1-16 在harbor01上新建目标
在harbor01上新建规则
在“系统管理”下面的“复制管理”里面选择“新建规则”。
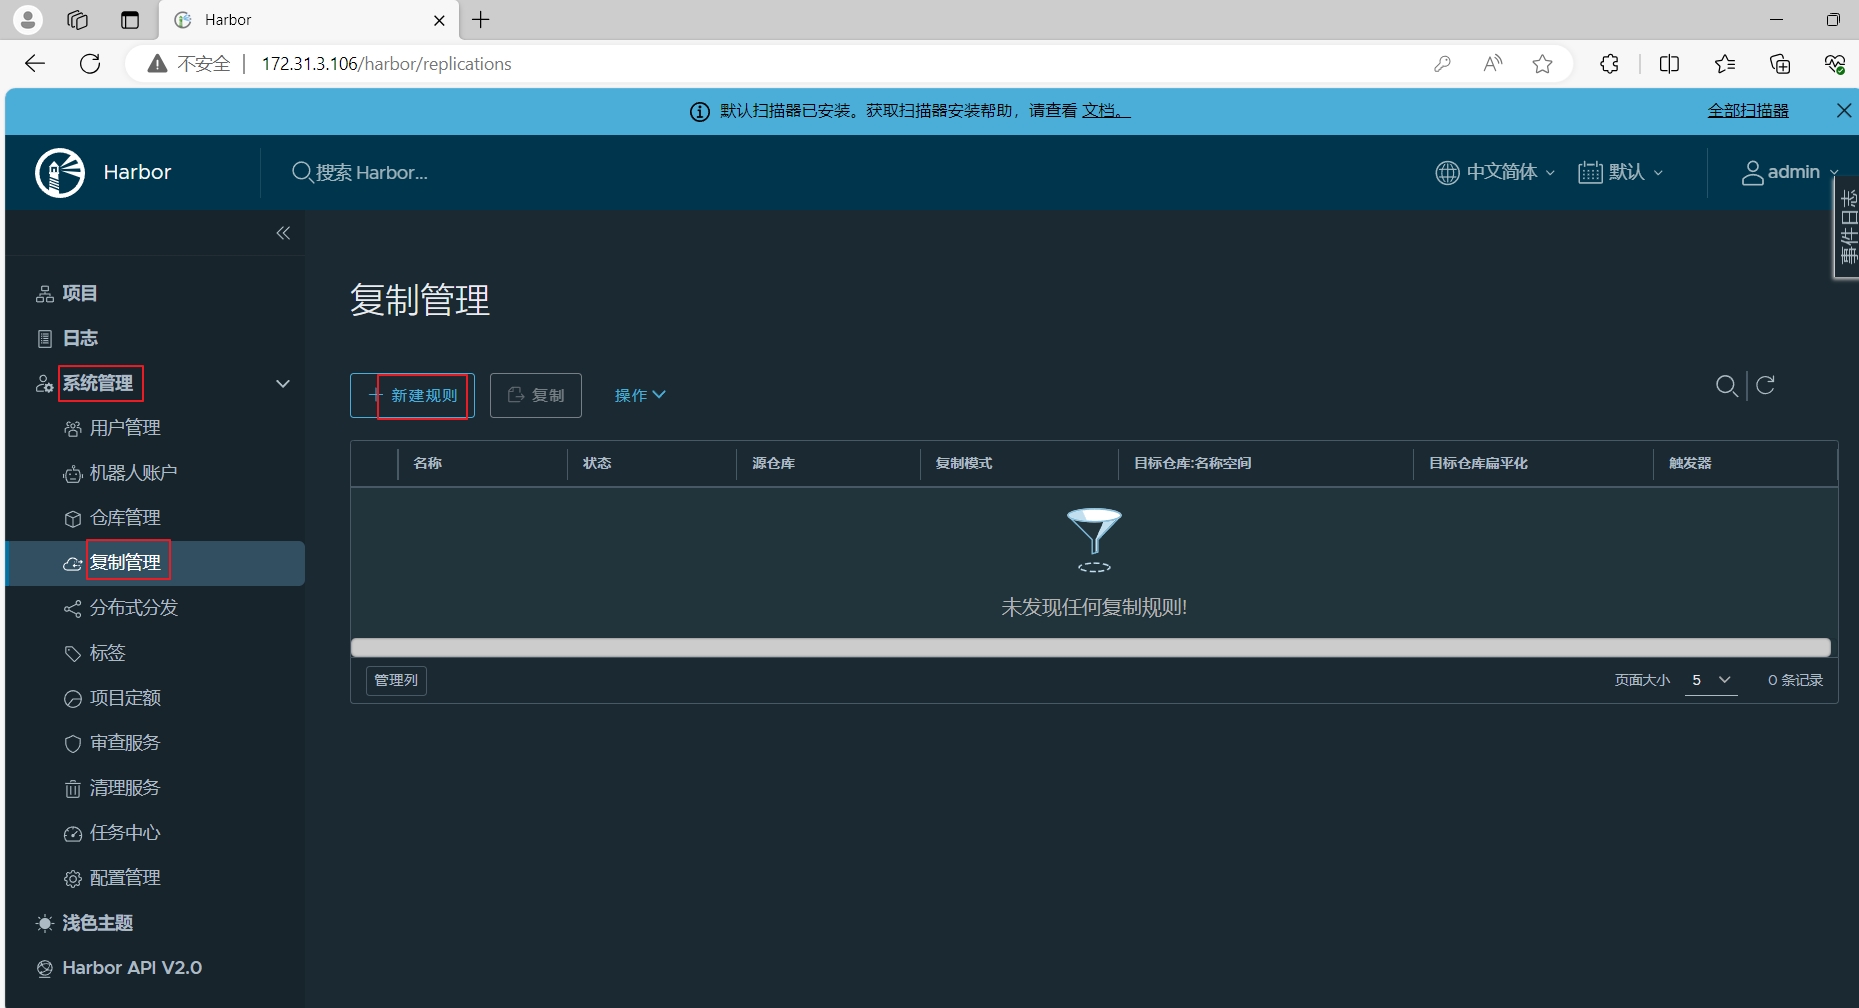
图1-17 在harbor01上新建规则
名称设置为“google_containers”,目标仓库选择“google_containers-http://172.31.0.107”,触发模式设置为“事件驱动”,勾选“删除本地资源时同时也删除远程的资源 ”,然后选择“保存”。
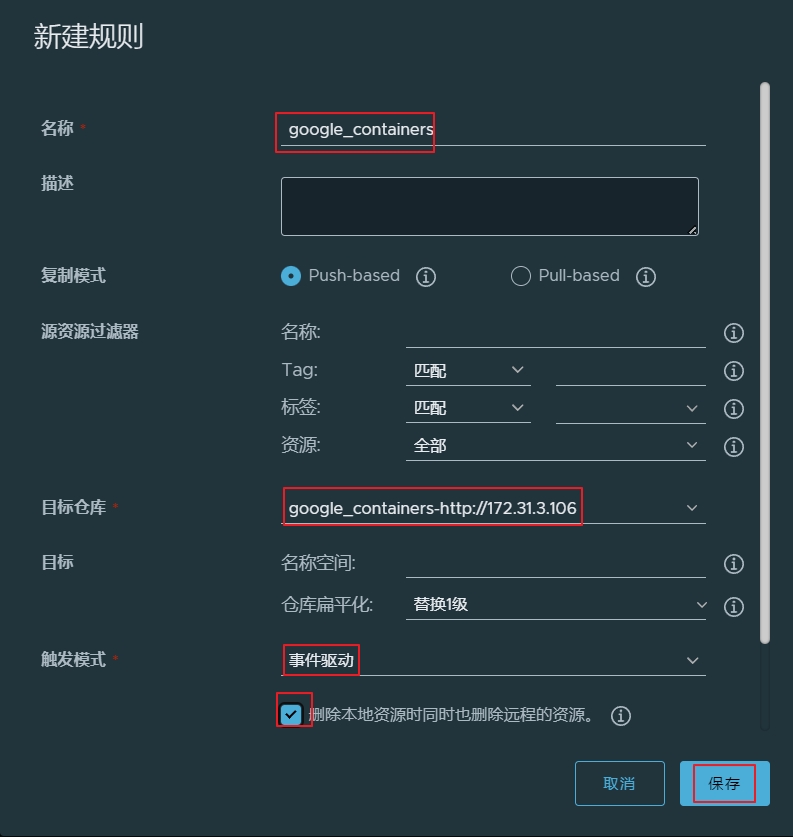
图1-18 在harbor01上新建规则
1.7 在docker客户端验证
在172.31.0.8的Rocky 8的主机上无需登录,即可下载镜像
首先要主机初始化和安装docker
[root@client ~]# cat >> /etc/hosts <<-EOF
172.31.3.188 harbor.raymonds.cc
EOF[root@client ~]# docker login harbor.raymonds.cc
Username: admin
Password:
Error response from daemon: Get "https://harbor.raymonds.cc/v2/": dial tcp 172.31.3.188:443: connect: connection refuse
# 登录失败[root@client ~]# cat /etc/docker/daemon.json
{"registry-mirrors": ["https://registry.docker-cn.com","https://hub-mirror.c.163.com","https://docker.mirrors.ustc.edu.cn"],"insecure-registries": ["harbor.raymonds.cc"], # 设置非安全的镜像仓库"data-root": "/data/docker","exec-opts": ["native.cgroupdriver=systemd"],"max-concurrent-downloads": 10,"max-concurrent-uploads": 5,"log-opts": {"max-size": "300m","max-file": "2"  },"live-restore": true
}[root@client ~]# systemctl daemon-reload && systemctl restart docker[root@client ~]# docker login harbor.raymonds.cc
Username: admin
Password:
WARNING! Your password will be stored unencrypted in /root/.docker/config.json.
Configure a credential helper to remove this warning. See
https://docs.docker.com/engine/reference/commandline/login/#credentials-storeLogin Succeeded
# 现在登录成功了[root@client ~]# docker pull alpine[root@client ~]# docker images
REPOSITORY   TAG       IMAGE ID       CREATED      SIZE
alpine       latest    05455a08881e   3 days ago   7.38MB[root@client ~]# docker tag alpine harbor.raymonds.cc/google_containers/alpine[root@client ~]# docker images
REPOSITORY                                    TAG       IMAGE ID       CREATED      SIZE
alpine                                        latest    05455a08881e   3 days ago   7.38MB
harbor.raymonds.cc/google_containers/alpine   latest    05455a08881e   3 days ago   7.38MB[root@client ~]# docker push harbor.raymonds.cc/google_containers/alpine
Using default tag: latest
The push refers to repository [harbor.raymonds.cc/google_containers/alpine]
d4fc045c9e3a: Pushed
latest: digest: sha256:6457d53fb065d6f250e1504b9bc42d5b6c65941d57532c072d929dd0628977d0 size: 528
在harbor01上查看镜像已经上传。
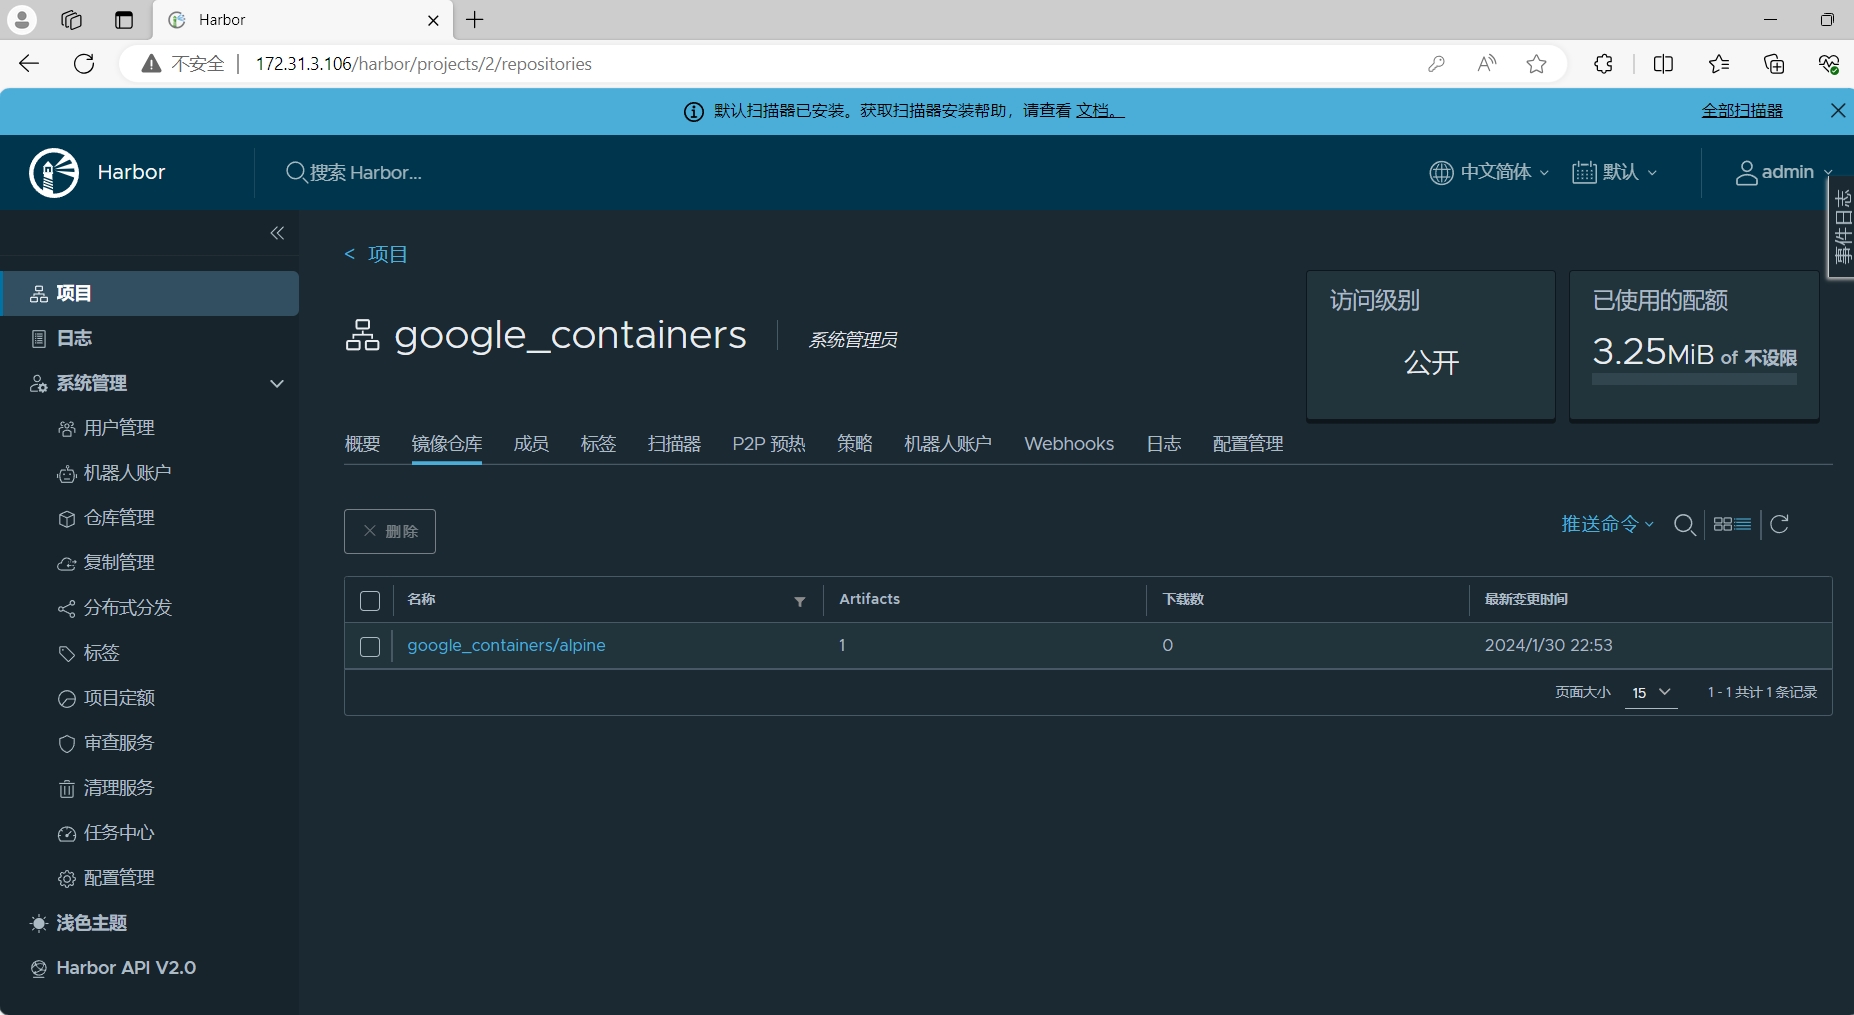
图1-19 在harbor01上查看镜像上传情况
在harbor02上查看镜像已经上传。
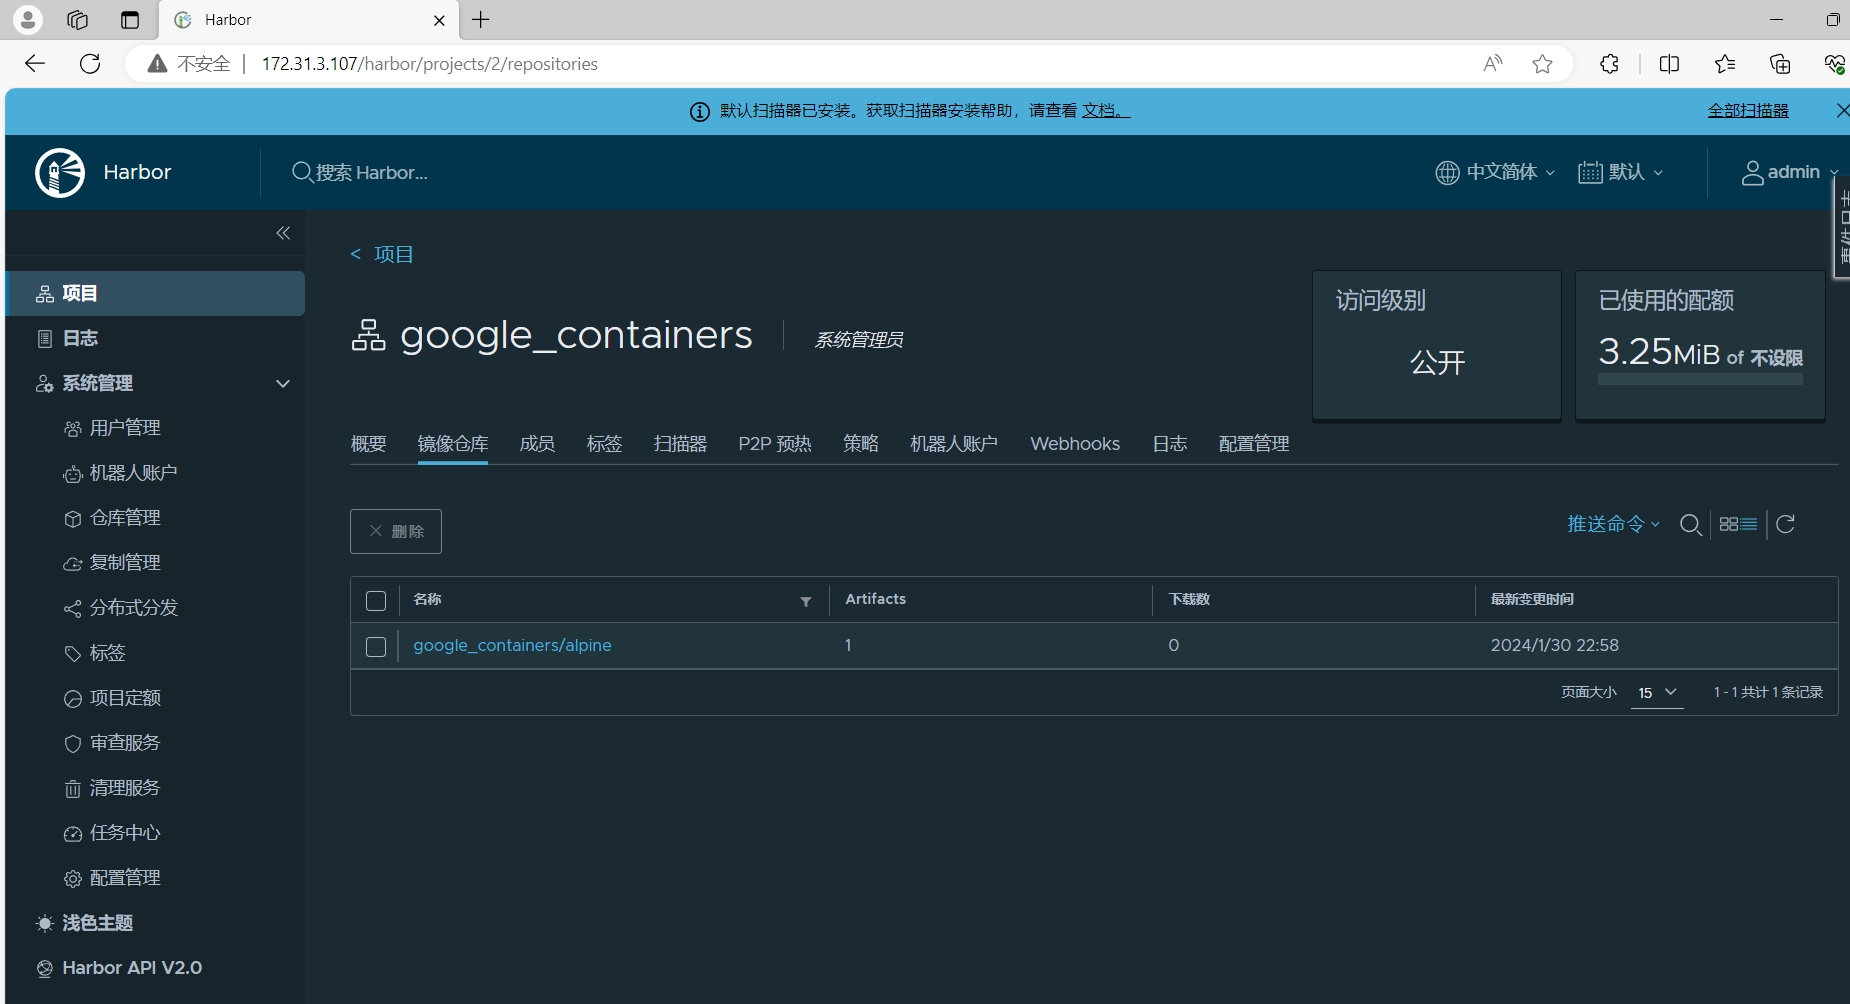
图1-20 在harbor02上查看镜像上传情况
从上面可以看出harbor01和harbor02镜像仓库是高可用的。
# 删除所有镜像
[root@client ~]# docker images -qa|xargs docker rmi -f[root@client ~]# docker images
REPOSITORY   TAG       IMAGE ID   CREATED   SIZE# 从harbor仓库拉取镜像
[root@client ~]# docker pull harbor.raymonds.cc/google_containers/alpine
Using default tag: latest
latest: Pulling from google_containers/alpine
4abcf2066143: Pull complete
Digest: sha256:6457d53fb065d6f250e1504b9bc42d5b6c65941d57532c072d929dd0628977d0
Status: Downloaded newer image for harbor.raymonds.cc/google_containers/alpine:latest
harbor.raymonds.cc/google_containers/alpine:latest[root@client ~]# docker images
REPOSITORY                                    TAG       IMAGE ID       CREATED      SIZE
harbor.raymonds.cc/google_containers/alpine   latest    05455a08881e   3 days ago   7.38MB
# 可以看到harbor仓库的镜像也是可以拉取到本地的