Vue2+ElementUI下拉、Select组件的封装:引言
在 Vue2 项目中,ElementUI 的 el-select 组件是常用的下拉选择框组件。它提供了丰富的功能和样式,可以满足各种需求。但是,在实际开发中,我们经常会遇到一些重复性的需求,比如:
- 需要根据不同的条件来过滤选项
- 需要对选项进行自定义格式化
- 需要在下拉框中添加额外的功能,比如搜索、多选等
为了提高开发效率,我们可以对 el-select 组件进行封装,将这些重复性的需求抽象成通用的功能。这样,在后续的项目中,我们就可以直接使用封装好的组件,而无需重复开发。
封装思路
封装 el-select 组件,可以从以下几个方面入手:
- 定义 props: 首先需要定义组件的 props,用于接收外部传入的数据和配置。
- 处理数据: 根据 props 中的数据,对选项进行过滤和格式化。
- 渲染选项: 使用
el-option组件渲染下拉框的选项。 - 扩展功能: 根据需求,添加额外的功能,比如搜索、多选等。
创建组件并使用官网模版
创建组件名为:H3yunSelectCompV1,选择官网的远程搜索下拉组件。
<template><div><el-selectv-model="value"multiplefilterableremotereserve-keywordplaceholder="请输入关键词":remote-method="remoteMethod":loading="loading"><el-optionv-for="item in options":key="item.value":label="item.label":value="item.value"></el-option></el-select></div>
</template><script>
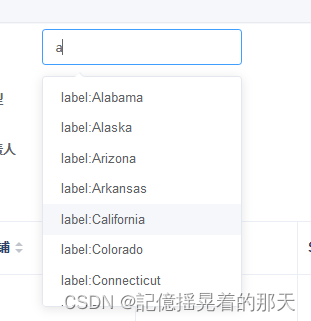
export default {name: "H3yunSelectCompV1",data() {return {options: [],value: [],list: [],loading: false,states: ["Alabama", "Alaska", "Arizona","Arkansas", "California", "Colorado","Connecticut", "Delaware", "Florida","Georgia", "Hawaii", "Idaho", "Illinois","Indiana", "Iowa", "Kansas", "Kentucky","Louisiana", "Maine", "Maryland","Massachusetts", "Michigan", "Minnesota","Mississippi", "Missouri", "Montana","Nebraska", "Nevada", "New Hampshire","New Jersey", "New Mexico", "New York","North Carolina", "North Dakota", "Ohio","Oklahoma", "Oregon", "Pennsylvania","Rhode Island", "South Carolina","South Dakota", "Tennessee", "Texas","Utah", "Vermont", "Virginia","Washington", "West Virginia", "Wisconsin","Wyoming"]}}, mounted() {this.list = this.states.map(item => {return {value: `value:${item}`, label: `label:${item}`};});},methods: {remoteMethod(query) {if (query !== '') {this.loading = true;setTimeout(() => {this.loading = false;this.options = this.list.filter(item => {return item.label.toLowerCase().indexOf(query.toLowerCase()) > -1;});}, 200);} else {this.options = [];}}}
}
</script><style scoped></style>
随便在哪个地方有用上这个组件。
父子组件通信
父组件给子组件传值
<H3yunSelectCompV1 :select="item"></H3yunSelectCompV1>
选择器选中的值传递到父组件,通过地址应用,因为上面父组件给子组件传递了一个对象,子组件可以直接操作对象,这个对象是父子公用的,从而实现父子通信。
1、给选择器绑定一个change事件
<el-selectv-model="value"filterableremotereserve-keywordplaceholder="请输入关键词":remote-method="remoteMethod"@change="selectChange":loading="loading"><el-optionv-for="item in options":key="item":label="item":value="item"></el-option></el-select>
2、在change方法里把选中值赋值到select对象里。(select对象是父组件传递过来的)
selectChange(val) {this.select.value = valconsole.log(this.select)}
上面通过控制台打印就能清楚的看到效果。

处理change事件
父组件加个change事件
<H3yunSelectCompV1:select="item"@change="handleSearch"></H3yunSelectCompV1>
在子组件里面去触发这个change事件
<el-selectv-model="value"filterableremotereserve-keyword:remote-method="remoteMethod"@change="selectChange":loading="loading"clearable><el-optionv-for="item in options":key="item":label="item":value="item"></el-option></el-select>methods: {selectChange(val) {this.select.value = val// 触发父组件的change事件this.$emit('change', val);}
}
处理远程搜索
把远程搜索的URL传进去。
<H3yunSelectCompV1:select="item":remoteMethodUrl="tableObj.http.filterRemoteMethodUrl"@change="handleSearch"></H3yunSelectCompV1>
修改模版原先的远程搜索方法。
remoteMethod(query) {if (query !== '') {this.loading = true;// 200毫秒内有输入清除定时器if (this.timerId) {clearTimeout(this.timerId);}this.timerId = setTimeout(async () => {this.loading = false;// 访问后端接口获取选项this.options = await this.getOptions(query)}, 200);} else {this.options = [];}},async getOptions(query) {// 后端接口地址const url = this.remoteMethodUrl// 构建请求参数,param {属性名:查询值}const param = {}param[this.select.prop] = query;// request方法是封装的axios请求 - 自定义const optionsObj = await request.post(url, param)// 使用 map 筛选出属性名为 this.select.prop 的值 - 自定义,根据后端的返回值自己来定const options = optionsObj.map(item => item[this.select.prop]);return options}
效果如下