文章目录
- 前言
- 一、引入和配置
- 1.引入
- 2.配置
- 二、使用
- 1.队列
- 2.发布/订阅
- 2.1 fanout(广播)
- 2.2 direct(Routing/路由)
- 2.3 Topics(主题)
- 2.4 Headers
- 总结
前言
mq常用于业务解耦、流量削峰和异步通信,rabbitmq是使用范围较广,比较稳定的一款开源产品,接下来我们使用springboot的starter来引入rabbitmq,了解mq的几种使用模式,通过几个简单的案例,让你可以快速地了解到该使用哪种模式来对应业务场景,使用rabbitmq看这一篇就够了,下方附安装链接。
一、引入和配置
1.引入
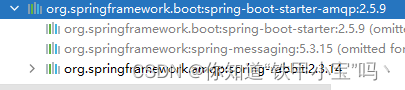
Spring AMQP高级消息队列协议有两部分组成,spring-amqp是基础抽象,spring-rabbit是RabbitMQ实现。
<dependency><groupId>org.springframework.boot</groupId><artifactId>spring-boot-starter-amqp</artifactId>
</dependency>
2.配置
配置参考RabbitProperties.java
spring:rabbitmq:host: 192.168.137.192port: 5672username: guestpassword: guestvirtualHost: /
二、使用
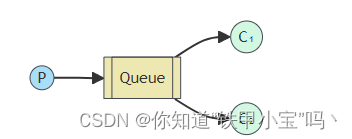
1.队列
RabbitConfiguration
package com.student.rabbit.queue;import org.springframework.context.annotation.Configuration;
import org.springframework.context.annotation.Bean;
import org.springframework.amqp.core.Queue;
/*** Create by zjg on 2024/3/9*/
@Configuration
public class RabbitConfiguration {protected final String queueName = "queue";@Beanpublic Queue queue() {return new Queue(this.queueName);}
}
Producer
package rabbit.queue;import com.student.SpringbootStart;
import org.junit.Test;
import org.junit.runner.RunWith;
import org.springframework.amqp.core.Queue;
import org.springframework.amqp.rabbit.core.RabbitTemplate;
import org.springframework.beans.factory.annotation.Autowired;
import org.springframework.boot.test.context.SpringBootTest;
import org.springframework.test.context.junit4.SpringRunner;import java.util.concurrent.atomic.AtomicInteger;/*** Create by zjg on 2024/3/9*/
@RunWith(SpringRunner.class)
@SpringBootTest(classes = SpringbootStart.class)
public class Producer {@Autowiredprivate RabbitTemplate template;@Autowiredprivate Queue queue;AtomicInteger count = new AtomicInteger(0);@Testpublic void send() {for (int i = 0; i < 10; i++) {StringBuilder builder = new StringBuilder("Hello");builder.append(" "+count.incrementAndGet());String message = builder.toString();template.convertAndSend(queue.getName(), message);System.out.println(" [x] Sent '" + message + "'");}}
}
Consumer
package com.student.rabbit.queue;import org.slf4j.Logger;
import org.slf4j.LoggerFactory;
import org.springframework.amqp.rabbit.annotation.RabbitListener;
import org.springframework.stereotype.Component;/*** Create by zjg on 2024/3/9*/
@Component
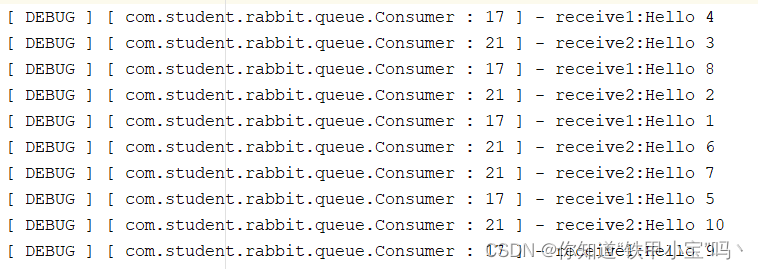
public class Consumer {private static final Logger log = LoggerFactory.getLogger(Consumer.class);protected final String queueName = "queue";@RabbitListener(queues = queueName)public void receive1(String message){log.debug("receive1:"+message);}@RabbitListener(queues = queueName)public void receive2(String message){log.debug("receive2:"+message);}
}每个队列都消费了5条消息
2.发布/订阅
交换机类型有fanout,direct, topic, headers四种,接下来我们来学习每种方式的使用以及它们的区别。
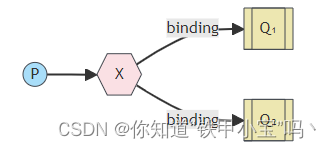
2.1 fanout(广播)
P(生产者)产生消息给到X(交换机),X分发给绑定的所有队列。
RabbitFanoutConfiguration
我们定义了AnonymousQueue,它创建了一个具有生成名称的非持久、独占、自动删除队列
package com.student.rabbit.fanout;import org.springframework.amqp.core.AnonymousQueue;
import org.springframework.amqp.core.Binding;
import org.springframework.amqp.core.BindingBuilder;
import org.springframework.amqp.core.FanoutExchange;
import org.springframework.amqp.core.Queue;
import org.springframework.context.annotation.Bean;
import org.springframework.context.annotation.Configuration;/*** Create by zjg on 2024/3/10*/
@Configuration
public class RabbitFanoutConfiguration {@Beanpublic FanoutExchange fanout() {return new FanoutExchange("sys.fanout");}private static class ReceiverConfig {@Beanpublic Queue fanoutQueue1() {return new AnonymousQueue();}@Beanpublic Queue fanoutQueue2() {return new AnonymousQueue();}@Beanpublic Binding bindingFanout1(FanoutExchange fanout,Queue fanoutQueue1) {return BindingBuilder.bind(fanoutQueue1).to(fanout);}@Beanpublic Binding bindingFanout2(FanoutExchange fanout,Queue fanoutQueue2) {return BindingBuilder.bind(fanoutQueue2).to(fanout);}}
}
FanoutProducer
package rabbit.fanout;import com.student.SpringbootStart;
import org.junit.Test;
import org.junit.runner.RunWith;
import org.springframework.amqp.core.FanoutExchange;
import org.springframework.amqp.rabbit.core.RabbitTemplate;
import org.springframework.beans.factory.annotation.Autowired;
import org.springframework.boot.test.context.SpringBootTest;
import org.springframework.test.context.junit4.SpringRunner;
import java.util.concurrent.atomic.AtomicInteger;/*** Create by zjg on 2024/3/10*/
@RunWith(SpringRunner.class)
@SpringBootTest(classes = SpringbootStart.class)
public class FanoutProducer {@Autowiredprivate RabbitTemplate template;@Autowiredprivate FanoutExchange fanout;@Testpublic void send() {AtomicInteger count = new AtomicInteger(0);for (int i = 0; i < 10; i++) {StringBuilder builder = new StringBuilder("Hello");builder.append(" "+count.incrementAndGet());String message = builder.toString();template.convertAndSend(fanout.getName(), "", message);System.out.println(" [x] Sent '" + message + "'");}}
}
FanoutConsumer
package com.student.rabbit.fanout;import org.slf4j.Logger;
import org.slf4j.LoggerFactory;
import org.springframework.amqp.rabbit.annotation.RabbitListener;
import org.springframework.stereotype.Component;/*** Create by zjg on 2024/3/10*/
@Component
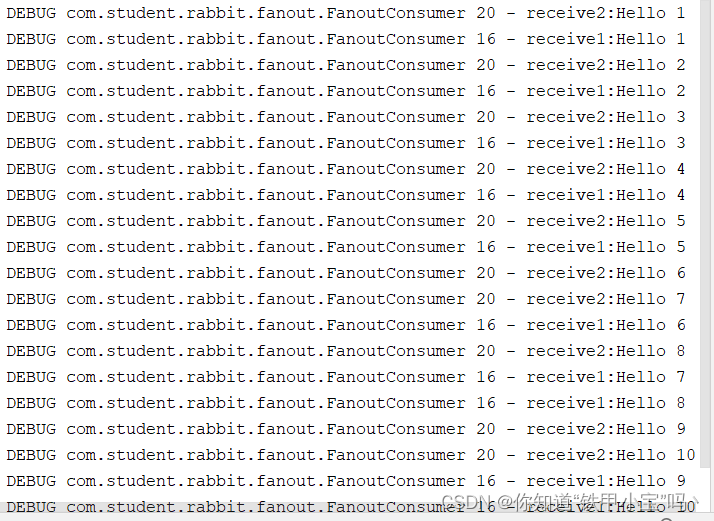
public class FanoutConsumer {private static final Logger log = LoggerFactory.getLogger(FanoutConsumer.class);@RabbitListener(queues = "#{fanoutQueue1.name}")public void receive1(String message){log.debug("receive1:"+message);}@RabbitListener(queues = "#{fanoutQueue2.name}")public void receive2(String message){log.debug("receive2:"+message);}
}总共发送10条消息,每个队列都消费了10条
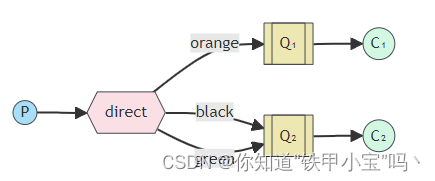
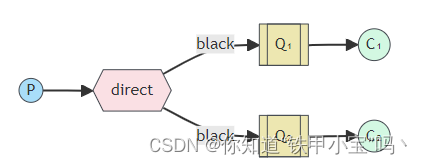
2.2 direct(Routing/路由)
可以将根据不同的路由规则分发消息,很灵活,消费者需要哪种就订阅哪种消息。
RabbitDirectConfiguration
package com.student.rabbit.direct;import org.springframework.amqp.core.AnonymousQueue;
import org.springframework.amqp.core.Binding;
import org.springframework.amqp.core.BindingBuilder;
import org.springframework.amqp.core.DirectExchange;
import org.springframework.amqp.core.Queue;
import org.springframework.context.annotation.Bean;
import org.springframework.context.annotation.Configuration;/*** Create by zjg on 2024/3/10*/
@Configuration
public class RabbitDirectConfiguration {@Beanpublic DirectExchange direct() {return new DirectExchange("sys.direct");}private static class ReceiverConfig {@Beanpublic Queue directQueue1() {return new AnonymousQueue();}@Beanpublic Queue directQueue2() {return new AnonymousQueue();}@Beanpublic Binding bindingDirect1a(DirectExchange direct,Queue directQueue1) {return BindingBuilder.bind(directQueue1).to(direct).with("orange");}@Beanpublic Binding bindingDirect1b(DirectExchange direct,Queue directQueue1) {return BindingBuilder.bind(directQueue1).to(direct).with("black");}@Beanpublic Binding bindingDirect2a(DirectExchange direct,Queue directQueue2) {return BindingBuilder.bind(directQueue2).to(direct).with("green");}@Beanpublic Binding bindingDirect2b(DirectExchange direct,Queue directQueue2) {return BindingBuilder.bind(directQueue2).to(direct).with("black");}}
}
DirectProducer
package rabbit.direct;import com.student.SpringbootStart;
import org.junit.Test;
import org.junit.runner.RunWith;
import org.springframework.amqp.core.DirectExchange;
import org.springframework.amqp.rabbit.core.RabbitTemplate;
import org.springframework.beans.factory.annotation.Autowired;
import org.springframework.boot.test.context.SpringBootTest;
import org.springframework.test.context.junit4.SpringRunner;
import java.util.concurrent.atomic.AtomicInteger;/*** Create by zjg on 2024/3/10*/
@RunWith(SpringRunner.class)
@SpringBootTest(classes = SpringbootStart.class)
public class DirectProducer {@Autowiredprivate RabbitTemplate template;@Autowiredprivate DirectExchange direct;private final String[] keys = {"orange", "black", "green"};@Testpublic void send() {AtomicInteger count = new AtomicInteger(0);for (int i = 0; i < keys.length; i++) {StringBuilder builder = new StringBuilder("Hello to ");String key = keys[count.getAndIncrement()];builder.append(" "+key);String message = builder.toString();template.convertAndSend(direct.getName(), key, message);System.out.println(" [x] Sent '" + message + "'");}}
}
DirectConsumer
package com.student.rabbit.direct;import org.slf4j.Logger;
import org.slf4j.LoggerFactory;
import org.springframework.amqp.rabbit.annotation.RabbitListener;
import org.springframework.stereotype.Component;/*** Create by zjg on 2024/3/10*/
@Component
public class DirectConsumer {private static final Logger log = LoggerFactory.getLogger(DirectConsumer.class);@RabbitListener(queues = "#{directQueue1.name}")public void receive1(String message){log.debug("receive1:"+message);}@RabbitListener(queues = "#{directQueue2.name}")public void receive2(String message){log.debug("receive2:"+message);}
}
共发送了3条消息,有两个队列都绑定了black,所以black的消息消费2次

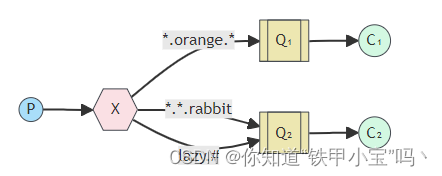
2.3 Topics(主题)
主题模式在路由的基础上增加了routingKey的模糊匹配。
*(星)可以代替一个词。
#(hash)可以代替零个或多个单词。
RabbitTopicConfiguration
package com.student.rabbit.topic;import org.springframework.amqp.core.AnonymousQueue;
import org.springframework.amqp.core.Binding;
import org.springframework.amqp.core.BindingBuilder;
import org.springframework.amqp.core.Queue;
import org.springframework.amqp.core.TopicExchange;
import org.springframework.context.annotation.Bean;
import org.springframework.context.annotation.Configuration;/*** Create by zjg on 2024/3/10*/
@Configuration
public class RabbitTopicConfiguration {@Beanpublic TopicExchange topic() {return new TopicExchange("sys.topic");}private static class ReceiverConfig {@Beanpublic Queue topicQueue1() {return new AnonymousQueue();}@Beanpublic Queue topicQueue2() {return new AnonymousQueue();}@Beanpublic Binding bindingTopic1a(TopicExchange topic,Queue topicQueue1) {return BindingBuilder.bind(topicQueue1).to(topic).with("*.orange.*");}@Beanpublic Binding bindingTopic1b(TopicExchange topic,Queue topicQueue1) {return BindingBuilder.bind(topicQueue1).to(topic).with("*.*.rabbit");}@Beanpublic Binding bindingTopic2a(TopicExchange topic,Queue topicQueue2) {return BindingBuilder.bind(topicQueue2).to(topic).with("lazy.#");}@Beanpublic Binding bindingTopic2b(TopicExchange topic,Queue topicQueue2) {return BindingBuilder.bind(topicQueue2).to(topic).with("quick.brown.*");}}
}
TopicProducer
package rabbit.topic;import com.student.SpringbootStart;
import org.junit.Test;
import org.junit.runner.RunWith;
import org.springframework.amqp.core.TopicExchange;
import org.springframework.amqp.rabbit.core.RabbitTemplate;
import org.springframework.beans.factory.annotation.Autowired;
import org.springframework.boot.test.context.SpringBootTest;
import org.springframework.test.context.junit4.SpringRunner;
import java.util.concurrent.atomic.AtomicInteger;/*** Create by zjg on 2024/3/10*/
@RunWith(SpringRunner.class)
@SpringBootTest(classes = SpringbootStart.class)
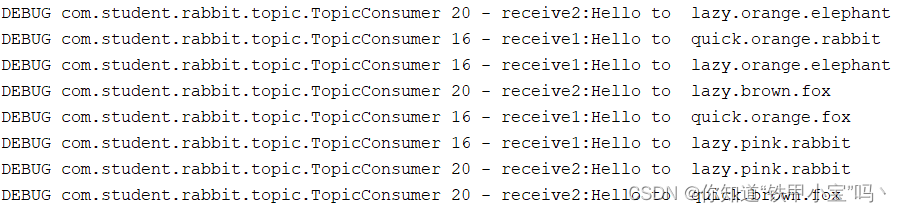
public class TopicProducer {@Autowiredprivate RabbitTemplate template;@Autowiredprivate TopicExchange topic;private final String[] keys = {"quick.orange.rabbit", "lazy.orange.elephant", "quick.orange.fox","lazy.brown.fox", "lazy.pink.rabbit", "quick.brown.fox"};@Testpublic void send() {AtomicInteger count = new AtomicInteger(0);for (int i = 0; i < keys.length; i++) {StringBuilder builder = new StringBuilder("Hello to ");String key = keys[count.getAndIncrement()];builder.append(" "+key);String message = builder.toString();template.convertAndSend(topic.getName(), key, message);System.out.println(" [x] Sent '" + message + "'");}}
}TopicConsumer
package com.student.rabbit.topic;import org.slf4j.Logger;
import org.slf4j.LoggerFactory;
import org.springframework.amqp.rabbit.annotation.RabbitListener;
import org.springframework.stereotype.Component;/*** Create by zjg on 2024/3/10*/
@Component
public class TopicConsumer {private static final Logger log = LoggerFactory.getLogger(TopicConsumer.class);@RabbitListener(queues = "#{topicQueue1.name}")public void receive1(String message){log.debug("receive1:"+message);}@RabbitListener(queues = "#{topicQueue2.name}")public void receive2(String message){log.debug("receive2:"+message);}
}
队列1匹配了中间值为orange和rabbit结尾的消息,队列2匹配了lazy开头和quick.brown开头的消息
2.4 Headers
关于headers模式,在官方没有找到文档,但包里还有,索性还是写一下吧。
RabbitHeadersConfiguration
package com.student.rabbit.headers;import org.springframework.amqp.core.AnonymousQueue;
import org.springframework.amqp.core.Binding;
import org.springframework.amqp.core.BindingBuilder;
import org.springframework.amqp.core.HeadersExchange;
import org.springframework.amqp.core.Queue;
import org.springframework.context.annotation.Bean;
import org.springframework.context.annotation.Configuration;
import java.util.HashMap;
import java.util.Map;/*** Create by zjg on 2024/3/10*/
@Configuration
public class RabbitHeadersConfiguration {@Beanpublic HeadersExchange headers() {return new HeadersExchange("sys.headers");}private static class ReceiverConfig {@Beanpublic Queue headersQueue1() {return new AnonymousQueue();}@Beanpublic Queue headersQueue2() {return new AnonymousQueue();}@Beanpublic Queue headersQueue3() {return new AnonymousQueue();}@Beanpublic Binding bindingHeaders1(HeadersExchange headers,Queue headersQueue1) {Map<String,Object> headerValue=new HashMap<>();headerValue.put("user","sys");return BindingBuilder.bind(headersQueue1).to(headers).whereAll(headerValue).match();}@Beanpublic Binding bindingHeaders2(HeadersExchange headers,Queue headersQueue2) {Map<String,Object> headerValue=new HashMap<>();headerValue.put("user","admin");return BindingBuilder.bind(headersQueue2).to(headers).whereAll(headerValue).match();}@Beanpublic Binding bindingHeaders3(HeadersExchange headers,Queue headersQueue3) {return BindingBuilder.bind(headersQueue3).to(headers).where("user").exists();}}
}
HeadersProducer
package rabbit.headers;import com.student.SpringbootStart;
import org.junit.Test;
import org.junit.runner.RunWith;
import org.springframework.amqp.core.HeadersExchange;
import org.springframework.amqp.core.Message;
import org.springframework.amqp.core.MessageBuilder;
import org.springframework.amqp.core.MessageProperties;
import org.springframework.amqp.rabbit.core.RabbitTemplate;
import org.springframework.beans.factory.annotation.Autowired;
import org.springframework.boot.test.context.SpringBootTest;
import org.springframework.test.context.junit4.SpringRunner;
import java.util.concurrent.atomic.AtomicInteger;/*** Create by zjg on 2024/3/10*/
@RunWith(SpringRunner.class)
@SpringBootTest(classes = SpringbootStart.class)
public class HeadersProducer {@Autowiredprivate RabbitTemplate template;@Autowiredprivate HeadersExchange headers;private final String[] keys = {"sys", "admin"};@Testpublic void send() {AtomicInteger count = new AtomicInteger(0);for (int i = 0; i < keys.length; i++) {StringBuilder builder = new StringBuilder("Hello to ");String key = keys[count.getAndIncrement()];builder.append(" "+key);MessageProperties messageProperties=new MessageProperties();messageProperties.setHeader("user",key);Message message = MessageBuilder.withBody(builder.toString().getBytes()).andProperties(messageProperties).build();template.send(headers.getName(), "", message);System.out.println(" [x] Sent '" + message + "'");}}
}
HeadersConsumer
package com.student.rabbit.headers;import org.slf4j.Logger;
import org.slf4j.LoggerFactory;
import org.springframework.amqp.core.Message;
import org.springframework.amqp.rabbit.annotation.RabbitListener;
import org.springframework.stereotype.Component;/*** Create by zjg on 2024/3/10*/
@Component
public class HeadersConsumer {private static final Logger log = LoggerFactory.getLogger(HeadersConsumer.class);@RabbitListener(queues = "#{headersQueue1.name}")public void receive1(Message message){log.debug("receive1:"+new String(message.getBody()));}@RabbitListener(queues = "#{headersQueue2.name}")public void receive2(Message message){log.debug("receive2:"+new String(message.getBody()));}@RabbitListener(queues = "#{headersQueue3.name}")public void receive3(Message message){log.debug("receive3:"+new String(message.getBody()));}
}
第一个队列接收sys消息,第二个队列接收admin消息,第三个队列只要包含user头的消息都接收。

总结
回到顶部
安装看这里
官方文档
官方网站
其他项目,可参考官方案例
路漫漫其修远兮,吾将上下而求索。