前言
Elasticsearch 是一个分布式、RESTful 风格的搜索和数据分析引擎,能够解决不断涌现出的各种用例。 作为 Elastic Stack 的核心,它集中存储您的数据,帮助您发现意料之中以及意料之外的情况。
环境准备
软件 OS系统 IP 节点
Elasticsearch7.7.0 centos 7 10.16.101.27 node-1
Elasticsearch7.7.0 centos 7 10.16.101.28 node-2
Elasticsearch7.7.0 centos 7 10.16.101.29 node-3
1.JDK环境安装以及配置
Elasticsearch7.7.0需要jdk11的允许环境,所有我们安装Jdk11
# 已经JDK保存在OSS,所有从OSS下载
cd root
wget https://starshop.obs.cn-south-1.myhuaweicloud.com/other/jdk-11.0.14_linux-x64_bin.tar.gz# 解压 jdk-11.0.14_linux-x64_bin.tar.gz 移动到/usr/java/jdk11目录下
tar xf jdk-11.0.14_linux-x64_bin.tar.gz
mv jdk-11.0.14_linux-x64_bin /usr/java/jdk11# 赋予java 执行权限
chmod 777 /usr/java/jdk11/bin/java
chmod 777 /usr/java/jdk11/jre/bin/java
配置jdk环境变量
配置环境变量
vi /etc/profile
在文本末添加以下内容
---------------------------------------------------------------
#java环境变量
export JAVA_HOME=/usr/java/jdk1.8
export PATH=$JAVA_HOME/bin:$PATH
export CLASSPATH=.:$JAVA_HOME/lib/dt.jar:$JAVA_HOME/lib/tools.jar
----------------------------------------------------------------
执行一下命令 立即生效
source  /etc/profile查看java版本
java -version
2.开端口
# Elasticsearch7.7.0 需要开启9200 9300 9100端口进行通信
firewall-cmd --zone=public --add-port=9100/tcp --permanent && firewall-cmd --zone=public --add-port=9200/tcp --permanent && firewall-cmd --zone=public --add-port=9300/tcp --permanent && firewall-cmd --reload
3.创建新用户,用户启动Elasticsearch
# 因为Elasticsearch不能使用root用户启动,所有必须新建用户
# 新建用户
adduser es
# 给新用户添加密码
passwd es
安装 Elasticsearch7.7.0
https://www.elastic.co/cn/downloads/past-releases#elasticsearch
# 下载es
cd /root
wget https://artifacts.elastic.co/downloads/elasticsearch/elasticsearch-7.7.0-linux-x86_64.tar.gz
# 解压文件到,移动到/usr/local/elastic/elasticsearch7
tar xf elasticsearch-7.7.0-linux-x86_64.tar.gz
mv elasticsearch-7.7.0-linux-x86_64 /usr/local/elastic/elasticsearch7
# 将elasticsearch7目录及路径下所有文件所有者均设为es用户
chown es:es -R /usr/local/elastic/elasticsearch7
1.修改系统配置文件
# 打开sysctl.conf文件。Linux默认不允许任何用户和应用程序直接开辟这么大的虚拟内存
vi /etc/sysctl.conf
# 文件sysctl.conf末尾加入
vm.max_map_count=655360
# 保存退出后,为了让系统控制权限配置生效
sysctl -p
2.修改limits.conf文件
vi /etc/security/limits.conf
# 在文件内结束符前加上下面给出的几行代码,保存即可
* soft nofile 65536
* hard nofile 131072
* soft nproc 4096
* hard nproc 4096
* soft memlock unlimited
* hard memlock unlimited
3.修改elasticsearch.yml(在27,28,29 编辑elasticsearch.yml)
# 切换到es用户
su es
# 编辑elasticsearch.yml
cd /usr/local/elastic/elasticsearch7/config
vi /usr/local/elastic/elasticsearch7/config/elasticsearch.yml
########################下面是文件内容########################################
# 集群名称,同一集群下每台服务器的名称要一致否则会报错
cluster.name: my-elasticsearch
# 节点名称,集群下每台机的节点名称唯一(举例的机器节点名称设为node-1,其他分别为node-2,node-3)
node.name: node-1
# ES数据储存路径(保证该目录存在不存在则报错)
path.data: /usr/local/elastic/elasticsearch7/data
# ES运行日志文件路径(保证该目录存在不存在则报错)
path.logs: /usr/local/elastic/elasticsearch7/logs
# 需求锁住物理内存,避免操作系统的内存Swaping
bootstrap.memory_lock: true
# 外界访问ES ip地址(设置0.0.0.0表示可以通过该机器的任何ip访问)
network.host: 0.0.0.0
# 加入此配置可以解决集群的警告
network.publish_host: 10.16.101.27
# ES的访问端口号(不设置则默认为9200)
http.port: 9200
# 集群下所有机器的访问ES的url集合
discovery.seed_hosts: ["10.16.101.27:9300", "10.16.101.28:9300", "10.16.101.29:9300"]
# 集群下所有节点集合
cluster.initial_master_nodes: ["node-1", "node-2", "node-3"]
4 . 修改elasticsearch的VM配置
vi /usr/local/elastic/elasticsearch7/config/jvm.options
修改VM为机器内存的一半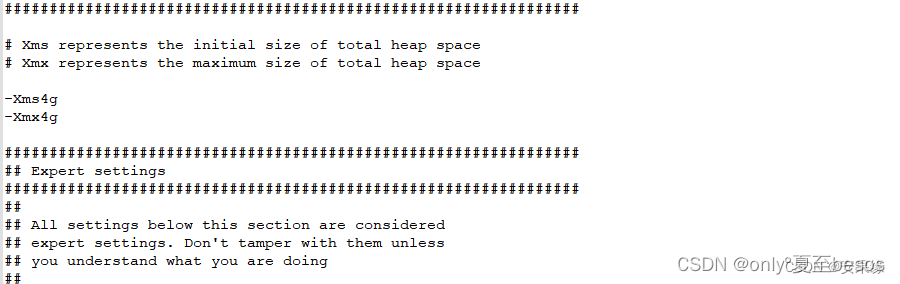
启动elasticsearch
1.设置elasticsearch开机启动
# 切换到root用户
su  root
# 切换到/etc/rc.d/init.d目录
cd /etc/rc.d/init.d
# 编辑elasticsearch启动文件
vi elasticsearch
####################### 贴入下面的文本保存即可 ###############################
#!/bin/sh
#chkconfig: 2345 80 05
#description: elasticsearch 6.2.2
export JAVA_HOME=/usr/java/jdk11
export ES_PATH=/usr/local/elastic/elasticsearch7
case "$1" in
start)su es<<!cd $ES_PATH./bin/elasticsearch -d -p pid
!echo "elasticsearch startup";;
stop)es_pid=`ps aux|grep elasticsearch | grep -v 'grep elasticsearch' | awk '{print $2}'`kill -9 $es_pidecho "elasticsearch stopped";;
restart)es_pid=`ps aux|grep elasticsearch | grep -v 'grep elasticsearch' | awk '{print $2}'`kill -9 $es_pidecho "elasticsearch stopped"su es<<!cd $ES_PATH./bin/elasticsearch -d -p pid
!echo "elasticsearch startup";;
*)echo "start|stop|restart";;
esac
exit $?# 刚编辑的文件需要赋予权限
chmod -X elasticsearch
# 添加到系统服务
chkconfig --add elasticsearch# 开启服务
service elasticsearch start
# 停止服务
service elasticsearch stop
# 重启服务
service elasticsearch restart
# 设置开机启动
chkconfig elasticsearch on
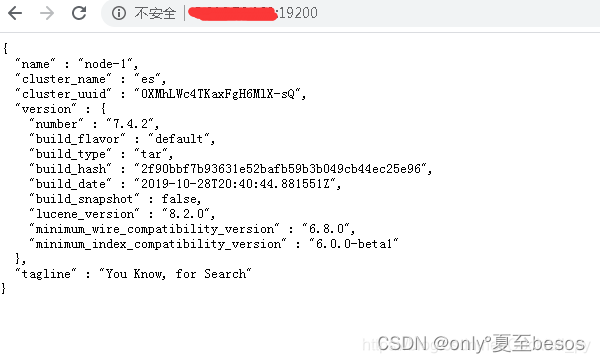
在浏览器中输入 http://10.16.101.27:9200 代表安装成功 查看集群是否成功 在浏览器输出入 http://10.16.101.27:9200/_cat/health?v 显示3节点代表成功
中文分词和拼音分词器安装
中文ik下载:https://github.com/medcl/elasticsearch-analysis-ik/releases
拼音分词器下载:https://github.com/medcl/elasticsearch-analysis-pinyin/releases
根据elasticsearch版本下载对应的分词器版本,必须版本对应
# 文件下载在root目录下
cd /root
#下载ik
wget https://github.com/medcl/elasticsearch-analysis-ik/releases/download/v7.7.0/elasticsearch-analysis-ik-7.7.0.zip
# 下载pinyin
wget https://github.com/medcl/elasticsearch-analysis-pinyin/releases/download/v7.7.0/elasticsearch-analysis-pinyin-7.7.0.zip# 在elasticsearch 的plugins目录下新疆ik和pinyin文件夹
mkdir /usr/local/elastic/elasticsearch7/plugins/ik
mkdir /usr/local/elastic/elasticsearch7/plugins/pinyin
# unzip 将上面的2个zip直接解压到对应ik和pinyin目录下
unzip elasticsearch-analysis-ik-7.7.0.zip -d /usr/local/elastic/elasticsearch7/plugins/ik
unzip elasticsearch-analysis-pinyin-7.7.0.zip -d /usr/local/elastic/elasticsearch7/plugins/pinyin
# 赋予权限,重启elasticsearch
chown es:es -R /usr/local/elastic/elasticsearch7
service elasticsearch restart
使用crul命令,输入下面的URL地址,验证分词器是否成功
curl -X GET -H "Content-Type: application/json" "http://localhost:9200/_analyze?pretty=true" -d'{"text":"中华五千年华夏"}';若elasticsearch无法关闭,可使用kill -9 pid 强制关闭在重启
# 查看pid
ps aux|grep elasticsearch
# 强制关闭
kill -9 xx
# 启动elasticsearch
service elasticsearch start
安装浏览器ealsticsearch-head插件
ealsticsearch只是后端提供各种api,那么怎么直观的使用它呢?elasticsearch-head将是一款专门针对于elasticsearch的客户端工具
elasticsearch-head 需要nodejs的支持
1.下载安装nodejs
# 文件下载在root下
cd /root
# 下载最新稳定版nodejs
wget https://nodejs.org/dist/v16.15.1/node-v16.15.1-linux-x64.tar.xz
# 解压文件
tar xf node-v16.15.1-linux-x64.tar.xz
# 移动解压后目录到软件目录,并将目录重命名nodejs
mv node-v16.15.1-linux-x64 /usr/local/nodejs
# 查看node的版本
/usr/local/nodejs/bin/node -v
# 配置环境变量
vim /etc/profile#################################将下面文本贴入profile文件中保存###################
# 添加node_home变量
export NODE_HOME=/usr/local/nodejs
# 把node_home变量添加到环境变量中
export PATH=$PATH:$NODE_HOME/bin# 重新加载一下配置文件使新的配置生效
source /etc/profile
# 查看nodejs版本
node -version

至此,centos7上的nodejs运行环境安装成功,下面我们安装elasticsearch-head
2.安装grunt构建工具
可以进行打包压缩、测试、执行等等的工作,head插件就是通过grunt启动的。因此需要安装grunt
# 切换到nodejs安装目录
cd /usr/local/nodejs
# 配置阿里镜像
npm config set registry https://registry.npm.taobao.org
# 安装grunt
npm install -g grunt-cli
# 查看是否安装成功
grunt -version
2.下载安装elasticsearch-head插件 GitHub - mobz/elasticsearch-head: A web front end for an elastic search cluster下载elasticsearch-head-master.zip,将文件拷贝到/root目录下
cd /root
# 解压elasticsearch-head-master
unzip elasticsearch-head-master.zip
# 将文件移动到/usr/local/elastic/elasticsearch-head目录
mv elasticsearch-head-master /usr/local/elastic/elasticsearch-head
# 切换到/usr/local/elastic/elasticsearch-head目录下
cd /usr/local/elastic/elasticsearch-head
# 编译elasticsearch-head
npm install
# 运行 elasticsearch-head 后台运行
nohup npm run start &
浏览器中输入上面的地址http://localhost:9100,如图说明head插件已经安装成功了。

上图不能显示集群健康值,需要在配置一下elasticsearch.yml
cd /usr/local/elastic/elasticsearch7/config
vi elasticsearch.yml
# 在elasticsearch.yml文件中加入下面配置,保存即可
http.cors.enabled: true
http.cors.allow-origin: "*"
# 重启 elasticsearch
service elasticsearch restart

3.ealsticsearch-head 开机启动
上面的配置ealsticsearch-head Xshell客户端关闭,后导致9100端口也关闭,所有必须配置开机自启动
cd /etc/init.d
# 新建elasticsearch-head启动脚本
vi elasticsearch-head
################## 写入下面的文本,根据自己时间安装情况配置#####################
#!/bin/sh
#chkconfig: 2345 80 05
#description: elasticsearch-head
# nodejs 安装的路径
export NODE_PATH=/usr/local/nodejs
export PATH=$PATH:$NODE_PATH/bin
# elasticsearch-head 的路径
cd /usr/local/elastic/elasticsearch-head
nohup npm run start >/usr/local/elastic/elasticsearch-head/nohup.out 2>&1 &
# 赋予 elasticsearch-head 权限
chmod +x elasticsearch-head
# 设置开机执行sh
chkconfig --add elasticsearch-head
# 也可手动启动
service elasticsearch-head start
启用x-pack验证
第一种
切换到es的用户下,使用下面命令生成证书
bin/elasticsearch-certutil cert -out config/elastic-certificates.p12 -pass ""启动elasticsearch
./elasticsearch -d自动生成默认用户和密码
bin/elasticsearch-setup-passwords auto
# 手动设置
# bin/elasticsearch-setup-passwords interactive
修改elastic超级用户密码
#  假设elastic 默认密码为 xxxxxxx
# curl -XPUT -u elastic:xxxxxxx 'http://localhost:9200/_xpack/security/user/elastic/_password' -d '{ "password" : "your_passwd" }'
浏览器验证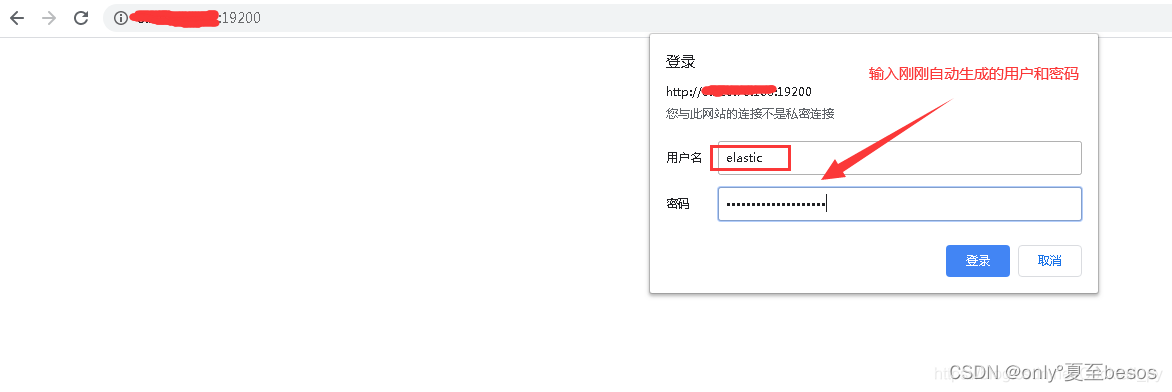
第二种
启动 Elasticsearch 程序
[elastic@console bin]$ ./elasticsearch -dfuture versions of Elasticsearch will require Java 11; your Java version from [/usr/java/jdk1.8.0_181/jre] does not meet this requirement创建密码
[elastic@console bin]$ ./elasticsearch-setup-passwords interactive
future versions of Elasticsearch will require Java 11; your Java version from [/usr/java/jdk1.8.0_181/jre] does not meet this requirementUnexpected response code [500] from calling GET http://192.168.108.126:9200/_security/_authenticate?pretty
It doesn't look like the X-Pack security feature is enabled on this Elasticsearch node.
Please check if you have enabled X-Pack security in your elasticsearch.yml configuration file.ERROR: X-Pack Security is disabled by configuration.
需要设置 X-Pack
[elastic@console bin]$ vim ../config/elasticsearch.ymlhttp.cors.enabled: truehttp.cors.allow-origin: "*"http.cors.allow-headers: Authorizationxpack.security.enabled: truexpack.security.transport.ssl.enabled: true添加密码
[elastic@console bin]$ ./elasticsearch-setup-passwords interactive
future versions of Elasticsearch will require Java 11; your Java version from [/usr/java/jdk1.8.0_181/jre] does not meet this requirement
Initiating the setup of passwords for reserved users elastic,apm_system,kibana,logstash_system,beats_system,remote_monitoring_user.
You will be prompted to enter passwords as the process progresses.
Please confirm that you would like to continue [y/N]yEnter password for [elastic]:
Reenter password for [elastic]:
Passwords do not match.
Try again.
Enter password for [elastic]:
Reenter password for [elastic]:
Enter password for [apm_system]:
Reenter password for [apm_system]:
Enter password for [kibana]:
Reenter password for [kibana]:
Enter password for [logstash_system]:
Reenter password for [logstash_system]:
Enter password for [beats_system]:
Reenter password for [beats_system]:
Enter password for [remote_monitoring_user]:
Reenter password for [remote_monitoring_user]:
Changed password for user [apm_system]
Changed password for user [kibana]
Changed password for user [logstash_system]
Changed password for user [beats_system]
Changed password for user [remote_monitoring_user]
Changed password for user [elastic]
修改kibana
[root@console bin]# vim ../config/kibana.ymlelasticsearch.username: "elastic"elasticsearch.password: "passwd"
修改密码
POST /_security/user/elastic/_password
{"password": "123456"
}
修改密码之后,需要重新设置kibana的配置文件,才可以重新使用kibana
java 连接认证
package elasticSearch.highLevelClient;import org.apache.http.HttpHost;
import org.apache.http.auth.AuthScope;
import org.apache.http.auth.UsernamePasswordCredentials;
import org.apache.http.client.CredentialsProvider;
import org.apache.http.impl.client.BasicCredentialsProvider;
import org.apache.http.impl.nio.client.HttpAsyncClientBuilder;
import org.elasticsearch.client.RestClient;
import org.elasticsearch.client.RestClientBuilder;
import org.elasticsearch.client.RestHighLevelClient;
import org.elasticsearch.client.XPackClient;import java.io.IOException;/*** @author [tu.tengfei]* @description* @date 2019/8/10*/
public class ESHighClient {public static RestHighLevelClient client;public static void getESClient(){//        client = new RestHighLevelClient(RestClient.builder(
//                new HttpHost("slave01", 9200, "http"),
//                new HttpHost("master01", 9200, "http")
//        ));//需要用户名和密码的认证final CredentialsProvider credentialsProvider = new BasicCredentialsProvider();credentialsProvider.setCredentials(AuthScope.ANY, new UsernamePasswordCredentials("elastic", "passwd"));RestClientBuilder restClientBuilder = RestClient.builder(new HttpHost("192.168.108.126", 9200, "http")).setHttpClientConfigCallback(new RestClientBuilder.HttpClientConfigCallback() {@Overridepublic HttpAsyncClientBuilder customizeHttpClient(HttpAsyncClientBuilder httpAsyncClientBuilder) {return httpAsyncClientBuilder.setDefaultCredentialsProvider(credentialsProvider);}});client = new RestHighLevelClient(restClientBuilder);}public static void clientClose(){if (client!=null){try {client.close();} catch (IOException e) {e.printStackTrace();}}}
}
Kibana7.4用户管理
1.下载kibana以及修改相应配置
cd /opt
wget https://artifacts.elastic.co/downloads/kibana/kibana-7.4.2-linux-x86_64.tar.gz
tar -zxvf kibana-7.4.2-linux-x86_64.tar.gz
2.修改配置
cd /opt/kibana-7.4.2-linux-x86_64/config
vim kibana.yml
# 中文
i18n.locale: "zh-CN"
server.port: 15601
server.host: "0.0.0.0"
elasticsearch.hosts: ["http://192.168.18.126:19200"]
elasticsearch.username: "kibana_system"
elasticsearch.password: "xxxxx"
kibana.index: ".kibana"
xpack.reporting.encryptionKey: "a_random_string"
xpack.security.encryptionKey: "something_at_least_32_characters"
# 是否开启安全策略
# xpack.security.enabled: false
3.kibana用户管理
/opt/kibana-7.4.2-linux-x86_64/bin/kibana --allow-root添加用户并赋予相应的权限